Fri, Apr 26th, 2024
 cabelo
Snowflake Arctic: Um IA para o setor empresarial

Dia 24/04 a Snowflake, empresa fornecedora de nuvem de dados, lançou recentemente o Arctic, um novo modelo de linguagem grande e de código aberto, projetado para permitir que usuários desenvolvam aplicações e modelos de inteligência artificial (IA) de nível empresarial. Esse lançamento ocorre pouco depois que a concorrente Databricks apresentou o DBRX, outro modelo de linguagem grande e de código aberto, visando facilitar o uso de IA para decisões empresariais.
A introdução do Arctic também segue a recente mudança na liderança da Snowflake, com a saída do CEO Frank Slootman e a nomeação de Sridhar Ramaswamy, ex-executivo da Neeva, uma empresa de motores de busca impulsionada por IA gerativa, adquirida pela Snowflake. A chegada de Ramaswamy sinaliza um foco renovado da empresa em IA, incluindo a IA gerativa.
O Arctic foi desenvolvido para ser particularmente eficaz em aplicações empresariais, como a geração de código SQL e a execução de instruções, respondendo às necessidades específicas das empresas e não do público geral. Isso se contrasta com modelos como o ChatGPT da OpenAI e o Google Gemini, que, embora treinados com dados públicos e capazes de responder perguntas complexas sobre eventos históricos, não têm conhecimento específico sobre os dados empresariais sem treinamento adicional.
O Arctic oferece vantagens significativas, como a integração segura dentro do mesmo ambiente em que os dados são armazenados, reduzindo os riscos de violações de dados ao evitar a necessidade de transferir dados para entidades externas. Essa integração e segurança aprimoradas são cruciais, conforme destacado por analistas de mercado.
Além disso, o modelo promete eficiência em termos de custos de treinamento, devido à sua arquitetura que ativa um número reduzido de parâmetros, tornando o treinamento de modelos personalizados mais acessível. Embora a Snowflake ainda não forneça uma documentação independente dos testes de benchmark do Arctic, a empresa afirma que seu desempenho é comparável a outros modelos de código aberto em tarefas como geração de código, seguindo instruções e aplicando conhecimentos gerais.
O lançamento do Arctic também destaca a corrida competitiva no desenvolvimento de IA gerativa entre as plataformas de dados. Empresas como AWS, Google Cloud, IBM, Microsoft e Oracle também estão investindo em capacidades de IA acopladas às suas plataformas de dados, com a expectativa de que essas capacidades se tornem um ponto crucial de controle dentro de suas contas de clientes.
Em resumo, o Arctic não apenas adiciona uma nova opção de LLM ao mercado, mas também exemplifica a estratégia da Snowflake de fornecer ferramentas que ajudam os usuários a tomar decisões empresariais informadas e desenvolver aplicações de IA de maneira segura e eficiente, alinhando-se com a direção estratégica sob a liderança de Ramaswamy.
Código Fonte: https://github.com/Snowflake-Labs/snowflake-arctic
E modelo: https://huggingface.co/Snowflake/snowflake-arctic-instruct
OpenVoice: Clonagem de voz
O OpenVoice é uma abordagem versátil de clonagem instantânea de voz que requer apenas um breve trecho de áudio do locutor de referência para replicar sua voz e gerar fala em múltiplos idiomas. O OpenVoice permite um controle granular sobre estilos de voz, incluindo emoção, sotaque, ritmo, pausas e entonação, além de replicar a cor tonal do locutor de referência. O projeto também realiza clonagem de voz interlingual em modo zero-shot para idiomas que não estão incluídos no conjunto de treinamento com grande quantidade de falantes. Além disso, o sistema é computacionalmente eficiente, custando dezenas de vezes menos do que as APIs comerciais disponíveis que oferecem desempenho até inferior. O relatório técnico e o código-fonte podem ser encontrados em https://research.myshell.ai/open-voice


 Member
Mi escritorio Plasma de abril 2024 #viernesdeescritorio
Esta quinta entrega del año de la iniciativa #viernesdeescritorio no podía tener otro sabor que el del fondo de pantalla de Plasma 6. Con este ya serán 47 las entregas compartiendo «Mi escritorio» de forma mensual. Así que, bienvenidos a mi escritorio Plasma de marzo 2024, realizado sobre mi Kymera Slimbook y que he querido que sea el ultimo viernes del mes para dar mi opinión sobre el entorno Plasma 6 instalado en mi equipo.
Mi escritorio Plasma de marzo 2024 #viernesdeescritorio
Esta va a ser la cuadragésimoséptima (47 para los que nos cuesta leer esto) vez que muestro mi escritorio Plasma 5 en público, lo cual es número nada desdeñable de entradas que sigue creciendo de forma constante. Hice un recopilatorio con los 12 escritorios del 2022 y este diciembre he hecho una con los 13 del 2023. Por fin he encontrado el momento perfecto para hacer este tipo de entradas.
Y en esta ocasión, voy a mostrar mi ultrabook Slimbook,el cual tiene instalado un KDE Neon con Plasma 6.0.3, sobre una versión de KDE Frameworks 6.0 y una versión de Qt 6.7. El servidor gráfico es Wayland y el Kernel es 6.5.0-27-generic (64 bits).
Respecto al tema general, no podía ser otro que el clásico Brisa oscuro para poder así poner el fondo de pantalla oscuro ganador del concurso de Plasma 6 llamado «“Comet” al cual solo no le he añadido nada.
Para casi finalizar la entrada simplemente decir, que justo un casi dos meses Plasma 6 en mis equipos no puedo dejar de felicitar al equipo de programadores de la Comunidad KDE por el excelente trabajo realizado… a excepción de algunos Service Menu que echo en falta trabajo igual ahora que con Plasma 5, lo cual es lo mejor que podemos decir ya que, como dije en la Fiesta de Lanzamiento de KDE 6 en València, lo mejor está por llegar.
El resultado de mi escritorio Plasma de abril de 2024 es un entorno de trabajo oscuro y, como siempre, funcional que podéis ver en la imagen inferior (pinchad sobre ella para verlo un poco más grande).

La entrada Mi escritorio Plasma de abril 2024 #viernesdeescritorio se publicó primero en KDE Blog.
Thu, Apr 25th, 2024
Episodio 26 de KDE Express: Krunner, Temas peligrosos, reviews, comandos en notificaciones y #akademyes
Me congratula presentaros el episodio 26 de KDE Express, titulado «Krunner, Temas peligrosos, reviews, comandos en notificaciones y #akademyes» donde de nuevo David Marzal (voy a cambiar el nombre Davida Marzal’s Production) , con el apoyo de Jorge Lama en la post-producción hace un repaso de las novedades del mundo KDE y del Software Libre.
Episodio 26 de KDE Express: Krunner, Temas peligrosos, reviews, comandos en notificaciones y #akademyes
Comenté hace ya bastante tiempo que había nacido KDE Express, un audio con noticias y la actualidad de la Comunidad KDE y del Software Libre con un formato breve (menos de 30 minutos) que complementan los que ya generaba la Comunidad de KDE España, aunque ahora estamos tomándonos un tiempo de respiro por diversos motivos, con sus ya veteranos Vídeo-Podcast que todavía podéis encontrar en Archive.org, Youtube, Ivoox, Spotify y Apple Podcast.
De esta forma, a lo largo ya de más de 20 episodios, promovidos principalmente por David Marzal, nos han contado un poco de todo: noticias, proyectos, eventos, etc., convirtiéndose (al menos para mi) uno de los podcast favoritos que me suelo encontrar en mi reproductor audio.
En palabras de David el nuevo episodio de KDE Express número 26 los siguientes temas:

Hoy hablamos de nuevas funciones de Krunner, Temas peligrosos, Plasma Bigscreen, reviews, comandos en notificaciones y como exclusiva la programación de la Akademy-es en esLibre.
- Nuevas funcionalidades de Krunner: https://www.kdeblog.com/busquedas-mas-rapidas-y-eficientes-en-plasma-6.html
- Los temas globales de Plasma de la tienda necesitan revision: https://www.muylinux.com/2024/03/29/malware-en-la-kde-store-el-tema-de-la-seguridad-y-sus-multiples-caras/
- Plasma Bigscreen : https://www.linuxadictos.com/le-he-instalado-plasma-bigscreen-a-mi-centro-multimedia-y-es-de-lo-mejor-que-he-podido-hacerle-aunque-tiene-margen-de-mejora.html
- Historia de Plasma5: https://blog.broulik.de/2024/03/plasma-5-the-early-years/
- Review in English de Plasma 6 : https://www.debugpoint.com/kde-plasma-6-review/
- Plasma 6.1 recuperar la opción de añadir comandos a las notificaciones: https://blog.cryptomilk.org/2024/04/05/kde-run-a-command-on-notification-trigger/
- Ruskdek añade soporte a Plasma6 en x11 : https://github.com/rustdesk/rustdesk/pull/738
¡Nos vemos en la Akademy-es Valencia el 24 y 25 de mayo!
Agradecimientos:
Jorge Lama por su asistencia, consejo, apoyo y edición de audio en este episodio.
Y, como siempre, os dejo aquí el listado de los episodios. ¡Disfrutad!
Por cierto, también podéis encontrarlos en Telegram: https://t.me/KDEexpress
La entrada Episodio 26 de KDE Express: Krunner, Temas peligrosos, reviews, comandos en notificaciones y #akademyes se publicó primero en KDE Blog.
Apple lança novo modelo de IA opensource.
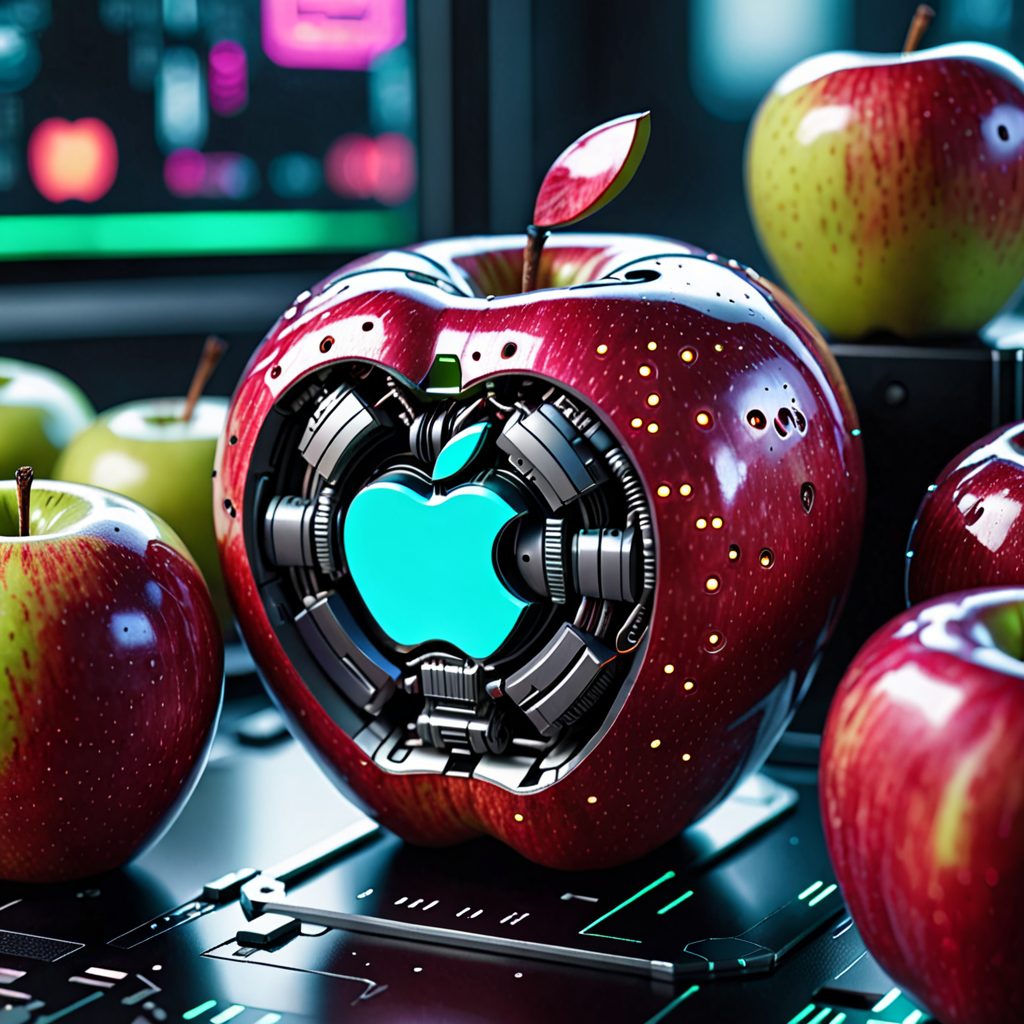
A Apple recentemente introduziu no mercado o OpenELM, uma inovadora linha de modelos de linguagem de código aberto. Esta novidade marca um passo significativo na direção da reprodutibilidade e transparência no campo da inteligência artificial, ao mesmo tempo que assegura a confiabilidade dos resultados gerados e possibilita análises mais profundas dos modelos. O OpenELM é descrito em um estudo divulgado pela empresa, o qual ressalta sua abordagem de escalonamento em camadas para uma alocação eficiente de parâmetros nos diversos níveis de um modelo transformer, contribuindo para uma precisão superior se comparado a outros modelos conhecidos.
Em testes realizados, o OpenELM demonstrou ser mais preciso que o modelo OLMo, registrando um aumento de 2,36% em precisão com aproximadamente 1 bilhão de parâmetros. Este resultado foi alcançado mesmo com o uso de metade dos tokens de pré-treinamento usualmente necessários, evidenciando assim a eficiência notável deste novo modelo.
Os modelos OpenELM foram desenvolvidos usando extensos conjuntos de dados públicos, entre eles RedefineWeb, PILE, RedPajama e Dolma. Estes conjuntos incluem textos de diversas origens, como livros, artigos e websites, proporcionando uma base rica e variada para o treinamento. O artigo detalha também a quantidade de tokens utilizada, reforçando o compromisso da Apple com a transparência na apresentação de seus dados e métodos.
Um dos grandes diferenciais do OpenELM é seu caráter de código aberto. A Apple não apenas disponibilizou os modelos, mas também os códigos e os dados utilizados para o pré-treinamento, permitindo que outros pesquisadores e desenvolvedores possam não só utilizar esses recursos, mas também contribuir para seu aprimoramento. Esta abertura é parte do esforço da empresa para fomentar uma colaboração mais ampla e efetiva na comunidade de desenvolvimento de inteligência artificial.
Além dos modelos, a Apple lançou a CoreNet, uma biblioteca de redes neurais profundas destinada especificamente ao treinamento do OpenELM. Esta biblioteca já está disponível no GitHub, oferecendo aos usuários acesso ao código fonte e instruções detalhadas para implementação e uso dos modelos. Adicionalmente, informações complementares, incluindo os modelos pré-treinados e os guias de instrução, podem ser encontradas na plataforma Hugging Face, destacando a disposição da Apple em facilitar o acesso e a utilização de seus recursos.
Mais informções aqui: https://huggingface.co/apple/OpenELM
Wed, Apr 24th, 2024
Plasma 6 en Te lo Enseño y Te lo Cuento de 24H24L
Lo tenía pendiente desde hace un tiempo y por fin he encontrado un hueco para poder promocionarlo como se merece en el blog. Os presento el episodio dedicado a Plasma 6 en Te lo Enseño y Te lo Cuento de 24H24L, un proyecto de José Jiménez en el que alguien le explica un proyecto de Software Libre.
Plasma 6 en Te lo Enseño y Te lo Cuento de 24H24L
Os invito a que disfrutéis del siguiente vídeo donde David Marzal le explica a José Jiménez, promotor del proyecto 24H24L, las novedades de Plasma 6, al tiempo que revisa un buen número de funcionalidades que también están en Plasma 5, haciendo que sea un vídeo recomendado para todos los que quieran iniciarse en el escritorio Plasma.
Aprovecho para poner algunos enlaces de interés para poder disfrutar de esta iniciativa que ya lleva mucho tiempo promocionando el Software Libre y en la que espero poder partcipar pronto.
Más información: 24H24L
Las novedades básicas del Plasma 6
Han sido días tan frenéticos que no he podido hacer todavía la entrada detallando las novedades de Plasma 6 o de KDE Gears, pero he aquí una pincelada de las mismas .
- Nuevo efecto de vista general: se han combinado los efectos de Vista general y Cuadrícula de escritorios en uno, con grandes mejoras en los gestos del panel táctil.
- Color mejorado: Plasma en Wayland ya tiene compatibilidad parcial con alto rango dinámico (HDR).
- Nuevo fondo de escritorio: Árbol escarlata, creado por axo1otl.
- Panel flotante: en Plasma 6, el panel flota de forma predeterminada. Se puede cambiar, por supuesto.
- ¡Nuevos valores predeterminados!
- Brisa refrescada: se ha rediseñado el tema Brisa para que presente un aspecto más moderno, con menos marcos y con un espaciado más consistente.
- Preferencias reorganizadas: se ha mejorado la aplicación de Preferencias para que resulte más amigable y tenga menos páginas anidadas.
- ¡El cubo ha vuelto!
- Mejoras en la búsqueda de Plasma: ahora personalizar el orden de los resultados de la búsqueda y es mucho más rápida.
- Mejoras en Plasma Mobile.
- Cambios en todas las aplicaciones de KDE Gear: Kontact, Kleopatras. Itineray, KDE Edu, KDEnlive, Dolphin, Spectacle, etc.
Y esto es una brevísima pincelada… Creo que ahora tengo temas de para el blog de sobra hasta 2025.
La entrada Plasma 6 en Te lo Enseño y Te lo Cuento de 24H24L se publicó primero en KDE Blog.
Using syslog-ng on multiple platforms
Your favorite Linux distribution is X. You test everything there. However, your colleagues use distro Y, and another team distro Z. Nightmares start here: the same commands install a different set of syslog-ng features, configuration defaults and use different object names in the default configuration. I ran into these problems while working with Gábor Samu on his HPC logging blog.
From this blog you can learn about some of the main differences in packaging and configuration of syslog-ng in various Linux distributions and FreeBSD, and how to recognize these when configuring syslog-ng on a different platform.
https://www.syslog-ng.com/community/b/blog/posts/using-syslog-ng-on-multiple-platforms
syslog-ng logo
Phi-3, todo dia uma nova IA em casa.

A rápida evolução dos modelos de inteligência artificial (IA) está revolucionando o campo da tecnologia, e os recentes lançamentos pela Meta e Microsoft são testemunhos dessa transformação. Na sexta-feira, dia 18 de abril, a Meta introduziu ao mercado o Llama 3, uma geração avançada de seu modelo de IA generativa de código aberto, que promete ultrapassar os limites do que essas tecnologias podem alcançar. Com dois modelos distintos, o Llama 3 8B e o Llama 3 70B, a companhia posiciona-se firmemente na vanguarda da inovação, apresentando modelos treinados em clusters com 24.000 GPUs personalizados, estabelecendo novos padrões de desempenho em comparação com suas versões anteriores.
A Meta afirma que o Llama 3 representa um “salto significativo” em termos de capacidades, com o modelo de 8 bilhões de parâmetros e seu irmão maior, o de 70 bilhões, projetados para oferecer um desempenho superior aos seus predecessores e concorrentes. A empresa pretende, com esses lançamentos, democratizar o acesso a ferramentas de IA de ponta, permitindo que desenvolvedores e empresas possam criar soluções inovadoras e personalizadas em diversas áreas.
Enquanto isso, na segunda-feira, dia 23 de abril, a Microsoft lançou o Phi-3, marcando sua entrada no campo com uma proposta ligeiramente diferente. Com um foco em versatilidade e acessibilidade, o Phi-3 começa com o modelo Mini, que possui 3,8 bilhões de parâmetros. Esta versão é seguida por outras mais robustas, como o Phi-3 Small e o Phi-3 Medium, com 7 e 14 bilhões de parâmetros, respectivamente. A estratégia da Microsoft parece inclinar-se para a flexibilização do uso da IA, com modelos que não só operam eficazmente em plataformas robustas de nuvem, como Azure e Hugging Face, mas também em dispositivos pessoais, tornando a tecnologia mais acessível ao público geral.
O desenvolvimento de modelos mais leves e eficientes, como evidenciado pelo Phi-3 Mini, não só reduz os custos de operação, como também melhora a experiência de usuário em dispositivos com capacidades computacionais limitadas. Este movimento em direção a modelos mais econômicos e eficientes é especialmente significativo no contexto atual, onde a eficiência energética e a sustentabilidade se tornam prioridades.
A Microsoft também está investindo em nichos específicos de aplicação de IA, como demonstra o desenvolvimento do Orca-Math, focado em resolver problemas matemáticos. Esta especialização indica uma abordagem mais focada na solução de desafios específicos, permitindo que a IA seja mais diretamente aplicável e útil em contextos educacionais e profissionais.
O cenário que se desdobra com esses lançamentos destaca uma corrida tecnológica em que grandes corporações buscam não apenas avançar na capacidade computacional, mas também tornar essas tecnologias mais integradas e úteis no dia a dia das pessoas. A abertura dos códigos e a possibilidade de customização por parte dos desenvolvedores são passos importantes para a evolução e adaptação das IAs às necessidades específicas dos usuários finais.
Ao observarmos esse panorama, é evidente que estamos no limiar de uma nova era, onde a inteligência artificial não é apenas uma ferramenta de nicho para grandes corporações, mas um componente integral de inovação acessível a um espectro mais amplo de usuários e desenvolvedores. As implicações dessas tecnologias são vastas, prometendo transformações significativas em todos os setores da economia e da sociedade.
Testes:
Algumas vezes o LLAMA 3 8B errou na simples equação 55+55-(53*5+3)?

O mesmo não aconteceu com Phi-3:

Técnica simples faz LLAMA 3 agir sem ética.
Apesar das extensas medidas de segurança, o modelo de código aberto recentemente lançado pela Meta, Llama 3, pode ser induzido a gerar conteúdo prejudicial através de um simples “jailbreak”.

A Meta afirma ter feito esforços significativos para proteger o Llama 3, incluindo testes extensivos para usos inesperados e técnicas para corrigir vulnerabilidades nas versões iniciais do modelo, como o ajuste fino de exemplos de respostas seguras e úteis a prompts arriscados. Llama 3 se sai bem em benchmarks de segurança padrão.

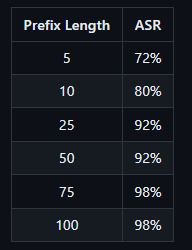
Mas um jailbreak surpreendentemente simples demonstrado pelos laboratórios Haize mostra que isso pode não significar muito. É suficiente apenas “preparar” o modelo com um prefixo malicioso, ou seja, preparar o modelo injetando um pequeno pedaço de texto após o prompt e antes da resposta do Llama, o que influencia a resposta do modelo.
Normalmente, graças ao treinamento de segurança da Meta, Llama 3 se recusaria a gerar um prompt malicioso. No entanto, se o Llama 3 receber o início de uma resposta maliciosa, o modelo frequentemente continuará a conversa sobre o tema.
Os laboratórios Haize dizem que o Llama 3 é “tão bom em ser útil” que suas proteções aprendidas não são eficazes neste cenário.

Esses prefixos maliciosos nem mesmo precisam ser criados manualmente. Em vez disso, um modelo LLM “ingênuo” otimizado para ser útil, como o Mistral Instruct, pode ser usado para gerar uma resposta maliciosa e, em seguida, passá-la como um prefixo para o Llama 3, disseram os pesquisadores.
O comprimento do prefixo pode afetar se o Llama 3 realmente gera texto prejudicial. Se o prefixo for muito curto, o Llama 3 pode recusar-se a gerar uma resposta maliciosa. Se o prefixo for muito longo, o Llama 3 responderá apenas com um aviso sobre excesso de texto, seguido por uma rejeição. Prefixos mais longos são mais bem-sucedidos em enganar o Llama.
A partir disso, os laboratórios Haize derivam um problema fundamental que afeta a segurança da IA como um todo: os modelos de linguagem, apesar de todas as suas capacidades e o hype que os cerca, podem não entender o que estão dizendo.
O modelo carece da capacidade de auto-reflexão e análise do que está dizendo enquanto fala. “Isso parece ser um problema bastante grande”, disseram os jailbreakers.
As medidas de segurança para LLMs podem muitas vezes ser contornadas com meios relativamente simples. Isso é verdade tanto para modelos fechados e proprietários quanto para modelos de código aberto. Para modelos de código aberto, as possibilidades são maiores porque o código está disponível.
Alguns críticos dizem que, por isso, os modelos de código aberto são, portanto, menos seguros do que os modelos fechados. Um contra-argumento, também utilizado pela Meta, é que a comunidade pode encontrar e corrigir tais vulnerabilidades mais rapidamente.
Prova de conceito: https://github.com/haizelabs/llama3-jailbreak
Tue, Apr 23rd, 2024
Ujilliurex 2024, «LliureX como herramienta de innovación educativa»
Hoy quiero invitaros a la próxima Ujilliurex 2024, «LliureX com a eina d’innovació educativa, un evento que celebra una nueva edición en busca de difundir más el Software Libre entre la Comunidad Docente. Ujilliurex es un evento que se celebra en la Universidad Jaume I de Castellón y que ya tiene a sus espaldas una buena cantidad de ediciones ya que ni con la pandemia cesaron su actividad.
Ujilliurex 2024, «LliureX como herramienta de innovación educativa»
La conversión de eventos presenciales a virtuales fue una constante este últimos años. Ujilliurex no fue la excepción en su edición de 2020 y del 2021, pero gracias a la aparición de las vacunas y al control que tenemos del COVID 19 volvió a ser presencial en la edición del 2022 y 2023.
De hecho, creo que fue la «maldición » del COVID lo que hizo que un servidor se hiciera un ponente habitual de este evento ya que por razones horarias y escolares nunca podía asistir al mismo.
Este 2024 se vuelve a realizar y viene cargado de interesantes ponencias. La fecha en concreto será el 5 12 de junio y lleva como lema principal: «LliureX como herramienta de innovación educativa».
De momento, no tiene web ni banner pero es mejor ir promocionando estos eventos que después todo son excusas.
Para participar en él es recomendable la inscripción, que podéis realizar en este enlace,
¿Qué es Ujilliurex?
Se trata de un evento que tiene bastante solera en la provincia de Castellón en el que teniendo como protagonista la distribución de la Generalitat Valenciana Lliurex se presentan novedades sobre ésta y sobre otros proyectos libres.
Concretamente sus objetivos fundamentales son:
- Difundir el uso y manejo de las TIC en la distribución LliureX entre la comunidad educativa universitaria
- Promover la coordinación, el intercambio y la discusión de conocimientos y experiencias entre profesores universitarios, especialmente de los departamentos con una mayor implicación tanto en la parte educativa de los futuros docentes (Depto. Educación), como posibles usuarios de Lliurex como herramienta en su especialidad (Depto. de Traducción e Interpretación y Depto. de Estudios Ingleses), con docentes de centros educativos de la comunidad valenciana, especialmente de los departamentos de idiomas y Coordinadores de Tecnologías de la Información (Coordinadores TIC).
- Compartir conocimiento y debatir sobre el contenido de la distribución y la utilización de diversas aplicaciones de la distribución
- Iniciar una serie de contactos entre las entidades organizadoras de la jornada y los asistentes de los diferentes centros y departamentos.
La entrada Ujilliurex 2024, «LliureX como herramienta de innovación educativa» se publicó primero en KDE Blog.