
 Member
 DimStar
openSUSE Tumbleweed – Review of the weeks 2021/38
Dear Tumbleweed users and hackers,
This week we have shipped the long-awaited glibc 2.34 update. Unfortunately, as was the case with earlier glibc updates, some containerization methods are blocking new syscalls, which can lead to issues out of the control of Tumbleweed. Our docker packages have been adjusted to handle Tumbleweed inside the containers, but many container providers might not be there yet. Besides the full rebuild snapshot with glibc, we released a total of 4 snapshots this week (0916, 0920, 0921, and 0922).
The main changes included:
- KDE Frameworks 5.86.0
- Harfbuzz 2.9.1
- glibc 2.34
- binutils 2.37
- GStreamer 1.18.5
- Linux kernel 5.14.5
- Apache 2.4.49
- shadow 4.9
The staging projects are currently filled with:
- Linux kernel 5.14.6
- KDE Plasma 5.23 beta (5.22.90)
- Perl 5.34.0
- Mesa 21.2.2
- Boost 1.77.0
- openssl 3.0

Playing with the openqa API
Today we are going to play a bit around with the amazing API that every openQA instance provides. The aim of this tutorial is to show how the API can be accessed using a simple language like python. More advanced topics like job posting, deletion and other methods that require authentication are possible but not covered extensively in this post. The reference for this post will be openqa.opensuse.org, but everything works pretty much with every openQA instance.
The ARM developers workstation: Why the SoftIron OverDrive 1000 is still relevant
The promise of “boring” ARM hardware has been with us for almost a decade. And a couple of years ago it really arrived: easy to use, standards compliant ARM hardware is now available on the market. However, not for everyone. When it comes to buying ARM hardware you still need to decide if it is “boring” or it is affordable. There was one notable exception, the SoftIron OverDrive 1000. It had its limitations, but it was standards compliant right from day one, affordable, and easily available not just for large companies.
Why standards compliance is important?
Before standardization arrived to the ARM world, each and every board had to be supported separately. You needed a dedicated installer for each board often with its own documentation, as each board booted in a different way and you needed different workarounds while installing the operating system. The situation improved over the years, but it is still far from ideal.
The good news? With standards, installation is as easy as on an x86_64 machine.
The bad news? There are many. First of all: standards compliant new machines are out of reach for most individual users or developers. Most of the boards / computers available to developers are not standards compliant. Or became standards compliant only years after release, when they are already mostly obsolete. Which means a lot of extra effort to get these supported by Linux distributions or BSD variants. Effort, that could be spent on polishing the distro instead of making ground work to get the given hardware up and running. The actual hardware is cheaper, but one pays a good part of the difference back with the extra time needed to get the software up and running.
The SoftIron OverDrive 1000
The OverDrive 1000 was announced by SoftIron during the annual openSUSE conference in 2016. It had some severe limitations on extensibility: no video, just two USB ports, no PCIe. However it is the first ARM machine fully standards compliant from day one, but still easily available AND affordable by individual users and developers. And unfortunately also the last one.
I had access to ARM boards that were better than the OverDrive 1000 in one way or in another. But often even using the latest firmware and OS image from the board vendor I could not get a board up and running. With the OverDrive 1000 I rarely had such problems. Even if it was not listed among the supported and/or tested boards, the OverDrive 1000 just worked perfectly in the vast majority of cases.
My focus is application support. If someone reports that syslog-ng has problems on a given version of SLES, FreeBSD, Fedora or Debian running on ARM I do not want to spend days to figure out how to install the given operating system and upgrade or downgrade the firmware along the way as needed by the given OS. The focus is the application, the OS install should be straightforward on the first try and ready in half an hour, including software download. The OverDrive 1000 provided me this convenience starting at day one. And even if the hardware is now completely obsolete, it still works reliably.
Trigger
You might wonder where the idea for this blog came from, especially that I already promised a couple of other topics already. The trigger was a tweet about a freshly released ARM workstation and the related thread: https://twitter.com/marypcbuk/status/1438151262994845702
it's not for anyone who would think about the price; it's a development platform for car makers like Volkswagen
If you really want, you can find the related the announcement on Twitter. I do not want to advertise them here. A friend of mine suggested to put a note here, even if I have never done this before: if they send you the machine, you could make an exception and post a review on your blog :-)
This kind of attitude hinders the wider adoption of ARM in enterprise grade servers. I talked to many people who are aware of the advantages of ARM and even have the financial resources to buy those servers. But without affordable standards compliant and ready to use testing hardware they just do not make the jump. In the x86_64 world they use a small cluster of HP Microserver boxes as a test environment for larger projects. For ARM there is nothing similar available at the moment.
A modern replacement for the OverDrive 1000 is badly needed:
- ready to use hardware (not just board)
- standards compliant from day one
- affordable to individuals and smaller companies
- easy to buy even by individuals
openSUSE Tumbleweed – Review of the weeks 2021/36 & 37
Dear Tumbleweed users and hackers,
Today, I have to span again two weeks of reviews. As you can imagine, a lot has happened in Tumbleweed and we have published 10 snapshots (0902, 0904, 0906, 0907, 0908, 0910, 0912, 0913, 0914, and 0915).
The most notable changes were:
- Bluez 5.61
- Cryptsetup 2.4.0
- Mesa 21.2.1
- Mozilla Firefox 91.0.2 & 92.0
- Mozilla Thunderbird 91.1.0
- KDE Gear 21.08.1
- KDE Plasma 5.22.5
- Linux kernel 5.14.0, 5.14.1, and 5.14.2
- Systemd 249.4
- Pipewire 0.3.35
- PostgreSQL 13.4
And as usual, we are testing a few stagings, containing these changes:
- KDE Frameworks 5.86.0
- glibc 2.34: all build fails resolved, staging QA in progress. There is a high chance that this will be merged in the next days. Note: as we always do with a glibc update, we will trigger a full rebuild of the distribution
- Linux kernel 5.14.5
- Perl 5.34.0
- shadow 4.9: boo#1190145 and boo#1190146
- openssl 3.0.0
The syslog-ng Insider 2021-09: 3.34; OpenBSD; OpenSearch; http() destination;
Dear syslog-ng users,
This is the 94th issue of syslog-ng Insider, a monthly newsletter that brings you syslog-ng-related news. Topics include:
- Version 3.34.1 of syslog-ng available
- Syslog-ng updated in OpenBSD ports
- OpenSearch and syslog-ng
- Creating a new http()-based syslog-ng destination: Seq
It is available at: https://www.syslog-ng.com/community/b/blog/posts/the-syslog-ng-insider-2021-09-3-34-openbsd-opensearch-http-destination

Thunar, Firefox, Python Update in Tumbleweed
Five Tumbleweed snapshots became available to users of openSUSE’s rolling release this week.
A couple smaller- and medium-sized snapshots brought new software updates for Xfce’s Thunar, the Linux Kernel, Mozilla Firefox, PostgreSQL, Python and more.
The 20210915 snapshot had two package updates. There was an update of translations for the manpages-l10n package to version 4.11.0, which enabled Hungarian translations. The tool set package for accessing and modifying virtual machine images, libguestfs 1.44.2, had a large amount of changes; it added and removed several patches and relicensed setup.py to LGPLv2+ from its original GPLv2+ license.
Xfce’s Thunar package was updated in snapshot 20210914; the update to the file manager 4.16.9 version fixed a memory leak, updated translations and disabled automatic queueing of file transfers. Linux Kernel 5.14.2 had a few USB serial control fixes and a Common Vulnerabilities and Exposures fix; the fix for CVE-2021-3640 could allow a privileged local user to crash the system or escalate their privileges on a system. The package for video and image frames, pfstools, updated to version 2.2.0 and provided many fixes allowing the package to work with newer versions of libraries. Also updated in the snapshot were aria2 1.36.0 and text browser links 2.24.
Mozilla Firefox updated to the 92.0 major version in snapshot 20210913. A new feature is the full-range color levels now has support for video playback on many systems. Firefox can now automatically upgrade to HTTPS using HTTPS RR as Alt-Svc headers. An update of postgresql 13.4 had a fix build with LLVM12 on s390x and fixed CVE-2021-3677. Application builder python-kiwi 9.23.54 made some changes to fix behavior with the rsync tool. Other updates in the snapshot wre make to KDE’s amarok, tuned 2.16.0, libsrtp2 2.4.1 and more.
The 20210912 snapshot gave an update of Mozilla Thunderbird 91.1.0. The email client fixed two CVEs and a memory safety bug. An update of pipewire 0.3.35 made adjustments to the Bluetooth codecs and now separates these as plugins to make it easier to ship. PipeWire’s audio mixer can now mix more formats. The update of python38 3.8.12 provided security updates and made email-date parsing more robust against malformed input, namely a whitespace-only. Some YaST packages were updated like yast2-installation 4.4.18, which now displays release notes during an upgrade.
YaST also had some updates in the 20210910 snapshot; the yast2-update 4.4.3 package fixed a crash during a system upgrade, which synchronized the YaST and libzypp repositories to avoid deleting caches for used repositories. The 1.5.25 version of ibus added a patch to fix a build on openSUSE Leap and nmap 7.92 had some improvements to include the Transport Layer Security 1.3 supporting most scripts for which the security scanner is relevant. The 5.14.1 Linux Kernel was also in the snapshot.

So you want to recover and old git branch because it has been overwritten?
So you just broke that PR you’ve been working on for months?
One day, you find yourself force pushing over your already existing Pull request/branch, because like me, you like to reuse funny names:
git fetch origin
git checkout tellmewhy #already exists and has a pull request still open, but you didn't know
git reset --hard origin/master
# hack hack hack
git commit $files
git push -f nameofmyremote

Panic!
Here’s when you realize that You’ve done something wrong, very very wrong, because github will throw the message:
Error creating pull request: Unprocessable Entity (HTTP 422)
A pull request already exists for foursixnine:tellmewhy.
So, you already broke your old PR with a completely unrelated change,

Don’t panic

If you happen to know what’s the previous commit id, you can always pick it up again (go to github.com/pulls for instance and look for the PR with the branch),
AND, AND, AAANDDDD, ABSOLUTELY ANDDDD, you haven’t ran git gc.
In my case:
@foursixnine foursixnine force-pushed the tellmewhy branch from 9e86f3a to **9714c93** 2 months ago
All there’s to do is:
git checkout $commit
# even better:
git checkout tellmewhy # old branch with new commits that are unrelated/overwritten over the old ones
git checkout -b tellmewhyagain # your new copy, open your pr from here
git push tellmewhyagain # now all is "safe" in the cloud
git checkout tellmewhy # Let's bring the dead back to life
git reset --hard 9714c93
git push -f tellmewhy
And this is it, you’ve brought the dead back to life


Chafa 1.8: Terminal graphics with a side of everything
The Chafa changelog was growing long again, owing to about half a year's worth of slow accretion. Hence, a release. Here's some stuff that happened.
High-end protocols
With existing choices of the old text mode standby and its friend, the most unreasonably efficient sixel encoder known to man, I threw Kitty and iTerm2 on the pile, bringing our total number of output formats to four. I think that's all the terminal graphics anyone could want (unless you want ReGIS; in which case, tough tty).
Moar terminals
Modern terminal emulators are generally less fickle than their pre-y2k ancestors. However, sometimes it takes a little sleuthing to figure out which extended features might be hiding behind e.g. some mysterious xterm-256color façade so we can do the right thing.
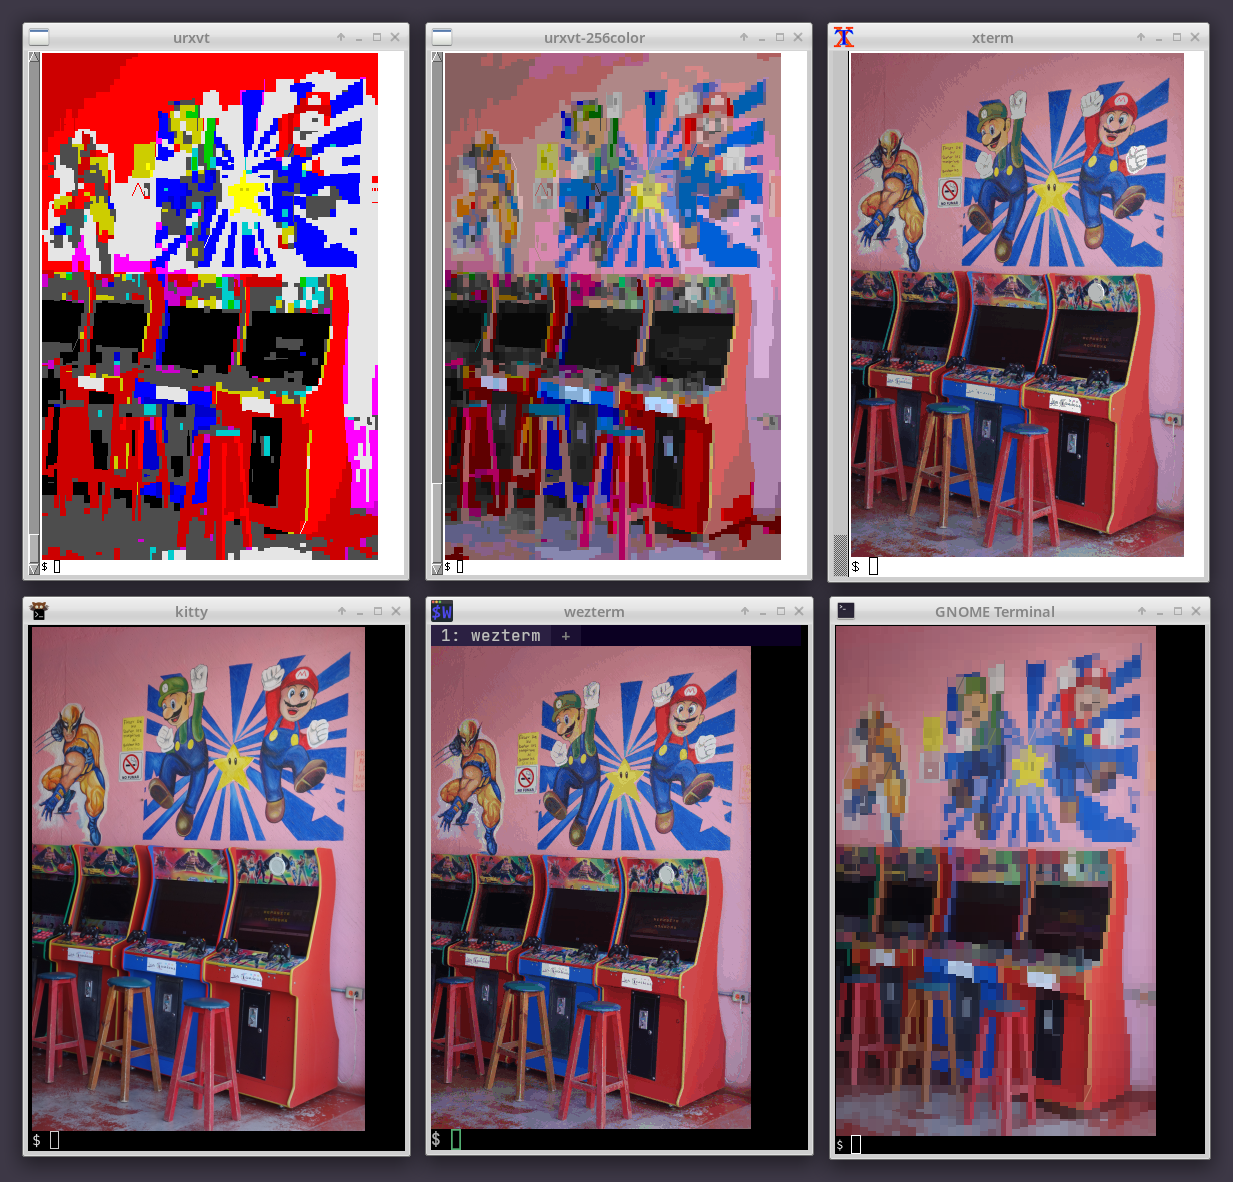
Luckily, Chafa has a steadily improving handle on terminals of the Unix/GNU/Linux world. A few examples:
- VTE-based terminals (there are many, including GNOME Terminal).
- Sixel crew: foot, mlterm, WezTerm, XTerm.
- A category unto its own: Kitty, packing one of the most featureful terminal graphics protocols around.
- Another innovative beast of genetically engineered goodness: ctx.
- Fullscreen consoles: fbterm (quirky!), yaft (yet more sixels!) and the Linux console.
- Simple and sweet: st, urxvt.
- For the Mac addicts: Apple Terminal, iTerm2.
- Sessions running in screen and tmux.
Of course, this is forever a work in progress and an area where I receive regular, highly appreciated contributions *chef's kiss – somehow still not an actual emoji*.
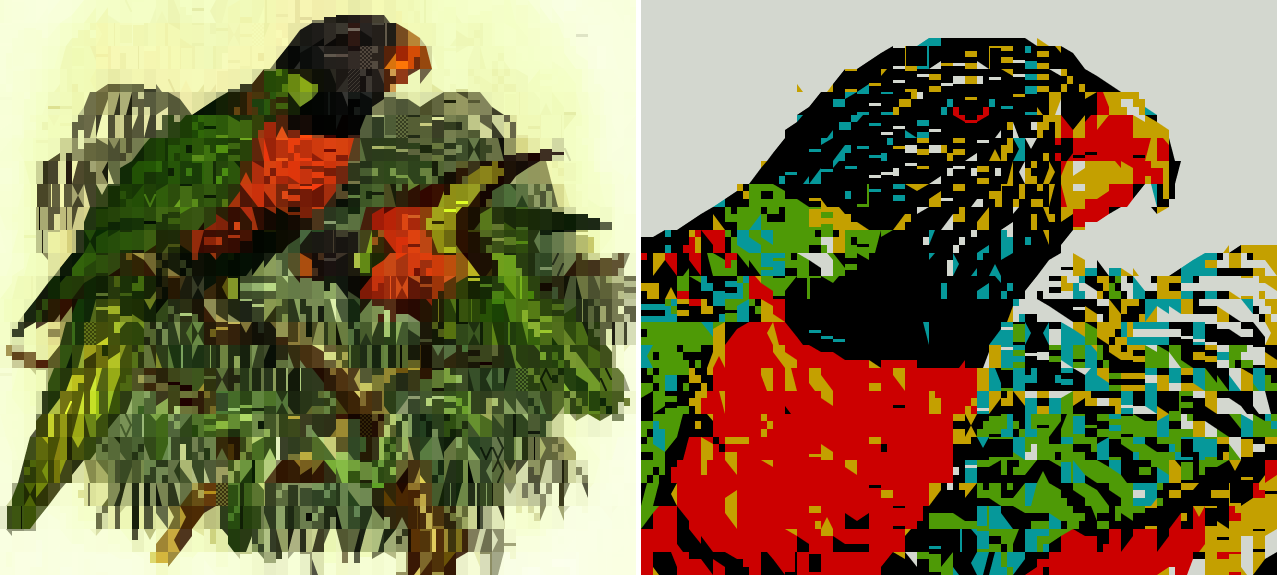
Funky lo-fi features
Øyvind Kolås (of GIMP and GEGL fame) swooped in with new builtins for the legacy computing block, meaning Chafa is now PETSCII Ready – or as ready as you can be with Unicode 13.0: The standard has a few annoying issues, such as not declaring any code points for the four permutations of black triangle, relying instead on existing code points in the geometric shapes block (U+25E2..U+25E5) which are typically represented by fonts as sitting on the baseline surrounded by empty space and therefore useless next to the legacy computing and block elements blocks.
Still, it's got a sweet 2×3 dot matrix (--symbols sextant) and all those nifty wedge shapes (--symbols wedge).

Øyvind also added an 8-color mode. Used together (-c 8 --symbols legacy+space), these features enable visual emulation of Teletext Level 1 and similar systems widely deployed in the late 1970s until roughly 1990 (technically into the present, albeit perhaps not so widely anymore).
Somewhere along the way I discovered that Øyvind has a Patreon page – and if you're a GIMP user and/or care about the free software graphics ecosystem, you may want to read this article and consider its implications.
A bit of background austerity
I followed up in the retro vein with a foreground-only (--fg-only) modifier, which allows emulation of vintage systems that could only specify a single color per cell against a uniform background color. A popular example is the Commodore 64's standard character mode. It's also useful in terminals where block symbols don't render correctly (for example due to missing font support), since it prevents background color variation from drowning out details in low-coverage symbols used in their place. The Linux console tends to be among these due to hardware and font limitations that are somehow still in play today.
This is also how many classic ASCII art packages did things; so I guess I am once again asking you to party like it's 1999 (…and stay up all night trying to make your Napster killer render with AAlib).
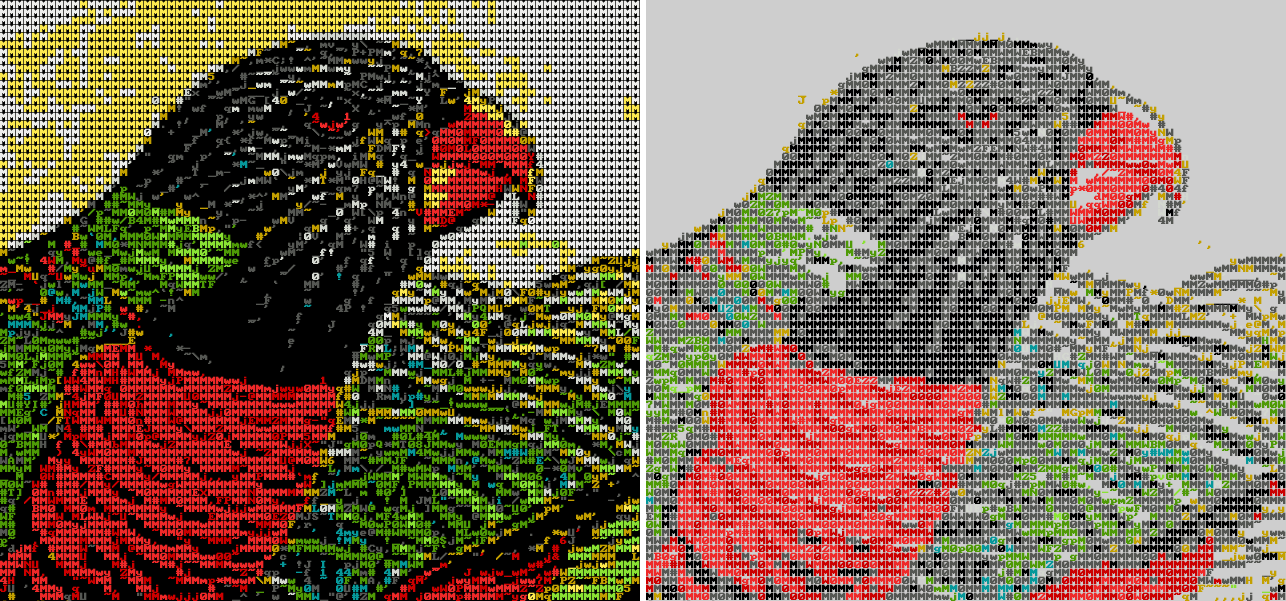
--invertWhen used with --fg-only, the existing --bg option has a greater impact than usual; in addition to being the fade color for alpha blending, it determines the relationship between symbols and blank space, including symbols where the background color "wins" part of a cell. A dark image on a bright background will have more high-coverage symbols that cover up the background as much as possible.
If your terminal has a bright background color, --invert is a shortcut to inverting the sense of --fg and --bg; the white-on-black default then becomes black-on-white.
Since foreground-only mode leaves the background color alone, you can easily experiment with setting it yourself, e.g:
echo -e '\033[41m'; \
chafa -c 16 --symbols ascii --fg-only --bg darkred birbs.png
Weird and wonderful forum art redux
If you read Steam reviews, you may be familiar with this guy:

There are layers to this, but I'll keep it brief and simply observe that people seem to like braille. Braille is popular in this context for at least four reasons. It has:
- A luxurious 2×4 dot matrix at your fingertips.
- Widespread font support.
- Consistent glyph width even in variable-width fonts.
- A special blank symbol (U+2800 BRAILLE PATTERN BLANK) for consistent spacing.
Chafa's supported this kind of output for a long time (-c none --symbols braille), but in some circumstances it could replace cells having identical foreground and background colors with a hardcoded U+0020 as an optimization. This could result in inconsistent spacing, making braille (and probably other symbol combinations) less useful. Fortunately the issue is now a thing of the past; the latest version will instead use a visually blank symbol from the user's symbol set, falling back to the lowest-coverage symbol it can find.
The GPL doesn't regulate netiquette: Please use for good, or in extreme cases, awesome.
The ever elusive practical application in the wild
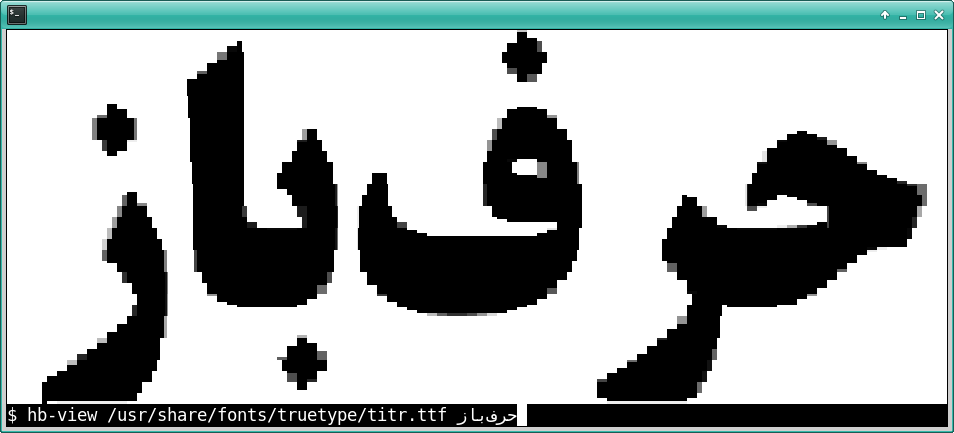
It's good to be useful. Neofetch was the first project to avail itself of Chafa's incredible power, and the latest is HarfBuzz' hb-view. And – er – I think that's all of them. For now!
2026 update: As indicated by my limited analysis, if you've landed on this page you're most likely looking for Shrek braille art. As such, your reward for scrolling this far is a Shrek you can copy and paste effortlessly:
⢀⡴⠑⡄⠀⠀⠀⠀⠀⠀⠀⣀⣀⣤⣤⣤⣀⡀
⠸⡇⠀⠿⡀⠀⠀⠀⣀⡴⢿⣿⣿⣿⣿⣿⣿⣿⣷⣦⡀
⠀⠀⠀⠀⠑⢄⣠⠾⠁⣀⣄⡈⠙⣿⣿⣿⣿⣿⣿⣿⣿⣆
⠀⠀⠀⠀⢀⡀⠁⠀⠀⠈⠙⠛⠂⠈⣿⣿⣿⣿⣿⠿⡿⢿⣆
⠀⠀⠀⢀⡾⣁⣀⠀⠴⠂⠙⣗⡀⠀⢻⣿⣿⠭⢤⣴⣦⣤⣹⠀⠀⠀⢀⢴⣶⣆
⠀⠀⢀⣾⣿⣿⣿⣷⣮⣽⣾⣿⣥⣴⣿⣿⡿⢂⠔⢚⡿⢿⣿⣦⣴⣾⠁⠸⣼⡿
⠀⢀⡞⠁⠙⠻⠿⠟⠉⠀⠛⢹⣿⣿⣿⣿⣿⣌⢤⣼⣿⣾⣿⡟⠉
⠀⣾⣷⣶⠇⠀⠀⣤⣄⣀⡀⠈⠻⣿⣿⣿⣿⣿⣿⣿⣿⣿⣿⡇
⠀⠉⠈⠉⠀⠀⢦⡈⢻⣿⣿⣿⣶⣶⣶⣶⣤⣽⡹⣿⣿⣿⣿⡇
⠀⠀⠀⠀⠀⠀⠀⠉⠲⣽⡻⢿⣿⣿⣿⣿⣿⣿⣷⣜⣿⣿⣿⡇
⠀⠀⠀⠀⠀⠀⠀⠀⢸⣿⣿⣷⣶⣮⣭⣽⣿⣿⣿⣿⣿⣿⣿
⠀⠀⠀⠀⠀⠀⣀⣀⣈⣿⣿⣿⣿⣿⣿⣿⣿⣿⣿⣿⣿⣿⠇
⠀⠀⠀⠀⠀⠀⢿⣿⣿⣿⣿⣿⣿⣿⣿⣿⣿⣿⣿⣿⣿⠃
Go wild.
Advanced dehydration
Back when i started using Let’s Encrypt I wanted a lightweight client. Danimo recommended dehydrated. Well it still had a different name back then. But details. So for years I had been a very happy camper with it. Then I learned that many daemons now support that you can run ECDSA and RSA certs at the same time and the server picks the right cert depending on the client. So we will solve this first.
What I learned from Russian students: logging is important
When I published my blog about openSUSE a couple of weeks ago, most questions I received in private were about the Russian students I mentioned. In that blog I quickly described how my interest in information security started, about 25 years ago. This blog gives you a bit of historical background and a few more details.
Historical background
It was 1995. I was studying at a university, but I was already running one of the servers of the faculty. It was a Linux box, and I also helped to run a FreeBSD server hosting the faculty web server. It was just three years after the Soviet army finally left Hungary. Our university had many students from Russia. While Hungarian students could attend the university for free, Russian students had to pay for their studies. As they were paying a lot, they could do anything, nobody punished their activities. And they did a lot of things, as they felt that they can still do anything in the ‘colonies’.
It was 1995, there was no Internet yet in the student dormitories. There was no Gmail, or any similar provider yet. Not even teachers received e-mail addresses automatically. Even if some people had computers at home, there was no Internet access yet from homes. Students could access servers from computer labs at the university. The Russian students had their own computer lab, where nobody else was allowed to enter.
It is 1995, the fifth consecutive year that funding was taken away from higher education. Which meant that faculties started to ask money from other faculties for their services. Russian students belonged to another faculty, so they could not get a user name on our servers.
Infosec is overrated
By that time even if I was running a couple of servers, I was just the same as the vast majority users even today. I mean, I thought that information security is overrated, ease of use, comfort are a way lot more important. It did not help either, that most of the commonly used protocols were not encrypted, like telnet, ftp, rsh and others. Even these protocols were often difficult to use from Windows machines. I was learning Linux and FreeBSD, and I was enabling all kinds of services. Using rsh between the two faculty UNIX servers was fun.
Logging is important
I checked the logfiles of the servers I managed occasionally, but mostly only to check if the hard drives were showing any signs of failure. While browsing the logs for hard drive errors, I came across some suspicious login messages. Logins from previously not seen unknown IP addresses. I knew that the addresses were from campus, so I asked around. It turned out, that they belonged to the Russian students laboratory. And talking to the user it turned out, that he was unaware that his account was used also by someone else.
The exact order of events is a kind of blurry, it was a quarter of a century ago. I started to check log messages not just for hard drive problems but also for security related events. I could see more and more logins from the Russian students laboratory. It was a kind of cat and mouse game, I was trying to keep unauthorized users out of the system. They kept coming back and started to do nasty things. Along the way I learned a lot about security:
- Network sniffing: most of the university had a BNC network and was using hubs instead of switches. Combine these with non-encrypted protocols…
- Keyboard loggers
- Black market. Access for students of our faculty was free, they just had to ask for it. Sometimes minutes after they received access, there was a login from the Russian lab. Accounts on my servers had a good price…
- Denial of Service: they tried all kinds of DoS attacks, like fork bombs, too many logins, etc.
- Stepping stone for further attacks, so I got some not so kind e-mails asking for explanation
Turning on a firewall could have been an easy way out, but seeing the IP addresses of the Russian lab in the system logs was the perfect indicator of compromise for an account. The account got quickly disabled, either for life (see black market) or until a password change. In the second case I tried to investigate, how the password was stolen. And of course gave a quick education on security awareness. Showing my log messages I tried to ask for some help to stop the Russian students, but as I was just a first year student and Russian students were paying: nobody cared.
Next steps
After so many years I do not recall any more how I got the hint, but I was suggested that I visit the Russian students computer lab. I was not supposed to enter there, but as they were messing with my servers, I did not care. The door was open, I walked in and looked around. The /etc/passwd file of my Linux box was printed on the wall. Even if encrypted, but it contained the passwords. As also described in my openSUSE blog, this was a final push towards information security.
FreeBSD already had passwords separate from the user readable passwd file, so I knew the concept. I looked around and found that the Linux distribution called Jurix had shadow passwords. It was a brand new thing in the Linux world at that time. I quickly migrated my Linux server to Jurix and did all kinds of hardening along the way. I removed all non-essential services, like rsh. Even if most users kept using telnet and other insecure services, I started to use SSH, which was just released.
When Russian students realized that they cannot get into my servers easily any more, they even tried to bribe me for access – with a counterfeit gaming CD for Windows :-)
Epilogue
As you can see, I ended up on the defender side. I did lots of security hardening and built systems that ran securely even years after I abandoned them. Logging still takes an important role in my life: I work with syslog-ng. Russian students were a major PITA at that time, but I learned a lot about security while I was trying to keep them out of the servers I managed.