
 Member
 yaloki
gpodder 2 vs 3 in Packman
The gpodder project introduced its new major release 3.0.0 today and, unfortunately, it seems like I didn't pay attention to the complete change announcement, as I just bumped the gpodder package in Packman to 3.0.0 (from 2.18).
Now, gpodder 3.0.0 does introduce a lot of changes, notably in the UI but also regarding its database format and requires migrating the database from 2 to 3. It doesn't seem to have all of the features of 2.20 either. So what happens is that when you just upgrade the gpodder package, you end up with something you don't necessarily want to use. At least as of now.
Upstream will still maintain the 2.x branch for quite a while, and gradually port features from 2 to 3 and, hence, it actually makes sense to do it differently. What I have done now is to revert the gpodder package at Packman to the 2.xx branch (and upgrade to 2.20 at the same time).
If you want to use gpodder 3.0.0, then just install the package gpodder3 instead: zypper or YaST2 will tell you to remove gpodder in order to do so, as you cannot have both installed at the same time (they have file conflicts).
Now, if, in between those changes, you already did the upgrade, do one of the following:
-
if you want to keep using 3.x: then run
rpm -e gpodder && zypper install gpodder3(as root) -
if you want to go back to 2.x: then run
rpm -e gpodder && zypper install gpodder(as root)
On a side note, please wait a couple of hours (after this blog post) before doing so, as our main repository server is only synced to some mirrors after 4 hours (after 1 hour for most though).
Sorry for the inconvenience.

Network Installation of openSUSE
What is the Motivation for this setup?
1) Local Area Networks (LANs) are ubiquitous... even in homes where, chances are, you have a modem to the Internet and next to it is a wireless/ethernet router for multiple wifi and ethernet capable devices (PCs, Laptops, Smartphones, Tablets etc) to connect and surf the web.
2) If you are a Linux/OSS enthusiast, you would be constantly downloading the latest ISOs from the web, burning them onto a DVDs and installing them on physical/virtual machines. This is time/resource intensive... time to download, time to burn a DVD, time/money spent on blank DVDs etc. Of course, if you install openSUSE on virtual machines, you avoid the DVD part of the process but you would still have lots of ISOs on your filesystem... if you have a classroom of 20 machines... well, you get the idea.
3) Almost all PCs and Laptops these days have an ethernet port and are capable of booting up from the network (ie PXE-boot). This means you physically power them on, tell it to go into PXE-boot mode and it will go onto the network and seek out an installation server to download and install the openSUSE binaries.
4) This is an efficient way to install openSUSE onto both physical and virtual machines in a LAN environment where there is only one central place for your software binaries.
Pre-requisites:
i) You have a LAN environment connecting a few machines via the network cable. Although booting from wifi is possible but it is out of the scope of this discussion.
ii) You have a physical machine (preferably*) with openSUSE installed and this will be the designated network installation server.
*It is possible to set this up on a virtual machine but you need to ensure it is connected to the physical LAN in a Bridge networking mode and not the usual NAT networking mode for typical virtual machines.
3 Simple^ Steps to Success:
^Simple - it will become more simple as you do this more frequently.
Step 1: Install and configure Apache2 webserver to host and distribute openSUSE binaries.
Please refer to my other blog entry on this subject - Using Apache2 to deploy & maintain SUSE
Step 2: Install and configure tftpboot server to enable initial boot of target machines over the network.
Please refer to my other blog entry on this subject - Install and configure TFTP server for PXE boot environment
Step 3: Install and configure dhcpd server to provide an IP address for target machines and redirect them to the tftpboot server.
Please refer to my other blog entry on this subject - Install and configure DHCP server
Step 4: On the target physical machines, on boot and depending on the BIOS, activate the boot from LAN option and watch it get an IP address from the Installation Server (via Step 3), followed by connecting to the TFTP server and presenting an installation menu (via Step 2). Enter the choice of OS to install and your installation will commence over the LAN (via Step 1).
Additional points of note:
a) Everything discussed here applies to SLES, SLED and openSUSE. The steps documented are based on openSUSE 11.x and should work on older versions and even the enterprise editions of SUSE.
b) Software installation (apache2, tftpboot, syslinux, dhcpd etc) assumes your SLE or openSUSE server have access to their respective binaries, either in DVD (also ISO) or software repository on the web.
References:
- openSUSE.org - SDB:PXE boot installation
- Novell Cool Solutions - Setting Up a SUSE PXE Installation Server in an Existing NetWare Environment
- Novell Article - Setting up a PXE Boot Server
Enjoy!
Install and configure TFTP server for PXE boot environment
1) Install SysLinux (Bootloader for Linux)
Command-line (as root): zypper in syslinux

2) Install tftp
Command-line (as root): zypper in tftp yast2-tftp-server

3) Enable tftp
Command-line (as root): yast2 tftp-server

In TFTP Server Configuration dialog, check to Enable the service. Ensure the Boot Image Directory is set to /srv/tftpboot. Finally, check the Open Port in Firewall and click Ok.
Note: Its been observed that the SUSE Firewall may still block incoming traffic to the TFTP boot server despite the Open Port in Firewall setting.
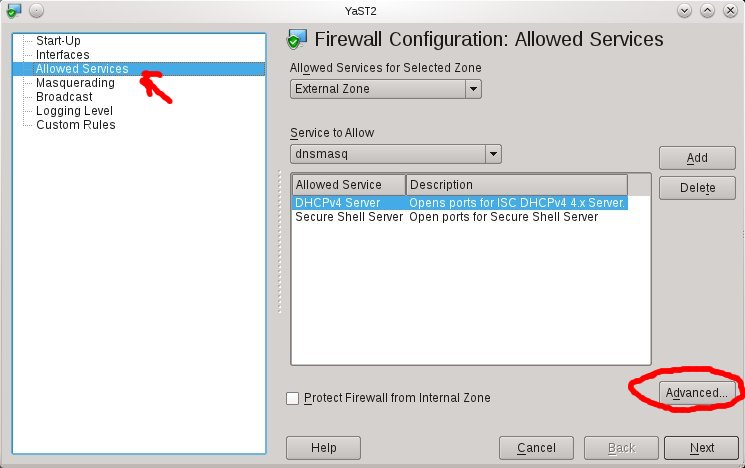

To ensure the Firewall is not blocking incoming TFTP traffic, open the Firewall setting via YaST (or command-line yast2 firewall). Navigate to the Allow Services section (left-hand pane) and click on Advanced button. Ensure that port 69 is listed in the UDP section and click OK to accept. Click Next and complete the settings change.
Next, create the sub-directory /srv/tftpboot/pxelinux.cfg via the command-line: mkdir -p /srv/tftpboot/pxelinux.cfg
4) Populating the /srv/tftpboot directory
Copy pxelinux.0 file (part of syslinux package installed earlier) to the /srv/tftpboot directory. Command-line: cp /usr/share/syslinux/pxelinux.0 /srv/tftpboot/
Copy the relevant Linux kernel and initrd boot files to /srv/tftpboot and provide meaning names (to avoid confusion later). This is best described by way of an example. Let's say I want to enable my installation server to provide an option to install both the 32-bit and 64-bit of openSUSE 11.4. Therefore, I would do the following:
a) Mount both 32-bit and 64-bit of openSUSE 11.4 ISO on the filesystem:
mount -t iso9660 -o ro,loop /directory/to/openSUSE-32-bit.iso /mnt/openSUSE-11.4-i586
mount -t iso9660 -o ro,loop /directory/to/openSUSE-64-bit.iso /mnt/openSUSE-11.4-x86_64/
b) Copy the relevant Linux kernel and initrd files to /srv/tftpboot and rename them with more meaning names:
cp /mnt/openSUSE-11.4-i586/boot/i386/loader/linux /srv/tftpboot/openSUSE-114-32bit.krnl
cp /mnt/openSUSE-11.4-i586/boot/i386/loader/initrd /srv/tftpboot/openSUSE-114-32bit.initrd
cp /mnt/openSUSE-11.4-x86_64/boot/x86_64/loader/linux /srv/tftpboot/openSUSE-114-64bit.krnl
cp /mnt/openSUSE-11.4-x86_64/boot/x86_64/loader/initrd /srv/tftpboot/openSUSE-114-64bit.initrd

c) Copy the message file from any openSUSE ISO to /srv/tftpboot:
cp /mnt/openSUSE-11.4-x86_64/boot/x86_64/loader/message /srv/tftpboot/
*You may unmount the ISOs as these copy are a one-time operation.
5) Prepare the text-based menu
[Update on 3 Dec 2011: added the directory where the file default should reside below]
Create a text-file (via your favourite editor as root), named default in the /srv/tftpboot/pxelinux.cfg directory with the following contents:
default harddisk
display message
prompt 1
timeout 600
# Install openSUSE 11.4 (32-bit)
label openSUSE-114-32
kernel openSUSE-114-32bit.krnl
append initrd=openSUSE-114-32bit.initrd splash=silent vga=0x314 showopts install=http://IP_ADDRESS_OF_SERVER/software/openSUSE-11.4-i586/
# Install openSUSE 11.4 (64-bit)
label openSUSE-114-64
kernel openSUSE-114-64bit.krnl
append initrd=openSUSE-114-64bit.initrd splash=silent vga=0x314 showopts install=http://IP_ADDRESS_OF_SERVER/software/openSUSE-11.4-x86_64/
Everything is self-explanatory above except for the install=http://IP_ADDRESS_OF_SERVER portion. Please refer to my other blog entry on using Apache2 webserver to host and serve up software binaries.
Finally, edit the message file in step 4c earlier to correspond with the example default file entries.
Welcome to openSUSE!
To start the installation, type one of the options below and press
Available boot options:
openSUSE-114-32 - Installation of 11.4 32bit
openSUSE-114-64 - Installation of 11.4 64bit
Have a lot of fun...
Done.
Install and configure DHCP server
The PXE boot environment (TFTP server) is documented in another blog entry Install and configure tftp server for PXE boot environment and the main entry discussion on Network Installation of openSUSE.
1) Install DHCP Server (dhcpd)
Command-line (as root): zypper in dhcp-server yast2-dhcp-server

2) Configure DHCP
Make a backup of the dhcpd.conf file to start afresh: mv /etc/dhcpd.conf /etc/dhcpd.org.conf
Create a new dhcpd.conf file, using your favourite text editor as root, from scratch with the following content:
option rfc3442-classless-static-routes code 121 = array of unsigned integer 8;
option domain-name "example.org";
option routers 192.168.11.1;
max-lease-time 7200;
ddns-updates off;
ddns-update-style none;
log-facility local7;
default-lease-time 600;
# define rules to identify DHCP Requests from PXE and Etherboot clients.
class "pxe" {
match if substring (option vendor-class-identifier, 0, 9) = "PXEClient";
}
class "etherboot" {
match if substring (option vendor-class-identifier, 0, 9) = "Etherboot";
}
subnet 192.168.11.0 netmask 255.255.255.0 {
range 192.168.11.51 192.168.11.60;
default-lease-time 14400;
max-lease-time 172800;
server-name "192.168.11.200";
next-server 192.168.11.200;
filename "pxelinux.0";
# allow members of "pxe";
}
Using the sample dhcpd.conf above, you can see that
- My router IP is 192.168.11.1
- DHCP daemon is giving out IP address starting from 192.168.11.51 to 192.168.11.60. You can adjust this setting to provide more IP addresses. The important part is to assign IP addresses outside the range of any other existing DHCP server (either in the router or in another environment where you do not have access to the official DHCP server).
- server-name and next-server points to the IP address of the network installation server (ie pointing back to the openSUSE server that is running DHCP server, TFTP server, Apache2 server with binaries)
Alternatively, if you would like a GUI interface, you may try yast2 dhcp-server. Below are screenshots of the 4 step wizard.


3) Starting and Stopping the DHCP Server
Its best to manually start and stop the DHCP Server as required... as most LANs already have some DHCP service running... doubly so if your machine is portable (ie Laptop), you wouldn't want your Laptop to start dishing out IP addresses on boot.
To start the DHCP server, command-line (as root): rcdhcpd start
To stop the DHCP server, command-line (as root): rcdhcpd stop

WebYaST 0.3 is out
WebYaST 0.3 is out
“We have doubled the speed and have halved the memory usage”

The latest version of WebYaST has many![]() improvements regarding speed, memory usage, usability and developing environment:
improvements regarding speed, memory usage, usability and developing environment:
-
Speed
Due a new caching mechanism the startup time of each module has been decreased to a maximum of 1-2 seconds. So the user is able now to click through WebYaST without any notable waiting time.
We have made a video which shows the speed improvement: WebYaST Comparison VideoFor more technical information have a look to: WebYaST Caching Howto -
Memory Usage
Former versions of WebYaST were split into a service and into an UI part. Each part has run in a own HTTP server. We have decided to bring these parts together in order to save one HTTP server which halves the memory usage.
One additional benefit is that the architecture of WebYaST has simplified a lot: -
Simplifying WebYaST architecture
Due the use of one HTTP WebYaST server only the development environment has been simplified very much:- Setup an environment system is much more easier now. Even a setup based on the GIT repository is quite easy.
For more information have a look to : WebYaST Installation - Writing an own WebYaST plugin has been reduced to a minimum effort. Everyone who has read a Ruby on Rails tutorial is now able to write a plugin.
You do not believe ? Then have a look to the Example plugin .
- Setup an environment system is much more easier now. Even a setup based on the GIT repository is quite easy.
How to get:
Available for…
.Sadly it is too late for 12.1 but you can install the packages from the repository described above for 11.4 and 12.1
Installing Perl Module RPMs on openSUSE
The additional repository devel:languages:perl has quite a slew of Perl module packages in it (over 2000 at the time of writing).
Hence, if you are often using and requiring Perl modules, it makes a lot of sense to add it to your list of repositories, which you can do with the following command (as root):
zypper addrepo http://r.opensu.se/devel:languages:perl.repo
(if you wonder what r.opensu.se is, read up on it here: r.opensu.se).
A little known fact is that when building RPM packages, there is a post-build script that analyzes the files that are part of the resulting package in order to scan for Perl modules. For each of those Perl modules, it adds a Provides with the Perl name of that Perl module, with a specific notation which is like this: perl(Name::of::the::Perl::package).
As an example, if you need the Perl module Net::SMTP::SSL, you just need to do this:
zypper install 'perl(Net::SMTP::SSL)'
Note that you should indeed put that parameter to the zypper install command into quotes, as if you don't, bash will attempt to interpret the braces and give a syntax error.
Now, in this case, it is fairly simple, as the Perl module Net::SMTP::SSL is provided by the RPM package perl-Net-SMTP-SSL (at least on openSUSE/SLE), so you might have been able to derive the name of the RPM package from the name of the missing Perl module on your own. But that Perl module could very well be part of a package with a different name: for example, the Perl module Class::MOP is not in the RPM package perl-Class-MOP but in the RPM package perl-Moose (because it's part of the Moose CPAN module).
And a last little trick: if you only want to find out which RPM package(s) provides specific Perl modules, you may also use this:
zypper what-provides 'perl(Class::MOP)'
(Note that this one only works on repositories that you have in your list of active repositories, which you can see with zypper repos or zypper lr.)

Greek openSUSE community, Translation of openSUSE Weekly news in Greek (issue 199)

Hello everyone!
I am very pleased to announce the new issue (199) of openSUSE Weekly News in Greek.
In this issue you will read about:
* openSUSE 12.1 RC1 spotted in the wild
* Help out with testing at openSUSE
* Fourth openSUSE Board Election 2011
* Wazi/Juliet Kemp: Git Tutorial: Branching and Merging
* Pascal Bleser: Loop mount iso files without being root
As well as many interesting news about openSUSE and useful advice, which can make our lives easier.
Enough said though... Read more at: http://own.opensuse.gr, http://el.opensuse.org/Weekly_news or www.os-el.gr
We are always looking forward to receiving your comments as well as suggestions regarding things you would like to read about in our next issue.
The openSUSE Weekly News is being translated in the Greek language from issue #150. You can read older translated issues here: http://el.opensuse.org/Κατηγορία:Weekly_news_issues
Enjoy it!
Efstathios Agrapidis (efagra)
Loop mount iso files without being root
There is a rather convenient way to mount ISO files (CD/DVD images) onto a directory on Linux, which goes as follows:
mount -o loop,ro /path/to/image.iso /path/to/mountpoint
(where the mountpoint is a directory).
This method works very well, but has one essential drawback: you must be root in order to do that. So how do I get to do so as a regular user ?
A barely known alternative lies in fuseiso, which uses the FUSE filesystem in user-space layer to accomplish that.
In order to use it, you must install the package fuseiso, which is available with the openSUSE distribution, and from the release repository (e.g. for 11.4) as well as from the filesystems repository and OBS project:
zypper install fuseiso
Once that has been done (as root ;)), you can simply mount ISO files like this, without being root:
fuseiso /path/to/image.iso /path/to/mountpoint
Note that as an additional benefit, fuseiso also supports images in NRG, BIN, MDF and IMG (dd) format, as well as zisofs.
In order to unmount, simply use fusermount -u, e.g. like this:
fusermount -u /path/to/mountpoint
Greek openSUSE community, Translation of openSUSE Weekly news in Greek (issue 198)

Hello everyone!
I am very pleased to announce the new issue (198) of openSUSE Weekly News in Greek.
In this issue you will read about:
* Dmitri Popov: Create Slick Slideshows with digiKam
* Michal Hrušecký: How do I handle all those MySQLs
* Jos Poortvliet: Almost too much going on…
* opensource.com/Marek Mahut: Creative Commons 4.0 on the horizon
* Linux Pro Magazine/Bruce Byfield: How I Learned to Love the KDE 4 Series
As well as many interesting news about openSUSE and useful advice, which can make our lives easier.
Enough said though... Read more at: http://own.opensuse.gr, http://el.opensuse.org/Weekly_news or www.os-el.gr
We are always looking forward to receiving your comments as well as suggestions regarding things you would like to read about in our next issue.
The openSUSE Weekly News is being translated in the Greek language from issue #150. You can read older translated issues here: http://el.opensuse.org/Κατηγορία:Weekly_news_issues
Enjoy it!
Efstathios Agrapidis (efagra)

Updated libvirt for openSUSE12.1 RC1
Last week I updated the libvirt package for openSUSE12.1 RC1 / Factory to version 0.9.6. The package was also submitted for SLE11 SP2 Beta8. Changes since last update include backporting of AHCI controller patch for qemu driver. With this patch it is possible to use SATA drives with qemu instances. The following controller device XML is used to specify an AHCI controller
<controller type='sata' index='0'>
  <address type='pci' domain='0x0000' bus='0x00' slot='0x05' function='0x0'/>
</controller
The libvirt qemu driver supports many AHCI controllers, each with one bus and 6 units. To attach a SATA disk to a unit on an AHCI controller, use the following disk device XML
<disk type='file' device='disk'>
  <driver name='qemu' type='raw'/>
  <source file='/var/lib/libvirt/images/test/disk0.raw'/>
  <target dev='sda' bus='sata'/>
  <address type='drive' controller='0' bus='0' unit='0'/>
</disk
Also new to this libvirt update is opt-in for Apparmor confinement of qemu instances. /etc/libvirt/qemu.conf has been patched to explicitly set the security driver to ‘none’. If Apparmor is enabled on the host, libvirtd is generously confined since it needs access to many utilities and libraries, but users must opt-in to also have qemu instances launched by libvirtd confined. Simply edit /etc/libvirt/qemu.conf and change security_driver to ‘apparmor’. Of course, selinux is also available if users prefer it over Apparmor.