
 SatManUK
26 Sales, Gnome 3, Lets Party!!
Well what can I say? 4 sales in on calendar week, and 2 sales to kick start April and this ain't no fool!!
Friday was an amazing day for Bolton Linux, 2 sales back to back took our sales to 4 for the week for the first time, all be it 2 on Wednesday and Two on Friday, it shows there is a market, and that it is growing.
To celebrate the launch of Gnome 3.0 (three point zero) Free Software UK are throwing a party in Manchester Next Sunday 10th April from 2pm till 5pm Bolton Linux will be giving a presentation on Gnome, Novel and openSUSE.
We would welcome everybody to join us.
This does mean that however, we will not be attending Sheffield market this month. Instead we will arrange for PC Centre North West to carry some stock on our behalf.
But I am sure you will all agree a party is better than hard slog at a market :)
Introducing snapper: A tool for managing btrfs snapshots
Today we want to present the current development of snapper, a tool for managing btrfs snapshots.
For years we had the request to provide rollbacks for YaST and zypper but things never got far due to various technical problems. With the rise of btrfs snapshots we finally saw the possibility for a usable solution. The basic idea is to create a snapshot before and after running YaST or zypper, compare the two snapshots and finally provide a tool to revert the differences between the two snapshots. That was the birth of snapper. Soon the idea was extended to create hourly snapshots as a backup system against general user mistakes.
The tool is now in a state where you can play with it. On the other hand there is still room and time for modifications and new features.
Overview
We provide a command line tool and a YaST UI module. Here is a brief tour:
First we manually create a snapshot:
# snapper create --description "initial"
Running YaST automatically creates two snapshots:
# yast2 users
Now we can list our snapshots:
# snapper list
Type   | # | Pre # | Date                     | Cleanup  | Description
-------+---+-------+--------------------------+----------+-------------
single | 0 |       |                          |          | current
single | 1 |       | Wed Mar 30 14:52:17 2011 |          | initial
pre    | 2 |       | Wed Mar 30 14:57:10 2011 | number   | yast users
post   | 3 | 2     | Wed Mar 30 14:57:35 2011 | number   |
single | 4 |       | Wed Mar 30 15:00:01 2011 | timeline | timeline
Snapshot #0 always refers to the current system. Snapshot #2 and #3 were created by YaST. Snapshot #4 was created by an hourly cronjob.
Getting the list of modified files between to snapshots is easy:
# snapper diff 2 3
c... /etc/group
c... /etc/group.YaST2save
c... /etc/passwd
c... /etc/passwd.YaST2save
c... /etc/shadow
c... /etc/shadow.YaST2save
c... /etc/sysconfig/displaymanager
c... /var/tmp/kdecache-linux/icon-cache.kcache
c... /var/tmp/kdecache-linux/plasma_theme_openSUSEdefault.kcache
You can also compare a single file between two snapshots:
# snapper diff --file /etc/passwd 2 3
--- /snapshots/2/snapshot/etc/passwd    2011-03-30 14:41:45.943000001 +0200
+++ /snapshots/3/snapshot/etc/passwd    2011-03-30 14:57:33.916000003 +0200
@@ -22,3 +22,4 @@
 uucp:x:10:14:Unix-to-Unix CoPy system:/etc/uucp:/bin/bash
 wwwrun:x:30:8:WWW daemon apache:/var/lib/wwwrun:/bin/false
 linux:x:1000:100:linux:/home/linux:/bin/bash
+tux:x:1001:100:tux:/home/tux:/bin/bash
The main feature of course is to revert the changes between two snapshots:
# snapper rollback 2 3
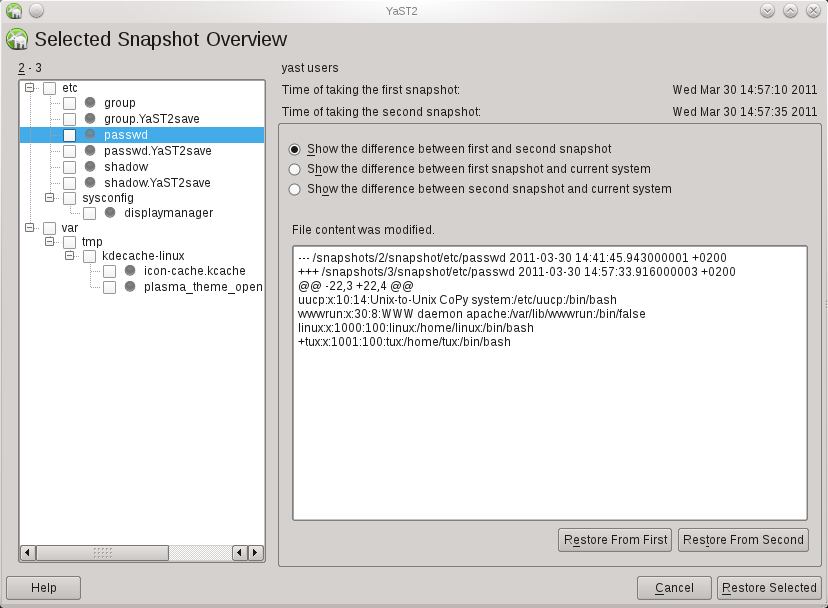
Finally yast2-snapper provides a YaST UI for snapper.
Testing
Playing with snapper should only be done on test machines. Both btrfs and snapper are not finished and included known bugs. Here is a step-by-step manual for installing and configuring snapper for openSUSE 11.4.
Feedback
We would like to get feedback, esp. about general problems and further ideas. There are also tasks everybody can work on, e.g. the snapper wiki page or a man-page for snapper.
For the time being there is no dedicated mailing-list so just use opensuse-factory@opensuse.org.

 Member
Canterbury Rolling Application Platform
Following the announcement of the Canterbury distribution, there has been a lot of work about this in the background too. In order to provide developers with the easiest framework to package with, we are pleased to announce the availability of the Canterbury Rolling Application Platform.
No more tedious packaging, upstream won't have to deal with the idiosyncrasies of distributions any more. Just write your source code, use our framework, and it will automagically be turned into a craplet, which is the new name for artifacts in our distributed platform. It will just fly!
Unlike all efforts of packaging and distribution, our approach is truly revolutionary and provides instant and effortless scalability for the cloud through virtualization of provisioning for horizontal and vertical growth of your business.
At the center of this revolutionary platform lies our secret sauce, Publish Organic in the Open, which will enable you to quickly push out your stuff into the wide world of users of the new Canterbury Rolling Application Platform.
aprfoo@feci.es$ make_poo --dist=loo LibreOpenOffice
Preparing upstream organic ... [DONE]
Building craplet loo.crap ... [DONE]
Flushing buffers ... [DONE]
Pushing to canterbury.org ... [DONE]
Finishing up.
Congratulations, your CRAP is flying at the loo !
We are expecting big vendor support behind this effort, with HP, Oracle, IBM and probably also Microsoft, as it would only be a natural fit for their .NET platform.
It is obviously written in Python (significant whitespace fits in naturally with our philosophy) and will be available in git repositories soon.

GNOME3 live image 0.3.1 released

I just did a quick update to GNOME 3 live image, to fix some issues people discovered in previous images :
- radeon / r600g openGL drivers have been switched to use gallium : they should be more stable with GNOME-Shell
- GNOME Control Center system information correctly detects graphics card on your system
- Empathy accounts panel is back in GNOME Control Center
Enjoy !
Amazon
Amazon has now sold two copies although i can't figure why the price changes each time!
GNOME3 Live Image version 0.3.0 released

Release team decided to do another call for tarballs to fix some bugs across the entire GNOME3 platform, so 2.91.93 was released yesterday.
And today, you can download GNOME Live Image 0.3.0, which contains all the fixes from 2.91.93 tarballs.
Url to download it hasn't changed : http://gnome3.org/tryit.html
Enjoy !

Introducing dister, a Heroku like solution for SUSE Studio
SUSE Studio is an awesome tool, with a couple of clicks you can create an openSUSE/SUSE based system and deploy to your hard drive, an usb flash, a live dvd, a VMware/VirtualBox/Xen server and even Amazon EC2 cloud.
Suppose you want to create a tailored SUSE Studio appliance to run a Ruby on Rails app, this is a list of things you have to take care of:
- install all the gems required by the app (this can be a long list).
- install and configure the database used by the app.
- install and configure a webserver.
- ensure all the required services are started at boot time. You can save some time by cloning this appliance shared on SUSE Gallery, but this is still going to be boring.
Dister to the rescue!
Dister is a command line tool similar to the one used by Heroku (one of the coolest ways to run your Rails app into the cloud). Within a few steps you will be able to create a SUSE Studio appliance running your rails application, download it and deploy wherever you want.
Dister is named after SUSE Studio robot. It has been created by Dominik Mayer and me during the latest hackweek.
How it works
We are going to create a SUSE Studio appliance running a rails application called “SUSE history”. The app uses bundler to handle its dependencies. This is its Gemfile file:
source 'http://rubygems.org'
gem 'rails', '3.0.5'
gem 'pg'
gem "flutie", "~> 1.1"
As you can see the app uses rails3, the flutie gem and PostgreSQL as database.
Appliance creation
Move into the suse_history directory and execute the following command:
dister create suse_history
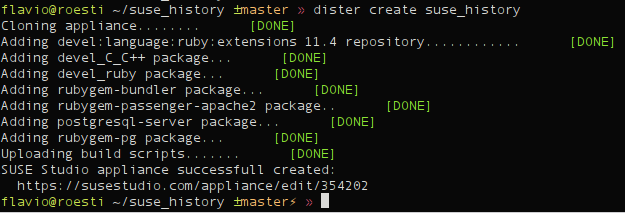
As you can see dister has already done a couple of things for you:
- created an appliance using latest version of openSUSE supported by SUSE Studio (you can use a different base system of course)
- added the devel:language:ruby:extensions repository to the appliance: this repo contains tons of ruby packages (like _modpassenger)
- installed a couple of things:
- _devel_CC++ pattern: this will allow you to build native gems.
- _develruby pattern: provides ruby, rubygems and a couple of development packages needed to build native gems.
- rubygem-bundler: bundler is required by dister in order to handle the dependencies of your rails application.
- rubygem-passenger-apache2: dister uses passenger and apache2 to deploy your rails application.
- postgresql-server: dister noticed suse_history uses PostgreSQL as database, hence it automatically installs it.
- rubygem-pg: dister noticed suse_history uses PostgreSQL as database, hence it automatically installs the ruby’s library forPostgreSQL.
- uploaded a custom build script which ensures:
- mod_passenger module is loaded by Apache
- both Apache and PostgreSQL are always started at boot time.
- all dependencies are installed: this is done only during the first boot using bundler.
- the database user required by your rails app is created. This is done only during the first boot using some SQL code.
- the database used by the appliance is properly initialized (aka rails db:create db:migrate). This is done only during the first boot.
Upload your code
It’s time to upload suse_history code. This is done using the following command:
dister push
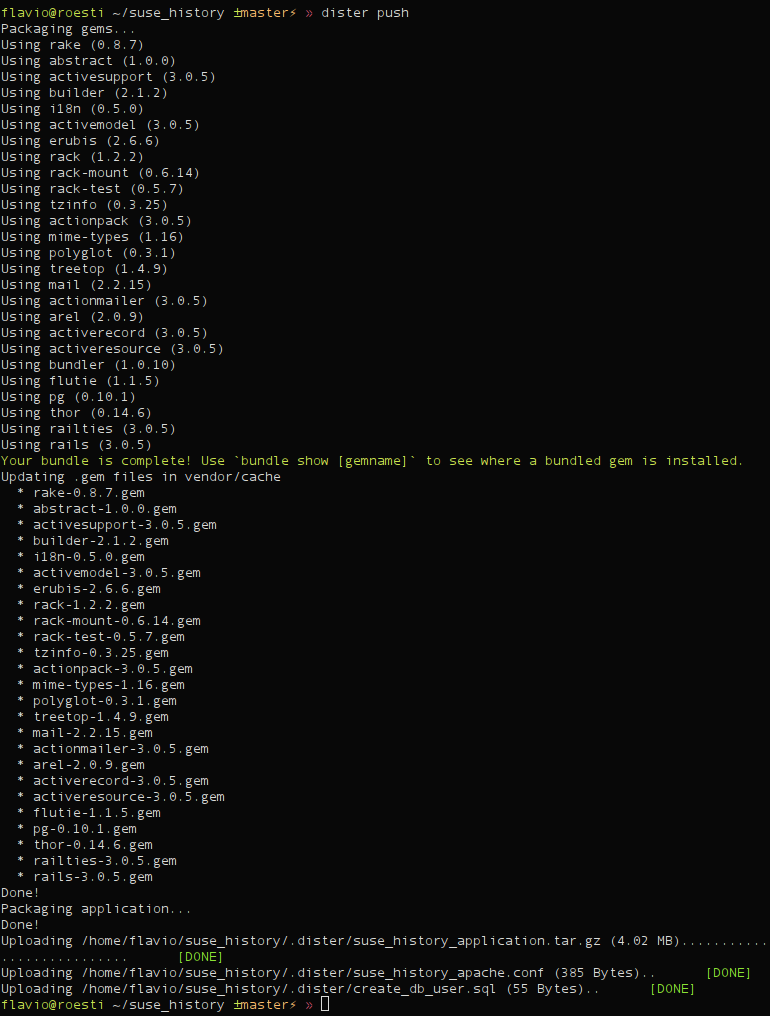
As you can see dister packaged the application source code and all its dependencies into a single archive. Then uploaded the archive to SUSE Studio as an overlay file. Dister uploaded also the configuration files required by Apache and by PostgreSQL setup.
Build your appliance
It’s build time!
dister build

The appliance has automatically being built using the raw disk. You can use different formats of course.
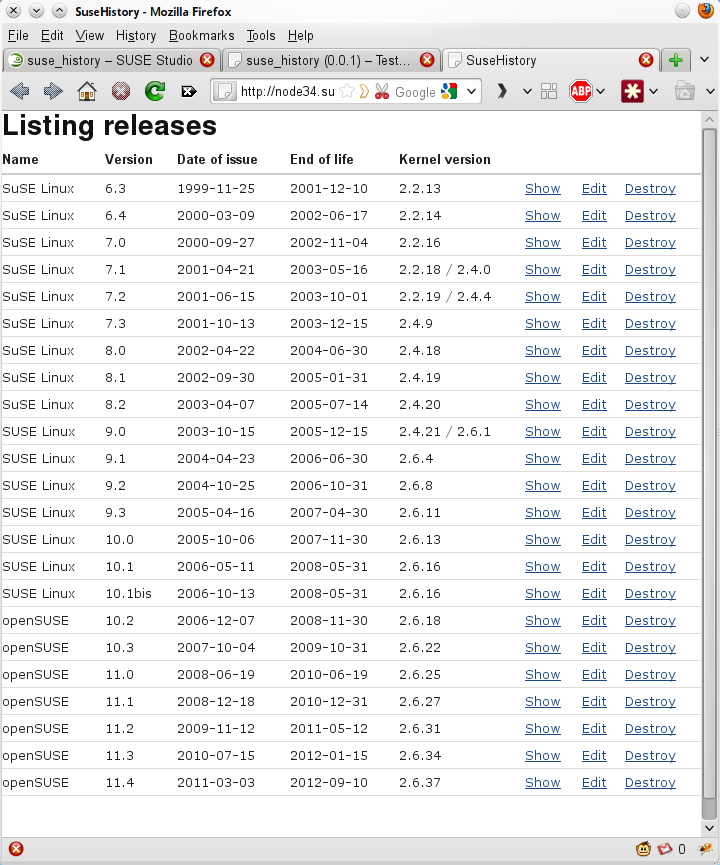
Testdrive
Testdrive is one of the coolest features of SUSE Studio. Unfortunately dister doesn’t support it yet. Just visit your appliance page and start testdrive from your browser. Just enable testdrive networking and connect to your appliance:
Download
Your appliance is working flawlessly. Download it and deploy it wherever you want.
dister download
Current status
As you can see dister handles pretty fine a simple Rails application, but there’s still room for improvements.
Here’s a small list of the things on my TODO list:
- The dependency management should install gems using rpm packages. This would make the installation of native gems easier, right now the user has to manually add all the development libraries required by the gem. Moreover it would reduce the size of the overlay files uploaded to SUSE Studio.
- SUSE Studio Testdrive should be supported.
- It should be possible to deploy the SUSE Studio directly to EC2.
- Fix bugs!
Bugs and enhancements are going to be tracked here.
Contribute
Dister code can be found here on github, fork it and start contributing.
If you are a student you can work on dister during the next Google Summer of code, apply now!

openSUSE Release versioning – Poll on last three options
The poll on SurveyMonkey on how to version the openSUSE distribution release is now closed, you can see the results here. The winner is the “old school” (like currently but only counting the right number until 3), followed by “Fedora style” (just integers) and “Ubuntu style” (2 digits year “.” 2 digits month).
The openSUSE members only poll is now live on connect.opensuse.org until April 04, 2011. Please select your favorite option!
Porting LibreOffice to x64 Windows
My goal was not to produce a complete installer just in one week, but to see how feasible an x64 LibreOffice on Windows is, and to get at least some tests to run successfully, and there I succeeded.
Porting LibreOffice to a new platform consists of
- Some trivial tasks like defining new LibreOffice internal codenames and whatnot for the platform
- The hard bit: Porting the so-called C++–UNO bridge to the platform
- A bunch of unexpected less hard stuff
The x64 Windows calling convention is luckily quite clean and simple. Compare to the AMD64 System V ABI used on Linux, with its complex rules on how to allocate registers for parameters.
Sure, thanks to the simplicity, it uses much fewer registers for parameter passing than the Linux one. There is always a maximum of four parameters passed in registers, either integer or floating point ones. One parameter always takes one register and parameters larger than 64 bits are always passed through pointers.
The exception handling mechanism used by MSVC on x64 is complex, but luckily it is roughly similar in principle to that on x86 Windows. Except of course that the structured exception handling (SEH) is table-based and not frame-based.
In addition to the trivial tasks and the C++–UNO bridge, a bunch of minor changes were needed here and there to get the code to compile. After all, 64-bit Windows is different from other 64-bit platforms in that the
long type is still 32 bits. The LibreOffice codebase is old, and consistent use of sane integral types is not one of its strong points.For instance, there is an infamous legacy type in LibreOffice's "solar" layer called
ULONG which surprisingly isn't typedeffed as unsigned long, as one might suspect from its name, but as (effectively) uintptr_t.That type is then mostly used as if it was
unsigned long anyway, for instance there were a couple of assumptions that literals like 42UL are of ULONG type. Of course, on other 64-bit platforms it doesn't matter, as both unsigned long and uintptr_t are 64 bits anyway, but this broke the compilation in a couple of places. There were a mass of warnings, obviously, as the code converts liberally back and forth between integral types, but then, there are a lot of similar warnings in a 32-bit build, too. It remains to be seen then once the actual LibreOffice application is running as 64-bit Windows code how many of those warnings actually cause run-time issues.So what did I then achieve, concretely?
- Most (maybe all even, I haven't verified exactly) of LibreOffice compiles as x64 Windows code.
- The extensive C++-UNO bridge test in "testtools" runs fine as long as one comments out the exception handling testing.
- The exception handling part of the C++–UNO bridge. I think it should be achievable with some week of additional effort. I have found good 3rd-party documentation on how it works, open source code even. It is possible to get an understandig what the existing code for 32-bit Windows is doing, and what the x64 code should do.
- Enabling also Java and the Mozilla bits in the build. I disabled them for now when building, didn't want to get stuck on those parts.
- Verifying that the monster then actually runs.
- Building an actual installer for it. Hopefully the installer-building mechanism doesn't even need to be aware that it is building an installer for 64-bit code, but there might be some details that need changing here.
As such, running a 32-bit LibreOffice on Windows "should be enough for everybody". Its hard to imagine a situation where one would need to, or want to, manipulate gigabyte-sized documents in LibreOffice. On Windows there isn't the same concern as on Linux where one wants to avoid needing to have both 32- and 64-bit libraries installed; at least so far all 64-bit Windows editions provide the full set of system libraries in both 64- and 32-bit versions. But who knows, maybe some day Intel or AMD will produce x64 CPUs that don't have 32-bit mode any more, and then there will be corresponding Windows editions that run 64-bit code only.
The code is in the master branch of the LibreOffice repositories. The completely new parts are licensed under the usual MPL 1.1 / GPLv3+ / LGPLv3+ combination.

RT: MEF vs MonoAddins
> Can you give a short summary on why you replaced MEF with Mono.Addins?
Basically it came down to maturity. Mono.Addins seems far more stable and mature than MEF. The MEF documentation was lacking, inconsistent and out of date in a lot of places. But all that could be worked around, and for the first few internal versions of our app, MEF was servicing us just fine.
Then our addins became a bit more complex. We needed to package them up with multiple files, ideally distribute them as an archive, host them online in a plugin exchange, allow them to be discovered and installed easily. Essentially this page covers features in Mono.Addins that made us switch rather than implementing a lot of the same things using MEF ourselves:
http://monoaddins.codeplex.com/wikipage?title=Creating%20and%20Managing%20Add-in%20Packages&referringTitle=Programming%20Guide
At the time as well MEF had issues on Mono on linux. This might have been a problem with how we were using it, but it just turned out easier to plonk Mono.Addins in instead. Was an easy migration and has a lot more power and features straight out of the box (and it worked on Linux).
Your millage may vary, and your needs are probably different. MEF might be an awesome tool for your requirements. It is a little simpler to get up and running and requires less engineering to support it (which was one of the reasons we used it first off).
Hope that helps,
Michael