
 lang-b1
Heads up: OBS SLES 11 PHP stuff migrates to SP2! – server:php:applications/SLE11 repository
Companies maintaining production servers often have a desire for stable, long-living Operating System and Software distributions. The idea is that once set up, things should not break and major upgrades should only be needed in long intervals and at points in time which best suit business operation. In the SUSE family of operating systems, openSUSE is the young and adventurous (fast-paced, community driven) branch while the SUSE Linux Enterprise (SLE Server and SLE Desktop) crowd is a stable, paid-for building block you can depend your mission critical data on. Enterprise platforms have a certain drawback: To maintain stability, they don’t ship the latest-greatest software packages and they try to stick to a certain set of core options and extensions.
For PHP Software, the Open Buildservice server:php:applications repository is one of the primary sources for up to date versions of software like PHPUnit, phpmyadmin, Horde Groupware or wordpress. While it is acceptable and desirable to have a stable and well-maintained (though old) version of apache or mysql, you don’t want to sit on an aged version of web applications or libraries and frameworks for developers.
Today, this repository switched to build against the new SLE11 SP2 code base. SLE11 comes with two PHP options: The php5-* packages which ship PHP 5.2 and the php53-* packages which ship PHP 5.3
Currently, some packages will not build as they require „php-{something}“ which is provided by multiple packages. We are working on resolving this.
The switch was needed because more and more packages rely on a more recent version of PEAR or PHP 5.3 features which simply cannot be provided in Service Pack 1 installations without adding extra repositories like server:php and server:php:extensions (unsupported, recent PHP 5.3 built against SLE11).
Please keep in mind that software from OBS is generally not supported by your SLE license.
Change Tracking for the iPad.
Change Tracking (also known as "tracked changes" or "red lining") is a feature which is very important for business users. For a lot of people reviewing change tracked documents is their daily business. Losing the change tracking information on the iPad make the iPad useless (or of limited use) for business users.
Therefore we decided that the Native OOXML layout engine should have change tracking support. That pretty much screwed up our schedules and release dates, but we felt that change tracking is so essential for business users that its worth doing. Six month later we are happy to announce change tracking support for text insertions, text deletions and comments. Here is what is looks like on the iPad:

You can quickly review all changes made to the document in the side bar. A simple tap on a side bar item brings you to the corresponding change and vice versa.
There is even an additional feature badly missing in Word. You can assign a color to an author by simply tapping on the colored square:

The assignment will be permanent across documents which makes it much quicker to review a document.
We will start a public beta test soon.

 Member
CSync and Mirall Development Setup
[caption id=“attachment_48” align=“alignleft” width=“92” caption=“Build it!”] [/caption] people were asking how to set up a development setup for the syncing client we are working on to sync local files to ownCloud and vice versa currently, work title mirall. While a website about it is not yet finished, I try to summarize it here. There are some hacks here and there but that’s how I do it today. It will improve over time. Note that this is about a real development setup, not for a production build.
Linux and Windows development should go in parallel as easy as possible.
Edit: Please also refer to the official build documentation.
Building CSync
To build mirall, csync must be built first. CSync is hosted in its upstream git repo and there is also my development branch which holds the latest changes.
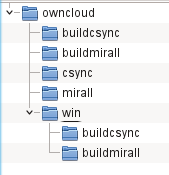 Clone the csync branch into a directory. In parallel to the cloned
 csync dir, create a new directory buildcsync as a cmake build dir. Change into buildcsync and call cmake like this:
cmake -DCMAKE_BUILD_TYPE="Debug" ../csync
and watch its output. You probably have to fulfill some dependencies, make sure to install all the needed devel packages. You will need log4c, iniparser, sqlite3 and for the modules libssh, libsmbclient and neon for the ownCloud module. Once cmake succeeds, call make to build it. So far relaxed for Linux.
To build csync for Windows, there are a couple of possibilities. The one I chose was to cross compile with mingw under openSUSE. That way I can build for all on one devel machine under my prefered system.
For that, I installed the cross compile and mingw32 packages from the openSUSE Build Service, which really demonstrates power here. I used the mingw repository. Kudos at this point to Dominik Schmidt, a Tomahawk developer, who helped me a lot to set all up and to all people who work in OBS to maintain the mingw repo.
Basically the cross compiler and libs (eg. packages mingw32-cross-gcc, mingw32-gcc-c++ and mingw32-cross-cpp) and the dependencies for the software to build have to be installed from the mingw repo. An action item is left to dig which in detail.
After installation you should have some mingw32-tools such as mingw32-cmake which should be used to build for win.
Now create a directory win and within that again buildcsync. In there, start cmake with
mingw32-cmake -DCMAKE_BUILD_TYPE="Debug" -DWITH_LOG4C=OFF ../../csync
That should do it. I did not find log4c for Win32, so I disabled it in the cmake call. Now build it with mingw32-make and see if it creates a dll in the src subdir and csync.exe in the client dir.
Building mirall
For mirall, it works similar. Mirall uses Qt and is C++, so again a lot of packages to install. Make again sure to have the mingw32-qt packages, for example mingw32-libqt4-devel and more.
However, there are two caveats with mirall:
-
the current development state of mirall needs the latest devel version of csync which we just built. I tweaked the CMakefile that way that if the mirall- and csync and build* folders are in the same directory, the csync is found by mirall cmake in the parallel dir. So I do not have to install the devel version of csync in my system.
-
to build mirall for windows, it must be made sure that cmake finds the mingw32 Qt tools like moc. Since there is also the Linux moc in the system, this can confuse. Domme pointed me to a script that sets some variables correct values to prevent mixing:
cat ../docmake.sh # %_mingw32_qt4_platform win32-g++-cross export QT_BINDIR=/usr/bin export BIN_PRE=i686-w64-mingw32 /usr/bin/mingw32-cmake \ -DCMAKE_BUILD_TYPE="Debug" \ -DQMAKESPEC=win32-g++-cross \ -DQT_MKSPECS_DIR:PATH=/usr/i686-w64-mingw32/sys-root/mingw/share/qt4/mkspecs \ -DQT_QT_INCLUDE_DIR=/usr/i686-w64-mingw32/sys-root/mingw/include \ -DQT_PLUGINS_DIR=/usr/i686-w64-mingw32/sys-root/mingw/lib/qt4/plugins \ -DQT_QMAKE_EXECUTABLE=${QT_BINDIR}/${BIN_PRE}-qmake \ -DQT_MOC_EXECUTABLE=${QT_BINDIR}/${BIN_PRE}-moc \ -DQT_RCC_EXECUTABLE=${QT_BINDIR}/${BIN_PRE}-rcc \ -DQT_UIC_EXECUTABLE=${QT_BINDIR}/${BIN_PRE}-uic \ -DQT_DBUSXML2CPP_EXECUTABLE=${QT_BINDIR}/qdbusxml2cpp \ -DQT_DBUSCPP2XML_EXECUTABLE=${QT_BINDIR}/qdbuscpp2xml ../../mirall
With that setup I can build both the Linux and Windows version quite easily. There is still a lot to be solved, such as automatted packaging and such. CMake as usual is a great help.

libvirt sanlock integration in openSUSE Factory
A few weeks back I found some time to package sanlock for openSUSE Factory, which subsequently allowed enabling the libvirt sanlock driver. And how might this be useful? When running qemu/kvm virtual machines on a pool of hosts that are not cluster-aware, it may be possible to start a virtual machine on more than one host, potentially corrupting the guest filesystem. To prevent such an unpleasant scenario, libvirt+sanlock can be used to protect the virtual machine’s disk images, ensuring we never have two qemu/kvm processes writing to an image concurrently. libvirt+sanlock provides protection against starting the same virtual machine on different hosts, or adding the same disk to different virtual machines.
In this blog post I’ll describe how to install and configure sanlock and the libvirt sanlock plugin. I’ll briefly cover lockspace and resource creation, and show some examples of specifying disk leases in libvirt, but users should become familiar with the wdmd (watchdog multiplexing daemon) and sanlock man pages, as well as the lease element specification in libvirt domainXML. I’ve used SLES11 SP2 hosts and guests for this example, but have also tested a similar configuration on openSUSE 12.1.
The sanlock and sanlock-enabled libvirt packages can be retrieved from a Factory repository or a repository from the OBS Virtualization project. (As a side note, for those that didn’t know, Virtualization is the development project for virtualization-related packages in Factory. Packages are built, tested, and staged in this project before submitting to Factory.)
After configuring the appropriate repository for the target host, update libvirt and install sanlock and libvirt-lock-sanlock.
# zypper up libvirt libvirt-client libvirt-python
# zypper in sanlock libsanlock1 libvirt-lock-sanlock
Enable watchdog daemon and sanlock daemons.
# insserv wdmd
# insserv sanlock
Specify the sanlock lock manager in /etc/libvirt/qemu.conf.
lock_manager = “sanlock”
The suggested libvirt sanlock configuration uses NFS for shared lock space storage. Mount a share at the default mount point.
# mount -t nfs nfs-server:/export/path /var/lib/libvirt/sanlock
These installation steps need to be performed on each host participating in the sanlock-protected environment.
libvirt provides two modes for configuring sanlock. The default mode requires a user or management application to manually define the sanlock lockspace and resource leases, and then describe those leases with a lease element in the virtual machine XML configuration. libvirt also supports an auto disk lease mode, where libvirt will automatically create a lockspace and lease for each fully qualified disk path in the virtual machine XML configuration. The latter mode removes the administrator burden of configuring lockspaces and leases, but only works if the administrator can ensure stable and unique disk paths across all participating hosts. I’ll describe both modes here, starting with the manual configuration.
Manual Configuration:
First we need to reserve and initialize host_id leases. Each host that wants to participate in the sanlock-enabled environment must first acquire a lease on its host_id number within the lockspace. The lockspace requirements for 2000 leases (2000 possible host_id’s) is 1MB (8MB for 4k sectors). On one host, create a 1M lockspace file in the default lease directory (/var/lib/libvirt/sanlock/).
# truncate -s 1M /var/lib/libvirt/sanlock/TEST_LS
And then initialize the lockspace for storing host_id leases.
# sanlock direct init -s TEST_LS:0:/var/lib/libvirt/sanlock/TEST_LS:0
On each participating host, start the watchdog and sanlock daemons and restart libvirtd.
# rcwdmd start; rcsanlock start; rclibvirtd restart
On each participating host, we’ll need to tell the sanlock daemon to acquire its host_id in the lockspace, which will subsequently allow resources to be acquired in the lockspace.
host1:
# sanlock client add_lockspace -s TEST_LS:1:var/lib/libvirt/sanlock/TEST_LS:0
host2:
# sanlock client add_lockspace -s TEST_LS:2:var/lib/libvirt/sanlock/TEST_LS:0
hostN:
# sanlock client add_lockspace -s TEST_LS:<hostidN>:var/lib/libvirt/sanlock/TEST_LS:0
To see the state of host_id leases read during the last renewal
# sanlock client host_status -s TEST_LS
1 timestamp 50766
2 timestamp 327323
Now that we have the hosts configured, time to move on to configuring a virtual machine resource lease and defining it in the virtual machine XML configuration. First we need to reserve and initialize a resource lease for the virtual machine disk image.
# truncate -s 1M /var/lib/libvirt/sanlock/sles11sp2-disk-resource-lock
# sanlock direct init -r TEST_LS:sles11sp2-disk-resource-lock:/var/lib/libvirt/sanlock/sles11sp2-disk-resource-lock:0
Then add the lease information to the virtual machine XML configuration
# virsh edit sles11sp2
…
<lease>
<lockspace>TEST_LS</lockspace>
<key>sles11sp2-disk-resource-lock</key>
<target path=’/var/lib/libvirt/sanlock/sles11sp2-disk-resource-lock’/>
</lease>
…
Finally, start the virtual machine!
# virsh start sles11sp2
Domain sles11sp2 started
Trying to start same virtual machine on different host will fail since the resource lock is already leased to another host
other-host:~ # virsh start sles11sp2
error: Failed to start domain sles11sp2
error: internal error Failed to acquire lock: error -243
Automatic disk lease configuration:
As can be seen even with the trivial example above, manual disk lease configuration puts quite a burden on the user, particularly in an adhoc environment with only a few hosts and no central management service to coordinate all of the lockspace and resource configuration. To ease this burden, Daniel Berrange adding support in libvirt for automatically creating sanlock disk leases. Once the environment is configured for automatic disk leases, libvirt will handle the details of creating lockspace and resource leases.
On each participating host, edit /etc/libvirt/qemu-sanlock.conf, setting auto_disk_leases to 1 and assigning a unique host_id.
auto_disk_leases = 1
host_id = 1
Then restart libvirtd
# rclibvirtd restart
Now libvirtd+sanlock is configured to automatically acquire a resource lease for each virtual machine disk. No lease configuration is required in the virtual machine XML configuration. We can simply start the virtual machine and libvirt will handle all the details for us.
host1 # virsh start sles11sp2
Domain sles11sp2 started
libvirt creates a host lease lockspace named __LIBVIRT__DISKS__. Disk resource leases are named using the MD5 checksum of the fully qualified disk path. After staring the above virtual machine, the lease directory contained
host1 # ls -l /var/lib/libvirt/sanlock/
total 2064
-rw——- 1 root root 1048576 Mar 13 01:35 3ab0d33a35403d03e3ad10b485c7b593
-rw——- 1 root root 1048576 Mar 13 01:35 __LIBVIRT__DISKS__
Finally, try to start the virtual machine on another participating host
host2 # virsh start sles11sp2
error: Failed to start domain sles11sp2
error: internal error Failed to acquire lock: error -243
Feel free to try the sanlock and sanlock-enabled libvirt packages from openSUSE Factory or our OBS Virtualization project. One thing to keep in mind is that the sanlock daemon protects resources for some process, in this case qemu/kvm. If the sanlock daemon is terminated, it can no longer protect those resources and kills the processes for which it holds leases. In other words, restarting the sanlock daemon will terminate your virtual machines! If the sanlock daemon is SIGKILL’ed, then the watchdog daemon intervenes by resetting the entire host. With this in mind, it would be wise to consider an appropriate disk cache mode such as ‘none’ or ‘writethrough’ to improve the integrity of your disk images in the event of a mass virtual machine kill off.
Google Summer of Code at LibreOffice: become famous and maybe rich!

So, just before the weekend, we received the great news that Google chose LibreOffice as a mentoring organisation for Google Summer of Code again this year. Some of you might remember that last year we had several extremely successful Google Summer of Code projects and that two of our successful students are currently employed working on free and opensource software as a direct consequence of their participation in the program. I had a priviledge to mentor Eilidh McAdam and we implemented a Visio import filter that is one of the flagship features of LibreOffice 3.5. Eilidh is now employed by Lanedo.
This year, we proposed with Valek Filippov two projects related to reverse-engineered file-formats. The first is the implementation of MS Publisher import filter for LibreOffice and the second is to help to improve and extend the Corel Draw import filter that will be part of LibreOffice 3.6 release. Both projects require working knowledge of C++ and a lot of good will. Each of the import filters consists of a standalone library and a glue that plugs the library into LibreOffice. These libraries can be built as system libraries and LibreOffice can use them from the system. The advantage of this approach for a student participating at the development is that there is only a minimum need of recompiling LibreOffice if some substantial part of the glue (that is rather small) changes. Therefore, I encourage all of you who are considering applying with LibreOffice for this year's Google Summer of Code to have a close look at those two projects. As a bonus is that if you are successful, you become famous and eventually rich.
You can have a look at libcdr, the horsepower behind the Corel Draw import filter and at the skeleton of libmspub, that will be the basis of the Publisher import filter. And don't hesitate to become rich and famous with Google Summer of Code at LibreOffice

Introducing MonoTouch.SQLite
I've been working on a personal side-project writing an app for the iPad that makes use of SQLite-Net, displaying that data in a UITableView.
Up until this past week, I had been using Miguel de Icaza's wonderful MonoTouch.Dialog library for displaying my data. Unfortunately, I wanted search filtering to be persistent, which means that I really needed to use Apple's UISearchDisplayController but I couldn't find an easy way to retrofit that onto MonoTouch.Dialog's DialogViewController to replace the simpler UISearchBar API that it currently uses. Since I had to look at creating an alternate solution, I figured I might as well solve the other potential problem I had with MonoTouch.Dialog, which is that my app really needed to be able to handle tables with a massive number of items. This brings us to...
MonoTouch.SQLite
MonoTouch.Dialog really made using UITableViews in iPhone and iPad apps trivial and I wanted to try and repeat at least some of that with MonoTouch.SQLite.
The first thing I had to do was to figure out a way of modeling the data in such a way as to allow a generic class to do most of the work for the developer. After a few sleepless nights of hacking last weekend, I figured out a fairly simple approach that seems to work pretty well. I started off thinking that I wouldn't be able to get around having to have a subclassable model, so I made most everything virtual. This is the public API that I came up with:
public class SQLiteTableModel<T> : IDisposable where T : new ()
{
    public SQLiteTableModel (SQLiteConnection sqlitedb, int pageSize, SQLiteOrderBy orderBy, string sectionExpr);

    // 2 ways of setting the search criteria
    public SQLiteWhereExpression SearchExpression { get; set; }
    public string SearchText { get; set; }

    // Gets the total number of table rows
    public int Count { get; }

    // Gets the number of table sections
    public int SectionCount { get; }

    // Gets the section titles
    public string[] SectionTitles { get; }

    // Gets the row count for a particular section
    public int GetRowCount (int section);

    // Get the index of an item
    public int IndexOf (T item, IComparer<t> comparer);

    // Convert item index into a section and row
    public bool IndexToSectionAndRow (int index, out int section, out int row);

    // Convert section and row into an item index
    public int SectionAndRowToIndex (int section, int row);

    // 2 ways of getting an item
    public T GetItem (int section, int row);
    public T GetItem (int index);

    // Reset the state of the model
    public void ReloadData ();
}
You can see the full class implementation here.
It turns out, though, that it really isn't necessary to subclass my model unless you want to have finer control over the specific SQL query commands that it makes (all of those methods are virtual).
SQLiteTableViewController<T>
As I started porting my iPad app to use my SQLiteTableModel class, I started to realize that I could abstract a lot of my usage of the model into a reusable base class. What I came up with will blow your mind.
Are you ready?
In order to populate a UITableView with the contents of an SQLite table, all you have to do is subclass SQLiteTableViewController<T> and implement 1 method:
protected UITableViewCell GetCell (UITableView tableView, NSIndexPath path, T item)
That's it.
I've written up a sample iPhone app that illustrates just how easy this is.
But wait! There's more!
If you order in the next 30 minutes, you can also get this free complimentary Sham-Wow!
Okay, just kidding about that Sham-Wow! bit, but I wasn't kidding about there being more:
Remember when I said one of the problems I wanted to solve was persistent search filtering? Yea, well, I did it. SQLiteTableViewController handles all of that for you as well. In fact, give searching a try in that sample above.
At this point I bet you're thinking, "wow, how could this get any better?"
I'll tell you. Remember how SQLiteTableModel had 2 methods for setting the search criteria? Well, the one that takes a string parses it to create a SQLiteWhereExpression allowing the user to match against specific fields. For example, if you had the following data item:
public class Contact {
    public string FirstName;
    public string LastName;
    public string PhoneNumber;
    public string Address;
    public string Comments;
}
...the user could type:
address:"Newton, MA"
and SQLiteTableModel would construct a query to match "Newton, MA" against only the Address field.
If the user, instead, types:
address:"Newton, MA" firstname:Jane
then the matches that would display in the list would be limited to contacts with a first name of "Jane" who live also in "Newton, MA".
I've also taken the liberty of implementing a SQLiteSearchAliasAttribute that allows you to specify aliases for your fields (or even the same alias to multiple fields!). For example, you could do this:
public class Contact {
    [SQLiteSearchAlias ("first")][SQLiteSearchAlias ("name")]
    public string FirstName;
    [SQLiteSearchAlias ("last")][SQLiteSearchAlias ("name")]
    public string LastName;
    [SQLiteSearchAlias ("phone")]
    public string PhoneNumber;
    public string Address;
    public string Comments;
}
This would allow your users to use "name" to match against either FirstName or LastName!
It also means they can type "first" instead of "firstname" to match against only the first name, as in the above example.Where Can I Find This Awesome Library?
Glad you asked! You can find it on my GitHub page: MonoTouch.SQLite.
Well? What are you waiting for? Get hacking!
On the road...
Busy times currently as we’re heading to releases of ownCloud. The syncing client I am working on plays a role for that and thus I was doing a lot of work on csync upstream and mirall to get that going. Meanwhile I succeeded to get mirall running under Win32, it was quite an experience for me digging through the mud of various compilers and environments and the different understandings of C standards, especially since csync is plain C and never run on Win32 before.
Last week I have been on CeBIT for a day, which is a huge and busy event. We had a nice preview running there with syncing between the web client and the desktop clients on Windows and Linux, as well as on an Android device. That already worked quite ok, nevertheless I got quite some bug reports since then. And I still have to work with csync upstream to get patches in there before we’re ready for a public beta.
This weekend I will be at the Chemnitzer Linuxtage together with friends from the openSUSE project. I will show some ownCloud syncing there as well, so if you like show up at the openSUSE booth for a demo and a chat :-)
php5.3 packages in SLES 11 SP2
SLES 11 SP2 ships php5.3 binaries but the default package php5 still installs php5.2 which already has reached upstream end of life and should be considered unsupported by any means. Recent versions of phpunit and other developer tools won’t provide all features on php5.2 any more.
You must use apache2-mod_php53, php53, php53-mysql and so on if you want to use php on SLES.
ESR and Thunderbird under KDE
A quick update about recent changes in Mozilla applications for openSUSE.
With the release of Firefox and Thunderbird 11 (and Seamonkey 2.8) the older versions (10) got obsolete as always. But Mozilla created ESR (Extended Support Release) for Firefox and Thunderbird based on versions 10 and will maintain them for a longer time. Please read the FAQ about the details. For openSUSE we will not switch to these versions for different reasons but I’ll provide these from the buildservice repository mozilla. You should be able to install the current versions (10.0.3) of Firefox and Thunderbird by choosing firefox-esr or thunderbird-esr (there is also xulrunner-esr) in your package manager if you added that repository before. Please note that this is opt-in only and it’s not possible to install latest normal version and ESR versions in parallel. They are using the same profile directory and therefore I didn’t give them a separate installation directory neither. It’s also a bit risky to jump between ESR and normal versions because of the profile. So as normal version gets higher every six weeks the riskier to jump back and forth. Basically those ESR versions should probably be used only if really necessary but I still wanted to provide that possibility. If you install the ESR versions and found issues please let me know. Because of the renaming and parallel usage of the branding packages I might have missed some packaging foo to make updates in every case smooth.
A similar topic is about Firefox 3.6 and Thunderbird 3.1. The latest round of updates (3.6.28 / 3.1.20) was most likely the last one and people should start switching to more recent versions. That also means that 11.4 will get Thunderbird 12 as replacement for 3.1.20 with the next round. Other versions are already on the latest packages. (Evergreen will likely switch to the ESR versions btw.)
And about the last announcement (from my “quick update”) people might notice that Thunderbird 11 now got at least some of the KDE integration from Firefox as people kept pinging me about it. (And Firefox’ KDE integration is also back for the official updates!)
subversion with libserf – continued
Further about my work on packages for Apache Subversion with support for serf / libserf / ra_serf, that repository access module was not made default in the 1.7 release after all. Anyway, version 1.0.13 of serf is now available in devel:libraries:c_c++ with the intention of getting this into and in Factory. You will find current Apache Subversion packages with fixed conditional compilation against serf in home:AndreasStieger:serf home:AndreasStieger:branches:devel:tools:scm:svn devel:tools:scm:svn for testing.
Updated 27/05/2012: repository locations
And again after SR#122507 was accepted.