
 miso
misoAutoYaST, network device names
I did 4 tests:
1 - When installation starts, udev will create configuration file for persistent naming (based on MAC address). At the end of 1st stage (before first reboot) YaST will copy this file into installed system, so after reboot all network devices will have same device names.
2 - Same as 1, but during AutoYaST installation. That means when no rule in AutoYaST profile about this file, keep it, not replace by empty file.
3 - Use AutoYaST profile. When there is defined some rule about this file, use it and replace the original one. This example from networking section creates corresponded udev rule to keep eth0 name for interface with 08:00:27:07:a2:2d MAC address (and replaces udev rule file from 1):
part of AY.xml
<networking>
...
 <net-udev type=list>
  <rule>
   <rule>ATTR{address}</rule>
   <value>08:00:27:07:a2:2d</value>
   <name>eth0</name>
  </rule>
 </net-udev>
...
</networking>
/etc/udev/rules.d/70-persistent-net.rules file as a result:
# Generated by autoyast
# program run by the persistent-net-generator.rules rules file.
#
# You can modify it, as long as you keep each rule on a single line.
SUBSYSTEM=="net", ACTION=="add", DRIVERS=="?*", ATTR{address}=="08:00:27:07:a2:2d", NAME="eth0"
4 - Migration from SLES10-style syntax. When you use your old profile (from <=SLES10x), it's something like:
<networking>
...
 <interfaces config:type=list>
   <interface>
     <bootproto>dhcp</bootproto>
     <device>eth-id-08:00:27:07:a2:2d</device>
     <name>79c970 [PCnet32 LANCE]</name>
     <startmode>auto</startmode>
     <usercontrol>no</usercontrol>
   </interface>
 </interfaces>
...
</networking>
YaST will convert device name eth-id-08:00:27:07:a2:2d into rule for udev:
# Generated by autoyast
# program run by the persistent-net-generator.rules rules file.
#
# You can modify it, as long as you keep each rule on a single line.
SUBSYSTEM=="net", ACTION=="add", DRIVERS=="?*", ATTR{address}=="08:00:27:07:a2:2d", NAME="eth0"
and rename configuration name into eth0
And that's all for now ...
... have a lot of fun
Bye,
Michal
 Member
Trick of the Day: Reboot as User
$ reboot
-bash: reboot: command not found
$ /sbin/reboot
reboot: must be superuser.
In KDE / GNOME, you can just click reboot in the menu and your session sends a message to display manager, which runs as root and does the dirty job of rebooting or shutting down your machine. Unfortunately, things are not that easy if you are using a simpler window manager or want to shutdown from a script. Sure, there is sudo, but that has to be configured first to work without password. Luckily, after a couple of hours of googling (only to find helpful advice as “this can be done easily with ConsoleKit or hal”), reading documentation of dbus, {Console,Policy}Kit and hal and clicking in qdbusviewer, I finally found a way with hal+dbus:
$ dbus-send --system --dest=org.freedesktop.Hal \
  --type=method_call --print-reply \
  /org/freedesktop/Hal/devices/computer \
  org.freedesktop.Hal.Device.SystemPowerManagement.Reboot
To shutdown, just replace Reboot with Shutdown. I’m going to add this to the default icewm configuration, so that the logout menu finally works.

Can dreams became true?
During the last years of university I spent some time wondering about my future job. After the degree I received lot of offers (fortunately also good ones), but none of them matched with my “dream job” . There was always something missing/different. I was just trying to convince myself that the “perfect job” can exist only in our dreams when my feed reader pointed me here.
After reading these lines:
” We are exploring new technologies, creating prototypes of future systems, and trying to find and shape some of the features that will be part of upcoming SUSE products and the ecosystem around that. It’s a fascinating job, challenging, fun, and always exciting. For somebody like me who loves to create new things and enjoys working with an awesome team of innovative people this is a dream job.”
I realized the description matched with all my wishes!
I immediately applied for the position and now, after more than a month, I’m looking at a signed proposal.
I’ve waited a long time before spreading my joy to the rest of the world… but now I just want to say that starting from 1st August I’ll be part of Suse’s Incubation team! :D
I’m really happy, excited and honoured for this awesome opportunity.
I wish you’ll be able to realize your dreams too!
Just a funny note… While Cornelius was writing about the job offer on his
blog, I was having a dinner with another Novell employee:
Massimiliano Mantione. I was
listening to his personal story, wishing to find a dream job like his one.
I have to admit I was a bit jealous :)
openSUSE Gets the JeOS
openSUSE is great for the desktop, great for the server, and now it’s ready to take on appliances — and we don’t mean toasters and blenders. No, we’re talking about software appliances — virtual machine images that come pre-configured with the application you want to use, without any of the hassle normally associated with installing an application.
If you’re interested in building a virtual appliance, or have another use for a minimal operating system, read on to learn about openSUSE LimeJeOS.
What is LimeJeOS?
LimeJeOS is the openSUSE version of JeOS. The term JeOS (“Just enough Operating System”) refers to a customized operating system that precisely fits the needs of a particular application. LimeJeOS includes only the pieces of an operating system required to support a particular application and any other third-party components contained in the appliance. This makes the appliance smaller, more efficient, more secure, and offers better performance than an application running under a full, general-purpose operating system.
As the name suggests, “LimeJeOS” itself is not an appliance or an operating system; it is just the base for various possible appliances. LimeJeOS contains just the very basic parts of an operating system. The major goal is to make the system as small as possible while providing the possibility to install additional software. A LimeJeOS system itself is not very useful without additional packages. Besides an editor (a stripped version of vi) it just contains a package manager that allows the actual applications to be installed. Of course all the usual repositories can be used for that purpose; just with a regular, full-size Linux distribution.
What is the difference between SLE JeOS and LimeJeOS?
SUSE Linux Enterprise JeOS relates to LimeJeOS just like openSUSE relates to SLES. In fact, SLE JeOS is built from the latest version of SLES while LimeJeOS is built from the latest version of openSUSE. While LimeJeOS provides the latest state of the openSUSE distribution, SLE JeOS will offer all the services and support that is also available for SLES.
Which one should you use? If you’re working on a virtual appliance for a project that won’t require commercial support, and you want to track the latest in open source, openSUSE is the version for you.
If you’re working on a project that’s likely to need support, then you probably want to go with SUSE Linux Enterprise JeOS.
Where can I get LimeJeOS?
LimeJeOS is built using kiwi. The configuration files are managed via Subversion and are available at: https://forgesvn1.novell.com/svn/opensuse/trunk/distribution/images/LimeJeOS/
In the future we plan to create a regular package (RPM) and add it to the openSUSE build service, so that the latest version is always created automatically with the latest software versions in openSuSE.
How to build LimeJeOS?
Check out the current version of LimeJeOS using the following commands:
svn co https://forgesvn1.novell.com/svn/opensuse/trunk/distribution/images/LimeJeOS
Make sure you have the needed kiwi packages installed. You will need at least: kiwi, kiwi-tools and kiwi-desc-vmxboot and/or kiwi-desc-xenboot from http://download.opensuse.org/repositories/openSUSE:/Tools/. When those conditions are met, building the openJeOS images is accomplished by just running the “./build.sh” script from the LimeJeOS repository.
./build.sh
Please note that the build process will need at least twice as much diskspace as the final images, so you’ll need around 2 GB of free disk space at this time to build Lime JeOS.
After you have booted the virtual system, log in as user “root” with password “linux”.
YaST module the C++ way
From May 30th to July 4th we had a YaST workshop in Nuremberg. The workshop was basically a hackshop as we wanted to work on cool and new things for YaST during this week.
There is one big change in YaST in openSUSE 11.0 – yea, we found out that there are even more colors than gray, ok – but there is one that is not really visible to the end-user. Stefan Hundhammer, maintainer our YaST UI, completely separated the UI from the rest of the YaST infrastructure. This now makes it possible to use the UI directly, from anywhere, independent from our YaST-own-language YCP. So with a team of four hackers we wanted to prove that we can write a YaST module in plain C++ using the new modularized UI directly. And here is the outcome:
We went for rewriting the registration module (well, we chose it because I know it well, as I am the maintainer, and it will change anyhow for the next release). This module is not that integrated in the overall YCP world, so it should be feasible. First we had to find an alternative way to access system configuration files, as this is done by so-called SCR agents in YCP. To make life easier (and future development faster) we had to look for a replacement of our YCP Wizard Seqencer. And of course we redesigned all dialogs to make them more intuitive.
We solved all the issues and now have
- a wrapper class for accessing different configuration files (currently only ini files)
- an automatic wizard sequencer equivalent (using the advantages of an object oriented language, btw YCP is not)
- three clear and intuitive dialogs, every user should understand
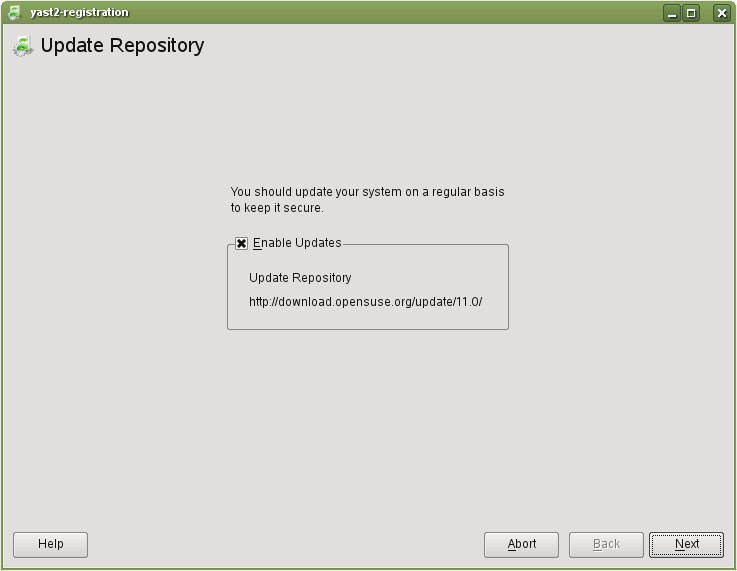
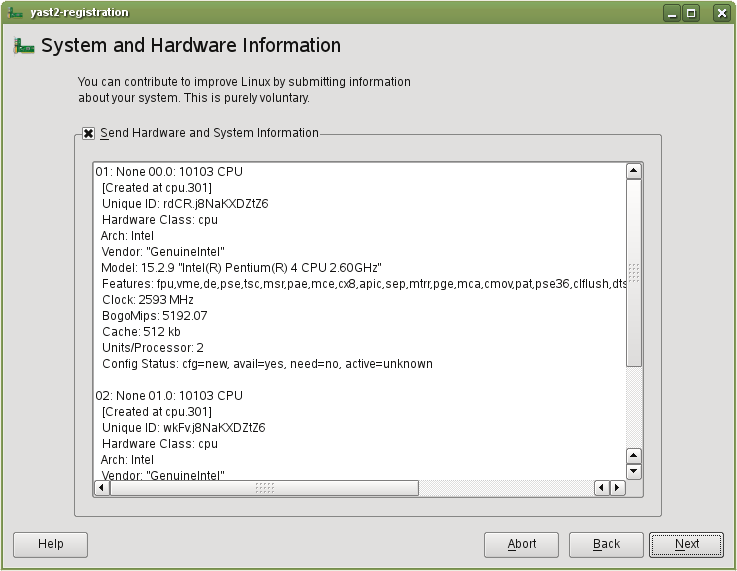
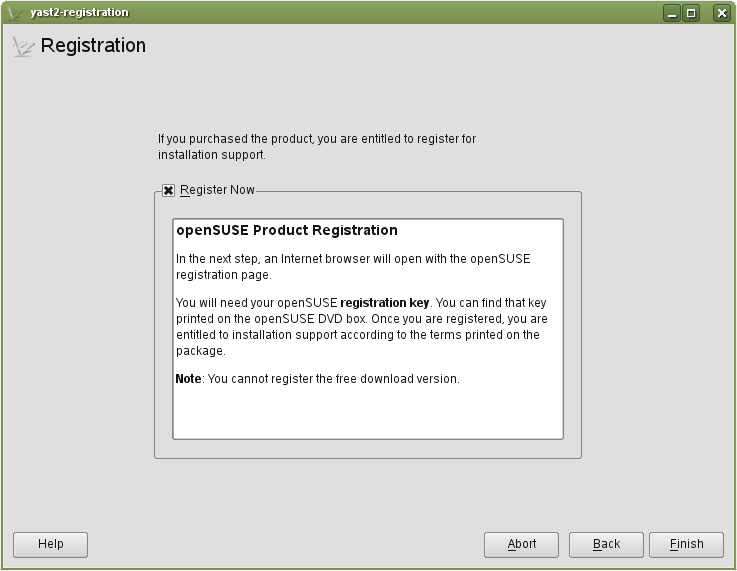
And as everybody wants to see screenshots, here they are:
The code is just a proof of concept and not yet reusable for new YaST modules but everything we wanted to show works great. We will continue to work on such kind of modules and in that process move the generic parts out into single libraries so that they can be reused and even may be exposed to scripting languages.
Writing YaST module this way has lots of advantages
- YaST modules evolved into the object oriented world and can make use of it (the automatic sequencer is the first benefit)
- the code is reusable
- a huge bunch of documentation and lots of tools exist for C++
- its a compiled language and has a better performance than an interpreted one
- we can bind automatically to the most important scripting languages and give them access to the modules logic
If you are interested in the source code, have a look at my svn repo and if you want to help join the team and contact us on our mailinglist.

GNOME Docker 0.1 Released
GNOME Docker 0.1 Released
Finally I managed to release gnome-docker 0.1, a small application to support users using a docking station. It is already included in openSUSE 11.0, but other pending things prevented me to do a public release earlier. One of these things is the self designed tray icon :-). I definitely have to look for a better alternative. The README should have all the necessary information:
GNOME docker 0.1
GNOME application for notifying laptop users about the state of their dock station and the possibility to undock the system via software, either from the tray icon, or via a hotkey. In future, it will also care about hotpluggable devices placed on the dock station, such as hard drives and DVD/CD drives.
It is meant to be well designed and to fit into the GNOME desktop. So an important aim for gnome-docker is to be shipped with GNOME upstream. It is still in early development.
Currently, it has the following features:
- tray icon showing the current status and with functionality to undock a laptop
- handling of hotkeys to undock a laptop (e.g. FN-F9 on ThinkPads)
- xrandr support to enable/disable external outputs attached to the dock station (experimental, evaluating how it fits there)
- user notifications about the state of the dock station. E.g.: "Now it's safe to remove the laptop"

As gnome-docker forges ahead, the linux kernel has to improve and has to provide sensible date for userspace to make use of, like exporting which devices are inside a dock station.
Requirements
- liblazy >= 0.2 from http://www.freedesktop.org/wiki/Software/liblazy
Download
Atheros AR 5007 EG on openSUSE 11.0
openSUSE 11.0 failed detect this hardware and wrong identifying the device as AR242x 802.11abg Wireless PCI Express Adapter. I usually uses madwifi driver for Atheros chipset instead of ath5k but the standard madwifi driver could not be applied for the device. After Googling for a while, I could make it works with the special AR 5007 EG madwifi driver, http://snapshots.madwifi.org/special/madwifi-ng-r2756+ar5007.tar.gz.
How to make it works ?
- Disable or blacklist ath5k driver by add the blacklist ath5k to /etc/modprobe.d/blacklist
- Open konsole or terminal
- Install the driver
su

zypper in kernel-source make gcc gcc-c++

wget -c http://snapshots.madwifi.org/special/madwifi-ng-r2756+ar5007.tar.gz

tar -zxvf madwifi-ng-r2756+ar5007.tar.gz

cd madwifi-ng-r2756+ar5007

make

make install

modprobe ath_pci

reboot
After reboot, you should be configure the wifi from YAST | Network Devices | Network Settings
Instalando o driver de video manualmente - NVidia
My name is Dave