
 Member
 baltolkien
Prime Render Switch and Status – Plasmoides de KDE (158)
Hoy os presento el widget 158 de la serie de plasmoides para Plasma con una de estos iconos informativos (aunque puede ponerse directamente sobre el fondo de pantalla como todos) y que puede venir bien en ciertas ocasiones. Se trata de Prime Render Switch and Status con el que podremos controlar las tarjetas gráficas de nuestro sistema con un simple click.
Prime Render Switch and Status – Plasmoides de KDE (158)
De la mano de Jfespianal nos llega un plasmoide perfecto para aquellas máquinas que disponen de dos tarjetas gráficas.
Se trata de un sencillo widget llamado Prime Render Switch and Status (lo cierto es que podrían buscarle un nombre más corto) que muestra el estado de tu tarjeta gráfica de vídeo mediante el comando «prime-select» y te permite cambiar entre tu tarjeta Nvidia y tu tarjeta de vídeo intel.
Por otra parte, nos da la opción de ver qué versión de los controladores de Nvidia tenemos instalado y un atajo rápido de teclado para abrir los ajustes de nvidia.

Para que este widget funcione a la perfección, necesitas tener instalados «zenity» y «libnotify-tools» (esto es necesario si quieres poder cambiar de tarjeta de vídeo) y necesitas tener los drivers de Nvidia instalados y el interruptor «prime-select nvidia» y «prime-select intel» funcionando correctamente.
Además Prime Render Switch and Status tiene dos características destacables:
- Puede personalizar los nombres y modelos de las tarjetas de vídeo en la configuración
- Se integra a la perfección tanto en temas oscuros y claros.

Y como siempre digo, si os gusta el plasmoide podéis “pagarlo” de muchas formas en la nueva página de KDE Store, que estoy seguro que el desarrollador lo agradecerá: puntúale positivamente, hazle un comentario en la página o realiza una donación. Ayudar al desarrollo del Software Libre también se hace simplemente dando las gracias, ayuda mucho más de lo que os podéis imaginar, recordad la campaña I love Free Software Day 2017 de la Free Software Foundation donde se nos recordaba esta forma tan sencilla de colaborar con el gran proyecto del Software Libre y que en el blog dedicamos un artículo.
Más información: KDE Store
¿Qué son los plasmoides?
Para los no iniciados en el blog, quizás la palabra plasmoide le suene un poco rara pero no es mas que el nombre que reciben los widgets para el escritorio Plasma de KDE.
En otras palabras, los plasmoides no son más que pequeñas aplicaciones que puestas sobre el escritorio o sobre una de las barras de tareas del mismo aumentan las funcionalidades del mismo o simplemente lo decoran.

Kurz práce s molekulárními daty v R 2021
R je v současnosti asi nejmocnější a nejpoužívanější nástroj na výpočty všeho druhu. Je k dispozici i celá řada modulů pro práci s molekulárními daty. Ty budou náplní kurzu.
Kurz obsahuje teorii použitých metod, tutoriály s použitím testovacích dat, úlohy pro samostatnou práci účastníků, a další.
Předchozí znalost R je výhodou, nikoli však podmínkou. Nutná je alespoň minimální znalost molekulární biologie a vhodná je předchozí znalost alespoň některých metod analýz DNA dat.
Kurz práce v příkazové řádce Linuxu nejen pro MetaCentrum 2021
Don’t be afraid of command line! It is friendly and powerful tool allowing to process large data and automate tasks. Practically identical is command line also in Apple macOS, BSD and another UNIX-based systems, not only in Linux. The course is designed for total beginners as well as intermediate advanced students. The only requirement is an interest (or need) to work in command line, typically on Linux computing server.
Course will be taught in Linux, but most of the point are applicable also for another UNIX systems like macOS.
GNU/Linux Social con Eugenia Bahit en GNU/Linux València
La gente de GNU/Linux València está en racha este otoño. De esta forma os invito a asistir a una charla virtual titulada «GNU/Linuz Social» a cargo de Eugenia Bahit retransmitida en directo desde Austici.
GNU/Linux Social con Eugenia Bahit en GNU/Linux València
De nuevo me complace compartir con vosotros los eventos de un grupo de personas que en Valencia está impulsado el Software Libre gracias a sus reuniones.
Se trata un nuevo encuentro organizado del grupo de GNU/Linux Valencia que el próximo 8 de octubre de 2020 realizarán de forma online y que tiene por temática: GNU/Linux Social.
De esta forma, José Picon hablará sobre este disperso tema con una invitada del otro lado del charco llamada Eugenia Bahit, informática Teórica especializada en Lógica, Teoría de Conjuntos, Teoría de Objetos, y Seguridad Informática. Además, es Especialista en Neuropsicología enfocada en Necesidades Específicas de Aprendizaje en adultos (principalmente, problemas de atención y altas capacidades intelectuales).
Trabaja como Investigadora Autónoma, y profesora de programación y como Jefa de Edición para Hackers & Developers Press.
Aprovecho para recordar que desde hace unos meses, los chicos de GNU/Linux Valencia ya tienen su menú propio en el blog, con lo que seguir sus eventos en esta humilde bitácora será más fácil que nunca, y así podréis comprobar su alto nivel de actividades que realizan que destacan por su variedad.
Y que además, GNU/Linux Valencia ha crecido y se ha ¡¡¡convertido en asociación!!!
Resumiendo, la información básica es:
- Fecha: jueves, 8 de octubre de 2020
- Horario: 18:00 hasta las 19:30
- Lugar: https://live.autistici.org/#gnulinuxvalenciasocial
- ¿Registro necesario?: No
Si podéis asistir no os lo perdáis, seguro que no quedáis decepcionados.
Más información: GNU/Linux València

[COVID-19] On peaufine notre trousse à outils pour mieux vous servir


Get cool merchandise for upcoming openSUSE + LibreOffice Conference
The joint openSUSE + LibreOffice Conference 2020 will take place from October 15 – 17. And there’s lots going on! We’ll have talks, presentations, keynotes, tutorials and much more – see the full schedule for all the details.
And there’s more: we’ve got merchandise too! Get prepared for the conference with a T-shirt, hoodie, bag or baseball cap, and help to support The Document Foundation, the non-profit entity behind LibreOffice.
We look forward to seeing you at the conference!

Build multi-architecture container images using argo workflow
Note well: this blog post is part of a series, checkout the previous episode about running containerized buildah on top of Kubernetes.
Quick recap
I have a small Kubernetes cluster running at home that is made of ARM64 and x86_64 nodes. I want to build multi-architecture images so that I can run them everywhere on the cluster, regardless of the node architecture. My plan is to leverage the same cluster to build these container images. That leads to a “Inception-style” scenario: building container images from within a container itself.
To achieve that I decided to rely on buildah to build the container images. I’ve shown how run buildah in a containerized fashion without using a privileged container and with a tailor-made AppArmor profile to secure it.
The previous blog post also showed the definition of Kubernetes PODs that would build the actual images.
Today’s goals
What I’m going to show today is how to automate the whole building process.
Given the references to the Git repository that provides a container image definition, I want to automate these steps:
- Build the container image on a ARM64 node, push the image to a container registry.
- Build the container image on a x86_64 node, push the image to a container registry.
- Create a multi-architecture container image manifest, push it to a container registry.
Steps #1 and #2 can be done in parallel, while step #3 needs to wait for the previous ones to complete.
This kind of automation can be done using some pipeline solution.
Kubernetes native pipeline solutions
There are many Continuous Integration and Continuous Delivery solutions that are available for Kubernetes. If you love to seek enlightenment by staring in front of beautiful logos, checkout this portion of the CNCF landscape dedicated to CI and CD solutions. 🤯
After some research I came up with two potential candidates: Argo and Tekton.
Both are valid projects with active communities. However I decided to settle on Argo. The main reason that led to this decision was the lack of ARM64 support from Tekton.
Interestingly enough, both Tekton and kaniko (which I discussed in the previous blog post of this series) use the same mechanism to build themselves, a mechanism that can produce only x86_64 container images and is not so easy to extend.
Argo is an umbrella of different projects, each one of them tackling specific problems like:
The projects above are just the mature ones, many others can be found under the Argo project labs GitHub organization. These projects are not yet considered production ready, but are super interesting.
My favourite ones are:
The majority of these projects don’t have ARM64 container images yet, but work is being done and this work is significantly simpler compared to the one of porting Tekton. Most important of all: the core projects I need have already been ported.
Creating pipelines using Argo Workflow
A pipeline can be created inside Argo by defining a Workflow resource.
Copying from the core concepts documentation page of Argo Workflow, these are the elements I’m going to use:
-
Workflow: a Kubernetes resource defining the execution of one or more
template. -
Template: a
step,stepsordag. - Step: a single step of a workflow, typically runs a container based on inputs and capture the outputs.
- Steps: a list of steps.
- Directed Acyclic Graph (DAG): a set of steps (nodes) and the dependencies (edges) between them.
Spoiler alert, I’m going to create multiple Argo Templates, each one of them focusing on one specific part of the problem. Then I’ll use a DAG to explicit the dependencies between all these Templates. Finally, I’ll define an Argo Workflow to “wrap” all these objects.
I could show you the final result right away, but you would probably be overwhelmed by it. I’ll instead go step-by-step as I did. I’ll start with a small subset of the problem and then I’ll keep building on top of it.
Porting our build POD to an Argo Workflow
By the end of the previous blog post, I was able to build a container image by using the following Kubernetes POD definition:
apiVersion: v1
kind: Pod
metadata:
  name: builder
  annotations:
    container.apparmor.security.beta.kubernetes.io/main: localhost/containerized_buildah
spec:
  nodeSelector:
    kubernetes.io/arch: "amd64"
  containers:
  - name: main
    image: registry.opensuse.org/home/flavio_castelli/containers/containers/buildahimage:latest
    command: ["/bin/sh"]
    args: ["-c", "cd code; cd $(readlink checkout); buildah bud -t guestbook ."]
    volumeMounts:
      - name: code
        mountPath: /code
    resources:
      limits:
        github.com/fuse: 1
  initContainers:
  - name: git-sync
    image: k8s.gcr.io/git-sync/git-sync:v3.1.7
    args: [
      "--one-time",
      "--depth", "1",
      "--dest", "checkout",
      "--repo", "https://github.com/flavio/guestbook-go.git",
      "--branch", "master"]
    volumeMounts:
      - name: code
        mountPath: /tmp/git
  volumes:
  - name: code
    emptyDir:
      medium: Memory
These are the key points of this POD:
- It uses an Init Container to retrieve the source code of the container image from a Git repository.
- A Kubernetes Volume is used to share the source code of the container image to be built between the Init Container and the main one.
- The Git repository details, the image name and other references are all hard-coded.
- The POD just builds the container image, there’s no push action at the end of it.
- The POD is forcefully scheduled on a x86_64 node; hence this will produce only x86_64 container images.
- The POD requires a Fuse resource, this is required to allow buildah to use the performant overlay graph driver.
- The POD uses a specific AppArmor profile, not the default one provided by the container engine.
Starting from something like Argo’s “Hello world Workflow”, we can transpose the POD defined above to something like that:
apiVersion: argoproj.io/v1alpha1
kind: Workflow
metadata:
  generateName: simple-build-
spec:
  entrypoint: buildah
  templates:
  - name: buildah
    metadata:
      annotations:
        container.apparmor.security.beta.kubernetes.io/main: localhost/containerized_buildah
    nodeSelector:
      kubernetes.io/arch: "amd64"
    container:
      image: registry.opensuse.org/home/flavio_castelli/containers/containers/buildahimage:latest
      command: ["/bin/sh"]
      args: ["-c", "cd code; cd $(readlink checkout); buildah bud -t guestbook ."]
      volumeMounts:
        - name: code
          mountPath: /code
      resources:
        limits:
          github.com/fuse: 1
    initContainers:
    - name: git-sync
      image: k8s.gcr.io/git-sync/git-sync:v3.1.7
      args: [
        "--one-time",
        "--depth", "1",
        "--dest", "checkout",
        "--repo", "https://github.com/flavio/guestbook-go.git",
        "--branch", "master"]
      volumeMounts:
        - name: code
          mountPath: /tmp/git
    volumes:
    - name: code
      emptyDir:
        medium: Memory
As you can see the POD definition has been transformed into a Template
object. The contents of the POD spec section have been basically copied and pasted under the Template.
The POD annotations have been moved straight under the template.metadata section.
I have to admit this was pretty confusing to me in the beginning, but everything became clear once I started to look at the field documentation of the Argo resources.
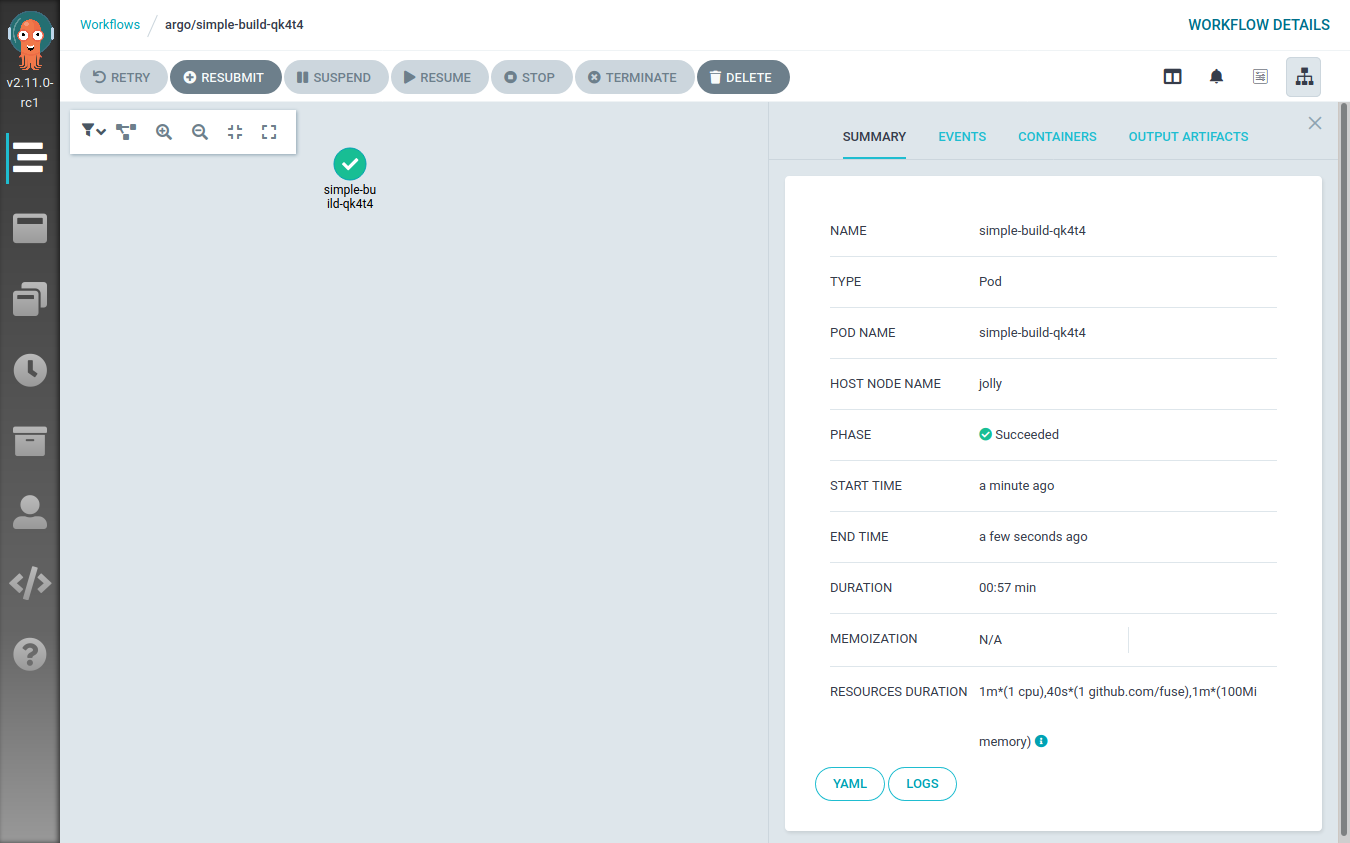
The workflow can be submitted using the argo cli tool:
$ argo submit workflow-simple-build.yaml
Name:                simple-build-qk4t4
Namespace:           argo
ServiceAccount:      default
Status:              Pending
Created:             Wed Sep 30 15:45:20 +0200 (now)
This will be visible also from the Argo Workflow UI:
Refactoring the Argo Workflow
The previous Workflow definition can be cleaned up a bit, leading to the following YAML file:
apiVersion: argoproj.io/v1alpha1
kind: Workflow
metadata:
  generateName: simple-build-
spec:
  entrypoint: buildah
  templates:
  - name: buildah
    inputs:
      parameters:
      - name: arch
      - name: repository
      - name: branch
      - name: image_name
      - name: image_tag
    metadata:
      annotations:
        container.apparmor.security.beta.kubernetes.io/main: localhost/containerized_buildah
    nodeSelector:
      kubernetes.io/arch: "amd64"
    script:
      image: registry.opensuse.org/home/flavio_castelli/containers/containers/buildahimage:latest
      command: [bash]
      source: |
        set -xe
        cd /code/
        # needed to workaround protected_symlink - we can't just cd into /code/checkout
        cd $(readlink checkout)
        buildah bud -t {{inputs.parameters.image_name}}:{{inputs.parameters.image_tag}}-{{inputs.parameters.arch}} .
        buildah push --cert-dir /certs {{inputs.parameters.image_name}}:{{inputs.parameters.image_tag}}-{{inputs.parameters.arch}}
        echo Image built and pushed to remote registry
      volumeMounts:
        - name: code
          mountPath: /code
        - name: certs
          mountPath: /certs
          readOnly: true
      resources:
        limits:
          github.com/fuse: 1
    initContainers:
    - name: git-sync
      image: k8s.gcr.io/git-sync/git-sync:v3.1.7
      args: [
        "--one-time",
        "--depth", "1",
        "--dest", "checkout",
        "--repo", "{{inputs.parameters.repository}}",
        "--branch", "{{inputs.parameters.branch}}"]
      volumeMounts:
        - name: code
          mountPath: /tmp/git
    volumes:
    - name: code
      emptyDir:
        medium: Memory
    - name: certs
      secret:
        secretName: registry-cert
Compared to the previous definition, this one doesn’t have any hard-coded
value inside of it. The details of the Git repository, the image name, the container registry,… all
of that is now passed dynamically to the template by using the input.parameters map.
The main container has also been rewritten to use an Argo Workflow specific field: script.source. This
is really handy because it provides a nice way to write a bash script to be executed inside the
container.
The source script has been also extended to perform a push operation at the
end of the build process.
As you can see the architecture of the image is appended to the tag of the image.
This is a common pattern used when building multi-architecture container images.
One final note about the push operation. The destination registry is secured
using a self-signed certificate. Because of that either the CA that signed the
certificate or the registry’s certificate have to be provided to buildah.
This can be done by using the --cert-dir flag and by placing the certificates
to be loaded under the specified path.
Note well, the certificate files must have the .crt file extension otherwise
they won’t be handled.
I “loaded” the certificate into Kubernetes by using a Kubernetes secret like this one:
apiVersion: v1
kind: Secret
metadata:
  name: registry-cert
  namespace: argo
type: Opaque
data:
  ca.crt: `base64 -w 0 actualcert.crt`
As you can see the main container is now mounting the contents of the registry-cert
Kubernetes Secret under /certs.
This time, when submitting the workflow, we must specify its parameters:
$ argo submit workflow-simple-build-2.yaml \
-p arch=amd64 \
-p repository=https://github.com/flavio/guestbook-go.git \
-p branch=master \
-p image_name=registry-testing.svc.lan/guestbook-go \
-p image_tag=0.0.1
Name: simple-build-npqdw
Namespace: argo
ServiceAccount: default
Status: Pending
Created: Wed Sep 30 15:52:06 +0200 (now)
Parameters:
arch: {1 0 amd64}
repository: {1 0 https://github.com/flavio/guestbook-go.git}
branch: {1 0 master}
image_name: {1 0 registry-testing.svc.lan/guestbook-go}
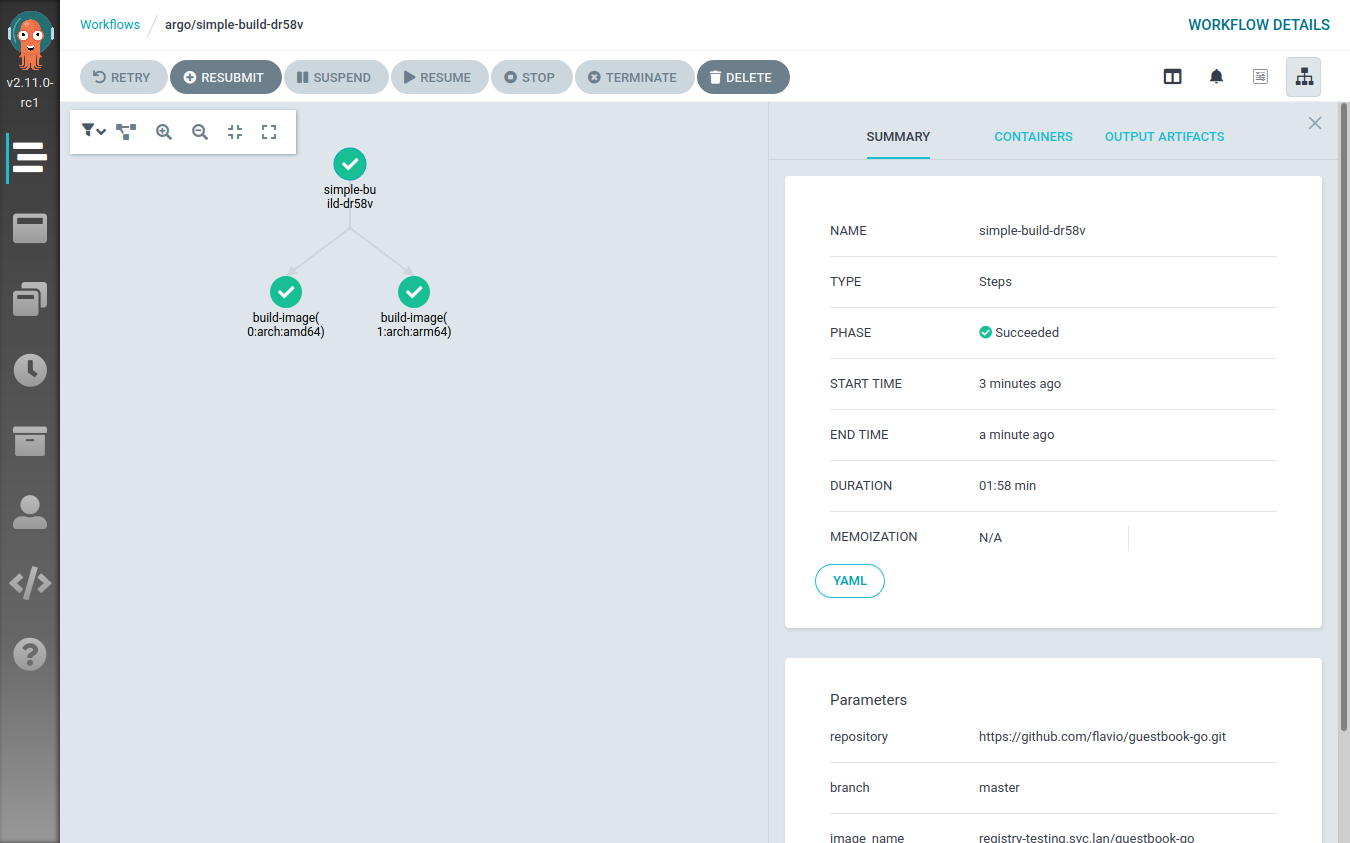
image_tag: {1 0 0.0.1}Building on multiple architectures
The Workflow object defined so far is still hard-coded to be scheduled only
on x86_64 nodes (see the nodeSelector constraint).
I could create a new Workflow definition by copying one shown before and then
change the nodeSelector constraint to reference the
ARM64 architecture. However, this would violate the
DRY principle.
Instead, I will abstract the Workflow definition by leveraging a feature of
Argo Workflow called
loops.
I will define a parameter for the target architecture and then I will iterate
over two possible values: amd64 and arm64.
This is the resulting Workflow definition:
apiVersion: argoproj.io/v1alpha1
kind: Workflow
metadata:
  generateName: simple-build-
spec:
  entrypoint: build-images-arch-loop
  templates:
  - name: build-images-arch-loop
    inputs:
      parameters:
      - name: repository
      - name: branch
      - name: image_name
      - name: image_tag
    steps:
    - - name: build-image
        template: buildah
        arguments:
          parameters:
          - name: arch
            value: "{{item.arch}}"
          - name: repository
            value: "{{inputs.parameters.repository}}"
          - name: branch
            value: "{{inputs.parameters.branch}}"
          - name: image_name
            value: "{{inputs.parameters.image_name}}"
          - name: image_tag
            value: "{{inputs.parameters.image_tag}}"
        withItems:
          - { arch: 'amd64' }
          - { arch: 'arm64' }
  - name: buildah
    inputs:
      parameters:
      - name: arch
      - name: repository
      - name: branch
      - name: image_name
      - name: image_tag
    metadata:
      annotations:
        container.apparmor.security.beta.kubernetes.io/main: localhost/containerized_buildah
    nodeSelector:
      kubernetes.io/arch: "{{inputs.parameters.arch}}"
    script:
      image: registry.opensuse.org/home/flavio_castelli/containers/containers/buildahimage:latest
      command: [bash]
      source: |
        set -xe
        cd /code/
        # needed to workaround protected_symlink - we can't just cd into /code/checkout
        cd $(readlink checkout)
        buildah bud -t {{inputs.parameters.image_name}}:{{inputs.parameters.image_tag}}-{{inputs.parameters.arch}} .
        buildah push --cert-dir /certs {{inputs.parameters.image_name}}:{{inputs.parameters.image_tag}}-{{inputs.parameters.arch}}
        echo Image built and pushed to remote registry
      volumeMounts:
        - name: code
          mountPath: /code
        - name: certs
          mountPath: /certs
          readOnly: true
      resources:
        limits:
          github.com/fuse: 1
    initContainers:
    - name: git-sync
      image: k8s.gcr.io/git-sync/git-sync:v3.1.7
      args: [
        "--one-time",
        "--depth", "1",
        "--dest", "checkout",
        "--repo", "{{inputs.parameters.repository}}",
        "--branch", "{{inputs.parameters.branch}}"]
      volumeMounts:
        - name: code
          mountPath: /tmp/git
    volumes:
    - name: code
      emptyDir:
        medium: Memory
    - name: certs
      secret:
        secretName: registry-cert
The workflow definition grew a bit. I’ve added a new template called build-images-arch-loop, which is now
the entry point of the workflow. This template performs a loop over the
[ { arch: 'amd64' }, { arch: 'arm64' } ] array, each time invoking the buildah
template with slightly different input parameters. The only parameter that changes
across the invocations is the arch one, which is used to define the
nodeSelector constraint.
Executing this workflow results in two steps being executed at the same time: one building the image on a random x86_64 node, the other doing the same thing on a random ARM64 node.
This can be clearly seen from the Argo Workflow UI:
When the workflow execution is over, the registry will contain two different images:
<image-name>:<image-tag>-amd64<image-name>:<image-tag>-arm64
Now there’s just one last step to perform: create a multi-architecture container manifest referencing these two images.
Creating the image manifest
The Image manifest Version 2, Schema 2
specification defines a new type of image manifest called “Manifest list”
(application/vnd.docker.distribution.manifest.list.v2+json).
Quoting the official specification:
The manifest list is the “fat manifest” which points to specific image manifests for one or more platforms. Its use is optional, and relatively few images will use one of these manifests. A client will distinguish a manifest list from an image manifest based on the Content-Type returned in the HTTP response.
The creation of such a manifest is pretty easy and it can be done with docker, podman and buildah in a similar way.
I will still use buildah to create the manifest and push it to the registry where all the images are stored.
This is the Argo Template that takes care of that:
 - name: create-manifest
    inputs:
      parameters:
      - name: image_name
      - name: image_tag
      - name: architectures
    metadata:
      annotations:
        container.apparmor.security.beta.kubernetes.io/main: localhost/containerized_buildah
    volumes:
    - name: certs
      secret:
        secretName: registry-cert
    script:
      image: registry.opensuse.org/home/flavio_castelli/containers/containers/buildahimage:latest
      command: [bash]
      source: |
        set -xe
        image_name="{{inputs.parameters.image_name}}"
        image_tag="{{inputs.parameters.image_tag}}"
        architectures="{{inputs.parameters.architectures}}"
        target="${image_name}:${image_tag}"
        architectures_list=($(echo $architectures | tr "," "\n"))
        buildah manifest create ${target}
        #Print the split string
        for arch in "${architectures_list[@]}"
        do
          arch_image="${image_name}:${image_tag}-${arch}"
          buildah pull --cert-dir /certs ${arch_image}
          buildah manifest add ${target} ${arch_image}
        done
        buildah manifest push --cert-dir /certs ${target} docker://${target}
        echo Manifest creation done
      volumeMounts:
        - name: certs
          mountPath: /certs
          readOnly: true
      resources:
        limits:
          github.com/fuse: 1
The template has an input parameter called architectures, this string is made
of the architectures names joined by a comma; e.g. "amd64,arm64".
The script creates a manifest with the name of the image and then, iterating
over the architectures, it adds the architecture-specific images to it.
Once this is done the manifest is pushed to the container registry.
To make a simple example, assuming the following scenario:
- We are building the
guestbook-goapplication with releasev0.1.0 - We want to build the image for the x86_64 and the ARM64 architectures
- We want to push the images to the
registry.svc.lanregistry
The Argo Template that creates the manifest will pull the following images:
-
registry.svc.lan/guestbook-go:v0.1.0-amd64: the x86_64 image -
registry.svc.lan/guestbook-go:v0.1.0-arm64: the ARM64 image
Finally, the Template will create and push a manifest named registry.svc.lan/guestbook-go:v0.1.0.
This image reference will always return the right container image to the node
requesting it.
Adding the container image to the manifest is done with the
buildah manifest add command. This command doesn’t actually need to have
the container image available locally, it would be enough to reach out to
the registry hosting it to obtain the manifest digest.
In our case the images are stored on a registry secured with
a custom certificate. Unfortunately, the manifest add command
was lacking some flags (like the cert one); because of that I had
to introduce the workaround of pre-pulling all the images referenced
by the manifest. This has the side effect of wasting some time, bandwidth and
disk space.
I’ve submitted patches both to buildah
and to podman to enrich their
manifest add commands; both pull requests have been merged into the master
branches. The next release of buildah will ship with my patch and the
manifest creation Template will be simpler and faster.
Explicating dependencies between Argo templates
Argo allows to define a workflow sequence with clear dependencies between each step. This is done by defining a DAG.
Our workflow will be made of one Argo Template of type DAG, that will have two tasks:
- Build the multi-architecture images. This is done with the Argo Workflow loop shown above.
- Create the manifest. This task depends on the successful completion of the previous one.
This is the Template definition:
- name: full-process
  dag:
    tasks:
    - name: build-images
      template: build-images-arch-loop
      arguments:
        parameters:
        - name: repository
          value: "{{workflow.parameters.repository}}"
        - name: branch
          value: "{{workflow.parameters.branch}}"
        - name: image_name
          value: "{{workflow.parameters.image_name}}"
        - name: image_tag
          value: "{{workflow.parameters.image_tag}}"
    - name: create-multi-arch-manifest
      dependencies: [build-images]
      template: create-manifest
      arguments:
        parameters:
        - name: image_name
          value: "{{workflow.parameters.image_name}}"
        - name: image_tag
          value: "{{workflow.parameters.image_tag}}"
        - name: architectures
          value: "{{workflow.parameters.architectures_string}}"
As you can see the Template takes the usual series of parameters we’ve already defined, and forwards them to the tasks.
This is the full definition of our Argo workflow, hold on… this is really long 🙀
apiVersion: argoproj.io/v1alpha1
kind: Workflow
metadata:
  generateName: build-multi-arch-image-
spec:
  ttlStrategy:
    secondsAfterCompletion: 60
  entrypoint: full-process
  arguments:
    parameters:
    - name: repository
      value: https://github.com/flavio/guestbook-go.git
    - name: branch
      value: master
    - name: image_name
      value: registry-testing.svc.lan/guestbook
    - name: image_tag
      value: 0.0.1
    - name: architectures_string
      value: "arm64,amd64"
  templates:
  - name: full-process
    dag:
      tasks:
      - name: build-images
        template: build-images-arch-loop
        arguments:
          parameters:
          - name: repository
            value: "{{workflow.parameters.repository}}"
          - name: branch
            value: "{{workflow.parameters.branch}}"
          - name: image_name
            value: "{{workflow.parameters.image_name}}"
          - name: image_tag
            value: "{{workflow.parameters.image_tag}}"
      - name: create-multi-arch-manifest
        dependencies: [build-images]
        template: create-manifest
        arguments:
          parameters:
          - name: image_name
            value: "{{workflow.parameters.image_name}}"
          - name: image_tag
            value: "{{workflow.parameters.image_tag}}"
          - name: architectures
            value: "{{workflow.parameters.architectures_string}}"
  - name: build-images-arch-loop
    inputs:
      parameters:
      - name: repository
      - name: branch
      - name: image_name
      - name: image_tag
    steps:
    - - name: build-image
        template: buildah
        arguments:
          parameters:
          - name: arch
            value: "{{item.arch}}"
          - name: repository
            value: "{{inputs.parameters.repository}}"
          - name: branch
            value: "{{inputs.parameters.branch}}"
          - name: image_name
            value: "{{inputs.parameters.image_name}}"
          - name: image_tag
            value: "{{inputs.parameters.image_tag}}"
        withItems:
          - { arch: 'amd64' }
          - { arch: 'arm64' }
  - name: buildah
    inputs:
      parameters:
      - name: arch
      - name: repository
      - name: branch
      - name: image_name
      - name: image_tag
    metadata:
      annotations:
        container.apparmor.security.beta.kubernetes.io/main: localhost/containerized_buildah
    nodeSelector:
      kubernetes.io/arch: "{{inputs.parameters.arch}}"
    volumes:
    - name: code
      emptyDir:
        medium: Memory
    - name: certs
      secret:
        secretName: registry-cert
    script:
      image: registry.opensuse.org/home/flavio_castelli/containers/containers/buildahimage:latest
      command: [bash]
      source: |
        set -xe
        cd /code/
        # needed to workaround protected_symlink - we can't just cd into /code/checkout
        cd $(readlink checkout)
        buildah bud -t {{inputs.parameters.image_name}}:{{inputs.parameters.image_tag}}-{{inputs.parameters.arch}} .
        buildah push --cert-dir /certs {{inputs.parameters.image_name}}:{{inputs.parameters.image_tag}}-{{inputs.parameters.arch}}
        echo Image built and pushed to remote registry
      volumeMounts:
        - name: code
          mountPath: /code
        - name: certs
          mountPath: /certs
          readOnly: true
      resources:
        limits:
          github.com/fuse: 1
    initContainers:
    - name: git-sync
      image: k8s.gcr.io/git-sync/git-sync:v3.1.7
      args: [
        "--one-time",
        "--depth", "1",
        "--dest", "checkout",
        "--repo", "{{inputs.parameters.repository}}",
        "--branch", "{{inputs.parameters.branch}}"]
      volumeMounts:
        - name: code
          mountPath: /tmp/git
  - name: create-manifest
    inputs:
      parameters:
      - name: image_name
      - name: image_tag
      - name: architectures
    metadata:
      annotations:
        container.apparmor.security.beta.kubernetes.io/main: localhost/containerized_buildah
    volumes:
    - name: certs
      secret:
        secretName: registry-cert
    script:
      image: registry.opensuse.org/home/flavio_castelli/containers/containers/buildahimage:latest
      command: [bash]
      source: |
        set -xe
        image_name="{{inputs.parameters.image_name}}"
        image_tag="{{inputs.parameters.image_tag}}"
        architectures="{{inputs.parameters.architectures}}"
        target="${image_name}:${image_tag}"
        architectures_list=($(echo $architectures | tr "," "\n"))
        buildah manifest create ${target}
        #Print the split string
        for arch in "${architectures_list[@]}"
        do
          arch_image="${image_name}:${image_tag}-${arch}"
          buildah pull --cert-dir /certs ${arch_image}
          buildah manifest add ${target} ${arch_image}
        done
        buildah manifest push --cert-dir /certs ${target} docker://${target}
        echo Manifest creation done
      volumeMounts:
        - name: certs
          mountPath: /certs
          readOnly: true
      resources:
        limits:
          github.com/fuse: 1
That’s how life goes with Kubernetes, sometimes there’s just a lot of YAML…

Now we can submit the workflow to Argo:
$ argo submit build-pipeline-final.yml
Name:                build-multi-arch-image-wndlr
Namespace:           argo
ServiceAccount:      default
Status:              Pending
Created:             Thu Oct 01 16:22:46 +0200 (now)
Parameters:
  repository:        {1 0 https://github.com/flavio/guestbook-go.git}
  branch:            {1 0 master}
  image_name:        {1 0 registry-testing.svc.lan/guestbook}
  image_tag:         {1 0 0.0.1}
  architectures_string: {1 0 arm64,amd64}
The visual representation of the workflow is pretty nice:
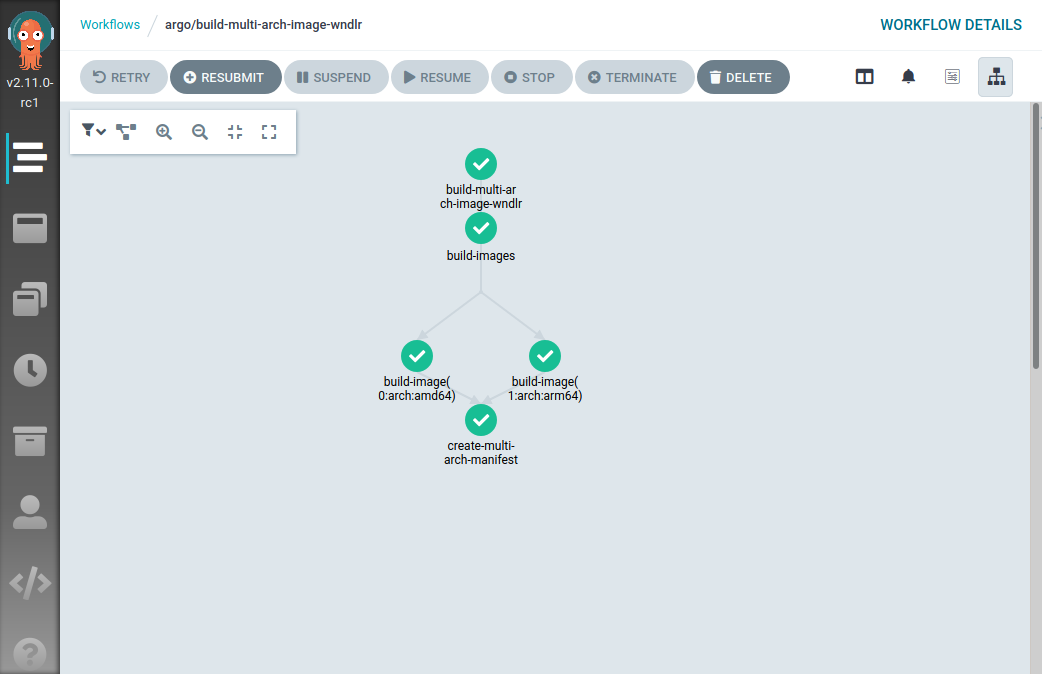
As you might have noticed, I didn’t provide any parameter to argo submit; the
Argo Workflow now has default values for all the input parameters.
Garbage collector
Something worth of note, Argo Workflow leaves behind all the containers it creates. This is good to triage failures, but I don’t want to clutter my cluster with all these resources.
Argo provides cost optimization parameters to implement cleanup strategies. The one I’ve used above is the Workflow TTL Strategy.
You can see these lines at the top of the full Workflow definition:
apiVersion: argoproj.io/v1alpha1
kind: Workflow
metadata:
  generateName: build-multi-arch-image-
spec:
  ttlStrategy:
    secondsAfterCompletion: 60
This triggers an automatic cleanup of all the PODs spawned by the Workflow 60 seconds after its completion, be it successful or not.
Summary
Today we have seen how to create a pipeline that builds container images for multiple architectures on top an existing Kubernetes cluster.
Argo Workflow proved to be a good solution for this kind of automation. There’s quite some YAML involved with that, but I highly doubt over projects would have spared us from that.
What can we do next? Well, to me the answer is pretty clear. The definition of the container image is stored inside of a Git repository; hence I want to connect my Argo Workflow to the events happening inside of the Git repository.
Stay tuned for more updates! In the meantime feedback is always welcome.
La Free Software Foundation cumple 35 años #fsf35
Este octubre de 2020 la Free Software Foundation cumple 35 años de vida defendiendo la libertad de los usuario de software

Esta mes de octubre de 2020 la Free Software Foundation (FSF), la fundación que creó Richard Stallman para la defensa y promoción del software libre y de la libertad de las personas que utilizan ese software cumple 35 años.
Durante la semana del 4 al 9 de octubre la FSF planea dar sorpresas y celebrar estos 35 años de historia, culminando con un evento “online” el día 9 de octubre de 2020.
En una sociedad cada vez más tecnológica y dependiente de esta tecnología, que esta sea abierta, libre y respetuosa con las personas que la utilizan es una tarea titánica.
Pero en esas está la FSF desde hace 35 años. Y sigue con la pretensión de no cesar en su tarea hasta que todo el software y los dispositivos que utilizamos lo sean, y nos hagan libres y no dependientes de empresas con oscuros intereses.
¿Eres un fan del software libre y del trabajo de la FSF? Entonces piden tu colaboración para que grabes un vídeo de menos de 2 minutos y lo compartas con la fundación.
Y como no, también quizás pensar en donar 35$, en conmemoración de estos 35 años de defensa de la libertad del software.
Pero también se puede celebrar esa libertad y ese evento de muchas maneras desde la FSF nos proponen algunas:
- Probar una distribución de GNU/Linux completamente libre, aunque solo sea en modo “live” en nuestro equipo (y quizás plantearse el cambio)
- Echar un vistazo a la Guía de autodefensa del correo electrónico (en la que participo en la traducción al español) para aprender a cifrar tu correo.
- Descargar e instalar y probar, si no lo has hecho ya, una de las piezas más antiguas y funcionales del proyecto GNU, como es el editor/sistema GNU Emacs
- Tratar de reemplazar una de esas aplicaciones privativas, por una libre. Por ejemplo probar LibreOffice o reproductores como VLC, navegadores libres, etc…
- Hacer una petición a un administrador web de tu página favorita, para que elimine el código privativo JavaScript por uno libre.
- Contribuir a la Free Software Directory, la wiki de la FSF, ya sea corrigiendo, aportando un artículo, etc.
- Echar un vistazo al “merchandaising” de la tienda GNU, para comprar un manual, un libro, o un peluche de un adorable ñu.
- Echar un vistazo a alguno de los vídeos de las ediciones de la conferencia anual LibrePlanet. Donde hacktivistas de todo el mundo exponen sus ideas y dan charlas sobre sus proyectos.
- Reemplazar tu tienda de aplicaciones Android por una de aplicaciones libres como es F-droid. O quizás abandonar Android por Replicant u otro sistema libre si tu dispositivo lo permite.
- Compartir este artículo o cualquier otro en defensa del software y la libertad de los usuarios dando a conocer la labor de la FSF en estos 35 años de vida, utilizando la etiqueta #fsf35.
O de cualquier otra forma que se te ocurra, si eres una persona que piensa que esto del software libre es algo más que simples bits.
Es una semana de celebración y de difusión de la libertad del software y de las acciones que llevan a cabo la FSF desde hace 35 años con tu apoyo…
Más información en el anuncio oficial:
Happy hacking!!


Librsvg is accepting interns for Outreachy's December 2020 round
There are two projects in librsvg available for Outreachy applicants in the December 2020 / March 2021 round:
-
Revamp the text engine - Do you know about international text layout? Can you read a right-to-left language, or do you write in a language that requires complex shaping? Would you like to implement the SVG 2 text specification in a pleasant Rust code base? This project requires someone who can write Rust comfortably; it will require reading and refactoring some existing code. You don't need to be an expert in exotic lifetimes and trait bounds and such; the code doesn't use them.
-
Implement SVG2/CSS3 features - Are you excited by all the SVG2 features in Inkscape, and would like to add support for them in librsvg? Would you like to do small changes to many parts of the code to implement small features, one at a time? Do you like test-driven development? This project requires someone who can write Rust code at a medium level; you'll learn a lot by cutting&pasting from existing code and refactoring things to implement SVG2 features.
Important: Outreachy's December 2020 / March 2021 round is available only for students in the Southern hemisphere. People in the Northern hemisphere can wait until the 2021 mid-year round.
You can see GNOME's projects in Outreachy for this round. The deadline for initial contributions and project applications is October 31, 2020 at 16:00 UTC.