
 Member
 baltolkien
Lanzada la actualización de febrero de KDE Aplicaciones 19.12
Me complace compartir con vosotros que ha sido lanzada la actualización de febrero de KDE Aplicaciones 19.12, tal y como estaba previsto en el calendario de lanzamientos. Es hora de actualizar nuestro sistema, solucionar pequeños errores y mejorar las traducciones. Una demostración más del compromiso constante de la Comunidad KDE con sus usuarios en su proceso de mejora continua.
Lanzada la actualización de febrero de KDE Aplicaciones 19.12
El pasado 13 de diciembre de 2019 fue la fecha marcada en su calendario por la Comunidad KDE para lanzar la gran actualización de cara al final de año del conjunto de sus aplicaciones. Al llegar casi al primer mes desde este lanzamiento los desarrolladores de KDE ya han puesto a disposición de los usuarios la segunda actualización de KDE Aplicaciones 19.12, de la que ya hablamos en el blog, es decir, ya tenemos entre nosotros KDE Aplicaciones 19.12.2.
Como es habitual en este tipo de actualizaciones, hay pocas mejoras ya que principalmente se han solucionado errores en aplicaciones y, como es habitual, mejorado las traducciones. Si queréis ver todos los cambios os aconsejo leer el «changelog» completo.
No obstante, y siguiendo lo iniciado en la última actualización de KDE aplicaciones, los desarrolladores han creído conveniente resaltar las novedades de KDE Aplicaciones 19.12.2 con un poco más de detalle:
- Lanzado KDevelop 5.5, la aplicación que hace que la programación en n C++, Python, PHP y otros entornos más fácil.
- Disponible Zanshin 0.5.71, el gestor de TODO sencillo y eficaz de KDE.
- Nuevo Latte-dock 0.9.8, la barra de tareas recibe una interesante actualización.

- Lanzado RKWard 0.7.1, una interfaz gráfica para el lenguaje de programación R (que desconocía y que me vendrá de lujo ahora que estoy aprendiendo)
- Actualizado Okteta 0.26.3, el editor hexadecimal de KDE.
- Nueva versión de KMyMoney 5.0.8, el gestor de cuentas de KDE.
Además se ha anunciado aplicaciones como Keysmith, Chocholatey (un gestor de aplicaciones para Windows) y se siguen mejorado algunas páginas web como la de KMyMoney.

Así que se trata de una actualización 100% recomendado por que solo puede mejorar tu sistema, sin darte ningún problema. ¿A qué esperas?
Más información: KDE.org
Novedades de la Comunidad KDE, próximo podcast de KDE España
El tiempo pasa inexorable… y las obligaciones de todos los miembros de la familia de KDE España son múltiples y variadas. Tanto es así que este año está costando más de lo habitual en poder realizar los podcast de la sexta temporada. No obstante, al final se ha encontrado el hueco y dado que se acumulan las noticias de la Comunidad se ha decidido realizar un episodio llamado «Novedades de la Comunidad KDE» donde a modo de tertulia se hablará de todo un poco.
Novedades de la Comunidad KDE, próximo podcast de KDE España

Este inicio de año está lleno de novedades y noticias relacionadas con la Comunidad KDE, es por ello que el equipo de podcast de KDE España ha decidido realizar un episodio especial recopilando las noticias de enero y principios de febrero.
Así que ya sabéis, estad atentos para escuchar en directo el próximo podcast de KDE España que emitiremos utilizando los servicios de Jitsi para reunir a los contertulios y los servicios de streaming de Youtube para poder transmitirlo en vivo.
Por cierto, veamos si funciona como toca el enlace de Youtube insertado en el blog.
¡Os esperamos el sábado 8 de febrero a las 11:00 CEST!
Los podcast de KDE España
 En un afán de acercarnos más a todos los simpatizantes de KDE hace un tiempo que empezamos a realizar podcast. En ellos varios miembros de la Comunidad KDE de España nos reunimos para hablar un poco de los diversos proyectos.
Hemos hablado de muchos temas como por ejemplo Akademy, KDE Connect, Plasma Mobile, Kirigami, KDE y el mundo empresarial y un largo etcétera de temas. Por supuesto, os animo a ayudarnos proponiendo temas en los comentarios de esta entrada, en el grupo de Telegram de Cañas y Bravas o en la sección especial en la web de bugs que hemos creado para la ocasión.
Podéis seguirnos en el canal de Youtube de KDE España o en Ivoox, donde estamos subiendo poco a poco los audios emitidos. Esperamos que os gusten.
Cómo borrar letras, palabras o la frase en el modo insertar del editor #Vim
Veamos unos atajos de teclado para borrar un caracter, una palabra o una frase sin abandonar el modo de insertar del editor Vim. Y además un truco un extra…

Mientras estamos en el modo de insertar texto del editor Vim, podemos editar nuestro texto escribiendo o borrando, etc. Para borrar una palabra que hemos escrito mal podemos utilizar el “back space” o la tecla suprimir.
La tecla “back space” borrará el texto caracter a caracter desde la posición del cursor hacia la izquierda. La tecla suprimir borrará el caracter donde se encuentra el cursor y será reemplazado por el siguiente de la derecha, si dejamos pulsada la tecla suprimir borrará el siguiente caracter, y así podremos borrar hasta el final de la línea.
Pero en este caso en vez de utilizar estas dos teclas, de sobra conocidas por su utilización no solo en Vim, vamos a aprender unos atajos de teclado para sin dejar el modo insertar poder borrar un caracter, una palabra o toda una línea.
Además también voy a compartir un atajo de teclado que he descubierto y que puede resultar útil… Empecemos el tutorial.
Este artículo viene a engrosar la lista de tutoriales sobre Vim que desde hace meses vengo escribiendo en mi blog. Si queréis leerlos todos están disponibles en este enlace:
Estando en el modo de insertar texto, si queremos borrar un caracter que acabamos de escribir y está mal, podemos utilizar la tecla “back space” como he comentado antes o el atajo de teclado Ctrl+h
Esto borrará la letra a la izquierda de la posición del cursor, y podremos ir borrando así caracter a caracter lo que queramos.
Pero si lo que queremos es borrar una palabra estando en el modo insertar, tenemos un atajo de teclado muy cómodo que es Ctrl+w
Que irá borrando palabra a palabra desde la posición del cursor hacia la izquierda sin abandonar el modo de insertar texto.
Con el atajo de teclado Ctrl+u en el modo insertar de Vim, lo que nos hará es borrar desde la posición del cursor hasta el inicio de la línea actual.
Atajos muy cómodos a la hora de estar editando con Vim sin necesidad de abandonar el modo insertar.
Bola extra
Como complemento a este tutorial, también quiero compartir un atajo de teclado en el que estando en modo edición de texto, podemos “abandonarlo” por el modo de comandos, ejecutar un comando y volver automáticamente al modo de insertar.
El atajo en cuestión es Ctrl+o Al pulsar este eatajo de teclado, veremos en la parte inferior izquierda de vim, cambia del modo — INSERTAR — al modo — (insertar) —
Esto nos indica que seguimos en ese modo, pero que podremos ejecutar un comando (cualquiera) y después regresará automáticamente al modo insertar normal automáticamente.
En alguna ocasión seguro que tanto unos como otros atajos de teclado nos resultarán muy útiles a la hora de trabajar con Vim.
¿Tienes algún atajo más similares a estos que quieras compartir? ¡Puedes utilizar los comentarios para complementar este artículo con tus conocimientos!

Usando Tilix en openSUSE - 2a. Parte
Traducción del artículo original publicado por Douglas DeMaio, el 03 de Febrero de 2020:
https://news.opensuse.org/2020/02/03/using-tilix-part-2-on-opensuse/
- Gestión de marcadores, locales o remotos;
- Enlaces personalizados (enlaces en los que se puede hacer clic basados en expresiones regulares);
- Cambio de perfil automático según la ubicación (local o remota (SSH));
- Gestión de contraseñas;
- Lanzamiento de acciones internas.
Gestión de marcadores
Tilix nos permite guardar y administrar una lista de "marcadores", es decir, ubicaciones locales o remotas. Simplemente abrimos las Preferencias y definimos algunas carpetas o servidores remotos a los que podemos conectarnos, luego abrímos esta lista, seleccionamos el marcador deseado y vamos inmediatamente a la carpeta o abrimos la sesión SSH para un host remoto.
Nota: los marcadores se guardan en $HOME/.config/tilix/bookmarks.json Se recomienda crear este archivo de antemano si notamos que nuestros marcadores no se guardan correctamente después de salir de Tilix.
Tilix nos permite organizar nuestros marcadores creando una carpeta simple en la que puede generarlos, para que estén bien organizados. Como ejemplo, esto es útil para agrupar conexiones SSH al mismo grupo de máquinas:

Hacemos clic en la carpeta y luego en el + para agregar marcadores.
Marcadores locales
Para agregar marcadores, abrímos las preferencias de Tilix, después vamos a la sección Marcadores para hacer clic en + ”.
Aquí agregaremos un marcador a la copia local de un proyecto en el Servicio Open Build.

Marcadores remotos
El procedimiento es el mismo, pero seleccionamos Remoto y luego ingresamos los parámetros del marcador:
Nombre: la referencia de nuestro marcador;
Protocolo: elección: SSH, SFTP, TELNET, FTP;
Host: el nombre de host del destino seguido del número de puerto;
Usuario: el usuario de la conexión;
Configuración: opciones SSH por ejemplo;
Comando: si se trata de una conexión SSH, el comando se inicia en el host remoto.

Comandos
El mismo procedimiento que los otros, pero aquí simplemente ingresamos un comando para iniciar. Por lo tanto, el marcador es aquí un simple alias.

Imagen de ejemplo para actualizar la copia local del repositorio OBS
Usar marcadores

Enlaces personalizados

Cambio de perfil automático
Llegamos ahí con una funcionalidad de Tilix, que es particularmente útil y debemos tener cuidado de evitar cometer errores graves al escribir un comando en el directorio incorrecto o en una conexión remota: el cambio automático de perfil. Tilix, como muchos emuladores de terminales modernos, nos permite crear varios perfiles (colores, shell utilizado, fuente, etc.), pero además, nos permite cambiar automáticamente de uno a otro, dependiendo de la ubicación activa: ya sea una carpeta local o , más interesante, pero también requiere un poco más de manipulación, una conexión SSH.

/ etc
/ usr
/raíz
Ahora, en la pestaña "Avanzado" del perfil, definiremos la condición necesaria para su activación.
Según lo especificado, los valores deben estar en el formato "host: carpeta" o "host:" o ": carpeta", el ":". Estos son obligatorios, por lo que "host" o "carpeta" solo no están permitidos.
Y ahora si vamos a / etc:

Tilix nos permite hacer lo mismo durante una conexión SSH. Pero esto requiere un poco de configuración en el host remoto:
Copia de la secuencia de comandos en el host remoto:
Debemos insertar el script /usr/share/tilix/scripts/tilix_int.sh en el $HOME del usuario remoto (o en cualquier otra carpeta desde donde pueda obtenerse como /usr/local/bin):
scp /usr/share/tilix/scripts/tilix_int.sh user @ hostname: / home / user
Luego, conectamos para agregar el inicio del script a la conexión, a través de nuestro .bashrc, por ejemplo:
[geeko @ host ~] $ cat .bashrc
# .bashrc
# Alias y funciones específicas del usuario
. ./tilix_int.sh
Luego, ahí también, definimos la condición de cambio de perfil como se indicó anteriormente, pero especificando el host (el proporcionado por el comando hostname en el que se basa Tilix) esta vez. Después conectar. El perfil cambiará tan pronto como se establezca la conexión SSH. Volverá al perfil predeterminado tan pronto como cerremos la sesión.
Tilix también nos permite almacenar contraseñas en la memoria. Para hacer esto, haga clic en el menú del terminal activo y seleccionamos "Contraseñas ...":


Esta es una función muy interesante junto con las anteriores:
- usando marcadores, se inicia una conexión remota;
- gracias a las contraseñas guardadas, desbloqueamos nuestra clave SSH, por ejemplo;
- Tilix cambia inmediatamente al perfil de nuestra elección, si es necesario.

Tilix se ha desarrollado activamente y ahora se considera maduro. Esperamos que esta revisión de sus características avanzadas los haya convencido, o al menos les haya dado ganas de probarlo.
Hasta pronto, disfruten!
Advanced Radio Player – Plasmoides de KDE (131)
Os presento Advanced Radio Player, el plasmoide para el escritorio Plasma de la Comunidad KDE 131 presentado en el blog, que nos ayuda a tener cualquier emisora de radio que emita por internet a solo un click de ratón. Otra demostración que poco a poco no entendemos la vida sin nuestra conexión a la nube.
Advanced Radio Player – Plasmoides de KDE (131)
Internet cada día está más presente en nuestra vida en multitud de formas. Ya no solo nos sirve para buscar información, comunicarnos con nuestras amistades, visualizar vídeos o escuchar podcast.
En la actualidad ya se nos vende cualquier producto por la red y se nos invitar a ver la televisión por internet. La radio, un medio que está muy vivo a pesar de sus limitaciones, no es ajena a esta evolución y casi todas las emisoras actuales emiten por internet.
La mayor parte de estas emisoras se pueden realizar vía web pero también tenemos la posibilidad de utilizar el plasmoide Advanced Radio Player para tenerlas integradas en nuestro escritorio.
Se trata de una creación de driglu4it que nos permite editar una lista de emisoras de radio en nuestro entorno de trabajo. Para hacerlo solo nos hace falta el nombre que queramos darle y el enlace a la emisión en directo, el cual suele estar en la web de la emisora.
Lo he probado con una emisora que no emite por las ondas hercianas en mi zona y funciona a la perfección.
Y como siempre digo, si os gusta el plasmoide podéis “pagarlo” de muchas formas en la mutante página de KDE Store (ya que está adaptándose cada vez más para una integración total con Plasma), que estoy seguro que el desarrollador lo agradecerá: puntúale positivamente, hazle un comentario en la página o realiza una donación. Ayudar al desarrollo del Software Libre también se hace simplemente dando las gracias, ayuda mucho más de lo que os podéis imaginar, recordad la campaña I love Free Software Day 2017 de la Free Software Foundation donde se nos recordaba esta forma tan sencilla de colaborar con el gran proyecto del Software Libre y que en el blog dedicamos un artículo.
Más información: KDE Store

Reaching the login prompt in 2.5 seconds - a journey
Not only in development environments it’s very handy to have a quick turnaround time, which can include reboots. Especially for transactional systems where changes to the system only take effect after booting into the new state, this can have a significant impact.
So let’s see what can be done. Remember: “The difference between screwing around and science is writing it down”!
Starting point
Starting point for this experiment is a VM (KVM), 4GiB RAM, 2 CPU cores, no EFI. Tumbleweed was installed as Server (textmode) with just defaults.
# systemd-analyze
Startup finished in 1.913s (kernel) + 2.041s (initrd) + 22.104s (userspace) = 25.958s
Almost 26 seconds just to get to the login prompt of a pretty minimal system, that’s not great. What can we do?
Low-hanging fruit
systemd-analyze blame tells us what the worst offenders are:
# systemd-analyze blame --no-pager
18.769s btrfsmaintenance-refresh.service
17.027s wicked.service
 3.170s plymouth-quit.service
 3.170s plymouth-quit-wait.service
 1.078s postfix.service
 1.023s apparmor.service
  839ms systemd-udev-settle.service
  601ms systemd-logind.service
  532ms firewalld.service
btrfsmaintenance-refresh.service is a bit special: It calls systemctl during execution
to enable/disable and start/stop the btrfs-*.timer units. Those depend on time-sync.target, which itself needs network.service through chronyd.service.
wicked.service is the next item on the list. Before the unit is considered active, it tries
to fully configure and setup all configured interfaces, which includes DHCPv4 and v6 by default.
This is directly used as state for network.service and thus network.target.
There is no distinction between network.service and network-online.target by wicked.
To make the bootup quicker, switching to NetworkManager is an option,
which interprets network.service in a more async way and thus is much quicker to reach the active state.
Note that with DHCP, switching between wicked and NM might result in a different IP address!
# zypper install NetworkManager
# systemctl disable wicked
Removed /etc/systemd/system/multi-user.target.wants/wicked.service.
Removed /etc/systemd/system/network.service.
Removed /etc/systemd/system/network-online.target.wants/wicked.service.
Removed /etc/systemd/system/dbus-org.opensuse.Network.Nanny.service.
Removed /etc/systemd/system/dbus-org.opensuse.Network.AUTO4.service.
Removed /etc/systemd/system/dbus-org.opensuse.Network.DHCP4.service.
Removed /etc/systemd/system/dbus-org.opensuse.Network.DHCP6.service.
# systemctl enable NetworkManager
Created symlink /etc/systemd/system/network.service → /usr/lib/systemd/system/NetworkManager.service.
Let’s also remove plymouth - except for eyecandy it does not provide any useful features.
# zypper rm -u plymouth
Reading installed packages...
Resolving package dependencies...

The following 23 packages are going to be REMOVED:
  gnu-unifont-bitmap-fonts libdatrie1 libdrm2 libfribidi0 libgraphite2-3 libharfbuzz0 libpango-1_0-0 libply5 libply-boot-client5 libply-splash-core5 libply-splash-graphics5 libthai0 libthai-data libXft2 plymouth plymouth-branding-openSUSE
  plymouth-dracut plymouth-plugin-label plymouth-plugin-label-ft plymouth-plugin-two-step plymouth-scripts plymouth-theme-bgrt plymouth-theme-spinner

23 packages to remove.
After the operation, 4.8 MiB will be freed.
Continue? [y/n/v/...? shows all options] (y):
...
Plymouth is still started in the initrd, but as it’s not part of the root filesystem anymore
it’s not stopped by plymouth-quit.service. This combination would result in a broken boot!
Normally, the initrd should be regenerated automatically if anything relevant changes,
but for removals that’s not implemented (boo#966057).
# mkinitrd
...
# reboot
...
Let’s see how much time this saved:
# systemd-analyze
Startup finished in 1.675s (kernel) + 2.066s (initrd) + 2.696s (userspace) = 6.438s
Over 19s saved, that’s quite a lot already!
# systemd-analyze blame --no-pager
1.411s btrfsmaintenance-refresh.service
893ms systemd-logind.service
849ms apparmor.service
Now the biggest contributor to the bootup time is btrfsmaintenance-refresh.service. As it is not quite clear how much value it provides with a recent kernel (boo#1063638#c106), let’s just remove it.
# zypper rm -u btrfsmaintenance
# reboot
...
# systemd-analyze
Startup finished in 1.700s (kernel) + 2.010s (initrd) + 2.367s (userspace) = 6.079s
multi-user.target reached after 2.347s in userspace
That’s a bit better again.
# systemd-analyze blame --no-pager
873ms apparmor.service
550ms systemd-logind.service
504ms postfix.service
405ms firewalld.service
Both apparmor and systemd-logind.service are needed, so no low hanging fruit remain.
Accelerating early boot
There’s still one part remaining in the boot time equation we can completely eliminate!
Startup finished in 1.700s (kernel) + 2.010s (initrd) + 2.367s (userspace) = 6.079s
                                      ^^^^^^^^^^^^^^^
So, what exactly is the initrd for anyway? In the vast majority of installations, it’s very clearly defined: Mount the real root filesystem and switch to it. Depending on the configuration, this can range from simple (local ext4) to very complex (encrypted block device over the network accepting the password over ssh). Additionally, the kernel binary as loaded by the bootloader is very small, so does not include drivers for every system. Those are part of modules included in the initrd.
Turns out, in simple cases (the majority of VM guest systems) we can boot without initrd just fine. The current setup is not tuned for this setup though, so a few adjustments are required.
Drivers for mounting / without loading modules
The kernel needs drivers for both the virtual devices connecting to the storage device and for the
filesystem on it.
The former part is dealt with by using the kernel-kvmsmall flavor, but unfortunately it does not
have btrfs built-in.
Fortunately, this is easy to fix by rebuilding the kernel with a custom config. By putting
CONFIG_FS_BTRFS=y (and some other required options) into config.addon.tar.bz2 next to the standard
openSUSE kernel in OBS, it spits out an .rpm with a working binary.
# zypper ar obs://devel:kubic:quickboot/ devel:kubic:quickboot
# zypper in --from devel:kubic:quickboot kernel-kvmsmall
kernel-kvmsmall does not have all kernel features enabled (not even as modules), which means that in
some cases it might be necessary to apply the changes on kernel-default instead, which has a complete
set of modules.
Mounting root by UUID
However, if you now reboot and comment out the initrd command in the grub config, you will notice
that the boot fails as the kernel is unable to find the root device. This is because by default,
the GRUB configuration uses root=UUID=deadbeef-1234... as parameter. This is interpreted by the
initrd in userspace. To be exact, when a block device is recognized by the kernel, Udev reacts by
reading the filesystem UUID and creating a link in /dev/disk/by-uuid/... which is then used as root device.
Without an initrd, that does not happen and the kernel is unable to continue.
Workaround here is to set GRUB_DISABLE_LINUX_UUID=true in /etc/default/grub. This means that device paths
like root=/dev/vda2 are used, which can lead to issues when changing the disk layout or order.
By additionally setting GRUB_DISABLE_LINUX_PARTUUID=false, it uses root=PARTUUID=cafebabe-4554... which is
supported by the kernel as well, but is more reliable.
# echo GRUB_DISABLE_LINUX_UUID=true >> /etc/default/grub
# echo GRUB_DISABLE_LINUX_PARTUUID=false >> /etc/default/grub
# grub2-mkconfig -o /boot/grub2/grub.cfg
# reboot
... (comment out the initrd call in grub, after pressing "e" in the menu and prepending "#" in the last line)
# systemd-analyze
Startup finished in 1.778s (kernel) + 2.725s (userspace) = 4.504s
Almost a third shaved off again, awesome!
However, there are now error messages shown in the console, which is not that awesome.
Something about systemd-gpt-auto-generator and systemd-remount-fs being unable to find
the root device - just like the kernel earlier. The cause is actually the same - /etc/fstab
still contains the mounts in UUID= format and those errors happen before systemd-udevd.service
is started and udev has settled.
No matter how systemd is configured, it’s not possible to get rid of the first error - generators run before any units. So we have to start udev even before that - before systemd!
But first, a quick detour.
Getting transactional
Let’s take a look at how MicroOS is doing. As the name already says, it’s supposed to be lighter than plain Tumbleweed out of the box.
# systemd-analyze
Startup finished in 1.788s (kernel) + 2.036s (initrd) + 21.243s (userspace) = 25.068s

# systemd-analyze blame --no-pager
17.669s btrfsmaintenance-refresh.service
16.177s wicked.service
 3.377s apparmor.service
 1.356s health-checker.service
 1.179s systemd-udev-settle.service
  968ms systemd-logind.service
  811ms kdump.service
A second quicker, ok. Plymouth is gone, but we gained health-checker and kdump.
The time is dominated by wicked slowing down the startup though, so let’s replace it.
Additionally, disable btrfsmaintenance-refresh.service. It’s not possible to remove it
as the microos_base pattern requires it.
# transactional-update shell
transactional update # zypper install NetworkManager
transactional update # systemctl disable wicked
transactional update # systemctl enable NetworkManager
transactional update # systemctl disable btrfsmaintenance-refresh.service
transactional update # exit
# reboot
...
# systemd-analyze
Startup finished in 1.744s (kernel) + 1.989s (initrd) + 2.342s (userspace) = 6.075s

# systemd-analyze blame
1.251s apparmor.service
1.066s kdump.service
 824ms NetworkManager-wait-online.service
 742ms systemd-logind.service
 730ms kdump-early.service
 638ms systemd-udevd.service
 563ms create-dirs-from-rpmdb.service
Much better again.
Booting a read only system without initrd
In a system with a read-only root filesystem like MicroOS (or transactional server), the initrd has
another task: Make sure that /var and /etc are mounted already, so that early boot can store logs
and read configuration.
So we actually have to mount /var and /etc before starting systemd. How? By having our own init
script! It is started directly by the kernel by setting init=/sbin/init.noinitrd and as last
step just does exec /sbin/init to replace itself as PID 1 with systemd.
Unfortunately it’s not quite as easy as just doing mount /var and calling it a day, as the mount
for /var uses a UUID= as source, so it needs udev running… Luckily, udev actually works in that
environment, after mounting /sys, /proc and /run manually.
Here the circle closes - we have udev running before systemd now. So by just using the script we need for read-only systems everywhere, that issue is solved too.
Making initrd-less booting simpler
As the setup for initrd-less booting is quite complex, there’s now a package which does the needed setup automatically (except for installing a suitable kernel).
This contains the needed “pre-init” wrapper script /sbin/init.noinitrd as well as a grub configuration
module which automatically adds entries to boot the system without initrd. Those are only generated
for kernels which have support for the root filesystem built-in. It takes care of setting root/rootflags
and init parameters properly as well. The boot options with initrd are still there, as failsafe.
# zypper ar obs://devel:kubic:quickboot/openSUSE_Tumbleweed devel:kubic:quickboot
# transactional-update initrd shell pkg in --from devel:kubic:quickboot kernel-kvmsmall noinitrd
...
transactional update # grub2-set-default 0
transactional update # exit
# reboot
...
# systemd-analyze
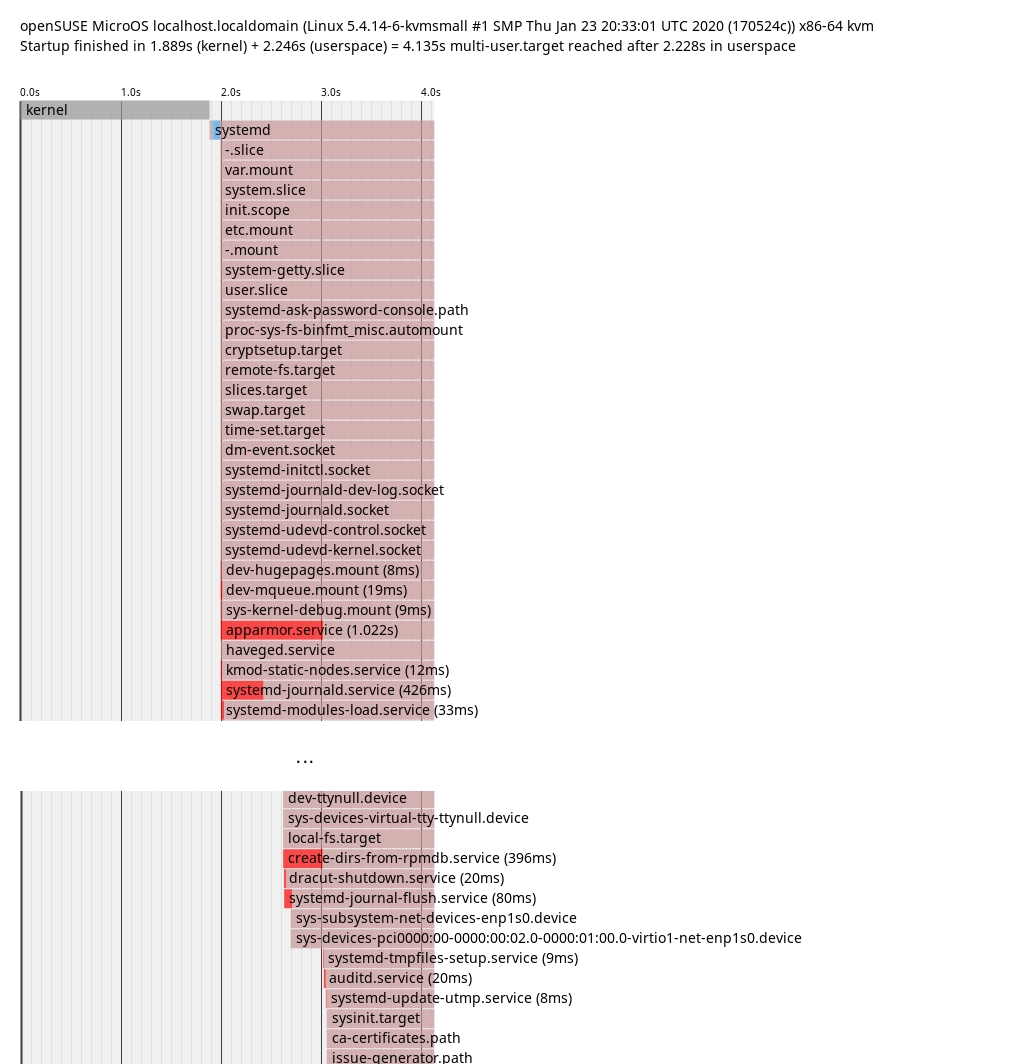
Startup finished in 1.889s (kernel) + 2.246s (userspace) = 4.135s
# systemd-analyze blame
1.022s apparmor.service
847ms kdump.service
820ms NetworkManager-wait-online.service
782ms systemd-logind.service
608ms kdump-early.service
542ms dev-vda3.device
Just over 4 seconds! That the /var partition is now part of the top six on systemd-analyze
means that we’re getting close to the limits.
An issue with issue-generator
Booting without an initrd seems to have introduced a bug: Instead of showing the active
network interface enp1s0 and its addresses, there’s just a lonely eth0: on the login
screen. Checking the journal, this is because the interface got renamed from eth0 to enp1s0
during boot. Usually this happens when udev runs in the initrd already, which means that
after switch-root there’s an add event with the new name already, which issue-generator
picks up. Without initrd, the rename happens in the booted system and issue-generator has to
handle that somehow.
How can this be implemented? To find out which udev events are triggered by a rename, the udev
monitor is very helpful. With the --property option it shows which properties are attached
to the triggered events:
# udevadm monitor --udev --property &
# ip link set lo down
# ip link set lo name lonew
# ip link set lonew name lo
...
UDEV  [630.458943] move     /devices/virtual/net/lo (net)
ACTION=move
DEVPATH=/devices/virtual/net/lo
SUBSYSTEM=net
DEVPATH_OLD=/devices/virtual/net/lonew
INTERFACE=lo
IFINDEX=1
SEQNUM=3616
USEC_INITIALIZED=1054433
ID_NET_LINK_FILE=/usr/lib/systemd/network/99-default.link
SYSTEMD_ALIAS=/sys/subsystem/net/devices/lonew /sys/subsystem/net/devices/lonew
TAGS=:systemd:
# fg
^C
# ip link set lo up
So using the DEVPATH_OLD and INTERFACE properties, the rename can be implemented in
issue-generator’s udev rules:
After applying those changes and a reboot, enp1s0 is shown properly now!
Optimizing apparmor.service
Those who paid attention to the output of systemd-analyze blame will have noticed
that compared to plain Tumbleweed, apparmor.service takes longer to start on MicroOS.
Why is that so?
# systemd-analyze plot > plot.svg
In this plot it’s possible to guess which explicit and also implicit dependencies there
are between services. If a service starts after a different service ends, it’s probably
an explicit dependency. If a service is only up after a different service started, it’s probably
waiting for it in some way. That’s what we can see in the plot: apparmor.service only finished
startup after create-dirs-from-rpmdb.service started up. So getting that to start earlier or
quicker would accelerate apparmor.service as well.
To confirm this theory, just disable the service:
# systemctl disable create-dirs-from-rpmdb.service
# reboot
# systemd-analyze blame
927ms systemd-logind.service
824ms NetworkManager-wait-online.service
721ms kdump.service
689ms kdump-early.service
554ms apparmor.service
# systemctl enable create-dirs-from-rpmdb.service
Confirmed. So how can this be optimized properly?
The purpose of this service is to create directories owned by packages, which are not part
of the system snapshots. It orders itself between local-fs.target and
systemd-tmpfiles-setup.service. Some tmpfiles.d files might rely on packaged directories
being present, so it has to run before systemd-tmpfiles-setup.service. Except for changing
it to RequiresMountsFor=/var /opt /srv there isn’t much potential for optimization.
However, instead of running on every boot, the service only has to be active if the set of packages
changed. Luckily, with rpm 4.15, a new method to ease such checks (rpmdbCookie) got implemented and
it was easy to make use of it in the service.
With this deployed, it only runs when necessary and otherwise just takes some time
to get the cookie from the rpm database:
# systemd-analyze blame
872ms NetworkManager-wait-online.service
832ms systemd-logind.service
811ms kdump.service
645ms dev-vda3.device
597ms kdump-early.service
526ms apparmor.service
# systemd-analyze blame | grep create-dirs-from-rpmdb
 52ms create-dirs-from-rpmdb.service
For some reason this doesn’t always help though, sometimes apparmor.service is back at >1s,
so this needs some more investigation.
rebootmgr
On top of the blame list we have NetworkManager-wait-online.service. This service can take a variable
amount of time depending on the network configration and the environment and is in most cases not needed
for getting services up and running. So what is currently pulling that into multi-user.target?
# systemd-analyze critical-chain
The time when unit became active or started is printed after the "@" character.
The time the unit took to start is printed after the "+" character.

multi-user.target @2.472s
└─rebootmgr.service @2.284s +24ms
  └─network-online.target @2.282s
    └─NetworkManager-wait-online.service @1.311s +970ms
      └─NetworkManager.service @1.246s +61ms
It’s rebootmgr.service! The reason it orders itself After=network-online.target is that it can
directly communicate with etcd. However, support for that is currently disabled in rebootmgr anyway
and it appears to handle the case with no network connection on start just fine. So until that
change ends up in the package, let’s just adjust that manually:
# systemctl edit --full rebootmgr.service
(Remove lines with network-online.target)
# reboot
Note that this doesn’t really improve the perceived speed of booting as only multi-user.target
itself depended on it and sshd/getty are started before that already.
The critical chain to multi-user.target is now:
# systemd-analyze critical-chain
The time when unit became active or started is printed after the "@" character.
The time the unit took to start is printed after the "+" character.

multi-user.target @2.188s
└─kdump.service @1.287s +899ms
  └─NetworkManager.service @1.202s +82ms
    └─dbus.service @1.197s
      └─basic.target @1.195s
        └─sockets.target @1.195s
          └─dbus.socket @1.195s
Getting close to the edge
It’s time to get creative now - what’s left for optimizing? Everything after this is arguably a hack, much more than the previous changes.
Disabling non-essential services
Let’s just disable everything which isn’t actually needed to get the system up.
apparmor.service:
Used for system hardening. If the system is not security relevant
(e.g. an isolated VM), this can be disabled. Not recommended though.
rebootmgr.service:
If a reboot is scheduled (e.g. by the automatic transactional-update.timer),
it triggers an automatic reboot in the configured timeframe (default 3:30am).
If the system is rebooted manually, this can be disabled.
kdump.service:
Loads a kernel and initrd for kernel coredumping into RAM. Unless
the system is a highly critical production machine and every crash has to be analyzed,
this can be disabled.
With those changes applied:
# systemd-analyze
Startup finished in 1.899s (kernel) + 1.505s (userspace) = 3.405s
# systemd-analyze blame
629ms systemd-journald.service
532ms systemd-logind.service
480ms dev-vda3.device
479ms dev-vda2.device
303ms systemd-hostnamed.service
Over a second saved again. systemd-analyze tells us that there’s not much left in userspace to optimize.
Kernel configuration
Currently the kernel takes quite a long time during boot for benchmarking some algorithms.
This is done so that it knows which of the available implementations is the quickest on the
system it’s running on.
Ironically, this means that on CPUs with new features it actually takes a bit longer.
If performance for RAID6 is not important, this can simply be disabled by setting
CONFIG_RAID6_PQ_BENCHMARK=n
After building such a kernel and installing it:
# systemd-analyze
Startup finished in 1.083s (kernel) + 1.356s (userspace) = 2.439s
This saves almost a second during kernel startup.
Direct kernel boot
The bootloader takes some time during boot as well (boot menu, kernel loading), which can be optimized as well. Apart from the obvious option to decrease the time the boot menu is shown (or hiding it by default), it’s also possible to skip it altogether! By supplying the kernel and cmdline from the VM host, booting can be even quicker. This is only a good idea in setups where there is a custom kernel build with everything built-in though, as otherwise it may happen that the modules in the VM get out of sync with the kernel image supplied by the VM host. This also breaks automatic rollbacks (health-checker needs GRUB for that) and selecting old snapshots to boot from.
I’m not aware of a way to measure the time it takes to load the kernel, so no measurement here. This mostly removes the time which systemd-analyze doesn’t show (on non-EFI systems).
Conclusion
Getting from 25.958s to 2.439s (with hacks) means that over 90% of boot time can be optimized away.
The next task is to push those optimizations into the distro and make them the default or at least easy to apply.
Have a lot of fun!
#Akademyes 2020 se celebrará en Málaga
La reunión anual de desarrolladores, usuarios y simpatizantes de KDE en España de este año 2020 se celebrará en Málaga del 24 al 26 de abril. ¿Te apuntas?

La comunidad de KDE España, ha desvelado donde se celebrará la nueva edición de Akademy-es para este año 2020. La ciudad de Málaga acogerá a la comunidad de KDE España, desarrolladores, usuarios o simplemente simpatizantes del software libre.
La comunidad de KDE España ha desvelado la elección de Málaga como ciudad en la que se celebrará el Akademy-es 2020, y las fechas serán del 24 al 26 de abril de 2020, junto a la celebración de otro gran evento como es el Opensouthcode 2020.
Tanto si estás cerca de Málaga, como si te toca recorrer unos cuantos kilómetros, te animo a participar a esta nueva edición de Akademy-es y además tienes el aliciente de poder asistir también al Opensouthcode y asistir a algunas de sus charlas.
También puedes animarte a realizar una charla relacionada con KDE, aunque también se aceptan otras propuestas que obviamente estén relacionadas de alguna manera con KDE o el software libre.
La cita de Akademy-es la organiza KDE España, y con ella tratan de difundir el proyecto y la comunidad de KDE, además de servir de punto de encuentro y reunión de la comunidad de KDE España, asociación de software libre a la que te puedes unir y aportar.
Yo voy a ir revisando horarios, y cuadrando fechas, para ver si una vez más puedo asistir al Akademy-es y disfrutar de una cita “geek” en buena compañía y en la ciudad de Málaga ¿buen plan, no te parece?
Tanto si usas Plasma o algo del software de KDE, tanto si desarrollas o como yo eres un simple usuario que disfruta del software libre gracias al gran trabajo de la comunidad KDE, esta cita de Akademy-es en Málaga es una cita ineludible.
Y lo que pase en Akademy-es no se quedará en la Akademy-es, lo mejor es difundirlo y dar a conocer qué es eso del software libre, o por lo menos contar aquello que se pueda contar… 


Rouen Journée de la CyberSécurité et du Logiciel Libre
Le samedi 22 Février 2020, nous organisons notre Journée Mensuelle du Logiciel Libre et de la Cybersécurité à la Maison St Sever à Rouen. (Rez-de-chaussée, centre commercial St Sever, 10-12 rue Saint-Julien, 76100, Rouen) de 14h00 à 18h00. Nous profitons de l’occasion pour communiquer sur les dates du premier semestre 2020 : 25 janvier 22 […]
The post Rouen Journée de la CyberSécurité et du Logiciel Libre appeared first on Network Users Institute - Cybersécurité, Intégration de Linux & Logiciels Libres à Rouen, Normandie..
Usando Tilix en openSUSE - 1a. Parte
Traducción del artículo original publicado por Douglas DeMaio:
https://news.opensuse.org/2020/01/27/using-tilix-part-1-on-opensuse/
Al igual que Terminator, se puede dividir, lo que le permite tener muchos terminales en una sola ventana:


Podemos tener varias sesiones dentro de una ventana de Tilix. Una sesión es simplemente un grupo de terminales divididas. Las sesiones se pueden mostrar como una barra lateral alterna:


Podemos dividir fácilmente la terminal actual usando los botones en la barra superior. La terminal actual se puede dividir vertical u horizontalmente. Las nuevas terminales siempre se crean debajo o a la derecha de la terminal activa.
Sincronizar la entrada
Tilix nos permite configurar algunas terminales de una sesión en sincronización. Esto significa que todo lo que se escribe en un terminal se envía también a todos las demás terminales sincronizadas. Esto es particularmente útil cuando se está conectado a varios hosts remotos y se desea enviarles los mismos comandos.

A través del ícono de lupa (búsqueda), podemos buscar texto dentro de todo el texto emitido en la terminal actualmente activa.

Cuando se trabaja mucho con emuladores de terminal, con muchos de ellos abiertos, es fácil comenzar a escribir en el incorrecto. Tilix nos permite configurar una terminal en lectura sólo para que nada de lo que se escriba tenga efecto (no se enviarán secuencias).

Tilix nos ofrece interesantes opciones de copiar y pegar. Deben activarse en las preferencias:

Podemos configurar un acceso directo para mostrarlo o elegir mostrarlo siempre. Este diálogo permite, por ejemplo, configurar el número de espacios en las tabulaciones al pegar:

Advertencia en caso de "pegado peligroso":

Esto concluye nuestra presentación de Tilix. En el siguiente artículo, profundizaremos y exploraremos sus funciones avanzadas.