
 Member
 FunkyPenguin
Get Bug Tracking With The Help Of Robots

license implications when packaging TrueCrypt
I use an encrypted USB stick to carry credentials and data for production servers I look after when I’m on call. One requirement was portability between my work (Windows) and home (GNU/Linux) desktops, so TrueCrypt came to mind. I packaged it all up an applied some patches to fix compiler issues and warnings. The TrueCrypt license, however, is not OSI-approved, and as such the program cannot be built in the openSUSE build service (see blacklist, discussion).
I almost forgot about the whole thing until I upgraded the package for new dependencies in the upcoming release of openSUSE 11.4. I talked with people over at packman, a popular 3rd-party repository for software not included in openSUSE proper for one reason or another. We analysed the license a bit and concluded that if we shipped binaries built from non-pristine sources, the product would have to be re-branded as per the requirements of their license. I am usually pragmatic about these things as long as FLOSS and non-FLOSS licences can be adhered to, but didn’t want to go the route Debian took with Firefox et al.
We contacted the TrueCrypt developers on this issue, we’ll see what comes out of that. Until then, if someone wants to build this package, here is what you need:
truecrypt.spec
truecrypt.desktop
truecrypt-tc_token_err.patch
truecrypt-NULL_PTR-redefinition-warning.patch
truecrypt-undefined-operation-warning.patch

It's off to conf.kde.in I go!
I'm feeling very lucky today. Why? Because in a few hours I'll be getting on a plane to Bengaluru, India and attending conf.kde.in. Pradeepto has been asking me for years to look outside the cosy confines of the US-Europe Axis of KDE, and thanks to my role in the openSUSE Boosters team, this has finally become possible.
I'll be giving a talk on contributing to KDE in the openSUSE project and a long talk/practical workshop on using the openSUSE Build Service as used by openSUSE, Novell, Dell, Intel, Nokia, Broadcom and Cray, to spread free software: your own, update existing software on openSUSE, or package for it and for many other distros at one go. But mainly I'm looking forward to meeting the people who make up a whole side of KDE. So if you haven't made up your mind what you're doing next week, how about coming to the RV College of Engineering in Bengaluru?
Like many others,
PS: I'm bringing a load of openSUSE loot to give away, so just look for the guy staggering under the huge carton!

USB-Stick als Schlüssel für die Festplattenverschlüsselung
OpenSUSE bietet seit einigen Versionen die Möglichkeit bei der Installation die Festplatte komplett zu Verschlüsseln. In Anbetracht der großen Menge an Daten macht dies heutzutage nicht nur bei Laptops, sondern auch bei stationären Rechnern Sinn. Wird der Rechner aber als Server — ohne Tastatur und Monitor — betrieben stört hierbei allerdings die notwendige Passworteingabe beim Starten des Rechners. Glücklicherweise bietet LUKS aber die Möglichkeit diese auf einem USB-Stick zu speichern, womit auch bei solchen Maschinen ein komfortabler Start möglich ist.
Achtung: Diese für openSUSE 11.3 erstellte Anleitung funktioniert bis einschließlich openSUSE 13.1. Auf openSUSE 13.2 und openSUSE Leap 42.1 habe ich sie nicht getestet. Auf openSUSE Leap 42.2 funktioniert sie nicht mehr. Es gibt einen neuen Mechanismus, welchen ich, sobald ich ihn ausführlich getestet habe, verbloggen und hier verlinken werde.
Ist ein USB-Stick als Schlüssel sicher?
Sicherheit ist immer relativ zur Bedrohung zu sehen. Auch beim USB-Stick stellt sich also die Frage wovor er schützen soll. Beim stationär zuhause stehenden Rechner hat die Verschlüsselung vor allem eine Funktion, sie schützt die Daten wenn die betroffen Festplatten mal das eigene Haus verlassen. Hierbei gibt es im Prinzip nur zwei Fälle. Stellt sich eine Platte während der Garantiezeit als defekt heraus so erspart einem die Verschlüsselung das heutzutage sehr zeitaufwendige Löschen der Platte. Wird die Festplatte entwendet, so ist sie ohne den USB-Stick, der natürlich in diesem Fall nicht im Rechner gesteckt haben darf, auch nicht auszulesen.
Ein großer Vorteil des USB-Sticks besteht hier darin, dass er sehr lange Passwörter ermöglicht. Möchte man lange Passwörten auf klassischem Weg verwenden kommt man um ein Aufschreiben des Passworts oft auch nicht herum. Außerdem gewinnt man eine Möglichkeit die Herausgabe des Passworts zu verweigern, sollte man je dazu aufgefordert werden. Bei einem langen Passwort welches man nie getippt hat ist die Chance sich zu erinnern nicht existieren. Auch hier gilt natürlich, der USB-Stick darf dann nicht trivial dem Rechner zuzuordnen sein.
Die Anleitung
Backup
Wie bei allen Operationen an der Basis eines Systems ist auch hier das Backup zu beginn wichtig. In diesem Fall ist es wichtig den Kernel und die Initramdisk zu sichern, da es sonst, sollte man sich bei der Konfiguration der Entsperrung via USB-Stick vertun, schwer ist wieder in das verschlüsselte System zu booten.Unter openSUSE ist es hierbei wichtig den Anfang des initrd und kernel-Namens zu ändern, da diese vom Befehl mkinitrd sonst dennoch aktualisiert werden.
cp /boot/initrd-2.6.34-12 /boot/safe-initrd-2.6.34-12
cp /boot/vmlinuz-2.6.34-12 /boot/safe-enable-vmlinuz-2.6.34-12/boot/grub/menu.lst die passenden Zeilen einfügt:
title SafetyNet -- openSUSE 11.3 - 2.6.34-12
    root (hd0,0)
    kernel /safe-vmlinuz-2.6.34-12 root=/dev/system/root resume=/dev/system/swap splash=silent quiet showopts vga=0x317
initrd /safe-enable-initrd-2.6.34-12Anlegen des Schlüssels
Als nächstes muss ein Schlüssel erzeugt werden. Um nicht zu viele zusätzliche Module in die Initramdisk packen zu müssen empfiehlt es sich einen Ext2-formatierten Stick zu verwenden. Dieser kann mitmkfs.ext2 -L keystick /dev/sdbkeystick gibt hierbei das Label des erzeugten Dateisystems an, /dev/sdb muss an den tatsächlichen Gerätenamen des USB-Sticks angepasst werden. Sollte der Stick bereits mit ext2 formatiert sein sollte dennoch ein Label gesetzt werden.
tune2fs -L keystick /dev/sdbDas Label kann natürlich frei gewählt werden. Es dient später zur Identifizierung des Sticks. Dies hat zwei Vorteile:
- Der USB-Stick unabhängig von hinzugekommenen oder entfernten Datenträgern gefunden
- Anders als bei der Identifizierung über die ID des Sticks kann man einen zweiten Stick mit gleichem Label als Backup verwenden. Ich recycle gerne nutzlose Werbegeschenke für diese Aufgabe. Sollte mal eines kaputt gehen spare ich mir das Zeitaufwendige zurückspielen des Backups der ganzen platte, da ich den Schlüssel ja noch von einem zweiten USB-Stick laden kann.
Anschließend sollte ein Passwort generieren und auf dem USB-Stick hinterlegen. Meine bevorzugte Methode ist diese:
pwgen -s 1024 1 > /media/keystick/keyfileNun kann man den erzeugten Schlüssel der verschlüsselten Partition hinzufügen. Leider verhält sich LUKS leicht unterschiedlich was interaktiv eingegebene Schlüssel und Schlüsseldateien angeht. Deshalb müssen wir unseren Schlüssel "interaktiv" eingeben. Hierzu erzeugt man zunächst eine Datei welche eine Zeile mit dem bei der Installation gewählten Schlüssel und eine mit dem neuen enthält.
cat oldkey /media/keystick/keyfile > tmpcryptsetup luksAddKey /dev/sda2 < tmprm tmpUm zu testen ob der Schlüssel korrekt hinzugefügt wurde kann man probehalber einen leeren Schlüssel hinzufügen. LUKS ist schlau genug diesen Schlüssel nicht wirklich aufzunehmen:
cryptsetup luksAddKey /dev/sda2 < /media/keystick/keyfileErstellen der neuen Initramdisk
Damit der Kernel bevor das Root-Verzeichnis eingebunden ist auf den USB-Stick zugreifen kann muss man sicherstellen, dass die USB-Module in der Initrandisk ist. Hierzu sollte man in openSUSE sicherstellen, dass die VariableINITRD_MODULES in /etc/sysconfig/kernel folgende Werte enthält:
usb_storage scsi_modUm LUKS den Schlüssel zu übergeben benötigt man ein Skript welches ihn vom USB-Stick liest. Dies kann an einer beliebigen Stelle im Dateisystem liegen, es wird beim erstellen der Initramdisk in diese gepackt:
#!/bin/sh

STICK=/dev/disk/by-label/keystick
FSTYPE=ext2
slumber=150
modprobe usb-storage 1>&2
modprobe scsi_mod 1>&2
mkdir /keystick 1>2&
sleep 5 1>2&

while [ $slumber -gt 0 ] && [ ! -e "$STICK" ]; do
      sleep 1
      slumber=$(( $slumber - 1 ))
done
if ! mount -t $FSTYPE -r $STICK /keystick ; then
   $( echo 'FAILED!!!' ) 1>2&
   echo ''
   exit 1
fi

cat /keystick/keyfile

umount /keystick 1>2&
Damit LUKS weiß, dass es den Wert von einem Skript erhält muss die Datei /etc/crypttab angepasst werden:
cr_sda2 /dev/sda2 none initrd,luks,keyscript=/root/keyscript.sh- Ist
keyscriptgesetzt ist keine interaktive Eingabe mehr möglich. Deshalb sollte man die alte Initramdisk (welche die alte Konfiguration enthält) vorher sichern. - Der Wert
initrdist notwendig, da openSUSE bei der Generierung der Initramdisk sonst nicht merkt, dass es das Keyscript mit einpacken muss.
Zu guter letzt kann durch den Aufruf von mkinitrd die neue Initramdisk erstellt werden. Ein Neustart sollte den Schlüssel dann vom USB-Stick lesen anstatt diesen interaktiv zu erwarten.
Hat man die neue Konfiguration hinreichen getestet kann man den bei der Installation vergebenen Schlüssel aus LUKS entfernen und die gesicherte Initramdisk löschen.
Eine Anmerkung zur Distributionsaktualisierung
Diese Anleitung habe ich ursprünglich anhand von openSUSE 11.3 erstellt. Sie gilt aber auch für aktuellere Versionen bis 13.1. Auf openSUSE Leap 42.2 funktionierte diese methode aber nicht! Auf neuere Versionen kann man über das normale DVD-Update aktualisieren. Hierbei muss man allerdings die verschlüsselte Partition über einen eingetippten Schlüssel öffnen. Hierzu hilft es den bei der initialien Installation verwendeten Schlüssel nicht deaktiviert zu haben, oder aber temporär per cryptsetup luksAddKey einen kürzeren Schlüssel hinzuzufügen. Getestet habe ich auf diese Weise das Update von 11.3 auf 11.4 und von 11.4 auf 12.1. Der Installer warnt einen zwar, dass es Probleme geben kann, wenn man Partitionen per Kernel Device Name mountet, dies hat sich aber bisher nicht als Problem herausgestellt.
Quellen
Da die Literatur — was openSUSE angeht — zu diesem Thema leider noch sehr dürftig ist habe ich mich vieler Quellen bedient, von denen ich hier nur die wichtigsten nennen möchte:
- http://forum.ubuntuusers.de/topic/luks-root-partition-mit-schluessel-auf-usb-st/#post-1928847 lieferte die Vorlage für mein Keyscript.
- http://code.google.com/p/cryptsetup/wiki/FrequentlyAskedQuestions hilft enorm beim Verständnis.
- http://forums.fedoraforum.org/showthread.php?t=241942 zeigt im Prinzip den ganzen Vorgang, funktioniert leider nicht 1:1 für openSUSE.
- http://wejn.org/how-to-make-passwordless-cryptsetup.html zeigt mehrere Variationen des Themas, aber passt auch nicht direkt auf openSUSE.
- http://raftaman.net/?p=300 ist inspirierend, löst aber nicht ganz das gleiche Problem (der verwendete USB-Stick ist cool).
- https://wiki.archlinux.org/index.php/System_Encryption_with_LUKS_for_dm-crypt#Remote_unlocking_of_the_root_.28or_other.29_partition liefert Grundlagen, wenn man dies möchte.
Getting The Necessitas To Port To Android
Bug Tracking With The Help Of An Entomologist

PDF Mod Update
I haven't blogged about PDF Mod since Nov, 2009. We've had five releases in the meantime, including 0.9.1 just released today!
We have had tons of improvements and fixes, and one major new feature: bookmark editing!
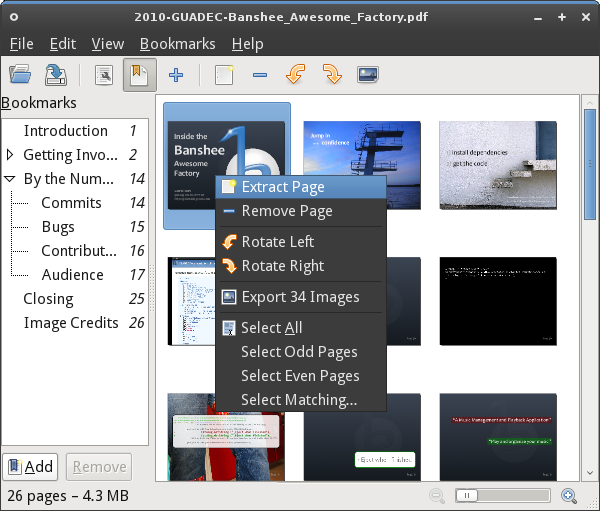
We're up to 26 translations now, including 11 of our user manual!
As a reminder, PDF Mod can:
- pull out (extract) pages from a document into a new PDF
- combine two documents, or parts thereof
- reorder and rotate pages
- extract embedded images
- edit basic metadata (title, author, keywords)
- edit a document's bookmarks (aka outlines)
- and that's it!
tarballs, release notes, git, mailing list, irc, bugzilla, website/wiki
First beta of MonoDevelop 2.6
The first new big feature is support for GIT. This was long time due, especially since Mono and MonoDevelop itself moved to GIT. I already blogged about it a few months ago, but basically we are using NGit, a C# port of JGit, as the core for the GIT add-in. It hasn't been easy to make this port fully operational, but we now have a GIT core that can be easily updated and which is fully portable.


LibreOffice 3.3.1 bugfix release available for openSUSE
I’m happy to announce LibreOffice 3.3.1 bugfix release for openSUSE. The packages are available in the Build Service LibreOffice:Stable project. They fix various crashers, usability and translation problems, see the libreoffice-3.3.1.2 release news for more details. See also some notes about openSUSE LibreOffice build.
The openSUSE LO team hopes that you will be happy with this release. Though, any software contains bugs and we kindly ask you to report bugs. It will help us to fix them in the future releases.
Other information and plans:
This version will be in openSUSE-11.4 out of box. We are going to prepare official maintenance update for openSUSE-11.2 and 11.3.
There are already several fixes for the LO-3.3.2 bugfix release. You might expect 3.3.2-rc1 in the “LibreOffice:Unstable” repositories by the end of the following week.
Most developers are already concentrated on LO-3.4 release. I hope that the first beta packages will be ready in the beginning of April.
gui-thread-check
To make it easier to track down those bugs, I created a simple profiler module for Mono which can detect invocations to GTK# methods from a thread other than the main GUI thread. This module is available here:
https://github.com/slluis/gui-thread-check
To use it, build and install the module, and then run your application with
the command:
mono --profile=gui-thread-check yourapp.exe
If the profiler is properly installed, you'll see an output like this:
*** Running with gui-thread-check ***
*** GUI THREAD INITIALIZED: 2861676352
While the application is running, if the profiler detects a non-gui thread
invoking gtk methods, it will print a warning message together with a
stack trace. For example:
*** GTK CALL NOT IN GUI THREAD: Widget.gtk_widget_get_parent
Widget.get_Parent
SourceEditorWidget.get_TextEditor
SourceEditorWidget.get_Document
SourceEditorWidget.HandleParseInformationUpdaterWorkerThreadDoWork
BackgroundWorker.OnDoWork
BackgroundWorker.ProcessWorker