
 Member
 CzP
CzPSecuring the sudo to sudo_logsrvd connection
Securing the sudo to sudo_logsrvd connection
Using sudo_logsrvd to centrally collect sudo session recordings from your network is a huge step forward in security: users cannot delete or modify session recordings locally. However, by default, transmission of recordings is not encrypted, making it open to modifications and eavesdropping. Encrypting the connection between sudo and sudo_logsrvd can eliminate these problems. Larger environments usually either have in-house PKI tooling in place, or colleagues who know all openssl options off the top of their heads. However, small and medium enterprises often lack the infrastructure or knowledge to work with TLS certificates.
This blog can help you to secure connections between sudo and sudo_logsrvd when there is no PKI tooling available to you, or you want to create all the certificates yourself using openssl. It is based on the sudo_logsrvd manual, but changed in such a way that all information is entered on the command line. While interactive certificate generation works fine for a single cert, generating multiple client certificates is easier when everything is on the command line.
Read my blog at https://blog.sudo.ws/posts/2021/08/securing-the-sudo-to-sudo_logsrvd-connection/

GNA compatibility with openSUSE
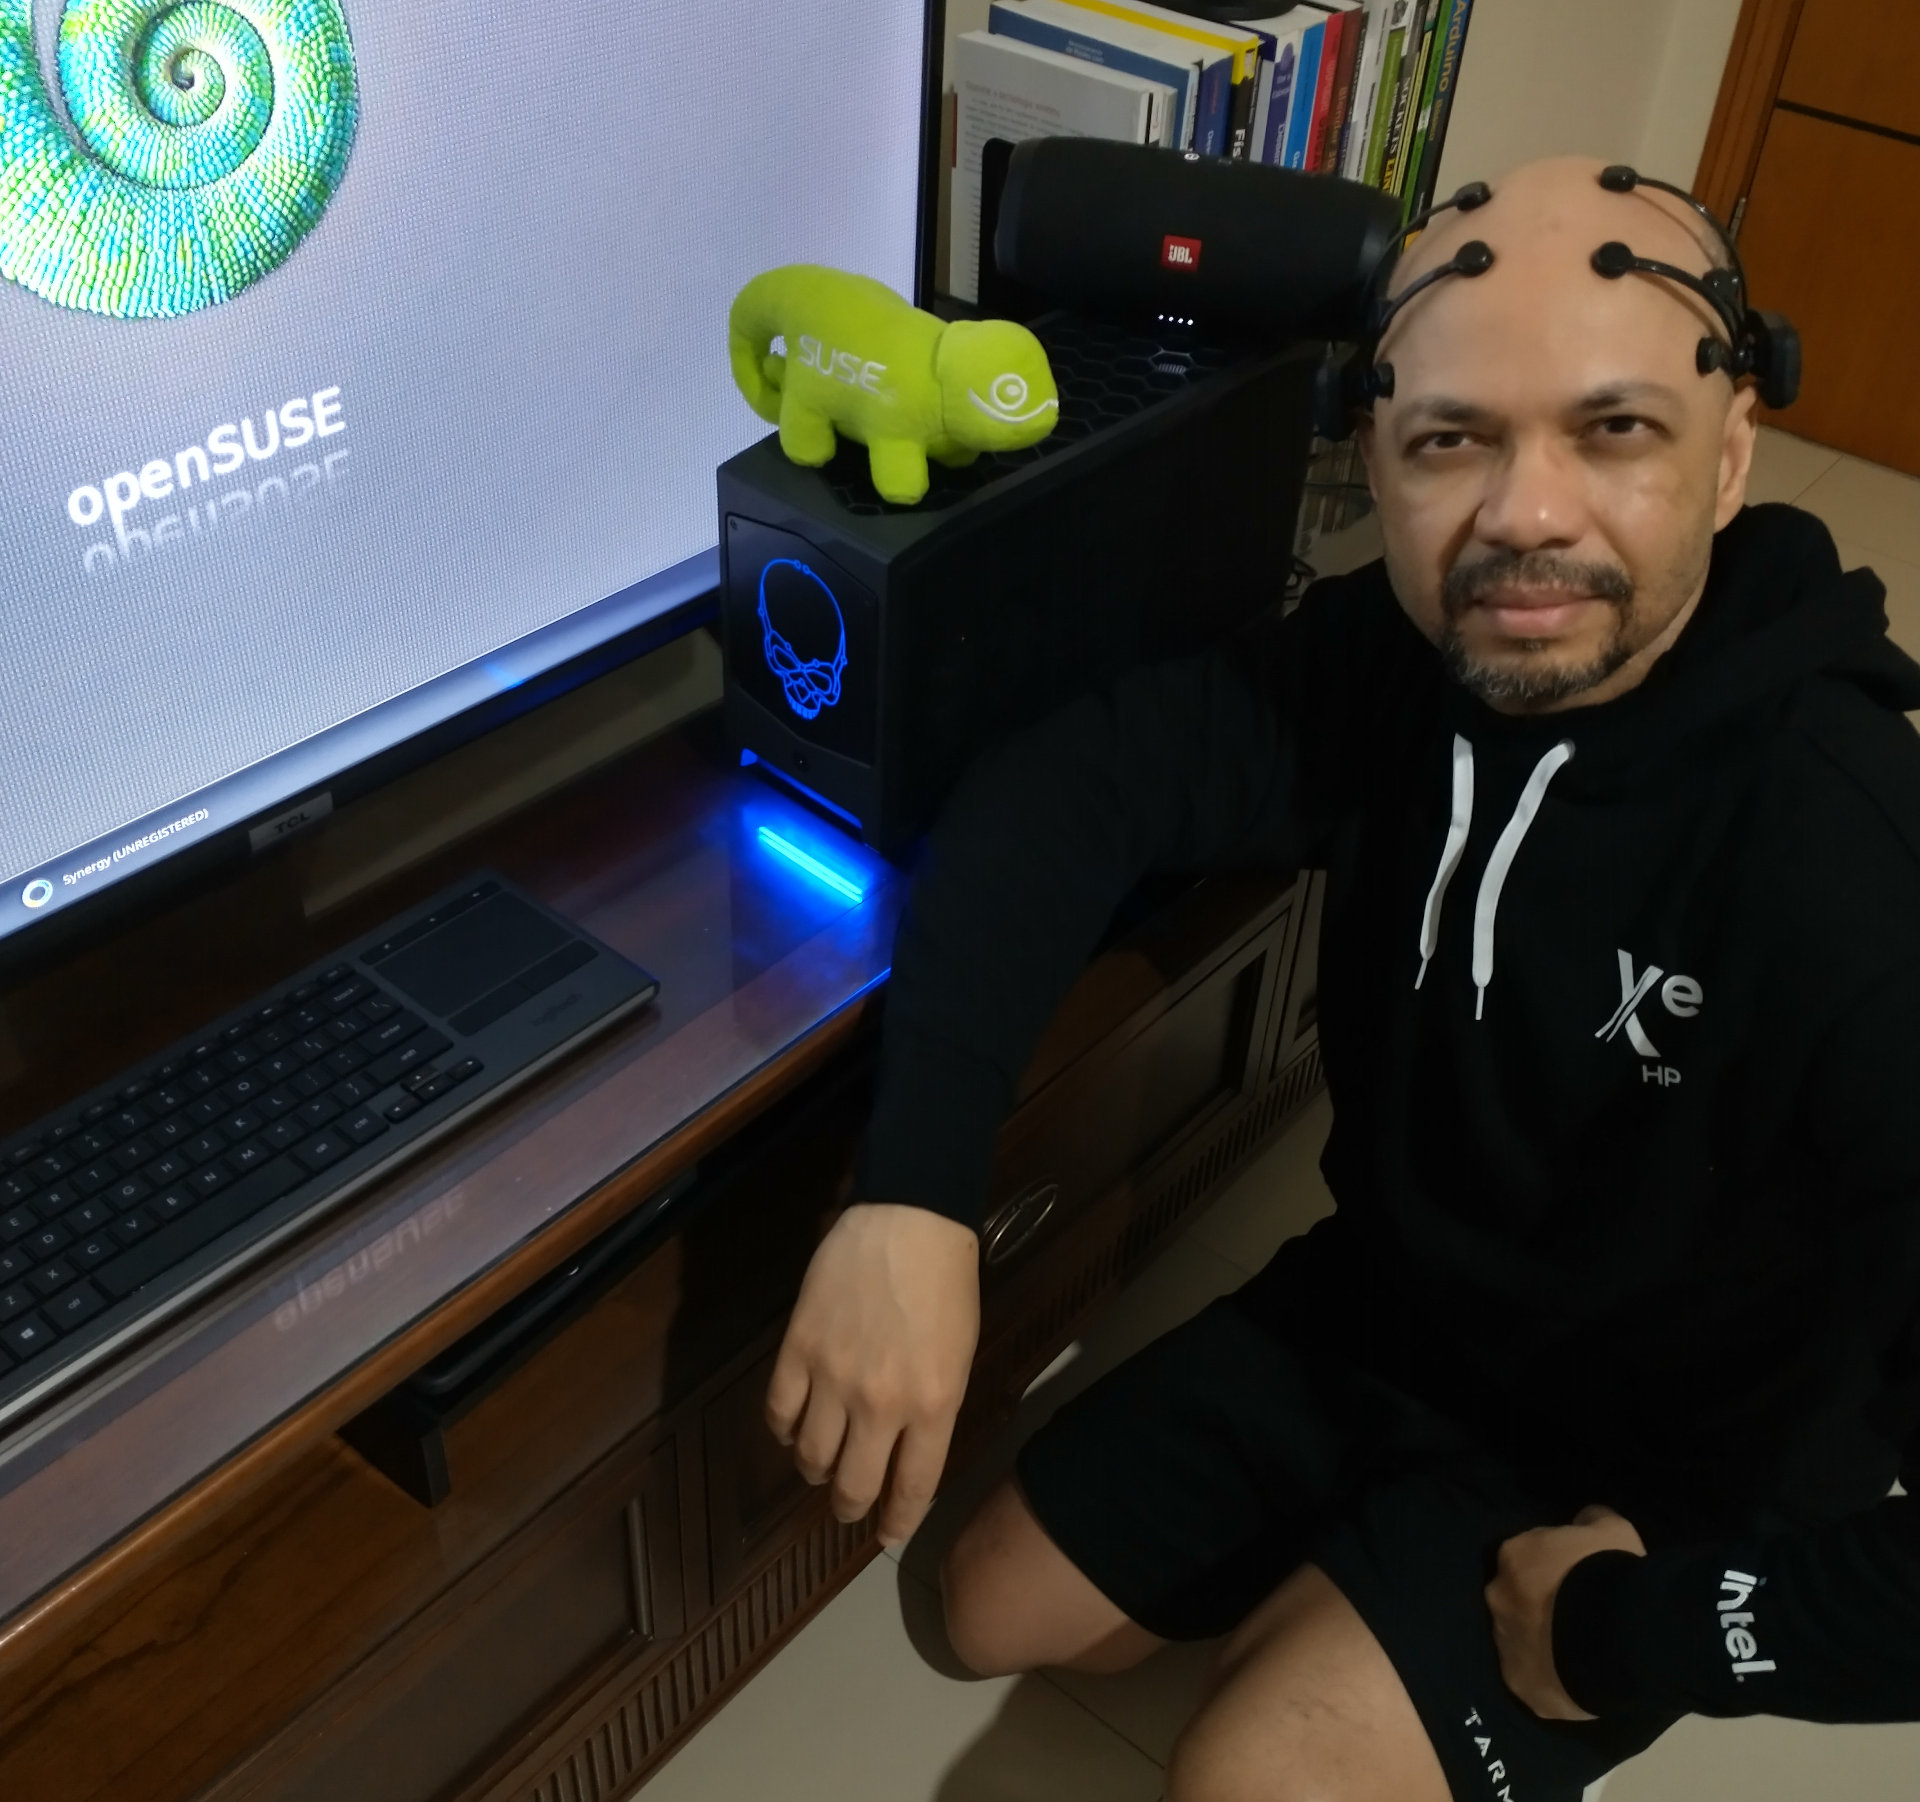
While focused on the openSUSE Innovator initiative as an openSUSE member and official Intel oneAPI innovator, I tested the Beast Canyon NUC 11 machine on openSUSE Leap 15.3 and Tumbleweed; With all the work, we made available in the SDB an article on how to use the GNA Technologie on the openSUSE platform. More information can be found at https://en.opensuse.org/SDB:Install_GNA_in_NUC_Beast_Canyon.
Beast Canyon (still on pre-order) is the highest-performing Intel® NUC available today. Beast Canyon is the evolution of Intel’s modular gaming mini PC, a more compact gaming PC than most gamers could dream of building on their own. The equipment in some models has the Core i9-11900KB processor with the GNA feature: Gaussian & Neural Accelerator Library.
Intel® Gaussian & Neural Accelerator is a low-power neural coprocessor for continuous inference at the edge. For more information, visit : https://github.com/intel/gna

Noodlings 32 | Settling In
openSUSE Tumbleweed – Review of the week 2021/34
Dear Tumbleweed users and hackers,
Thanks to Richard for taking care of Tumbleweed for us the last few weeks, while I did an electro-detox. Took some effort, but I did actually manage to stay away from all and any computers. But now I’m back, full in swing and helping Tumbleweed to roll at full speed again. Richards last review covered up to Snapshot 0817. Since then, and thus during the one-week time frame, 4 snapshots have been published (0820, 0823, 0824, and 0825).
The most noteworthy changes in those snapshots were:
- Mesa 21.2.0
- Mozilla Firefox 91.0.1 & Thunderbird 91.0.1
- Linux kernel 5.13.12
- Node.JS 16.6.2
- Python 3.8.11
- Poppler 21.08.0
- gcc 11.2.1
- Most of GNOME 40.4 (some late packages coming in the next days)
The staging projects are quite crowded, the main topics being worked on at the moment being:
- glibc 2.34
- openssl 1.1.1l
- rpmlint 2.1
- meson 0.59.1
- openssl 3 – test project
- Linux kernel 5.13.13
- systemd 249.2
elementary OS 6.0 | Review From an openSUSE User

Tumbleweed Updates Kismet, PulseAudio, Python
Snapshot releases of openSUSE Tumbleweed began to flow this week for the rolling release.
Moving past last week’s build failures and the obstacles with the ISO media size being excessively large, three snapshots were released this week.
The latest 20210824 snapshot updated Mozilla Thunderbird from version 78.13.0 to version 91.0.1, which is the next Extended Support Release codebase. The new email client offers many new features like keyboard shortcuts to access To/CC/BCC fields and a PDF JavaScript viewer is now included in Thunderbird. Two major version updates were in the snapshot; an update to nftables 1.0.0 now recognizes the command-line option --define. GTK based volume control tool pavucontrol 5.0 has support for switching Bluetooth codecs that comes new in PulseAudio 15.0, which was released in the 20210823 snapshot 24-hours earlier. GNU Compiler Collection was updated to version 11.2 and fixed the One-time Passwords In Everything package with glibc 2.34. A few GNOME and RubyGems packages were updated in the snapshot. Command-line utility grep updated to version 3.7, which skipped the stack overflow tests in the qemu build. The runtime nodejs16 16.6.2 update fixed the improper handling of untypical characters in domain names and fixed three Common Vulnerabilities and Exposures.
The network-detector, packet-sniffer, and intrusion-detection package Kismet updated to its latest 2021.08 version in snapshot 20210823; the packages made some small improvements and has a new Wireless Intrusion Detection System alert. PulseAudio 15.0 dropped several BlueTooth patches and improved hardware support. PDF rendering package poppler 21.08.0 added an Application Programming Interfaces to allow the addition and modification of outlines into a PDF. An updated 1.9.7 version of sudo enabled OpenSSL support for a secure central session recording collection. And yast2-bootloader 4.4.6 replaced mkinitrd with dracut.
The 20210820 snapshot updated the Linux Kernel to version 5.13.12, which had several network device support fixes. The update of Mozilla Firefox 91.0.1 fixed an issue that caused tabs from private windows to be visible in non-private windows and it had several CVE fixes in the updated browser version. The update of python38 3.8.11 addressed some security issues and fixed a regression introduced in the previous version. Updated graphics package Mesa 21.2.0 enabled the Gallium3D OpenGL driver in case there is an issue with some video hardware acceleration. Other packages to update in the snapshot were document reader okular 21.08.0, libstorage-ng 4.4.35, diffutils 3.8 and several YaST packages.
Skia on Mac
So, current LibreOffice git version now has support for drawing based on Skia also for the Mac. Both Raster and Metal (the Mac GPU framework). Below is the obligatory screenshot, and here is the hey-it-can-be-faster video.

Wayland Display Server on openSUSE Tumbleweed in 2021
The lazy audiophile
I love listening to music. And while I am lazy (which is the popular term for considering if something is worth the effort before doing it), I still prefer listening to it in a realistic sound quality. Which sounds like a contradiction, isn’t it? Well, yes, but only if you are not ready for compromises. In this blog, I focus on technologies and software problems, and the compromises I made to keep listening to music simple but still enjoy it. On the audio device side, I won’t mention any brands.
Digital audio
My number one compromise is that I listen to digital audio. I am often told that a true audiophile listens only to analog sound sources. For them, listening to music actually starts days earlier: doing all kinds of cleaning rituals on vinyls.
I have multiple problems with the vinyl approach. First of all: I have no idea what I will want to listen to in a few days. I do not even know what I want to listen to in a few hours. I only know what I want to listen to right now. This need is easy to meet with digital sources, but not so convenient with analog ones, especially not with vinyl. The other problem is that there is no vinyl without some extra noise. When I bring this up, I’m reminded of concerts, namely that there are extra noises in the concert room as well. That is right. And I do not like that either :-).
Bluetooth headphones
Whenever I mention that next to my regular headphones, I also use a pair of Bluetooth headphones, people swear at me, claiming that it substantially degrades sound quality. Yes, that is right. And to add insult to injury, I even use active noise canceling, which changes the original sound even more. But who cares when it is just background music, so I can concentrate on my work when people are talking around me? It does its job: keeps the noise out. Of course I switch to my studio headphones as soon as I want to focus on the music itself. But when it comes to background music, Bluetooth is a lot more comfortable.
Music sources
I have tons of CDs, but no CD player anymore. I have a USB CD drive instead, which I use to grab CDs into FLAC files. I play those lossless files whenever I want to play my collection. Of course you might ask why do I still buy CDs. There are many reasons for that. First of all: I want to own the music I like in physical format. I also like the booklets. Many CDs are never published to TIDAL or to online services. Finally, music could be removed from online services or could become region limited. So, it could happen that the music I like suddenly disappears. What I have in a physical format and grabbed into FLAC files is already my own. It just cannot disappear suddenly.
I also buy digital music files. Once I was a Society of Sound member, but as you can see, this service is no longer available. They published one, later two albums each month. Even if I did not like the music on each and every album, the quality of their recordings is fantastic, and a joy to listen to.
Currently, I am a TIDAL subscriber. When you use their player, they have all albums available at least in CD quality, some even at a higher quality. Originally, they had a very limited repertoire, but now it is quite good.
Linux
For many years, I listened to music on Linux. First of all, because it is my primary operating system. But also because it sounded the best. There were no additional layers between the sound card and music player applications, making the sound very clean. Unfortunately, pulseaudio became popular later, and now you cannot use a GUI without using pulseaudio. And while it adds some extra flexibility, it really degrades sound quality. With some tuning, the situation can be improved, but it is far from perfect.
There are still some Linux-based music appliances without pulseaudio, providing excellent sound quality. But unless it is just background music, the Linux desktop is not really good to listen to music anymore.
Another pain point on Linux is TIDAL. You can only use it from a browser, where only the lowest sound quality is available.
Windows
I am a Linux guy, so I avoid Windows as much as possible. But of course sometimes I still use it, for example for photo editing, when playing with my MIDI keyboard, and for some minimal gaming. On Windows, I have Foobar2000 as music player. And of course I also have TIDAL. Recently I learned some extra settings: using the sound card directly (without sharing it with other applications), and turning off normalization. These two settings eliminate all degradation I could hear. Of course some people say that even this is not enough, but for me, additional complex tweaks just do not worth the time, money or effort.
MacOS
Not my favorite OS either. Neither of my DACs work perfectly with music player applications trying to use the sound directly. The only exception here is TIDAL, which works just perfectly and can use the sound card directly, just like on Windows. So, I often use my MacBook Pro when I want to listen to TIDAL. It is an Intel-based one though, but hopefully it will be supported for another few years.
A surprising choice: Android
Android is not famous for its multimedia capabilities. The TIDAL Android app cannot use the sound output directly, so sound quality is degraded, only good for some background music. Previously I used a music player application, which could play my FLAC and DSD files from my NAS accessing the USB port of my Android device directly. First they broke DSD support, which was not a problem though, as I only had a few sample files. My own collection is purely FLAC. But then they also broke network support, which proved to be a bigger problem, as my music collection sits on a NAS, because it is a lot larger than it could fit the storage of my Android devices.
Luckily, I heard about USB Audio Player Pro in one of the Facebook discussion groups I am a member of. It can directly access the USB port, making “bit perfect” audio possible. And best of all, it can play back not just my FLAC collection, but also TIDAL - in better sound quality than the official TIDAL application on Android itself! Of course, there are some limitations: discovering new music is not so easy as it is in the official app. As a workaround, I use TIDAL on my MacBook Pro to discover new music, but I use my Google Pixel C tablet with USB Audio Player Pro whenever I listen to music or composers I already know. There, I can easily combine music from my NAS with music from TIDAL. A few weeks ago, I complained that the keyboard of my Google Pixel C tablet died. Luckily the tablet itself still works just fine, so I can use it to listen to music.
A bit of fun
And just to prove that analog vs. digital is more of a religious question than audio quality. One of my favorite recordings is John Metcalfe – Kites And Echoes (The Vinyl Experience). It was one of the albums from Society of Sound. And, as its note states:
A special exclusive edition called The Vinyl Experience. This is to provide listeners with a high resolution 96kHz recording of the actual vinyl LP.
Someone was listening to music at my place, and loudly complained that digital music does not have a soul, as it’s missing important details, and all the usual arguments. So, I proposed that we listen to an LP instead of digital. Of course I do not have a record player, but I started the above recording on my Pixel C. The mood quickly changed, and my guest was all smiles once the familiar sound of an LP started coming out from the speakers. However, the smile turned into laughter, once I explained how I cheated :-)


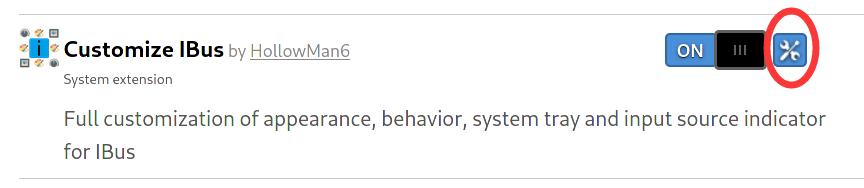
Customize IBus User Guide
GNOME Desktop
First, make sure you have installed the GNOME Shell Extension: Customize IBus https://extensions.gnome.org/extension/4112/customize-ibus/
Installation
You can refer to here: https://itsfoss.com/gnome-shell-extensions/ to install the GNOME Shell Extension from a web browser.
or
- Linux:
git clone https://github.com/openSUSE/Customize-IBus.git
cd Customize-IBus && make install
- FreeBSD:
git clone https://github.com/openSUSE/Customize-IBus.git
cd Customize-IBus && gmake install
If you want to install Customize IBus as a system extension for all users:
- For Arch based:
yay -S gnome-shell-extension-customize-ibus

- For Fedora:
wget https://github.com/openSUSE/Customize-IBus/raw/package-repo/customize-ibus-rpm.repo
sudo mv customize-ibus-rpm.repo /etc/yum.repos.d/
sudo dnf update
sudo dnf install gnome-shell-extension-customize-ibus
- For OpenSUSE:
wget https://github.com/openSUSE/Customize-IBus/raw/package-repo/customize-ibus-rpm.repo
sudo mv customize-ibus-rpm.repo /etc/zypp/repos.d/
sudo zypper refresh
sudo zypper install gnome-shell-extension-customize-ibus
Or install directly through the ymp file.
- For Debian based (Ubuntu):
echo "deb http://opensuse.github.io/Customize-IBus/deb/ /" | sudo tee -a /etc/apt/sources.list.d/customize-ibus-deb.list > /dev/null
wget -q -O - http://opensuse.github.io/Customize-IBus/hollowman.pgp | sudo apt-key add -
sudo apt update
sudo apt install gnome-shell-extension-customize-ibus
PPA:
sudo add-apt-repository ppa:hollowman86/customize-ibus
sudo apt-get update
You can download the majority of your Linux distributions related packages through OpenSUSE OBS and then install.
- Gentoo:
git clone https://github.com/openSUSE/Customize-IBus.git
cd Customize-IBus && make emerge
- NixOS:
sudo nix-env -i gnomeExtensions.customize-ibus
- Guix:
guix install gnome-shell-extension-customize-ibus
- FreeBSD:
wget https://github.com/openSUSE/Customize-IBus/raw/package-repo/customize_ibus.conf
sudo mkdir -p /usr/local/etc/pkg/repos/
sudo mv customize_ibus.conf /usr/local/etc/pkg/repos/
sudo pkg update
sudo pkg install gnome-shell-extension-customize-ibus
After installation, you will find that there is an additional entry Customize IBus in the IBus input source indicator menu. Click it, and you will open the Customize IBus preferences. If there is no such menu entry, you can press Alt+F2 to restart the GNOME shell, or log out and log in again. If that still doesn’t work, please make sure you have installed the latest version of the extension and have enabled the extension.

You can also click the configuration icon of the Customize IBus extension in https://extensions.gnome.org/local/ to open the preferences.
General

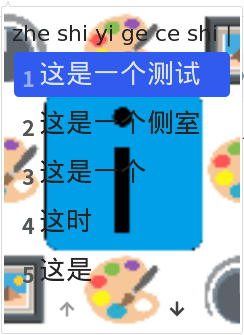
At item Candidates orientation, select the check box on the left to enable the configuration of the IBus candidate box direction. Click on the right side to select, it can be set to vertical or horizontal.
At item Candidates popup animation, select the check box on the left to enable the configuration of the IBus animation. Click on the right side to select, support setting to no animation, slide, fade, and both.
Example to turn on the sliding animation: 
At item Candidate box right click, select the check box on the left to enable the configuration of right-click the candidate box to perform related operations when using the IBus. Click on the right to make a selection, and you can set to open the tray menu or switch the input source.
At item Candidates scroll, select the check box on the left to enable the configuration of actions performed when scrolling using the IBus. Click on the right to select, and you can set to switch the current candidate word or page.
At item Fix candidate box, select the check box on the left to enable a fixed candidate box. Click on the right to select. You can set the candidate box position with 9 options. Recommend to enable Drag to reposition candidate box at the same time so that you can rearrange the position at any time. Will remember candidate position forever after reposition if you set to Remember last position, and restore at next login.
At item Use custom font, select the check box on the left to enable configuration of the font and size of the text in the IBus candidate box. Click on the right to open the font selector. In the pop-up dialog box, you can select the font you want in the upper part and the font size in the lower part. Click Select to confirm the modification. 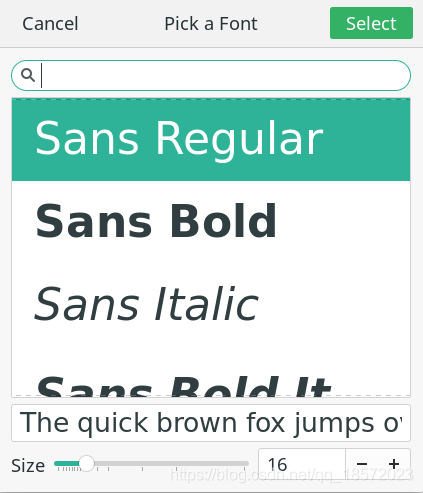
At item Auto switch ASCII mode, select the check box on the left to enable configuration of switching ASCII mode when switching windows, Click on the far right to select. It supports setting to make ASCII mode on and off, or just keep to remain current mode. You can also set to remember input state or not on the near right. If you have set to Remember Input State, every opened APP’s input mode will be remembered if you have switched the input source manually in the APP’s window, and the newly-opened APP will follow the configuration. APP’s Input State will be remembered forever.
At item Candidate box opacity, select the check box on the left to enable configuration of the opacity in the IBus candidate box. Slide the right button to configure opacity ranging from 0 to 255 step 1.
At item Fix IME list order, click the switch on the right to turn this feature on or off.
If you use multiple input methods in your system, when you use the keyboard shortcut to switch input methods (usually Win + Space), the input method displayed by default on the screen will be sorted by the most recently used input method. Turn on this feature to modify the order of input methods as fixed.
When off:

When on:

At item Enable drag to reposition candidate box, click the switch on the right to turn this feature on or off.
Example of turning on drag to reposition candidate box: 
At item Candidate box page buttons, click the switch on the right to show or hide the candidate page buttons.
Tray
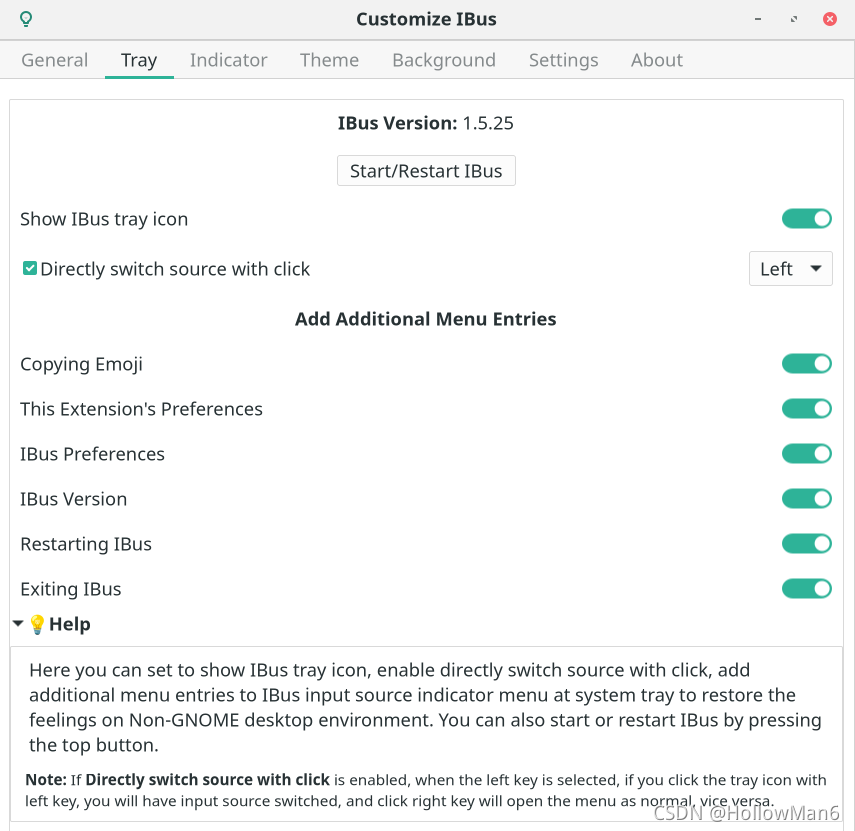
Here you can set to show IBus tray icon, enable directly switch source with click, add additional menu entries to IBus input source indicator menu at system tray to restore the feelings on Non-GNOME desktop environment.
All menus are enabled:

You can also start or restart IBus by pressing the top button: 
Indicator
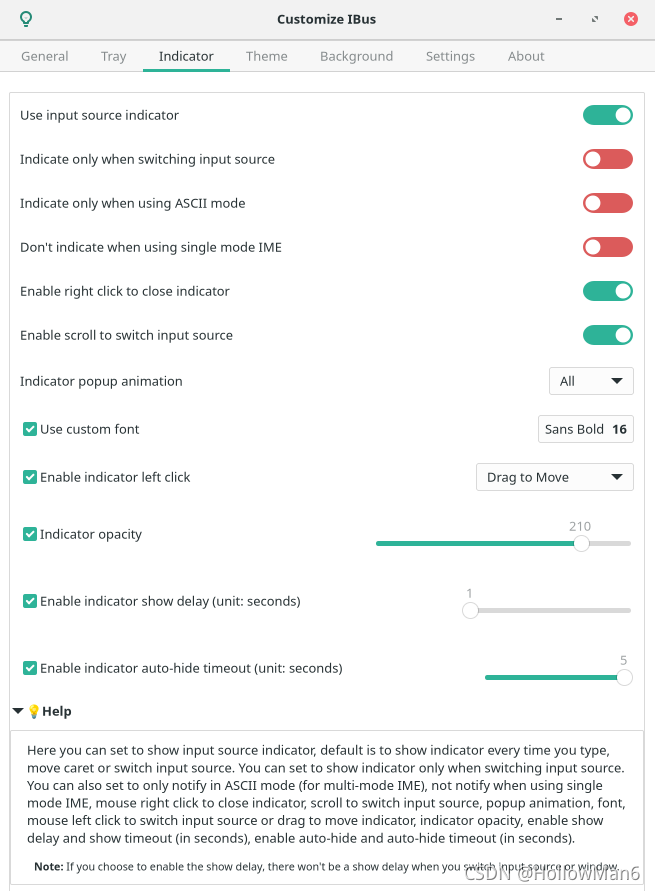
Here you can set to Use input source indicator, default is to show indicator every time you type, move caret or switch input source. You can set to Indicate only when switching input source by clicking the switch on the right. You can also set to Indicate only when using ASCII mode (for multi-mode IME), Don't indicate when using single mode IME, Right click to close indicator, Scroll to switch input source, Indicator popup animation supporting None, Slide, Fade, All. Also support to Use custom font, Enable indicator left click to switch input source or drag to move indicator, set Indicator opacity supporting range of 0 to 255, and the setting step is 1, Enable indicator show delay (unit: seconds), Enable indicator auto-hide timeout (unit: seconds) and auto-hide timeout (in ” “seconds) supporting to set the hidden delay in the range of 1 second to 5 seconds, and the setting step is 1.
Note: If you choose to enable the show delay, there won’t be a show delay when you switch input source or window.
Example animation: 
Theme
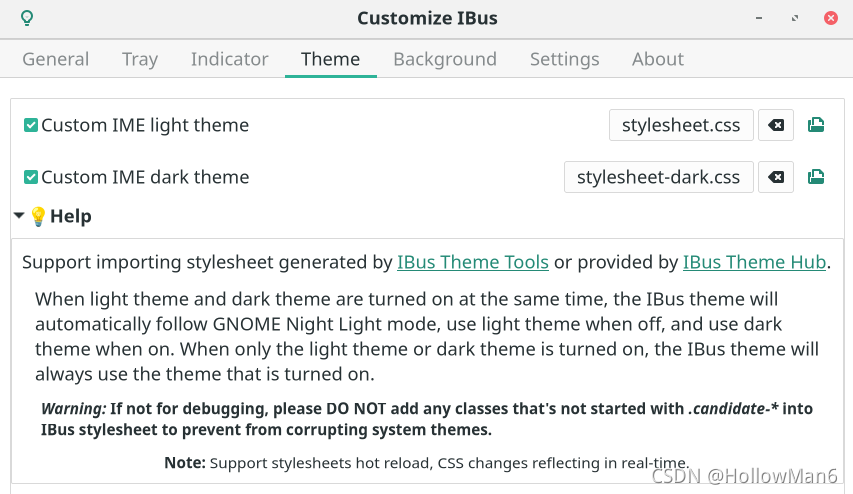
Same as the general part, select the check box on the left to enable the configuration, and click on the right to select the IBus theme style sheet.
If you have selected a style sheet, click the icon on the far right to directly open it to view the style sheet. You can also click the clear icon to make it follow system theme.
Supports importing style sheets generated by the IBus Theme Tools or provided by the IBus Theme Hub.
When light theme and dark theme are turned on at the same time, the IBus theme will automatically follow GNOME Night Light mode, use light theme when off, and use dark theme when on. When only the light theme or dark theme is turned on, the IBus theme will always use the theme that is turned on.
If not for debugging, please DO NOT add any classes that’s not started with .candidate-* into IBus stylesheet to prevent from corrupting system themes.
If your IBus style sheet has changed after application, please close and reopen the corresponding Starting from v69, now this extension support stylesheets hot reload, CSS changes will reflect in real-time.custom IME theme to make it effective.
You can download more GNOME Shell themes from this website: https://www.pling.com/s/Gnome/browse/cat/134/order/latest/, then put it under the $HOME/.themes/ directory to complete the installation.
The IBus theme tool style sheet generation uses the GNOME Shell theme that has been installed on the computer to extract the IBus style. The extraction steps are as follows:
- Refer to the following part:
Non-GNOME Desktop->Customize IBus Themesteps 1-2 to run the program. - Enter the number of the IBus-related GNOME Shell theme style you want to export, and press
Enter.
- Enter the location of the GNOME Shell theme style sheet exported related to IBus that you want to store, and press
Enter. Empty selection will be the default, that is in the current directoryexportedIBusTheme.cssfile. If there is no error message, it will be successfully exported to the specified location.


Example export file:
/*
 Generated by IBus Theme Tools
 Tool Author: Hollow Man <hollowman@hollowman.ml>
 Tool Source Code: https://github.com/openSUSE/IBus-Theme-Tools
 Tool Licence: GPLv3
 CSS Source File: /usr/share/gnome-shell/theme/gnome-classic-high-contrast.css

 Recommend to use Customize IBus GNOME Shell Extension:
 https://extensions.gnome.org/extension/4112/customize-ibus/
 to change IBus theme by selecting this file.

 If you make any changes to this content after applying this file in above extension,
 for Customize IBus Extension before v68, please disable and then enable 'custom IME theme'
 again to make the changes take effect.

 Starting from v69, support stylesheets hot reload, CSS changes reflecting in real-time.
*/

/*
 Imported from CSS Source File: /usr/share/gnome-shell/theme/gnome-classic.css
*/

.candidate-page-button:focus {
  color: #2e3436;
  text-shadow: 0 1px rgba(255, 255, 255, 0.3);
  icon-shadow: 0 1px rgba(255, 255, 255, 0.3);
  box-shadow: inset 0 0 0 2px rgba(53, 132, 228, 0.6);
}

.candidate-page-button:hover {
  color: #2e3436;
  background-color: white;
  border-color: #d6d1cd;
  box-shadow: 0 1px 1px 0 rgba(0, 0, 0, 0.1);
  text-shadow: 0 1px rgba(255, 255, 255, 0.3);
  icon-shadow: 0 1px rgba(255, 255, 255, 0.3);
}

.candidate-page-button:insensitive {
  color: #929595;
  border-color: #e1ddda;
  background-color: #faf9f8;
  box-shadow: none;
  text-shadow: none;
  icon-shadow: none;
}

.candidate-page-button:active {
  color: #2e3436;
  background-color: #efedec;
  border-color: #cdc7c2;
  text-shadow: none;
  icon-shadow: none;
  box-shadow: none;
}

.candidate-index {
  padding: 0 0.5em 0 0;
  color: #17191a;
}

.candidate-box:selected,
.candidate-box:hover {
  background-color: #3584e4;
  color: #fff;
}

.candidate-page-button-box {
  height: 2em;
}

.vertical .candidate-page-button-box {
  padding-top: 0.5em;
}

.horizontal .candidate-page-button-box {
  padding-left: 0.5em;
}

.candidate-page-button-previous {
  border-radius: 5px 0px 0px 5px;
  border-right-width: 0;
}

.candidate-page-button-next {
  border-radius: 0px 5px 5px 0px;
}

.candidate-page-button-icon {
  icon-size: 1em;
}

.candidate-box {
  padding: 0.3em 0.5em 0.3em 0.5em;
  border-radius: 5px; /* Fix candidate color */
  color: #2e3436;
}

.candidate-popup-content {
  padding: 0.5em;
  spacing: 0.3em; /* Fix system IBus theme background inherited in replaced theme */
  background: transparent;
  /* Fix system IBus theme candidate window border inherited in replaced theme */
  border: transparent;
  /* Fix system IBus theme candidate box shadow inherited in replaced theme */
  box-shadow: none;
  /* Fix candidate color */
  color: #2e3436;
}

.candidate-popup-boxpointer {
  -arrow-border-radius: 9px;
  -arrow-background-color: #f6f5f4;
  -arrow-border-width: 1px;
  -arrow-border-color: #cdc7c2;
  -arrow-base: 24px;
  -arrow-rise: 12px;
  -arrow-box-shadow: 0 1px 3px rgba(0, 0, 0, 0.5); /* Fix black border at pointer when system theme is black */
  border-image: none;
}

/* Unify system page button and IBus style page button */
.candidate-page-button {
  border-style: solid;
  border-width: 1px;
  min-height: 22px;
  padding: 3px 24px;
  color: #2e3436;
  background-color: #fdfdfc;
  border-color: #cdc7c2;
  box-shadow: 0 1px 1px 0 rgba(0, 0, 0, 0.1);
  text-shadow: 0 1px rgba(255, 255, 255, 0.3);
  icon-shadow: 0 1px rgba(255, 255, 255, 0.3); /* IBus style page button */
  padding: 4px;
}

/* EOF */
You can also go directly to the IBus Theme Hub and download specialized made IBus theme style sheet file. Here are the IBus theme style sheet files with Microsoft IME style: https://github.com/openSUSE/IBus-Theme-Hub/tree/main/%E4%BB%BF%E5%BE%AE%E8%BD%AFMicrosoft
Background
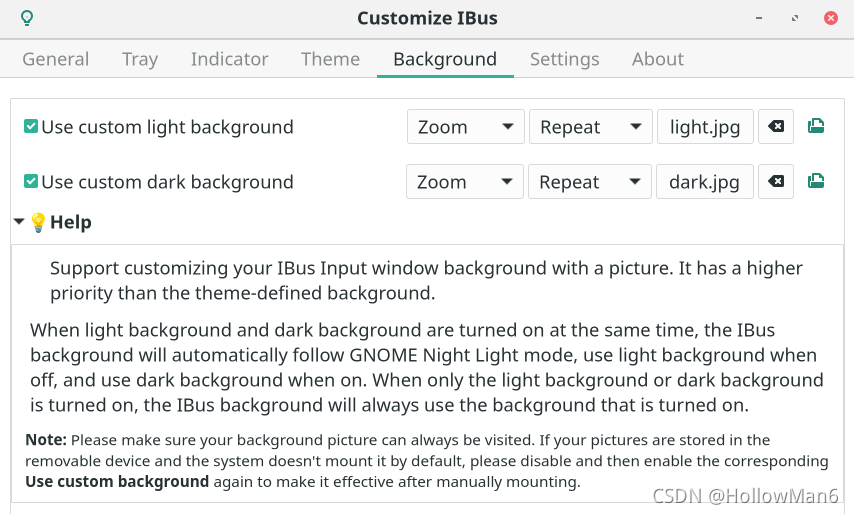
Support customizing your IBus Input window background with a picture. It has a higher priority than the theme-defined background.
If you have selected a picture, click the icon on the far right to directly open and view the picture. You can also click the clear icon to make it follow theme background.
When light background and dark background are turned on at the same time, the IBus background will automatically follow GNOME Night Light mode, use light background when off, and use dark background when on. When only the light background or dark background is turned on, the IBus background will always use the background that is turned on.
Please make sure your background picture can always be visited. If your pictures are stored in the removable device and the system doesn’t mount it by default, please disable and then enable the corresponding Use custom background again to make it effective after manually mounting.
Same as the general part, select the check box on the left to enable the configuration, and click on the right to select the background image of the IBus input candidate box.
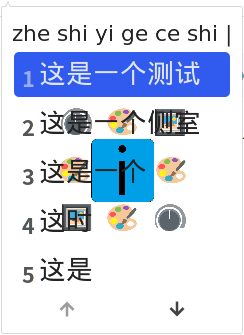
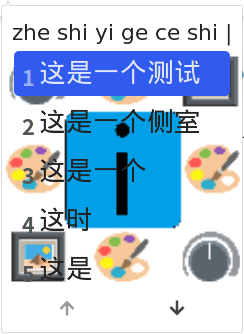
You can also set the background picture display mode, you can set whether the background picture is displayed repeatedly, or the display mode Centered, Full or Zoom.
Examples of various picture display modes (using 128×128 compressed pictures: https://github.com/openSUSE/Customize-IBus/blob/main/customize-ibus%40hollowman.ml/img/logo.png ):

- Centered + No repeat:
- Centered + Repeat:
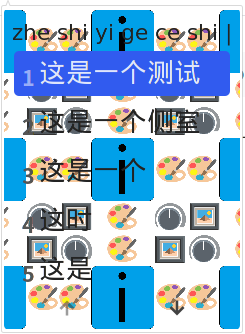
- Full + No repeat:
- Full + Repeat:

- Zoom + No Repeat/Repeat (equivalent):


Settings
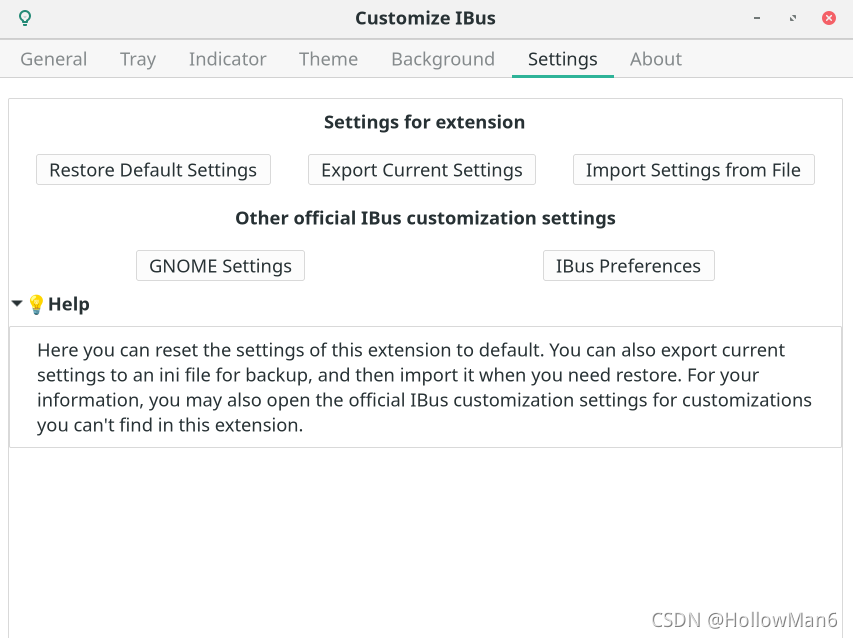
Here you can reset the settings of this extension to default. You can also export current settings to an ini file for backup, and then import it when you need restore. For your information, you may also open the official IBus customization settings for customizations you can’t find in this extension.
Click Restore Default Settings, after confirming, you can re-initialize the extension.

Click Export Current Settings, you can choose to export the current settings as a *.inifile. The default file name is Customize_IBus_Settings_[Current Time].ini: 
Example settings export file content:
[/]
candidate-box-position={'x': uint32 0, 'y': 0}
candidate-opacity=uint32 210
candidate-orientation=uint32 0
candidate-scroll-mode=uint32 0
custom-bg='/home/hollowman/图片/light.jpg'
custom-bg-dark='/home/hollowman/图片/dark.jpg'
custom-bg-mode=uint32 2
custom-bg-repeat-mode=uint32 1
custom-font='Sans 16'
custom-theme='/home/hollowman/stylesheet.css'
custom-theme-dark='/home/hollowman/stylesheet-dark.css'
enable-custom-theme=true
enable-custom-theme-dark=true
enable-orientation=true
fix-ime-list=true
ibus-restart-time='1625063857427'
indicator-custom-font='Sans Bold 16'
indicator-left-click-func=uint32 0
indicator-opacity=uint32 210
input-indicator-hide-time=uint32 2
input-indicator-not-on-single-ime=true
input-indicator-right-close=true
input-indicator-show-time=uint32 1
input-indicator-use-scroll=true
input-mode-list={'undefined': true, '': false, 'gjs': false, 'org.gnome.nautilus': false, 'google-chrome-beta': false, 'gedit': false, 'gnome-terminal': true, 'code': false, 'org.gnome.shell.extensions': true}
input-mode-remember=uint32 0
menu-ibus-emoji=true
menu-ibus-exit=true
menu-ibus-preference=true
menu-ibus-restart=true
menu-ibus-version=true
use-candidate-box-right-click=true
use-candidate-buttons=false
use-candidate-opacity=true
use-candidate-reposition=true
use-candidate-scroll=true
use-candidate-still=false
use-custom-bg=true
use-custom-bg-dark=true
use-custom-font=true
use-indicator-auto-hide=true
use-indicator-custom-font=true
use-indicator-left-click=true
use-indicator-opacity=true
use-indicator-reposition=true
use-indicator-show-delay=true
use-input-indicator=true
use-popup-animation=true
use-tray=true
use-tray-click-source-switch=true
Click Import Settings from File, you can choose to import the settings file you just saved: 
About
At any time, you can click on the icon in the upper left corner to open this guide:

Non-GNOME desktop
Customize IBus theme
In non-GNOME Shell desktop environment, the display effect of IBus is determined by the current GTK theme.
You can download more GTK3/4 themes from this website: https://www.gnome-look.org/browse/cat/135/, then put them in the $HOME/.themes/ directory to complete the installation.
The following steps can change the GTK theme of IBus:
- First, Install ibus-theme-tools:
Recommend to use pip to install:
pip install ibus-theme-tools
You can also install manually:
git clone https://github.com/openSUSE/IBus-Theme-Tools.git
cd IBus-Theme-Tools && python3 setup.py install
For install using package manager:
- Arch Linux:
You can use AUR to install:
yay -S ibus-theme-tools
- Ubuntu:
You can use PPA to install:
sudo add-apt-repository ppa:hollowman86/ibus-theme-tools
sudo apt-get update
- openSUSE:
You can install directly through the ymp file.
You can download the majority of your Linux distributions related packages through OpenSUSE OBS and then install.
- Gentoo:
git clone https://github.com/openSUSE/IBus-Theme-Tools.git
cd IBus-Theme-Tools && make emerge
- NixOS:
sudo nix-env -i ibus-theme-tools
- Guix:
guix install ibus-theme-tools
- Then run
ibus-theme-toolsin the terminal. - Enter
1, choose to extract an IBus-related GTK theme, and pressEnter.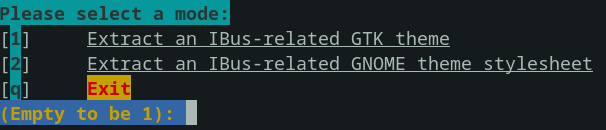
- Enter the IBus GTK theme you want to extract, and then press
Enter. (Note that the theme name ends with:darkis the dark mode of the theme)
- Enter the system GTK you want to mix, and then press
Enter.
- Select whether to add a customized background image for IBus panel, if you need press
2and then pressEnter.
- Enter the picture address:

- Then choose repeat and sizing modes, and set background border radius (unit:
px).
- If there is no error message, the setting action should be successful. Then you can choose the GTK theme that just generated in the system theme settings to apply the previous choices.


Customize IBus font size
Recommend to directly change the font and font size settings in the IBus preferences (ibus-setup).
Or:
$HOME/.config/gtk-3.0/settings.ini defines the current GTK3 theme and font size.
Example of the content of the file is as follows:
[Settings]
gtk-theme-name=Materia-light
gtk-font-name=更纱黑体 SC 12
In the above content, gtk-theme-name specifies that the current GTK theme is material-light, gtk-font-name specifies that the current font is 更纱黑体 SC and the font size is 12.
The IBus font and font size can be changed by modifying the above documents.
Customize IBus colors (Create a GTK theme)
Create a GTK3 theme called ibus-custom-theme by running:
mkdir -p $HOME/.themes/ibus-custom-theme/gtk-3.0
$EDITOR $HOME/.themes/ibus-custom-theme/gtk-3.0/gtk.css
then edit the file content. An example can be:
* {
  color: #0b141a; /* Font Color */
  background-color: #ffffff; /* Background Color */
  -gtk-secondary-caret-color: #d4d4d4; /* Highlight Background Color */
}
After that, referring to the actions of the Customize IBus theme part, please select the theme ibus-custom-theme which you just created.