
zypper-upgraderepo 1.2 is out
Fixes and updates applied with this second minor version improved and extended the main functions, let’s see what’s new.
If you are new to the zypper-upgraderepo plugin, give a look to the previous article to better understand the mission and the basic usage.
Repository check
The first important change is inherent the way to check a valid repository:
- the HTTP request sent is HEAD instead of GET in order to have a more lightweight answer from the server, being the HTML page not included in the packet;
- the request point directly to the repodata.xml file instead of the folder, that because some server security setting could hide the directory listing and send back a 404 error although the repository works properly.
Check just a few repos
Most of the times we want to check the whole repository’s list at once, but sometimes we want to check few of them to see whether or not they are finally available or ready to be upgraded without looping through the whole list again and again. That’s where the –only-repo switch followed by a list of comma-separated numbers comes in help.

–only-repo switch
All repo by default
The disabled repositories now are shown by default and a new column highlights which of them are enabled or not, keeping their number in sync with the zypper lr output. To see only the enabled ones just use the switch –only-enabled.
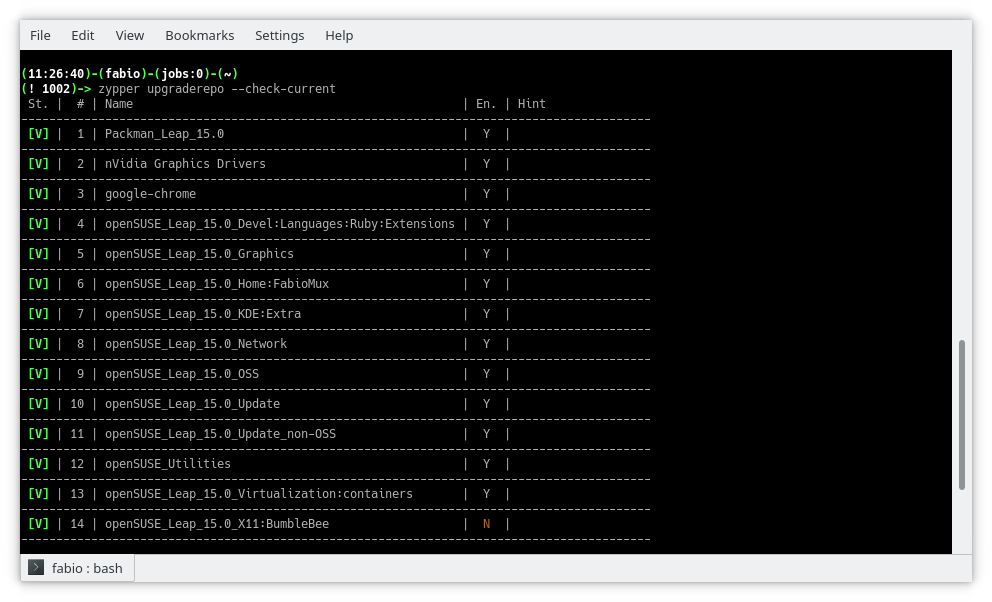
Table view
Report view
Beside the table view, the switch –report introduce a new pleasant view using just two columns and spanning the right cell to more rows in order to improve the number of info and the reading quality.

Report view
Other changes
The procedure which tries to discover an alternative URL now dives back and forth the directory list in order to explore the whole tree of folders wherever the access is allowed by the server itself. The side effect is a general improvement also in repo downgrade.
The output in upgrade mode is now verbose and shows a table similar to the checking one, giving details about the changed URLs in the details column.
The server timeout error is now handled through the switch –timeout which allows tweaking the time before to consider an error any late answer from the server itself.
Final thoughts and what’s next
This plugin is practically completed, achieving all the goals needed for its main purpose no other relevant changes are scheduled, so I started thinking of other projects to work in my spare time.
Among them, there is one I am interested in: bring the power of openSUSE software search page to the command line.
However, there are some problems:
- This website doesn’t implement any web API so will be a lot of scraping job;
- There are missing packages while switching from the global research (selecting All distribution) to the specific distribution;
- Packages from Packman are not included.
I have already got some ideas to solve them and did lay down several lines of code, so let’s see what happens!

 Member
 Futureboy
KDE Plasma 5.15.0 on openSUSE Tumbleweed
Certified danger
Makulu Linux 15 | Review from an openSUSE User

FOSDEM 2019 aftermath
 |
| Nextcloud group |
One more year visiting Brussels to visit the ultimate FOSS conference, FOSDEM 2019. This is my second year.
My trip was easy. A stop in Rome and then Charleroi. Bought tickets online for a shuttle bus to Brussels (I write this for the people who read this for the first time and they want to attend to FOSDEM). In Rome, I met two friends from my Nextcloud presentations in Greece. It was their first time visiting FOSDEM conference.
The first time it was all new and unknown. This time, I tried to attend as many talks as possible, but I failed. Well, the first day I had to cover Nextcloud booth and the second day (usually is calmer), after I left Nextcloud booth to walk around the campus and check if there's a talk for me, I missed the notification on signal about the group picture. So that's why I'm not in the group picture.
FOSDEM supposed to be all about the talks but usually is all about meeting new people and have a conversation outside of the talks. Also as far as I know, if I want to see a specific talk, I have to sit in the room early in the morning because rooms are crowded for the whole day. Also, there's a plus, that you can watch all the talks from your computer at home wearing slippers and pajamas.
FOSDEM usually starts on Friday at Delirium Cafe (map) with the beer event. The place is awesome and it has plenty of beers but you better go little early. It'll be crowded and you might have to wait 30 mins to get your beer.

The first conference day is all about finding the buildings, rooms, etc and also the booths of my fav projects.
One of my favs is openSUSE booth. Beer is always the no1 item that people are interested (obviously). Free stickers and Linux magazine. GNU Health was also there.
 |
| openSUSE booth |
Next stop GNOME booth. This year is special for me because GUADEC will be held at my city.
 |
| GNOME booth |
And finally Nextcloud booth where it was the place I talked to many people about the project.
 |
| Nextcloud booth |
I had the chance to take a picture with an elephant. Relax, the PostgreSQL one.

During those 2 days, I met many Greek friends from FOSS communities. I also met some friends who moved to Belgium due to Greek's financial issues.
Here is a video:
If you would like to see more video from me, press the button to subscribe:
To end this post, I would like to thank Nextcloud, that sponsored my trip.

Performance benchmark on mdds R-tree
I’d like to share the results of the quick benchmark tests I’ve done to measure the performance of the R-tree implementation included in the mdds library since 1.4.0.
Brief overview on R-tree
R-tree is a data structure designed for optimal query performance on spatial data. It is especially well suited when you need to store a large number of spatial objects in a single store and need to perform point- or range-based queries. The version of R-tree implemented in mdds is a variant known as R*-tree, which differs from the original R-tree in that it occasionally forces re-insertion of stored objects when inserting a new object would cause the target node to exceed its capacity. The original R-tree would simply split the node unconditionally in such cases. The reason behind R*-tree’s choice of re-insertion is that re-insertion would result in the tree being more balanced than simply splitting the node without re-insertion. The downside of such re-insertion is that it would severely affect the worst case performance of object insertion; however, it is claimed that in most real world use cases, the worst case performance would rarely be hit.
That being said, the insertion performance of R-tree is still not very optimal especially when you need to insert a large number of objects up-front, and unfortunately this is a very common scenario in many applications. To mitigate this, the mdds implementation includes a bulk loader that is suitable for mass-insertion of objects at tree initialization time.
What is measured in this benchmark
What I measured in this benchmark are the following:
- bulk-loading of objects at tree initialization,
- the size() method call, and
- the average query performance.
I have written a specially-crafted benchmark program to measure these three categories, and you can find its source code here. The size() method is included here because in a way it represents the worst case query scenario since what it does is visit every single leaf node in the entire tree and count the number of stored objects.
The mdds implementation of R-tree supports arbitrary dimension sizes, but in this test, the dimension size was set to 2, for storing 2-dimensional objects.
Benchmark test design
Here is how I designed my benchmark tests.
First, I decided to use map data which I obtained from OpenStreetMap (OSM) for regions large enough to contain the number of objects in the millions. Since OSM does not allow you to specify a very large export region from its web interface, I went to the Geofabrik download server to download the region data. For this benchmark test, I used the region data for North Carolina, California, and Japan’s Chubu region. The latitude and longitude were used as the dimensions for the objects.
All data were in the OSM XML format, and I used the XML parser from the orcus project to parse the input data and build the input objects.
Since the map objects are not necessarily of rectangular shape, and not necessarily perfectly aligned with the latitude and longitude axes, the test program would compute the bounding box for each map object that is aligned with both axes before inserting it into R-tree.
To prevent the XML parsing portion of the test to affect the measurement of the bulk loading performance, the map object data gathered from the input XML file were first stored in a temporary store, and then bulk-loaded into R-tree afterward.
To measure the query performance, the region was evenly split into 40 x 40 sub-regions, and a point query was performed at each point of intersection that neighbors 4 sub-regions. Put it another way, a total of 1521 queries were performed at equally-spaced intervals throughout the region, and the average query time was calculated.
Note that what I refer to as a point query here is a type of query that retrieves all stored objects that intersects with a specified point. R-tree also allows you to perform area queries where you specify a 2D area and retrieve all objects that overlap with the area. But in this benchmark testing, only point queries were performed.
For each region data, I ran the tests five times and calculated the average value for each test category.
It is worth mentioning that the machine I used to run the benchmark tests is a 7-year old desktop machine with Intel Xeon E5630, with 4 cores and 8 native threads running Ubuntu LTS 1804. It is definitely not the fastest machine by today’s standard. You may want to keep this in mind when reviewing the benchmark results.
Benchmark results
Without further ado, these are the actual numbers from my benchmark tests.

The Shapes column shows the numbers of map objects included in the source region data. When comparing the number of shapes against the bulk-loading times, you can see that the bulk-loading time scales almost linearly with the number of shapes:

You can also see a similar trend in the size query time against the number of shapes:

The point query search performance, on the other hand, does not appear to show any correlation with the number of shapes in the tree:

This makes sense since the structure of R-tree allows you to only search in the area of interest regardless of how many shapes are stored in the entire tree. I’m also pleasantly surprised with the speed of the query; each query only takes 5-6 microseconds on this outdated machine!
Conclusion
I must say that I am overall very pleased with the performance of R-tree. I can already envision various use cases where R-tree will be immensely useful. One area I’m particularly interested in is spreadsheet application’s formula dependency tracking mechanism which involves tracing through chained dependency targets to broadcast cell value changes. Since the spreadsheet organizes its data in terms of row and column positions which is 2-dimensional, and many queries it performs can be considered spatial in nature, R-tree can potentially be useful for speeding things up in many areas of the application.

Who wrote librsvg?
Authors by lines of code, each year:

Authors by percentage of lines of code, each year:

Which lines of code remain each year?

The shitty thing about a gradual rewrite is that a few people end up "owning" all the lines of source code. Hopefully this post is a little acknowledgment of the people that made librsvg possible.
The charts are made with the incredible tool git-of-theseus — thanks to @norwin@mastodon.art for digging it up! Its README also points to a Hercules plotter with awesome graphs. You know, for if you needed something to keep your computer busy during the weekend.
Right-to-Left Script in LibreOffice using KDE Plasma on openSUSE
Tuning Snapper | BTRFS Snapshot Management on openSUSE


Engaging the openSUSE community
Membership issues
On the 30th of January, openSUSE notified me that my membership was being revoked.
Everybody is welcome to participate and get involved in the openSUSE project and we grant membership for those that have shown a continued and substantial contribution to the openSUSE project. Membership officials have rejected your application since that does not apply to you. We just found too little contribution and encourage you to get more involved with openSUSE and then apply again for membership. As a person new to openSUSE you might check the "How to Participate" which gives a variety of possibilities, http://en.opensuse.org/Portal:How_to_participate to start contributing. Or you join our bi-weekly project meeting to see what' going on, http://en.opensuse.org/Portal: Meetings
As I am a fan of the openSUSE project and like to advocate the use of openSUSE through this website, I was quite disappointed. In 2018 I have written 15 articles about openSUSE Leap and about the various applications used on openSUSE. Fossadventures received 87.241 visits and 40.639 visitors over the last year. The RSS feed of this website is added to Planet openSUSE. And Fossadventures is still listed on the first page of the Google search results for “install openSUSE Leap 15”.

I have e-mailed openSUSE Membership Officials to re-activate my membership. I also have requested a membership (again) via openSUSE Connect. Almost 2 weeks later, my membership status has not been restored. Which means that I cannot participate in the openSUSE 2018-2019 Elections, as voting will close on Friday 15 Februari.

My difficulties are not limited to staying an active openSUSE member. Becoming an openSUSE member also required me to jump through a couple of hoops. After applying for an openSUSE membership, I didn’t get a response for months.
tickets #34573: Membership request still pending
...
Dear openSUSE team,

I have requested an openSUSE membership a couple of months ago. Until now this request is still
pending. I have made small contributions, including:- Helping people out on Reddit r/openSUSE-
Creating an openSUSE promotion website: www.fossadventures.com I hope that is enough to get me
a membership. I want to increase my involvement over the coming year.

Best regards, Martin de Boer
Last year I got my membership sorted out, but I needed to be very persistent! Its much easier to get kicked out, than it is to join. Which (in my opinion) is a problem for a community that relies on contributors.
Community life-cycle
In my work as an IT architect, I have learned a few things about Marketing. One of these lessons was the notion of the customer life-cycle. You can read about this phenomenon here: (1), (2), (3). The idea is that businesses not merely try to get a customer to buy your product or service once, but that you try to keep them engaged so they come back. In a typical life-cycle, the customer first visits a site, then shows interest in a certain product or service. Before the customer is ready to buy the product, (s)he might want to evaluate the product/service first. This can be achieved by offering information or for instance a trial period. This leads to a first purchase by the the customer. Most businesses (think shops, supermarkets, restaurants, dealers, etc.) benefit from returning customers. This is why they try to service these customers as good as possible. If the business offers quality products / services time and time again and the business offers quality support and the business is well regarded in the market and the business keeps in touch with the customer, that person might become a loyal customer.

Although communities have a different dynamic, there are certainly similarities. Lets discuss openSUSE for instance. Looking at the guiding principles, openSUSE wants to create the best Linux distribution in the world, which has the largest user community, and provide the primary source for getting free software.
Three questions spring to mind:
- How to get openSUSE in the hands of more users?
- How to expand the openSUSE community?
- How to get more contributors to volunteer working on openSUSE?
Suffice to say that Marketing is important to achieve these goals. openSUSE might want to use a similar life-cycle, made for the community.

A typical Linux user might encounter openSUSE as the best KDE distribution, advertised in some kind of publication or podcast. This will raise awareness about openSUSE. The user wonders what makes openSUSE unique and starts looking for information. They will soon learn about all the great tools that openSUSE has (co)developed, such as YaST, Zypper, BtrFS, Snapper, Open Build Service, Open QA, Kiwi, Portus and Machinery. And they might want to give it a spin. They will need to learn how to do certain things. Maybe they try to use KDE Discover to update their software and things don’t work out. So they go to the forums and learn that they need to use YaST Software Management or Zypper. If they like the way that openSUSE is setup and how it works, they become active users. After a while, they start to help other users to get things done. This increases their involvement and they start wanting to give back to the community. In some communities it is possible to become a supporter by donating a certain amount on Kickstarter, Indiegogo, Patreon or Liberapay. In the openSUSE community, it is valued to participate in the project, so they become contributors. After they start enjoying working together with other Geeko’s, they might end up becoming core contributors to the openSUSE project.
Contributor Journey
In Marketing its all about the Customer Journey. The underlying exercise is to create a Customer Journey Map that represents the experience of the customer in its encounters with the business. So the Customer Journey goes beyond the single purchase and focusses on the returning encounters in all phases of the life-cycle. The customer journey looks at touch points and at moments of truth. And of course it maps the experience and the emotions of the customer. But the map is only the beginning. The next exercise is to look at the bottlenecks in the current journey and start to optimize these moments. The idea is that the business tries to pull the Customer from one phase into the next one. And to track and measure this. So its all about conversion rates between phases. As a ‘tech person’ you can call this Marketing BS. You could argue: developers are just trying to build a quality product. But with that attitude, its not possible to:
- Get openSUSE in the hands of more users
- Increase the number of community members
- Increase the number of contributors
Maybe we need to look at the Journey of Linux enthousiasts from user to community member to contributor? Maybe we need to look at where people are dropping of. Maybe we need to look at the motivations of people to become an active community member or to become a contributor. So we can better target these people to engage with openSUSE.
Personal Journey
Looking at my personal Journey, I started being interested in Linux during my years in University, because I was tired of paying over and over again for the same software (especially MS Office). Software as a Service didn’t exist yet. When starting working in IT in 2009, I decided it was time to switch to Linux. I looked for a high quality distribution of European origins that looked familiar to Windows. So I ended up with openSUSE 11.1 and KDE 4.2 as my Desktop Environment. In the following years I learned more and more about Linux, openSUSE and all the cool free and open source software that is available. I started listening to podcasts (Linux Action Show, Linux Action News, Linux Unplugged). Via these podcasts, I was encouraged to go to open source conferences. So I went to FOSDEM in Brussels, which is pretty close to the Netherlands. This year (2019), I have attended FOSDEM for the 5th time. I have attended a lot of talks by Richard Brown / on openSUSE. Last year (2018) I started with my own website and posting articles on openSUSE and various applications running on openSUSE. So my personal involvement is increasing steadily. I am not a contributor to main parts of the openSUSE project, although that is likely to happen in the future.
My Journey is not without bumps in the road. I have solved a lot of problems with openSUSE over the last few years. Problems such as programs that suddenly stopped working or encountering hardware related problems. Rolling back updates, adjusting / restoring configuration files, et cetera. Because of the great build quality of openSUSE, I managed to fix these problems. However, many less technically skilled people would have given up in the same circumstances.
The same can be said of my efforts of becoming an openSUSE Member. I will likely try and try again. But many less motivated people would certainly give up in the same circumstances.
Conclusion
For me, the email that I received last month is an indication that the openSUSE community can do more to retain its users. And that the openSUSE community should have a better ‘Marketing strategy’ (for the lack of a better term) to make the Contributor Journey a smoother experience. To try to get the roadblocks out of the way for the people that want to be informed or be involved. It is an area where I could see myself contributing to in the future. For more discussions on this topic, you can message me via Mastodon: @fossadventures@fosstodon.org.
Published on: 12 February 2019