
SUSE is the trusted source for your Cloud Foundry PaaS

 Member
 Ana06
Ana06Running for openSUSE Board
Hi! I am running as openSUSE Board member and I would like to let you know more about me, my view of what openSUSE is and why I want to be in the Board. :raised_hands:
About myself
I’m Ana María Martínez, 24 years old, from Madrid, Spain and living in Nuremberg, Germany. I studied Computer Science Engineering and Mathematics in Madrid. During my last year at university, I started in open source development contributing to a local open government project. At the end of my university studies (2016), I participated in Google Summer of Code (GSoC) as a student for openSUSE. I fell in love with the open source development and the openSUSE community. Because of that, after GSoC, I moved to Nuremberg to work as a Software Engineer at SUSE in the Open Build Service frontend team.
I’m currently writing a lot of Ruby code. As I can not avoid taking a look to every code that crosses my path, apart from my work at SUSE, I contribute to several open source projects inside and outside openSUSE. In some cases becoming active contributor, or even maintainer, for some of them. Some people say I am addicted to GitHub! :wink: In openSUSE, I maintain projects like Open Build Service (build.opensuse.org), OSEM (events.opensuse.org), Trollolo, mentoring (101.opensuse.org) and software-o-o (software.opensuse.org). Outside openSUSE, I have recently contributed to Jekyll, the Ruby core, Rubocop, Rantly, etc.
What I like the most of openSUSE and working in open source is that it is fun, I learn a lot and I have the chance to work with a lot of talented people interested in the same things as me all around the world. I think it is really important that everybody who is interested can join openSUSE development and community. Because of that I help newcomers to open source, for example by participating as a mentor and organization admin in GSoC for openSUSE.
I have also happily spoken at openSUSE events (openSUSE conference, openSUSE.Asia Summit) about topics like mentoring and Open Build Service and I try to contribute to make those events as fun as possible.
You will find me in Github, IRC and some other places as @Ana06. You can contact me in Twitter as well (@anamma_06).
Goals and values
I have heard from previous Board members that the board needs to become more approachable and improve communication. I also think this is important and that there is still room for improvement in this regard. In addition, I find really important that the board works as transparent as possible, so that every openSUSE member is aware of the things that are done and the decisions that are made and how they are made. In openSUSE we like to say that those who does, decide. And I also think that those who does, should be as informed as possible. I consider really important as well that openSUSE contributors are valued and have fun, and we should promote this fun spirit from the board. Last but not least, I think we have to improve as a community on encouraging new people to join us, keeping always fun and advertising openSUSE as much and spread as possible.
Why should you vote for me?
I think it is important that there are openSUSE developers in the board and openSUSE developer is a term that defines myself quite well. :joy: Most of the candidates to the board will probably mention here that they are using openSUSE since more than a decade. This is not something I can say. I am using openSUSE distribution and contributing to openSUSE since less than 2 years. Without forgetting that there are people in openSUSE that know much more than me, that I need to hear and learn from, I think that my point of view can be really valuable for the board. I bring new ideas and energy and a great desire to learn and improve things. And of course the reason why you should vote me is because you share my ideas and concept of what openSUSE is and the things that need to be improved.
Hack Days; Removing the Rules
At Unruly we have a quarterly whole-company hack day that we call Oneruly day. Hackdays allow the whole company to focus on one thing for a day.
Unlike our 20% time, which is time for individuals to work on what is most important to them, Hackdays are time for everyone to rally around a common goal.
In product development we run this in true Unruly style: avoiding rules or control. We do have a lightweight process that seems to work well for self-organisation in a group this size (~50 people).
Self Organisation
During the week in the run up to Oneruly day we set up a whiteboard in the middle of the office with the topic written on. Anyone with an idea of something related to that topic that we could work on writes it on an oversized postit note and pops it up on the board.

On the day itself there’s usually a last minute flurry of ideas added to the board, and the whole product development team (some 50-60 people) all gather around. We go through the ideas one by one. The proposer pitches their idea for around 60 seconds, explaining why it’s important/interesting, and why others might want to work on it.
Once we’ve heard the pitches, the proposers take their oversized postit and spread out, everyone else goes and joins one of the people with postits—forming small teams aligned around an interest in a topic.
Each group then finds a desk/workstation to use and starts discussing what they want to achieve & the best way of going about it.
This is facilitated by our pair-programming friendly office space—having workstations that are all set up the same, with large desks and plenty of space for groups to gather round, in any part of the office.
Usually each group ends up self-organising into either a large mob (multiple developers all working on the same thing, at the same time, on the same workstation), or a couple of smaller pairs or mobs (depending on the tasks at hand). Sometimes people will decide that their group has too many people, or they’re not adding value and and go and help another group instead.
Teams will often split up to investigate different things, explore different options or tackle sub-problems, and then come back together later.
Inspiring Results
We usually wrap up with a show and tell for the last hour of the day. It’s pretty inspiring to see the results from a very few hours work…
- There’s great ideas that are commercially strong and genuinely support the goal.
- We get improvements all the way from idea to production.
- People step up and on leadership roles, regardless of their seniority
- We learn things in areas that we wouldn’t normally explore.
- People work effectively in teams that didn’t exist until that morning.
- There’s a variety of activities from lightweight lean-startup style experiments to improving sustainability of existing systems.
All this despite the lack of any top down direction other than choosing the high level theme for the day.
What can we learn?
Seeing such a large group consistently self-organise to achieve valuable outcomes in a short space of time begets the question: How much are our normally more heavyweight processes and decision-making stifling excellence rather than improving outcomes?
What rules (real or imaginary) could we get rid of? What would happen if we did?
Hackdays are a great opportunity to run a timeboxed experiment of a completely different way of working.
The post Hack Days; Removing the Rules appeared first on Benji's Blog.
Builder Nightly
One of the great aspects of the Flatpak model, apart from separating apps from the OS, is that you can have multiple versions of the same app installed concurrently. You can rely on the stable release while trying things out in the development or nightly built version. This creates a need to easily identify the two versions apart when launching it with the shell.
I think Mozilla has set a great precedent on how to manage multiple version identities.

Thus came the desire to spend a couple of nights working on the Builder nightly app icon. While we've generally tried to simplify app icons to match what's happening on the mobile platforms and trickling down to the older desktop OSes, I've decided to retain the 3D workflow for the builder icon. Mainly because I want to get better at it, but also because it's a perfect platform for kit bashing.

For Builder specifically I've identified some properties I think should describe the 'nightly' icon:
- Dark (nightly)
- Modern (new stuff)
- Not as polished — dangling cables, open panels, dirty
- Unstable / indicating it can move (wheels, legs ...)

Next up is giving a stab at a few more apps and then it's time to develop some guidelines for these nightly app icons and emphasize it with some Shell styling. Overlaid emblems haven't particularly worked in the past, but perhaps some tag style for the label could do.

Librsvg and Gnome-class accepting interns
I would like to mentor people for librsvg and gnome-class this Summer, both for Outreachy and Summer of Code.
Librsvg projects
Project: port filter effects from C to Rust
Currently librsvg implements SVG filter effects in C. These are basic image processing filters like Gaussian blur, matrix convolution, Porter-Duff alpha compositing, etc.
There are some things that need to be done:
-
Split the single
rsvg-filter.cinto multiple source files, so it's easier to port each one individually. -
Figure out the common infrasctructure:
RsvgFilter,RsvgFilterPrimitive. All the filter use these to store intermediate results when processing SVG elements. -
Experiment with the correct Rust abstractions to process images pixel-by-pixel. We would like to omit per-pixel bounds checks on array accesses. The image crate has some nice iterator traits for pixels. WebKit's implementation of SVG filters also has interesting abstractions for things like the need for a sliding window with edge handling for Gaussian blurs.
-
Ensure that our current filters code is actually working. Not all of the official SVG test suite's tests are in place right now for the filter effects; it is likely that some of our implementation is broken.
For this project, it will be especially helpful to have a little background in image processing. You don't need to be an expert; just to have done some pixel crunching at some point. You need to be able to read C and write Rust.
Project: CSS styling with rust-selectors
Librsvg uses an very simplistic algorithm for CSS cascading. It uses libcroco to parse CSS style data; libcroco is unmaintained and rather prone to exploits. I want to use Servo's selectors crate to do the cascading; we already use the rust-cssparser crate as a tokenizer for basic CSS properties.
-
For each node in its DOM tree, librsvg's
Nodestructure keeps aVec<>of children. We need to move this to store the next sibling and the first/last children instead. This is the data structure that rust-selectors prefers. The Kuchiki crate has an example implementation; borrowing some patterns from there could also help us simplify our reference counting for nodes. -
Our styling machinery needs porting to Rust. We have a big
RsvgStatestruct which holds the CSS state for each node. It is easy to port this to Rust; it's more interesting to gradually move it to a scheme like Servo's, with a distinction between specified/computed/used values for each CSS property.
For this project, it will be helpful to know a bit of how CSS works. Definitely be comfortable with Rust concepts like ownership and borrowing. You don't need to be an expert, but if you are going through the "fighting the borrow checker" stage, you'll have a harder time with this. Or it may be what lets you grow out of it! You need to be able to read C and write Rust.
Bugs for newcomers: We have a number of easy bugs for newcomers to librsvg. Some of these are in the Rust part, some in the C part, some in both — take your pick!
Projects for gnome-class
Gnome-class is the code generator that lets you write GObject implementations in Rust. Or at least that's the intention — the project is in early development. The code is so new that practically all of our bugs are of an exploratory nature.
Gnome-class works like a little compiler. This is from one of the
examples; note the call to gobject_gen! in there:
struct SignalerPrivate {
    val: Cell<u32>
}

impl Default for SignalerPrivate {
    fn default() -> Self {
        SignalerPrivate {
            val: Cell::new(0)
        }
    }
}

gobject_gen! {
    class Signaler {
        type InstancePrivate = SignalerPrivate;
    }

    impl Signaler {
        signal fn value_changed(&self);

        fn set_value(&self, v: u32) {
            let private = self.get_priv();
            private.val.set(v);
            self.emit_value_changed();
        }
    }
}
Gnome-class implements this gobject_gen! macro as follows:
-
First we parse the code inside the macro using the
syncrate. This is a crate that lets you parse Rust source code from theTokenStreamthat the compiler hands to implementations of procedural macros. You give aTokenStreamtosyn, and it gives you back structs that represent function definitions,implblocks, expressions, etc. From this parsing stage we build an Abstract Syntax Tree (AST) that closely matches the structure of the code that the user wrote. -
Second, we take the AST and convert it to higher-level concepts, while verifying that the code is semantically valid. For example, we build up a
Classstructure for each defined GObject class, and annotate it with the methods and signals that the user defined for it. This stage is the High-level Internal Representation (HIR). -
Third, we generate Rust code from the validated HIR. For each class, we write out the boilerplate needed to register it against the GObject type system. For each virtual method we write a trampoline to let the C code call into the Rust implementation, and then write out the actual Rust impl that the user wrote. For each signal, we register it against the GObjectClass, and write the appropriate trampolines both to invoke the signal's default handler and any Rust callbacks for signal handlers.
For this project, you definitely need to have written GObject code in C in the past. You don't need to know the GObject internals; just know that there are things like type registration, signal creation, argument marshalling, etc.
You don't need to know about compiler internals.
You don't need to have written Rust procedural macros; you can learn as you go. The code has enough infrastructure right now that you can cut&paste useful bits to get started with new features. You should definitely be comfortable with the Rust borrow checker and simple lifetimes — again, you can cut&paste useful code already, and I'm happy to help with those.
This project demands a little patience. Working on the implementation of procedural macros is not the smoothest experience right now (one needs to examine generated code carefully, and play some tricks with the compiler to debug things), but it's getting better very fast.
How to apply as an intern
End to End Tests
End to end automated tests written with Webdriver have a reputation for being slow, unreliable (failing for spurious reasons), and brittle (breaking with any change).
So much so that many recommend not using them. They can become a maintenance burden, making it harder, rather than easier, to make changes to the user interface.
However, these tests can be invaluable. They can catch critical bugs before they hit production. They can identify browser-specific bugs, are implementation-agnostic, can check invariants, be used for visual approval tests, can even be used for production monitoring, not to mention retrofitting safety to poorly tested systems.
Despite their reputation, these tests can be kept reliable, fast, and maintainable. There’s no “one weird trick”—it’s mostly a matter of applying the same good practices and discipline that we ought to be applying to any automated tests; end to end tests really turn up the pain from doing it wrong.
Avoid
When I polled a few people what their top tip for writing reliable, fast, and maintainable webdriver tests was, the most common suggestion was, simply…
“Don’t”
They are indeed hard to write well, they are indeed expensive to maintain, there are easier, better testing tools for checking behaviour.
So don’t use them if you don’t need them. They are easier to retrofit later if you change your mind than most other forms of automated testing.
Certainly they don’t replace other types of automated tests. Nor can they be a replacement for manual exploratory testing.
Often subcutaneous testing (testing just under the UI layer) can be sufficient to cover important behaviours—if you are disciplined about keeping logic out of your UI.
Unfortunately, that’s particularly hard with web tech, where the presentation itself is often complex enough to need testing; while behaviour can work perfectly in one browser or in a simulated environment, it can still fail spectacularly in just one browser.
We often see the pain of maintaining end to end tests, but there’s also lots of value…
Tackling Risk
I work in adtech, where the real user experience in real browsers is really, really important.
This might sound like an odd statement, who likes ads? who would mind if they didn’t work?
I’m sure you can remember a poor user experience with an ad. Perhaps it popped up in front of the content you were trying to read, perhaps it blasted sound in your ears and you had to go hunting through your tabs to find the culprit.

I’m guessing these experiences didn’t endear you to the brand that was advertising? User experience is important, politeness is important. Impolite ads come not only from intentionally obnoxious advertisers, but from bugs, and even browser specific bugs.
We also have an elevated risk, we’re running code out in the wild, on publisher pages, where it interacts with lots of other people’s code. There’s lots that could go wrong. We have a heavy responsibility to avoid any possibility of breaking publisher pages.
However simple our UI, we couldn’t take the risk of not testing it.
Extra Value
If you have invested in end to end tests, there’s lots of opportunities for extracting extra value from them, beyond the obvious.
Multi-device
Once a test has been written, that same test case can be run same across multiple browsers & devices. Checking that behaviour has at least some semblance of working on different devices can be incredibly valuable to increase confidence in changes.
Who has time and money to manually test every tiny change with a plethora of devices? Even if you did, how slow would it make your team, do you want to measure your release lead time in minutes or months?
Approval Tests
Webdriver tests don’t actually check that a user is able to complete an action—they check whether a robot can; they won’t always pick up on visual defects that make a feature unusable.
Approval Tests can help here. Approval tests flag a change in a visual way that a person can quickly evaluate to either approve or reject the change.
We can store a known-good screenshot of how a feature should look, and then automatically compare it to a screenshot generated by a testcase. If they differ (beyond agreed tolerances) flag the change to a somebody to review.
Webdriver can take screenshots, and can be easily integrated with various approval tests tools & services. If you have an existing suite of webdriver tests, using a selected few for visual approval tests can significantly reduce risk.
Approval tests are deliberately brittle, you don’t want many of them. They require someone to manually intervene every time there’s a change. However, they can really help spot unexpected changes.
Legacy
Not everyone is fortunate enough to get to work with systems with high levels of automated test coverage. For those who aren’t, tests that drive the UI provide a mechanism to adding some automated test coverage without invasive changes to the application to introduce seams for testing.
Even a few smoke end to end tests for key workflows can significantly increase a team’s confidence to make changes. Lots of diagnosis time can be saved if breakages are identified close to the point in time at which they were introduced.
Invariants
With a suite of end to end tests, one can check invariants—things that should be true in every single testcase; including things that would be hard to test in other ways. These can be asserted in the test suite or with hooks like junit rules, without modifying each testcase.
Sound
People understandably really don’t like it when they get unsolicited sound while they’re browsing.
By capturing audio to the sound device during every webdriver test execution we are able to assert that we don’t have any features that unintentionally trigger sound.
Security
Preexisting test suites can be run with a proxy attached to the browser, such as OWASP ZAP and the recordings from the proxy can be used to check for common security vulnerabilities.
Download Size
Rules such as “no page may be over 1MB in total size” can be added as assertions across every test.
Implementation Independent
We have webdriver tests that have survived across multiple implementations & technology stacks.
Desired behaviours often remain the same even when the underlying technology changes.
Webdriver tests are agnostic to the technology used for implementation, and can live longer as a result.
They can also provide confidence that behaviour is unchanged during a migration to a new technology stack. They support incremental migration with the strangler pattern or similar techniques.
Production Monitoring
End to end tests usually check behaviour that should exist and work in production. We usually run these tests in an isolated environment for feedback pre-production.
However, it’s possible to run the same test suites against the production instances of applications and check that the behaviour works there. Often just by changing the URL your tests point to.
This unlocks extra value—there’s so many reasons that features may not work as expected in production, regardless of whether your application is “up”.
It does require you to find a way to isolate your test data in production, to avoid your tests polluting your production environment.
Inventory Cost
Browser based tests can be made reasonably reliable and kept reasonably fast, but they do have a significant inventory cost. The more tests we have, the more time we need to invest in keeping them reliable and fast.
A 0.01% failure rate might be tolerable with 10 tests but probably isn’t with 1,000 tests.
Testcases that take 5 seconds each to run might be tolerable with 10 tests, but probably aren’t with 1,000 tests (unless they parallelise really well).
There’s also a maintenance cost to keeping the tests working as you change your application. It takes effort to write your tests such that they don’t break with minor UI changes.
The cost of tests can spiral out of control to the point that they’re no longer a net benefit. To stay on top of it requires prioritising test maintenance as seriously as keeping production monitoring checks working; it means deleting tests that aren’t worth fixing “right now” lest they undermine our confidence in the whole suite.
Reliability
End to end tests have a reputation for being unreliable, for good reason.
They’re difficult to get right due to asynchronicity, and have to be tolerant of failure due to the main moving parts and unreliable infrastructure they tend to depend upon.
Test or Implementation?
One of the most common causes for flakey tests is a non-deterministic implementation. It’s easy to blame the test for being unreliable when it fails one in a hundred times.
However, it’s just as likely, if not more likely, to be your implementation that is unreliable.
Could your flakey test be caused by a race condition in your code? Does your code still work when network operations are slow? Does your code behave correctly in the face of errors?
Good diagnostics are essential to answer this question; see below.
Wait for interactivity
A common cause of the tests themselves being unreliable seems to be failing to wait for elements to become interactive.
It’s not always possible to simply click on an element on the page, the element might not have been rendered yet, or it might not be visible yet. Instead, one should wait for an element to become visible and interactive, and then click on it.
These waits should be implicit, not explicit. If you instruct your test to sleep for a second before attempting to click a button, that might work most of the time, but will still fail when there’s a slow network connection. Moreover, your test will be unnecessarily slow most of the time when the button becomes clickable in milliseconds.
WebDriver provides an API for implicit waits that allows you to wait for a condition to be true before proceeding. Under the hood it will poll for a condition.
I prefer defining a wrapper around these waits that allows using a lambda to check a condition – it means we can say something like
waitUntil(confirmationMessage::isDisplayed);
Under the hood this polls a page object to check whether the message is displayed or not, and blocks until it is (or a timeout is reached)
Wait, don’t Assert
We’re used to writing assertions in automated tests like
assertEquals("Hello World", confirmationMessage.text());
or
assertThat(confirmationMessage.text(), is("Hello World"));
This kind of assertion tends to suffer from the same problem as failing to wait for interactivity. It may take some amount of elapsed time before the condition you wish to assert becomes true.
It’s generally more reliable to wait /until/ a condition becomes true in the future, and fail with an assertion error if a timeout is hit.
It can help make this the general pattern by combining the waiting and the assertion into a single step.
waitUntilEquals("Hello World", confirmationMessage::text);
Poll confirmationMessage.text() until it becomes equal to Hello World, or a timeout is reached.
This means your tests will continue to pass, even if it takes some time to reach the state you wish to assert.
Stub Dependencies
Browser-controlling tests can be unreliable because they rely on unreliable infrastructure and third parties.
We once discovered that the biggest contributor to test flakiness was our office DNS server, which was sometimes not resolving dns requests correctly.
It's always DNS … #sysadmin #haiku pic.twitter.com/DmxRXWoZBl
— Andi Mann (@AndiMann) July 30, 2017
If your tests load resources (images, javascript, html, etc) over the internet, you rely on infrastructure outside your control. What happens if there is packet loss? What happens if the server you’re loading assets from has a brief outage? Do your tests all fail?
The most reliable option seems to be to host the assets your browser tests load on same machine that the tests are running on, so there is no network involved.
Sometimes you have requests to hardcoded URIs in your application, that can’t be easily changed to resolve to localhost for testing purposes. An HTTP proxy server like browsermob can be used to stub out HTTP requests to resolve to a local resource for test purposes. Think of it like mocking dependencies in unit tests.
Quarantine and Delete
Tests that are unreliable are arguably worse than missing tests. They undermine your confidence in the test suite. It doesn’t take many flakey tests to change your default reaction from seeing a failing test from “Something must be broken” to “Oh the tests are being unreliable”
To avoid this erosion of confidence, it’s important to prioritise fixing problematic tests. This may mean deleting the test if it’s not possible to make it reliable within the amount of time it’s worth spending on it. It’s better to delete tests than live with non-determinism.
A downside to “just” deleting non-deterministic tests is that you lose the opportunity to learn what made them non-deterministic, which may apply to other tests that you have not yet observed being flakey.
An alternative is quarantining the failing tests, so they no longer fail your build when non-deterministic, but still run on a regular basis to help gather more diagnostics as to why they might be failing.
This can be done in JUnit with rules, where you annotate the test method as @NonDeterministic and the framework retries it.
It’s possible to have the tests fail the build if they fail deterministically (i.e. if the feature is genuinely broken), but collect diagnostics if they fail and subsequently pass (non-deterministically).
@Test
@NonDeterministic
public void my_unreliable_test() {

}
This approach needs to be combined with discipline. e.g. collecting the test failures in tickets that the team treats as seriously as a broken build. If these failures are ignored the non-determinism will just increase until the test suite doesn’t work at all.
Diagnosis is harder the longer you leave between introducing a problem and fixing it, and your buggy approach may end up getting proliferated into other tests if you leave it in place.
Diagnostics
It’s hard to work out why our tests are unreliable if all we get out as diagnostics is the occasional assertion error or timeout.
This is a particular problem when tests only fail one time in a thousand runs; we don’t get to see them fail, we have only the diagnostics we were prescient enough to collect.
This means it’s particularly important to gather as much diagnostics as possible each time a test fails. In particular, I’ve found it useful to collect
- Browser JS console output
- HTTP requests made by the test (HAR file)
- Screenshots captured between steps in the test
This information could simply be logged as part of your test run. I’ve used Unit rules to tag this information onto test failure messages by wrapping the AssertionErrors thrown by junit.
public class AdditionalDiagnostics extends RuntimeException {

    public AdditionalDiagnostics(Browser browser, Throwable e) {
        super(
		e.getMessage() +
		consoleLog(browser) +
		httpRequests(browser),
		collectedScreenshots(browser),
		e
	);
    }

}
This gives us a lot of information to diagnose what’s gone on. It’s not as good as having a browser open with devtools to investigate what’s going on, but it’s pretty good.
You could even record the entire test run as a video that can be reviewed later, there are services that can do this for you.
Stress testing new tests
Given it’s very easy to write unreliable webdriver tests, it’s a good idea to run it many times before pushing your changes.
I’ve found a junit rule handy for this too, to re-run the test many times and fail the test run if the test fails a single time.
@ReliabilityCheck(runs=1000)
Another approach is to Junit’s Parameterized test feature to generate many repetitions.
Harder problems
Alas, not all causes of non-determinism in webdriver tests are straightforward to fix. Once you’ve resolved the most common issues you may still experience occasional failure that are outside your control.
Browser Bugs
Browser bugs sometimes cause the browsers to spontaneously crash during test runs.
This can sometimes be mitigated by building support into your tests for restarting browsers when they crash—if you can detect it.
Headless browsers seem less prone to crashing, but also may not yet support everything you might want to test. Headless chrome still has issues with proxies, extensions, and video playback at time of writing.
Treat like Monitoring
Everything from buggy graphics drivers, to lying DNS servers, to slow clocks, to congested networks can cause unexpected test failures.
A production system is never “up”. It is in a constant state of degradation. The same applies to end to end tests to some extent, as they also tend to rely on infrastructure and many moving parts.
When we build production monitoring we take this into account. It’s unrealistic to say things must be up. Instead we look for our system to be healthy. We tolerate a certain amount of failure.
A 0.01% failure rate may be tolerable to the business; what’s the cost? If it’s someone viewing a tweet the cost of failure is probably acceptable. If it’s a transfer of a million dollars it’s probably not. We determine the failure rate that’s acceptable given the context.
We can apply that to our tests as well. If a 1% failure rate is acceptable for a test, and it happens to fail once, perhaps it’s acceptable if it passes for the next 100 times in a row – this can happen, just needs a small infrastructure blip.
You can achieve this kind of measurement/control with junit rules as well. Run tests multiple times and measure its failure rate and see if it’s within a tolerable level
A benefit of treating your tests like production monitoring checks, is that you can also re-use them as production monitoring checks. Don’t you want to know whether users can successfully log-in in production as well as in your test environment? (See above)
Speed
Writing a lot of automated tests brings a lot of nice-to-have problems. End to end tests are relatively slow as tests go. It doesn’t need many tests before running them starts to get tediously slow.
One of the main benefits of automated tests is that they enable agility, by letting you build, deploy, release, experiment—try things out quickly with some confidence that you’re not breaking important things.
If it takes you hours, even several minutes to run your test suite then you’re not learning as fast as you could, and not getting the full benefits of test automation. You’ll probably need to do something else while you wait for production feedback rather than getting it straight away.
It is possible to keep test suites fast over time, but like with reliability, it requires discipline.
Synchronicity
A sometimes unpopular, but effective way to incentivise keeping test suites fast is to make them (and keep them) a synchronous part of your development process.
As developers we love making slow things asynchronous so that we can ignore the pain. We’ll push our changes to a build server to run the tests in the background while we do something else for an hour.
We check back in later to find that our change has broken the test suite, and now we’ve forgotten the context of our change.
When tests are always run asynchronously like this, there’s little incentive to keep them fast. There’s little difference between a 5 min and a 15min test run, even an hour.
On the other hand if you’re sitting around waiting for the tests to run so inform the next change you want to make, then you feel the pain when they slow down and have a strong incentive to keep them fast—and fast tests enable agility.
If your tests are fast enough to run synchronously after each change then they can give you useful feedback that truly informs the next thing you do: Do you do that refactoring because they’re green, or fix the regression you just introduced?
Of course this only works if you actually listen to the pain and prioritise accordingly. If you’re quite happy sitting around bored and twiddling your thumbs then you’ll get no benefit.
Delete
Tests have an inventory cost. Keeping them around means we have to keep them up to date as things change, keep them reliable, and do performance work to keep our entire test suite fast.
Maybe the cost of breaking certain things just isn’t that high, or you’re unsure why the test exists in the first place. Deleting tests is an ok thing to do. If it’s not giving more value than its cost then delete it.
There’s no reason our test suites only have to get bigger over time, perhaps we can trim them. After all, your tests are only covering the cases you’ve thought about testing anyway, we’re always missing things. Which of the things we are testing are really important not to break?
Monitoring / Async Tests
I argued above that keeping tests fast enough that they can be part of a synchronous development feedback loop is valuable. However, maybe there’s some tests that are less important, and could be asynchronous—either as production monitoring or async test suites.
Is it essential that you avoid breaking everything? Is there anything that isn’t that bad to break? Perhaps some features are more important than others? It might be really crucial that you never release a change that calculates financial transactions incorrectly, but is it as crucial that people can upload photos?
How long could you live with any given feature being broken for? What’s the cost? If half of your features could be broken for an hour with minimal business impact, and you can deploy a change in a few minutes, then you could consider monitoring the health of those features in production instead of prior to production.
If you can be notified, respond, and fix a production problem and still maintain your service level objective, then sometimes you’re better off not checking certain things pre-production if it helps you move faster.
On the other hand if you find yourself regularly breaking certain things in production and having to roll back then you probably need to move checks the other way, into pre-production gates.
Stubbing Dependencies
Stubbing dependencies helps with test reliability—eliminating network round trips eliminates the network as a cause of failure.
Stubbing dependencies also helps with test performance. Network round trips are slow, eliminating them speeds up the tests. Services we depend on may be slow, if that service is not under test in this particular case then why not stub it out?
When we write unit tests we stub out slow dependencies to keep them fast, we can apply the same principles to end to end tests. Stub out the dependencies that are not relevant to the test.
Move test assets onto the same machine that’s executing the tests (or as close as possible) to reduce round trip times. Stub out calls to third party services that are not applicable to the behaviour under test with default responses to reduce execution time.
Split Deployables
A slow test suite for a system is a design smell. It may be telling us that this has too many responsibilities and could be split up into separate independently deployable components.
The web is a great platform for integration. Even the humble hyperlink is a fantastic integration tool.
Does all of your webapp have to be a single deployable? Perhaps the login system could be deployed separately to the photo browser? Perhaps the financial reporting pages could be deployed separately to the user administration pages?
Defining smaller, independent components that can be independently tested and deployed, helps keep the test suites for each fast. It helps us keep iterating quickly as the overall system complexity grows.
It’s often valuable to invest in a few cross-system integration smoke tests when breaking systems apart like this.
Parallelise
The closest thing to a silver bullet for end to end test performance is parallelisation. If you have 1,000 tests that take 5 seconds each, but you can run all 1,000 in parallel, then your test suite still only takes a few seconds.
This can sometimes be quite straightforward, if you avoid adding state to your tests then what’s stopping you running all of them in parallel?
There are, however, some roadblocks that appear in practice.
Infrastructure
On a single machine there’s often a fairly low limit to how many tests you can execute in parallel, particularly if you need real browsers as opposed to headless. Running thousands of tests concurrently in a server farm also requires quite a bit of infrastructure setup.
All that test infrastructure also introduces more non-deterministic failure scenarios that we need to be able to deal with. It may of course be worth it if your tests are providing enough value.
AWS lambda is very promising for executing tests in parallel, though currently limited to headless browsers.
State
Application state is a challenge for test parallelisation. It’s relatively easy to parallelise end to end tests of stateless webapp features, where our tests have no side-effect on the running application. It’s more of a challenge when our tests have side effects such as purchasing a product, or signing-up as a new user.
The result of one test can easily affect another by changing the state in the application. There’s a few techniques that can help:
Multiple Instances
Perhaps the conceptually simplest solution is to run one instance of the application you’re testing for each test runner, and keep the state completely isolated.
This may of course be impractical. Spinning up multiple instances of the app and all its associated infrastructure might be easier said than done—perhaps you’re testing a legacy application that can’t easily be provisioned.
Side-Effect Toggles
This is a technique that can also be used for production monitoring. Have a URL parameter (or other way of passing a flag to your application under test) that instructs the application to avoid triggering certain side effects. e.g. ?record_analytics=false
This technique is only useful if the side effects are not necessary to the feature that you’re trying to test. It’s also only applicable if you have the ability to change the implementation to help testing.
Application Level Isolation
Another approach is to have some way of isolating the state for each test within the application. For example, each test could create itself a new user account, and all data created by that user might be isolated from access by other users.
This also enables cleanup after the test run by deleting all data associated with the temporary user.
This can also be used for production monitoring if you build in a “right to be forgotten” feature for production users. However, again it assumes you have the ability to change the implementation to make it easier to test.
Maintainability
Performance is one of the nice-to-have problems that comes from having a decently sized suite of end to end tests. Another is maintainability over the long term.
We write end to end tests to make it easier to change the system rapidly and with confidence. Without care, the opposite can be true. Tests that are coupled to implementations create resistance to change rather than enabling it.
If you re-organise your HTML and need to trawl through hundreds of tests fixing them all to match the new page structure, you’re not getting the touted benefits, you might even be better off without such tests.
If you change a key user journey such as logging into the system and as a result need to update every test then you’re not seeing the benefits.
There are two patterns that help avoid these problems: the Page Object Pattern and the Screenplay Pattern.
Really, both of these patterns are explaining what emerges if you were to ruthlessly refactor your tests—factoring out unnecessary repetition and creating abstractions that add clarity
Page Objects
Page Objects abstract your testcases themselves away from the mechanics of locating and interacting with elements on the page. If you’ve got strings and selectors in your test cases, you may be coupling your tests to the current implementation.
If you’re using page objects well, then when you redesign your site, or re-organise your markup you shouldn’t have to update multiple testcases. You should just need to update your page objects to map to the new page structure.
// directly interacting with page
driver.findElement(By.id("username")).sendKeys(username);

// using a page object
page.loginAs(username);
I’ve seen this pay off: tests written for one ad format being entirely re-usable with a built-from-scratch ad format that shared behaviours. All that was needed was re-mapping the page objects.
Page objects can be a win for reliability. There’s fewer places to update when you realise you’re not waiting for interactivity of a component. A small improvement to your page objects can improve many tests at once.
Screenplay Pattern
For a long time our end to end testing efforts were focused on Ads—with small, simple, user journeys. Standard page objects coped well with the complexity.
When we started end to end testing more complex applications we took what we’d learnt the hard way from our ad tests and introduced page objects early.
However, this time we started noticing code smells—the page objects themselves started getting big and unwieldy, and we were seeing repetition of interactions with the pageobjects in different tests.
You could understand what the tests were doing by comparing the tests to what you see on the screen—you’d log in, then browse to a section. However, they were mechanical, they were written in the domain of interacting with the page, not using the language the users would use to describe the tasks they were trying to accomplish.
That’s when we were introduced to the screenplay pattern by Antony Marcarno (tests written in this style tend to read a little like a screenplay)
There are other articles that explain the screenplay pattern far more eloquently than I could. Suffice to say that it resolved many of the code smells we were noticing applying page objects to more complex applications.
Interactions & Tasks become small re-usable functions, and these functions can be composed into higher level conceptual tasks.
You might have a test where a user performs a login task, while another test might perform a “view report” task that composes the login and navigation tasks.
.attemptsTo(loginAs(publisher))
.attemptsTo(navigateToEarnings())
.attemptsTo(viewSavedReport())

/* extract, refactor, reuse */

.attemptsTo(viewEarnings())
Unruly has released a little library that emerged when we started writing tests in the screenplay pattern style, and there’s also gold standard of Serenity BDD.
Summary
End to end tests with webdriver present lots of opportunities—reducing risks, checking across browsers & devices, testing invariants, and reuse for monitoring.
Like any automated tests, there are performance, maintainability, and reliability challenges that can be overcome.
Most of these principles are applicable to any automated tests, with end to end tests we tend to run into the pain earlier, and the costs of test inventory are higher.
The post End to End Tests appeared first on Benji's Blog.

My affidavit in the Geniatech vs. McHardy case
As many people know, last week there was a court hearing in the Geniatech vs. McHardy case. This was a case brought claiming a license violation of the Linux kernel in Geniatech devices in the German court of OLG Cologne.
Harald Welte has written up a wonderful summary of the hearing, I strongly recommend that everyone go read that first.
In Harald’s summary, he refers to an affidavit that I provided to the court. Because the case was withdrawn by McHardy, my affidavit was not entered into the public record. I had always assumed that my affidavit would be made public, and since I have had a number of people ask me about what it contained, I figured it was good to just publish it for everyone to be able to see it.
There are some minor edits from what was exactly submitted to the court such as the side-by-side German translation of the English text, and some reformatting around some footnotes in the text, because I don’t know how to do that directly here, and they really were not all that relevant for anyone who reads this blog. Exhibit A is also not reproduced as it’s just a huge list of all of the kernel releases in which I felt that were no evidence of any contribution by Patrick McHardy.
AFFIDAVIT

I, the undersigned, Greg Kroah-Hartman,
declare in lieu of an oath and in the
knowledge that a wrong declaration in
lieu of an oath is punishable, to be
submitted before the Court:

I. With regard to me personally:

1. I have been an active contributor to
   the Linux Kernel since 1999.

2. Since February 1, 2012 I have been a
   Linux Foundation Fellow.  I am currently
   one of five Linux Foundation Fellows
   devoted to full time maintenance and
   advancement of Linux. In particular, I am
   the current Linux stable Kernel maintainer
   and manage the stable Kernel releases. I
   am also the maintainer for a variety of
   different subsystems that include USB,
   staging, driver core, tty, and sysfs,
   among others.

3. I have been a member of the Linux
   Technical Advisory Board since 2005.

4. I have authored two books on Linux Kernel
   development including Linux Kernel in a
   Nutshell (2006) and Linux Device Drivers
   (co-authored Third Edition in 2009.)

5. I have been a contributing editor to Linux
   Journal from 2003 - 2006.

6. I am a co-author of every Linux Kernel
   Development Report. The first report was
   based on my Ottawa Linux Symposium keynote
   in 2006, and the report has been published
   every few years since then. I have been
   one of the co-author on all of them. This
   report includes a periodic in-depth
   analysis of who is currently contributing
   to Linux. Because of this work, I have an
   in-depth knowledge of the various records
   of contributions that have been maintained
   over the course of the Linux Kernel
   project.

   For many years, Linus Torvalds compiled a
   list of contributors to the Linux kernel
   with each release. There are also usenet
   and email records of contributions made
   prior to 2005. In April of 2005, Linus
   Torvalds created a program now known as
   “Git” which is a version control system
   for tracking changes in computer files and
   coordinating work on those files among
   multiple people. Every Git directory on
   every computer contains an accurate
   repository with complete history and full
   version tracking abilities.  Every Git
   directory captures the identity of
   contributors.  Development of the Linux
   kernel has been tracked and managed using
   Git since April of 2005.

   One of the findings in the report is that
   since the 2.6.11 release in 2005, a total
   of 15,637 developers have contributed to
   the Linux Kernel.

7. I have been an advisor on the Cregit
   project and compared its results to other
   methods that have been used to identify
   contributors and contributions to the
   Linux Kernel, such as a tool known as “git
   blame” that is used by developers to
   identify contributions to a git repository
   such as the repositories used by the Linux
   Kernel project.

8. I have been shown documents related to
   court actions by Patrick McHardy to
   enforce copyright claims regarding the
   Linux Kernel. I have heard many people
   familiar with the court actions discuss
   the cases and the threats of injunction
   McHardy leverages to obtain financial
   settlements. I have not otherwise been
   involved in any of the previous court
   actions.

II. With regard to the facts:

1. The Linux Kernel project started in 1991
   with a release of code authored entirely
   by Linus Torvalds (who is also currently a
   Linux Foundation Fellow).  Since that time
   there have been a variety of ways in which
   contributions and contributors to the
   Linux Kernel have been tracked and
   identified. I am familiar with these
   records.

2. The first record of any contribution
   explicitly attributed to Patrick McHardy
   to the Linux kernel is April 23, 2002.
   McHardy’s last contribution to the Linux
   Kernel was made on November 24, 2015.

3. The Linux Kernel 2.5.12 was released by
   Linus Torvalds on April 30, 2002.

4. After review of the relevant records, I
   conclude that there is no evidence in the
   records that the Kernel community relies
   upon to identify contributions and
   contributors that Patrick McHardy made any
   code contributions to versions of the
   Linux Kernel earlier than 2.4.18 and
   2.5.12. Attached as Exhibit A is a list of
   Kernel releases which have no evidence in
   the relevant records of any contribution
   by Patrick McHardy.
Affidavit
As many people know, last week there was a court hearing in the Geniatech vs. McHardy case. This was a case brought claiming a license violation of the Linux kernel in Geniatech devices in the German court of OLG Cologne.
Harald Welte has written up a wonderful summary of the hearing, I strongly recommend that everyone go read that first.
In Harald’s summary, he refers to an affidavit that I provided to the court. Because the case was withdrawn by McHardy, my affidavit was not entered into the public record. I had always assumed that my affidavit would be made public, and since I have had a number of people ask me about what it contained, I figured it was good to just publish it for everyone to be able to see it.
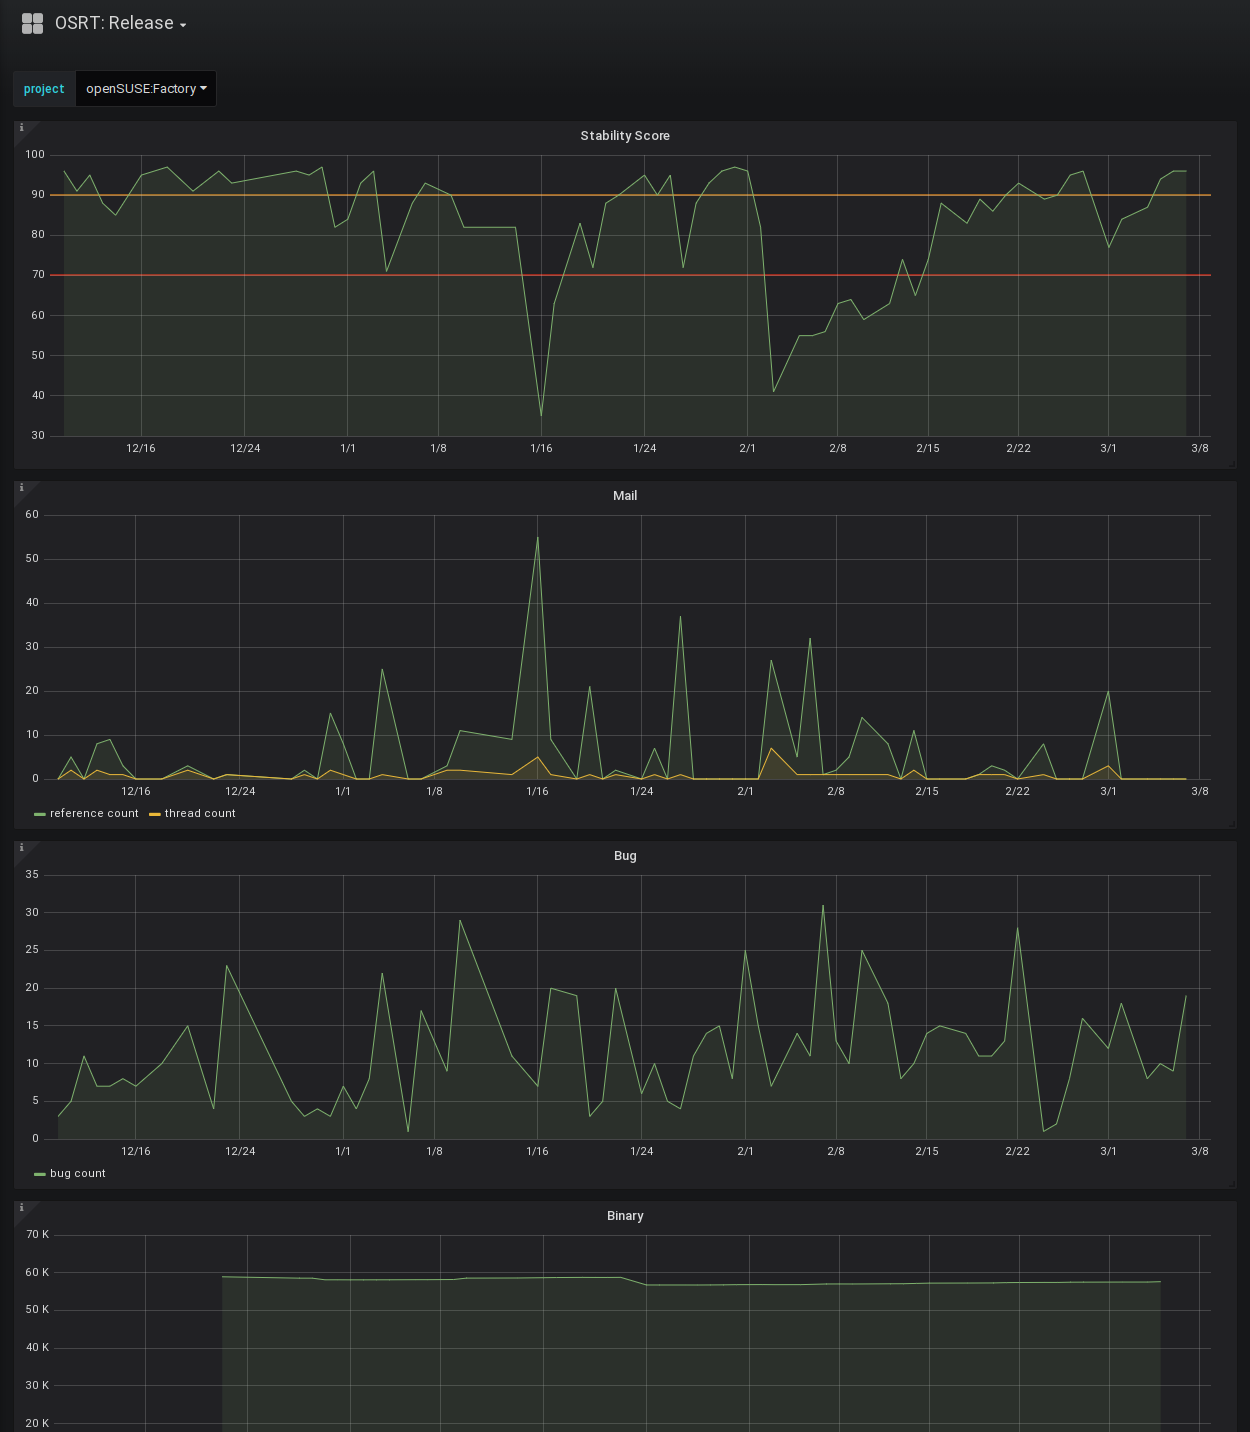
2018w09-10: ReviewBot comment commands, quality of life changes, metrics.o.o for Grafana 5.x and TW release data, and more
ReviewBot overrides via comment commands
Something which has been discussed for quite a while, a method for overriding bot reviews, was added recently. The functionality ended up being to interpret comments in the form @bot <command> [args...]. Comment commands are then restricted to members of either a configured group or the staging group. For example release overrides addressed to leaper may be issued by anyone in leap-reviewers group or factory-staging (responsible for staging process).
repo-checker gained the ability to skip the cycles check via a comment command placed on a staging project (@repo-checker skip-cycle). Previously, this had to be done via the command line by manually running the bot.
The final decision towards this workflow was clear after it turned out OBS groups were insufficient for the override workflow.
leaper was also modified to leave previously declined reviews open for SLE manager override. A similar change will be made to the openSUSE portion of the bot.
Quality of life changes
Instead of printing the list of packages, requiring the package to be deleted, to build as a flat list it is formatted as a bulleted list by repo-checker.
sad-package is still a build requirement of package1, package2, package3
to
sad-package is still a build requirement of:

- package1
- package2
- package3
Similarly, ReviewBots were changed to accept unhandled request types without posting a comment to reduce e-mail spam.
All config options are now lazy-loaded to allow for placement in remote config.
metrics.o.o update for Grafana 5.x and TW review site
In light of the Grafana 5.x series changing the dashboard format the existing 4.x dashboards were migrated. The Tumbleweed snapshot review site data can now also be ingested and presented. Both improvements are scheduled for deployment to metrics.opensuse.org next week.
pkglistgen adventures
A rather interesting bug was causing the pkglistgen.py code to crash on Leap 15.0 after Build153.1 during drop list creation. It ended up being solved by adding a flush() call before passing the file to read by libsolv. The situation would have been easier to resolve if the libsolv components complained about in incomplete XML file, but instead the invalid data makes it through a chain of tools before being read by a tool that complains. In addition to fixing the problem the metadata hash is now validated as further assurance that the correct data is present.
The repo metadata hash for update repos is now used to avoid downloading unchanged information.
To complete the week for pkglistgen the addition of services to Leap 15.0 exposed the need to skip local service run during update.
repo-checker for SLE 15
Lastly, the repo-checker is now utilized for SLE 15.0 development which should reduce both the pre-release problems in SLE 15, but also in Leap 15.0 since it sources core packages from SLE. In combination with Factory this should elevate the quality of pre-releases and even the final releases in addition to reducing negative staging results.
last year
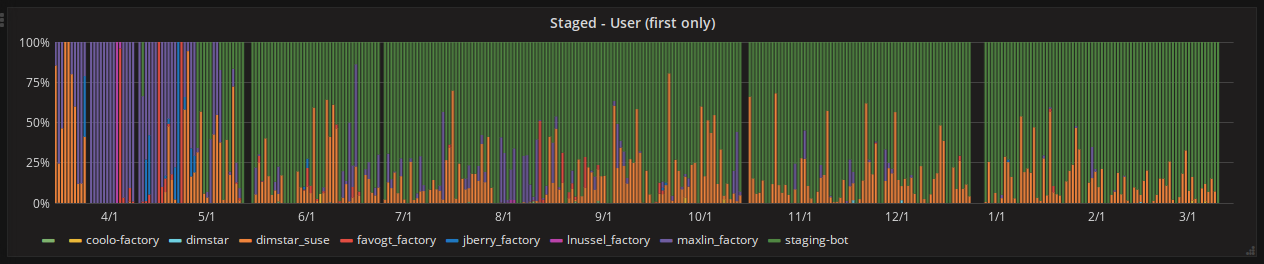
One of the biggest acheivements of last year was the introduction of select automation: merge and strategies which ended up taking over the majority of staging grouping work. An example of using the strategies in interactive mode can be seen in 2018w01-02. The work was based on observations and involvement with Leap 42.3 and Factory staging. Five strategies were created which are evaluated against the open requests based on a priority order. The result is rather powerful automated staging and follow-up staging.
Stagings which were initially filled using a strategy can have further requests --merged into them that match the same strategy. This combined with configurable time period since first staging and other conditions makes for a solid follow-up workflow allowing maintainers to send requests organically. An initial waiting period of an hour is used to allow for patterns to emerge.
A staging-bot user was created under which this code and more now runs as a service. One can clearly see it take over for Factory in the Staged - User* graphs on metrics.opensuse.org.
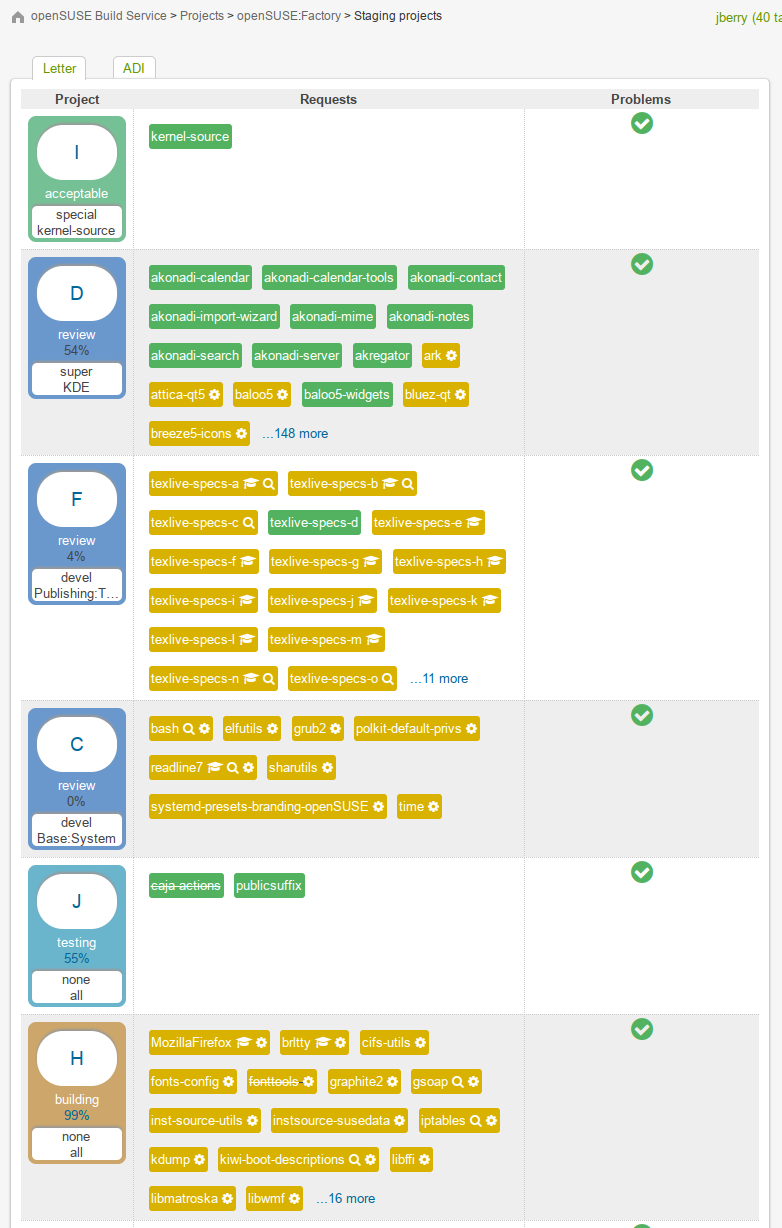
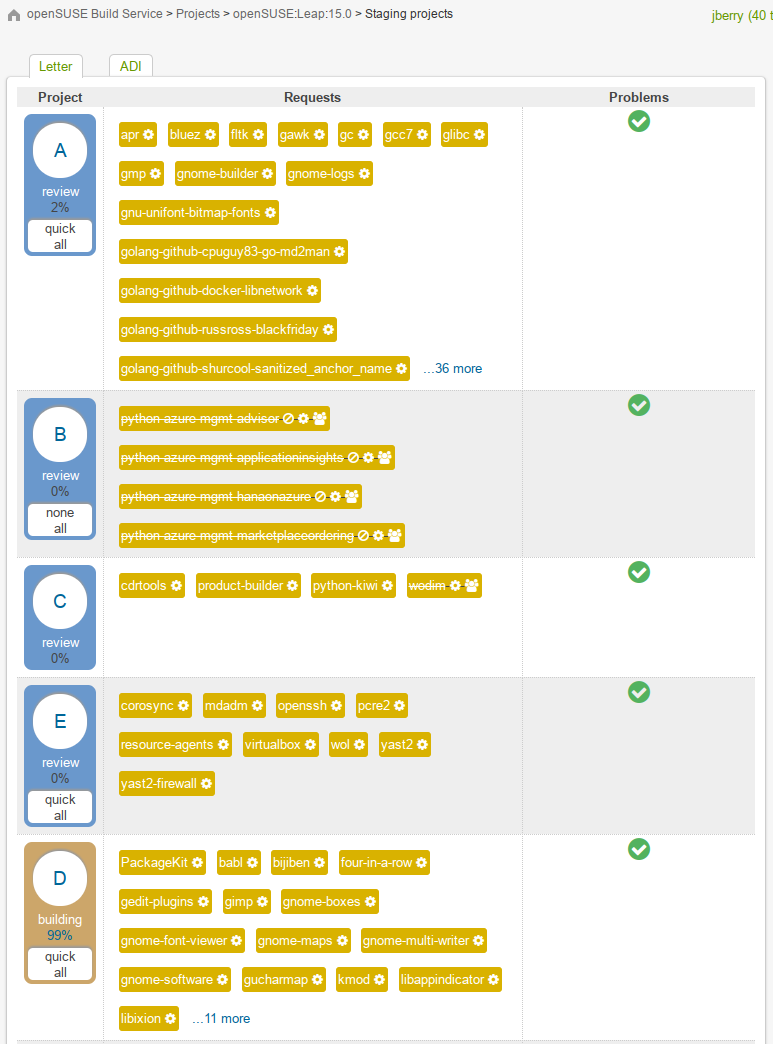
The strategies were also integrated into the OBS dashboard which allows one to quickly tell what strategy was used for each staging. Note the white section within the Project column on the left in the below images (ex. special, kernel-source).
The existing feature set was documented in repo wiki for staging masters and future plans were organized in a github project.
Towards the same goal of automating staging work several commands were given --cleanup flags to remove mundane and neglected tasks. Similarly, a rebuild command was introduced to trigger rebuilds of flaky packages rather than waiting hours for a staging master to come around.
A couple quality of life improvements were made:
-
frozenagedefaults to all letter stagings (to avoid typing all of them) -
include a
--messageoption inunselectto allow for ignoring a request while un-staging since both are commonly done together -
provide an
unlockcommand to resolve stuck staging locks
All in the same week, a tool for interacting with devel projects was introduced. The tool provides an overview of the requests to devel projects and the open reviews for devel project (requests targeting Factory). The --remind feature is run as a service to create review reminder comments of which contributors are likely familiar.
On the OBS end, changes were made to the obs_factory plugin in order to improve development experience, harden validation, and enhance the API for use by the staging tools. Rather than make hundreds of individual API calls a single aggregate call could be made which drastically improved performance.
What 3 Words?
I dig online maps like everyone else, but it is somewhat clumsy sharing a location. The W3W service addesses the issue by chunking up the whole world into 3x3m squares and assigning each a name (Supposedly around 57 trillion). Sometimes it’s a bit of a tongue twister, but most of the time it’s fun to say to meet at a “massive message chuckle” for some fpv flying. I’m really surprised this didn’t take off.