
 Member
 Bubli
BubliInstall more packages? ["Yes"]["No"]
It was the same with YaST package manager and pop-up question from the title of this post. I'm sure we all remember that one:
It was introduced in openSUSE 10.1 (aka BrokenSwManagement edition) in order to alleviate suffering of the poor users forced to use our package management (powered by zmd and baby-libzypp) with ultra-slow start-up. libzypp grew faster and faster over the time, but the pop-up question remained and (quite reasonably) it started to annoy users. "Why do I have to click to have this crappy pop-up disappear?" they asked. "I've made my choice, installed all packages I wanted, so I want to answer no further questions."
After many heated discussions, we finally made the pop-up go away in openSUSE 11.1 After clicking on 'Accept' and installing all packages, package manager simply ended. That, of course, made the other half of the users speak up: "Why YaST does not ask anymore whether I want to install more packages? I don't want to start package manager anew each time. I simply want to have an option to install something more I forgot about in the first round."
In openSUSE 11.2, my colleague lslezak (now the link to his blog should be here, but he is too shy to have one :)) used really ingenious way of cutting the Gordian knot - he made the behaviour on exit from package manager configurable. And not only that - besides an option to close package manager (for those who want to be done with it) and option to restart it (for those who may want to come back and select something more), he added a third one. When the package installation is over, you can choose to display a neat summary of what has been installed/deleted, how long did it take and view some detailed logs. Then, you can either finish, or go back to install more packages:
Now all you have to do is to open /etc/sysconfig/yast2 file in your favourite editor and set PKGMGR_ACTION_AT_EXIT variable to some reasonable value. Please find more detailed information here.
"But I don't want to edit some cryptic file manually," you might think. "Isn't there any other way?" Well, of course there is. YaST ncurses package manager has a brand new menu that allows you to pick the exit action of your choice in a few key presses:
There are some minor things left to polish, but it basically works by now. Better don't ask me how the sysconfig variable is actually written :-) It took me by surprise to realize that libzypp's interface to sysconfig is read-only, so I'm impatienly waiting for Augeas ;-)

Riding the D-Bus with Ruby
Riding the D-Bus with Ruby
The last time I looked at D-Bus is a couple of years ago. What I saw back then was promising in technology but ugly in (C-)programming. D-Bus has come a long way 'til then.And so have my programming skills with scripting languages, esp. with Ruby. The ruby-dbus project provides a nice and easy-to-use programming API, once one has mastered the lack of examples and the D-Bus nomenclature.
About D-Bus
There is plenty of information available on D-Bus. I personally found the Introduction to D-Bus most valuable from a developers point of view.
D-Bus originates from the freedesktop.org initiative and is hosted at www.freedesktop.org
Basically, D-Bus is a RPC (remote procedure call) mechanism, allowing different programs to talk to each other and provide services in a standardized way.
The transport used for talking is called a bus, meaning everyone can ride (connect to) it. Usually there are two independent buses available
- System bus
This is for system-wide services, like hardware information (usually provided by HAL) - Session bus
This is for per-login services, like a Gnome Desktop session.
The nice thing about D-Bus is that it allows introspection. You can ask a service about its capabilities. And the D-Bus itself is a service, so you just need to know about org.freedesktop.DBus to find all other services.
Services provide objects. These are organized in a tree-like fashion and typically addressed using slash-separated paths, just like filenames. Iterating over the objects of org.freedesktop.Hal gives you all devices.
Objects then have members. Members are methods to call, providing the functionality of the service. To make things more
Putting it all together gives you this chain
Bus (System/Session)
-> Service (e.g. org.freedesktop.Hal)
-> Object (e.g. /org/freedesktop/Hal/devices/storage_model_DVDRW_LH_20A1S)
-> Interface (e.g. org.freedesktop.Hal.Device.Storage.Removable)
-> Member (e.g. bool CheckForMedia())
Using ruby-dbus
Connecting to the bus in Ruby is as easy asrequire 'dbus' bus = DBus::SystemBus.instance # resp. 'bus = DBus::SessionBus.instance'DBus::SystemBus is a Singleton, hence the .instance instead of the usual .new for creating the object.
Now you can create a proxy object. Its named 'proxy' because the real object lives on the other side of the connection, in the service. The proxy object is in your application and proxy-ing calls via D-Bus to the service object. You can use this to find all services on the bus
require 'dbus'

bus = DBus::SystemBus.instance

bus.proxy.ListNames[0].each do |service|
  puts "Service: #{service}"
end
Given a known service, D-Bus introspection allows to find its objects, subnodes and interfaces
require 'dbus'

bus = DBus::SystemBus.instance

# Create the proxy object
proxy = bus.introspect "org.freedesktop.Hal", "/"

# proxy.bus gives you the bus
# proxy.path is the object path
# proxy.destination is the service name

# Print object interfaces
proxy.interfaces.each do |interface|
  puts "Object #{proxy.path} provides #{interface}"
end

# Print object subnodes
proxy.subnodes.each do |path|
  puts "-> #{proxy.path}/#{path}"
end
A specific interface of an object can be accessed by the [] operator. And the interface knows about the signature of its methods.
require 'dbus'

bus = DBus::SystemBus.instance
# create proxy for the 'computer' device
proxy = bus.introspect "org.freedesktop.Hal", "/org/freedesktop/Hal/devices/computer"

# Print object interfaces
proxy.interfaces.each do |interface|
  puts "Object #{proxy.path} provides #{interface}"
  proxy[interface].methods.each do |key,value|
    puts "  #{value.rets} #{key}( #{value.params} )"
  end
end
Due to the dynamic nature of Ruby, Object methods are directly accessible in normal Ruby conventions. One just has to select the right interface first.
require 'dbus'

bus = DBus::SystemBus.instance
proxy = bus.introspect "org.freedesktop.Hal", "/org/freedesktop/Hal/devices/computer"

iface = proxy["org.freedesktop.Hal.Device.CPUFreq"]
freq = iface.GetCPUFreqPerformance
gov = iface.GetCPUFreqGovernor
puts "Frequency #{freq}, Governor #{gov}"
Riding the D-Bus with Ruby is easy and fun !
Writing first YCP program
Hi folks!
It was a long time since my last blog. 
Today, i will show you my first program, it`s a simple test program which shows basic functions of YCP
Let`s start!!
first of all, you need all core development YaST and QT packages
(All mentioned bottom steps, can be made with normal user )
second , you must create a symlink to /usr/lib/YaST2/bin/y2base
$ ln -s <destination> <linkname>
(In my case name of symlink is y2base.)
third , you need two console`s , one for program writing and one for monitoring .y2log (where you can see all debug messages)
if you wish more detailed debug output during root session, than type in console following :
$ su
$ export Y2DEBUG=1
$ exit
(switching back to normal user)
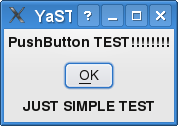
Ok, lets see the code of PushButton.ycp !
{
// Build a dialog with one button and two labels.
// Wait until that button is clicked,
// then close the dialog and terminate.
UI::OpenDialog( `VBox(
`Label(`opt(`boldFont),”PushButton TEST!!!!!!!!”),
`PushButton( “&OK” ),
`Label(`opt(`boldFont),”JUST SIMPLE TEST”)
)
);
UI::UserInput();
UI::CloseDialog();
}
Than:
$ chmod 765 PushButton.ycp
After you have written the program , type in the console:
$ ./y2base ./PushButton.ycp qt
You will get following window:
What is amazing at YCP, that this code can be interpreted into ncurses
Try following command:
$ ./y2base ./PushButton.ycp ncurses
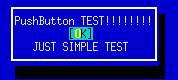
Result:
You have written only one code , which can be used in two different gui environments graphical and text mode!
In my next blog i will write about creating own SCR Agent.

Fun with Studio
I’ve been working on a new project now for a while called SUSE Studio. Essentially it is a web interface which allows you to build your own customized version of SUSE. You can select packages, do some configuration, and even add your own branding.
I created a media center appliance to see how hard it would be. The appliance is based on openSUSE 11.1, and boots right into the excellent Elisa Media Center. You can download the image here. The tarball contains one file, which you can ‘dd’ to a USB storage device. We’re working on writing a small application to make this part easier.
On the first boot it will do some one-time setup like repartition and resize the disk, install NVIDIA or ATI video drivers (if appropriate), and setup X.

FOSDEM
FOSDEM is ... strange. Lots of people, everything crowded, hot devrooms (cooling probably not paid for the weekends). Listened to some of our talks and the Debian keynote. With the task of finding out more about motivating our community I was a bit at loss.
My Wine talk on Sunday noon was well received, around 110 listeners according to Juergen. I do not understand why so much people are interested in the topic, remembering Security with just 20 listeners 3 years ago...
The video will show up tomorrow on the FOSDEM 2009 overview page.
And here are is my Flickr Set of images.
Product Creation with the openSUSE Build Service
Product
First of all, what is a “Product”? The openSUSE Wiki has the following statement on the Product Definition Article:
“A product is a defined set of packages plus extra information”
In the most simple interpretation this means a set of RPM files plus a set of metadata which contains the installation kernel, information about the installation work flow, hardware detection, languages, licenses, slide shows and the like.
Thus the most simple product imaginable is a basic set of RPM files for the system to be installed and a minimum set of metadata: an installation system consisting of kernel, initrd and the packages necessary for installation.
kiwi
The kiwi imaging system allows creation of all kinds of live media: live DVDs, CDs, USB sticks and VMware and XEN bootable images. Those images are extremely useful for systems where a regular setup of equal hosts is required. The build client farm of the openSUSE Build Service is just one popular example.
kiwi is used in several popular projects, among which you can find several project based live DVDs, terminal server, thin clients and preload images. It is also relatively easy to create a personal custom image to boot different machines from USB stick or live CD, for instance to fix crashed machines and save or recover data.
kiwi-instsource module
A weakness of the images is that it is not possible to install from them as easy and complete as it is from installable media. The reason therefore is the way in which the image is created. As explained in depth in the official kiwi documentation (available from the project web site and delivered with the kiwi-doc package) kiwi creates a so called root tree (“physical extent”) where packages are installed into. After finishing the installation an image (“logical extent”) is created from that root tree. The same root tree can be used for multiple image types (usb, iso, xen, …) and can even be tweaked manually after the physical extent is created.
This means several things. First of all, the installation process makes choices. It is not possible to have conflicting packages installed in parallel and hence there is no choice later (in case there is no other installation source available). Secondly, the system can only install on one compatible platform. Which means you can’t use a x86_64 image to boot and install an i386 machine. And only with regressions vice versa.
All those problems are solvable by using an installation source. This term refers to official online repositories (such as openSUSE:11.1), product media (boxes, downloadable iso images) and update channels.
These repositories were created by the autobuild team in the past and are created by kiwi-instsource as imaging back end in the openSUSE Build Service since openSUSE-11.1. In principle everybody can brew his or her own linux distribution that way. I presented several talks on that topic, one on FOSDEM 2008 about imaging in general, then an interim talk which was held in the Nürnberg SuSE office and is available through tube.opensuse.org, and finally about installation source creation on FOSDEM 2009.
All three talks were recorded and can be found at [1] and [2].
kiwi-instsource is a subpackage to kiwi and maintained in the openSUSE:Tools build service project [3]. Its devel project is my home project at home:helcaraxe [4].
FOSDEM Talk
Preparing and delivering this talk was really fun, thanks a lot to all attendees. I was amazed how many people attended the talk, the openSUSE DevRoom was nicknamed openSAUNA later. It is always very interesting to know possible users and contributors face to face. I met several people I knew from mailing lists before and we got some nice discussions on what is needed in the community.
Please feel free to comment on that.
One mayor feedback to me is that we have to document what needs to be done to customise installation sources. I will add some information to the openSUSE wiki at this article: Installation_Source
FOSDEM is always a great event, thanks to all the organisation around it. Unfortunately I could not attend as many talks as I intended but got at least to the ext4 talk and the syslinux talk on the main track and some of my colleagues’ talks in the openSUSE DevRoom.
Plus I discovered some very nice locations for dinner and good belgian beers thanks to the people of the X.org team.
Further Reading
[1] FOSDEM talks linked in openSUSE Wiki: FOSDEM 09, FOSDEM 08
[2] Interim talks aggregated in openSUSE Wiki
[3] Development project for kiwi in Build Service: openSUSE:Tools
[4] My home project in Build Service: home:helcaraxe
[5] My user page: User:helcaraxe
Testing GNOME 2.25.90 on my main Workstation
I was already testing 2.25.x on my jhbuild without any problems so far.
So i just added three repositories and upgraded. After that i'm running Gnome 2.25.90. The upgrade run pretty good and no issues so far.
If you want to test 2.25.90 on openSUSE just add these repositories:
http://download.opensuse.org/repositories/home:/MBoman/openSUSE_11.1/ (Xorg packages needed a patch to avoid 100% CPU, already fixed upstream)
http://download.opensuse.org/repositories/GNOME:/Factory/openSUSE_11.1/ (Main 2.25.90 Repository)
http://download.opensuse.org/repositories/GNOME:/Backports/openSUSE_11.1/ (Packages from openSUSE Factory needed by the new Gnome)
and sudo zypper up
USB EVDO (Alltel UM175AL) under SLED 10
This was a bit of a bear, but I’ve inhereted a generic looking USB EVDO stick at the office. After some research and elbow grease, I’ve managed to get it working. In this post, I’ll detail EVDO configuration under SLED 10. I’ll leave out most of the gory technical details as others have covered that for me. I’ll link to the appropriate reference where necessary.
The UM175AL card from Alltel attempts to identify itself as a USB storage device/cdrom when it’s first inserted. This is a huge mess as it needs to be recognized as a serial device. After some searching, I came across Mark A. Ziesemer’s post on using this same card under Ubuntu. He recommends using USB_ModeSwitch to change the device’s mode.
First, I downloaded the USB_ModeSwitch source, extracted it, and deleted the binary. Next, you’ll want to download libusb and libusb-devel from the OBS. If you don’t have OneClick-Install enabled on your SLED install, simply download the libusb RPMs and issue the following commands:
rpm -Uv libusb-*.rpm
rpm -ivh libusb-devel*.rpm
Once those are installed, go ahead and issue ‘make’ in the USB_ModeSwitch directory. This should execute rather quickly and you should have a new usb_modeswitch binary. Copy ‘usb_modeswitch’ to /usr/sbin.
Next you’ll need to create a config for USB_ModeSwitch. As root, edit /etc/usb_modeswitch.conf with the following information (all the gory details can be found at Mark’s site if you’re up for a read):
# /etc/usb_modeswitch.conf
# alltel evdo hax
DefaultVendor = 0x106c
DefaultProduct = 0x3b03MessageEndpoint = 0x05
MessageContent = “55534243904ed68a24000000800008ff024445564348470000000000000000”
Note that the above only works for this particular card. You can likely ignore that if your EVDO card is already supported.
Now we should be able to access the modem and use ‘wvdial’ (which conveniently ships with SLED) to get connected. First we’ll need to edit our /etc/wvdial.conf. This example is for Alltel only:
[Dialer Defaults]
Stupid Mode = On
Modem = /dev/ttyACM0
Baud = 921600
Init = ATZ
Init2 = ATQ0 V1 E1 S0=0 &C1 &D2 +FCLASS=0
Phone = #777
Username = XXXXXXXXXX@alltel.net
Password = alltel
Init1 = ATZ
ISDN = 0
Modem Type = Analog Modem
Auto Reconnect = on
Carrier Check = no
[Dialer shh]
Init3 = ATM0
[Dialer Pulse]
Dial Command = ATDP
Replace XXXXXXXXXX with your 10 digit phone number. I gleaned this information from two sources: Linux.com’s EVDO tutorial for VoIP and Linux * Screw’s EVDO with Linux article.
Now that everything is all configured, plug in your EVDO stick and use usb_switchmode to switch it to the proper mode for serial access:
/usr/sbin/usb_modeswitch -c /etc/usb_modeswitch.conf
Which should spit out some “everything OK” messages. If it didn’t, you’ll need to go back and check your configuration.
Once you’ve switched the card to the proper setting, go ahead and use ifconfig to bring your wireless and wired network interfaces down (ifconfig eth0 down, etc.). This step is optional, but I like to do it for good measure.
Now you should be ready to dial your wireless carrier. To do so, simply execute ‘wvdial’ and wait for the connection to finish. You should be online at this point!
So there you have it. I want to give a HUGE thanks to Mark Ziesemer for doing so much research on this card, that helped progress a TON!
Enjoy!

Fosdem talks
I held two talks that were pretty crammed (actually, on the RandR 1.3 talk the room was completely full, and people weren't allowed to get in any more). The r600_demo talk was pretty technical, so of course it drew in a little less people.
If you hadn't had a chance to visit the talks, you can download the slides from my web page. And Phoronix will have videos of all talks.
-
RandR1.3: New Features in a Nutshell
Transformation, Panning, Properties
Slides Video
-
r600_demo: Programming the New GPU Generations from ADM
HowTo Render a Freaking Triangle
Slides Video
Android Fun
And it's easy to programme. I used to try to programme my Nokia phone using Symbian. But the number of hoops I had to jump through in order to get anything to work totally put me off, and I never got futher than writing a programme which said 'Hello' on the screen. (I guess 'Hello World' wouldn't have been much more effort, but by that time I'd had enough.) But programming Android is very easy. At first it was a little awkward, because on my six year old laptop (yes, six years old) the emulator was very slow, and used nearly all my computer's memory. But now I have a real phone I can plug the USB cable in and run and debug my programmes directly on the device. And from Linux too, which is pretty good.
I'm currently working on a little programme which will log sensor values to a file. Then I'll be able to plot them on a Google map and see how fast I was travelling and how hard I was accelerating or cornering. Not because I drive 'that way', but because I've always thought it would be interesting to log stuff like that, and now I have a device which can do it. So far I've just written a test programme which shows the values of the various sensors and moves sliders around, but it's been incredibly easy to do.
And just in case there's anyone reading this who wonders how I got the debugging to work in openSUSE 11.1, here's how. (Bear in mind that this is additional info to that which is in the SDK - it doesn't really make sense on its own). I created a file called 50-android.rules in /etc/udev/rules.d containing this line:
SUBSYSTEM=="usb", SYSFS{idVendor}=="0bb4", MODE="0666", SYMLINK+="android_adb"
Then I chmodded it to 755, and, as root, ran 'adb kill-server' followed by 'adb start-server'. Then I ran 'adb devices' to see if the device showed up in the list. If it didn't I killed and restarted the server again until it did. (I don't know if I need to, or if I could just wait.)
After that, I was able to run and debug programmes from Eclipse directly on the device. Although I had to make sure that the manifest file had debuggable set to true, otherwise it didn't work.