
 Member
kaveau: easy and integrated backups solution for KDE
During the last week I had the possibility to work on anything I wanted, Novell’s hackweek is so cool :)
I decided to dedicate myself to an idea that has been obsessing me since a long time. Last December my brand new hard disk suddenly died, making impossible to recover anything. Fortunately I had just synchronized the most important documents between my workstation and my laptop, so I didn’t lose anything important. This incident make me realize that I should perform backups regularly and I immediately started looking for a good solution.
Personally I think that doing backups is pretty boring so I wanted something damned easy to setup and use. Something that once configured runs in the background and does the dirty job without bothering you. Let’s face the truth: I wanted Apple’s Time Machine for KDE.
After some searches I realized that nothing was fitting my requirements and I decided to create something new: kaveau.
What is kaveau?
Kaveau is a backup program that makes backup easy for the average user.
As you will see while coding/planning kaveau I made some assumptions and so only few things are configurable. I really think that sometimes “less is more”.
What does kaveau?
Current features:
- it performs backups to an external storage device: I don’t think it will ever store backup data on a remote host. If you want to do that just use some good project like Backup pc.
- it backs up the complete home directory of the user: storage is cheap and average users (like me) keep everything inside their home directory ( but it’s possible to exclude some directories from the backup).
- it performs incremental backups.
- the backup data are neither compressed nor stored in fancy formats: in this way you can plug your external disk into another machine and access your data without additional work.
- backups are performed automatically every hour (of course only if your external disk is plugged).
- notification messages are shown if your backup is older that a week. More enhancements are coming…
What technologies does it use?
Backups are performed using rdiff-backup because it’s damned easy to use, well tested (it’s used also in production environments) and packaged by all distributions.
The awesome solid library is used for interacting with the external disks is super easy.
Status of kaveau
I have been working on kaveau just for five days, so there’s still a lot of work to do.
A screenshot tour will give you the right idea of its status.
First run - external storage device attached
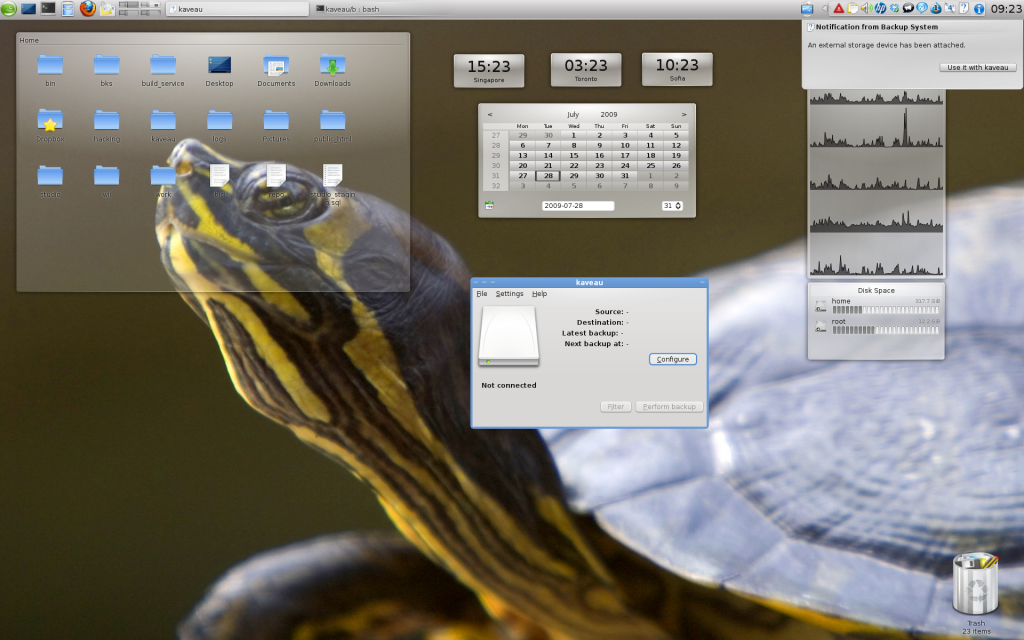
####Backup wizard - page 1
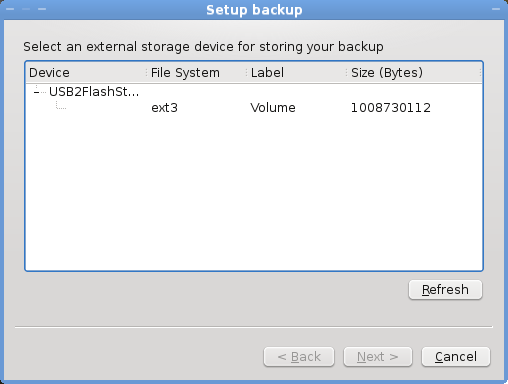
####Backup wizard - page 2
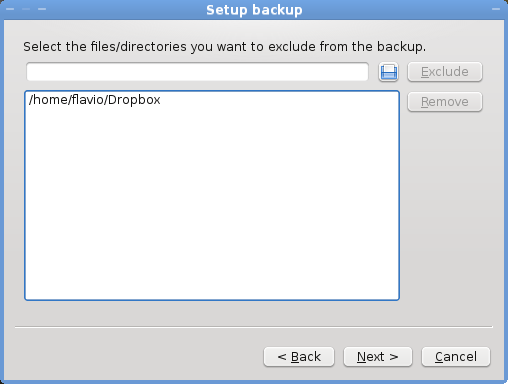
####Backup wizard - final page
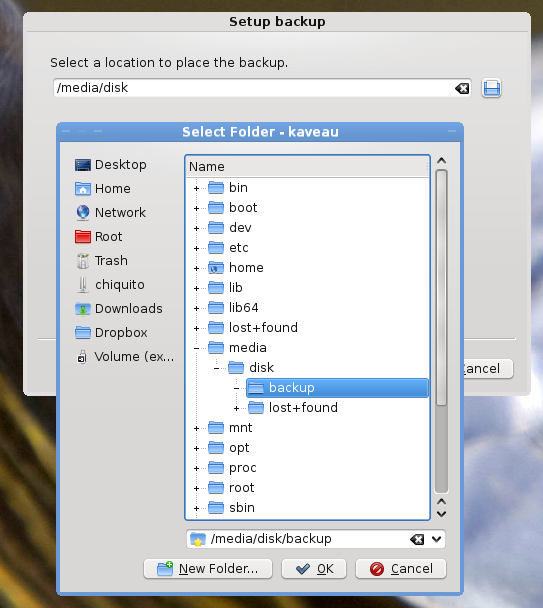
####Backup operation in progress
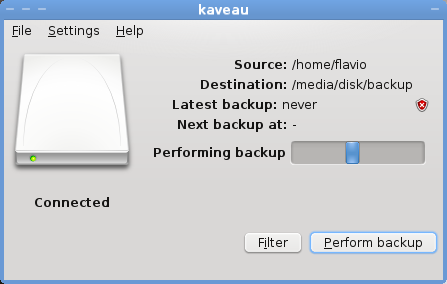
####Backup completed
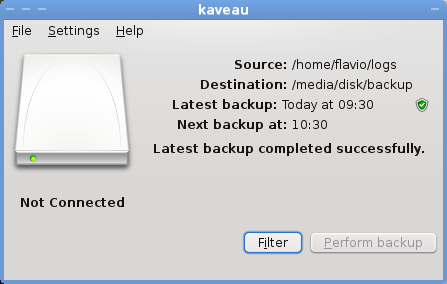
Right now the code is available on this git repository but I don’t recommend you to try it (unless you want to find and fix bugs ;) ).
I would really appreciate:
- feedback about the user interface (right now it looks too much like Time Machine).
- icons: it would be great to have a desktop icon and some system tray icons (contact me for more details).
- new code, bug fixes, code reviews, hints,…

ullae-veliyae: Live graphs for I/O, CPU...
RPM can be found here: http://download.opensuse.org/repositories/home://nikanth/openSUSE_11.1/noarch/

 cgoncalves
The new shiny Smolt client

Since end of last week I restarted working on my Smolt Qt Client, which was born during first semester exams (nothing to do in that boring and meaningless period, right?). But before I continue, let me quote what the Smolt project is all about:
Smolt is, very simply, a hardware reporting tool for Linux based systems. It was originally written for Fedora and now also supports SuSE, Debian and Ubuntu. It gathers information from users, and stores them in a queryable database with a web frontend that produces statistics.
More information about Smolt here. The original Smolt client was written in GTK but the Smolt maintainer decided to replace it by mine - "With great power comes great responsibility".
The client is quite a straightforward port of the GTK one as you can see:
 Smolt GTK client
 Smolt Qt client
Noticed the new "Distribution" tab? In a near future it will provides distribution specific information such as installed packages. It has been developed by Sebastian Pipping as a Google Summer of Code 2009 project to support Gentoo, though support for other distributions are currently under development (openSUSE/SUSE Linux, Fedora and Debian):

I will be fixing last bugs found to then push a new release version out late this week, so before openSUSE 11.2 feature/version freeze. In the meantime if you want to try it and even report bugs, checkout my home:cgoncalves:playground repository for the smolt-snapshot package:
openSUSE 11.1:
# zypper ar http://download.opensuse.org/repositories/home:/cgoncalves:/playground/openSUSE_11.1/ home:cgoncalves:playgroundopenSUSE Factory:
# zypper ar http://download.opensuse.org/repositories/home:/cgoncalves:/playground/openSUSE_Factory/ home:cgoncalves:playground# zypper ref home:cgoncalves:playground
# zypper in smolt-snapshot
Please, give us feedback! We want to know your opinion about Smolt!
Call for openSUSE Core Test Team
In addition to well-developed code, testing is a major part of ensuring a rock-solid openSUSE Linux distro. To make sure testing of openSUSE 11.2 (and beyond) are done in a well-organized way, we’re improving the way the openSUSE Core Test Team works together to ensure top quality for openSUSE.
In the next couple of days Milestone 4 of openSUSE 11.2 will be available. This is a very good moment to have a closer look into the next openSUSE release: some new features are already implemented and there is enough time to fix reported problems.
Thus we are looking for 15 members of the openSUSE Community that are willing to contribute to the openSUSE project by joining the openSUSE Core Test Team and operate in the following areas:
- Check if new features are implemented and working as requested
- Have a deeper look into the install and update system of openSUSE and ensure a broad hardware coverage
- Creating, improving and executing test cases for various areas of the distribution
Repository for test cases and tracking system for all test results will be Testopia, the test case management extension of Novell’s Bugzilla. Members of the Core Test Team will get access to the openSUSE test plans and will so be able to contribute. Beside storing test results they are also able to create or modify test cases.
If you are really interested in joining the openSUSE Core Test Team and willing to spend a reasonable amount of time to move the openSUSE project forward please get in contact with Holger Sickenberg <holgi at suse.de> providing following information:
- Your Linux experience
- Previous testing experience, if any
- Areas you are interested in testing
The number of members is limited to 15 at the moment to ensure we are able to adequate support everyone of them. We will add more once we’ve figured out in the smaller group whether everything works.
Of course everybody is still able to contribute to the openSUSE project by testing parts of the distribution. Enabling the openSUSE Core Test Team will not have any impact on that. Further information on testing is available at www.opensuse.org/Testing.
We are looking forward to your application. Deadline for applications is August, 15th 2009.

More Powermanagement for radeonhd
 .
.Determination of some of the values is still scary, and I don't know yet whether we will stumble over them - especially the minimum frequencies are sort-of guessed from the (known) minimum PLL output frequencies. But we need them, because some cards (e.g. one RV770 I have here) only have one known good memory clock configuration, while it can save tons of power if it is lowered (tested + measured, GDDR5 memory really uses a lot of power). Therefor, the values are checked for reasonable bounds, and rejected if they exceed. So if a future chip needs less than 500mV for operation, we will have to update these tests...
The current code has all these bits in place, but doesn't configure anything different than previous versions. First, a set of reasonable settings has to be determined, which will need additional heuristics (this is done in rhdPmSelectSettings(), which needs some love still). This selection also depends on how difficult it will be to change the engine and memory clock, and the VDDC voltage. So far we only set the engine clock, but code is already in place for the other two.
Before setting a clock, it must be made sure that the engines using this clock are idle - that's why we (ahem!) only set the engine clock once at the beginning so far:
- For setting the engine clock, the engine must be idle (surprise).
- For setting the memory clock, memory accesses must be prohibited. Which means that the screen will be blank during this phase. It remains to be seen whether the vertical blank is long enough to do this on the fly. Otherwise this means that we typically shouldn't change the memory clock during runtime. Things get messy when multiple screens are attached...
- For setting the VDDC voltage, all engines must be idle. Also, certain combinations of engine and memory clock require certain VDDC voltages.
 . Remains to be seen whether we can sort-of interpolate between good settings, because typically there are more voltage values available than used...
Later we will need an oracle for selecting the right power state according to the current usage pattern. It might be easier to do that in kernel space, but this remains to be seen.
That's it for today, I actually hoped to get more accomplished during our HackWeek. But reading out dynamic AtomBIOS tables can be... intriguingly complex.
Linux Bierwanderung 2009
There is no entrance fee, you just have to pay your own hotel+food+travel ;)
It is not too late to join, in fact you can even just drop by, say hi and join in.
I will probably go, even though I have not booked yet. ;)
Porting Valgrind to Windows
At first I had to resolve lots of SVN merge conflicts after doing an SVN update for the first time in months. The code for Darwin had been merged into Valgrind's trunk and this of course had touched lots of the same places that also my changes touch. After getting it to build again I was relieved to find that it still worked more or less like last time I had hacked on it, and I could continue with real coding.
Despite warnings from upstream developers that a Windows port of Valgrind would basically mean a total rewrite, it hasn't turned out to be that bad. In most of the source files with conditional compilation for the different platforms, the Windows code is basically just one more elif branch. Many parts of Valgrind, like the VEX virtual CPU or the Stabs and Dwarf debug information handling, practically work as such also on Windows.
So, does Valgrind work on Windows? Yes but actually no;)
For trivial console programs, sure, it kinda works, Memcheck detects the kinds of errors it is supposed to detect. (Memcheck is the only Valgrind tool that builds so far.)
But for "real" programs with a GUI it basically doesn't work. A lot of work remains to be done, and some mysteries remain to be solved. A healthy dose of pessimism is useful: I am not that sure it will ever work well enough to be useful.
What kinds of applications could Valgrind eventually be useful for on Windows? Personally, I would look forward to the possibility to use it on Open Source applications based on Open Source libraries like the GTK+ and (partial) GNOME stacks. GIMP or Evolution come to mind. Why not Qt-based applications, too. Perhaps even OpenOffice.org. I am not personally interested in making Valgrind work for applications based on weird proprietary technologies like COM.
I have been hacking it on 32-bit XP. Some minor additions are needed to handle also WOW64, i.e. 32-bit code on 64-bit Windows, and more major additions for 64-bit Windows.
So, what can you do to help? If you are an application developer with no in-depth Windows knowledge, don't bother. If you are an experienced Windows hacker with knowledge of kernel and Win32 subsystem system calls (or are prepared to learn about such things, like I was), you can help.
For anybody interested in helping, prerequisites would be as follows:
- A basic understanding of how Valgrind works on Linux
- A MinGW and MSYS installation, and some experience of gcc in general and MinGW in particular
- An SVN client, to keep up with upstream development
- Autotools, to be able to run the autogen.sh. If requested, I might be convinced to run a make dist now and then to create a tarball that includes my diffs and a pre-generated configure script.
- Debugging tools for Windows, to get the latest windbg.dll, and to get WinDbg which is essential for finding out how undocumented things work. (Of course, if you have more advanced tools like SoftICE available, the better.)
- Literature (or a good knowledge of these things by heart...). I recommend the following books:
-
Windows NT/2000 Native API Reference by GaryNebbett. Documents the kernel "native" API. Needed for writing wrappers for kernel system calls. Might be hard to find. Much of the same information is also available on the web.
- Windows Internals, Fifth Edition by Mark E. Russinovich, David A. Solomon and Alex Ionescu. A classic, the fifth edition of which has just been published.
- Advanced Windows Debugging by Mario Hewardt and Daniel Pravat.
-
Windows Graphics Programming: Win32 GDI and DirectDraw by Feng Yuan might also be useful.
- Wine and ReactOS sources can be useful at times
- Decide whether all this makes any sense at all, whether it's best just to declare it a failure before wasting any more time.
- Write wrappers for more kernel system calls.
- Write wrappers for such Win32 (GDI, USER) system calls that modify data (to tell the tool what memory has been written to, to avoid invalid warnings about use of uninitialized data). Mostly undocumented territory here.
- Fix the mysterious issues in handling callbacks from system calls (this happens a lot in GUI programs; in fact most user code in such executes in callbacks). Callbacks are a bit like signal handlers in POSIX, except that they aren't, as callbacks and system calls can be stacked arbitrarily high.
- Fix issues related to communication with csrss.exe. Again, this is mostly undocumented foo...
- Does SEH need any handling?
- Read MSVC debugging information (.pdb files). (Either using Microsoft's APIs, or the existing code in Valgrind.)
- Test on Vista and Windows 7
- Make it cross-compilable from Linux
- Make it buildable with Microsoft's tools. (Either just a makefile for nmake, or a Visual Studio project.)
- Once it works well enough, some kind of integration with Visual Studio
Making Valgrind buildable with Microsoft tools would not be impossible. If I get offers of help from otherwise qualified people who would want to help but can't/won't use MinGW, I might try. A couple of short inline assembly parts would need MSVC syntax versions. A couple of assembler source files would need MASM syntax versions. Does MSVC support vararg macros in its preprocessor?
I have diffs at http://www.iki.fi/tml/valgrind/ . Apply to valgrind trunk from SVN as of the time indicated. Making binaries available is not really useful at this stage (if ever).
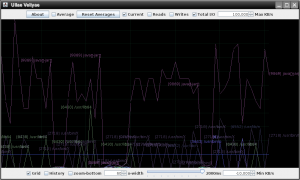
Ullae-veliyae (iotop-gui) : Hackweek
The hackweek project I worked on was to implement a live graphing utility for per process I/O data. See https://features.opensuse.org/306941 (Yes, I added the fate request, just now, after doing most of the work.)
Screen-shots, RPM download link, project homepage link,..
The main idea behind choosing to work on this was to do some GUI programming on a modern language. I work on the linux-kernel(so no gui) and most of the time I write ‘C’ programs.(In fact, at times even when bash would be appropriate!)
So I decided to do this and had to choose between moonlight and Java. My experience with C# was nil, and moonlight was an applet/flash equivalent not aimed at desktop apps.(Yes, there are desktop applications in flash. Even mono has mopen) I thought that I would have to access procfs and might also need to do netlink sockets and moonlight could be a problem. And the real benefit of flash is the the IDE/designer for development, which anyway moonlight is yet to get. In the end, I chose Java.(was a tough fight with C# but again gtk# versus winforms…)
And here it is..
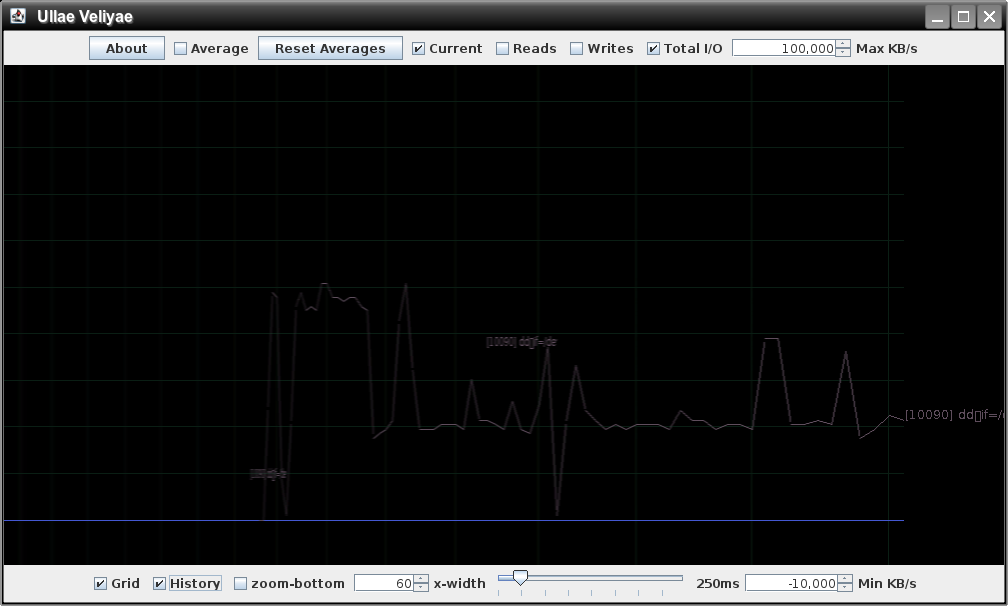
watching dd...
Watching vlc reading from disk as I seek
You can download it from http://download.opensuse.org/repositories/home:/nikanth/ The source is also available at http://gitorious.org/ullae-veliyae/
RPM quick Links:
[Yes, it should be made as no-arch! ;)]
chaos
If you are trying it out, see whether you can find an easter egg?  [Yes, it is kind of lame to have easter-eggs on a open-source project with just hundreds of LOC] The easter egg is an hidden functionality.
I should thank Vojtech Pavlik, for his very useful ideas of “history”, such that we can squeeze the historical data and keep it for longer duration. And another idea of showing average of the data instead of current data, as it tends to be spiky. I haven’t implemented rolling-window for the average though.
A picture is worth 1000 words, but trying it out yourself is worth much more than that. So play with this once. 
New QJson release
Gran Canaria Desktop Summit has been great and really productive. I had the pleasure to meet people interested in QJson, chat with them but also hack with them.
In fact we hacked a lot, doing lots of changes to QJson:
- the API has been cleaned, now it can be considered stable
- unicode support has been completely rewritten
- it’s now possible to convert QVariant objects into JSON ones
So it’s with a great pleasure that I announce the release of QJson 0.6.0.
Beware, since the API has been changed your application will probably break. I’m really sorry about that, but I guarantee it won’t happen in the future (as I said both API and ABI interfaces can now be considered stable).
QJson web site has been updated, reflecting all the changes made to the library. openSUSE packages has been moved from my home repo to KDE:Qt one.
One last note, if you have problems with QJson please contact me using the qjson-devel mailing list. You can subscribe here.

Voulez-vous chercher les paquets avec moi?
... YaST webpin package search client!
It is already quite some time since I blogged about YaST frontend to webpin package search, which enables user to search packages in online repositories and install them via one-click handler later. I proposed some solutions of integrating it with the rest of YaST, but did not particularly like any of them (that's the perfectionist side of me ...). After being (just a little bit :)) poked by some openSUSE users, I decided to implement two of the less perfect solutions ;-) in the first part of Hackweek IV.
In order to use the client and search packages in online repositories, you will need a new yast2-packager-webpin package (which has been splitted off the "main" yast2-packager). It contains the module, the client and the .desktop file, which effectively adds the icon to YaST control centre. The idea behind creating a new package is rather simple - not to clutter software section of CC with (similar) modules/icons by default for all users, including those who don't want to make use of that functionality. Now I guess I've made this package (originating from Packman) rather obsoleted .. :)
In addition to that, you can launch webpin package search from package manager's menu (Qt and ncurses so far), just as you would do with repository manager or online update configuration.
Call for contribution
These are the things that still need to be done in order to get webpin search integration even better:1. A new icon for webpin client is needed - as you can see, I recycled package manager icon for the time being
2. Gtk package manager (yast2-gtk-pkg) can't call webpin client currently - should be simple and straightforward to add the functionality to it.
If any of those sounds appealing to you, please let me know and I'll give you all the necessary information on how, what, where etc. :)
FAQ's
Q: Why haven't you made webpin search separate filter view of package manager/integrated it into regular search in existing package manager(s) GUI?A: Because neither of package managers (Qt/Gtk/curses) speaks XML and webpin search engine does not speak libzypp. Learning PMs read XML and adjusting their data models to feed it, along with libzypp data, to UI is work for few hackweeks in a row (for me, a person with zero experience with C++ XML libs - yast2-packager-webpin uses Perl XML::Simple). However if anyone's willing to hack on this ...
Q: Why does webpin search not work in Factory?
A: Because Factory is not a rpm-md repo. See bug #431939 for gory details