
 Member
 egbert
RadeonHD: Support for RV620/635 added!
A lot of people have been asking why there were so few commits
lately. People have been wondering if we were working on something
big.
Indeed we were:
Mode setting-wise RV620/635 ment the biggest change in subsystems
since R5xx: All outputs blocks have changed to allow for support
of Displayport.
The Displayport support is still missing as we are both lacking
hardware and programming information.
The digital outputs have been split up into an encoder and a
transmitter block which is now reflected in our programming model.
Furthermore the pixel clock PLL had been reworked completely.
We got hardware for testing as early as December 2007 however most
of the relevant documentation needed to code this has only been
received over the past four weeks.
Along with this support for dual link DVI has been added which is
still completely untested (due to lack of hardware).
So, even if you don't use any RV620/RV635 hardware, please get it
and give it a try! We are awaiting your feedback...
SOCKS proxy with SSH
Do you want to connect to irc network you realize that the ports are blocked. Using ssh -X you can forward programs on your computer but if you have a slow connection it doesn't work very well. It is possible to use -D option to create a SOCKS proxy:
    -D [bind_address:]port

    Specifies a local ``dynamic'' application-level port forwarding.
    This works by allocating a socket to listen to port on the local
    side, optionally bound to the specified bind_address.  Whenever a
    connection is made to this port, the connection is forwarded over
    the secure channel, and the application protocol is then used to
    determine where to connect to from the remote machine.  Currently
    the SOCKS4 and SOCKS5 protocols are supported, and ssh will act
    as a SOCKS server.  Only root can forward privileged ports.  Dy-
    namic port forwardings can also be specified in the configuration
    file.
So the magic command is (you need a ssh account on remote server):
$ssh -D 10000 user@ssh-server
this will create a SOCKS proxy on port “10000″ of your computer. This is a nice tunnel to the server. Now, all you need to do is to set in xchat to use a SOCKS proxy. The proxy is, “localhost”, with the port 10000. That's all, the xchat works and you can spend a lot of time on irc.
Also you can use this kind of tunnel for safe browsing. You have to set your preferences in Firefox to use a SOCKS proxy. When you browse, all the connections you make to websites will seem to originate from the server to which you SSH-ed. In addition, all outgoing and incoming data for the browsing session will be encrypted since it passes through the SSH connection. I am using the SOCKS proxy when I need access to websites and I don't have access from home (for example if I need scientific papers), so I open a ssh-tunnel to university and then I can access them.
There are also applications (email clients) which may also support SOCKS proxy.
bash completion for zypper
Thanx to Marek for doing this!
Currently the script provides completion of commands and command options. This can be extended in the future to include package name completion for the install, remove and info commands, or even repository aliases for the repo handling commands and the --repo option.
Hi! In this blog i will write about my work on zypper or eventually libzypp and related stuff, plans, ideas.

When the cat's away, the mice can play
KDE Project:
It may work earlier for other couples, but it didn't work out earlier for us. So yesterday was officially the first evening mom was out alone - that is without being called home at 7pm because coolo ran out of ideas how to calm the baby.
Breastfeeding is really a great way to feed babies (and taking that Felix almost tripled his birth weight in just 6 months proves my point), but it also has one downside: My wife was irreplaceable when it came to food for quite some time and she both loved and hated it. Now she's out of direct duty as he's getting random vegetables for lunch and millet gruel for dinner, she thought we retry the experiment.
So I had an interesting evening, of course this ultraclever boy figured pretty quickly that something is different this evening. So he protested pretty clearly when I tried to feed him and did not want to sleep at all. I guess many parents know that: too tired to eat, too hungry to sleep.
So I put on our beloved "Ergo Baby Carrier" and went up and down till he finally was more tired than hungry and slept. Then I read the backlog of the openSUSE project IRC meeting and turned on the TV to watch some soccer. But as sleeping hungry wasn't the long term plan of my son, I only watched the first half. Then the bottle? carrying? diper? fun? bottle? sleep? carrying? bottle? fun? - cycle started, which almost frustrated me as much as calling my wife. Then we entered the living room and he spotted the soccer - and was calm out of the sudden. Something of it fascinates him, so he forgets every other problem he's having. This only works with soccer - and for a short time if our birds are having a fight.
So I was very pleased the fabulous Neuer kept the race open till well after 10pm. During that time, Felix was nipping from the bottle and it was enough so he felt back to sleep early enough so I could only guess the result of the penalty shootout while singing him to sleep in the sleeping room. But I did not expect anything else from the Neuer we saw last night (and even though the guy basically destroys the dream of my brother-in-law to ever become goal keeper auf Schalke).
Needless to say Maren was very happy to see us alive as she came home. And I'm very happy she does not want to go out tonight, so if time permits I may join the yast team tonight.

Getting Rid of 2nd Stage of Installation
The area of most of the steps is the 2nd stage of installation (after reboot). We internally call this the configuration of the new system and it consists of several steps giving the user maximum flexibility to setup the system before it starts in a full-scale. While the reasoning works for simple servers that get online immediately, it does not fit any of these use cases:
- server running mission-critical service - those servers are installed off-line, running in a testing mode for some time and only after that they are put into production environment
- workstations and home users - there, a user needs to be running full system as quickly as possible
So, one of the goals is to reduce the 2nd stage of installation to only the minimal set of steps.
Status in openSUSE 10.3
There are following steps in the 10.3 installation workflow:
- root password
- hostname and domain
- network hardware proposal
- test of internet access
- setup of updates repository
- application of the already released security and recommended updates
- adding non-root users
- release notes
- hardware configuration proposal
- congratulations screen
How to Simplify?
There are several ways to simplify the workflow. It's easy to see that the only absolutely necessary step needed is entering the root password. However, having a normal user is also quite a good security policy, so this step should stay as well.How to get rid of other steps?
The following steps can wait for the running system:
hostname and domain
test of internet access
setup of updates repository
application of the already released security and recommended updates
Hostname and domain is typically set by DHCP these days, or an admin knows how to set it up. The test of internet access can be easily done by starting Firefox or ping, and that's a typical first action of a user, right?
The question of security updates is a bit more complicated. Yes, it is very important to apply the security fixes as soon as possible, but frankly, who wants to wait for this before the machine can be used? Also, application of the updates are done by the applet, where the tendency is to have it as non-distracting as possible. So, the applet (and of course YaST Online Update (YOU) and zypper) could be enhanced to identify that there are no updates repositories set up and provide an easy option to do it. YOU already has this capability (it detects if there are not repositories containing patches). A final note: firewall is enabled by default during the whole installation.
What about the rest of the steps?
root password
network hardware proposal
adding non-root users
release notes
hardware configuration proposal
congratulations screen
The current proposal is to move the root password and adding of non-root users to the 1st stage, as they are mandatory for the system to be functional. This introduces quite interesting issues like checking the quality of root password as the cracklib dictionaries are big. Also, how to support LDAP, NIS and all other kinds of 'enterprise' authentication options (here, it would be possible to reactivate the needed parts of the interactive 2nd stage based on the input from the 1st stage).
This leaves us with 2 hardware-related proposals:
network hardware proposal
This contains both hardware proposal, but also configuration of firewall, proxy and remote administration. The hardware part could be easily handled by NetworkManager for workstations while servers need typically a complex static setup which is much easier done and is far less error-prone in the running system. For me, the only crucial part left is the firewall, specifically enabling of ssh access to the machine. Without this, you cannot remotely finish the configuration after the installation is done. OTOH, it's wise to activate the firewall with closed ssh port by default. A possible solution would be to move firewall to the 1st stage as well.
hardware proposal
This one might be tricky. The installation currently configures printers, sound, X11 and TV cards. In most cases, sound and TV cards just work with the proposal. Both printers and X11 are heading in direction of autoconfiguration, although if X11 proposal breaks, this can be quite an issue for the system - anyway, I'd consider to be a bug and the X11 configuration that's used during the install is available in the running system as fallback as well. As soon as the system has any running X11, there is plenty of tools to fine-tune the setup. So, the proposal solution would be here to autoconfigure all hardware and leave the fine-tuning to the running system as well.
congratulations screen
And of course, let's get rid of the congratulations screen ;-)
The Proposal
So, the summary of the proposed changes:- root password -> 1st stage
- hostname and domain -> drop
- network hardware proposal -> NetworkManager + firewall in 1st stage
- test of internet access -> drop
- setup of updates repository -> opensuse-updater, zypper, YOU
- application of the already released security and recommended updates -> opensuse-updater, zypper, YOU
- adding non-root users -> 1st stage
- release notes -> 1st stage
- hardware configuration proposal -> autoconfigure in 1st stage
- congratulations screen -> drop
There are quite some assumptions and a big question if we can reach this state for 11.0 already, but in the end, the installation experience of openSUSE would be much improved in my opinion.
Note: This proposal is a result of my discussions with Coolo (who's driving the rewrite of the workflow), kobliha (who's maintaining YaST installation), Jiri Srain (one of the YaST team leads) and others.

Mango Lassi
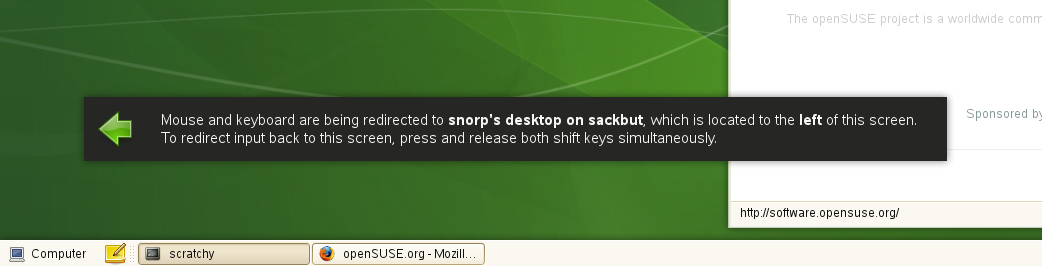
The other day I looked into switching away from synergy to Mango Lassi. I only use it between two machines, so I figured my use case was simple enough that it should work at this stage. I was not disappointed. I was getting some very strange behavior with synergy and vmware, and Mango Lassi has none of that. Plus it gives an OSD telling you which machine the mouse/keyboard are being used on, which is a nice perk.
Anyway, I was so happy with it that I made packages for openSUSE. You can get it from my build service repository.

If I can't go to FOSDEM... [2nd part]
- http://flickr.com/photos/11426495@N08/tags/fosdem/
- http://flickr.com/photos/giannaros/sets/72157603979849061/
- http://flickr.com/photos/lhirlimann/sets/72157603971804540/
- http://flickr.com/photos/crema/sets/72157603972080068/
- http://flickr.com/photos/isriya/sets/72157603971808570/
- http://flickr.com/photos/m0dlx/sets/72157603966397580/
- http://flickr.com/photos/entre4yeux/sets/72157603971388475/
- http://flickr.com/photos/qmap66/sets/72157603971716588/
- http://amarok.kde.org/blog/uploads/dscf4537.jpg
If I can't go to FOSDEM...
Dear FOSDEM 2008 attendees,
Unfortunately I couldn't go to FOSDEM 2008. I can't either find much photos available on the Internet nor videos at all. So... I'm begging you to upload some photos and videos from FOSDEM 2008, specially from the openSUSE booth and talks.
Best regards,
Carlos Gonçalves
To be continued...
Kubuntu from 7.04 to 7.10 by resizing virtual disk
Finally, I found some time to update my virtual machine, Kubuntu from Feisty Fawn to Gutsy Gibbon. I didn't before because I had to resize the virtual disk, the empty space didn't allow me to do the update. So, the necessary steps are here:
1. resize the virtual disk with:
vmware-vdiskmanager -t 1 -x 12GB KUbuntu.vmdk
the options for command are:
t 1 - growable virtual disk split in 2Gb files
x 12 -GB the new size for disk
2. Now we have a large virtual disk but we still need some work to have
also a bigger disk in Kubuntu. So, change in bios, for virtual machine
to boot from cd in order to resize also the ext3 partition. I used
Knoppix for this task and
Gparted as application.
3. Reboot and change in bios to boot from hdd.
4. Using Adept as is described on Kubuntu
site do the
update. After about 1 hour I had the last version of Kubuntu installed
and a lot of free space.