
a silhouette of a person's head and shoulders, used as a default avatar

Copr: build your Fedora / RHEL packages for POWER

I’m often asked, how can I be an IBM Champion for POWER, if I do not own an IBM POWER server or workstation. Yes, life would definitely be easier if I had one. However, I have an over 30 years history with POWER, and there are some fantastic resources available to developers for free. Both help me to stay an active member of the IBM POWER open source community.

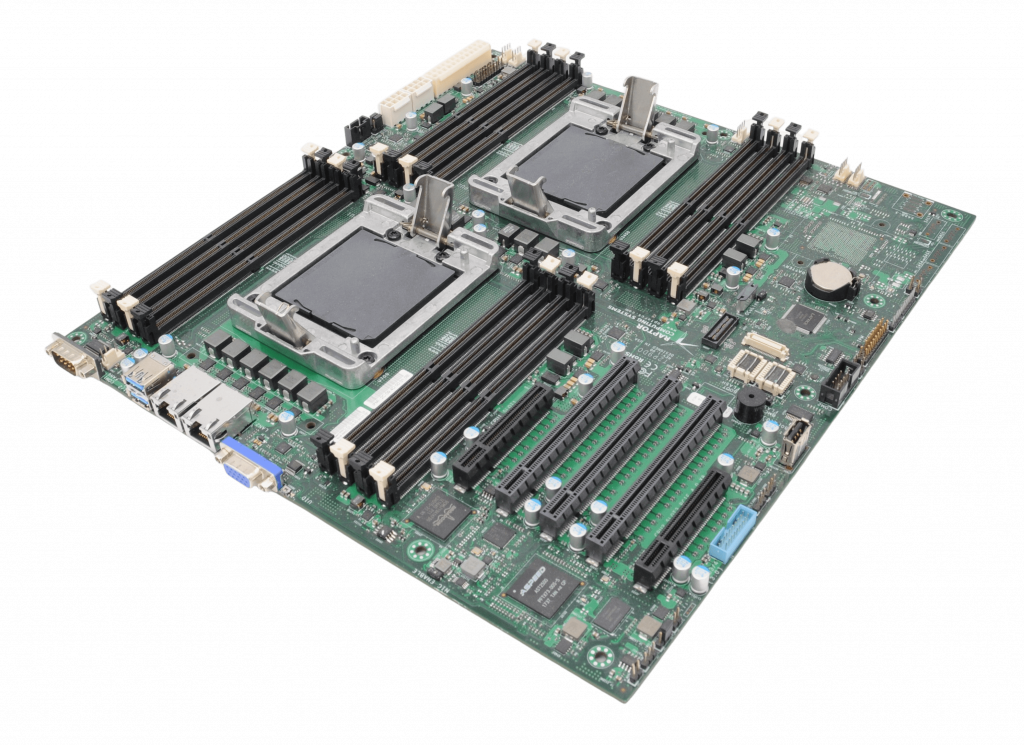
Talos II POWER9 mainboard

Last time I introduced you to the openSUSE Build Service. This time I show you Copr, the Fedora build service.

Copr

Just like OBS, Fedora Copr also started out as a (relatively) simple service to build Fedora and CentOS packages for x86. As Copr is a project by Fedora, the public instance maintained by Fedora at https://copr.fedorainfracloud.org/ only allows you to build open source software. However, you can also install Copr yourself on your own infrastructure. The source code of Copr is available at https://copr.fedorainfracloud.org/, where you can also find links to the documentation.

Today you can use Copr to build packages not just for Fedora x86, but almost all RPM distributions, including openSUSE and OpenMandriva. In addition to x86, you can build packages for 64 bit ARM (aarch64), IBM mainframes (s390x), and IBM POWER 64 bit, little Endian (ppc64le).

Platform selection in Fedora Copr

You can access Copr using its web interface. There is also a command-line utility, but it was very limited when I last checked. Enabling support for POWER in your project is easy: just select the POWER architecture versions of distributions when you setup the project. You can enable support for POWER also later, but Copr does not automatically build packages for the new architecture. TL;DR: enable support for POWER before building any packages to make your life easier.

How do I use Copr?

Just as with the openSUSE Build Service, my first use of Copr was to make up-to-date syslog-ng packages available to the community. Along the way I used Copr to build some syslog-ng dependencies not yet available in Fedora or RHEL. Some of these are already part of the official distributions.

I did not have a chance yet to benchmark syslog-ng on POWER10, however in the POWER9 era POWER was the best platform to run syslog-ng. I measured syslog-ng collecting over 3 million log messages a second on a POWER9 box when x86 servers could barely go above the 1 million mark.

When I make the latest syslog-ng versions available, I build my EPEL (Extra Packages for Enterprise Linux) packages not just for x86, but also for POWER. I do not know how accurate Copr download statistics are, but for some syslog-ng releases it shows that almost a fourth of all downloads were for POWER syslog-ng packages: https://copr.fedorainfracloud.org/coprs/czanik/syslog-ng44/.

Why Copr?

If your primary focus is to build packages for the Red Hat family of operating systems, Copr provides you with the widest range of possibilities. You can regularly test if your software still compiles on Fedora Rawhide, while providing your users with packages for all the Fedora and RHEL releases. Best of all: even if you do not have a POWER server to work on, you can serve your users with packages built for POWER.

the avatar of openSUSE News

OpenVINO Arrives in openSUSE Releases

While focused on the openSUSE Innovator initiative as an openSUSE member and Intel Innovator, it was frustrating for me to see that openVINO did not have support on the openSUSE Linux distribution.

In October 2023, I decided to take the personal initiative to start working on compiling and using OpenVINO from the source code for the openSUSE platform. I humbly contributed and published the first adaptations for our distribution on GitHub.

My motivation for this effort stemmed from the potential of OpenVINO to democratize the use of artificial intelligence for those who do not have the resources to invest in expensive GPUs. This library provides multicore programming and the acceleration registers of Intel processors, as well as the resources of ARM processors, allowing the use of AI on processors from the 6th generation onwards.

With the emergence of technologies such as VPU, NPU, and AMX, it is now possible to run LLMs and generative AI without the need for a dedicated GPU. Therefore, I started working on the RPM packaging for openSUSE. This work would not have been successful without the support and assistance of Ilya Lavrenov from Intel and Atri Bhattacharya on the openSUSE Build Service. They not only shared their knowledge with me but also collaborated to ensure compatibility between Intel and openSUSE’s technical policies.

As a result of all this collaborative effort, openSUSE became the first Linux distribution to offer [OpenVINO in its native repository, compiled from the source code. It is a great source of pride to have contributed to this project, which will undoubtedly make a difference in future endeavors. As members of an open-source community, it is our duty to strive to democratize emerging technologies and reduce digital exclusion in society.

For more information, visit here or get it at software.opensuse.org!

the avatar of rickspencer3's Blog

A Shallow Understanding of openSUSE

A Shallow Understanding of openSUSE

Introduction

As part of my job at SUSE, I have been using openSUSE Leap and Tumbleweed, in addition to SLE Micro for a while now. After some experimentation last weekend, and asking some friends some questions, I think I finally have a mental model of SUSE's distro options. I thought I would test that understanding by trying to write it out a bit here. I already know that there are a lot of details I glossed over, and a lot of people see things differently.

I think that openSUSE is the most useful and stable distro available, and more people should know about it and use it. Part of what makes SUSE’s distros great is the community and open source ethics that go into the distros, including the Enterprise versions. With any healthy open source community comes innovation, and with innovation comes choice. But with choice comes decision making, it can be hard to know where to start.

In general, when choosing a SUSE distro, I think there are 3 points to consider:

  1. What package lifecycle do you want?
  2. How do you want to manage the OS?
  3. Do you want Enterprise support or not?

Lifecycle

openSUSE has two major flavors of distros: Tumbleweed and Leap.

Tumbleweed, The Reliable Rolling Release

The major difference between them is that Tumbleweed’s package repositories are constantly updated, and as soon as the automated tests all pass, package updates are released to users. Major and minor version updates can be released as soon as they are ready and tests pass, so distribution updates are available as often as daily.

Unlike rolling releases from other distros, Tumbleweed updates are low drama for the user. They almost always work, and the packages are securely built on SUSE’s Open Build Service, so there is no fussing with local compilation and such.

Tumbleweed provides a great option if you like to have the most up to date software, but you don’t want to hassle with keeping the software up to date yourself. I am running it on a laptop that I use for work, and it is working quite well.

Leap, The Stable Release

By contrast, Leap tracks the SUSE Linux Enterprise release cycles. The package versions in the repositories receive security and bug fixes, but new versions of the software are only provided via point releases. For example, the upcoming release of 15.6 will offer some updated package versions.

This means that you can lock in on a working configuration and run it for a long time with minimal maintenance and overhead.

“Stability”

Both Tumbleweed and Leap are “stable” in the sense that they pass quality control checks and aren’t prone to crashes etc… I like to use the word “reliable” for this quality of openSUSE. By “stability” in this context, I really refer to how often the major package versions do or do not change. Management

Management

The second dimension that you can consider is if you want to manage a read only file system, or a traditional file system. This boils down to deciding between traditional openSUSE and Micro.

Both versions support transactional updates, as described below.

Traditional

If you opt for a traditional install (as I do) then you manage the system with zypper (or whatever package management tool you prefer) and use zypper to install packages like applications, and to keep the system up to date. Zypper makes changes directly to the system by doing things like installing dependencies, etc…

If you are using a traditional SUSE flavor, you don’t typically need to reboot the system after running installations and updates (there are exceptions of course). You can also use repositories to install software packaged as RPMs to install directly on the system or use things like Flatpaks and containers, depending on your preference.

Before updating the system or installing software, it’s a good idea to take a snapshot so that you can roll back easily if you need to or want to. This is done with the tool Snapper. One neat thing is that, in the default configuration, when you run the zypper dup command, it takes a snapshot for you automatically.

Micro

“SUSE Linux Micro” is the Enterprise version, whereas “openSUSE Leap Micro” is the community Leap version, and “openSUSE MicroOS” is the community Tumbleweed version. For simplicity I will refer to them collectively as “Micro” here.

Micro flavors come with a read only root file system. This provides a lot of benefits in terms of safety, but it requires a different approach to managing the system.

If you try to use zypper to install, it won’t work because you can’t make changes directly to the filesystem. Rather, if you want to install an RPM, you need to create a transaction wherein Micro will create a new copy of the root filesystem, update that copy, and then reboot into it. If the reboot fails, no problem, it will fall back to the original. As such, you can’t really use zypper in the normal way, but rather apply transactional updates.

Micro is designed with Flatpak, Containers, and VMs in mind for running applications. The idea is that your applications are containerized and can be safely installed and updated without touching the root filesystem.

In this approach, your applications come with their dependencies bundled in, so there are fewer dependencies in the base system in the first place. This makes Micro smaller, but also means that there are fewer dependencies to be updated, so updating the base system is less frequent as well.

Micro also keeps a list of previous states, so you can easily rollback to a previous transaction point for the base OS.

Enterprise Support

SUSE’s Enterprise Support includes critical benefits such as:

Certifications such as CC EAL 4+, FIPS, etc… Dedicated support engineers available around the clock Level 3 Support Dependable, clearly documented, and long life cycles for releases

If you need, or think you might need to opt for Enterprise support but you want to start with openSUSE, then you should stick with Leap (either traditional or Micro). This is because Leap is built out of the same repositories that SUSE Linux Enterprise is built out of, and opting into SUSE Support can, in some cases, be as simple as installing some packages.

Conclusion

Like any healthy distro, the openSUSE community has seen a flowering of innovation as community members put together solutions based on their own interests. For example, the community also maintains a sort of “in between” version called Slowroll. There is also an image based on MicroOS that includes a full desktop experience, called Aeon, and lots of other options. Too much richness to cover here, but I tried to cover the essential decision points.

Want some links? Community supported “choose your version” site

Leap 15.5 (stable traditional version
Tumbleweed (rolling traditional version
openSUSE Leap Micro (stable read only file system version
MicroOS (rolling read only file system version

a silhouette of a person's head and shoulders, used as a default avatar

The syslog-ng Insider 2024-05: documentation; grouping-by(); PAM Essentials; health

The May syslog-ng newsletter is now on-line:

  • The official syslog-ng OSE documentation got a new look

The syslog-ng Administration Guide received a new look and easier navigation. Not only that, but it is also up-to-date now. Besides, there are now contributor guides available both for the documentation and for syslog-ng developers.

The admin guide is available at: https://syslog-ng.github.io/admin-guide/README

You can reach all syslog-ng OSE-related documentation at: https://syslog-ng.github.io/

If you find any issues, pull requests and problem reports are welcome. The contributor guide describes how you can fix / extend the documentation. You can report issues at: https://github.com/syslog-ng/syslog-ng.github.io/issues

  • Aggregating messages in syslog-ng using grouping-by()
  • Alerting on One Identity Cloud PAM Essentials logs using syslog-ng
  • The syslog-ng health check

It is available at https://www.syslog-ng.com/community/b/blog/posts/the-syslog-ng-insider-2024-05-documentation-grouping-by-pam-essentials-health

syslog-ng logo

the avatar of openSUSE News

Planned outage of Weblate on May 14th

The openSUSE will undergo a critical update with the migration of Weblate to a hosted solution.

Shifting to a hosted solution for the web-based localization tool in order to keep up with the increasing demands of projects’ development.

The migration is slated for May 14 and it is anticipated that the service will be down for approximately one day.

This is a planned short-term inconvenience for a long-term benefit and will allow for our translation contributors to pick up right where they left off.

People wanting to contribute to the openSUSE Project by helping to translate using Weblate can register on https://l10n.opensuse.org and connect with other translators through translation@lists.opensuse.org and project@lists.opensuse.org mailing lists.

Any attempt to connect to Weblate during the migration will trigger a notification informing the user of the ongoing maintenance. Others will be informed of the outage through https://status.opensuse.org.

the avatar of Stefan Dirsch

How to install SLE-15-SP6 on NVIDIA’s Jetson AGX Orin, Jetson Orin Nano/NX and IGX Orin

This covers the installation of updated Kernel, out-of-tree nvidia kernel modules package, how to get GNOME desktop running and installation/run of glmark2 benchmark. Also it describes how to get some CUDA and TensorRT samples running. In addition it describes the firmware update on Jetson AGX Orin and Jetson Orin Nano and how to connect a serial console to Jetson Orin Nano.

Firmware Update on Jetson AGX Orin

On Jetson AGX Orin first update the firmware to Jetpack 6.1/36.4.0.

Download Driver Package (BSP) from this location. Extract Jetson_Linux_R36.4.0_aarch64.tbz2.

tar xf Jetson_Linux_R36.4.0_aarch64.tbz2

Then connect with two cables your computer to the Micro-USB port and Type-C port (next to the 40pin connector) of Jetson AGX Orin. Now switch Jetson AGX Orin to recovery mode (using your Micro-USB cable).

cd Linux_for_Tegra
sudo ./tools/board_automation/boardctl -t topo recovery

Check that Jetson AGX Orin is now in recovery mode.

lsusb
[...]
Bus 003 Device 099: ID 0955:7023 NVIDIA Corp. APX
[...]

Now flash your firmware (using the Type-C cable). Make sure you have package dtc installed, because the tool fdtoverlay is needed.

sudo ./flash.sh p3737-0000-p3701-0000-qspi external

Reboot Jetson AGX Orin.

sudo ./tools/board_automation/boardctl -t topo power_on

After reboot you should see in the Firmware setup - shown on your monitor or on your serial console - the firmware version 36.4.0-gcid-XXXXXXXX.

Firmware Update on Jetson Orin Nano

Updating the firmware on Jetson Orin Nano is similar to the process above for Jetson AGX Orin.

Unfortunately the board automation tools do not support Jetson Orin Nano. Therefore for switching this device in recovery mode instead of running boardctl you need to connect two pins or put a jumper on both respectively. These are the pins 9/10 (GND/FC REC) of the 12-pin J14 “button” header of carrier board located under the Jetson module (right below the fan next to the SD card slot).

So disconnect Jetson Orin Nano from power, then connect these pins and then reconnect power. With that the device should be in Recovery mode. Connect an USB cable to the Type-C port of Jetson Orin Nano and check if it is now in Recovery mode.

lsusb
[...]
Bus 003 Device 105: ID 0955:7523 NVIDIA Corp. APX
[...]

Now flash your firmware. Make sure you have package dtc installed, because the tool fdtoverlay is needed.

sudo ./flash.sh p3768-0000-p3767-0000-a0-qspi external

Disconnect Jetson Orin Nano from power and reconnect it to power. After reboot you should see in the Firmware setup - shown on your monitor or on your serial console - the firmware version 36.4.0-gcid-XXXXXXXX.

Serial Console on Jetson Orin Nano

In order to have a serial console on Jetson Orin Nano you need a 3.3.V USB-UART adapter/cable. Connect it to the pins 3/4/7 (RXD/TXD/GND) of the 12-pin J14 “button” header of carrier board located under the Jetson module (right below the fan next to the SD card slot).

SP6

Download SLE-15-SP6 (Arm) installation image. This you can put on a regular USB stick or on an SD card using dd command.

Boot from the USB stick/SD card, that you wrote above and install SP6. You can install via serial console or connect a monitor to the display port.

When using a connected monitor for installation

This needs for the installation a special setting in the Firmware of the machine.

--> UEFI Firmware Settings
 --> Device Manager
  --> NVIDIA Configuration
   --> Boot Configuration
    --> SOC Display Hand-Off Mode <Always>

This setting for SOC Display Hand-Off Mode will change automatically to Never later with the installation of the graphics driver.

Installation

Once grub starts you need to edit the grub entry Installation. Press e for doing this and add console=tty0 exec="date -s 2025-01-27" (when using a connected monitor for intallation) or exec="date -s 2025-01-27" (when installing on a serial console and add also console=ttyTCU0,115200 on Jetson Orin Nano) to the linux [...] line. Replace 2025-01-27 with the current date.

### When using a connected monitor for intallation
[...]
linux /boot/aarch64/linux splash=silent console=tty0 exec="date -s 2025-01-27"
[...]
### When installing on a serial console
[...]
linux /boot/aarch64/linux splash=silent exec="date -s 2025-01-27"
# On Jetson Orin Nano
linux /boot/aarch64/linux splash=silent console=ttyTCU0,115200 exec="date -s 2025-01-27"
[...]

The reason for this is that during installation the driver nvvrs-pseq-rtc for the battery-backed RTC0 (Real Time Clock) is not yet available and therefore the non-battery-backed RTC1 is used, which doesn’t have the correct time set during installation. So this is a workaround to avoid a product registration failure later due to a certificate, which is not valid yet.

Then press F10 to continue to boot.

Make sure you select the following modules during installation:

  • Basesystem (enough for just installing the kernel driver)
  • Containers (needed for podman for CUDA libraries)
  • Desktop Applications (needed for running a desktop)
  • Development Tools (needed for git for CUDA samples)

Select SLES with GNOME for installation.

In Clock and Time Zone dialogue chose Other Settings to open Change Date and Time dialogue. There enable Synchronize with NTP Server.

--> Clock and Time Zone dialogue
 --> Other Settings
  --> Change Date and Time dialogue
   --> (x) Synchronize with NTP Server

Kernel + KMP drivers

After installation update kernel and install our KMP (kernel module package) for all nvidia kernel modules.

Installation on NVIDIA’s Jetson AGX Orin and Jetson Orin Nano/NX

The KMP is available as a driver kit via the SolidDriver Program. For installation please use the following commands:

# flavor either default or 64kb (check with `uname -r` command)
sudo zypper up kernel-<flavor>
sudo zypper ar https://drivers.suse.com/nvidia/Jetson/NVIDIA_JetPack_6.1/sle-15-sp6-aarch64/1.0/install jetson-kmp
sudo zypper ar https://drivers.suse.com/nvidia/Jetson/NVIDIA_JetPack_6.1/sle-15-sp6-aarch64/1.0/update  jetson-kmp-update
sudo zypper ref
sudo zypper in -r jetson-kmp nvidia-jetson-kmp-<flavor>

Installation on NVIDIA IGX Orin

We plan to make the KMP available as a driver kit via the SolidDriver Program. For now please install an updated kernel and the KMP after checking the build status (type ‘igx’ in Search… field; rebuilding can take a few hours!) from our open buildservice:

# flavor either default or 64kb (check with `uname -r` command)
sudo zypper up kernel-<flavor>
sudo zypper ar https://download.opensuse.org/repositories/X11:/XOrg/SLE_15_SP6/ igx-kmp
sudo zypper ref
sudo zypper in -r jetson-kmp nvidia-igx-kmp-<flavor>

Userspace/Desktop

Installation on NVIDIA’s Jetson AGX Orin and Jetson Orin Nano/NX

Please install userspace on these devices by using the following commands:

sudo zypper ar https://repo.download.nvidia.com/jetson/sle15-sp6/jp6.1/ jetson-userspace 
sudo zypper ref 
sudo zypper in nvidia-jetpack-all

Installation on NVIDIA IGX Orin

Unfortunately installing the userspace on this device is still a non-trivial task.

Download Bootloader(QSPI) Package from this location (select IGX-SW 1.1.1 Production Release). Extract Jetson_Linux_R36.4.5_aarch64.tbz2.

tar xf Jetson_Linux_R36.4.5_aarch64.tbz2

Then you need to convert debian packages from this content into tarballs.

pushd Linux_for_Tegra
sed -i -e 's/lbzip2/bzip2/g' -e 's/-I zstd //g' nv_tools/scripts/nv_repackager.sh
./nv_tools/scripts/nv_repackager.sh -o ./nv_tegra/l4t_tar_packages --convert-all
popd

From the generated tarballs you only need these:

nvidia-l4t-3d-core_36.4.5-20250205154014_arm64.tbz2
nvidia-l4t-camera_36.4.5-20250205154014_arm64.tbz2
nvidia-l4t-core_36.4.5-20250205154014_arm64.tbz2
nvidia-l4t-cuda_36.4.5-20250205154014_arm64.tbz2
nvidia-l4t-firmware_36.4.5-20250205154014_arm64.tbz2
nvidia-l4t-gbm_36.4.5-20250205154014_arm64.tbz2
nvidia-l4t-multimedia-utils_36.4.5-20250205154014_arm64.tbz2
nvidia-l4t-multimedia_36.4.5-20250205154014_arm64.tbz2
nvidia-l4t-nvfancontrol_36.4.5-20250205154014_arm64.tbz2
nvidia-l4t-nvml_36.4.5-20250205154014_arm64.tbz2
nvidia-l4t-nvpmodel_36.4.5-20250205154014_arm64.tbz2
nvidia-l4t-nvsci_36.4.5-20250205154014_arm64.tbz2
nvidia-l4t-pva_36.4.5-20250205154014_arm64.tbz2
nvidia-l4t-tools_36.4.5-20250205154014_arm64.tbz2
nvidia-l4t-vulkan-sc-sdk_36.4.5-20250205154014_arm64.tbz2
nvidia-l4t-wayland_36.4.5-20250205154014_arm64.tbz2
nvidia-l4t-x11_36.4.5-20250205154014_arm64.tbz2
nvidia-l4t-nvml_36.4.5-20250205154014_arm64.tbz2

And from this tarball nvidia-l4t-init_36.4.5-20250205154014_arm64.tbz2 you only need these files:

etc/asound.conf.tegra-ape
etc/asound.conf.tegra-hda-jetson-agx
etc/asound.conf.tegra-hda-jetson-xnx
etc/nvidia-container-runtime/host-files-for-container.d/devices.csv
etc/nvidia-container-runtime/host-files-for-container.d/drivers.csv
etc/nvsciipc.cfg
etc/sysctl.d/60-nvsciipc.conf
etc/systemd/nv_nvsciipc_init.sh
etc/systemd/nvpower.sh
etc/systemd/nv.sh
etc/systemd/system.conf.d/watchdog.conf
etc/systemd/system/multi-user.target.wants/nv_nvsciipc_init.service
etc/systemd/system/multi-user.target.wants/nvpower.service
etc/systemd/system/multi-user.target.wants/nv.service
etc/systemd/system/nv_nvsciipc_init.service
etc/systemd/system/nvpower.service
etc/systemd/system/nv.service
etc/udev/rules.d/99-tegra-devices.rules
usr/share/alsa/cards/tegra-ape.conf
usr/share/alsa/cards/tegra-hda.conf
usr/share/alsa/init/postinit/00-tegra.conf
usr/share/alsa/init/postinit/01-tegra-rt565x.conf
usr/share/alsa/init/postinit/02-tegra-rt5640.conf

So first let’s repackage nvidia-l4t-init_36.4.5-20250205154014_arm64.tbz2:

pushd Linux_for_Tegra/nv_tegra/l4t_tar_packages/
cat > nvidia-l4t-init.txt << EOF
etc/asound.conf.tegra-ape
etc/asound.conf.tegra-hda-jetson-agx
etc/asound.conf.tegra-hda-jetson-xnx
etc/nvidia-container-runtime/host-files-for-container.d/devices.csv
etc/nvidia-container-runtime/host-files-for-container.d/drivers.csv
etc/nvsciipc.cfg
etc/sysctl.d/60-nvsciipc.conf
etc/systemd/nv_nvsciipc_init.sh
etc/systemd/nvpower.sh
etc/systemd/nv.sh
etc/systemd/system.conf.d/watchdog.conf
etc/systemd/system/multi-user.target.wants/nv_nvsciipc_init.service
etc/systemd/system/multi-user.target.wants/nvpower.service
etc/systemd/system/multi-user.target.wants/nv.service
etc/systemd/system/nv_nvsciipc_init.service
etc/systemd/system/nvpower.service
etc/systemd/system/nv.service
etc/udev/rules.d/99-tegra-devices.rules
usr/share/alsa/cards/tegra-ape.conf
usr/share/alsa/cards/tegra-hda.conf
usr/share/alsa/init/postinit/00-tegra.conf
usr/share/alsa/init/postinit/01-tegra-rt565x.conf
usr/share/alsa/init/postinit/02-tegra-rt5640.conf
EOF
tar xf nvidia-l4t-init_36.4.5-20250205154014_arm64.tbz2
rm nvidia-l4t-init_36.4.5-20250205154014_arm64.tbz2
tar cjf nvidia-l4t-init_36.4.5-20250205154014_arm64.tbz2 $(cat nvidia-l4t-init.txt)
popd

On NVIDIA IGX Orin with dedicated graphics card (dGPU systems) you need to get rid of some files due to conflicts with dGPU userspace drivers.

# repackage nvidia-l4t-x11_ package
tar tf nvidia-l4t-x11_36.4.5-20250205154014_arm64.tbz2 | grep -v /usr/bin/nvidia-xconfig \
  > nvidia-l4t-x11_36.4.5-20250205154014.txt
tar xf  nvidia-l4t-x11_36.4.5-20250205154014_arm64.tbz2
rm      nvidia-l4t-x11_36.4.5-20250205154014_arm64.tbz2
tar cjf nvidia-l4t-x11_36.4.5-20250205154014_arm64.tbz2 $(cat nvidia-l4t-x11_36.4.5-20250205154014.txt)

# repackage nvidia-l4t-3d-core_ package
tar tf nvidia-l4t-3d-core_36.4.5-20250205154014_arm64.tbz2 | \
  grep -v \
       -e /etc/vulkan/icd.d/nvidia_icd.json \
       -e /usr/lib/xorg/modules/drivers/nvidia_drv.so \
       -e /usr/lib/xorg/modules/extensions/libglxserver_nvidia.so \
       -e /usr/share/glvnd/egl_vendor.d/10_nvidia.json \
       > nvidia-l4t-3d-core_36.4.5-20250205154014.txt
tar xf  nvidia-l4t-3d-core_36.4.5-20250205154014_arm64.tbz2
rm      nvidia-l4t-3d-core_36.4.5-20250205154014_arm64.tbz2
tar cjf nvidia-l4t-3d-core_36.4.5-20250205154014_arm64.tbz2 $(cat nvidia-l4t-3d-core_36.4.5-20250205154014.txt)

Then extract the generated tarballs to your system.

pushd Linux_for_Tegra/nv_tegra/l4t_tar_packages
for i in \
nvidia-l4t-core_36.4.5-20250205154014_arm64.tbz2 \
nvidia-l4t-3d-core_36.4.5-20250205154014_arm64.tbz2 \
nvidia-l4t-cuda_36.4.5-20250205154014_arm64.tbz2 \
nvidia-l4t-firmware_36.4.5-20250205154014_arm64.tbz2 \
nvidia-l4t-gbm_36.4.5-20250205154014_arm64.tbz2 \
nvidia-l4t-multimedia-utils_36.4.5-20250205154014_arm64.tbz2 \
nvidia-l4t-multimedia_36.4.5-20250205154014_arm64.tbz2 \
nvidia-l4t-nvfancontrol_36.4.5-20250205154014_arm64.tbz2 \
nvidia-l4t-nvpmodel_36.4.5-20250205154014_arm64.tbz2 \
nvidia-l4t-tools_36.4.5-20250205154014_arm64.tbz2 \
nvidia-l4t-x11_36.4.5-20250205154014_arm64.tbz2 \
nvidia-l4t-nvsci_36.4.5-20250205154014_arm64.tbz2 \
nvidia-l4t-pva_36.4.5-20250205154014_arm64.tbz2 \
nvidia-l4t-wayland_36.4.5-20250205154014_arm64.tbz2 \
nvidia-l4t-camera_36.4.5-20250205154014_arm64.tbz2 \
nvidia-l4t-vulkan-sc-sdk_36.4.5-20250205154014_arm64.tbz2 \
nvidia-l4t-nvml_36.4.5-20250205154014_arm64.tbz2 \
nvidia-l4t-init_36.4.5-20250205154014_arm64.tbz2; do
  sudo tar xjf $i -C /
done
popd

On systems without dedicated graphics (internal GPU systems) card you still need to move

/usr/lib/xorg/modules/drivers/nvidia_drv.so
/usr/lib/xorg/modules/extensions/libglxserver_nvidia.so

to

/usr/lib64/xorg/modules/drivers/nvidia_drv.so
/usr/lib64/xorg/modules/extensions/libglxserver_nvidia.so

So let’s do this.

sudo mv /usr/lib/xorg/modules/drivers/nvidia_drv.so \
          /usr/lib64/xorg/modules/drivers/
sudo mv /usr/lib/xorg/modules/extensions/libglxserver_nvidia.so \
          /usr/lib64/xorg/modules/extensions/
sudo rm -rf /usr/lib/xorg

Then add /usr/lib/aarch64-linux-gnu and /usr/lib/aarch64-linux-gnu/tegra-egl to /etc/ld.so.conf.d/nvidia-tegra.conf.

echo /usr/lib/aarch64-linux-gnu | sudo tee -a /etc/ld.so.conf.d/nvidia-tegra.conf
echo /usr/lib/aarch64-linux-gnu/tegra-egl | sudo tee -a /etc/ld.so.conf.d/nvidia-tegra.conf

Run ldconfig 

sudo ldconfig

Video group for regular users

A regular user needs to be added to the group video to be able to log in to the GNOME desktop as regular user. This can be achieved by using YaST, usermod or editing /etc/group manually.

Reboot the machine with the previously updated kernel

sudo reboot

Select first entry SLES 15-SP6 for booting.

Basic testing

First basic testing will be running nvidia-smi

sudo nvidia-smi

Graphical desktop (GNOME) should work as well. Linux console will also be available. Use either a serial console or a ssh connection if you don’t want to use the graphical desktop/Linux console or need remote access to the system.

glmark2

Install phoronix-test-suite

sudo zypper ar https://cdn.opensuse.org/distribution/leap/15.6/repo/oss/ repo-oss
sudo zypper ref
sudo zypper in phoronix-test-suite

Run phoronix-test-suite

sudo zypper in gcc gcc-c++
# Prepare for realistic numbers
# 1. Logout from your GNOME session
# 2. Login again, but select IceWM Session as desktop instead of GNOME
# 3. Start xterm and run the following command
phoronix-test-suite benchmark glmark2

This should give you an average score of about 4500 running in 1920x1080 resolution with MaxN Power and best performance settings (see Misc/Performance and Misc/MaxN/MaxN_Super Power below) on Jetson AGX Orin and about 2500 on Jetson Orin Nano (also with best performance settings).

Wayland based Desktop

In order to enable our GNOME on Wayland desktop you need to install two additional packages: xwayland and gnome-session-wayland.

sudo zypper in xwayland gnome-session-wayland

Afterwards restart GDM

sudo systemctl restart display-manager.service

or reboot your machine.

CUDA/Tensorflow

Containers

NVIDIA provides containers available for Jetson that include SDKs such as CUDA. More details here. These containers are Ubuntu based, but can be used from SLE as well. You need to install the NVIDIA container runtime for this. Detailed information here.

1. Install podman and nvidia-container-runtime
sudo zypper install podman
sudo zypper ar https://nvidia.github.io/libnvidia-container/stable/rpm/nvidia-container-toolkit.repo
sudo zypper modifyrepo --enable nvidia-container-toolkit-experimental
sudo zypper --gpg-auto-import-keys install -y nvidia-container-toolkit
sudo nvidia-ctk cdi generate --mode=csv --output=/var/run/cdi/nvidia.yaml
sudo nvidia-ctk cdi list
2. Download the CUDA samples
sudo zypper install git
cd
git clone https://github.com/NVIDIA/cuda-samples.git
cd cuda-samples
git checkout v12.5
3. Start X
sudo rcxdm stop
sudo Xorg -retro &> /tmp/log &
export DISPLAY=:0
xterm &

Monitor should now show a Moiree pattern with an unframed xterm on it. Otherwise check /tmp/log.

4. Download and run the JetPack6 container
sudo podman run --rm -it -e DISPLAY --net=host --device nvidia.com/gpu=all --group-add keep-groups --security-opt label=disable -v $HOME/cuda-samples:/cuda-samples nvcr.io/nvidia/l4t-jetpack:r36.4.0 /bin/bash
# needed in container for nbody
apt-get install libglu1-mesa freeglut3
apt-get install --fix-missing libglu1-mesa-dev freeglut3-dev

CUDA

5. Build and run the samples in the container
cd /cuda-samples
make -j$(nproc)
./bin/aarch64/linux/release/deviceQuery
./bin/aarch64/linux/release/nbody

Tensorrt

6. Build and run Tensorrt in the container

This is both with the GPU and DLA (deep-learning accelerator).

cd /usr/src/tensorrt/samples/
make -j$(nproc)
cd ..
./bin/sample_algorithm_selector
./bin/sample_onnx_mnist
# Fails on Jetson Orin Nano due to lack of Deep Learning Accelerator(s) (DLA)
./bin/sample_onnx_mnist --useDLACore=0
./bin/sample_onnx_mnist --useDLACore=1

Misc

Performance

You can improve the performance by giving the clock a boost. For best performance you can run jetson_clocks to set the device to max clock settings

sudo jetson_clocks --show
sudo jetson_clocks
sudo jetson_clocks --show

The 1st and 3rd command just prints the clock settings.

MaxN/MaxN_Super Power

For maximum performance you also need to set MaxN/MaxN_Super Power. This can be done by running

# Jetson AGX Orin
sudo nvpmodel -m 0
# Jetson Orin Nano
sudo ln -snf nvpmodel/nvpmodel_p3767_0003_super.conf /etc/nvpmodel.conf
sudo nvpmodel -m 2

Afterwards on Jetson AGX Orin you need to reboot the system though.

sudo reboot

In order to check for the current value run

sudo nvpmodel -q

Known Issues

Jetson Orin Nano: Super Mode

Unfortunately Super mode of Jetson Orin Nano needs Jetpack 6.2.1/36.4.4 for Firmware, KMP drivers and userspace. We’re currently working on providing these as easily installable packages in addition to our packages for Jetpack 6.1/36.4.0. This document will be updated accordingly once these are available. Therefore currently when trying to switch Jetson Orin Nano into Super mode with

sudo nvpmodel -m 2

you’ll get an error message. Of course the other non-Super modes on Jetson Orin Nano are still available and working.

the avatar of Stefan's openSUSE Blog

How to install SLE-15-SP6 on NVIDIA Jetson platform (Jetson AGX Orin/IGX Orin)

This covers the installation of updated Kernel, out-of-tree nvidia kernel modules package, how to get GNOME desktop running and installation/run of glmark2 benchmark. Also it describes how to get some CUDA and TensorRT samples running.

SP6

Download SLE-15-SP6 (Arm) installation image. This you can put on a regular USB stick or on an SD card using dd command.

Boot from the USB stick/SD card, that you wrote above and install SP6. You can install via serial console or connect a monitor to the display port.

When using a connected monitor for installation

This needs for the installation a special setting in the Firmware of the machine.

--> UEFI Firmware Settings
 --> Device Manager
  --> NVIDIA Configuration
   --> Boot Configuration
    --> SOC Display Hand-Off Mode <Always>

This setting for SOC Display Hand-Off Mode will change automatically to Never later with the installation of the graphics driver.

Installation

Once grub starts you need to edit the grub entry Installation. Press e for doing this and add console=tty0 exec="date -s 2025-01-27" (when using a connected monitor for intallation) or exec="date -s 2025-01-27" (when installing on a serial console) to the linux [...] line. Replace 2025-01-27 with the current date.

### When using a connected monitor for intallation
[...]
linux /boot/aarch64/linux splash=silent console=tty0 exec="date -s 2025-01-27"
[...]
### When installing on a serial console
[...]
linux /boot/aarch64/linux splash=silent exec="date -s 2025-01-27"
[...]

The reason for this is that during installation the driver nvvrs-pseq-rtc for the battery-backed RTC0 (Real Time Clock) is not yet available and therefore the non-battery-backed RTC1 is used, which doesn’t have the correct time set during installation. So this is a workaround to avoid a product registration failure later due to a certificate, which is not valid yet.

Then press F10 to continue to boot.

Make sure you select the following modules during installation:

  • Basesystem (enough for just installing the kernel driver)
  • Containers (needed for podman for CUDA libraries)
  • Desktop Applications (needed for running a desktop)
  • Development Tools (needed for git for CUDA samples)

Select SLES with GNOME for installation.

In Clock and Time Zone dialogue chose Other Settings to open Change Date and Time dialogue. There enable Synchronize with NTP Server.

--> Clock and Time Zone dialogue
 --> Other Settings
  --> Change Date and Time dialogue
   --> (x) Synchronize with NTP Server

Kernel + KMP drivers

After installation update kernel and install our KMP (kernel module package) for all nvidia kernel modules.

We plan to make the KMP available as a driver kit via the SolidDriver Program. For now please install an updated kernel and the KMP after checking the build status (type ‘jetson’ in Search… field; rebuilding can take a few hours!) from our open buildservice:

# flavor either default or 64kb (check with `uname -r` command)
sudo zypper up kernel-<flavor>
sudo zypper ar https://download.opensuse.org/repositories/X11:/XOrg/SLE_15_SP6/  jetson-kmp
sudo zypper ref
sudo zypper in -r jetson-kmp nvidia-jetson-36_4-kmp-<flavor> kernel-firmware-nvidia-jetson-36_4

Userspace/Desktop

Unfortunately installing the userspace is a non-trivial task.

Installation

Download Driver Package (BSP) from this location. Extract Jetson_Linux_R36.4.0_aarch64.tbz2.

tar xf Jetson_Linux_R36.4.0_aarch64.tbz2

Then you need to convert debian packages from this content into tarballs.

pushd Linux_for_Tegra
sed -i -e 's/lbzip2/bzip2/g' -e 's/-I zstd //g' nv_tools/scripts/nv_repackager.sh
./nv_tools/scripts/nv_repackager.sh -o ./nv_tegra/l4t_tar_packages --convert-all
popd

From the generated tarballs you only need these:

nvidia-l4t-3d-core_36.4.0-20240912212859_arm64.tbz2
nvidia-l4t-camera_36.4.0-20240912212859_arm64.tbz2
nvidia-l4t-core_36.4.0-20240912212859_arm64.tbz2
nvidia-l4t-cuda_36.4.0-20240912212859_arm64.tbz2
nvidia-l4t-gbm_36.4.0-20240912212859_arm64.tbz2
nvidia-l4t-multimedia-utils_36.4.0-20240912212859_arm64.tbz2
nvidia-l4t-multimedia_36.4.0-20240912212859_arm64.tbz2
nvidia-l4t-nvfancontrol_36.4.0-20240912212859_arm64.tbz2
nvidia-l4t-nvml_36.4.0-20240912212859_arm64.tbz2
nvidia-l4t-nvpmodel_36.4.0-20240912212859_arm64.tbz2
nvidia-l4t-nvsci_36.4.0-20240912212859_arm64.tbz2
nvidia-l4t-pva_36.4.0-20240912212859_arm64.tbz2
nvidia-l4t-tools_36.4.0-20240912212859_arm64.tbz2
nvidia-l4t-vulkan-sc-sdk_36.4.0-20240912212859_arm64.tbz2
nvidia-l4t-wayland_36.4.0-20240912212859_arm64.tbz2
nvidia-l4t-x11_36.4.0-20240912212859_arm64.tbz2
nvidia-l4t-nvml_36.4.0-20240912212859_arm64.tbz2

And from this tarball nvidia-l4t-init_36.4.0-20240912212859_arm64.tbz2 you only need these files:

etc/asound.conf.tegra-ape
etc/asound.conf.tegra-hda-jetson-agx
etc/asound.conf.tegra-hda-jetson-xnx
etc/nvidia-container-runtime/host-files-for-container.d/devices.csv
etc/nvidia-container-runtime/host-files-for-container.d/drivers.csv
etc/nvsciipc.cfg
etc/sysctl.d/60-nvsciipc.conf
etc/systemd/nv_nvsciipc_init.sh
etc/systemd/nvpower.sh
etc/systemd/nv.sh
etc/systemd/system.conf.d/watchdog.conf
etc/systemd/system/multi-user.target.wants/nv_nvsciipc_init.service
etc/systemd/system/multi-user.target.wants/nvpower.service
etc/systemd/system/multi-user.target.wants/nv.service
etc/systemd/system/nv_nvsciipc_init.service
etc/systemd/system/nvpower.service
etc/systemd/system/nv.service
etc/udev/rules.d/99-tegra-devices.rules
usr/share/alsa/cards/tegra-ape.conf
usr/share/alsa/cards/tegra-hda.conf
usr/share/alsa/init/postinit/00-tegra.conf
usr/share/alsa/init/postinit/01-tegra-rt565x.conf
usr/share/alsa/init/postinit/02-tegra-rt5640.conf

So first let’s repackage nvidia-l4t-init_36.4.0-20240912212859_arm64.tbz2:

pushd Linux_for_Tegra/nv_tegra/l4t_tar_packages/
cat > nvidia-l4t-init.txt << EOF
etc/asound.conf.tegra-ape
etc/asound.conf.tegra-hda-jetson-agx
etc/asound.conf.tegra-hda-jetson-xnx
etc/nvidia-container-runtime/host-files-for-container.d/devices.csv
etc/nvidia-container-runtime/host-files-for-container.d/drivers.csv
etc/nvsciipc.cfg
etc/sysctl.d/60-nvsciipc.conf
etc/systemd/nv_nvsciipc_init.sh
etc/systemd/nvpower.sh
etc/systemd/nv.sh
etc/systemd/system.conf.d/watchdog.conf
etc/systemd/system/multi-user.target.wants/nv_nvsciipc_init.service
etc/systemd/system/multi-user.target.wants/nvpower.service
etc/systemd/system/multi-user.target.wants/nv.service
etc/systemd/system/nv_nvsciipc_init.service
etc/systemd/system/nvpower.service
etc/systemd/system/nv.service
etc/udev/rules.d/99-tegra-devices.rules
usr/share/alsa/cards/tegra-ape.conf
usr/share/alsa/cards/tegra-hda.conf
usr/share/alsa/init/postinit/00-tegra.conf
usr/share/alsa/init/postinit/01-tegra-rt565x.conf
usr/share/alsa/init/postinit/02-tegra-rt5640.conf
EOF
tar xf nvidia-l4t-init_36.4.0-20240912212859_arm64.tbz2
rm nvidia-l4t-init_36.4.0-20240912212859_arm64.tbz2
tar cjf nvidia-l4t-init_36.4.0-20240912212859_arm64.tbz2 $(cat nvidia-l4t-init.txt)
popd

On IGX Orin platform with dedicated graphics card (dGPU systems) you need to get rid of some files due to conflicts with dGPU userspace drivers.

# repackage nvidia-l4t-x11_ package
tar tf nvidia-l4t-x11_36.4.0-20240912212859_arm64.tbz2 | grep -v /usr/bin/nvidia-xconfig \
  > nvidia-l4t-x11_36.4.0-20240912212859.txt
tar xf  nvidia-l4t-x11_36.4.0-20240912212859_arm64.tbz2
rm      nvidia-l4t-x11_36.4.0-20240912212859_arm64.tbz2
tar cjf nvidia-l4t-x11_36.4.0-20240912212859_arm64.tbz2 $(cat nvidia-l4t-x11_36.4.0-20240912212859.txt)

# repackage nvidia-l4t-3d-core_ package
tar tf nvidia-l4t-3d-core_36.4.0-20240912212859_arm64.tbz2 | \
  grep -v \
       -e /etc/vulkan/icd.d/nvidia_icd.json \
       -e /usr/lib/xorg/modules/drivers/nvidia_drv.so \
       -e /usr/lib/xorg/modules/extensions/libglxserver_nvidia.so \
       -e /usr/share/glvnd/egl_vendor.d/10_nvidia.json \
       > nvidia-l4t-3d-core_36.4.0-20240912212859.txt
tar xf  nvidia-l4t-3d-core_36.4.0-20240912212859_arm64.tbz2
rm      nvidia-l4t-3d-core_36.4.0-20240912212859_arm64.tbz2
tar cjf nvidia-l4t-3d-core_36.4.0-20240912212859_arm64.tbz2 $(cat nvidia-l4t-3d-core_36.4.0-20240912212859.txt)

Then extract the generated tarballs to your system.

pushd Linux_for_Tegra/nv_tegra/l4t_tar_packages
for i in \
nvidia-l4t-core_36.4.0-20240912212859_arm64.tbz2 \
nvidia-l4t-3d-core_36.4.0-20240912212859_arm64.tbz2 \
nvidia-l4t-cuda_36.4.0-20240912212859_arm64.tbz2 \
nvidia-l4t-gbm_36.4.0-20240912212859_arm64.tbz2 \
nvidia-l4t-multimedia-utils_36.4.0-20240912212859_arm64.tbz2 \
nvidia-l4t-multimedia_36.4.0-20240912212859_arm64.tbz2 \
nvidia-l4t-nvfancontrol_36.4.0-20240912212859_arm64.tbz2 \
nvidia-l4t-nvpmodel_36.4.0-20240912212859_arm64.tbz2 \
nvidia-l4t-tools_36.4.0-20240912212859_arm64.tbz2 \
nvidia-l4t-x11_36.4.0-20240912212859_arm64.tbz2 \
nvidia-l4t-nvsci_36.4.0-20240912212859_arm64.tbz2 \
nvidia-l4t-pva_36.4.0-20240912212859_arm64.tbz2 \
nvidia-l4t-wayland_36.4.0-20240912212859_arm64.tbz2 \
nvidia-l4t-camera_36.4.0-20240912212859_arm64.tbz2 \
nvidia-l4t-vulkan-sc-sdk_36.4.0-20240912212859_arm64.tbz2 \
nvidia-l4t-nvml_36.4.0-20240912212859_arm64.tbz2 \
nvidia-l4t-init_36.4.0-20240912212859_arm64.tbz2; do
  sudo tar xjf $i -C /
done
popd

On systems without dedicated graphics (internal GPU systems) card you still need to move

/usr/lib/xorg/modules/drivers/nvidia_drv.so
/usr/lib/xorg/modules/extensions/libglxserver_nvidia.so

to

/usr/lib64/xorg/modules/drivers/nvidia_drv.so
/usr/lib64/xorg/modules/extensions/libglxserver_nvidia.so

So let’s do this.

sudo mv /usr/lib/xorg/modules/drivers/nvidia_drv.so \
          /usr/lib64/xorg/modules/drivers/
sudo mv /usr/lib/xorg/modules/extensions/libglxserver_nvidia.so \
          /usr/lib64/xorg/modules/extensions/
sudo rm -rf /usr/lib/xorg

Then add /usr/lib/aarch64-linux-gnu and /usr/lib/aarch64-linux-gnu/tegra-egl to /etc/ld.so.conf.d/nvidia-tegra.conf.

echo /usr/lib/aarch64-linux-gnu | sudo tee -a /etc/ld.so.conf.d/nvidia-tegra.conf
echo /usr/lib/aarch64-linux-gnu/tegra-egl | sudo tee -a /etc/ld.so.conf.d/nvidia-tegra.conf

Run ldconfig 

sudo ldconfig

Video group for regular users

A regular user needs to be added to the group video to be able to log in to the GNOME desktop as regular user. This can be achieved by using YaST, usermod or editing /etc/group manually.

Reboot the machine with the previously updated kernel

sudo reboot

In Mokmanager (Perform MOK management) select Continue boot. Although Secureboot is enabled by default in BIOS it seems it hasn’t been implemented yet (BIOS from 04/04/2024). Select first entry SLES 15-SP6 for booting.

Basic testing

First basic testing will be running nvidia-smi

sudo nvidia-smi

Graphical desktop (GNOME) should work as well. Unfortunately Linux console is not available. Use either a serial console or a ssh connection if you don’t want to use the graphical desktop or need remote access to the system.

glmark2

Install phoronix-test-suite

sudo zypper ar https://cdn.opensuse.org/distribution/leap/15.6/repo/oss/ repo-oss
sudo zypper ref
sudo zypper in phoronix-test-suite

Run phoronix-test-suite

sudo zypper in gcc gcc-c++
phoronix-test-suite benchmark glmark2

CUDA/Tensorflow

Containers

NVIDIA provides containers available for Jetson that include SDKs such as CUDA. More details here. These containers are Ubuntu based, but can be used from SLE as well. You need to install the NVIDIA container runtime for this. Detailed information here.

1. Install podman and nvidia-container-runtime
sudo zypper install podman
sudo zypper ar https://nvidia.github.io/libnvidia-container/stable/rpm/nvidia-container-toolkit.repo
sudo zypper modifyrepo --enable nvidia-container-toolkit-experimental
sudo zypper --gpg-auto-import-keys install -y nvidia-container-toolkit
sudo nvidia-ctk cdi generate --mode=csv --output=/var/run/cdi/nvidia.yaml
sudo nvidia-ctk cdi list
2. Download the CUDA samples
sudo zypper install git
cd
git clone https://github.com/NVIDIA/cuda-samples.git
cd cuda-samples
git checkout v12.4
3. Start X
sudo rcxdm stop
sudo Xorg -retro &> /tmp/log &
export DISPLAY=:0
xterm &

Monitor should now show a Moiree pattern with an unframed xterm on it. Otherwise check /tmp/log.

4. Download and run the JetPack6 container
sudo podman run --rm -it -e DISPLAY --net=host --device nvidia.com/gpu=all --group-add keep-groups --security-opt label=disable -v $HOME/cuda-samples:/cuda-samples nvcr.io/nvidia/l4t-jetpack:r36.2.0 /bin/bash

CUDA

5. Build and run the samples in the container
cd /cuda-samples
make -j$(nproc)
pushd ./Samples/5_Domain_Specific/nbody
make
popd
./bin/aarch64/linux/release/deviceQuery
./bin/aarch64/linux/release/nbody

Tensorrt

6. Build and run Tensorrt in the container

This is both with the GPU and DLA (deep-learning accelerator).

cd /usr/src/tensorrt/samples/
make -j$(nproc)
cd ..
./bin/sample_algorithm_selector
./bin/sample_onnx_mnist
./bin/sample_onnx_mnist --useDLACore=0
./bin/sample_onnx_mnist --useDLACore=1

Misc

Performance

You can improve the performance by giving the clock a boost. For best performance you can run jetson_clocks to set the device to max clock settings

sudo jetson_clocks --show
sudo jetson_clocks
sudo jetson_clocks --show

The 1st and 3rd command just prints the clock settings.

MaxN Power

For maximum performance you also need to set MaxN Power. This can be done by running

sudo nvpmodel -m 0

Afterwards you need to reboot the system though.

sudo reboot

In order to check for the current value run

sudo nvpmodel -q

the avatar of openSUSE News

openSUSE Asia Summit Set for Tokyo

openSUSE.Asia Summit will come back to Tokyo, Japan

The openSUSE Project is exciting to announce that openSUSE.Asia Summit 2024 is going to be held in Tokyo, Japan. The openSUSE.Asia Summit is an annual conference for users and contributors of openSUSE and FLOSS enthusiasts. During this summit, they will gather in person to share knowledge and experiences about openSUSE including applications running on it.

The venue of the summit will be located in Tokyo, the capital of Japan, blending tradition and cutting-edge technology. Its infrastructure and global connectivity make it a primal location for promoting collaboration among openSUSE users and developers. Moreover, Tokyo is a center of information technology; Many technology companies have their offices in Tokyo, with numerous engineers residing in the surrounding areas.

Tokyo is also a popular place for sightseeing with its unique culture, food, etc. Especially, characters from video games, anime, and comics, which are now common in the world, attract tourists to Japan. In Tokyo, you can easily find character shops and get items related to works you love.

The number of tourists from abroad has recovered last year to the same level as before COVID-19. Due to the currency exchange rate, it will be a great chance to enjoy your trip to Japan while saving your money. Even though you may have attended the last summit in Tokyo, you will discover new facets, developed before the TOKYO 2020 Summer Olympics.

Please see also:

The expected summit date is Nov. 2 and 3 soon after Open Source Summit Japan. Our call for speakers is going to end around the end of July. For more details including the venue, please stay tuned until the next announcement in a couple of weeks.

the avatar of rickspencer3's Blog

openSUSE Tumbleweed is the Best Distro No One Knows About

openSUSE Tumbleweed is the Best Distro No One Knows About

I've been at SUSE for 4 months now. Of course the company keeps my primary focus on our Enterprise customers, but I have learned a lot more how openSUSE is built and used in the four months, and I have to say, I am impressed. I think Tumbleweed is the best developer distro that nobody knows about.

On my main laptop I opted to install the "stable" verion of openSUSE called "Leap." (you can read about that here). I followed suit on my $65 laptop, but ran into some issues based on the cheapness and newness of the laptop's components. For example, the wifi module was not recognized, and the built in speakers just didn't work. The wifi issue was obvious; the wifi module was too new for Leap 15.5, and I was too lazy to compile and install an up to date kernel driver for it.

As I learned more about openSUSE, I finally understood the difference between Tumbleweed and Leap, and I realized that Tumbleweed would probably work well on my oddball $65 laptop.

How is openSUSE built anyway?

openSUSE is unique, because it is both upstream of Suse Linux Enterprise, and downstream from it. Basically, what happens is:

  1. The openSUSE community is constantly packaging upstream software with the Open Build Server.
  2. Those packages are constantly being built into openSUSE Tumbleweed, which is, therefore, a rolling release. There is a quality assurance process that keeps Tumbleweed stable in the sense of "not crashy."
  3. Periodically, those packages from the Open Build Server, which become highly used and vetted by the community using Tumbleweed, then get moved into SUSE's Internal Build Server. From there, SUSE builds Certified and L3 Supported packages, that go into SUSE Linux Enterprie releases. This is a paid Enterprise product.
  4. Out of those packages, openSUSE Leap is built. Leap, therefore, is essentially the same as SUSE Linux Enterprise, but without the certifications and support.

diagram of SUSE packaging process

I assume I got some details wronng above, but I think that's the gist of it.

Choice happens. You can choose a high quality rolling release, a fully supported Enterprise release with a long lifecycle, or a free (as in speach and beer) release with the same lifecycle and bits as the Enterprise version.

For simplicity, I left out that there are even more options. For example, do you want an immutable OS with transactional updates? The openSUSE community has you covered with Microos.

So How did it Go?

Installing Tumbleweed was actually pretty boring. The main difference from installing Leap was that the wifi driver was recogized by the kernel (as I expected). I was pleasantly surprised to see that I also a built in LTE modem.

Tumbleweed detected and allowed me to configure the wifi

Up to Date

Looks like after install, every single package is up to date with the repositories. I uppose the installer installed all up to date packages from the repositories, which is sweet.

everything up to date

WIFI woes

However, while the built in wifi seemsto work, I noticed that when I am downloading files, they sometimes get "stuck." Either the server times out, or the data trickles in so slowly the files will never download. More on this bellow.

Next Steps

So now I seem to be a happy Tumbleweed user. I have installed my work software (Slack, etc...) so I am planning to take this device as my only laptop on an upcoming work trip to Europe in May. I should be in meetings most of the time, so it's a pretty low risk situation.

Follow up on Issues

So, this wifi issue ... this seems like a good opportunity for me to help out with the community however modestly. I will learn how to log an issue in the right place, and then see if I can help who ever turns out to be the right mainter address the bug.

Connect with the Community

I am motivated to started looking at this issue as openSUSE Conference is coming up at the end of June, and I am looking forward to connecting with community members and generally learning how the openSUSE community works, and seeing how I can collaborate and help.

a silhouette of a person's head and shoulders, used as a default avatar

openSUSE Tumbleweed – Review of the weeks 2024/17 & 18

Dear Tumbleweed users and hackers,

Last week, I was attending the SUSE Labs Conference last week and had to skip writing the weekly review. As many SUSE devs were there too, the expectation was to get fewer changes anyway during week 17. Consequently, I am spanning two weeks again today and will be covering the nine snapshots (0419, 0421, 0423, 0425…0430) released during this period.

The most relevant changes delivered were:

  • Linux kernel 6.8.7 & 6.8.8
  • SETools 4.5.0
  • libxml 2.12.6
  • LLVM 18.1.4
  • Python 3.11.9 & 3.12.3
  • Mesa 24.0.5
  • Mozilla Firefox 125.0.2
  • SQLite 3.45.3

Having some engineers together at the Labs Conference also allowed them to directly exchange ideas and work on some of the things in staging. Simon and I have worked on dbus-broker and made some good progress, but we have not yet reached the end goal. Similarly for other things in the staging areas. The most interesting changes being prepared are: