
 Member
 CzP
CzPSyslog-ng development and AI
Recently, several people have asked me about the syslog-ng project’s view on Artificial intelligence. In short, there is cautious optimism: we embrace AI, but it does not take over any critical tasks from humans. But what does this mean for syslog-ng?
Read more at https://www.syslog-ng.com/community/b/blog/posts/syslog-ng-development-and-ai
syslog-ng logo
Actualización de julio de 2025 del mapa de usuarios KDE
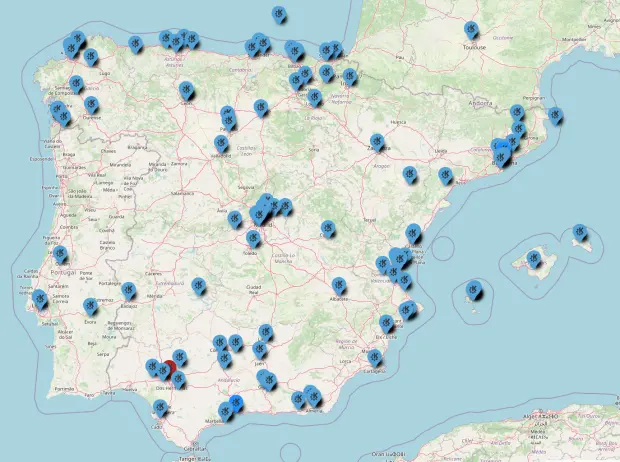
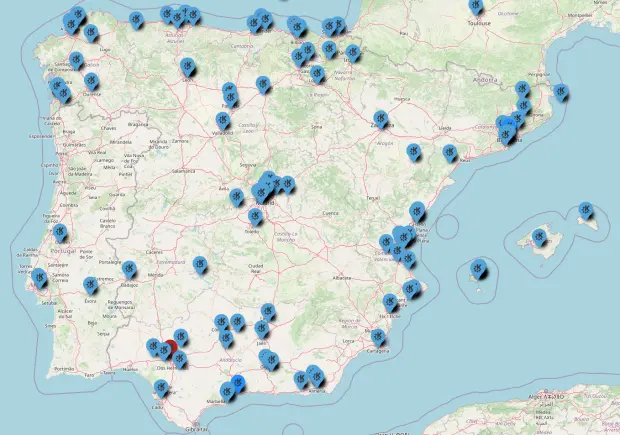
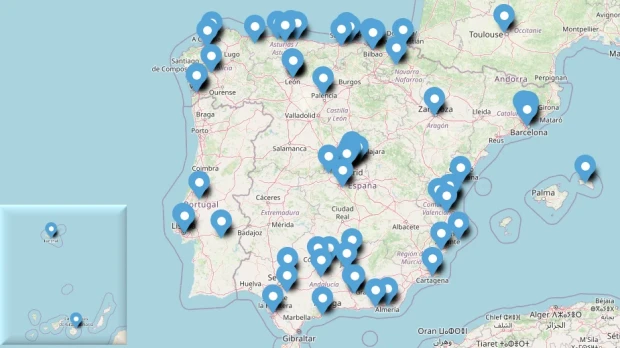
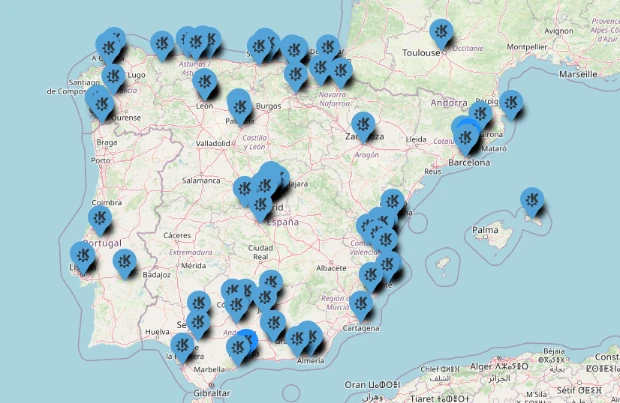
Hace mucho tiempo publiqué el mapa generado en Google de los usuarios de KDE. Ese mapa era colaborativo y voluntario pero generado sobre Software Privativo. En varias ocasiones pedí que alguien lo cambiara a OpenStreetMap y mis súplicas fueron escuchadas. Ya casi había olvidado este proyecto pero este agosto lo recuperé, publicitándolo en el grupo de Telegram KDE – Cañas y Bravas y parece que el proyecto ha tomado impulso, así que he decidido seguir publicitándolo durante unos meses. Así que os doy la bienvenida a la actualización de julio de 2025 del mapa de usuarios KDE que empieza a ser complicado de seguir ya que al parecer se actualiza pero en zonas donde ya hay usuarios, así que estoy intentando sacar un listado en formato hoja de cálculo para poder obervar los cambios, que los hay. No obstante, seguimos sin tener a nadie en Cáceres, Lleida, Salamanca o Huesca, por poner algunas capitales de provincia. ¿No podemos solucionar este vacío? ¿Conoces a alguien de alguna de esas capitales? Si es así convéncele que se apunte.
Actualización de julio de 2025 del mapa de usuarios KDE
Si vais a ver el mapa de la Comunidad KDE de España marzo 2018, podréis ver una imagen estática de los usuarios que se habían puesto voluntariamente , y digo estática, porque alguien borró (queriendo o sin querer) los «pines» del mapa.
Ese incidente fue comentado en el grupo de Telegram KDE – Cañas y Bravas, y un usuario dijo que trabajaría en ello aprovechando que se debía empezar de nuevo el mapa.
Este compañero de grupo era @wakutiteo y creó, utilizando los servicios de uMap sobre OpenStreetMap el nuevo mapa de la usuarios KDE en España en el que podemos empezar a registrarnos.
En un principio había poca poca gente apuntada (mirad la entrada de junio de 2018) pero poco a poco se ha ido llenando, a pesar de la poca promoción que ha tenido. A ver si a partir de ahora voy dándole más cancha y el mapa crece .
2025
Julio 2025
Cada vez es más complicado seguir la evolución de este mapa. Aunque no tenemos usuarios en capitales de provincia parece que en los lugares donde ya había usuarios siguen aumentando su densidad, lo cual no se puede apreciar en la imagen a menos que sean creativos y en vez de pines pinga cactus. Parece que el hecho de tener algún compañero/a por la zona anima al resto.
Os recuerdo que necesitamos llenar capitales de provincia como Lleida, Salamanca, Huelva, Zamora, Lugo, Soria, Teruel, Segovia, Tarragona, Girona (aunque ya hay alguien cerca), Alicante (pero si Elche, y dos), Santiago de Compostela, Pontevedra o Ávila, si no he mirado mal (que es posible).
Una vez realizada esta proeza creo que lo siguiente sería pensar en local y empezar a hacer una entrada pero centrándome en provincias. ¿Qué os parece? Puede que así veamos el crecimiento de forma más detallada.
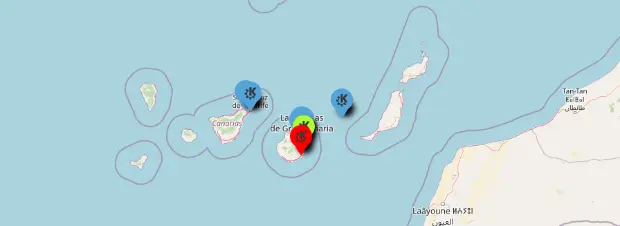
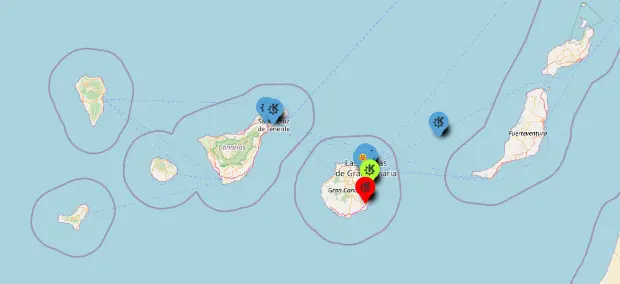
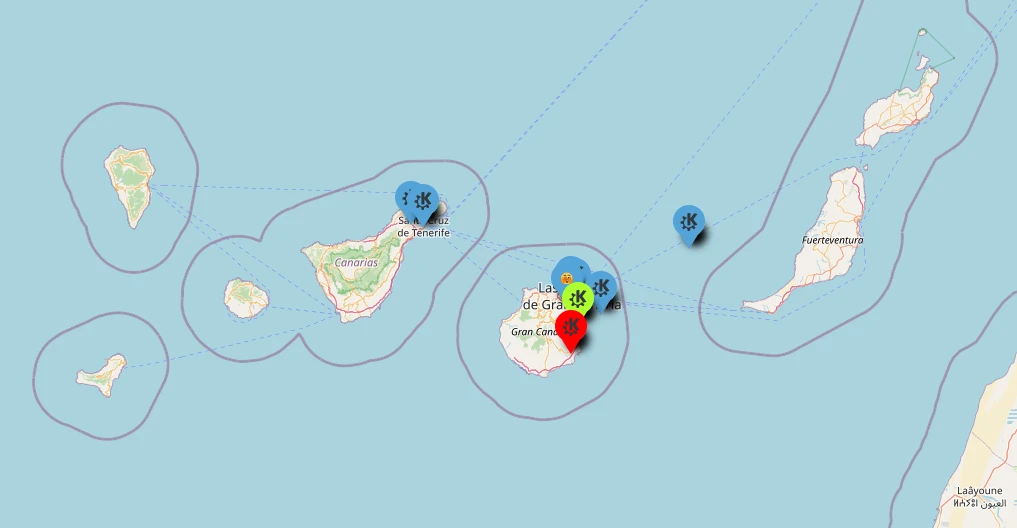
Adjunto las capturas y comentar que el mapa de las Islas Canarias lo he capturado un poco más ampliado para poder ver mejor los detalles, de hecho, tenemos a toscalix en Santa Cruz de la Palma.


Junio 2025


Abril 2025


Pincha en este enlace para ver el mapa interactivo.
Evidentemente, es voluntario y apuntaros es bajo vuestra propia responsabilidad. Os dejo también el mapa incrustado que se irá actualizando poco a poco.
Marzo 2025


Febrero 2025
Enero 2025
2024
Para facilitar el seguimiento he decidido crear la sección del año separándolo del mes conrrespondiente.
Agosto 2024
Septiembre 2024
Octubre 2024


Diciembre 2024


Y también os dejo un vídeo de cómo editar el mapa para poder apuntaros.
¿Qué es Umap?
Básicamente, con uMap puedes crear mapas con capas de OpenStreetMap en un minuto e incrustarlo en tu página web, de código libre. Con uMap puedes realizar las siguientes acciones:
- Elegir las capas de tu mapa
- Añadir PDIs: marcadores, líneas, polígonos…
- Elegir los colores y los iconos de los PDIs
- Gestionar opciones del mapa: mostrar un minimapa, localizar al usuario al cargar…
- Importar por lotes datos geoestructurados (geojson, gpx, kml, osm…)
- Elegir la licencia de tus datos
- Embeber y compartir tu mapa
La entrada Actualización de julio de 2025 del mapa de usuarios KDE se publicó primero en KDE Blog.

Planet News Roundup
This is a roundup of articles from the openSUSE community listed on planet.opensuse.org.
The below featured highlights listed on the community’s blog feed aggregator from July 21 to 27. Some of the most recent blogs openSUSE Conference 2025, updates on Tumbleweed developments, and important security insights.
Here is a summary and links for each post:
openSUSE Conference 2025 Highlights
openSUSE Conference 2025 - Ish Sookun shared his experience attending oSC25 in Nuremberg, Germany, including his perspective as a newly elected openSUSE Board member. The conference brought together developers, contributors, and open-source enthusiasts from around the world. Key highlights included setting up an on-site openSUSE Shop to make swag more accessible to international attendees, keynotes from SUSE leadership emphasizing the power of open collaboration, and technical presentations covering topics like SELinux security improvements and distributed Kubernetes clusters. Ish also presented talks on improving openSUSE membership management and building mirrors in Mauritius.
Tumbleweed Updates
openSUSE Tumbleweed revision de la semana 30 de 2025 - Victorhck provided a detailed review of Tumbleweed snapshots 0718, 0722, and 0723 in Spanish and noted a delay due to SELinux 3.9 debugging. Key updates included KDE Plasma 6.4.3, Mesa 25.1.6, Apache 2.4.64, and Linux kernel 6.15.7. Snapshot 0724 is in quality control and expected to bring SELinux 3.9, Bash 5.3, and Firefox 141.0.
Tumbleweed – Review of the weeks 2025/30 - Dominique Leuenberger provided a detailed review of Tumbleweed snapshots like that listed above.
Security Insights
SUSE Security Team Spotlight Spring 2025 - The SUSE security team shared insights from their spring 2025 work, including reviews of new Polkit features in GDM, Flatpak, and ModemManager. They also detailed privilege escalation vulnerabilities found in cyrus-imapd and configuration changes for systemd-coredump.
Community and Advocacy
Urgency to Switch from Windows 10 Builds - Douglas DeMaio highlighted the openSUSE Project’s participation in the End of 10 campaign, urging users to migrate from Windows 10 (which ends support in October) to Linux-based operating systems. The article emphasizes both cybersecurity risks of staying on unsupported systems and the environmental benefits of extending older hardware life through Linux adoption.
Technical Deep Dives
Dealing with multiple syslog protocols in syslog-ng made easy - Peter Czanik explained the new transport(auto) option in syslog-ng that simplifies handling multiple syslog protocol variants (RFC3164, RFC5424) through a single source driver, making syslog configuration more straightforward.
KDE Community
Esquinas inferiores redondeadas – Esta semana en Plasma - Baltolkien translated Nate Graham’s weekly Plasma update in Spanish covering Plasma 6.5 developments, including the implementation of automatically rounded bottom window corners and various UI improvements.
Control del nivel de tinta de la impresora – Esta semana en Plasma - Another Spanish translation by Baltolkien of Nate Graham’s weekly Plasma update, featuring printer ink level notifications, notification handling improvements, and various bug fixes in Plasma 6.4.4 and 6.5.
Community Events
Akademy 2026 busca sede ¡anímate y presenta una candidatura! - Baltolkien announced that KDE’s annual developer conference Akademy 2026 is seeking a European host venue for its 30th anniversary celebration, providing details on requirements and how to submit a proposal.
View more blogs or learn to publish your own on planet.opensuse.org.
Juegos libres de calidad y en desarrollo julio 2025
Este mes si llego a la entrada recopilatoria mensual que tiene como objetivo promocionar los juegos libres, pero no como una página que quede obsoleta o sea un cementerio de proyectos muertos, así que la voy a realizar poco a poco y con conocimiento de causa. Por ello, y conociendo mis limitaciones y mi estilo de trabajo, la voy a ir remodelando mes a mes y su contenido se irá ampliando poco a poco. De esta forma, bienvenidos a la entrada de juegos libres de calidad y en desarrollo de julio 2025 en la que recopilo los juegos libres presentados en forma de entrada «tocha» en el blog ampliándola con Pixel Wheels.
Juegos libres de calidad y en desarrollo julio 2025

Como decía al principio, esta entrada de la serie Juegos Libre de Calidad y en Desarrollo pretende ser una entrada viva y creciente, que tenga una parte fija pero dinámica en la que muestre no solo juegos libres sino también su estado de desarrollo, sus novedades principales y, si es posible, alguna noticia relevante de alguno de ellos: lanzamientos especiales, vídeos, premios, cambios notables, etc.
Para empezar utilizaré una tabla para mostrar la información y los juegos iniciales que aparecen son aquellos que he analizado a fondo en el blog dado que son los que tengo más claro su desarrollo.
Este mes no voy a repasar el estado de actualizaciones de cada juego a conciencia.
También os aconsejo que visualicéis el vídeo del final y, como extra este mes preparando los meses más jugones del hemisferio norte (porque con la calor que vamos a pasar lo mejor es estar encerrados en casa), os he hecho una recopilación de vídeos de cada unos de los géneros.
| Género | Nombre | Presentado en el blog | Última actualización | Comentario | Otros juegos alternativos Libres o no. |
|---|---|---|---|---|---|
| Conducción | Speed dreams | Si | Junio 2025 Versión 2.4.2 |
La versión 2.4.2 de Speed Dreams se lanzó a principios de junio de 2025. Esta actualización fue publicada como una versión hotfix para corregir varios errores detectados tras el lanzamiento de la versión 2.4.1, además de incluir pequeñas mejoras en la interfaz y el sistema de tiempos en carrera. | Need For Speed |
| Conducción | SuperTux Kart | Si | Septiembre 2023 1.4 RC de 1.5, mayo 2024 |
Aunque se está desarrollando la versión 1.5, se está preparando la versión 2.0 que incluirá un mínimo de cinco nuevas pistas estándar de alta calidad, versiones mejoradas de todas las pistas existentes, además de cambios y mejoras considerables en todos los elementos del juego. | SuperMario Kart |
| Conducción | Pixel Wheels | Si | 11 Julio 2025 RC de 1.0 |
Juego de carreras con vista aérea para PC y Android. Compite por el primer puesto en diversas pistas. ¡Recoge bonificaciones para mejorar tu posición o ralentizar a tus rivales! |
?¿?? |
| Estrategia por turnos | The Battle of Wesnoth | Si | Versión en desarrollo 1.19.13 versión estable 1.18.5 |
La versión 1.19.13 añade animaciones de ataque, defensa y parada de Dune Rover. | ?¿?League of Legends??¿ |
| Estrategia por turnos | Hedgewars | Si | Versión 1.0 el 9 de octubre de 2019 | Disponible un mapa de 1-1 de Super Mario Bros. 1-1 (ajustar la subida de agua muerte súbita antes de jugar) y una canción personalizada que es un remix NES-como de snow.og. Enlace. | Worms Warmux (proyecto libre sin desarrollo) |
| Estrategia en tiempo real | OpenRA | Si | Versión 20250330 25 de marzo de 2025 |
La Comunidad OpenRA tiene una página web para creen: https://resource.openra.net/ | Warcraft, Starcraft, Red Alert, Command & Conquer, Dune 2000. |
| Estrategia en tiempo real | 0 A.D | Si | 30 de enero 2025 Alpha 27: Agni |
No os perdáis el vídeo de la actualización de enero de 2025, Alpha 27 Agni de 0 A.D. | Age of Empires |
| Estrategia en tiempo real | Stone Kingdoms | Si | 2024 0.6.1 |
Experimenta la emoción de la construcción y destrucción de castillos medievales en nuestro juego de estrategia isométrico de código abierto, una reedición moderna del clásico Stronghold de Firefly Studios. | Stronghold |
| Estrategia en tiempo real 3D | MegaGlest | Si | 3.13 2017 | Aunque no hay registros de actualizaciones posteriores a 2017 en fuentes oficiales. El proyecto mantiene actividad en repositorios como GitHub, con contribuciones comunitarias enfocadas en correcciones menores y compatibilidad con nuevos sistemas | Warcraft III |
| FPS | Alien Arena | Si | 7.71.7 2025 | Aunque no hay anuncios recientes de nuevas características, la compatibilidad con Flathub (23k+ instalaciones) y Steam sugiere actividad continua. | Quake, Doom, Nexuiz, Unreal |
| FPS | Xonotic | Si |
20/06/2023 Versión 0.8.6 |
Disponible el mapa Lavarena Remake, uuna versión del mapa oficial «lavaarena» de Open Arena. | Quake, Doom, Nexuiz, Unreal |
| FPS | OpenArena | Si | 0.8.8 2012 |
Publicado un mapa llamado gothic_ctf o «Gothic Abbey». | Quake, Doom, Nexuiz, Unreal |
| FPS | Warsow | Si | 2.1.2 | Ambientado en un mundo futurista de dibujos animados. Acción en primera persona de ritmo rápido. | Quake, Doom, Nexuiz, Unreal |
| Sigilo | The Dark Mod | Si | 2.13 | The Dark Mod se publicó por primera vez como mod para Doom 3 en octubre de 2009. Se convirtió en un juego independiente en octubre de 2013, y desde entonces se ha actualizado con regularidad. | Metal Gear Solid Thief |
| MMORPG | Ryzom | Si | Patch 2025-01-16: Magic Mirror & Return of the Sagass | El espejo mágico está disponible para todos en los barrios. Es gratis para aquellos que lo hayan obtenido con Kadox, y se puede comprar como tickets de mobiliario para los demás (en la sección de eventos OCC / 20 cumpleaños de Rykea). El espejo te permite aumentar o disminuir ciertos atributos de tu personaje (excluyendo la cara) una vez cada 20 horas. |
World of Warcraft Albion Online |
| MMORPG | Eternal Lands | Si | Diciembre 2024 1.9.7 |
La última actualización de diciembre de 2024 trajo la siguiente novedad en el creador de mapas: permitir que los objetos autoiluminados se autoiluminen realmente en el editor de mapas en las circunstancias correctas (mazmorras/mapas interiores). | World of Warcraft Albion Online |
| Plataformas | Supertux | Si | 2021 Versón 0.6.3 |
Si te interesan los addons de Supertux esta es tu página. | Super Mario |
| Plataformas | Frogatto & Friends | Si | 1.0 2010 |
Juego cerrado y completo | Wonder Boy |
| Roguelike |
Shattered Pixel Dungeon |
Si | 3.1.0 lanzado en junio de 2025 | La v3.1.0 incluye cambios en el mini Guerrero,, nuevo terreno/habitaciones, una nueva baratija, y un montón de otros pequeños cambios y adiciones! | Dungeon Pixel |
| Simulación | Simutrans | Si | 124.3.1 | Ganadores del concurso de capturas de pantalla de Simutrans 2024 | Transport Tycoon Deluxe |
| Simulación | OpenTTD | Si | 3 de mayo 2024 14.1 15.0-beta2 |
OpenTTD 15.0-beta2 fue lanzada el 13 de abril de 2025. | Transport Tycoon Deluxe |
Vídeo destacado
¡No te pierdas este vídeo titulado «Is Linux ACTUALLY Better for Gaming in 2025? The Complete Deep Dive» de Ton Does Linux and More!:
Vídeos de juegos
Conducción: Speed Dreams
Estrategía por turnos: Battle for Wesnoth
FPS: Alien Arena
Sigilo: The Dark Mod
MMORPG: Ryzom
Plataformas: Supertux
Roguelike: Shattered Pixel Dungeon
Simulación: Simutrans
La entrada Juegos libres de calidad y en desarrollo julio 2025 se publicó primero en KDE Blog.

openSUSE Conference 2025
The openSUSE Conference 2025, was held from 26 - 28 June at the vibrant Z-Bau, House of Contemporary Culture, Nuremberg, Germany. I had the pleasure of attending with my colleagues Eddy Lareine and Alex Bissessur. It marked my third time attending and speaking at the openSUSE Conference in Germany, and my fifth international openSUSE talk, after the Africa Internet Summit 2019 in Kampala, Uganda and the openSUSE Asia Summit 2019 in Bali, Indonesia.

My First Conference as a Board Member
Earlier this year, I was elected to the openSUSE Board, making this year's conference a little different, with added responsibilities.
Two days before the conference began, the Board held our face-to-face meetings. We voted on a few pending items and prepared for the Board's public session with the community, which was scheduled for Friday, 27 June at 6 p.m. These pre-conference meetings were insightful, especially for me as a new Board Member. I learned a great deal from more seasoned members like Simon Lees, Shawn Dunn, and our Chair Gerlald Pfeifer. I also benefitted from the perspectives of former Board Members Douglas DeMaio and Patrick Fitzgerald, who also joined the sessions. Although Jeff Mahoney and I started our mandates at the same time, his experience and understanding of how SUSE and openSUSE intersect brought invaluable context to many of the discussions.
Swag at the conference
One of my proposals as a Board Member was to set up an openSUSE Shop at the conference venue. This initiative allowed attendees, especially those visiting from outside Europe, to purchase openSUSE swag such as t-shirts, caps, tote bags, and mugs. For many of us from regions like Africa or islands like Mauritius, international shipping fees often exceed the actual item costs. This shop helped address that.

Thankfully, Eddy and Alex volunteered to help run the shop, so we didn't need to recruit more volunteers. However, managing the swag table while attending sessions was no easy feat. We had to take turns so we could still attend the talks we were interested in and present our own sessions (Alex and I each had two talks spread across different days).
Day 1 — Keynotes, Community Energy and Technical Deep Dives
The conference opened with a keynote address by SUSE CEO Dirk-Peter van Leeuwen. He spoke from the heart, about his roots as an engineer, his passion for coding, and his belief in the power of community. He reminded us of how openSUSE reached its 20-year milestone, highlighting major contributions like YaST, KDE integration, and the Open Build Service (OBS), the latter being adopted by the Cloud Native Computing Foundation for running Kubernetes builds.

Proprietary software development does not get you anywhere, it has to be open.
— Dirk-Peter van Leeuwen
That statement received a resounding applause.

Next up was Rick Spencer, SUSE General Manager, who emphasized that openSUSE is not just a collection of distros, but a single project with a unified purpose. He encouraged contributors to see beyond labels like Tumbleweed or Leap, and instead, embrace a collaborative spirit. His closing call-to-action was simple but powerful:
Join the momentum, every contribution matters.
— Rick Spencer


Later that day, I also attended Cathy Hu's talk on "SELinux — current state in (open)SUSE" while keeping an eye on the shop. As the maintainer of openSUSE's SELinux policy and userspace toolchain, Cathy gave a thorough overview of security improvements in the distro.

The second keynote was delivered by Peer Heinlein, CEO of the Heinlein Group. He talked about the risks of relying on proprietary software, referencing the fate of ownCloud after its acquisition by Kiteworks. In response, the Heinlein Group forked the open-source ownCloud Infinite Scale (OCIS) codebase to launch OpenCloud.
Midway through his talk, I had a déjà vu moment as his name sounded familiar. That's when I remembered that Peer Heinlein is the author of the book Dovecot: POP3/IMAP Servers for Enterprises and ISPs, a crucial reference when I built the email infrastructure for La Sentinelle five years ago.

After his talk, I introduced myself, shared how his book helped me, and thanked him in person. I took a selfie with him and Richard brown, the former openSUSE Board Chair who has always pushed me to be more involved in the project.
I attended the session on Leap 16.0 Beta, by Luboš Kocman, during which he unveiled the new Leap wallpaper.

We were very happy to see the green lizard on the wallpaper, a photo taken by our dear friend and fellow Mauritian, Arwin Neil Baichoo and submitted for the Leap 16.0 and Tumbleweed wallpaper collection. He made us proud. 😊
Day 2 — Talks on Community, Infrastructure, and the African Context
I delivered my first talk in the "Gallerie" room titled "2 cents on improving openSUSE Membership (Management)".

I presented my thoughts on how we could improve the membership process through a custom Laravel-based platform. I had a productive follow-up discussion afterward.
Later, Alex gave his talk on "Geographically Distributed Kubernetes Clusters", highlighting the challenges cloud enthusiasts face in Mauritius, where GCP, AWS, and Azure are absent.

He described how unreliable power and lack of local cloud services inspired him and his friends to build a distributed Kubernetes cluster to host their own blogs and applications.
My second talk, "Building openSUSE Mirror(s) in Mauritius", took place at 4 p.m. in the main hall. It was a status update on the mirror infrastructure project I began in 2022.


I shared lessons learned, improvements to sync strategies, and announced that Kaldera is sponsoring a second mirror in Mauritius, soon to be the fourth mirror in Africa.
The day concluded with the openSUSE Board Q&A session at 6 p.m. Gerald opened with a summary of proposed updates to election and membership rules, and I expanded on our membership platform. Jeff, Simon, and Shawn addressed governance structure proposals. The session felt productive, open, and reflective of the community's spirit.

Day 3 — Bring openSUSE swag for folks back home
On the final day, Alex gave his second talk, "Production-Ready Virtualisation with Harvester and Longhorn." He addressed how recent changes in pricing/licensing by a major virtualization vendor created uncertainty, especially in Africa. Thus, prompting many to seek alternatives.

Harvester and Longhorn, being open-source, hyperconverged solutions, offer a practical alternative at a time when cloud-native infrastructure is becoming the default.
At the end of day, as we were wrapping up, Doug said that we had a few conference t-shirts left and if I would like to bring back home some of them. Naturally, I agreed as I know friends back home would love that.
In fact, I distributed the t-shirts during my talk about the openSUSE Project at the Developers Conference 2025 (Mauritius), which happened just a few weeks after the openSUSE Conference.


Wrapping Up
This year's conference was memorable for many reasons, my new role on the Board, the warm community spirit, the brilliant talks, and of course, the friendships and collaborations that deepened along the way. Videos from all the sessions at oSC25 are available on YouTube.
A big thanks to everyone who made the openSUSE Conference 2025 a success.
Looking forward to seeing you all again in 2026!
Control del nivel de tinta de la impresora – Esta semana en Plasma
Es increíble el trabajo de promoción que está realizando Nate en su blog, dese hace más del tiempo que puedo recordar. Cada semana hace un resumen de las novedades más destacadas, pero no en forma de telegrama, sino de artículo completo. Su cita semanal no falla y voy a intentar hacer algo que es simple pero requiere constancia. Traducir sus artículos al castellano utilizando los magníficos traductores lo cual hará que: la gente que no domine el inglés esté al día y que yo me entere bien de todo. Bienvenidos pues a «Control del nivel de tinta de la impresora – Esta semana en Plasma». Espero que os guste y, sobre todo, que pueda mantener el ritmo de publicación de Nate Graham.
Control del nivel de tinta de la impresora – Esta semana en Plasma
Nota: artículo original en Blogs KDE. Traducción realizada utilizando deepl.com. Esta entrada está llena de novedades de la Comunidad KDE. Mis comentarios están entre corchetes y se nota que estamos en periodo vacacional por la brevedad del artículo. Con la publicación de hoy me pongo al día.
¡Bienvenido a un nuevo número de «Esta semana en Plasma»! Cada semana cubrimos lo más destacado de lo que está sucediendo en el mundo de KDE Plasma y sus aplicaciones asociadas como Discover, System Monitor, y más.
Esta semana continuó el trabajo en la interfaz de usuario y las funciones de Plasma 6.5, junto con una serie de interesantes cambios técnicos y correcciones de errores. Echa un vistazo.
Novedades
Plasma 6.5
Para las impresoras compatibles, ¡Plasma ahora te avisa cuando la impresora se está quedando sin tinta! (Mike Noe, enlace) [Mi odio a las impresoras no tiene fin pero aun así creo que debemos integrarlas en nuestro sistema… aunque no se dejen.]

Mejoras en la interfaz de usuario
Plasma 6.4.4
Las notificaciones marcadas como «baja prioridad» o que hayas configurado manualmente para que no aparezcan en el historial ahora ignoran eso de forma selectiva y aparecen en el historial cuando llegan durante el modo No molestar. El motivo es que, de lo contrario, estas notificaciones simplemente desaparecerían y nunca tendrías la oportunidad de verlas. (Niccolò Venerandi, enlace) [Este tipo de cosas me recuerda a la ley de las consecuencias imprevistas].
Las casillas de selección de los elementos del escritorio ahora coinciden con el estilo visual; ¡ya no tendrás que hacer clic en un lugar que parece vacío y seleccionar un archivo o carpeta a pesar de que no haya efecto de desplazamiento! (Niccolò Venerandi, enlace)
Plasma 6.5
Se ha desactivado la repetición de teclas para una serie de atajos globales que podrían provocar un parpadeo rápido en pantalla completa si se mantuvieran pulsados, ya que esto podría provocar convulsiones en personas fotosensibles. Las acciones afectadas incluyen alternar entre la vista general, el modo de pantalla completa, maximizar/minimizar e invertir los colores de la pantalla. (Ritchie Frodomar, enlace 1, enlace 2 y enlace 3)
La notificación «Alguien ha empezado a compartir esta pantalla» ahora solo aparece después de que la conexión se haya establecido completamente y el uso compartido de la pantalla haya comenzado realmente, en lugar de en el momento en que se inició la conexión. (David Edmundson, enlace)
El cuadro de diálogo «Confirmar eliminación de la conexión de red» ahora utiliza el estilo estándar de KDE. (Renner 03, enlace)
El espaciado entre los elementos del menú en el widget Menú global ahora es más coherente con los menús de las ventanas individuales. (Rebecca Bee, enlace)
Corrección de errores importantes
Pronto
El complemento del navegador Plasma Browser Integration ya no interrumpe funciones aleatorias ni diversos sitios web conocidos de videoconferencia cuando está activa su configuración de controles multimedia mejorados. (Kai Uwe Broulik, enlace)
Plasma 6.4.4
Se ha corregido un error que provocaba el bloqueo de KWin en el siguiente inicio de sesión cuando se habilitaba el efecto de lupa, pero no se utilizaba para ampliar la imagen antes de cerrar la sesión. (Xaver Hugl, enlace)
Se ha corregido un error que provocaba el bloqueo de KWin al iniciar sesión cuando se ejecutaba en una máquina virtual QEMU con el controlador de vídeo Bochs. (Xaver Hugl, enlace)
Se ha corregido el modo de un solo botón del widget del menú global también para los usuarios de X11. (Kishore Gopalakrishnan, enlace) [Mucho error corregido en X11, algo que no me pasa a mi pues estoy en Wayland].
El campo de búsqueda del widget del menú global en la versión Wayland vuelve a funcionar. (Niccolò Venerandi, enlace)
Se ha corregido un error en la implementación de KDE del portal XDG de accesos directos globales que confundía a las aplicaciones haciéndoles creer que no tenían accesos directos después de aceptar el cuadro de diálogo para realizar algunos cambios. (David Redondo, enlace)
Se ha corregido un error que provocaba que las notificaciones en la vista del historial no aparecieran en orden secuencial. Si recuerdas que anteriormente se anunció que se había corregido, es porque solucionamos un error de Qt que causaba el problema. Bueno, ese error de Qt se corrigió, ¡lo que provocó que nuestra solución alternativa reintrodujera el error! El desarrollo de software es difícil. (Kai Uwe Broulik, enlace) [De nuevo la Ley de las Consecuencias Imprevistas].
La función para compartir integrada en Plasma Browser Integration vuelve a funcionar. (Kai Uwe Broulik, enlace)
Plasma 6.5
La activación/apertura de ventanas entre aplicaciones ahora funciona de forma más fiable en algunos casos, y también funciona para archivos abiertos desde búsquedas con KRunner, excepto para el ejecutor de documentos recientes, en el que también se está trabajando. (Kai Uwe Broulik y Xaver Hugl, enlace 1, enlace 2 y enlace 3)
Se ha corregido un error que impedía que el teclado virtual pudiera introducir texto en el campo de búsqueda del widget del panel de aplicaciones. (Arnav Rawat, enlace)
Se ha corregido un error de diseño que provocaba que el contenido de la página «Configurar una conexión de impresora» se desbordara visualmente al abrirla desde la notificación «Se ha detectado una nueva impresora». (Mike Noe, enlace)
Cuando se accede desde Plasma (no desde la configuración del sistema), los elementos de la cuadrícula del fondo de pantalla ahora siguen el esquema de colores de Plasma, en lugar del esquema de colores de la aplicación. Esto es relevante cuando se utiliza un tema global mixto claro/oscuro como Breeze Twilight. (David Redondo, enlace)
Frameworks 6.17
Los resultados de búsqueda impulsados por KRunner vuelven a tener en cuenta la frecuencia de uso. (Nate Graham, enlace)
Otra información de errores destacables:
- 4 bugs Plasma de muy alta prioridad (los mismos que la semana pasada). Lista actual de errores
- 28 fallos de Plasma de 15 minutos (cuatro menos que la semana pasada). Lista actual de fallos
Mejoras de rendimiento y aspectos técnicos
Plasma 6.4.4
Se ha corregido una fuente de fugas de inotify causadas por la reconfiguración del escritorio Plasma o del widget Vista de carpetas para mostrar una carpeta diferente. (Harald Sitter, enlace)
Plasma 6.5
Se ha implementado la compatibilidad con el protocolo Wayland pointer_warp_v1 («Pointer Warp»), que permite a las aplicaciones solicitar al compositor que mueva el puntero. (Xaver Hugl, enlace)
Las aplicaciones que utilizan el portal XDG ahora pueden solicitar explícitamente una sesión de screencast o de escritorio remoto de una nueva salida virtual. (David Redondo, enlace 1 y enlace 2)
Se han añadido algunas pruebas automáticas más para la funcionalidad básica de carga de widgets de Plasma. (Nicolas Fella, enlace)
El tamaño y la posición de la ventana de configuración del portapapeles ahora se almacenan en el archivo de configuración de estado, no en el archivo de configuración de ajustes. (Nicolas Fella, enlace)
Cómo puedes ayudar
KDE se ha convertido en algo importante en el mundo, y tu tiempo y contribuciones nos han ayudado a conseguirlo. A medida que crecemos, necesitamos su apoyo para mantener KDE sostenible.
Puedes ayudar a KDE convirtiéndote en un miembro activo de la comunidad e involucrándote de alguna manera. Cada colaborador marca una gran diferencia en KDE – ¡no eres un número o un engranaje en una máquina!
Tampoco tienes que ser programador. Existen muchas otras oportunidades:
- Clasificar y confirmar informes de errores, tal vez incluso identificar su causa raíz.
- Contribuir al diseño de fondos de pantalla, iconos e interfaces de aplicaciones.
- Diseñar y mantener sitios web
- Traducir elementos de texto de la interfaz de usuario a su propio idioma.
- Promover KDE en su comunidad local
- …¡Y un montón de cosas más!
¡También puedes ayudarnos haciendo una donación! Cualquier contribución monetaria – por pequeña que sea – nos ayudará a cubrir los costes operativos, salarios, gastos de viaje de los colaboradores, y en general a mantener KDE llevando el Software Libre al mundo.
Para obtener una nueva característica de Plasma o una corrección de errores mencionada aquí, siéntase libre de enviar un commit a la solicitud de fusión correspondiente en invent.kde.org.
La entrada Control del nivel de tinta de la impresora – Esta semana en Plasma se publicó primero en KDE Blog.
Pixel Wheels, carreras pixeladas en vista cenital – Juegos Linux (XXII)
Nueva entrada de la serie de grandes juegos libres. Hoy tenemos entre nosotros al género de las carreras de coches, pero en la variante de la vista cenital. Se trata de Pixel Wheels, que ya apareció hace 7 años en el blog, pero que merece pertenecer a este selecta selección de juegos linux en desarrollo.
Pixel Wheels, carreras pixeladas en vista cenital – Juegos Linux (XXII)
Antes de empezar recordar que ya he tocado muchos de los géneros: estrategia por turnos (The Battle for Wesnoth, Hedgewars), disparos en primera persona (Xonotic, Alien Arena, OpenArena, WarSow), sigilo en 3D (The Dark Mod), velocidad (Speed Dreams, SuperTuxKart), MMORPG (Ryzom), plataformas (SuperTux), sandbox (Minestest), simulador (OpenTTD, Simutrans) o estrategia en tiempo real (OpenRa, 0 A.D., Stone Kingdoms). Así que si no os interesa este, podéis visitar alguno de los enlaces anteriores.
Hoy volvemos al clásico género de las carreras con un juego creado por Aurélien Gâteau, responsable durante 14 años del magnífico visor Gwenview.
Se trata de Pixel Wheels, un juego de coches de vista superior realmente sorprendente ya que, como su propio nombre indica, nos ofrece gráficos pixelados pero limpios, dotándole de un aire nostálgico para aquellos que peinamos canas, que en sus propias palabras:
Pixel Wheels es un juego de carreras con vista aérea para PC (Linux, macOS, Windows) y Android.
Compite por el primer puesto en diversas pistas. ¡Recoge bonificaciones para mejorar tu posición o ralentizar a tus rivales!
El desarrollo de este juego va lento pero seguro, justo este mes de julio ha aparecido la primera release candidate de la versión Pixel Wheels 1.0.0, toda una declaración de intenciones.
Las características de Pixel Wheels
Como ya hemos dicho Pixel Wheels es un juego de carreras retro con las siguientes características principales:
- Estilo gráfico retro: Destaca por sus gráficos llamativos y pixelados, diseñados para recordar a los juegos clásicos de carreras
- Vista cenital: Las carreras se juegan desde una perspectiva superior, lo que facilita la visión de todo el circuito
- Tipos de juego: Incluye modo carrera rápida y modo campeonato
- Selección y desbloqueo de vehículos y circuitos: Al inicio solo algunos vehículos y pistas están disponibles, pero se pueden desbloquear más al sumar puntuación y avanzar en el juego
- Controles sencillos: Utiliza flechas para girar y otros dos botones para retroceder o acelerar, lo que lo hace accesible para todo tipo de jugadores
- Bonificaciones en carrera: Durante la carrera puedes recoger objetos que ayudan a mejorar tu posición en la competencia
- Múltiples tipos de vehículos: Ofrece variedad en los vehículos que puedes utilizar, con diferentes características
Por cierto, Pixel Wheels tiene una página Speedrun y puedes seguir sus novedades en su blog de ídem.
¿Cómo conseguir Pixel Wheels?
Para conseguir Pixel Wheels tenemos las siguientes opciones:
- Para Linux, macOS, Windows podemos ir a las páginas de Flathub o itch.io.
- Para Android tenemos tres opciones: F-Droid, Google Play o, de nuevo, itch.io
Según comenta el mismo Aurélien, se recomienda descargar el juego a través de F-Droid o Google Play para asegurarse de recibir actualizaciones cuando se publiquen nuevas versiones.
¿Puedo participar en su desarrollo?
La verdad es que hay poca información al respecto, o mejor dicho, es bastante sencillo participar en su desarrollo ya que al ser el proyecto personal de alguien ponerse en contacto con él es algo sencillo.
De esa forma tenemos que:
- Si queréis poneros en contacto con él tenéis el correo. También lo podéis encontrar en Mastodon, GitHub y LinkedIn.
- SI queréis reportar un error utilizad Pixel Wheels bug tracker.
- SI queréis el código fuente lo podéis encontrar en GitHub.
La entrada Pixel Wheels, carreras pixeladas en vista cenital – Juegos Linux (XXII) se publicó primero en KDE Blog.
#openSUSE Tumbleweed revisión de la semana 30 de 2025
Tumbleweed es una distribución de GNU/Linux «Rolling Release» o de actualización contínua. Aquí puedes estar al tanto de las últimas novedades.

openSUSE Tumbleweed es la versión «rolling release» o de actualización continua de la distribución de GNU/Linux openSUSE.
Hagamos un repaso a las novedades que han llegado hasta los repositorios estas semanas.
Y recuerda que puedes estar al tanto de las nuevas publicaciones de snapshots en esta web:
El anuncio original lo puedes leer en el blog de Dominique Leuenberger, publicado bajo licencia CC-by-sa, en este este enlace:
Esta revisión cubrirá los eventos que ocurrieron durante esta semana, esencialmente las snapshots 0718, 0722 y 0723. Como ya se puede ver en los números, hubo una brecha un poco más larga entre 0718 y 0722. Esto se debe en parte al fin de semana, pero también a algunos problemas con la actualización planificada de SELinux 3.9, que primero debía depurarse para comprender por qué fallaban ciertas pruebas.
En el medio, se ha vuelto a SELinux 3.8 para desbloquear las pruebas y seguir avanzando, mientras depuran más en un sistema aislado (y SELinux, por supuesto, lo descubrió, solucionó el problema y volvió a enviar SELinux 3.9, que será parte de la snapshot 0724)
Las actualizaciones más destacadas de esta semana:
- KDE Plasma 6.4.3
- Mesa 25.1.6
- Apache 2.4.64
- cURL 8.15.0
- gpgme 2.0.0
- Linux kernel 6.15.7
- LibreOffice 25.2.5.2
- SQLite 3.50.3
La snapshot 0724 se encuentra actualmente en control de calidad y parece muy prometedora. Esta instantánea y el futuro cercano deberían traerle estos cambios:
- SELinux 3.9
- Bash 5.3
- Linux kernel 6.15.8
- Mozilla Firefox 141.0
- GStreamer 1.26.4
- gettext 0.25.1
Si quieres estar a la última con software actualizado y probado utiliza openSUSE Tumbleweed la opción rolling release de la distribución de GNU/Linux openSUSE.
Mantente actualizado y ya sabes: Have a lot of fun!!
Enlaces de interés
- ¿Por qué deberías utilizar openSUSE Tumbleweed?
- zypper dup en Tumbleweed hace todo el trabajo al actualizar
- ¿Cual es el mejor comando para actualizar Tumbleweed?
- ¿Qué es el test openQA?
- http://download.opensuse.org/tumbleweed/iso/
- https://es.opensuse.org/Portal:Tumbleweed
——————————–
Tumbleweed – Review of the weeks 2025/30
Dear Tumbleweed users and hackers,
First off, it has been a bit too quiet from my side on the weekly reviews. The last one published was 2025/25 – the ‘error’ for you missing out on the information is solely on my side: first, there was the openSUSE conference, which was a lot of fun seeing many of you (hopefully many more next year). After that, I dared to take a vacation, which probably nobody realized, as Tumbleweed kept rolling just fine without me. I’ll spare you all the changes that happened in the weeks when no review was conducted. Only so much: a total of 22 snapshots have been released.
This review will cover the events that occurred during this week, essentially snapshots 0718, 0722, and 0723. As can be seen already from the numbers, there was a slightly longer gap between 0718 and 0722. This is partly due to the weekend, but also because of some issues with the planned SELinux 3.9 upgrade, which needed to be debugged first to understand why certain tests were failing. In between, we have reverted to SELinux 3.8 to unblock the tests and keep rolling, while debugging further in an isolated system (and the SELinux, of course, figured it out, addressed the issue, and resubmitted SELinux 3.9, which will be part of Snapshot 0724)
The most relevant changes published in the three mentioned snapshots were:
- KDE Plasma 6.4.3
- Mesa 25.1.6
- Apache 2.4.64
- cURL 8.15.0
- gpgme 2.0.0
- Linux kernel 6.15.7
- LibreOffice 25.2.5.2
- SQLite 3.50.3
Snapshot 0724 is currently in QA and looks very promising. This snapshot and the near future should bring you these changes:
- SELinux 3.9
- Bash 5.3
- Linux kernel 6.15.8
- Mozilla Firefox 141.0
- GStreamer 1.26.4
- gettext 0.25.1
¡Aprende a usar GNU/Linux! Taller práctico – nueva charla organizada por GNU/Linux València
Organizada por la asociación sin ánimo de lucro GNU/Linux València os invito a participar en la charla ¡Aprende a usar GNU/Linux! Taller práctico – nueva charla organizada por GNU/Linux València que se celebrará hoy 25 de julio a las 18:30 horas. Ven y aprende como proteger tu intimidad.
¡Aprende a usar GNU/Linux! Taller práctico – nueva charla organizada por GNU/Linux València
Me complace presentaros un nuevo evento de la Asociación sin Ánimo de Lucro GNU/Linux València que siguen sus actividades este 2025 con una jornada de concienciación y liberación.
En palabras de los organizadores:
Aquest Juliol, dona el salt! 🐧
Cóm s’actualitza, cóm instal·lar programes, configurar el firewall… ¿Quins són els teus dubtes? Apunta’ls i porta-los al taller explicatiu i pràctic que començarà a les 18:30. Allí ensenyarem les funcionalitats més bàsiques de GNU/Linux, i respondrem els vostres dubtes.
¡No li tingues més por a GNU/Linux! Voràs que és molt més fàcil del que pareix, e inclús amb molt més de sentit que els sistemes privatius.
Un aprenentatge col·laboratiu súper interessant, on per fi podràs alliberar-te de estar anclat a la «filosofía» de Windows o Mac.
Però abans… ¡instal·la GNU/Linux! 🔌
Si encara no tens GNU/Linux al teu ordinador, pots vindre una estona abans, ja que a partir de les 17:00, podràs vindre a:
- Instal·lar GNU/Linux al teu ordinador. 🔧 (Important: cal fer còpia de seguretat 💾)
- Aprendre a bloquejar anuncis al teu mòbil. 🛡️
- Descobrir i instal·lar aplicacions lliures, conéixer-ne els avantatges i eliminar les que ja no voldràs. 🔄
- Descobrir xarxes socials i mitjans de comunicació lliures i federats 🌐
- Resoldre dubtes, problemes o necessitats al teu sistema GNU/Linux. 🐧
Encara que ja tingues GNU/Linux instal·lat, agrairem moltíssim si t’apropes a ajudar-nos a ajudar a la gent, i aportar el teu coneiximent. ❤️
Fes clic ací per obtindre més informació sobre el esdeveniment de les 17:00.
¡Recorda-ho! 🧠
📅 Divendres 25 de Juliol de 2025
🎟️ ¡Entrada lliure!
📍 Edifici Las Naves (Carrer Joan Verdeguer, 16, 46024, València)
🕔 17:00 Taller d’instal·lació/ajuda GNU/Linux
🕡 18:30 Taller pràctic: aprén a usar GNU/Linux!
Ens veiem molt prompte! ❤️ No oblides seguir-nos.
¡Este julio, da el salto! 🐧
Cómo se actualiza, cómo instalar programas, configurar el cortafuegos… ¿Cuáles son tus dudas? Apúntalas y tráelas al taller explicativo y práctico que comenzará a las 18:30. Allí enseñaremos las funcionalidades más básicas de GNU/Linux y responderemos a vuestras dudas.
¡No le tengas más miedo a GNU/Linux! Verás que es mucho más fácil de lo que parece, e incluso tiene mucho más sentido que los sistemas privativos.
Un aprendizaje colaborativo superinteresante, donde por fin podrás liberarte de estar anclado a la «filosofía» de Windows o Mac.
Pero antes… ¡instala GNU/Linux! 🔌
Si aún no tienes GNU/Linux en tu ordenador, puedes venir un rato antes, ya que a partir de las 17:00 podrás venir a:
- Instalar GNU/Linux en tu ordenador. 🔧 (Importante: es necesario hacer una copia de seguridad 💾).
- Aprender a bloquear anuncios en tu móvil. 🛡️
- Descubrir e instalar aplicaciones libres, conocer sus ventajas y eliminar las que ya no querrás. 🔄
- Descubrir redes sociales y medios de comunicación libres y federados. 🌐
- Resolver dudas, problemas o necesidades con tu sistema GNU/Linux. 🐧
Aunque ya tengas GNU/Linux instalado, agradeceremos muchísimo si te acercas a ayudarnos a ayudar a la gente y a aportar tu conocimiento. ❤️
Haz clic aquí para obtener más información sobre el evento de las 17:00.
¡Recuérdalo! 🧠
📅 Viernes, 25 de julio de 2025
🎟️ ¡Entrada libre!
📍 Edificio Las Naves (Carrer de Joan Verdeguer, 16, 46024, València)
🕔 17:00 Taller de instalación/ayuda GNU/Linux
🕡 18:30 Taller práctico: ¡aprende a usar GNU/Linux!
¡Nos vemos muy pronto! ❤️ No olvides seguirnos.

Más información: GNU/Linux València
¡Únete a GNU/Linux València!
Aprovecho para recordar que desde hace unos meses, los chicos de GNU/Linux Valencia ya tienen su menú propio en el blog, con lo que seguir sus eventos en esta humilde bitácora será más fácil que nunca, y así podréis comprobar su alto nivel de actividades que realizan que destacan por su variedad.
Y que además, GNU/Linux València creció y se ha convertió en asociación. Así que si buscas una forma de colaborar con el Software Libre, esta asociación puede ser tu sitio. ¡Te esperamos!
La entrada ¡Aprende a usar GNU/Linux! Taller práctico – nueva charla organizada por GNU/Linux València se publicó primero en KDE Blog.