 cabelo
Feliz dia quântico!

O Dia Mundial do Quântico é celebrado anualmente no dia 14 de abril. A escolha desta data não é aleatória: ela faz referência à notação 4,14, que representa os dígitos iniciais, de forma arredondada, da constante de Planck — um dos pilares fundamentais da física quântica.
Essa constante, cujo valor exato é 4,1356677 × 10⁻¹⁵ elétron-volt segundo (eV·s), estabelece a relação entre a energia de uma partícula e a frequência da sua onda associada.
Em termos simples, trata-se de um valor extremamente pequeno, equivalente a 0,000 000 000 000 004 1356677 eV·s, e é essencial para descrever o comportamento das partículas subatômicas. Assim, o dia 14/4 simboliza a grandiosidade do infinitamente pequeno, homenageando a revolução científica trazida pela mecânica quântica.

 Member
Disponible la beta para Amarok 3.3
Ya está disponible para probar la versión beta del reproductor de música de la comunidad KDE Amarok 3.3

Desde hace unos meses Tuomas Nurmi, un miembro de KDE, ha tomado las riendas del desarrollo del reproductor de música Amarok, actualizándolo y adaptando su código a Qt6.
Y desde que ese desarrollo se ha reactivado, le he estad dando publicidad en el blog, porque he vuelto a redescubrir este reproductor, un clásico en KDE.
En este caso las noticias son la disponibilidad para probar Amarok 3.3 en su versión Beta
En esta versión 3.3, de la que ya está disponible en versión beta y pronto en su versión final, los cambios son en su mayoría técnicos: se elimina el soporte de Qt5 y Amarok 3.3 beta solo es compatible con Qt6/KF6. Además, una actualización del esquema de la base de datos (la primera desde 2012) corrige errores relacionados con la codificación y la fecha.
Debido a esto volver a una versión anterior hace que sea necesaria una intervención manual para volver a dejar operativa la base de datos actualizada.
El alinearse con la versión principal actual de KDE Frameworks debería simplificar varias dependencias directas e indirectas del software. Sin embargo, phonon-vlc es el único backend compatible con Qt6 Phonon, que Amarok 3.3 beta todavía está usando para la reproducción de audio, lo que impone algunas limitaciones, por ejemplo, en las funcionalidades del ecualizador y el analizador.
Además, aún no hay versiones oficiales con soporte Qt6 para liblastfm y libmygpo-qt (necesario para el soporte de last.fm y gpodder, respectivamente). Por lo que si se necesitan, se deberían obtener desde las fuentes.
Pronto podremos disfrutar de la versión final, de la que daré debida cuenta por el blog, pero hasta que llegue se puede disfrutar de esta versión Beta y participar en el desarrollo de esta gran aplicación para escuchar música y mucho más.
Más información de cambios, enlaces, descargas y formas de participar en el anuncio oficial:

Vigesimosexto audio de Podcast Linux – «Linux Connexion con Ugeek» (Podcast Linux #26)
Aunque el proyecto Podcast Linux está parado esto no significa que no tenga cabida en el blog y, mientras pueda, seguiré promocionándolo con la esperanza de que reviva, como cierto pájaro mitológico. Y he pensado hacerlo de una forma sencilla para mi y creo que benificiosa para todos, creando poco a poco un índice de todas sus emisiones, de forma que podamos encontrar en este blog una alternativa a su magnífica obra. Así que bienvenidos al vigesimosexto audio de Podcast Linux – «Linux Connexion con Ugeek» donde Juan habla con uno de los divulgadores más importantes de este mundillo.
Vigesimosexto audio de Podcast Linux – «Linux Connexion con Ugeek» (Podcast Linux #26)
Como los lectores del blog sabrán hace un tiempo Podcast Linux cerró sus emisiones por motivos que solo incumben a su creador. Desde el blog no quiero dejar que su recuerdo se desvanezca así que seguiré publicitando sus audios ya que su calidad no debe caer en el olvido.
Hace un tiempo decidí empezar por el principio, mostrando su primer audio, el cual no promocioné en su día y a lo tonto ya llevamos 25 episodios repasados.
De esta forma continuo con su vigesimocuarto audio de esta serie presentado en el blog, que en palabras de Juan:
Muy buenas Linuxero. Bienvenido a otro episodio más de Podcast Linux.
Mi nombre es Juan Febles y hoy toca una entrevista Linux Connexion, los programas especiales de este podcast para acercarte a las personas o proyectos de la sección Comunidad Linux.Hoy tenemos con nosotros a Ugeek, podcaster y bloguero linuxero, amante del software libre y de los servicios en conectividad. Una mente inquieta con muchas ganas de cacharrear y que desconocemos de dónde saca el tiempo.
Feed: http://feeds.feedburner.com/ugeek
Twitter: @uGeekPodcast
Blog: https://ugeek.github.io/
Canal de Telegram: t.me/ugeek
Más información: Podcast Linux
Sigue a Podcast Linux
Aprovecho para animaros a seguir Podcast Linux en algunos de los canales de comunicación que tiene:
- Twitter: https://twitter.com/podcastlinux
- Mastodon: https://mastodon.social/@podcastlinux/
- Correo: podcastlinux@disroot.org
- Web: https://podcastlinux.com/
- Telegram: https://t.me/podcastlinux
- Telegram Juan Febles: https://t.me/juanfebles
- Youtube: https://www.youtube.com/PodcastLinux
- Feed Podcast Linux: https://podcastlinux.com/feed
- Feed Linux Express (Audios Telegram): https://podcastlinux.com/Linux-Express/feed
La entrada Vigesimosexto audio de Podcast Linux – «Linux Connexion con Ugeek» (Podcast Linux #26) se publicó primero en KDE Blog.

Replace Windows, Not Your Device
The Upgrade to Freedom campaign has joined the End of 10 initiative to promote Free and Open Source Software as a sustainable alternative to Windows 10. Learn more at endof10.org.
Messaging around the end of Windows 10 support has been loud, urgent and, unfortunately, irresponsibly narrow.
In a recent article titled ‘Microsoft’s Free Upgrade Offer For 500 Million Windows Users,’, the advice given to users whose PCs don’t meet the requirements for Windows 11 states to recycle or landfill the device.
Let’s pause right there.
Rather than encourage users to reuse perfectly functional hardware with open-source alternatives like openSUSE, the suggestion to discard it not only perpetuates environmental harm, it completely ignores the thriving world of Linux distributions. This Forbes article promotes a false choice between buying new hardware or getting rid of it.
The upgrade eligibility criteria exclude hundreds of millions of PCs. TPM 2.0, Secure Boot and other artificial requirements have nothing to do with a system’s actual performance. What these new features do accomplish is force users to believe they need to buy new hardware rather than seek alternatives.
But these computers still work.
Recycling and landfills should be the last resort; not the default recommendation. The environmental toll of electronic waste is well documented. Replacing a laptop every few years because of arbitrary OS restrictions is not sustainable as highlighted by Joanna Murzyn at the 2024 KDE Akademy conference.
The open-source community has spent decades creating operating systems that run fast, are secure and function stable on modern and older machines alike. Look at openSUSE’s Leap, Slowroll, Tumbleweed, Kalpa, Aeon; these are just a few of the powerful Linux distributions people can install to breathe new life into their hardware. There are no activation keys; there are no hidden costs, and there are no surveillance features like Recall.
Linux has a different approach. It values privacy. Its code is open for a reason: transparency. It’s reviewed by a global community and supported by open-source companies and not tied to corporate lock-in. Security updates arrive quickly without requiring a purchase or subscription. Most importantly; you stay in control of your device.
With openSUSE and other Linux distributions, users can:
- Keep using their hardware long past Microsoft’s expiration dates
- Install professional-grade software at no cost
- Customize and control their computing environment
The Forbes article paints a bleak future for Windows 10 by declaring peoples devices ineligible and obsolete. This is misleading and irresponsible. People should not throw away their working computer and should settle on an OS that upgrades them to freedom rather than filling landfills and recycling centers.
Download an openSUSE flavor today at get.opensuse.org and discover an OS that respects your hardware, your privacy and your freedom.
This is part of a series on Upgrade to Freedom where we offer reasons to transition from Windows to Linux.
OpenVINO 2025.1.0 Lançado
Como mantenedor do OpenVINO na distribuição OpenSUSE for INNOVATORS base de tecnologia MultiCortex, disponibilizo as principais novidades desta versão.

 Maior cobertura em Gen AI e integração com frameworks para minimizar alterações no código:
- Novos modelos suportados: Phi-4 Mini, Jina CLIP v1 e Bce Embedding Base v1.
- O OpenVINO
 Model Server agora suporta modelos VLM, incluindo Qwen2-VL, Phi-3.5-Vision e InternVL2.
 - OpenVINO GenAI agora inclui recursos de image-to-image e inpainting para pipelines baseados em transformers como Flux.1 e Stable Diffusion 3.
- Prévia: O AI Playground agora utiliza o backend do OpenVINO GenAI para inferência altamente otimizada em PCs com IA.
 Model Server agora suporta modelos VLM, incluindo Qwen2-VL, Phi-3.5-Vision e InternVL2.
 Suporte ampliado para LLMs e novas técnicas de compressão:
 Suporte ampliado para LLMs e novas técnicas de compressão:
- Redução no tamanho do binário via otimização do plugin CPU e remoção do kernel GEMM.
- Novos kernels otimizados para GPU melhoram o desempenho de modelos LSTM usados em reconhecimento de fala, modelagem de linguagem e previsão de séries temporais.
- Prévia: Implementação de Token Eviction no GenAI reduz o uso de memória do KV Cache ao descartar tokens irrelevantes, útil para chatbots e geração de código.
- Aceleração por NPU agora habilitada no OpenVINO Runtime e Model Server para modelos VLM em PCs com IA de baixa concorrência.
 Mais portabilidade e desempenho para executar IA na borda, na nuvem ou localmente:
 Mais portabilidade e desempenho para executar IA na borda, na nuvem ou localmente:
- Suporte para os mais recentes processadores Intel® Core (série 2, codinome Bartlett Lake), Core 3 Processor N-series e Processor N-series (Twin Lake) no Windows.
- Otimizações de LLM em processadores Intel® Core Ultra 200H com melhor latência do segundo token.
- Paged Attention e Continuous Batching ativados por padrão no plugin GPU.
- Prévia: Backend OpenVINO para Executorch trará inferência acelerada em CPUs, GPUs e NPUs Intel.
OpenVINO Runtime
Geral
- Compressão de pesos agora pode ser feita com atraso para economizar memória.
- Registro de extensões por frontend (nova API).
- Tensors com mmap permitem leitura direta do disco com menos uso de memória (ex.: ao usar LoRa em GenAI).
Plugin de dispositivo CPU
- Quantização dinâmica de camadas Fully Connected com pesos assimétricos ativada em AVX2.
- Desempenho de LLMs com pesos comprimidos otimizado, especialmente na latência do primeiro token.
- Suporte a fusão de projeção QKV e MLP em BF16 no Windows em plataformas AMX.
- Kernel GEMM removido da biblioteca CPU.
- Suporte a modelos FP8 (f8e4m3 e f8e5m2) aprimorado.
Plugin de dispositivo GPU
- Latência do segundo token melhorada com otimizações no TLB e Group Query Attention.
- Latência do primeiro token reduzida com Paged Attention.
- Cache KV comprimido em Int8 ativado por padrão.
- Desempenho de modelos VLM melhorado com extensões XMX.
Plugin de dispositivo NPU
- Suporte a cache sem pesos e criptografia de blobs de LLMs.
- Novas APIs para carregar modelos do cache com menor uso de memória.
- Suporte a entrada/saída NF4 (4-bit NormalFloat).
- Correções de bugs: modelos com estado e erros com
zeContextDestroy.
API Python
- Agora é possível criar
Tensordiretamente a partir de uma imagem Pillow. - Redução no uso de memória em
export_model,read_model,compile_model.
API Node.js
- Bindings GenAI agora disponíveis no pacote
genai-nodeno npm.
Suporte a Frameworks
PyTorch
- Suporte ao PyTorch 2.6.
- Tradutores comuns para operações em PyTorch, TensorFlow, ONNX e JAX.
- Conversão de modelos FP8 e TTS com STFT/ISTFT ativada.
JAX
- Suporte validado para JAX 0.5.2 e Flax 0.10.4.
Keras 3
- Compatível com Keras 3.9.0.
- Testes mais granulares por operação.
TensorFlow Lite
- Suporte para modelos com tensores quantizados entre camadas em tempo de execução.
OpenVINO Model Server
Novos recursos principais:
- Suporte a modelos VLM com batching contínuo e envio de imagens no contexto do chat.
- Suporte a aceleração por NPU para geração de texto com endpoints de completions.
Melhorias gerais:
- Modelos e grafos
mediapipeagora iniciáveis via linha de comando. - Demonstração de escalabilidade com múltiplas instâncias.
- Aumento do número de stop words permitido por requisição (4 → 16).
- Integração com a extensão VS Code Continue.
- Melhorias de desempenho para cargas de alta concorrência.
Mudanças críticas:
- Servidor gRPC agora é opcional. É obrigatório passar
--portou--rest_port. - Correções em contexto de LLM (excede comprimento, erro se prompt muito longo, etc.).
- Melhorias de segurança, estabilidade e suporte ao cancelamento sem streaming.
Limitações conhecidas:
- Chat/completions só aceita imagens em base64, não em URL.
Neural Network Compression Framework (NNCF)
- Suporte preview para Treinamento Ciente de Quantização (QAT) com LoRA em PyTorch (método FQ_LORA).
- Novos métodos de compressão 4-bit para pesos em PyTorch.
- Redução no tempo e uso de memória em compressão GPTQ e mista.
- Novo tracing baseado em
TorchFunctionMode. - Várias melhorias no backend TorchFX e adoção de quantizadores personalizados.
- Suporte preview para backend OpenVINO no ExecuTorch.
- Suporte a PyTorch 2.6.
OpenVINO Tokenizers
- Suporte ao modelo de tokenização Unigram.
- Compilação com ICU opcional para reduzir binário.
- Ajuste dinâmico de
max_lengthepaddingcom classe Tokenizer. - Dependência de
fast_tokenizerremovida.
OpenVINO GenAI
- Métodos demorados liberam o GIL.
- Suporte preview a Token Eviction.
- Bindings C e JavaScript para
LLMPipeline. - suporte aos modelos
Phi-3-vision-128k-instructePhi-3.5-vision-instruct. - Novos pipelines de Image2image e Inpainting com FLUX e Stable Diffusion 3.
-
LLMPipelineagora usa Paged Attention por padrão. - Streaming ocorre em thread separada.
- Template de chat aplicado mesmo com modo desativado (configurável).
Los cimientos de la restauración de la sesión de Wayland – Esta semana en Plasma
Es increíble el trabajo de promoción que está realizando Nate en su blog, dese hace más del tiempo que puedo recordar. Cada semana hace un resumen de las novedades más destacadas, pero no en forma de telegrama, sino de artículo completo. Su cita semanal no falla y voy a intentar hacer algo que es simple pero requiere constancia. Traducir sus artículos al castellano utilizando los magníficos traductores lo cual hará que: la gente que no domine el inglés esté al día y que yo me entere bien de todo. Bienvenidos pues al primero de la serie «Esta semana en Plasma» que lleva por título «Los cimientos de la restauración de la sesión de Wayland». Espero que os guste y, sobre todo, que pueda mantener el ritmo de publicación de Nate Graham.
Los cimientos de la restauración de la sesión de Wayland – Esta semana en Plasma
Nota: artículo original en Blogs KDE. Traducción realizada utilizando deepl.com. Mis comentarios están entre corchetes.
¡Bienvenido a un nuevo número de «Esta semana en Plasma»! Cada semana cubrimos lo más destacado de lo que está ocurriendo en el mundo de KDE Plasma y sus aplicaciones asociadas como Discover, System Monitor y más.
Esta semana hay grandes noticias: ¡por fin, KWin es compatible con la versión inicial del protocolo de restauración de sesión Wayland! Este trabajo fue realizado por David Edmundson y Vlad Zahorodnii, y aterriza en Plasma 6.4.
Ahora, antes de que vayas a celebrar en las calles, hay algunas grandes advertencias:
Esta versión del protocolo sólo soporta el tamaño de las ventanas, el posicionamiento y la colocación de escritorios virtuales.
Todavía no permite que las ventanas guarden su contenido interno. Eso vendrá más adelante.
Los kits de herramientas y las aplicaciones aún tienen que ser aceptados; nada empieza a funcionar automáticamente de forma gratuita.
Pero lo importante es… ¡estas cosas están en desarrollo y llegarán pronto! Tiempos emocionantes.
Mejoras notables en la interfaz de usuario
Plasma 6.4.0
Se ha revisado la ventana del selector de accesos directos basada en el portal para que tenga un aspecto más agradable y sea más fácil de usar. (David Redondo, enlace) [Seguimos puliendo la interfaz].
El selector de velocidad de doble clic ahora incluye un área de prueba que puedes utilizar para probarlo. (Kai Uwe Broulik, enlace) [Seguimos puliendo la usabilidad].

Ahora puedes iniciar una actualización en Discover directamente desde la notificación, sin necesidad de abrir la aplicación y hacerlo allí. (Aleix Pol Gonzalez, enlace) [Seguimos minimizando clics].
Al editar una entrada del portapapeles, el botón «Guardar» ahora sólo se activa si se ha producido un cambio en el texto. (Fushan Wen, enlace) [Seguimos simplificando la información que mostramos].
Frameworks 6.14
Se ha corregido un caso en el que varios mensajes de Ajustes del sistema y aplicaciones tenían enlaces que no hacían nada al pulsarlos (Arjen Hiemstra, enlace).
Corrección de errores importantes
Plasma 6.3.5
Corregidos varios fallos de KWin. (Vlad Zahorodnii y Xaver Hugl, enlace 1, enlace 2, enlace 3, enlace 4)
Se ha corregido un error que afectaba a las personas con GPU NVIDIA y que podía hacer que la pantalla de bloqueo se volviera negra o parpadeara en determinadas circunstancias. (Xaver Hugl, enlace) [Se sigue mejorando la compatibilidad con NVidia].
Se ha corregido un fallo visual con las sombras de las ventanas al utilizar Luz nocturna en determinado hardware. (Xaver Hugl, enlace)
Los iconos de «audio en reproducción» del Administrador de tareas ya no se ven tan borrosos cuando se utiliza un factor de escala fraccional. (Marco Martin, enlace)
Plasma 6.4.0
Al hacer clic en los iconos de la bandeja del sistema de varias aplicaciones que quieren mostrar un menú al hacer clic con el botón izquierdo, ahora se muestra el menú, en lugar de una extraña ventana diminuta en medio de la pantalla con un elemento de menú en ella. (David Redondo, enlace)
Se ha vuelto a añadir el acceso directo global al portapapeles «Editar contenido» que se eliminó accidentalmente en Plasma 6.0. (Fushan Wen, enlace) [Daños colaterales cuando se programa].
Arreglados los botones Seleccionar todo/Ninguno en la página Filtro de la ventana de configuración del escritorio de Plasma, que también se estropearon en Plasma 6.0. (Christoph Wolk, enlace) [Arreglando más daños colaterales].
Se han corregido algunos casos en los que la configuración o el restablecimiento de los iconos personalizados en el widget Kicker Application Menu no funcionaban correctamente. (Christoph Wolk, enlace)
Se ha corregido un error por el que la selección de texto en aplicaciones que utilizan XWayland no rellenaba correctamente el portapapeles cuando se utilizaban determinados ajustes del portapapeles. (Fabian Vogt, enlace)
Mejoradas las actualizaciones automáticas en Discover. (Yosuke Matsumura, enlace)
Otra información de errores destacables:
- 1 bug Plasma de muy alta prioridad (igual que teníamos la semana pasada). Lista actual de errores
- 20 fallos de Plasma de 15 minutos (frente a los 18 de la semana pasada). Lista actual de fallos
Novedades técnicas y de rendimiento
Plasma 6.4.0
Plasma Browser Integration ahora soporta Chrome y Firefox variantes como LibreWolf y Ungoogled Chromium cuando se ejecuta en un Flatpak. (Kristen McWilliam, enlace 1, enlace 2)
Mejora del rendimiento al utilizar Luz nocturna y cambiar el brillo. (Vlad Zahorodnii, enlace)
La pantalla de bloqueo ahora respeta el valor de tiempo de espera de inicio de sesión procedente de PAM, lo que permite configurarlo. (Akash Suresh, enlace)
Cómo puedes ayudar
KDE se ha convertido en algo importante en el mundo, y tu tiempo y contribuciones nos han ayudado a conseguirlo. A medida que crecemos, necesitamos su apoyo para mantener KDE sostenible.
Puedes ayudar a KDE convirtiéndote en un miembro activo de la comunidad e involucrándote de alguna manera. Cada colaborador marca una gran diferencia en KDE – ¡no eres un número o un engranaje en una máquina!
Tampoco tienes que ser programador. Existen muchas otras oportunidades:
- Clasificar y confirmar informes de errores, tal vez incluso identificar su causa raíz.
- Contribuir al diseño de fondos de pantalla, iconos e interfaces de aplicaciones.
- Diseñar y mantener sitios web
- Traducir elementos de texto de la interfaz de usuario a su propio idioma.
- Promover KDE en su comunidad local
- …¡Y un montón de cosas más!
¡También puedes ayudarnos haciendo una donación! Cualquier contribución monetaria – por pequeña que sea – nos ayudará a cubrir los costes operativos, salarios, gastos de viaje de los colaboradores, y en general a mantener KDE llevando el Software Libre al mundo.
Para obtener una nueva característica de Plasma o una corrección de errores mencionada aquí, siéntase libre de enviar un commit a la solicitud de fusión correspondiente en invent.kde.org.
La entrada Los cimientos de la restauración de la sesión de Wayland – Esta semana en Plasma se publicó primero en KDE Blog.
Decimotercera actualización de KDE Frameworks 6
Como los lectores habituales del blog sabrán, el 28 de febrero de 2024 la Comunidad KDE realizó un importante salto tecnológico, uno que va a marcar su evolución para los próximos años. Este gran cambio a las librerías Qt 6 nos proporcionó el nuevo escritorio Plasma 6, del que ya he hablado a lo largo de muchas entradas. Pero no solo fue eso, sino que además nos trajo el salto también a KDE Frameworks 6, las librerías propias del proyecto KDE. Hoy se ha anunciado la decimotercera actualización de KDE Frameworks 6, el motor del proyecto que soporta todo el resto de la infraestructura.
Decimotercera actualización de KDE Frameworks 6
A pesar de que para los usuarios corrientes esta noticia sea algo confusa ya que no se trata de realzar una nueva aplicación ni de una nueva gran funcionalidad del escritorio, el desarrollo de KDE Frameworks tiene repercusiones directas en él a medio y largo plazo.

Para los que no lo sepan, KDE Frameworks añade más de 72 librerías a la propias de Qt que proporcionan una gran variedad de funcionalidades necesarias y comunes, precisadas por los desarrolladores, testeadas por aplicaciones específicas y publicadas bajo licencias flexibles.
De esta forma, KDE Frameworks se convierte en la base de trabajo de los desarrolladores para realizar sus aplicaciones o sus desarrollos para los entornos de trabajo (escritorio para ordenadores, plasma mobile, etc).
Un buen símil es que KDE Framworks es como el papel y las herramientas de dibujo para un artista: cuanto mejor sea el papel y mejores pinceles tenga, la creación de una artista será mejor.
Como he dicho, el pasado 28 de febrero de 2024 KDE Frameworks saltó de la versión 5 a la 6, y ayer mismo, 11 de abril de 2025 se ha anunciado que ya tenemos la decimotercera actualización de la rama, es decir, que ha sido lanzado KDE Frameworks 6.13.
Hay que destacar que esta versión forma parte de una serie de versiones mensuales planificadas para poner las mejoras a disposición de los desarrolladores de forma rápida y previsible y que es absolutamente recomendable su actualización.
Aquí podéis encontrar un listado con todos estos frameworks y la serie de artículos que dedico a KDE Frameworks en el blog,
Más información: KDE
La entrada Decimotercera actualización de KDE Frameworks 6 se publicó primero en KDE Blog.
#openSUSE Tumbleweed revisión de la semana 15 de 2025
Tumbleweed es una distribución de GNU/Linux «Rolling Release» o de actualización contínua. Aquí puedes estar al tanto de las últimas novedades.

openSUSE Tumbleweed es la versión «rolling release» o de actualización continua de la distribución de GNU/Linux openSUSE.
Hagamos un repaso a las novedades que han llegado hasta los repositorios esta semana.
Y recuerda que puedes estar al tanto de las nuevas publicaciones de snapshots en esta web:
El anuncio original lo puedes leer en el blog de Dominique Leuenberger, publicado bajo licencia CC-by-sa, en este este enlace:
Durante esta semana se han publicado 3 nuevas snapshots (20250403, 20250405, y 20250409)
Las actualizaciones más destacadas de estas semanas:
- KDE Plasma 6.3.4
- Linux Kernel 6.14.1
- libvirt 11.2.0
- QEMU 9.2.3
- mozilla-nss 3.109
- btrfsprogs
- libsolv y libzypp
- dracut
- sdbootutil
- Mozilla Firefox 137.0
- GTK4 4.18.4 y libportal, libsoup, glib2
- Qt 6.9.0
- Mesa 25.0.3
- poppler 25.04.0
- ImageMagick
- GIMP
- FFmpeg 7.1.1
Si quieres estar a la última con software actualizado y probado utiliza openSUSE Tumbleweed la opción rolling release de la distribución de GNU/Linux openSUSE.
Mantente actualizado y ya sabes: Have a lot of fun!!
Enlaces de interés
- ¿Por qué deberías utilizar openSUSE Tumbleweed?
- zypper dup en Tumbleweed hace todo el trabajo al actualizar
- ¿Cual es el mejor comando para actualizar Tumbleweed?
- ¿Qué es el test openQA?
- http://download.opensuse.org/tumbleweed/iso/
- https://es.opensuse.org/Portal:Tumbleweed
——————————–
Tumbleweed – Review of the week 2025/15
Dear Tumbleweed users and rolling release aficionados,
Another week, another fresh batch of snapshots for openSUSE Tumbleweed! Week 15 of 2025 brought in three solid snapshots — 20250403, 20250405, and 20250409 — with a healthy mix of desktop polish, toolchain improvements, and a sprinkle of bug fixes across the board. Let’s take a quick dive into the highlights!
 Snapshot 20250403: KDE Plasma 6.3.4 – The Polish Continues
 Snapshot 20250403: KDE Plasma 6.3.4 – The Polish Continues
The entire KDE Plasma 6 stack received a minor bump to version 6.3.4, bringing incremental improvements and bugfixes across the board:
- Plasma Desktop, KWin, System Settings, Discover, and all your favorite Plasma companions now reflect this version.
- This update targets stability, performance, and visual consistency. No flashy new features, but plenty of refinement!
Other notables:
- libvirt 11.2.0 and QEMU 9.2.3 help keep your virtualization experience top-notch.
- mozilla-nss 3.109 landed, updating core TLS/SSL libraries.
-
Python world saw updates like
python-libvirt-python, ensuring compatibility with the new libvirt version.
 Snapshot 20250405: Core Stack Evolves
 Snapshot 20250405: Core Stack Evolves
This snapshot was all about the plumbing:
- btrfsprogs was bumped again to 6.14, continuing the evolution of the default Tumbleweed filesystem.
- libsolv and libzypp received updates, which help fine-tune package resolution and improve zypper performance and behavior.
- dracut received another SUSE-specific update, ensuring smoother initramfs generation.
- For devs and scripters, m4, ed, and python-gobject got modest version updates.
- sdbootutil was updated twice this week (again in 20250409), reflecting ongoing work around bootloader and Secure Boot handling.
 Snapshot 20250409: Gnome Touch-ups and Qt6.9 Lands
 Snapshot 20250409: Gnome Touch-ups and Qt6.9 Lands
This snapshot was a heavy hitter, especially for desktop users:
- Mozilla Firefox 137.0 brings the latest browser enhancements, performance tweaks, and security patches.
- The GNOME stack saw refinements:
- Updates to Gnome Control Center, Gnome Keyring, Remote Desktop, and more.
- These likely align with GNOME 48 maintenance polishing.
- GTK4 4.18.4 and libportal, libsoup, glib2 updates continue improving GNOME app responsiveness and interoperability.
Big win for Qt fans:
-
Qt 6.9.0 landed across the board — including all its modules from
qt6-basetoqt6-webengine. Expect compatibility improvements and performance boosts in Qt-based apps.
Other highlights:
- Mesa 25.0.3 and drivers updated again — always a treat for gamers and Wayland users.
- PHP 8.4.5 landed, bumping up both the interpreter and the Apache module.
- Kernel 6.14.1 and firmware updates bring the latest hardware enablement.
- poppler 25.04.0, ImageMagick, GIMP, and FFmpeg 7.1.1 updates round out a rich multimedia set.
 Tumbleweed’s Rolling Momentum
 Tumbleweed’s Rolling Momentum
This week showed the strength of Tumbleweed’s integration work: frequent Plasma and GNOME refinements, Qt and toolchain updates, and a healthy dose of backend upgrades.
As always: zypper dup is your friend. Roll forward, not backward!
Stay tuned, and until next time: keep rollin’!
10 cosas que no sabías que podías hacer (o sí) en Plasma 6 en Akademy-es 2024 de València esLibre Edition #akademyes
Me enorgullece seguir presentando los vídeos de la pasada Akademy-es. Hoy sigo con la ponencia «10 cosas que no sabías que podías hacer (o sí) en Plasma 6 en Akademy-es 2024 de València esLibre Edition donde un servidor, Baltasar Ortega, Secretario de KDE España y editor de este blog, donde realiza su charla anual explicando más trucos que convierten Plasma 6 en el escritorio más eficiente. Un excelente punto de partida para poder conocer de forma virtual el gran evento de la comunidad española de KDE.
10 cosas que no sabías que podías hacer (o sí) en Plasma 6 en Akademy-es 2024 de València esLibre Edition #akademyes
Hoy me sigue complaciendo presentar un gran trabajo de equipo que se inició con los técnicos de GNU/Linux València, que utilizando los dispositivos de Slimbook, consiguieron grabar con éxito todas las ponencias de Akademy-es.
Posteriormente, David Marzal y Jon Intxaurbe se encargaron de ir montando la ponencias para poder publicarlas, de momento, en Kockatoo Tube. Están todas, con subtítulos y todo, así que poco a poco las voy a ir promocionando en el blog.
Sigo la serie con la charla «10 cosas que no sabías que podías hacer (o sí) en Plasma 6» de Baltasar Ortega en Akademy-es 2024 de València esLibre Edition.
La Comunidad KDE siempre se ha caracterizado por estar a la vanguardia en la creación de entornos de trabajo libres, potentes, personalizables y respetuosos con la privacidad y la libertad de sus usuarios. Con su lema «Simple por defecto, potente cuando se necesita» han dado el salto tecnológico de Qt5/KF5 a Qt6/KF6 ofreciendo un nuevo escritorio que que mejora su anterior propuesta y pone la piedra angular a nuevas y mejores funcionalidades.
Ven a descubrir las 10 cosas que no sabías que podías hacer (o sí) en Plasma 6, el nuevo escritorio de la Comunidad KDE.
Gracias a Jon por su inestimable ayuda en la edición de estos vídeos. En comunidad somos más fuertes.
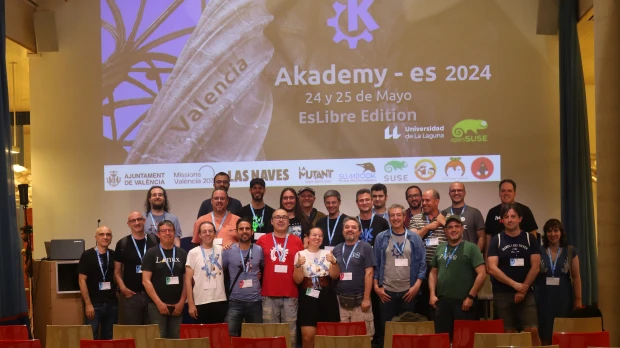
¿Qué es el Akademy-es?
Akademy-es es el encuentro anual de desarrolladores, colaboradores y usuarios de KDE en España, que se celebra desde el año 2006 en distintas ciudades del territorio español y con esta se llegará a la decimasexta edición, lo cual significa una cifra más que aceptable.
Más información: KDE España
La entrada 10 cosas que no sabías que podías hacer (o sí) en Plasma 6 en Akademy-es 2024 de València esLibre Edition #akademyes se publicó primero en KDE Blog.