
 Member
 baltolkien
Reloj y mucho más con Soniq Widget- Plasmoides para Plasma 6 (9)
Tras un parón debido al salto de Qt5/KF5 a Qt6/KF6 que realizó la Comunidad KDE el pasado 28 de febrero he decidido retomar esta sección aunque renombrándola ya que en ella solo hablaré de Plasmoides para Plasma 6. En la entrada de hoy me complace compartir con vosotros Soniq Widgets, el noveno plasmoide de la serie, que nos ofrece un reloj y mucho más con la que dotar de información útil nuestro fondo de escritorio.
Reloj y mucho más con Soniq Widget- Plasmoides para Plasma 6 (9)
Como he comentado en otras ocasiones, de plasmoides tenemos de todo tipo funcionales, de configuración, de comportamiento, de decoración o, como no podía ser de otra forma, de información sobre nuestro sistema como puede ser el uso de disco duro, o de memoria RAM, la temperatura o la carga de uso de nuestras CPUs.
Así que espero que le deis la bienvenida a un plasmoide llamado Soniq Widget, una creación del incombustible zayronXIO que nos ofrece reloj con información complemantaria como el día de la semana, el mes, la temperatura y la humedad, entre otras.

Y como siempre digo, si os gusta el plasmoide podéis «pagarlo» de muchas formas en la página de KDE Store, que estoy seguro que el desarrollador lo agradecerá: puntúale positivamente, hazle un comentario en la página o realiza una donación. Ayudar al desarrollo del Software Libre también se hace simplemente dando las gracias, ayuda mucho más de lo que os podéis imaginar, recordad la campaña I love Free Software Day de la Free Software Foundation donde se nos recordaba esta forma tan sencilla de colaborar con el gran proyecto del Software Libre y que en el blog dedicamos un artículo.
Más información: KDE Store
¿Qué son los plasmoides?
Para los no iniciados en el blog, quizás la palabra plasmoide le suene un poco rara pero no es mas que el nombre que reciben los widgets para el escritorio Plasma de KDE.
En otras palabras, los plasmoides no son más que pequeñas aplicaciones que puestas sobre el escritorio o sobre una de las barras de tareas del mismo aumentan las funcionalidades del mismo o simplemente lo decoran.
La entrada Reloj y mucho más con Soniq Widget- Plasmoides para Plasma 6 (9) se publicó primero en KDE Blog.
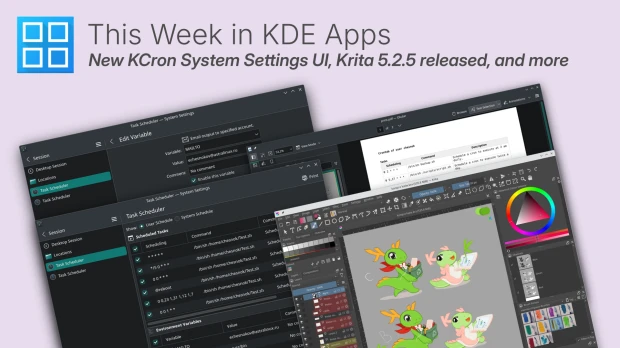
Octava actualización de KDE Frameworks 6
Como los lectores habituales del blog sabrán, el pasado 28 de febrero la Comunidad KDE realizó un importante salto tecnológico, uno que va a marcar su evolución para los próximos años. Este gran cambio a las librerías Qt 6 nos proporcionó el nuevo escritorio Plasma 6, del que ya he hablado a lo largo de muchas entradas de marzo, y el ecosistema de aplicaciones KDE Gear 24.02, del cual desgrané a lo largo del pasado mes de abril. Pero no solo fue eso, sino que además nos trajo el salto también a KDE Frameworks 6, las librerías propias del proyecto KDE. Hoy se ha anunciado la octava actualización de KDE Frameworks 6, el motor del proyecto que soporta todo el resto de la infraestructura.
Octava actualización de KDE Frameworks 6
A pesar de que para los usuarios corrientes esta noticia sea algo confusa ya que no se trata de realzar una nueva aplicación ni de una nueva gran funcionalidad del escritorio, el desarrollo de KDE Frameworks tiene repercusiones directas en él a medio y largo plazo.

Para los que no lo sepan, KDE Frameworks añade más de 70 librerías a la propias de Qt que proporcionan una gran variedad de funcionalidades necesarias y comunes, precisadas por los desarrolladores, testeadas por aplicaciones específicas y publicadas bajo licencias flexibles.
De esta forma, KDE Frameworks se convierte en la base de trabajo de los desarrolladores para realizar sus aplicaciones o sus desarrollos para los entornos de trabajo (escritorio para ordenadores, plasma mobile, etc).
Un buen símil es que KDE Framworks es como el papel y las herramientas de dibujo para un artista: cuanto mejor sea el papel y mejores pinceles tenga, la creación de una artista será mejor.
Como he dicho, el pasado 28 de febrero KDE Frameworks saltó de la versión 5 a la 6, y ha sido ayer viernes 8 de noviembre cuando se ha anunciado que ya tenemos la octava actualización de la rama, es decir, que ha sido lanzado KDE Frameworks 6.8.
Hay que destacar que esta versión forma parte de una serie de versiones mensuales planificadas para poner las mejoras a disposición de los desarrolladores de forma rápida y previsible y que es absolutamente recomendable su actualización.
Aquí podéis encontrar un listado con todos estos frameworks y la serie de artículos que dedico a KDE Frameworks en el blog,
Más información: KDE
La entrada Octava actualización de KDE Frameworks 6 se publicó primero en KDE Blog.
#openSUSE Tumbleweed revisión de la semana 45 de 2024
Tumbleweed es una distribución de GNU/Linux «Rolling Release» o de actualización contínua. Aquí puedes estar al tanto de las últimas novedades.

openSUSE Tumbleweed es la versión «rolling release» o de actualización continua de la distribución de GNU/Linux openSUSE.
Hagamos un repaso a las novedades que han llegado hasta los repositorios esta semana.
Y recuerda que puedes estar al tanto de las nuevas publicaciones de snapshots en esta web:
El anuncio original lo puedes leer en el blog de Dominique Leuenberger, publicado bajo licencia CC-by-sa, en este este enlace:
Un total de seis snapshots (1102, 1103, 1104, 1105, 1106, y 1107)han sido las publicadas esta semana que han traído un montón de actualizaciones.
Lo mejor de esta semana:
- OpenJDK CPU actualizaciones para openjdk 1.8.0, 11, 17, 21, y 23
- GTK 4.16.5
- Linux kernel 6.11.6
- TigerVNC 1.14.1
- KDE Plasma 6.2.3
- libheif 1.19.1
- openSSL 3.2.3
- Ruby 3.3.6
- GStreamer 1.24.9
- Enchant 2.8.2
Pero hay mucho más que se está preparando
- Mesa 24.2.6
- LLVM 19.1.3
- Swig 4.3.0
- KDE Gear 24.08.3
- KDE Frameworks 6.8.0
- Mozilla Firefox 132.0.1
- Habilitar módulos de Python 3.13; Python 3.11 continuará siendo el interpretador predeterminado
Si quieres estar a la última con software actualizado y probado utiliza openSUSE Tumbleweed la opción rolling release de la distribución de GNU/Linux openSUSE.
Mantente actualizado y ya sabes: Have a lot of fun!!
Enlaces de interés
- ¿Por qué deberías utilizar openSUSE Tumbleweed?
- zypper dup en Tumbleweed hace todo el trabajo al actualizar
- ¿Cual es el mejor comando para actualizar Tumbleweed?
- ¿Qué es el test openQA?
- http://download.opensuse.org/tumbleweed/iso/
- https://es.opensuse.org/Portal:Tumbleweed

——————————–
Tumbleweed – Review of the week 2024/45
Dear Tumbleweed users and hackers,
Over Europe, the days are getting shorter here, and it’s colder and greyer outside. This is all the more reason to spend time at your desk updating your Tumbleweed installation. This week, we gave you six snapshots to enjoy (1102, 1103, 1104, 1105, 1106, and 1107).
The most relevant updates delivered this week are:
- OpenJDK CPU updates for openjdk 1.8.0, 11, 17, 21, and 23
- GTK 4.16.5
- Linux kernel 6.11.6
- TigerVNC 1.14.1
- KDE Plasma 6.2.3
- libheif 1.19.1
- openSSL 3.2.3
- Ruby 3.3.6
- GStreamer 1.24.9
- Enchant 2.8.2
The next week will be really interesting, as we got fixes for Mesa 24.2.x submitted – and they passed staging already. For the next few days/weeks, we can expect these changes to happen:
- Mesa 24.2.6
- LLVM 19.1.3
- Swig 4.3.0
- KDE Gear 24.08.3
- KDE Frameworks 6.8.0
- Mozilla Firefox 132.0.1: removing the openSUSE specific KDE integration patches, relying on the xdg-desktop-portals for desktop integration
- Enabling python 3.13 modules; Python 3.11 will remain the default for now.
El desarrollador de Vim, Bram Moolenaar, recibe póstumamente el Premio Europeo SFS
Este premio celebra las innumerables y grandes contribuciones de Moolenaar, el creador de Vim, a la comunidad del software libre

La Free Software Foundation Europe (FSFE) y el Grupo de Usuarios de Linux Bolzano-Bozen (LUGBZ) honran póstumamente a Bram Moolenaar, creador del ampliamente utilizado editor de texto Vim, con el Premio Europeo SFS en SFSCON 2024.
Tal como anuncia de FSFE en su web este año el creador de Vim Bram Moolenar recibirá dicho premio, que cada año, el grupo de usuarios de Linux Bozen-Bolzano-Bulsan concede. El premio se otorga a una persona que contribuyó a la introducción de la cultura del Software Libre en la Provincia de Bolzano.
“El Premio Europeo SFS de este año es para Bram Moolenaar, cuyo mantra era ‘Detectar ineficiencias, encontrar una manera más rápida, convertirlo en un hábito’, alguien para quien la eficiencia de los usuarios de computadoras era crucial.
Su trabajo transformó la forma en que muchos interactúan con las computadoras, maximizando la productividad de los programadores al minimizar las pulsaciones de teclas innecesarias.
Su herramienta es una herramienta muy valiosa para las personas que colabora, desarrollan o crean software libre”. dijo Matthias Kirschner, presidente de la FSFE al presentar el Premio Europeo SFS 2024 durante SFSCON 24.
Bram Moolenaar es mejor conocido por desarrollar VIM, un potente editor. Lanzado en 1991, Vim fue originalmente una adaptación del editor Stevie para Amiga y desde entonces se ha convertido en una herramienta indispensable para desarrolladores de todo el mundo, disponible en múltiples plataformas.
Vim sigue siendo uno de los entornos de desarrollo más populares y versátiles, brinda soporte a innumerables programadores y fomenta una comunidad de usuarios comprometida.
Moolenaar lanzó Vim como «software benéfico», alentando a los usuarios a apoyar a los niños del sur de Uganda a través de donaciones.
“Educar a otros para empoderarlos también fue importante para Bram fuera del ámbito tecnológico”, explicó Raphael Barbieri, miembro de LUGBZ, durante la ceremonia.
“Ayudó a niños de Uganda, muchos de los cuales habían perdido a sus padres a causa del VIH, a acceder a la educación en el Centro Comunitario de Kibaale. Fundó una ONG para recolectar donaciones para este trabajo, incluso en su escritorio había una hucha para que los visitantes pudieran donar fácilmente”.
Más allá de Vim, Moolenaar fue un prolífico colaborador dentro del movimiento del software libre, ya que trabajó en numerosos proyectos técnicos, creó un lenguaje de programación y desarrolló una herramienta para optimizar la instalación y administración de software.
También ocupó cargos oficiales dentro de organizaciones de software, amplificando su impacto en el panorama del software libre.
Este premio conmemora la inquebrantable dedicación de Moolenaar para ayudar a otros a comprender mejor las computadoras y el software.
Disfrutaba participando en conferencias, explicando la cultura del Software Libre en su lugar de trabajo y ayudar a otras personas a desarrollar y utilizar su software. Quería que otras personas también experimentaran esta alegría. «¡Si tú eres feliz, yo soy feliz!» fue uno de sus dichos.
Moolenaar falleció el 3 de agosto de 2023 debido a una enfermedad que empeoraba rápidamente. Se espera que su legado en la comunidad de desarrolladores y en el trabajo social continúe.
En un mensaje de la familia de Moolenaar, expresaron su orgullo y gratitud: «Estamos muy orgullosos de que Bram haya recibido este premio. Como partidario dedicado del Software Libre, creemos que habría sido un honor para él aceptarlo. Agradecemos a la Free Software Foundation Europa y LUGBZ por reconocer el trabajo de toda una vida de Bram y alentar a cualquiera que desee honrarlo a apoyar a los niños en Uganda a través de ICCF Holland».
Enlaces de interés
- https://fsfe.org/news/2024/news-20241108-01.html
- https://www.sfscon.it/awards/sfs-award-2024/
- https://www.vim.org/
- https://www.iccf-holland.org/donate.html
- https://victorhckinthefreeworld.com/tag/vim/

Tercera actualización de KDE Gear 24.08
La Comunidad KDE es una comunidad responsable y no solo se preocupa en lanzar novedades sino que también en mejorarlas. Me complace presentar la tercera actualización de KDE Gear 24.08 que apareció hace casi tres meses. Más estabilidad, mejores traducciones y pequeñas mejoras para las aplicaciones de nuestro entornos de trabajo.
Tercera actualización de KDE Gear 24.08
A pesar de lo que puedan pensar muchas personas, las aplicaciones no son perfectas. Entre las líneas de código se pueden colar errores de tipografía o que el usuario realice alguna opción que en un principio no estaba prevista por los desarrollador, por poner solo un par de ejemplos de imperfecciones.
Este no es un problema del Software Libre ya que el Software actual funciona de esta manera ya que no se piensa en él como un producto final que se encierra en una caja y se olvida. En la actualidad se sabe que el Software está vivo y sería estúpido ir guardando las mejoras sin dejarlas a disposición del gran público.
Con esto se gana en rapidez y evolución pero puede aumentar el número de errores (por norma general) leves, los cuales son subsanables con pequeñas actualizaciones.
La Comunidad KDE lo tiene claro: grandes lanzamientos cada cuatro meses y actualizaciones mensuales para subsanar errores.
Por ello me congratula compartir con vosotros la segunda actualización de KDE Gear 24.08 que nos ofrece más de 180 errores resueltos entre aplicaciones, librerías y widgets, algo que mejora el rendimiento del sistema.
Aquí podéis encontrar la lista completa de cambios de KDE Gear 24.08.3, pero por poner unos cuantos ejemplos de los errores que sea han resuelto tenemos:
- Neochat: Ajustes para que funcione con la nueva libquotient 0.9
- kdevelo; MesonManager: eliminar conjuntos de pruebas cuando un proyecto se está cerrando.
- kdevelop: solucionado un error con qml
Más información: KDE Gear 24.08.03
La entrada Tercera actualización de KDE Gear 24.08 se publicó primero en KDE Blog.

Project Launches Recognition Platform
The openSUSE Project has announced the launch of a new initiative aimed at highlighting contributions of its diverse community members.
Dubbed “Contributor in the Spotlight,” the project aims to feature a different contributor each month and showcase their work in areas such as coding, art, documentation and more.
“It’s a great opportunity to get involved in the community and help ensure that our contributors receive the recognition they deserve,” wrote Tobias Görgens and Gertjan Lettink in an email on the project mailing list.
The program aims to increase visibility, provide recognition, express gratitude and to inspire others to contribute to open-source.
Many contributors’ efforts often go unnoticed and this initiative seeks to change this by sharing their stories and acknowledging their efforts to enhance open source development.
Contributors can apply to be featured by self-nomination though submitting an application by the 15th of each month. Nominations are permissible with the consent of the person being nominated. The selection process will focus on impact, uniqueness and relevance of their work to the project and beyond. Those chosen will be spotlighted in a blog post on the first Monday of the following month.
In addition to encouraging submissions, members of the project seek volunteers to help manage the initiative. Organizers will review applications, create blog posts and promote the project within the community.
Applications are now open, with the first feature expected to be published soon.
For more information, visit the mailing list email or the openSUSE GitHub page.
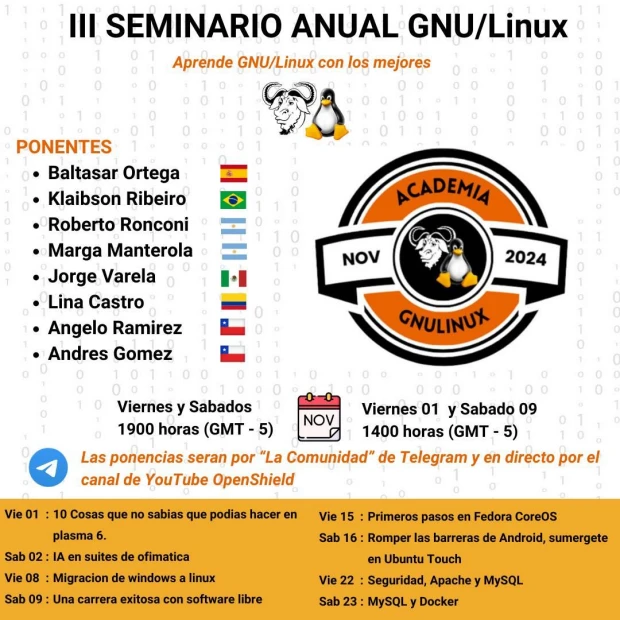
Carrera exitosa con software libre en el III Seminario Anual GNU/Linux
El sábado 9 de noviembre tienes otra cita online. En este caso con la ponencia «Carrera exitosa con software libre» en el III Seminario Anual GNU/Linux en el III Seminario Anual GNU/Linux organizado por la Comunidad OpenShield. Este evento, que será retransmitido a todo el mundo utilizando los servicios de Telegram y Youtube, pretende mostrar, enseñar y demostrar las bondades de Linux, GNU/Linux.
Carrera exitosa con software libre en el III Seminario Anual GNU/Linux
Mi participación en este evento ya ha finalizado y solo puedo dar las gracias a los organizadores por facilitarme la realización de la charla. Me ha sorprendido dos cosas: la utilización de Telegram como servicio de difusión y la fluidez de mi equipo a la hora de mostrar las cosas. Me guardo comentarios más profundos para una próxima entrada.
Y es que hoy quiero promocionar la próxima ponencia que será realizada por Marga Manterola (@aprendiendoconmarga, en youtube) y que lleva por título «Carrera exitosa con software libre en el III Seminario Anual GNU/Linux» en la que nos hablará de que es posible tener éxito laboral utilizando el Software Libre. La fecha es el sábado 9 de noviembre a las 20:15 hora peninsular española.
Los canales para su visualización son los siguientes:
Telegram

Youtube

III Seminario Anual GNU/Linux
Todos los fines de semana de noviembre tienes una cita con el mundo GNU/Linux en forma de ponencia en directo con divulgadores de todo el mundo hispano hablante con la nueva edición del seminario Anual GNU/Linux.
De esta forma, la Comunidad OpenShield está organizando 8 presentaciones con las que iniciarse, aprender, profundizar y, en general, conocer un poco más el abanico de posibilidades que te ofrece el mundo del Conocimiento Libre al módico precio de un poco de tu tiempo (que no es poco).
El objetivo de este evento es mostrar, enseñar y demostrando las bondades de Linux, GNU/Linux. Pero lo mejor es que veáis el vídeo presentación:
Esta es la lista de participantes:
🗣 Klaibson Ribeiro 🇧🇷 🏢 Comunidad Brasileña del Software Libre de Brasil 📝 La IA en Suites de ofimatica
🗣 Roberto Ronconi 🇦🇷 🏢 Independiente 📝 Migración de Windows a GNULinux
🗣 Baltasar Ortega (un servidor) 🇪🇸 🏢 Comunidad KDE España 📝 10 cosas que no sabías que podías hacer con Plasma 6
🗣 Angelo Ramírez 🇨🇱 🏢 Bit Technology 📝 Seguridad, Apache, MySQL
🗣 Andres Gomez 🇨🇱 🏢 Bit Technology 📝 MySQL, Docker
🗣 Lina Castro 🇨🇴 🏢 Cencosud 📝 Romper las barreras de Android, sumérgete en Ubuntu Touch
🗣 Marga Manterola 🇦🇷 🏢 Aprendiendo con Marga 📝 Una carrera exitosa con sofware libre
🗣️ Jorge Varela🇲🇽 🏢 Red Hat Latinoamérica 📝 Primeros pasos en Fedora CoreOS
¿Qué os parece?
Más información: III Seminario GNU/Linux
La entrada Carrera exitosa con software libre en el III Seminario Anual GNU/Linux se publicó primero en KDE Blog.
Call for testing: syslog-ng in openSUSE Leap 16.0
Last week, I submitted syslog-ng to openSUSE Leap 16.0. While the distro is still in a pre-alpha stage, everything already works for me as expected. Well, except for syslog-ng, where I found a number of smaller problems. As such, this blog is a call for testing, both for syslog-ng on openSUSE Leap 16.0 and also for the distribution itself.
Read the rest at https://www.syslog-ng.com/community/b/blog/posts/call-for-testing-syslog-ng-in-opensuse-leap-16-0
syslog-ng logo
Concurso para diseñar el logotipo de celebración de los 40 años de la FSF
Tu diseño puede ser el logotipo escogido para celebrar los 40 años de la Free Software Foundation (FSF). Anímate a participar con tu diseño

La Free Software Foundation cumplirá 40 años el próximo 4 de octubre de 2025 y pone en marcha un concurso para diseñar el logotipo que conmemore esa fecha.
Ya tengas experiencia o no, puedes participar enviando tantos diseños como quieras y optar a que tu diseño sea el escogido para celebrar la efeméride.
El diseño ganador será elegido por la comunidad y, en última instancia, inmortalizado en la historia de la FSF. Se mostrará en la página principal de la FSF, se imprimirá en todos los materiales impresos de la celebración, y posiblemente incluso se estampará en algunos productos.
¿Qué se está buscando?
- El logotipo debe reflejar la historia de la FSF
- Relevancia para el movimiento del software libre
- Mejor si contiene el logotipo de la FSF
- Utiliza colores llamativos, como colores divertidos y brillantes
¿Qué requisitos debe cumplir el diseño?
- El logotipo debe producirse utilizando exclusivamente herramientas de edición de software libre, como GIMP, Krita o Inkscape
- Todas las fuentes tipográficas utilizadas en el diseño deben estar bajo la licencia SIL Open Font u otra licencia libre
- Todos los archivos deben entregarse tanto en formato .png como en formato .svg.
- A menos que sea absolutamente necesario, no hay que convertir el texto en rutas, ya que impide la traducción y la edición
- No contener texto ni imágenes que infrinjan la Política de espacio seguro.
El logotipo final se lanzará bajo una licencia CC BY, atribuido a la FSF. La FSF puede ponerse en contacto con el diseñador o diseñadores ganadores para adaptar el logotipo a otro tipo de soportes.
Tienes de fecha hasta el próximo 1 de enero de 2025 y puedes participar enviando un correo con tu diseño o diseños a campaigns@fsf.org
El 6 de enero de 2025 se votará para escoger el mejor y el 22 de enero de 2025 se anunciará el diseño ganador.
¿Te animas a participar con la FSF?
Enlaces de interés
- https://www.fsf.org/blogs/community/fsf-anniversary-logo-contest
- https://www.fsf.org/blogs/community/forty-years-of-commitment-to-software-freedom
