Member
 baltolkien
La visión del Proyecto KDE en detalle
A raiz del reciente video promocional de Akademy 2024 de Würzburg realizado por Aleix Pol, presidente de KDE e.V., me di cuenta que nunca había explicado la visión del proyecto KDE en detalle. Es hora de enmendar este error ya que en realidad estas palabras son de suma importancia para que cuando se tengan que tomar decisiones importantes que puedan cambiar el rumbo de este proyecto y que no se escore hacia destinos no desados.
La visión del Proyecto KDE en detalle
El proyecto KDE tiene un lema que me parece fabuloso:
«Un mundo en el que todos tengan control sobre su vida digital y disfruten de libertad y privacidad».
Según se explica en la página específica de KDE dedicada a su visión y que he traducido gracias a Deepl.com, cada parte de la visión se ha elegido cuidadosamente para transmitir nuestra intención y alcance:
Un mundo: No lo hacemos sólo por nosotros, sino también por nuestros amigos y familiares, nuestros empleados y clientes, y no reconocemos barreras geográficas a nuestro trabajo. Queremos cambiar nada menos que el mundo en que vivimos.
A todo el mundo: El trabajo no debe ser sólo para un pequeño grupo de personas. Los frutos de nuestro trabajo deben estar al alcance de todos, sin restringirse a personas privilegiadas desde el punto de vista material, educativo o social.
Control: KDE siempre ha pretendido que las personas tengan el control. No queremos ceder el control a nadie más: ni a algunos proveedores de servicios; ni a algunos vendedores de hardware; ni a los gobiernos; ni siquiera a KDE. KDE quiere ponerte al volante.
De la vida digital: Queremos permitir a la gente controlar todos los aspectos de su vida digital: Hardware, software, datos, comunicación, todo. Por supuesto, la vida es mucho más que la parte «digital». Aunque todos queremos libertad y control en las otras partes también influir en eso está fuera del alcance de KDE, así que limitamos nuestra visión a la «vida digital».
Libertad: Creemos que la libertad es un requisito previo para el verdadero control. Algunos pueden sentirse en control de una aplicación propietaria mientras obedezca sus órdenes, pero sin la libertad de hacer cambios y compartirlos, dependen totalmente de la benevolencia del vendedor para este aparente «control».
La privacidad: En un mundo en el que nuestra privacidad está cada vez más amenazada, hemos querido destacar su importancia. La libertad sin derecho a la intimidad no es libertad.

¿Qué os parecen? Por supuesto que la visión del proyecto es mutable pero en mi humilde opinión esta visión se acerca mucho a la de mi mundo ideal.
La entrada La visión del Proyecto KDE en detalle se publicó primero en KDE Blog.

Inteligência Artificial no Direito

Durante minha pesquisa sobre a aplicação de Inteligência Artificial (IA) no setor jurídico, observei uma vasta oferta de ferramentas que prometem revolucionar a prática jurídica com o uso de IA. No entanto, após testar modelos de linguagem de grande escala (LLMs) proprietários e de código aberto, como Llama e Gemmini, surgiram questionamentos importantes sobre a real eficácia e limitações dessas tecnologias.
Muitos vídeos e conteúdos nas redes sociais promovem uma visão excessivamente otimista e, por vezes, sensacionalista, sugerindo que a IA pode acelerar significativamente a elaboração de documentos jurídicos complexos. No entanto, é crucial compreender que a IA não substitui o aconselhamento jurídico especializado. Através dos testes realizados, ficou evidente que, apesar das capacidades avançadas dos LLMs, eles não conseguem replicar a profundidade de análise e o julgamento crítico de um profissional jurídico experiente. As questões legais são, em sua essência, complexas e multifacetadas, exigindo que as decisões sejam fundamentadas em informações fornecidas por profissionais qualificados, capazes de entender as nuances e particularidades das leis.
Um dos principais desafios enfrentados pelos modelos de IA no setor jurídico é a compreensão contextual. Os LLMs algumas vezes falham em captar o contexto completo das questões jurídicas, resultando em respostas que, embora possam parecer corretas à primeira vista, carecem da profundidade necessária para uma análise adequada. Esse tipo de limitação pode, paradoxalmente, aumentar o trabalho ao invés de reduzi-lo, uma vez que as respostas geradas precisam ser revisadas e corrigidas por profissionais.
A linguagem jurídica, com sua complexidade e nuances, representa outro obstáculo significativo. Mesmo os modelos treinados especificamente para fins jurídicos podem cometer erros de interpretação que podem ter consequências graves. Nos testes realizados, foi comum observar interpretações incorretas até mesmo em demandas simples, como respostas a e-mails do dia a dia. Isso reforça a necessidade de cautela ao confiar em modelos de linguagem para tarefas jurídicas.
Além disso, a utilização de modelos baseados em nuvem para gerar conteúdo jurídico levanta sérias preocupações éticas relacionadas à privacidade, confidencialidade e ao manejo adequado de dados sensíveis. A ausência de responsabilidade por parte dos modelos de IA em relação às informações fornecidas é um ponto crítico, pois não há garantias sobre a veracidade ou as consequências das respostas geradas. A imprevisibilidade nas respostas dos modelos pode resultar em inconsistências ou contradições, o que é particularmente problemático no contexto jurídico, onde a clareza e coerência são essenciais.
Apesar dessas limitações, a IA oferece vantagens substanciais no campo jurídico, como a otimização do tempo e a melhoria na pesquisa e na elaboração de documentos. No entanto, é imperativo que os advogados estejam cientes dessas limitações e assumam a responsabilidade de validar as informações geradas, assegurando que estejam em conformidade com as normas éticas e profissionais. O uso criterioso da IA pode, sim, aumentar a produtividade no setor jurídico, mas sempre com a devida supervisão humana.
Por fim, surge a questão sobre a viabilidade do uso de Small Language Models (SLMs) em comparação com os LLMs nesse contexto. A escolha entre um SLM e um LLM deve ser cuidadosamente avaliada, levando em consideração as necessidades específicas da aplicação, os recursos disponíveis e as restrições de desempenho. É possível que, em certos casos, um SLM seja uma solução mais adequada, oferecendo respostas mais focadas e contextualizadas dentro das limitações impostas pelo cenário jurídico.
#openSUSE Tumbleweed revisión de la semana 33 de 2024
Tumbleweed es una distribución de GNU/Linux «Rolling Release» o de actualización contínua. Aquí puedes estar al tanto de las últimas novedades.

openSUSE Tumbleweed es la versión «rolling release» o de actualización continua de la distribución de GNU/Linux openSUSE.
Hagamos un repaso a las novedades que han llegado hasta los repositorios esta semana.
Y recuerda que puedes estar al tanto de las nuevas publicaciones de snapshots en esta web:
El anuncio original lo puedes leer en el blog de Dominique Leuenberger, publicado bajo licencia CC-by-sa, en este este enlace:
Durante esta semana se han publicado 6 nuevas snapshots (0809, 0810, 0811, 0812, 0813, y 0815) que han traido entre otros, estos cambios:
- GCC 13.3.1
- glibc 2.40
- KDE Frameworks 6.5.0
- Mozilla Firefox 129.0
- NetworkManager 1.48.8
- binutils 2.43
- cURL 8.9.1
- Linux kernel 6.10.4
- GO 1.22
- FFMPEG
Y poco a poco se va reduciendo la lista de pendientes. Pero esto es sobre lo que se está trabajando para pŕoximas semanas:
- Linux kernel 6.10.5
- dbus-broker
- GCC 14
Si quieres estar a la última con software actualizado y probado utiliza openSUSE Tumbleweed la opción rolling release de la distribución de GNU/Linux openSUSE.
Mantente actualizado y ya sabes: Have a lot of fun!!
Enlaces de interés
- ¿Por qué deberías utilizar openSUSE Tumbleweed?
- zypper dup en Tumbleweed hace todo el trabajo al actualizar
- ¿Cual es el mejor comando para actualizar Tumbleweed?
- ¿Qué es el test openQA?
- http://download.opensuse.org/tumbleweed/iso/
- https://es.opensuse.org/Portal:Tumbleweed

——————————–
Actualizando el mapa de usuarios KDE en España
Hace mucho tiempo publiqué el mapa generado en Google de los usuarios de KDE. Ese mapa era colaborativo y voluntario pero generado sobre Software Privativo. En varias ocasiones pedí que alguien lo cambiara a OpenStreetMap y mis súplicas fueron escuchadas. Ya casi había olvidado este proyecto pero gracias a la entrada de ayer ha vuelto a mi memoria así que vamos a dar un impulso a eto actualizando el mapa de usuarios KDE en España realizado sobre un proyecto abierto.
Actualizando el mapa de usuarios KDE en España
Si vais a ver el mapa de la Comunidad KDE de España marzo 2018, podréis ver una imagen estática de los usuarios que se habían puesto voluntariamente , y digo estática, porque alguien borró (queriendo o sin querer) los «pines» del mapa.
Ese incidente fue comentado en el grupo de Telegram KDE – Cañas y Bravas, y un usuario dijo que trabajaría en ello aprovechando que se debía empezar de nuevo el mapa.
Este compañero de grupo era @wakutiteo y ha creado, utilizando los servicios de uMap sobre OpenStreetMap el nuevo mapa de la usuarios KDE en España en el que podemos empezar a registrarnos.
En un principio babía poca poca gente apuntada (mirad la entrada de junio de 2018) pero poco a poco se ha ido llenando, a pesar de la poca promoción que ha tenido. A ver si a partir de ahora voy dándole más cancha y el mapa crece . De momento pongo la captura de pantalla de este mes de agosto de 2024.
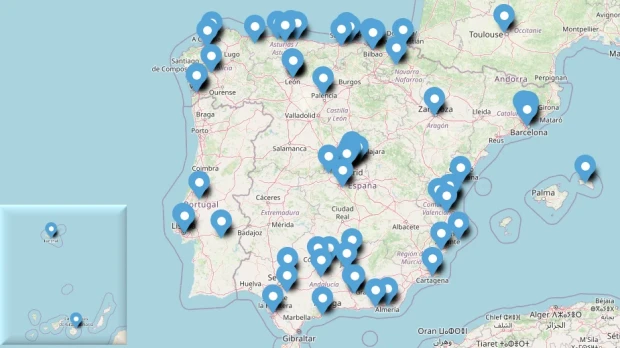
Evidentemente, es voluntario y apuntaros bajo vuestra propia responsabilidad. Os dejo también el mapa incrustado que se irá actualizando poco a poco.
Pincha para ver en pantalla completa
Y también os dejo un vídeo de cómo editar el mapa para poder apuntaros.
¿Qué es Umap?
Básicamente, con uMap puedes crear mapas con capas de OpenStreetMap en un minuto e incrustarlo en tu página web, de código libre. Con uMap puedes realizar las siguientes acciones:
- Elegir las capas de tu mapa
- Añadir PDIs: marcadores, líneas, polígonos…
- Elegir los colores y los iconos de los PDIs
- Gestionar opciones del mapa: mostrar un minimapa, localizar al usuario al cargar…
- Importar por lotes datos geoestructurados (geojson, gpx, kml, osm…)
- Elegir la licencia de tus datos
- Embeber y compartir tu mapa
La entrada Actualizando el mapa de usuarios KDE en España se publicó primero en KDE Blog.
Tumbleweed – Review of the week 2024/33
Dear Tumbleweed users and hackers,
Week 33 was busy, but busy in a good way. We managed to clear almost all stagings out, except the ‘long lasting’ topics like GCC, and dbus-broker, which we carried for a few weeks already. Other than that, the queue has been emptied (At the time of writing, there are now 54 pending requests to Factory). Summer vacation helped us achieve this result. And the fact, that we produced 7 snapshots (one discarded) during the last week.
The six published snapshots (0809, 0810, 0811, 0812, 0813, and 0815) brought you those changes:
- GCC 13.3.1
- glibc 2.40
- KDE Frameworks 6.5.0
- Mozilla Firefox 129.0
- NetworkManager 1.48.8
- binutils 2.43
- cURL 8.9.1
- Linux kernel 6.10.4
- GO 1.22 has become the new default Go compiler version
- FFMPEG default has switched from version 6 to version 7
As mentioned, stagings are almost empty – the few things currently left are:
- Linux kernel 6.10.5
- dbus-broker: some progress was made last week; most QA tests are fine, there is just a race condition on shutdown (likely not new, but dbus-daemon might have waited longer to report it, by when the system had completely shut down and the error has been ‘swallowed’)
- GCC 14: phase 2: use gcc14 as the default compiler – great progress has been made and we believe we will be able to switch during Week 34
he syslog-ng Insider 2024-08: 4.8.0 release; Prometheus; Amazon Linux
The August syslog-ng newsletter is now on-line:
- Version 4.8.0 of syslog-ng improves FreeBSD and MacOS support
- syslog-ng Prometheus exporter
- Experimental syslog-ng packages for Amazon Linux 2023
It is available at https://www.syslog-ng.com/community/b/blog/posts/the-syslog-ng-insider-2024-08-4-8-0-release-prometheus-amazon-linux
syslog-ng logo
Cómo crear un mapa interactivo con eXeLearning – Vídeo
Hace ya casi tres años que presenté eXeLearning, un editor de recursos educativos e interactivos de código abierto que te permite llevar tu actividades a otro nivel a la vez que compartirlos sin ningún tipo de restricción en multitud de formatos. Lo cierto es que me interesa mucho esta aplicación y he empezado a aprender mucho sobre ella, y es mi deber pagarlo mediante promoción. Hoy os traigo cómo crear un mapa interativo con eXeLearning, un vídeo de Cedec_Intef .
Cómo crear un mapa interactivo con eXeLearning – Vídeo
Seguimos con eXeLearning, y en esta ocasión con un vídeo de Cedec_Intef, que no es más que el Centro Nacional de Desarrollo Curricular en Sistemas no Propietarios (Cedec), un organismo público español que promueve la transformación digital y metodológica de las aulas que pone a disposición de los docentes recursos educativos abiertos (REA) del Proyecto EDIA, elaborados por docentes en activo con la herramienta de software libre eXeLearning.
Pues bien, en el vídeo que os presento hoy se explica en varios pasos cómo crear un mapa con zonas activas donde el alumnadopodrás investigar sobre sus partes ya que se activarán textos, sonidos, imágenes, vídeos, etc.
¿Qué es EXeLearning?
Para los que no lo conozcan, eXeLearning es un editor de recursos educativos e interactivos de código abierto se caracteriza por:
- Permite crear contenidos educativos de una manera sencilla
- Descarga fácil y gratuita desde su web.
- Está disponible para todos los sistemas operativos.
- Nos pemite catalogar los contenidos y publicarlos en diferentes formatos:
- Sitio web navegable y adaptable a diferentes dispositivos (responsive design).
- Estándar educativo, para trabajar con Moodle y otros LMS.
- Página HTML única para imprimir cómodamente tu trabajo.
- ePub3 (libro electrónico), etc.
- Ofrece diferentes diseños a elegir desde el menú, además de la posibilidad de crear diseños propios.
Con eXelearnig se puede crear todo tipo de actividades entre las que destaco rellenar huecos, pregunta de elección múltiple, pregunta de selección múltiple, pregunta verdadero-falso, cuestionario SCORM o actividad desplegable.
Además, y este es uno de los principales usos que hago de esta aplicación, nos permte crear rúbricas de forma sencilla, así como incluir recursos realizados con otras aplicaciones. Por ejemplo, Jclic, Descartes, Scratch, Geogebra, Physlets…
La entrada Cómo crear un mapa interactivo con eXeLearning – Vídeo se publicó primero en KDE Blog.
Grok-2 com capacidade de gerar imagens
xAI, a empresa de inteligência artificial de Elon Musk, anunciou ontem duas novas versões do seu chatbot Grok, denominadas Grok-2 e Grok-2 mini. Atualmente, esses modelos estão em fase beta na plataforma X, anteriormente conhecida como Twitter.
As atualizações incluem melhorias nas funcionalidades de chat, codificação e raciocínio. Além disso, esses modelos agora podem gerar imagens utilizando um modelo de IA chamado Flux 1, desenvolvido pela Black Forest Labs.

A xAI apresentou o Grok-2, destacando suas capacidades avançadas para usuários do X, incluindo bate-papo aprimorado, codificação e capacidades analíticas. O Grok-2 e sua versão menos avançada, o Grok-2 mini, estão disponíveis apenas para os assinantes Premium e Premium+ da plataforma.

Durante o evento de lançamento, foi mencionado que o Grok-2 integra informações em tempo real do X e utiliza avançada compreensão de texto e capacidades visuais para executar comandos complexos. Comparativamente, o Grok-2 mini foca em oferecer uma resposta mais rápida, embora com menos capacidades.
Desde a aquisição do X por Musk em 2022, a plataforma tem sido reticente em responder à imprensa, especialmente sobre questões futuras relacionadas ao Grok, deixando muitas perguntas sem resposta.
A xAI também planeja disponibilizar os modelos Grok-2 e Grok-2 mini para desenvolvedores através de uma API empresarial ainda este mês. A empresa anunciou recentemente uma rodada de financiamento que elevou sua avaliação, sublinhando o sucesso e a expansão contínua dos seus modelos de IA.
Marcando la diferencia, vídeo de Aleix Pol
Sigue el verano y el Software Libre no deja degenerar noticias ni contenido. Es esta ocasión me alegra compartir con vosotros un vídeo Aleix Pol, presidente de KDE e.V, ex-presidente de KDE España y, me atrevo a decir, amigo personal que ha titulado «Marcando la diferencia» donde habla de cómo contribuir e impulsar su carrera en el Software Libre con la Comunidad KDE. Una hora de charla, en inglés, ideal para las largas tardes estivales y para ir calentando motores de cara al evento de septiembre: Akademy 2024 de Würzburg, Alemania.
Marcando la diferencia, vídeo de Aleix Pol
Hay muchas personas que me han marcado en este mundillo del Software Libre pero, como es normal, las primeras son las que generas un vínculo más particular.
Esto es lo que me pasó con Aleix Pol, Presidente de KDE e.V. y desarrollador principal de (entre otras muchas cosas) KDE Connect, Plasma, Discover y KAlgebra, que conocí personalmente en la Akademy-es 2010 de Bilbao, mi primer evento comunitario al que asistí.
Entre escucharle hablar de sus proyectos en las dos o tres charlas en las que fue ponente y en los numerosos encuentros en los pasillos y trayectos en transporte público se creó un vínculo y descubrí algunos de los huecos donde yo podría participar.
Descubrí a una persona joven muy comprometida con el Software Libre y el proyecto KDE, atributos que no le han abandonado a medida que sí que ha adquirido más peso en la Comunidad ya que, como ya he dicho, actualmente es el presidente de KDE e.V.
Es por ello que es altamente recomendable ver este vídeo que cumple varias funciones: describir la mutante Comunidad KDE, explicar algunos de los productos que genera a un precio bastante bajo (0 en euros), promocionar la próxima Akademy de Würzburg, Alemanía y, lo más importante, animar a todas las personas a unirse a una Comunidad que tiene una visión clara y ambiciosa:
«Un mundo en el que todos tengan control sobre su vida digital y disfruten de libertad y privacidad».
Vale, no me enrrollo más y os dejo el vídeo para que lo disfrutéis:
Finalizo el artículo recordando que el mes de septiembre tenéis a vuestro alcance el gran evento de la Comunidad KDE.

La entrada Marcando la diferencia, vídeo de Aleix Pol se publicó primero en KDE Blog.