GNU sed (stream editor) es un software del proyecto GNU que consiste en un editor de texto no interactivopara la línea de comandos
GNU sed o apartir de ahora simplemente sed es un editor de texto. Pero no un editor de texto al uso como podríamos pensar. Sí, podemos borrar, sustituir, y realizar otras acciones en el texto, pero no de la manera usual.
Se utiliza para realizar transformaciones de texto básicas en una secuencia de entrada (que puede ser un archivo o la salida de otro comando a la que realizar la transformación).
Toma un flujo de texto como entrada.
Selecciona algunas líneas específicas.
Realiza algunas operaciones en cada línea seleccionada.
Imprime el texto resultante o lo guarda en el propio archivo o en otro archivo.
Sed funciona haciendo solo una pasada sobre las entradas y, en consecuencia, es más eficiente. Pero es la capacidad de sed para filtrar texto en una canalización lo que lo distingue particularmente de otros tipos de editores. Además de poderlo usar en scripts.
Veamos algunas funciones básicas con ejemplos para adentrarnos en su uso.
Empezando por lo básico
La manera más básica de utilizar sed es la siguiente:
sed [script] [archivo...]
El script define el trabajo o trabajos de edición que queremos realizar en el texto (borrar algo, modificar o sustituir un texto, etc) y el archivo es el archivo en el que queremos realizar esas acciones. Puede ser uno, o más o el resultado de otro comando.
sed '' README.md
Como en ese ejemplo, la parte del script está vacía, no realiza nada, simplemente mostrará el texto del archivo README.md. Sería algo similar a ejecutar cat README.md
Y si en vez de un archivo queremos que sed haga cosas con la salida de un comando podemos realizar a modo de ejemplo lo siguiente:
echo "sed es software libre parte de GNU" | sed ''
Bueno, realmente estos dos primeros ejemplos no tienen mucha miga ni mucho sentido, pero es un primer acercamiento a sed, que puede hacer tareas mucho más complicadas y tediosas por nosotros.
Las tres partes de las que consta el script de sed
Cuando queremos realizar otras tareas con más enjundia mediante sed, debemos elaborar un poco más el script que indicará a sed las tareas a realizar. Este script consta de tres partes:
Dirección → Las líneas que desea editar. Siempre va seguido de un comando.
Comando → La operación que desea realizar. Siempre es una sola letra.
Opciones → Un par de comandos pueden tener opciones, como el comando de sustituir, por ejemplo.
Veamos un ejemplo muy básico:
sed '1d' README.md
Con este ejemplo le hemos dado la dirección 1 y el comando d de delete o elimiar y no le hemos dado ninguna opción. Por lo que simplemente borrará la línea 1 del archivo especificado y mostrará el resultado en pantalla.
Debemos tener en cuenta que sed nunca modificará el archivo (o entrada) proporcionado de manera predeterminada. En cambio, lo hará:
Copiar cada línea de la entrada en un búfer.
Realizar las operaciones descritas por el script sed en las líneas almacenadas en dicho búfer.
Generar las líneas almacenadas en el búfer (posiblemente modificadas).
Es decir, con eso, nuestro archivo README.md sigue intacto, lo podemos comprobar si queremos. Podemos hacer que ese archivo modificado se guarde en otro archivo, o sobre el propio archivo, modificando esta vez sí el contenido del archivo.
Con este ejemplo el archivo modificado se guardará en un nuevo archivo al que le ponemos otro nombre:
sed '1d' README.md > README_modif.md
Si queremos que la modificación de sed se guarde en el propio archivo, utilizaremos la opción -i. Es recomendable realizar una copia de seguridad del archivo original por si el resultado no es lo que esperábamos y queremos recuperar el original:
sed -i_copia '1d' README.md
Con este ejemplo sed nos creará un archivo con el nombre original al que añadirá _copia y que contendrá el original. Y una vez aplicado el script, eliminando la línea 1 del archivo, guardará esa edición en README.md.
Seleccionar multiples líneas en la dirección
Hasta ahora a sed solo le habíamos dicho que realizara acciones en la línea 1 del archivo. Pero por supuesto podemos seleccionar:
Un número de línea. sed '1d' README.md Borra la línea 1 del archivo.
Una rango de líneas. sed '3,6d' nginx.conf Borra las líneas de la 3 a la 6 inslusive.
Cada enésima línea. sed '0~2d' nginx.conf Borra desde la línea 0 las líneas pares del archiv.
Una expresión regular. sed '/windows/d' nginx.conf Borra cada línea que contenga el patrón buscado, en este caso la palabra windows
Otras acciones que puede realizar sed
Hasta ahora hemos utilizado el comando de borrado de una línea o un rango, etc. Pero por supuesto que sed puede realizar muchas otras acciones o comandos.
Imprimir una parte del texto
Podemos hacer que sed extraiga y nos muestre solo la línea del texto en el que aparece un patrón que buscamos. Para ello usaremos la opción p de print. Veamos un ejemplo:
sed -n '1p' README.md
Esto nos mostrará sólo la primera línea del archivo. Pero como seguro que eres una persona observadora, habrás visto que hay una opción -n (de no print) de la que no he comentado nada ¿qué hace ahí?
Si no ponemos esa opción, sed mostrará la primera línea y después el archivo completo, por lo que la primera línea la mostrará dos veces y eso no es lo que queremos.
Con la opción -n le decimos que no muestre el archivo completo (que es lo que hace sed de manera predeterminada) y que solo muestre lo que le decimos con el comando 1p
También podemos mostrar todas las líneas que contengan un patrón:
sed -n '/GNU/p' README.md
Esto extraerá todas las líneas del archivo que contenga la cadena de texto GNU.
El comando de sustitución con sed
Hemos borrado texto, hemos extraido texto. Ahora veremos que sed también puede sustituir texto con el comando s
sed 's/windows/GNU/g' README.md
Con s le indicamos que sustituya en el archivo el texto windows por GNU separado el texto del patrón y del sustituto con barras invertidas.
Y hemos añadido al final la opción g para indicar que queremos que lo haga no solo en la primera coincidencia que encuentre, si no en todo el archivo en todas las coincidencias del texto.
Ya hemos aprendido algunos comandos de sed. Y la potencia de sed viene en la forma en la que podemos seleccionar las líneas en las que queremos que actúe y en poder realizar varias acciones a la vez.
Así por ejemplo, veremos cómo eliminar una línea y sustituir texto en otras todo de una vez. Para ello, separaremos los diferentes comandos a ejecutar mediante ;
sed '1d;s/windows/GNU/g' README.md
Este ejemplo borrará la primera línea y después sustituirá en todo el texto la cadena de texto windows por GNU en el archivo especificado.
Otra opción similar será añadiendo -e (de expression) delante de cada comando:
sed -e '1d' -e 's/windows/GNU/g' README.md
Conclusión
GNU sed es una herramienta muy potente, de la que en este artículo solo he quitado la primera capa de la cebolla, pero queda mucho más que explorar.
Este ha sido solo un primer acercamiento a esta interesante herramienta de GNU/Linux para la línea de comandos. ¿Conocías esta herramienta? ¿Ya la utilizabas en tu día a día?
The openSUSE Conference in Nuremberg, Germany, at the end of June may feel like a long time away, but if you are planning to oSC24, there are topics that need action now before timelines become too short.
Getting a visa may take some time. There are certain requirements necessary to receive a visa for those who are not citizens of a Schengen country. You may need a formal invitation letter that fully explains the nature of your visit.
An overview of visa requirements/exemptions for entry into the Federal Republic of Germany can be found at the Federal Foreign Office website. You must apply for a Schengen visa through the German embassy or consulate in your country.
If you plan to attend the conference and are coming from a country where you will need a formal invitation letter, email ddemaio(at)opensuse.org with the email subject “oSC24 Visa”.
Also important to consider is the Travel Support Program. People who want to use the TSP for this year’s openSUSE Conference must read the How to Apply section and follow the appropriate steps. The TSP is now being done by the Geeko Foundation, so be aware that some new procedures and certain limitations apply. Read the info on the wiki and use tsp.opensuse.org to apply. Requests will be accepted until May 10. The TSP is a helpful way to get people in the community to attend the conference. Funding is limited, but help to support the community’s attendance.
Sigo con estas pequeñas aplicacionesque se conocen como applets, widgets o plasmoides y que dotan de funcionalidades de todo tipo a nuestro entorno de trabajo KDE. Hoy toca otro minireproductor de música para tu escritorioque te permite controlar tus canciones directamente desde el escritorio. Se llama Widget Music Simple, será el plasmoide número 245 de la serie y ha sido creado por el Zayronxyo, uno de los desarrolladores de este tipo de aplicaciones más activo desde hace meses en la Store.
Minireproductor de música para tu escritorioa, Widget Music Simple – Plasmoides de KDE (245)
Como he comentado en otras ocasiones, de plasmoides tenemos de todo tipo funcionales, de configuración, de comportamiento, de decoración o, como no podía ser de otra forma, de información sobre nuestro sistema como puede ser el uso de disco duro, o de memoria RAM, la temperatura o la carga de uso de nuestras CPUs.
Así que espero que le deis la bienvenida a un plasmoide llamado Widget Music Simple, una creación de Zayronxyo con el que controlas el reproductor multimedia directamente desde tu escritorio con el contenido mínimo que te pueda interesar: canción, autor de la canción y los mínimos controles multimedia (como hacía Minimal Musica Widget) pero añadiendo la carátula, para aquellos que les guste este tipo de efectos visuales (como a mí).
En mi humilde opinión, podría unir este a Minimal Musica Widget y crear la opción de mostrar o no la carátula. Creo que se lo pondré en los comentarios.
Y como siempre digo, si os gusta el plasmoide podéis «pagarlo» de muchas formas en la nueva página de KDE Store, que estoy seguro que el desarrollador lo agradecer?: puntúale positivamente, hazle un comentario en la página o realiza una donación. Ayudar al desarrollo del Software Libre también se hace simplemente dando las gracias, ayuda mucho más de lo que os podéis imaginar, recordad la campaña I love Free Software Day de la Free Software Foundation donde se nos recordaba esta forma tan sencilla de colaborar con el gran proyecto del Software Libre y que en el blog dedicamos un artículo.
Para los no iniciados en el blog, quizás la palabra plasmoide le suene un poco rara pero no es mas que el nombre que reciben los widgets para el escritorio Plasma de KDE.
En otras palabras, los plasmoides no son más que pequeñas aplicaciones que puestas sobre el escritorio o sobre una de las barras de tareas del mismo aumentan las funcionalidades del mismo o simplemente lo decoran.
Hace tiempo que este tipo de artículos no aparecian en el blog. Y es que cada vez tengo menos problemas con GNU/Linux, aunque eso no significa que no los haya. No obstante siempre se aprende algo nuevo, sobre todo cuando haas convencido a gente de tu entorno a pasarse a este sistema operativo libre. Hoy os presento cómo entrar en el menú de arranque en KDE Neon, algo que he aprendido a raiz de un problema que tuvo una amiga mía.
Cómo entrar en el menú de arranque en KDE Neon
Que los sistemas operativos GNU/Linux son robustos y aptos para todo el mundo es un hecho. Mis allegados que se han dejado convencer por mi tozudez y llevan un sistema libre en sus equipos apenas tienen problemas.
Sólo cuando realizan alguna acción no debida como apagar en medio de una actualización, se produce un error de hardware como la muerte de un disco duro o tienen una complicación imprevista como que se le llene el espacio de la partición raiz, algo que deberían revisar los desarrolladores y poner algún tipo de freno.
Justamente lo primero le pasó a un amiga mía hace bien poco en su Slimbook Essential de 15 pulagadas que tiene instalado un KDE Neon desde hace unos 4 años… con cero problemas más allá de instalar Chrome y que se queje de que no se actualiza con el sistema.
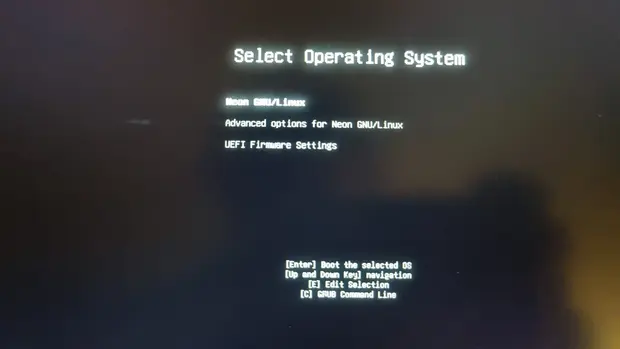
Pues bie, hace unos días me comenta que le aparece la siguiente pantalla:
Al parecer se quedó sin bateria en el medio de una actualización, con lo que no le arrancaba con el Kernel que tenía en el Grub.
Esto significaba entrar en el menú de arranque ya que por defecto su equipo entra a la primera opción sin dejar elección.
Esta aparente sencilla acción se complicó un poco más de lo esperado ya que no respondía a las teclas que por la red aparecían que se debían de pulsar al arrancar el equipo.
Una rápida busqueda por internet nos dice que para hacerlo se debía pulsar «mayúsculas izquierda» o la tecla «Esc» pero al parecer esa información no funcionaba en su equipo.
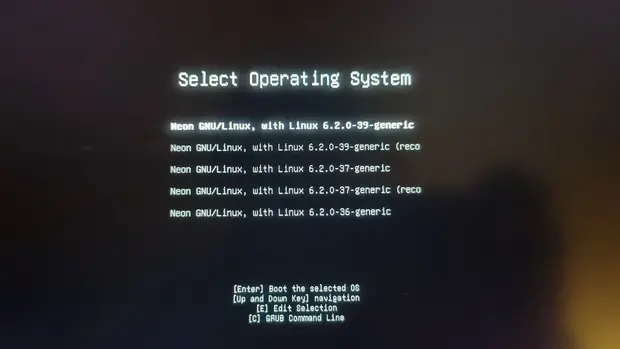
En un ataque de inspiración (sí, fue así y es de recibo ponerme una medalla) le comenté que pulsara la tecla de tabulación durante el arranque… y funcionó.
De esta forma pudo entrar en el menú de grub, seleccionar el segundo Kernel, arrancar el sistema, actualizar y dejar el ordenador de nuevo operativo.
Todo en apenas 10 minutos con unas indicaciones por mensajería instantánea. ¡No es maravilloso!
Hace ya casi dos años que presenté eXeLearning, un editor de recursos educativos e interactivos de código abierto que te permite llevar tu actividades a otro nivel a la vez que compartirlos sin ningún tipo de restricción en multitud de formatos.Lo cierto es que me interesa mucho esta aplicación y he empezado a aprender mucho sobre ella, y es mi deber pagarlo mediante promoción. Hoy os traigo cómo crearuna actividad Adivina con eXeLearning , un vídeo de Cedec_Intef .
Cómo crear una actividad Adivina con eXeLearning – Vídeo
Seguimos con eXeLearning, y en esta ocasión con un vídeo de Cedec_Intef, que no es más que elCentro Nacional de Desarrollo Curricular en Sistemas no Propietarios (Cedec), un organismo público español que promueve la transformación digital y metodológica de las aulas que pone a disposición de los docentes recursos educativos abiertos (REA) del Proyecto EDIA, elaborados por docentes en activo con la herramienta de software libre eXeLearning.
Pues bien, en el vídeo que os presento hoy se explica en varios pasos cómo crear una actividad Advina con eXeLearning, es decir, un nuevo iDevice como ellos dicen.
Esta iDevice o Actividad llamdo Adivina es un juego donde se realizan preguntas, se muestra una pista y se resuelve, si se acierta se ganan puntos, si no se pueden perder, las preguntas pueden ser al azar y si se supera nos puede dar una palabra secreta para continuar el aprendizaje.
¿Qué es EXeLearning?
Para los que no lo conozcan, eXeLearning es un editor de recursos educativos e interactivos de código abierto se caracteriza por:
Permite crear contenidos educativos de una manera sencilla
Descarga fácil y gratuita desde su web.
Está disponible para todos los sistemas operativos.
Nos pemite catalogar los contenidos y publicarlos en diferentes formatos:
Sitio web navegable y adaptable a diferentes dispositivos (responsive design).
Estándar educativo, para trabajar con Moodle y otros LMS.
Página HTML única para imprimir cómodamente tu trabajo.
ePub3 (libro electrónico), etc.
Ofrece diferentes diseños a elegir desde el menú, además de la posibilidad de crear diseños propios.
Con eXelearnig se puede crear todo tipo de actividades entre las que destaco rellenar huecos, pregunta de elección múltiple, pregunta de selección múltiple, pregunta verdadero-falso, cuestionario SCORM o actividad desplegable.
Además, y este es uno de los principales usos que hago de esta aplicación, nos permte crear rúbricas de forma sencilla, así como incluir recursos realizados con otras aplicaciones. Por ejemplo, Jclic, Descartes, Scratch, Geogebra, Physlets…
Cada año hay un evento que en relidad no lo es, ya que en realidad es un marco que promueve que se realicen eventos en ciudades de toda América del Sur, Portugal y España. Suele tener una fecha aproximada, por lo que me complace concretar que este año FLISOL 2024 se realizará el 27 de abril, una fecha que en realidad es aproximada. Una nueva oportunidad de iniciarse en el mundo del Software Libre y conocer esa maravillosa Comunidad.
FLISOL 2024 se celebrará el 27 de abril
Cada año, desde 2008, el cuarto sábado de abril se organizan unas jornadas de difusión de Software Libre de forma simultánea en multitud de lugares del planeta. Este evento recibe el nombre de FLISOL y como principal objetivo es promover el uso del software libre mediante charlas y eventos.
Este 2024 FLISOL cae el 27 de abril, lo cual significa que los diversos eventos que se organizan con esta idea en mente se celebrarán alrededor de esta fecha.
Aprovecho para que os animéis a organizar un FLISOL en vuestra ciudad de referencia ya que lo que más le hace falta al Software Libre es promoción.
Para los que todavía no conozcan Flisol, se trata de un evento «… de difusión de Software Libre más grande en Latinoamérica y está dirigido a todo tipo de público: estudiantes, académicos, empresarios, trabajadores, funcionarios públicos, entusiastas y aun personas que no poseen mucho conocimiento informático…»
La asistencia es gratuita y su principal objetivo es promover el uso del software libre, dando a conocer al público en general su filosofía, alcances, avances y desarrollo.
Welcome to the monthly update for openSUSE Tumbleweed for January 2024. This will be the new format going forward as recommended by those contributing to the marketing efforts of openSUSE. These updates will highlight major changes, improvements and key issues addressed in openSUSE Tumbleweed snapshots throughout the month. The aim is to keep the community and users informed about the developments and updates of the distribution. Should readers desire a more frequent amount of information about openSUSE Tumbleweed snapshots, readers are advised to subscribe to the openSUSE Factory mailing list.
New Features and Enhancements
Linux Kernel: Updates to versions 6.6.7, 6.6.9, 6.6.10, 6.6.11 and 6.7.1.
Fixes have been applied for memory management and security vulnerabilities, enhancing overall system safety.
Support for new hardware models
PCI: Adds ACS quirks for more Zhaoxin Root Ports, enhancing compatibility and performance for Zhaoxin’s CPUs and motherboards.
ALSA (Advanced Linux Sound Architecture): Added driver properties for cs35l41 for Lenovo Legion Slim 7 Gen 8 series, and introduced support for additional Dell models without _DSD, along with fixes for HP Envy X360 13-ay0xxx’s mute and mic-mute LEDs, indicating broader compatibility for sound hardware in laptops.
LEDs: The ledtrig-tty module receives updates to the free allocated ttyname buffer on deactivation, impacting how LED triggers are handled for terminal activities.
Significant updates include fixes in Extra CMake Modules, introduction of holidays in Kenya observed by KHolidays, and quality settings adjustments for AVIF in KImageFormats.
Key improvements in KIO for handling malformed Exec entries, accessibility enhancements in Kirigami, and stability fixes in KJobWidgets to prevent potential use-after-free errors.
Focus on Python 3.6 build fixes and enhancements in driver support.
The release introduces NVK, a new Vulkan driver for NVIDIA hardware, which marks a step forward in support for NVIDIA GPUs, yet it remains in the experimental phase.
Improved graphics performance and compatibility Asahi and RADV and enhancements of OpenGL ES and Vulkan capabilities
Introduces critical updates like the requirement of libvulkan1 for Mesa-dri to support zink/swrast driver fallbacks, which further improves the overall user experience with graphics applications and games.
Reverts patches related to udev device node updates and workarounds for issues. Took a cautious approach to fixing reported bugs and ensuring stability in device management systems.
Adjustments to udev ensure the proper existence and ownership of %_modulesloaddir, facilitating smoother module installation by other packages, thereby improving system configuration and module management.
Addresses issues like the inability of net changesecretpw to set the machine account password with an empty secrets.tdb,
Improves documentation generation with respect to XML_CATALOG_FILES environment variable.
Resolved issues where smbd did not detect ctdb public IPv6 addresses for multichannel exclusion, and the force user = localunixuser setting was ineffective when allow trusted domains = no.
Addressed critical vulnerabilities and bugs, such as visible Deleted Object tombstones in AD LDAP to normal users CVE-2018-14628, and various smbget authentication and functionality fixes, enhancing security and user experience.
Security Updates
This month’s updates include critical security patches across various packages. Notable security improvements were integrated into the Firefox, systemd, Samba and PHP updates and more.
Bug Fixes
xorg-x11-server 21.1.11 and xwayland 23.2.4: These updates addressed multiple CVEs, improving security and stability in the display server protocols. A list of this CVEs can be found in the security advisory.
gnutls 3.8.3: CVE-2024-0553 was a vulnerability that allows timing attacks in RSA-PSK, risking data leak and a fix for CVE-2024-0567 was made, which is a flaw in cockpit’s certificate validation that enables remote denial of service attacks.
samba 4.19.4: CVE-2018-14628 an authenticated but unprivileged attacker could have discovered the names and preserved attributes of deleted objects in the LDAP store.
python-Jinja2 3.1.3: CVE-2024-22195 was a flaw where the xmlattr filter improperly allows space-containing keys, enabling attackers to inject harmful attributes through user inputs.
rdma-core 49.1: Although specific CVEs addressed in the update were not mentioned, the update is part of regular maintenance to ensure stability and security.
Contributing to openSUSE Tumbleweed
Your contributions and feedback make openSUSE Tumbleweed better with every update. Whether reporting bugs, suggesting features, or participating in community discussions, your involvement is highly valued.
Conclusion
We will continue to refine and enhance this format. We look forward to another exciting year of development and community engagement with openSUSE Tumbleweed. See you all at FOSDEM next week. Happy computing!
Em breve a minha imagem Linux batizada como JAX (Just Artificial Intelligence Extended), será uma distribuição baseada no openSUSE com IA pré-instalada para rodar em computadores modestos. Nesta imagem teremos recursos para utilizar a computação heterogênea com NVIDIA, Intel e futuros hardwares, e grande parte da mágica esta na tecnologia openVINO.
OpenVINOé uma sigla para “Open Visual Inference and Neural Network Optimization”. É uma plataforma de software livre da Intel que foi projetada para facilitar o desenvolvimento e a implantação de aplicações de inteligência artificial (IA), com foco em otimizar inferência de visão computacional e deep learning em uma variedade de dispositivos Intel. O objetivo do OpenVINO é permitir que os desenvolvedores acelerem suas aplicações de IA, otimizando para o hardware Intel, incluindo CPUs, GPUs integradas, FPGAs (Field Programmable Gate Arrays) e VPU (Unidades de Processamento Visual), como as Intel Movidius Neural Compute Sticks.
O software fornece uma série de ferramentas e pré-otimizações que visam melhorar o desempenho e a eficiência energética dos algoritmos de IA, permitindo que trabalhem de forma mais eficaz em hardware da Intel. Ele suporta modelos de deep learning de frameworks populares como TensorFlow, PyTorch, Caffe, MXNet, entre outros, convertendo-os para o formato intermediário do OpenVINO (IR), que é otimizado para execução eficiente em hardware da Intel.
A ideia é simplificar o processo de levar a IA do protótipo à solução final, reduzindo a necessidade de reescrever ou adaptar o código para cada tipo de hardware, permitindo assim que as aplicações tirem o máximo proveito da aceleração de hardware disponível.
Key Highlights: More Gen AI coverage and frameworks integrations to minimize code changes: Torch.compile is now fully integrated with OpenVINO, which now includes a hardware ‘options’ parameter allowing for seamless inferencing hardware selection by leveraging OpenVINO plugin architecture. Introducing OpenVINO Gen AI repository on GitHub that demonstrates native C and C++ pipeline samples for LLMs. We’ve started supporting string tensors as inputs and tokenizers natively to reduce overhead and ease of production. New and noteworthy models supported or enhanced in this release: Qwen, chatGLM3, Mistral, Zephyr, LCM, and Distil-Whisper. Broader LLM model support and more model compression techniques: As part of the Neural Network Compression Framework (NNCF), Int4 weight compression model formats are now fully supported on Intel® Xeon® CPUs in addition to Intel® Core and iGPU, adding more performance, lower memory usage, and accuracy opportunity when using LLMs. Improved performance of transformer based LLM on CPU using stateful model technique to increase memory efficiency where internal states are shared among multiple iterations of inference. Tokenizer and Torchvision transform support is now available in the OpenVINO runtime (via new API), requiring less preprocessing code and enhancing performance by automatically handling this model setup. More portability and performance to run AI at the edge, in the cloud or locally: Full support for 5th Generation Intel® Xeon® (codename Emerald Rapids), delivering on the AI everywhere promise. Further optimized performance on Intel® Core Ultra (codename Meteor Lake) CPU with latency hint by leveraging both P-core and E-cores. Improved performance on ARM platforms with throughput hint by increasing efficiency in usage of the CPU cores and memory bandwidth. Preview JavaScript API to enable node JS development to access JavaScript binding via source code. Improved model serving of LLMs through OpenVINO Model Server. This not only enables LLM serving over KServe v2 gRPC and REST APIs for more flexibility but also improves throughput by running processing like tokenization on the server side.
Principais destaques:
Maior cobertura com IA Generativa e integrações de estruturas para minimizar alterações de código:
Torch.compile agora está totalmente integrado ao OpenVINO, que agora inclui um parâmetro de ‘opções’ de hardware que permite uma seleção de hardware de inferência perfeita, aproveitando a arquitetura do plugin OpenVINO.
Apresentando o repositório OpenVINO IA Generativa no GitHub que demonstra amostras de pipeline C e C++ nativos para LLMs. Começamos a oferecer suporte nativo a tensores de string como entradas e tokenizadores para reduzir a sobrecarga e facilitar a produção.
Modelos novos e notáveis suportados ou aprimorados nesta versão: Qwen, chatGLM3, Mistral, Zephyr, LCM e Distil-Whisper.
Suporte mais amplo ao modelo LLM e mais técnicas de compactação de modelo:
Como parte do Neural Network Compression Framework (NNCF), os formatos de modelo de compactação de peso Int4 agora são totalmente suportados em CPUs Intel® Xeon®, além de Intel® Core e iGPU, adicionando mais desempenho, menor uso de memória e oportunidade de precisão ao usar LLMs.
Melhor desempenho do LLM baseado em transformador na CPU usando técnica de modelo com estado para aumentar a eficiência da memória onde os estados internos são compartilhados entre múltiplas iterações de inferência.
O suporte à transformação Tokenizer e Torchvision agora está disponível no tempo de execução OpenVINO (por meio da nova API), exigindo menos código de pré-processamento e melhorando o desempenho ao lidar automaticamente com a configuração deste modelo.
Mais portabilidade e desempenho para executar IA na borda, na nuvem ou localmente:
Suporte total para Intel® Xeon® de 5ª geração (codinome Emerald Rapids), cumprindo a promessa de IA em todos os lugares.
Desempenho ainda mais otimizado na CPU Intel® Core Ultra (codinome Meteor Lake) com dica de latência, aproveitando os núcleos P e E.
Melhor desempenho em plataformas ARM com dica de rendimento, aumentando a eficiência no uso dos núcleos da CPU e largura de banda da memória.
Visualize a API JavaScript para permitir que o desenvolvimento JS do nó acesse a ligação JavaScript por meio do código-fonte.
Atendimento de modelo aprimorado de LLMs por meio do OpenVINO Model Server. Isso não apenas permite a veiculação do LLM por meio de APIs REST e gRPC do KServe v2 para maior flexibilidade, mas também melhora o rendimento ao executar processamento como tokenização no lado do servidor.
Como he comentado, los desarrolladores de la Comunidad KDE están inmersos en un salto tecnológico que elevará a cotas superiores la excelencia de los productos KDE. Fruto de este movimiento se ha preparado un lanzamiento colectivo de Plasma 6, KDE Frameworks 6 y KDE Gear 24.02 para el 28 de febrero. A falta de un nombre mejor me he permitido bautizarlo como KDE 6, ya que utilizará tecnología de las librerías Qt 6. Es evidente que hay que preprarar bien las cosas y de esta forma hoy ha se ha anunciado que ya está disponible KDE Neon Testing Edition con KDE 6 para su prueba Es el momento de testear esta versión y reportar los errores que se encuentren. ¡No pierdas la oportunidad de contribuir al desarrollo de Plasma!
Disponible KDE Neon Testing Edition con KDE 6 para su prueba
Desde que probé KDE Neon en mis equipos no hay ninguna otra distribución (aunque ellos no quieran llamarla así) habitando en mis equiopos. Sé que se actualiza mucho y que a veces, muy pocas, puede ponerse algo tonta.
De hecho, mi transición a Plasma 6 se realizará cuando lo haga la distribución, con lo que considero muy importante la noticia de hoy ya que este 25 de enero ha sido anunciado que ya está disponible KDE Neon Testing Edition con KDE 6 ( es decir, de Plasma 6, KDE Frameworks 6 y KDE Gear 24.02). Este conjunto de software está previsto que sea lanzado el 28 de febrero de 2024. Esta primera versión liberada no es apta todavía para el usuario que busquen estabilidad, así que abstenerse usuarios finales si no queréis que se os rompa el sistema.
En palabras de sus desarrolladores:
KDE’s 6th Megarelease es el nombre que se nos ocurrió para el lanzamiento combinado de KDE Frameworks 6, Plasma 6 y el paquete de aplicaciones y librerías KDE Gear. Saldrá dentro de un mes y es la portabilidad de todas nuestras librerías y muchas de nuestras aplicaciones a Qt 6.
En principio, esto no hace ninguna diferencia para los usuarios finales, pero todavía nos gusta hacer algunas mejoras con esto y habrá nuevas características y viejos trastos eliminados lo que permite acelerar las nuevas características que vienen en breve. Pero primero hay que probarlo.
Así que descarga KDE neon Testing Edition que está construido con las ramas Git de los productos que pronto serán lanzados e instálalo en hardware si puedes o en algo como Virtualbox (ten en cuenta que en Virtualbox necesitas activar «Enable 3D Accelaration» en Display settings porque usa Wayland, también deberías activar «EFI Special OSes only» aunque sólo sea para sentirte especial).
Konqi siempre se encuentra dispuesto, con nuestra ayuda, a buscar bugs y solucionarlos.
Todas las tareas dentro del mundo del Software Libre son importantes: desarrollar, traducir, empaquetar, diseñar, promocionar, etc. Pero hay una que se suele pasar por alto y de la que solo nos acordamos cuando las cosas no nos funcionan como debería: buscar errores.
Desde el blog te animo a que tú seas una de las personas responsables del éxito del nuevo lanzamiento de la Comunidad KDE. Para ello debes participar en la tarea de buscar y reportar errores, algo básico para que los desarrolladores los solucionen para que el despegue del escritorio esté bien pulido. Debéis pensar que en muchas ocasiones los errores existen porque no le han aparecido al grupo de desarrolladores ya que no se han dado las circunstancias para que lo hagan.
Now, while hunting for bsc#1219073 which is quite sporadic, and took quite some time to show up often enough so that
became noticeable and traceable, once stars aligned and managed to find a way to get a higher failure rate,
I wanted to have a way for me and for the developer to test the kernel with the different patches to help with the bisecting
and ease the process of finding the culprit and finding a solution for it.
I came with a fairly simple solution, using the --repeat parameter of the openqa-cli tool, and a simple shell script to run it:
```bash
$ cat ~/Downloads/trigger-kernel-openqa-mdadm.sh
# the kernel repo must be the one without https; tests don't have the kernel CA installedKERNEL="KOTD_REPO=http://download.opensuse.org/repositories/Kernel:/linux-next/standard/"REPEAT="--repeat 100"# using 100 by defaultJOBS="https://openqa.your.instan.ce/tests/13311283 https://openqa.your.instan.ce/tests/13311263 https://openqa.your.instan.ce/tests/13311276 https://openqa.your.instan.ce/tests/13311278"BUILD="bsc1219073"for JOB in$JOBS;do
openqa-clone-job --within-instance$JOBCASEDIR=https://github.com/foursixnine/os-autoinst-distri-opensuse.git#tellmewhy ${REPEAT}\_GROUP=DEVELOPERS ${KERNEL}BUILD=${BUILD}FORCE_SERIAL_TERMINAL=1\TEST="${BUILD}_checkmdadm"YAML_SCHEDULE=schedule/qam/QR/15-SP5/textmode/textmode-skip-registration-extra.yaml INSTALLONLY=0 DESKTOP=textmode\
|& tee jobs-launched.list;done;
There are few things to note here:
the kernel repo must be the one without https; tests don’t have the CA installed by default.
the --repeat parameter is set to 100 by default, but can be changed to whatever number is desired.
the JOBS variable contains the list of jobs to clone and run, having all supported architecures is recommended (at least for this case)
the BUILD variable can be anything, but it’s recommended to use the bug number or something that makes sense.
the TEST variable is used to set the name of the test as it will show in the test overview page, you can use TEST+=foo if you want to append text instead of overriding it, the --repeat parameter, will append a number incrementally to your test, see os-autoinst/openQA#5331 for more details.
the YAML_SCHEDULE variable is used to set the yaml schedule to use, there are other ways to modify the schedule, but in this case I want to perform a full installation
Running the script
Ensure you can run at least the openQA client; if you need API keys, see post linked at the beginning of this post
replace the kernel repo with your branch in line 5
run the script $ bash trigger-kernel-openqa-mdadm.sh and you should get the following, times the --repeat if you modified it
1 job has been created:
 - sle-15-SP5-Full-QR-x86_64-Build134.5-skip_registration+workaround_modules@64bit -> https://openqa.your.instan.ce/tests/13345270
Each URL, will be a job triggered in openQA, depending on the load and amount of jobs, you might need to wait quite a bit (some users can help moving the priority of these jobs so it executes faster)
The review stuff:
Looking at the results
Go to https://openqa.your.instan.ce/tests/overview?distri=sle&build=bsc1219073&version=15-SP5 or from any job from the list above click on Job groups menu at the top, and select Build bsc1219073
Click on “Filter”
type the name of the test module to filter in the field Module name, e.g mdadm, and select the desired result of such test module e.g failed (you can also type, and select multiple result types)
Click Apply
The overall summary of the build overview page, will provide you with enough information to calculate the pass/fail rate.
A rule of thumb: anything above 5% is bad, but you need to also understand your sample size + the setup you’re using; YMMV.
Ain’t nobody got time to wait
The script will generate a file called: jobs-launched.list, in case you absolutely need to change the priority of the jobs, set it to 45, so it runs higher than default priority, which is 50
cat jobs-launched.list | grep https | sed -E 's/^.*->\s.*tests\///' | xargs -r -I {} bash -c "openqa-cli api --osd -X POST jobs/{}/prio prio=45; sleep 1"
The magic
The actual magic is in the schedule, so right after booting the system and setting it up, before running the mdadm test, I inserted the update_kernel module, which will add the kernel repo specified by KOTD_REPO, and install the kernel from there, reboot the system, and leave the system ready for the actual test,
however I had to add very small changes:
---
 tests/kernel/update_kernel.pm | 4 ++--
 1 file changed, 2 insertions(+), 2 deletions(-)

diff --git a/tests/kernel/update_kernel.pm b/tests/kernel/update_kernel.pm
index 1d6312bee0dc..048da593f68f 100644
--- a/tests/kernel/update_kernel.pm
+++ b/tests/kernel/update_kernel.pm
@@ -398,7 +398,7 @@ sub boot_to_console {
 sub run {
     my $self = shift;

-    if ((is_ipmi && get_var('LTP_BAREMETAL')) || is_transactional) {
+    if ((is_ipmi && get_var('LTP_BAREMETAL')) || is_transactional || get_var('FORCE_SERIAL_TERMINAL')) {
         # System is already booted after installation, just switch terminal
         select_serial_terminal;
     } else {
@@ -476,7 +476,7 @@ sub run {
         reboot_on_changes;
     } elsif (!get_var('KGRAFT')) {
         power_action('reboot', textmode => 1);
-        $self->wait_boot if get_var('LTP_BAREMETAL');
+        $self->wait_boot if (get_var('FORCE_SERIAL_TERMINAL') || get_var('LTP_BAREMETAL'));
     }
 }
Likely I’ll make a new pull request to have this in the test distribution, but for now this is good enough to help kernel developers
to do some self-service and trigger their own openQA tests, that have many more tests (hopefully in parallel) and faster than if there
was a person doing all of this manually.
Special thanks to the QE Kernel team, who do the amazing job of thinking of some scenarios like this, because they save a lot
of time.

 Member
 Victorhck


 é uma sigla para “Open Visual Inference and Neural Network Optimization”. É uma plataforma de software livre da Intel que foi projetada para facilitar o desenvolvimento e a implantação de aplicações de inteligência artificial (IA), com foco em otimizar inferência de visão computacional e deep learning em uma variedade de dispositivos Intel. O objetivo do OpenVINO é permitir que os desenvolvedores acelerem suas aplicações de IA, otimizando para o hardware Intel, incluindo CPUs, GPUs integradas, FPGAs (Field Programmable Gate Arrays) e VPU (Unidades de Processamento Visual), como as Intel Movidius Neural Compute Sticks.
 e iGPU, adicionando mais desempenho, menor uso de memória e oportunidade de precisão ao usar LLMs.