
Survey to Explore openSUSE's Use Cases, More
A recently published openSUSE survey is asking IT professionals and users about their views on open-source technologies and the ever-evolving Linux ecosystem.
The Use Case Survey aims to gather insights on what will shape the future of Linux and its role in various industries. The survey has four groups with the potential of answering up to 30 questions based on the response of the first and only mandatory question. The survey can take less than 10 minutes depending on how in depth of details a surveyee would like to provide. The overarching themes and ideas of the survey are the following:
Understanding User Needs and Satisfaction
The survey kicks off by categorizing respondents based on their use of IT: work/business, home/hobby, or both. This segmentation helps tailor the approach to better serve the needs of the surveyee.
For those in the work/business category, the survey delves into IT services satisfaction. Those not satisfied have options to suggest improvement, and it explores the idea of future growth prospects for Linux.
Home and Hobby Enthusiasts
For those using Linux at home or for hobbies, the survey asks about their preferences among openSUSE’s offerings like Tumbleweed, Leap, MicroOS, and SlowRoll, and why these distributions appeal to users and developers.
Contributions and Open Source Involvement
As an open-source project, it makes sense to inquire about contributions to open-source projects and to openSUSE. This helps to recognize not only the use of open-source software and projects, but how much users are contributing to it.
General Insights and Future Trends
This section asks all respondents about broader use of Linux beyond primary use cases. The aim is to help to understand the benefits respondents experience and the challenges they encounter. Respondents are encouraged to share their preferences for specific Linux distributions and their thoughts on emerging IT trends and technologies. The community members who came up with the survey are keen to understand if Linux is well-positioned to meet the market’s evolving needs with medium to long-term strategies.
The openSUSE’s Use Case Survey is not just a set of questions; it’s a collective effort to ensure that Linux continues to evolve to meet the diverse needs of its users and to make a brighter future for open-source technologies. Stay tuned for more updates and analysis from the results of the survey, which will run until Oct. 31.

Releasing version 4
After publishing Agama 3 a month ago, it is time for a new release. Among other things, this new version fixes several issues in the startup process, allows the use of a network proxy, adds (partial) support for IPv6, includes a few improvements in the web UI and features a new tool to extract Agama-related logs.
But as important as those changes, we did some internal work that will serve as the base for other features, like proper i18n support and more flexible storage management. Some of those features will land sooner than later, but meanwhile, let's focus on what Agama 4 brings.
Agama startup issues
Our QA team is testing Agama through several scenarios and in different architectures. Those tests helped identify some issues with Agama's startup process: D-Bus activation errors, time-outs and even potential crashes.
Working closely with QA, we have identified and (hopefully) fixed most of those problems. In a nutshell, you should not see the "Cannot connect to D-Bus" error message anymore. And if that's not the case, please open a bug report attaching the logs 😉
If you are interested in the technical details, there is a bunch of fixes you might want to check: #729, #732, #747, #749, #753.
Installing through a proxy
Many users and customers are used to deploy their systems with no direct access to Internet, just
using a proxy. So it did not come as a surprise that it was one of the most requested features.
Agama 4 includes support for specifying a proxy at
boot time using the option proxy= when the installation requires to use a HTTP(S) or FTP source.
The supported proxy URL format is: protocol://[user[:password]@]host[:port].
Of course, the proxy configuration is copied to the target system at the end of the installation.
The nitty-gritty details are available in #696 and #711.
IPv6 support in the automated installation
In Agama 4 it is possible to specify the IPv6 configuration when using the automated installation. To accommodate this feature, we decided to introduce some changes in the profile definition. Here is an example that sets up IPv4 and IPv6 addresses.
  "network": {
    "connections": [
      {
        "id": "Ethernet network device 1",
        "method4": "manual",
        "method6": "manual",
        "addresses": [
          "192.168.122.100/24",
          "::ffff:c0a8:7ac7/64"
        ],
        "gateway4": "192.168.122.1",
        "gateway6": "::ffff:c0a8:7a01",
        "nameservers": [
          "192.168.122.1",
          "2001:4860:4860::8888"
        ]
      }
    ]
  }
Matching specific network devices
In previous versions of Agama, it was not possible specify which interface to use for a given network connection when using the auto-installation mechanism: Agama just delegated on NetworkManager to decide. Now you can associate a network connection with an specific interface by using its name or more complex conditions. See #723 for further details.
  "network": {
    "connections": [
      {
        "id": "Ethernet network device 1",
        "method4": "auto",
        "interface": "enp1s0"
      }
    ]
  }
Agama specific storage settings
Agama reads the information about the products offered for installation from a configuration
(/etc/agama.yaml). Such a file contains a storage section which indicates the options
(whether to use LVM, encryption, etc.) and the volumes (file systems) to create in the target
system.
Since both Agama and YaST use the same mechanism to calculate the storage layout (known as the Guided Setup in YaST), the configuration for Agama was a direct translation of the YaST settings. But although the internal components and algorithms are the same, Agama's approach for tweaking their behavior is actually different in several aspects from YaST. For that reason, Agama now implements its own storage settings, making the product configuration more straightforward and less error-prone.
This change has a direct impact in Agama's auto-installation profiles.
storage: {
  bootDevice: "/dev/vda",
  lvm: true,
  encryptionPassword: "123456"
}
Interested in the implementation? Feel free to check: #721, #738 and #748.
Better logging support
As the project evolves and more people try Agama, we need to make the debugging process easier.
Recently, we introduced a new command that gathers all the information we need to debug the problems
you face when using Agama (similar to the venerable save_y2logs for YaST). Typing agama logs store creates a tarball you can attach to your bug reports.
This first version (#757) is rather basic but we are already working on additional features to have a pleasant debugging process 🐛.
Polishing the web user interface
Balsa Asanovic has become a regular contributor of Agama. For example, he implemented the "show password" feature (#750) and improved the error reporting in the iSCSI form (#699). But not only that, he is actively involved in our discussions in GitHub. Thank you, Balsa!
Moreover, a bug that prevented to download YaST2 logs through the web UI has been fixed (#746).
i18n support is coming to Agama
If you follow the project closely enough, you might already know that we are working on i18n support. Many of the pieces are already in place but we did not make it for this version. However, we trust that our next major version will feature a translated web interface. Actually, our translators are already working on that.
Trying Agama 4
The easiest way to try Agama is to download one of the two variants (ALP or openSUSE) of the Agama Live devel ISO. This image is built in the systemsmanagement:Agama:Devel OBS project and is updated each time we release a new version.
If you are interested in the bleeding edge, try the ISO in the systemsmanagement:Agama:Staging OBS project. It is built automatically and contains the code from Agama's Git repository, so it might get broken occassionally.
What to expect
We expect to be able to ship a translated Agama interface and better handling of the storage settings in the next release. But, meanwhile, we are already working on other important features like software patterns selection or support for the SUSE Customer Center.
Of course, we appreciate opinions and feedback. As usual, feel free to contact the YaST team at the
YaST Development mailing
list, our #yast channel
at Libera.chat or even the Agama project at
GitHub.
Stay tuned!

Announcing Agama 4
After publishing Agama 3 a month ago, it is time for a new release. Among other things, this new version fixes several issues in the startup process, allows the use of a network proxy, adds (partial) support for IPv6, includes a few improvements in the web UI and features a new tool to extract Agama-related logs.
But as important as those changes, we did some internal work that will serve as the base for other features, like proper i18n support and more flexible storage management. Some of those features will land sooner than later, but meanwhile, let’s focus on what Agama 4 brings.
Agama startup issues
Our QA team is testing Agama through several scenarios and in different architectures. Those tests helped identify some issues with Agama’s startup process: D-Bus activation errors, time-outs and even potential crashes.
Working closely with QA, we have identified and (hopefully) fixed most of those problems. In a nutshell, you should not see the “Cannot connect to D-Bus” error message anymore. And if that’s not the case, please open a bug report attaching the logs :wink:
If you are interested in the technical details, there is a bunch of fixes you might want to check: #729, #732, #747, #749, #753.
Installing through a proxy
Many users and customers are used to deploy their systems with no direct access to Internet, just
using a proxy. So it did not come as a surprise that it was one of the most requested features.
Agama 4 includes support for specifying a proxy at
boot time using the option proxy= when the installation requires to use a HTTP(S) or FTP source.
The supported proxy URL format is: protocol://[user[:password]@]host[:port].
Of course, the proxy configuration is copied to the target system at the end of the installation.
The nitty-gritty details are available in #696 and #711.
IPv6 support in the automated installation
In Agama 4 it is possible to specify the IPv6 configuration when using the automated installation. To accommodate this feature, we decided to introduce some changes in the profile definition. Here is an example that sets up IPv4 and IPv6 addresses.
  "network": {
    "connections": [
      {
        "id": "Ethernet network device 1",
        "method4": "manual",
        "method6": "manual",
        "addresses": [
          "192.168.122.100/24",
          "::ffff:c0a8:7ac7/64"
        ],
        "gateway4": "192.168.122.1",
        "gateway6": "::ffff:c0a8:7a01",
        "nameservers": [
          "192.168.122.1",
          "2001:4860:4860::8888"
        ]
      }
    ]
  }
Matching specific network devices
In previous versions of Agama, it was not possible specify which interface to use for a given network connection when using the auto-installation mechanism: Agama just delegated on NetworkManager to decide. Now you can associate a network connection with an specific interface by using its name or more complex conditions. See #723 for further details.
  "network": {
    "connections": [
      {
        "id": "Ethernet network device 1",
        "method4": "auto",
        "interface": "enp1s0"
      }
    ]
  }
Agama specific storage settings
Agama reads the information about the products offered for installation from a configuration
(/etc/agama.yaml). Such a file contains a storage section which indicates the options
(whether to use LVM, encryption, etc.) and the volumes (file systems) to create in the target
system.
Since both Agama and YaST use the same mechanism to calculate the storage layout (known as the Guided Setup in YaST), the configuration for Agama was a direct translation of the YaST settings. But although the internal components and algorithms are the same, Agama’s approach for tweaking their behavior is actually different in several aspects from YaST. For that reason, Agama now implements its own storage settings, making the product configuration more straightforward and less error-prone.
This change has a direct impact in Agama’s auto-installation profiles.
storage: {
  bootDevice: "/dev/vda",
  lvm: true,
  encryptionPassword: "123456"
}
Interested in the implementation? Feel free to check: #721, #738 and #748.
Better logging support
As the project evolves and more people try Agama, we need to make the debugging process easier.
Recently, we introduced a new command that gathers all the information we need to debug the problems
you face when using Agama (similar to the venerable save_y2logs for YaST). Typing agama logs
store creates a tarball you can attach to your bug reports.
This first version (#757) is rather basic but we are already working on additional features to have a pleasant debugging process :bug:.
Polishing the web user interface
Balsa Asanovic has become a regular contributor of Agama. For example, he implemented the “show password” feature (#750) and improved the error reporting in the iSCSI form (#699). But not only that, he is actively involved in our discussions in GitHub. Thank you, Balsa!
Moreover, a bug that prevented to download YaST2 logs through the web UI has been fixed (#746).
i18n support is coming to Agama
If you follow the project closely enough, you might already know that we are working on i18n support. Many of the pieces are already in place but we did not make it for this version. However, we trust that our next major version will feature a translated web interface. Actually, our translators are already working on that.
Trying Agama 4
The easiest way to try Agama is to download one of the two variants (ALP or openSUSE) of the Agama Live devel ISO. This image is built in the systemsmanagement:Agama:Devel OBS project and is updated each time we release a new version.
If you are interested in the bleeding edge, try the ISO in the systemsmanagement:Agama:Staging OBS project. It is built automatically and contains the code from Agama’s Git repository, so it might get broken occassionally.
What to expect
We expect to be able to ship a translated Agama interface and better handling of the storage settings in the next release. But, meanwhile, we are already working on other important features like software patterns selection or support for the SUSE Customer Center.
Of course, we appreciate opinions and feedback. As usual, feel free to contact the YaST team at the
YaST Development mailing
list, our #yast channel
at Libera.chat or even the Agama project at
GitHub.
Stay tuned!

 Vojtaeus
Kurz práce v příkazové řádce Linuxu nejen pro MetaCentrum 2024
Nebojte se příkazové řádky Linuxu! Je to mocný a přívětivý nástroj umožňující efektivně zpracovat i velká data a zautomatizovat činnosti. Prakticky shodně funguje příkazová řádka i v Apple macOS, BSD a dalších UNIXových systémech, nejen v Linuxu. Kurz je vhodný pro úplné začátečníky i mírně pokročilé. Jediným vstupním požadavkem je zájem (nebo potřeba) pracovat v příkazové řádce, typicky na linuxovém výpočetním serveru.
 Member
openSUSE Slowroll mantendrá el nombre
La encuesta realizada a la comunidad de openSUSE ha revelado que una amplia mayoría ha votado por mantener el nombre

Hace una semana podías leer en este mismo blog, que se había puesto en marcha una encuesta a la comunidad de openSUSE para ponerle un nombre a la nueva versión de este sistema operativo basado en GNU/Linux.
La comunidad ya ha expresado su opinión y más de 1.000 personas han dicho cual es su preferencia.
Aunque a openSUSE Leap (la versión estable de publicaciones periódicas y pensada en uso de soporte extendido) todavía le queda cuerda para un tiempo, la comunidad de openSUSE ha puesto ya en marcha una nueva versión de openSUSE.
Esa nueva versión es un compromiso entre el largo soporte de Leap y la evolución constante de Tumbleweed, la versión rolling release de openSUSE.
El proyecto nació con el nombre temporal de Slowroll que indica ese caracter «rolling release» pero más reposado que Tumbleweed.
Después de la buena acogida inicial, se puso en marcha una encuesta para pedir la opinión a la comunidad sobre el nombre definitivo que debería tener este nuevo proyecto. Según se puede leer en el anuncio oficial, más de 1.000 personas han expresado su opinión y este ha sido el resultado de las 5 opciones más votadas:
- Slowroll – 46.33%
- Driftwood – 25.91%
- Snowroll – 21.04%
- Drift – 20.51%
- Wave – 16.36%
A la vista de los resultados, se ve que Slowroll, la primera opción con casi la mitad de los votos es la opción más votada muy de lejos seguida por la segunda opción. Por tanto, Slowroll será el nombre con el que se siga designando a esta nueva versión de openSUSE.
La verdad, es que era mi opción preferida y tampoco quería que se cambiara por no despistar más a las personas que sean ajenas de openSUSE. Son pocas las distribuciones de GNU/Linux que ofrezcan tan variadas opciones de su proyecto (¿quizás Fedora esté a la zaga?)
Ahora viene la fase de diseñarle un logo para esta nueva versión igual que tiene Leap, Tumbleweed, MicroOS o ALP. Puedes participar enviando tu diseño al canal de Telegram de openSUSE.

Slowroll Distribution Keeps Name
Choosing a name for anything is not an easy task; the detail can wield significant influence, which is why a survey to make a decision about renaming Slowroll was presented.
Slowroll is a new distribution based on Tumbleweed, but rolls out updates slower; it is designed to implement updates at a pace of one to two months, integrating bug fixes and addressing Common Vulnerability and Exposure issues as they emerge.
As will all things in open source, the name was presented along with the idea for the distribution and discussion took place about the details surrounding Slowroll. The origin of the name was self-describing the distribution, but other names for Slowroll were proposed, so the renaming of it was put to a vote. All names there were proposed were included in the survey.
That voting process concluded today with more than 1,000 votes cast by interested members of the open-source community. This enthusiastic involvement underscores the interest of the openSUSE user base and trajectory of the project. The top results are the following:
-
Slowroll - 46.33%
-
Driftwood - 25.91%
-
Snowroll - 21.04%
-
Drift - 20.51%
-
Wave - 16.36%
-
Orbit - 13.44%
-
Lunar - 12.56%
-
Tide - 12.47%
The percentages surpass the 100% threshold due to the respondents’ option to endorse multiple choices.
With an impressive 46.33% of the votes, the community found Slowroll to remain the best option to describe the naming of the distribution. The decision has been reached to retain the established name as it represents a communal vision and messaging in name.
Members of the project extend their gratitude and appreciation for all those who took the survey and contributed to this pivotal decision.
Anyone interested in making a logo for the new distribution can send design images to the project’s marketing telegram channel. The logo should be an .svg image and should complement other logos for the project that related to a branding direction being discussed on the project’s GitHub.
Thank you for being part of the journey, and have a lot of fun!
Controla tu reproductor multimedia con MPD Plasma Widget- Plasmoides de KDE (226)
Ahora que el mundo de la manzana ha descubierto los applets en elescritorio es un buen momento para decdicar otra entrada a estos veteranas pequeñas aplicaciones que llevan años en el mundo de KDE. Hoy toca uno que controla tu reproductor multimedia en tu escritorio. Su nombre: MPD Plasma Widget y será el plasmoide número 226 de la serie.
Controla tu reproductor multimedia con MPD Plasma Widget- Plasmoides de KDE (226)
Como he comentado en otras ocasiones, de plasmoides tenemos de todo tipo funcionales, de configuración, de comportamiento, de decoración o, como no podía ser de otra forma, de información sobre nuestro sistema como puede ser el uso de disco duro, o de memoria RAM, la temperatura o la carga de uso de nuestras CPUs.
Así que espero que le deis la bienvenida a un plasmoide llamado MPD Plasma Widget, una creación de Schlaefer con el que controlas el reproductor multimedia directamente desde tu escritorio. No es el único que hay pero siempre viene bien tener alternativas.
Entre sus características más destacadas se encuentran:
- Clic en la carátula para reproducir/pausar
- Doble clic en la carátula para escuchar la canción siguiente
- Desplaza la rueda del ratón por la carátula o utilice el control deslizante para el volumen.
- Haz clic en la información de la canción para gestionar la cola

Y como siempre digo, si os gusta el plasmoide podéis «pagarlo» de muchas formas en la nueva página de KDE Store, que estoy seguro que el desarrollador lo agradecer?: puntúale positivamente, hazle un comentario en la página o realiza una donación. Ayudar al desarrollo del Software Libre también se hace simplemente dando las gracias, ayuda mucho más de lo que os podéis imaginar, recordad la campaña I love Free Software Day de la Free Software Foundation donde se nos recordaba esta forma tan sencilla de colaborar con el gran proyecto del Software Libre y que en el blog dedicamos un artículo.
Más información: KDE Store
¿Qué son los plasmoides?
Para los no iniciados en el blog, quizás la palabra plasmoide le suene un poco rara pero no es mas que el nombre que reciben los widgets para el escritorio Plasma de KDE.
En otras palabras, los plasmoides no son más que pequeñas aplicaciones que puestas sobre el escritorio o sobre una de las barras de tareas del mismo aumentan las funcionalidades del mismo o simplemente lo decoran.
La entrada Controla tu reproductor multimedia con MPD Plasma Widget- Plasmoides de KDE (226) se publicó primero en KDE Blog.
La falta de implicación en las asociaciones de Software Libre – Charla Hablemos de GNU/Linux València
Organizada por la asociación sin ánimo de lucro GNU/Linux València retomamos las charlas Hablemos en este inicio del otoño y que tanto éxito tuvieron en el pasado. Y lo hace con una charla a cargo de Voro Mataix y Julián Moyano que reflexionaran sobre «La falta de implicación en las asociaciones de Software Libre» que se celebrará el próximo el próximo 29 de septiembre a las 19:00 horas GTM+2.
La falta de implicación en las asociaciones de Software Libre – Charla Hablemos de GNU/Linux València
Me complace presentaros un nuevo evento de la Asociación sin Ánimo de Lucro GNU/Linux València. que versará sobre un tema delicado pero que creo que alguien debe poner sobre la mesa, no solo para revertir una situación que parece ser que se ha hecho patente desde la pandemia sino también para reflexionar sobre si este es el modelo que se quiere… que quizás sea el único posible. En fin.
En palabras de los organizadores:
Después del paréntesis veraniego reanudamos nuestros encuentros del último viernes laborable de cada mes.
En esta ocasión Voro Mataix y Julián Moyano charlarán sobre la creciente dificultad que tienen las asociaciones, y en especial las dedicadas al software libre, para atraer al público en sus actos.
Analizaran con los asistentes que actuaciones podemos intentar para conseguir revertir esta tendencia.
Es este caso será el 29 de septiembre a las 19:00 a 20:30 GTM+2 (huso horario de la España peninsular) en Las Naves (Carrer de Joan Verdeguer, 16, 46024, València: Localización en OpenStreetMap)
Más información: GNU/Linux València
¡Únete a GNU/Linux València!
Aprovecho para recordar que desde hace unos meses, los chicos de GNU/Linux Valencia ya tienen su menú propio en el blog, con lo que seguir sus eventos en esta humilde bitácora será más fácil que nunca, y así podréis comprobar su alto nivel de actividades que realizan que destacan por su variedad.
Y que además, GNU/Linux València creció y se ha convertió en asociación. Así que si buscas una forma de colaborar con el Software Libre, esta asociación puede ser tu sitio. ¡Te esperamos!
La entrada La falta de implicación en las asociaciones de Software Libre – Charla Hablemos de GNU/Linux València se publicó primero en KDE Blog.
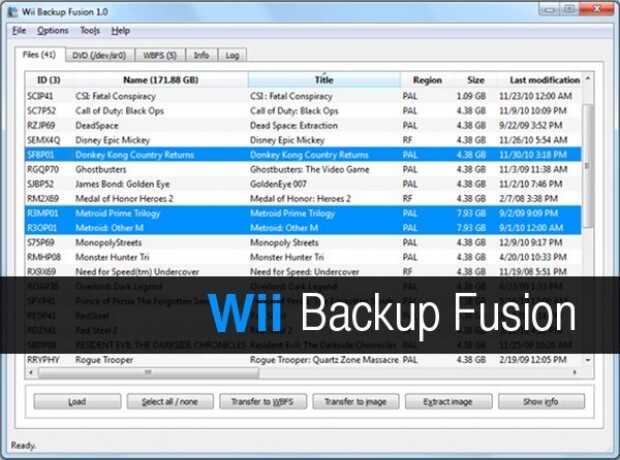
Cómo instalar Wii Backup Fusion en Linux
Hace unos días que os prensenté Wii Backup Fusion, una aplicacion que gestiona tus copias de seguridad de la Wii en Linux con lo que te asegurabas que nunca perdería tus juegos de esta veterana y mítica consola. A pesar de que la encontré rápidp debo reconocer que no fue sencillo hacerla funcionar, así que hoy os cuento cómo instalar Wii Backup Fusion en Linux, lo cual no es demasiado complicado eligiendo un métoto, y lo más importante, cómo ejecutarlo de foma correcta.
¿Qué es Wii Bakcup Fusion?
Como ya dije., Wii Backup Fusion es un gestor gráfico de ISO y WBFS basado en Wiimm’s ISO Tools y creado por Larsen Vallecillo. Esta aplicación nos permite realizar de forma gráfica copias de seguridad completas a la vez que nos facilita la gestión de juegos de Wii en Windows, Mac OS y Linux.
Esta aplicación se puede utilizar para los juegos, crear particiones WBFS (Wii Backup File System) y DVD con toda la información del juego, para transferir imágenes en una partición WBFS juego o archivos, etc. La conversión también puede ocurrir entre los formatos de imagen del juego.
Cómo instalar Wii Backup Fusion en Linux
Para instalar esta aplicación en Linux, que es lo que nos interesa, tenemos tres opciones básicas.
- Los usuarios que utilicen una distribución basada en Arch lo tienen fácil ya que está preparado para ser compilado para arquitecturas i686 y x86_64. Más información aquí.
- Para los que no tengamos esa aqitectura se pude hacerlo desde cero ya que nos ofrecen el código fuente. Más información aquí.
- Y para los que tememos hacerlo por temas de dependencias y/o conocimientos os animo a utilizar una AppImage, con lo que en realidad no instalamos nada, simplemente ejecutamos la aplicación.
Si elegís la última el enlace óptimo es el siguiente donde encontramos la última AppImage del 2021 para 32 y 64 bits, así como también el código fuente y las versiones Windows y Mac.
Una vez descargada en nuestra computadora se debe ejecutar pero aquí tenemos un detalle muy importante ya que la aplicación debe ejecutarse con los permisos de administrador, para que tenga acceso a la partición wbfs que es la que utiliza un disco duro formateado de forma óptima para la Wii. Para hacerlo, suponiendo que tenemos la versión WiiBaFu_2.0_Linux-x86_64.AppImage, debemos ejecutar la AppImage de la siguiente forma:
$ sudo ./WiiBaFu_2.0_Linux-x86_64.AppImage
Con lo que ya lo tendremos. Espero que os sea de utilidad.
Más información: Wii Backup Fusion | Download Wii Backup Fusion
La entrada Cómo instalar Wii Backup Fusion en Linux se publicó primero en KDE Blog.

Kraft Version 1.1
Version 1.1 von Kraft ist mit wichtigen Verbesserungen für Benutzende und die Integration in moderne Softwarestacks wie cmake und KDE releast worden. Die wichtigsten Änderungen sollen hier kurz vorgestellt werden.
Als erstes einige technische Details: Die niederländischen Übersetzungen sind aktualisiert. Das Anwendungs-Icon wurde repariert, und die cmake Steuerdateien wurden so geändert, dass Kraft jetzt sowohl mit älteren als auch neuen Versionen von Akonadi zusammenarbeitet, wie sie in verschiedenen Linux-Distributionen gefunden werden.
Aus Sicht von Benutzenden gibt es zwei wesentliche Verbesserungen:
Erstens können die Kopf- und Fußtexte der Dokumente können jetzt mit Makros erweitert werden, die automatische Berechnung z. B. von Datumswerten unterstützen. So kann beispielsweise ein Zahlungsziel von zwei Wochen nach dem Dokumentdatum durch den Einsatz eines Makros sehr leicht automatisch auf dem Ausdruck eingefügt werden. Darüber hinaus gibt es noch weitere interessante Makros z. B. zur Berechnung der sog. haushaltsnahen Dienstleistungen. Sie werden in einem separaten Beitrag vorgestellt.
Zum Zweiten wurde ein neuer Knopf hinzugefügt, mit dem Vorlagen für Kopf- und Fußtexte jetzt an der Cursorposition zusätzlich in die Texte des Dokumentes eingefügt werden. Bisher konnten nur die gesamten Dokumenttexte ersetzt werden. Mit der neuen Erweiterung steigt die Flexibilität wie die
Vorlagen organisiert werden, da jetzt leichter spezifische Textbausteine erstellt werden können.
Parallel zu diesem Release geht die Arbeit an einem Kraft 2.0 Branch weiter, der Kraft zu einem kollaborativen, digital souveränen Werkzeug über Internet machen wird.
Kraft Version 1.1 kann wie üblich über die Download-Seite heruntergeladen werden.
Bitte beachten: Wenn man Kraft 1.1 selbst übersetzen will, stößt man auf einen kleinen Fehler: Im root-Verzeichnis des source Tarballs wird die Datei .tag erwartet, sonst bricht cmake mit einem Fehler ab. Dies kann behoben werden, indem die Datei angelegt wird mit dem Inhalt 100ca9f3.