
 Member
 benJIman
Meetings, ugh! Let’s change our language
“How was your day?” “Ugh, I spent all day in meetings, didn’t get any work done!”
How often have you heard this exchange?
It makes me sad because someone’s day has not been joyful; work can be fun.
I love a whinge as much as the next Brit; maybe if we said what we mean rather than using the catch-all “meetings” we could make work joyful.
Meetings are work
Meetings are work. It’s a rare job where you can get something done alone without collaborating with anyone else. There are some organisations that thrive with purely async communication. Regardless, if you’re having meetings let’s recognise that they are work.
What was it about your meeting-full day that made you sad? It doesn’t have to be that way.
Working together can be fun
I’ve seen teams after a day of ensemble (mob) programming. Exhausted, yet elated at the amount they’ve been able to achieve together; at the breakthroughs they’ve made. Yet a group of people, working together, on the same thing, sounds an awful lot like a meeting. Aren’t those bad‽
Teams who make time together for a full day of planning, who embrace the opportunity to envision the future together, can sometimes come away filled with hope. Hope that better things are within their grasp than they previously believed possible.
Yet the more common experience of meetings seems synonymous with “waste of time” or “distraction from real work”. Why is this? Why weren’t they useful?
One team’s standup can be an energising way to kick off the day. Hearing interesting things we collectively learned since yesterday Deciding together what that means for today’s plan; who will work with whom on what?
For another team it may be a depressing round of status updates that shames people who feel bad that they’ve not achieved as much as they’d hoped.
How do we make meetings better?
A first step is talking about what did or didn’t work, rather than accepting they have to be this way. Because there’s no “one weird trick” that will make your meetings magical. You’ll need to find what works for your team.
Why should you care? You probably prefer fun work. If you could make your meetings a little more fun you might enjoy your work a lot more.
Meetings beget meetings. Running out of time. Follow-ups. Clarifying things that were confusing from the first meeting… Ineffective meetings breed. Tolerating bad leads to more misery.
Saying what we mean
Here’s some things we could say that are more specific
We didn’t need a meeting for that.
Was it purely a broadcast of information with no interactivity? Could we have handled it asynchronously via email/irc/slack etc?
I didn’t need to be there
No new information to you? Nothing you could contribute? If you’re not adding value how about applying the law of mobility and leave / opt out in future. Or feed back to the organiser. Maybe they’re seeing value you’re adding that you’re oblivious to.
I don’t know what that meeting was for
How about we clarify the goal for next time. Make it a ground rule for future meetings. If it’s worth everyone making time for it’s worth stating the purpose clearly so people can prepare & participate.
It wasn’t productive
Was the meeting to make a decision and we came out without either deciding anything or learning anything?
Was the meeting to make progress towards a shared goal and it feels like we talked for an hour and achieved nothing.
Perhaps we’d benefit from a facilitator next time.
It was boring
Can we try mixing up the format? Could you rotate the facilitator to get different styles? How can you engage everyone? Or does the boredom indicate that the topic is not worth a meeting?
If it is important but still boring how do we make it engaging? It’s telling that “workshop” “retrospective” “hackathon” and other more specific names don’t have the same connotation as the catch-all “meetings”. Just giving the activity a name shows that someone has thought about an appropriate activity that will engage the participants to achieve a goal.
I needed more time to think
Could we share proposals for consideration beforehand? Suggest background reading to enable people to come prepared? Allocate time for reading and thinking in the meeting?
It was too long
We could have achieved the same outcome in 5 minutes but ended up talking in circles for an hour.
I didn’t hear from ____
Did we exclude certain people from the conversation, intentionally or unintentionally? What efforts can you make to create a space for everyone to participate?
Not enough focus time
Do you need to defragment your calendar? Cramming in activities that need deep focus in gaps between meetings is not a recipe for success. Do you need to ask your manager for help rescheduling meetings that you can’t control? Should you be going to them all or can you trust someone else to represent you?
Too many context switches
Even if you don’t need focus time, context switching from one meeting to another can be exhausting. Are you or your team actively involved in too many different things? Can you say no to more? Can you work with others and reschedule meetings to give each day a focus?
It wasn’t as important as other work
Maybe you’re wasting lots of time planning things you might never get to and would be better off focusing on what’s important right now? Is your whole team attending something that you could send a representative to? Perhaps reading the minutes will be enough.
Highlight the value
We decided on a database for the next feature
We learned how the production incident occurred
We heard the difficulty the customer is having with…
We made a plan for the day
We shared how we halved our production lead time
We realised that our solution won’t work
We agreed some coding principles
Tackling your meetings
What’s your least valuable meeting? Which brings you the least joy?
What’s your most valuable meeting? Which brings you the most joy?
What’s the difference between these? What made them good or bad.
Turn up the good; vote with your feet on the bad.
The post Meetings, ugh! Let’s change our language appeared first on Benji's Blog.
Disponible el vigesimocuarto número de la revista digital SoloLinux que cumple 2 años
Ya tenemos disponible el vigesimocuarto número de la revista digital SoloLinux la cual cunle 2 años de publicaciones mensuales sin interrupciones y que, como siempre, podéis leer online o descargar para poder disfrutar en vuestro lugar de vacaciones si tenéis una conexión de internet limitada o donde queráis, que para eso el Software Libre promueve la libertad.
Disponible el vigesimocuarto número de la revista digital SoloLinux que cumple 2 años
La introducción es repetitiva, pero es que es interesante hacer un poco de historia cada mes para aquellos que llegan de rebote a esta sección.
Hubo un tiempo en que las revistas sobre Linux digitales estuvieron de moda. Tenemos todavía publicándose Atix y Full Circle Magazine (en inglés, gracias Vampiro Nocturno), pero antes teníamos a Linux+, Papirux, Begins o TuxInfo, por citar algunas discontinuadas.
Desde hace un tiempo una revista digital SoloLinux tiene su entrada mensual en el blog, tener todas las alternativas posibles para compartir conocimiento es algo que caracteriza al Conocimiento Libre.
Y es loable no solo por su calidad y puntualidad sino porque el proyecto acaba de cunplir 2 años de publicación. Por tanto solo puedo decir que «¡Muchas gracias por vuestro trabajo!» y que digáis una palabras:
«Lo que parecía una utopía, muchos nos llamaban soñadores, ahora es una realidad. Hoy celebramos dos años de la revista digital sololinux. Sí, estimados lectores hoy lanzamos el número 24 de nuestra revista digital y, os aseguro que no es tarea fácil tanto la creación de contenidos diarios de calidad, como el propio diseño y maquetación de la revista.
Todo esto haciendo frente a una pandemia mundial, donde en algún momento nos sentimos rendidos y pensamos en bajar los brazos. Pero debemos seguir nuestra labor, los miles de lectores diarios se lo merecen, ahora más nunca no podemos fallaros.«

Más información: Revista Sololinux N24
Así que, ya tenemos disponible el vigésimocuarto número de la revistas digital SoloLinux, el cual llega, como siempre, cargado de contenidos y con el siguiente índice.
|
MANUALES Debsecan – Actualizaciones de seguridad en Debian Limitar el tiempo de sesión sudo en Linux Cómo actualizar sudo en Linux Uso del comando history en Linux Preguntas y respuestas sobre puertos en Linux Instalar Apache Maven en Ubuntu 20.04 Uso del comando sar – Monitorizar los recursos del sistema Uso del comando strace en linux 13 comandos linux que pueden destruir tu sistema Comparar archivos en linux con el comando diff Uso del comando split en linux Modificar el limite de archivos abiertos en linux Verificar la suma de comprobación SHA256 Borrar la caché de Apt en Debian, Ubuntu y derivados |
SOFTWARE Nuevo qBittorrent 4.3.2 compatible con IDN Instalar gThumb 3.11.2 en Ubuntu y derivados Instalar Luminance HDR 2.6.1.1 en Linux HARDWARE Que son los inodos en linux Mantener los controladores Mesa actualizados DISTROS LINUX Linux Mint 20.1 Ulyssa – Listo para su descarga Wifislax 2.4 64bits – El linux forense español REDES Diferencias entre TCP y UDP Deshabilitar IPv6 en Ubuntu 20.04 y otras distribuciones Como usar traceroute en linux ENTREVISTAS Entrevista a Erwin Andres Espitia Torres, Admin de Espacio Tecnológico |
La revista puede ser descargada o simplemente visualizarla en línea, ya que se cuelga en diferente servicios como Calameo. A continuación os dejo los enlaces de descarga y visualización directa de todos los números publicados hasta la fecha.
Además, recordar que desde el número anterior se ha abierto el canal oficial sololinux.es de Telegram: https://t.me/sololinux_es
Descarga:
Visualización directa:
Evidentemente, este proyecto no se centra en exclusivo a los contenidos de su web y está abierto a colaboraciones de todo tipo. De esta forma si estas interesado en insertar publicidad en nuestra revista, o quieres que publiquemos algún articulo que hayas escrito tu mismo, puedes contactar con «Adrián» por correo electrónico: adrian @ sololinux. com
Muchos ánimos en este proyecto que ya parecer estar consolidad y que que facilita la difusión del Software Libre de una forma que ya no es tan habitual en estos tiempos pero que es igual de válida y necesaria en algunas ocasiones.
Git Worktree — Concurrent Development

Sometimes you have to sit on two chairs at the same time. No, I don't mean to give you east-European political advice. I mean developing things in two concurrent branches can be a pain with the constant switching.
In my case I need to develop a stylesheet for both gtk3 and gtk4 at the same time, usually having to compare the two running concurrently. Matthias recently introduced me to the secret cabal of people knowing about git worktree. Thanks to it you can have two branches of the same project checked out at the same time, not only saving you the (cheap) drive space, but keeping a single history so cherry picking and diffing between the two doesn't need to involve refreshing remotes or jumping through other hoops.
So let's take a look at my scenario. I have gtk checked out in Builder, by default going to ~/Projects/gtk. The master branch equates to the new goodness of gtk4. Pushing the run button will build me gtk4-widget-factory ready to test the stylesheet. But to have the gtk3 equivalent run side by side, I don't use a duplicate of the repo, but instead created a worktree copy:
cd ~/Projects/gtk
git checkout -tb gtk-3-24 origin/gtk-3-24
git checkout master
git worktree add ../gtk3 gtk-3-24
At this point you can open the gtk3 project in Builder and works as if those were not closely interconnected. But every commit is 'visible' in the other project.

Usar la cámara del celular como webcam en openSUSE Tumbleweed
KDE está presente en FOSDEM 2021 en línea
Como todos los años, mañana sábado y el próximo domingo la gente de KDE está presente en FOSDEM 2021. Esta edición, como todos los eventos desde el pasado marzo del 2020 se realizará en línea debido a la pandemia mundial provocada por la COVID’19. No obstante, este inconveniente nos va a venir muy bien para no tener excusar para pasarnos un poco por este evento.
Un Fosdem 2021 en línea diferente

Para aquellos que no lo sepan, FOSDEM (del inglés Free and Open source Software Developers’ European Meeting) es un evento anual de dos días que reúne a la comunidad del Software Libre) y que se celebra desde 2001, con cada vez más participantes, charlas y talleres. Se podría decir que aglutina los proyectos de Software Libre más importantes de la escena actual.
En esta ocasión el evento se celebrará el 6 y 7 de febrero en línea, y como todos los años, se esperan miles de programadores, diseñadores, mantenedores y jefes de los equipos de los proyecto más importantes del panorama actual del Software Libre.
Fosdem 2021 tiene 3 líneas principales de actuación, es decir, 3 tipos diferentes de actividades que puedes realizar:
- Las charlas principales que consisten en las típicas webconferencias que en Fosdem se prensentan en 4 ponencias simultáneas… es por tanto imposible llegar a todas. Os recomiendo consultar el calendario del sábado y del domingo.
- Las Salas de desarrolladores (Developers Rooms) que son charlas, sesiones de hacking, debates abiertos organizadas y gestionadas por los propios proyectos de código abierto, o incluso por asociaciones entre varios de estos proyectos sobre un tema común para fomentar la colaboración.
- Los stands que ofrecen una oportunidad única de entrar en contacto con los desarrolladores o miembros del proyecto, y descubrir de un vistazo lo que hacen. En Fosdem 2021 hay más de 50 stands.
KDE está presente en FOSDEM 2021 en línea
Y el proyecto KDE no puede estar presente de este evento y estará representado mediante un stand donde además de poder conocer todo el trabajo que está realizando esta comunidad.
El enlace al Stand es el siguiente y las actividades están resumidas en la imagen inferior.

Este año no tienes excusa ya que desde casa te puedes pasar por el stand, así que espero que nos veamos por ahí.

Wayland, firewalld, PulseAudio update in Tumbleweed
A total of five openSUSE Tumbleweed snapshots were released so far this week.
Among some of the more known packages to update this week in Tumbleweed were firewalld, Flatpak, Wayland, LibreOffice, PulseAudio and both Mozilla Firefox and Thunderbird.
Two out the five snapshots updated more than three packages like the most recent snapshot; snapshot 20210203 updated gthumb 3.10.2. The image viewer and browser utility for the GNOME environment fixed a jump to the bottom when selecting thumbnails with mouse and fixed a possible crash to the app after cancelling a search. KDE’s hex editor for viewing and editing raw data of a file, okteta 0.26.5, improved the cursor flash time setting and improved a new menu entry for selecting a custom UI color scheme. The xfce4-cpufreq-plugin 1.2.4 package now creates a label widget if it does not already exist. This panel plugin shows information about the CPU governor and frequencies supported and used by a system.
PulseAudio disabled Link Time Optimisation on armv7 in the updated 14.2 version in Snapshot 20210202. The snapshot updated the Linux Kernel to version 5.10.12 and ImageMagick to version 7.0.10.59, which now generates histograms by comparing pixel components rather than color. LibreOffice fixed some text that wrongly aligned in its 7.0.4 update. Wayland 1.19.0 had a minor update with bug fixes and protocol updates. Several Python Packages were updated in the snapshot including python-packaging 20.8, which reverted back to setuptools for compatibility purposes for some Linux distros, and python-Pillow 8.1.0, which fixed Common Vulnerabilities and Exposures that a Read Overflow in PCX Decoding. A patch was removed in firewalld 0.9.3 and fixes were made for iptables when an ipset is used as a zone source. The general-purpose parser generator bison 3.7.5 fixed the Table Generation that was generating incorrect parsers when there are many useless tokens. Other packages updated in the snapshot were xterm 363, yast2 4.3.51, iproute2 5.10.0 and zeromq 4.3.4.
Snapshot 20210131 updated the theorem prover from Microsoft Research; this z3 package was updated to version 4.8.10, which rewrote the arithmetic solver thereby replacing the legacy arithmetic solver.
Both Mozilla Firefox and Thunderbird were updated in snapshot 20210130. The new 85.0 major version of Firefox eliminated 13 CVEs. A new feature in the browser protects from supercookies, which is a type of tracker that can stay hidden in the browser and track even after clearing cookies. Thunderbird 78.7.0 fixed a half dozen CVEs. One of the CVEs was related to an IMAP response injection when using the Opportunistic Transport Security Layer. Flatpak 1.10.1 switched to an upstream release tarball, updated translations and had a fix for some compiler warnings. Documentation typos were fixed and a fix to a minor extensions problem was made in the update of sqlite3 3.34.1. Other packages to update in the snapshot were bind 9.16.11, icewm 2.1.1, soundtouch 2.2 and yast2-bootloader 4.3.20, which ensures the proposal is re-calculated when the partitioning plan has changed,
Another snapshot with three packages updated was 20210128. This snapshot updated perl-Mojolicious to version 8.72, which deprecated quite a few connection methods, but did add support for trusted reverse proxies. Other packages to update in the snapshot were perl-IO-Tty 1.16, which switched to a github for tracking issues, and kvm_stat 5.10.9, which installs the systemd unit file in the proper place, so that the service can be started right away.
Animated Tour
We've struggled with bringing subtle animation to GNOME in the past. There is interest in bringing it in some shape or form to gtk4. The bad news is the tools are still lacking on the production side. There's not much past Glaxanimate to do even simple transforms.

While we iterated on the GNOME 40 onboarding, it became clear a subtle animation for the touch gestures would really help. And because the CSS machinery in gtk is fairly capable, I experimented implementing such a thing with good'ol @keyframes.
While anything more complex would be a nightmare, animating the hand going back and forth is well served by a simple CSS rule:
@keyframes left-and-right {
    from { background-position: 40% 30%, center 30%, center; }
    to { background-position: 60% 30%, center 30%, center; }
}

.page:nth-child(6) {   /* left right */
  background: url('/org/gnome/Tour/hand-fg.svg'),
              url('/org/gnome/Tour/leftright-bg.svg');
  background-repeat: no-repeat;
  background-position: center 30%;
  animation: left-and-right 2s ease-in-out infinite alternate;
}
It's a bit fragile, but a first shy step for animations in the UI. Hopefully first of many.

8 Bits Are Enough for a Version Number...
As was pointed out to us stable kernel maintainers last week, the overflow of the .y release number was going to happen soon, and our proposed solution for it (use 16 bits instead of 8), turns out to be breaking a userspace-visable api.
As we can’t really break this, I did a release of the 4.4.256 and 4.9.256 releases today that contain nothing but a new version number. See the links for the full technical details if curious.
Actualización de las aplicaciones de KDE de febrero de 2021
Me complace anunciar la actualización de las aplicaciones de KDE de febrero de 2021, una actualización que nos recuerda la aparición de la nueva aplicación Kongress con la que será más fácil seguir los eventos comunitarios.
Actualización de las aplicaciones de KDE de febrero de 2021
Es complicado llevar al unísono todo el ecosistema que representa el proyecto KDE. No obstante creo que la Comunidad lo lleva bastante bien al dividir su trabajo en tres ramas diferenciadas: entorno de desarrollo KDE Frameworks, escritorio Plasma y aplicaciones KDE.

Esta estructura de trabajo parece funcionar bastante bien desde hace mucho tiempo (concretamente desde el lanzamiento de Plasma 5) siendo la última rama de ellas, el de las aplicaciones KDE, la que más problemas puede dar ya que es complicado que todas los programas sigan el mismo ritmo de desarrollo. No obstante hay que destacar que la mayor parte de ellas siguen el paso que se espera de ellas.
De esta forma, mes a mes los desarrolladores lanzan una gran actualización de sus aplicaciones, os animo a seguir la de noviembre o meses anteriores para poder ver esta evolución constante.

Así que entre las actualizaciones destacadas de KDE de este febrero 2021 nos encontramos básicamente con dos.
En primer lugar el lanzamiento definitivo de Kongress, una aplicación que proporciona información práctica sobre las conferencias como el horario y los lugares de las charlas en el lugar.
Y, en segundo lugar, destaca el nuevo lanzamiento de Calligra Plan, la aplicación de planificación y seguimiento de proyectos. En esta versión 3.3 se ha publicado esta semana y mejora principalmente la impresión . Ahora se puede seleccionar un intervalo de tiempos para imprimir. Se puede escalar la impresión para que ocupe una única página, ajustarla a la altura de la página o en varias páginas. También se usa una paleta de color que funciona mejor sobre el papel blanco.
Por último, no hay que olvidar la intensa tarea de corrección de errores realizada y que podéis consultar de forma completa en este enlace.
Más información: KDE

VS code Azure Account extension 小記
VS code Azure Account extension 小記
OS: openSUSE Leap 15.2
vscode: 1.52.1
Extension: Azure Account v0.9.5
今天要來寫 Azure Account extension in vscode
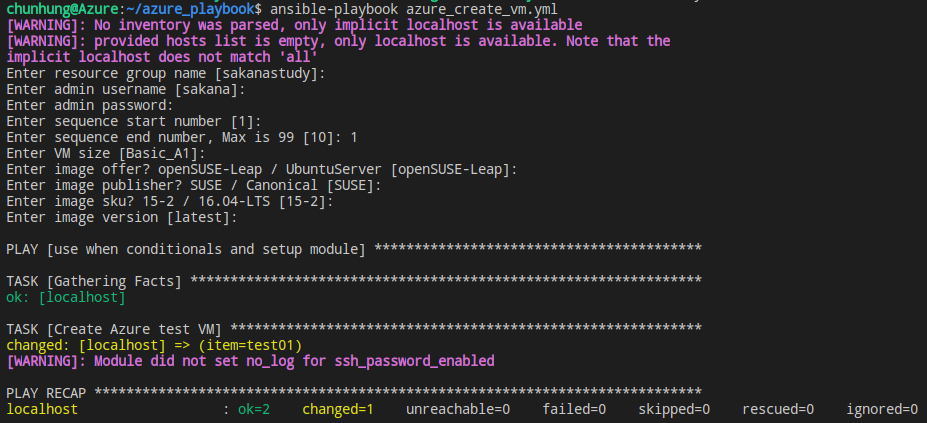
在很多實驗情境的時候, 可能會使用 vscode 來撰寫 shell script 或是 ansible playbook 來對雲端上面的機器進行實驗. 甚至是使用 Remote SSH 在雲端上面開發.
在 Azure 的使用上面, 我就常常使用到 Cloud Shell 來進行 ansible playbook 的佈署.
VS code 對我最亮眼的地方就是有一大推好用的 Extension.
今天要來寫的就是 Azure Account 這個 extension. 我主要用來在 vscode 內開啟 Bash 版本 Cloud Shell
安裝方式
開啟 vscode
點選左側 Extension 圖示, 搜尋 Azure 可以找到 Azure Account 這個 Extension
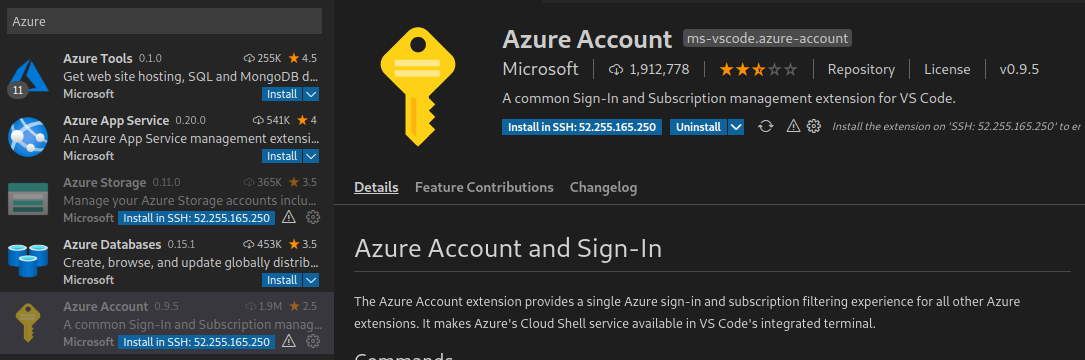
點選 Install 進行安裝
在 vscode 內 點選 View -- > Command Palette (或是按 Ctrl + Shift + P)

選取 Azure: Open Bash in Cloud Shell

如果還沒有登入 Azure, 會被要求登入 Azure
順利的話就會在 vscode 內開啟 Cloud Shell :)

接下來就可以快樂的在 vscode 內開啟 Cloud Shell 來進行管理
不用開啟 Azure Portal 真是方便 :)
同場加映: 如果碰到要開啓 Cloud Shell 要求選取目錄導致無法開啟的問題
請見 https://github.com/microsoft/vscode-azure-account/issues/220
解法
登入 Azure Portal
開啟 Cloud shell
輸入 az account list
複製 tenantId
開啟 VS code
點選 Azure Account extension 設定

在Azure: Tenant 設定將剛剛的 tenantId 貼上去

這樣就解決了
再次感謝 DanielMOliveira
這個 issue 我也開了快五個月 :p
又向 Azure 前進一步
~ enjoy it
Reference: