
 Member
openSUSE Leap 15.1chega ao fim da vida útil, atualize para openSUSE Leap 15.2

O sistema operacional openSUSE Leap 15.1 chega ao fim no dia 31 de Janeiro de 2021, o que significa que ele não receberá mais atualizações de softwares e segurança, Isso também significa que os usuários agora devem atualizar para a versão mais recente do openSUSE Leap 15.2.
Lançado há 18 meses, em 22 de maio de 2019, o sistema operacional OpenSuSE Leap 15.1 é a primeira versão da série openSUSE Leap 15, que também é a primeira baseada na série de sistemas operacionais SUSE Linux Enterprise (SLE) 15.
O openSUSE Leap 15.1 foi baseado nos pacotes do SUSE Linux Enterprise 15 Service Pack 1 e foi desenvolvido com a série de kernel Linux 5.3 com suporte de longo prazo.
Se você estiver usando a versão openSUSE Leap 15.1 é recomendável atualizar para a versão mais recente do openSUSE Leap 15.2 o mais rápido possível, que se baseia no SUSE Linux Enterprise 15 Service Pack 1 (SP1) e terá suporte por muitos meses.
 Victorhck
#openSUSE Tumbleweed revisión de la semana 4 de 2021
Tumbleweed es una distribución “Rolling Release” de actualización contínua. Aquí puedes estar al tanto de las últimas novedades.

openSUSE Tumbleweed es la versión “rolling release” o de actualización continua de la distribución de GNU/Linux openSUSE.
Hagamos un repaso a las novedades que han llegado hasta los repositorios estas semanas.
El anuncio original lo puedes leer en el blog de Dominique Leuenberger, publicado bajo licencia CC-by-sa, en este enlace:
Debido a cierto problemas en OpenQA “solo” se han publicado 3 snapshots esta semana. Pero hubo una gran actualización entre la última versión de la semana pasada y la primera de esta.
Estas fueron las snapshots publicadas esta semana 0126, 0127 y 0128.
Que trajeron entre otros muchos estas actualizaciones:
- Automake 1.16.3
- findutils 4.8.0
- Linux kernel 5.10.9
- libvirt 7.0.0
- Sudo 1.9.5p2 (CVE-2021-3156)
Y próximamente podremos disfrutar de estas actualizaciones en openSUSE Tumbleweed:
- Mozilla Firefox 85.0
- Linux kernel 5.10.11
- util-linux 2.36.1
- Rust 1.49.0
- Postfix: cambia la base de datos predeterminada de lmdb a BerkleyDB.
- Bison 3.7.5
- Firewalld 0.9.3
- Pulseaudio 14.2
- Bind 9.16.11
- KDE Plasma 5.21
- openssl 1.1.1i
Si quieres estar a la última con software actualizado y probado utiliza openSUSE Tumbleweed la opción rolling release de la distribución de GNU/Linux openSUSE.
Mantente actualizado y ya sabes: Have a lot of fun!!
Enlaces de interés
-
-
- ¿Por qué deberías utilizar openSUSE Tumbleweed?
- zypper dup en Tumbleweed hace todo el trabajo al actualizar
- ¿Cual es el mejor comando para actualizar Tumbleweed?
- Comprueba la valoración de las “snapshots” de Tumbleweed
- ¿Qué es el test openQA?
- http://download.opensuse.org/tumbleweed/iso/
- https://es.opensuse.org/Portal:Tumbleweed
-

——————————–
openSUSE Tumbleweed – Review of the week 2021/04
Dear Tumbleweed users and hackers,
This week felt like I was fighting with OBS and openQA, and packages breaking Tumbleweed. This also shows in the number of released snapshots: ‘only’ 3. But there was a huge gap between 0121 (reviewer last week) and 0126 (first published snapshot this week). But I’m sure you all prefer longer gaps, but working snapshots. The longer the gap, the more packages are in there, so the total net change remains the same. This wee, we released 0126, 0127, and 0128.
The main changes included:
- Automake 1.16.3
- findutils 4.8.0
- Linux kernel 5.10.9
- libvirt 7.0.0
- Sudo 1.9.5p2 (CVE-2021-3156)
Plenty of submissions are being tested in the Staging projects – almost all of them are filled. The main upcoming changes will be:
- Mozilla Firefox 85.0
- Linux kernel 5.10.11
- util-linux 2.36.1
- Rust 1.49.0
- More work on python-rpm-macros, used for multiple python flavors (aka python singlespec)
- This will come together with python 3.8.7
- Postfix: change the default database format to lmdb, migrating away from BerkeleyDB (3rd attempt, previous two were reverted)
- Bison 3.7.5
- Firewalld 0.9.3
- Pulseaudio 14.2
- Bind 9.16.11: changed protection of/against “named” from chroot jail to systemd protection. This obsoletes subpackage named-chrootenv.
- KDE Plasma 5.21: currently 5.20.90 being tested
- openssl 1.1.1i, based on centralized crypto-policies package

Customizing the GRUB menu
Simple customization of the the GRUB 2 menu on openSUSE can be quickly done without any additional software.
GRUB stands for GRand Unified Bootloader. It was developed by Erich Boleyn in 1995 under the GNU Project and released under the GPLv3 license. Its current version is 2, that is why it is often written as GRUB 2.
GRUB is a bootloader which is the piece of software that a computer reads when booting up to know the location of the operating system.

In order to change the boot options and Kernel parameters, open YaST and go to System > Boot Loader.

More advanced customization can be done by editing the /etc/default/grub file. However, one needs to proceed with caution as a broken config can prevent your computer from booting up.
The /etc/default/grub is well documented. I suggest that you follow the in-line comments when modifying values, rather than relying on bits and pieces of info from the internet. The first line in the file reminds the user to execute grub2-mkconfig -o /boot/grub2/grub.cfg after making changes to the file. Always remember to run after making changes.
Now, look at the bottom of the file:
# GRUB_INIT_TUNE="480 440 1"
GRUB_BACKGROUND=
GRUB_THEME=/boot/grub2/themes/openSUSE/theme.txt
SUSE_BTRFS_SNAPSHOT_BOOTING="true"
GRUB_DISABLE_OS_PROBER="false"
GRUB_ENABLE_CRYPTODISK="n"
GRUB_CMDLINE_XEN_DEFAULT="vga=gfx-1024x768x16"
These are pretty much everything you will need to make a fancy GRUB menu. Note that the above configuration is taken from openSUSE Leap 15.2. If you are using another Linux distribution, they may be different.
You can specify a background image for GRUB. The image must be .png, .tga, .jpg, or .jpeg and it will be scaled if necessary. The image should be in a location where GRUB can read. I suggest you put the image in the /boot/grub2/themes/openSUSE folder for now. You could also add the GRUB_DISTRIBUTOR key to provide a custom name to the distribution, like to say openSUSE Leap is rock-solid!. 😉
# GRUB_INIT_TUNE="480 440 1"
GRUB_BACKGROUND=/boot/grub2/themes/openSUSE/blue-background.png
GRUB_DISTRIBUTOR='openSUSE Leap is rock-solid!'
#GRUB_THEME=/boot/grub2/themes/openSUSE/theme.txt
SUSE_BTRFS_SNAPSHOT_BOOTING="true"
GRUB_DISABLE_OS_PROBER="false"
GRUB_ENABLE_CRYPTODISK="n"
GRUB_CMDLINE_XEN_DEFAULT="vga=gfx-1024x768x16"
Notice that I commented the GRUB_THEME key to avoid it overwriting the change. Lastly, we run grub2-mkconfig to re-build the GRUB configuration.
sudo grub2-mkconfig -o /boot/grub2/grub.cfgReboot the machine & we should now see the blue background image that we specified.

You can also edit the openSUSE GRUB theme specified by editing the /boot/grub2/themes/openSUSE/theme.txt file and experiment further with GRUB theming.

The GNU GRUB official manual can help you better understand the theme file format.
Read more on the getting nice background images.
Camino a Plasma 5.21 (IV): KDE y Wayland
Sigo la serie de artículos que nos van a ir informando de las novedades que nos esperan en la nueva versión del escritorio Plasma de la Comunidad KDE. Así que bienvenidos a «Camino a Plasma 5.21 (IV): KDE y Wayland» donde hablaremos de los avances en este nuevo servidor gráfico, que no son pocos.
Camino a Plasma 5.21 (IV): KDE y Wayland
Ya ha pasado tiempor desde que el 21 de enero fue lanzado la beta de Plasma 5.21, una versión no apta todavía para el usuario domésticos, y que se libera para ir solucionando errores.
En el artículo del pasado jueves ya hablé por encima de sus novedades pero hoy quiero comentaros más a fondo los avances respecto al desarrollo de Wayland en el escosistema de aplicaciones y escritorio KDE, el cual poco a poco se va consolidando, y doy fe porque cuando reportas los errores (como yo he hecho) se van solucionando.
De esta forma, la KDE se está esforzando para tener un soporte de primera clase para Wayland, y Plasma 5.21 supone un gran avance para alcanzar dicho objetivo. Recordemos que era uno de los objetivos que fueron marcados como prioritarios por la Comunidad KDE.

Así tenemos jugosas y concretas novedades como:
- Se ha refactorizado ampliamente el código de composición de KWin lo cual debería reducir la latencia de todas las operaciones de composición.
- Se ha añadido un control en las preferencias de la composición para que pueda elegir si prefiere una latencia más baja o unas animaciones más suaves.
- Se ha añadido soporte para configuraciones de pantalla de frecuencia de actualización mixta en Wayland. De esta forma se puede tener una pantalla con refresco a 144 Hz y otra a 60 Hz.
- También se ha añadido soporte preliminar para múltiples GPU en Wayland.
- Se ha mejorado el teclado virtual de Wayland se ha mejorado y ahora admite aplicaciones GTK que usan el protocolo
text-input-v3. - Mejorado el uso de tabletas gráficas y ahora incluye todos los controles que faltaban en la versión anterior, como el anillo y los botones de la tableta.
- Evidentemente, se han añadido numerosas mejoras de estabilidad en bastantes componentes de Plasma. Un ejemplo es KRunner que ahora puede enumerar todas las ventanas abiertas en Wayland, y también se permiten funciones necesarias para GTK4, por lo que las aplicaciones GTK4 funcionarán ahora.
Más información: KDE.org
Pruébalo y reporta errores

Todas las tareas dentro del mundo del Software Libre son importantes: desarrollar, traducir, empaquetar, diseñar, promocionar, etc. Pero hay una que se suele pasar por alto y de la que solo nos acordamos cuando las cosas no nos funcionan como debería: buscar errores.
Desde el blog te animo a que tú seas una de las personas responsables del éxito del nuevo lanzamiento de Plasma 5.21 de la Comunidad KDE. Para ello debes participar en la tarea de buscar y reportar errores, algo básico para que los desarrolladores los solucionen para que el despegue del escritorio esté bien pulido. Debéis pensar que en muchas ocasiones los errores existen porque no le han aparecido al grupo de desarrolladores ya que no se han dado las circunstancias para que lo hagan.
Para ello debes instalarte esta beta y comunicar los errores que salgan en bugs.kde.org, tal y como expliqué en su día en esta entrada del blog.
Grab a cool wallpaper for your Linux desktop
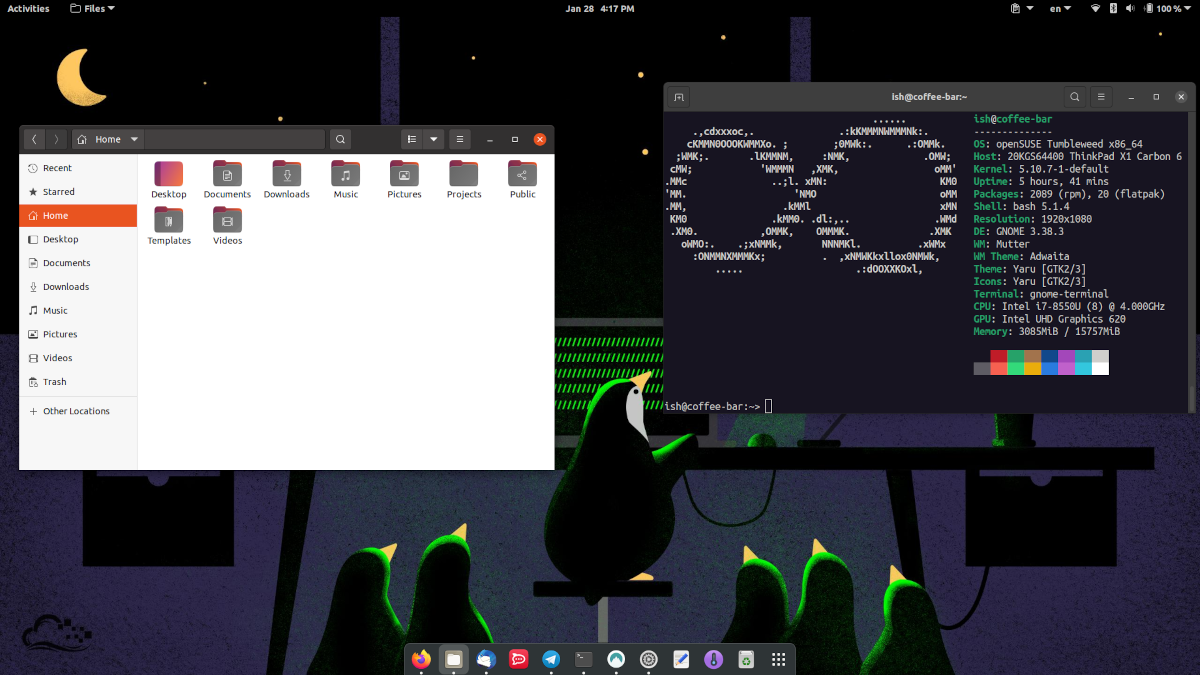
I tweeted about a blog post which I published on opensuse.mu, explaining how I configured the GNOME desktop theme Yaru (by the Ubuntu community) on my openSUSE Tumbleweed machine. The tweet got a lot of reaction, not just for the blog post or cool Yaru theme but also for the nice wallpaper showing penguins using a computer.
Our friends in the #Ubuntu community did a nice job with the Yaru theme for the #GNOME desktop. If you'd like to have the same theme on #openSUSE, then I wrote the instructions at the https://t.co/6SlMP0kbqY blog.https://t.co/NraGym2KZL pic.twitter.com/pRO93SjeTC
— Ish Sookun (@IshSookun) January 28, 2021
I got a question whether the wallpaper was freely available. The answer is yes. The wallpaper was released, among many others, by Digital Ocean in 2016.
We've made a handful wallpapers which you can find by sailing to this link: https://t.co/QerTGG51Ig pic.twitter.com/UUOMM7W9X3
— DigitalOcean (@digitalocean) April 7, 2016
You can head to imgur.com now and grab a cool wallpaper for your Linux desktop.

RubyGems, sudo, libvirt update in Tumbleweed
Three openSUSE Tumbleweed snapshots were released since the last update.
Several RubyGems were updated in the first two snapshots of the week and an update to sudo came in the most recent 20210127 snapshot.
A 10-year-old Common Vulnerabilities and Exposures that allowed root-level access was fixed with the update to sudo 1.9.5p2. Patches for CVE-2021-3156 were also backported in maintenance updates for openSUSE Leap. A minor version update of virtualbox to 6.1.18 fixed some nested virtualization hangs when executing symmetric multiprocessing with nested-guests under certain conditions on Intel hosts. An update was made to jhead, which is a command-line tool for displaying and manipulating exif header data in jpeg images; the 3.04 version removed an unnecessary warning with some types of GPS data and fixed a few bugs, including one bug that did not clear exif information when processing images. Some buttons were disabled in the update of yast2-network 4.3.41, which also added basic support for writing the network configuration to the NetworkManager backend.
New features from the update of libvirt 7.0.0 arrived in snapshot 20210126. The new version allows control of the qcow2 metadata cache for qemu. Another qemu improvement was the reporting of guest disks informations in virDomainGetGuestInfo; libvirt is now able to report disks and filesystems from the guest’s perspective using guest agent 5.3.0 or newer. The Linux Kernel 5.10.9 updated in the snapshot as well. A few updates were made for the i915 graphics drivers including allowing a sysadmin to override security mitigations for digital rights management. Skopeo, which is a command line utility for container images and image repositories, updated the vendor of containers and integrated tests for the syncing of the k8s.gcr.io directory. Other packages to arrive in the snapshot wree ncurses, xen, email client mutt 2.0.5 and text rendering library pango 1.48.1. A few RubyGems arrived in the snapshot; rubygem-parser 3.0.0.0, rubygem-rspec 3.10.0 and rubygem-rubocop 1.8.1 were among the RubyGems packages to arrive in this snapshot.
The majority of the gem packages arrived in snapshot 20210121. The entire snapshot was filled with more than 40 plus RubyGems updates. Notable packages to update were Ruby’s logging layer rubygem-fluentd 1.12.0, major version updates of rubygem-webpacker 5.2.1 and rubygem-liquid 5.0.0, and rubygem-js-routes 1.4.14. Only four other packages were updated. Those updates were xapps 2.0.6, gstreamer-devtools 1.18.3, gstreamer-editing-services 1.18.3 and python-gst 1.18.3.
Camino a Plasma 5.21 (III): nuevo Monitor del Sistema
Sigo la serie de artículos que nos van a ir informando de las novedades que nos esperan en la nueva versión del escritorio Plasma de la Comunidad KDE. Así que bienvenidos a «Camino a Plasma 5.21 (III): nuevo Monitor del Sistema» donde hablaremos del nuevo Monitor del Sistema, que nos ofrece todo tipo de información para controlar nuestro equipo.
Camino a Plasma 5.21 (III): nuevo Monitor del Sistema
El pasado 21 de enero fue lanzado la beta de Plasma 5.21, una versión no apta todavía para el usuario domésticos, y que se libera para ir solucionando errores.
En el artículo del pasado jueves ya hablé por encima de sus novedades pero hoy quiero comentaros más a fondo el nuevo Monitor del Sistema, que viene a dotar de un aspecto muy profesional y completo, dispuesto a satisfacer cualquier necesidad que tengamos.
Este nuevo Monitor del Sistema se ha construido sobre Kirigami y un servicio de estadísticas del sistema llamado «KSystemStats», lo cual le da la adaptabilidad a cualquier tipo de pantalla. Comparte código con los nuevos subprogramas de monitorización del sistema introducidos en Plasma 5.19 y está diseñado para suceder a KSysGuard.

En cuanto al aspecto gráfico el «Monitor del sistema» de Plasma proporciona muchas vistas diferentes y ofrece una página de resumen general que muestra información sobre los recursos centrales importantes, como la memoria, el espacio en disco, la red y el uso de CPU.
Además proporciona una vista rápida de las aplicaciones que consumen más recursos y un historial que muestra la evolución del uso de los recursos de su máquina a lo largo del tiempo.

Si se necesita más detalles, la página «Aplicaciones» le muestra todas las aplicaciones en ejecución junto a estadísticas y gráficos detallados. También dispone de una página con información sobre los procesos.
Finalmente, también puede crear nuevas páginas personalizadas usando el editor de páginas. Esto le permite adaptar a sus necesidades la información que obtiene de su sistema.
Más información: KDE.org
Pruébalo y reporta errores
Todas las tareas dentro del mundo del Software Libre son importantes: desarrollar, traducir, empaquetar, diseñar, promocionar, etc. Pero hay una que se suele pasar por alto y de la que solo nos acordamos cuando las cosas no nos funcionan como debería: buscar errores.
Desde el blog te animo a que tú seas una de las personas responsables del éxito del nuevo lanzamiento de Plasma 5.21 de la Comunidad KDE. Para ello debes participar en la tarea de buscar y reportar errores, algo básico para que los desarrolladores los solucionen para que el despegue del escritorio esté bien pulido. Debéis pensar que en muchas ocasiones los errores existen porque no le han aparecido al grupo de desarrolladores ya que no se han dado las circunstancias para que lo hagan.
Para ello debes instalarte esta beta y comunicar los errores que salgan en bugs.kde.org, tal y como expliqué en su día en esta entrada del blog.

Upgraded matomo
As usual, we keep our infrastructure up-to-date. While this is easy for the base system ('zypper patch', you know? ;-) most of the applications need special handling. Normally, we package them as well in our OBS repositories. But this often means that we need to maintain them on our own. At least: packaging them allows us to track them easily and integrates them in the normal workflow. All we have to do to keep them updated on the production machines is a 'zypper up' (which updates all packages with higher version and/or release number - while a 'zypper patch' only updates packages, which have an official patchinfo with them).
Upgrading Matomo from version 3.14.1 to 4.1.1 was not that easy: simply replacing the files in the package was not enough. Upstream changed so much in the database structure, that the standard calls in the post installation script (which normally update the database as well during package update) were just not enough. As this is (hopefully) a one-time effort, we run some steps manually from the commandline, which took ~20hours. After that, our DB was updated, cleaned up and ready to go again.
Summary: Being an openSUSE hero includes not only being an infrastructure Guru with automation and scripting skills. Often enough, you need some packaging expertise as well. ...and sometimes even this is not enough!
Web Development Sprints To Start Next Week
The openSUSE Project will begin monthly web development sprints to address feedback provided by attendees of the Jan. 23 meetup regarding the results of the End of the Year Survey.
The sprints will be every first Thursday of the month at 18:30 UTC and will take place online at https://meet.opensuse.org/websprints; the first sprint starts on Feb. 4.
The web sprints are open for people to provide feedback to the community about the various websites openSUSE has for on-boarding people who install openSUSE and people who want to learn more about the distributions, tools and technologies. The sprints will focus on several aspects of web development and enhance the structure of the websites to better direct users toward helpful links, resources and communication tools. The web sprints seek participation from new, current and former users to provide feedback to developers with the desire to better understand how people navigate the openSUSE websites.
Gaining feedback on the best communication channels to help people solve technical issues and better ways to show people how to get involved in the project are desired outcomes from the web development sprints.
The sprints will provide a useful way for people to voice their feedback and gain knowledge about web development and technologies.
Organizers of the sprint are collecting topics and ideas on https://etherpad.opensuse.org/p/websprints, so even people who are interested but unable to attend can help improve the navigation and content of the project’s websites.
Next Meetup for End of Year Survey Results
The next sessions will start at 13:00 UTC on openSUSE’s Jitsi instance on Jan. 30. Topics to be discussed are:
- Tools driving switchers to openSUSE (Where are users coming from)
- Discuss flagship project/s
- Expanding global users
- Increasing diversity
- Increase usage with people under 34
The meetup will take place at https://meet.opensuse.org/EOY2020.