
 Member
 seife
seifeLeap 15.2 Beta: mariadb upgrade woes
This machine is running an Owncloud instance, serving some internal NFS shares and used as a development machine for (cross-)compiling stuff, packaging etc.
The update went pretty smooth, only the mariadb instance used by Owncloud was hosed afterwards. There was no login possible and generally database users were gone.
Fortunately, I always have recent backups available, both a mysqldump and a complete file system backup.
So I tried to just restore the mysqldump on the updated database. This did not work, Bug#1166786.
Then I did just restore the filesystem backup of /var/lib/mysql and the database worked again.
Unfortunately, as I found out reproducing and investigating the issue, it would just get killed again by the next update, Bug#1166781. (Extra kudos to openSUSE Product Management which decided that this is not a bug, but instead regarded a feature!).
Finally I found the upstream bug in mariadb JIRA bugtracker, (which also does not look like there is much interest in fixing this), but with the information given there, I was able to fix this for me.
So all of you who are stuck with
ERROR 1045 (28000): Access denied for user 'root'@'localhost' (using password: YES)after updating a mariadb instance to 10.4, this might help:
- restart mysqld with option --skip-grant-tables, to disable user authentication
- in the mysql database, execute
- ALTER TABLE user CHANGE COLUMN `auth_string` `authentication_string` text;
- DROP TABLE global_priv;
- now run the mariadb-upgrade command
- restart mariadb.service with default options

AWS Client VPN with openSUSE leap 15.1 小記
- 透過 AWS Client VPN 可以使用桌機或是筆電接入 AWS VPN 的內網, 達成在本機使用 Ansible 進行 AWS 上面的資源調整或是佈署.
- 因為不是所有的resource 都有 public IP, 另外也不一定要想要弄台跳板機, 或是把 playbook 放在上面

- 確保有相關 cli 環境, 例如 aws cli / gcloud / az
- 建立過程中如果有本機不需要的套件需要安裝, 不會影響到本機
- 也可以用本機來進行建立過程
- 這邊也可以考慮掛載一個臨時目錄等等將相關檔案匯出
- -v /home/sakana/下載/test20200321:/root/test20200321
- 務必儲存用戶端憑證和用戶端私有金鑰,因為您在設定用戶端時需要它們

- 這邊要注意的是 - 憑證和金鑰要上傳到用戶端 VPN 端點的同一區域, 我這邊以 us-east-2 為例


- Client IPv4 CIDR 必須介於 /16 - /22 之間, 就是 Class B ~ 4 個 Class C 大小

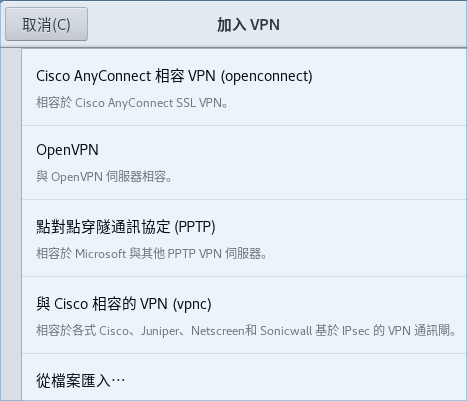
- 這邊可以觀察到 AWS Client VPN 有兩種驗證方式, 我們使用的是第二種
- AD 驗證
- 使用 Client 憑證進行交互驗證


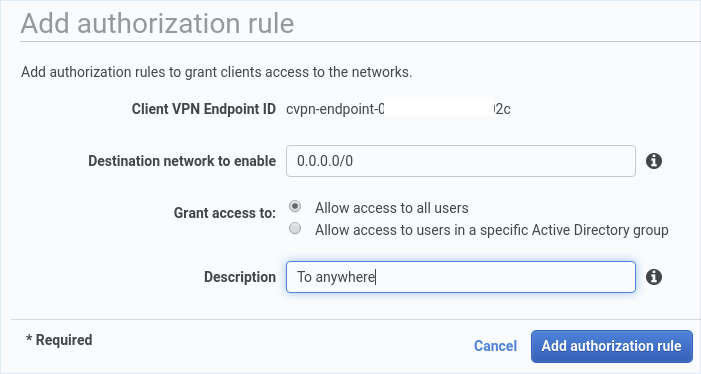


- 這邊實驗的關係, 我套用剛剛建立的 openvpn-udp 與 VPN default 規則


- 剛剛在上面有建議可以將 container 掛載主機的特定目錄, 所以我是將設定檔放在同一個目錄 test20200321
- 這邊可以看到剛剛下載的 downloaded-client-config.ovpn 以及剛剛建立的憑證
- 也可以看到 client 的憑證與 key

- 在 remote 設定的部分, 加上任一主機名稱
- remote test.cvpn-endpoint-002c11553b655b02c.prod.clientvpn.us-east-2.amazonaws.com 1194
- 原因是 Client VPN 的 DNS name 是 *.cvpn-endpoint-002c11553b655b02c.prod.clientvpn.us-east-2.amazonaws.com
- 如果只是 cvpn-endpoint-002c11553b655b02c.prod.clientvpn.us-east-2.amazonaws.com 會解析不到


- 在 </ca> 後面加入 cert 以及 key 兩個區段
- cert 加入 client1.domain.tld.crt 檔案憑證內容
- key 加入 client1.domain.tld.key 檔案 key 內容


- 這邊注意一下 閘道是否是 test.cvpn-endpoint-xxxxxxx


- 因為現在預設路由是走 VPN 出去, 我們並沒有設定 Split tunnel / DNS / 路由

- 可以連線 AWS Subnet
- 也可以上網呢?
- 啟用的時候讓 VPN 可以同時用自己的網路對外, 以及連 AWS VPC
- 如果沒有啟用, 因為都是透過 AWS Client VPN 所以沒辦法上網


- 這邊有觀察到 default route 有不同
- 這邊就可以觀察到是從 AWS 出去的
Oreo, cursores simpáticos para Plasma
Aprovechando que mucha gente va a estar pendiente de su ordenador, no es mala idea personalizarlo hasta que es visualmente perfecto para su gusto. Evidentemente, los cursores son parte de esa personalización. Hoy toca hablar de Oreo un pack de cursores originales para Plasma que lo dotarán de un aspecto simpático y agradable.
Oreo, cursores simpáticos para Plasma
Nacidos de la mano y de la mente de x-varlesh-x nos llega Oreo, un tema de cursores de aspecto monocromático, redondeado y muy simpático que seguro que gusta a más de uno.
Se trata de un tema simple con dos resoluciones, 32 y 64, pero con varios colores a instalar de forma independiente: azul, púrpura, rosa, gris y teal (un color entre un color entre el verde-azulado oscuro y el cian oscuro, cuyo nombre en castellano no he encontrado), y que podéis ver abajo.

Y como siempre digo, si os gusta este conjunto de cursores Oreo podéis “pagarlo” de muchas formas en la página de KDE Store, que estoy seguro que el desarrollador lo agradecerá: puntúale positivamente, hazle un comentario en la página o realiza una donación. Ayudar al desarrollo del Software Libre también se hace simplemente dando las gracias, ayuda mucho más de lo que os podéis imaginar, recordad la campaña I love Free Software Day 2017 de la Free Software Foundation donde se nos recordaba esta forma tan sencilla de colaborar con el gran proyecto del Software Libre y que en el blog dedicamos un artículo.
Más información: KDE Store
Cómo cambiar el tema de los cursores en Plasma
Al igual que con los iconos hay varias formas de cambiar el tema de cursores en Plasma, pero la más fácil es:
- Abrir las Preferencias del Sistema
- Ir a la sección Temas para el espacio de trabajo
- Ir a la subsección Tema de Cursor.
- En esta ventana pinchar en “Obtener nuevos temas”
- Buscar Moonlight y dar a instalar.
- Seleccionar el tema y aplicar.
Rápido, sencillo y efectivo, como la mayoría de cosas en en el escritorio Plasma de la Comunidad KDE.
#openSUSE Tumbleweed revisión de la semanas 11 y 12 de 2020
Tumbleweed es una distribución “Rolling Release” de actualización contínua. Aquí puedes estar al tanto de las últimas novedades.

openSUSE Tumbleweed es la versión “rolling release” o de actualización continua de la distribución de GNU/Linux openSUSE.
Hagamos un repaso a las novedades que han llegado hasta los repositorios estas semanas.
El anuncio original lo puedes leer en el blog de Dominique Leuenberger, publicado bajo licencia CC-by-sa, en este enlace:
En estas 2 semanas se han pulicado 7 nuevas Snapshots (0305, 0306, 0307, 0309, 0311, 0312 y 0314). Los cambios más notables han sido:
- Linux kernel 5.5.7
- Python 3.8.2, con la actualización de numerosos módulos de python
- Mesa 20.0.1
- KDE Applications 19.12.3
- KDE Plasma 5.18.3
Y esto es lo que pronto llegará en próximas actualizaciones:
- RPM
- Linux kernel 5.5.10
- Qt 5.15.0 (actualmente se están testeando las versiones Beta)
- Ruby 2.7 quizás junto con la eliminación de Ruby 2.6
- GCC 10 como compilador predeterminado
- Eliminación de Python 2
- GNU Make 4.3
Si quieres estar a la última con software actualizado y probado utiliza openSUSE Tumbleweed la opción rolling release de la distribución de GNU/Linux openSUSE.
Mantente actualizado y ya sabes: Have a lot of fun!!
Enlaces de interés
-
-
- ¿Por qué deberías utilizar openSUSE Tumbleweed?
- zypper dup en Tumbleweed hace todo el trabajo al actualizar
- ¿Cual es el mejor comando para actualizar Tumbleweed?
- Comprueba la valoración de las “snapshots” de Tumbleweed
- ¿Qué es el test openQA?
- http://download.opensuse.org/tumbleweed/iso/
- https://es.opensuse.org/Portal:Tumbleweed
-

——————————–

Reducing memory consumption in librsvg, part 2: SpecifiedValues
To continue with last time's topic, let's see how to make librsvg's DOM nodes smaller in memory. Since that time, there have been some changes to the code; that is why in this post some of the type names are different from last time's.
Every SVG element is represented with this struct:
pub struct Element {
    element_type: ElementType,
    element_name: QualName,
    id: Option<String>,
    class: Option<String>,
    specified_values: SpecifiedValues,
    important_styles: HashSet<QualName>,
    result: ElementResult,
    transform: Transform,
    values: ComputedValues,
    cond: bool,
    style_attr: String,
    element_impl: Box<dyn ElementTrait>,
}
The two biggest fields are the ones with types SpecifiedValues and
ComputedValues. These are the sizes of the whole Element struct
and those two types:
sizeof Element: 1808
sizeof SpecifiedValues: 824
sizeof ComputedValues: 704
In this post, we'll reduce the size of SpecifiedValues.
What is SpecifiedValues?
If we have an element like this:
<circle cx="10" cy="10" r="10" stroke-width="4" stroke="blue"/>
The values of the style properties stroke-width and stroke get
stored in a SpecifiedValues struct. This struct has a bunch of
fields, one for each possible style property:
pub struct SpecifiedValues {
    baseline_shift:              SpecifiedValue<BaselineShift>,
    clip_path:                   SpecifiedValue<ClipPath>,
    clip_rule:                   SpecifiedValue<ClipRule>,
    /// ...
    stroke:                      SpecifiedValue<Stroke>,
    stroke_width:                SpecifiedValue<StrokeWidth>,
    /// ...
}
Each field is a SpecifiedValue<T> for the following reason. In
CSS/SVG, a style property can be unspecified, or it can have an
inherit value to force the property to be copied from the element's
parent, or it can actually have a specified value. Librsvg represents
these as follows:
pub enum SpecifiedValue<T>
where
    T: // some trait bounds here
{
    Unspecified,
    Inherit,
    Specified(T),
}
Now, SpecifiedValues has a bunch of fields, 47 of them to be exact —
one for each of the style properties that librsvg supports. That is
why SpecifiedValues has a size of 824 bytes; it is the largest
sub-structure within Element, and it would be good to reduce its
size.
Not all properties are specified
Let's go back to the chunk of SVG from above:
<circle cx="10" cy="10" r="10" stroke-width="4" stroke="blue"/>
Here we only have two specified properties, so the stroke_width and
stroke fields of SpecifiedValues will be set as
SpecifiedValue::Specified(something) and all the other fields will
be left as SpecifiedValue::Unspecified.
It would be good to store only complete values for the properties that are specified, and just a small flag for unset properties.
Another way to represent the set of properties
Since there is a maximum of 47 properties per element (or more if librsvg adds support for extra ones), we can have a small array of 47 bytes. Each byte contains the index within another array that contains only the values of specified properties, or a sentinel value for properties that are unset.
First, I made an enum that fits in a u8 for all the properties, plus
the sentinel value, which also gives us the total number of
properties. The #[repr(u8)] guarantees that this enum fits in a
byte.
#[repr(u8)]
enum PropertyId {
    BaselineShift,
    ClipPath,
    ClipRule,
    Color,
    // ...
    WritingMode,
    XmlLang,
    XmlSpace,
    UnsetProperty, // the number of properties and also the sentinel value
}
Also, since before these changes there was the following monster to represent "which property is this" plus the property's value:
pub enum ParsedProperty {
    BaselineShift(SpecifiedValue<BaselineShift>),
    ClipPath(SpecifiedValue<ClipPath>),
    ClipRule(SpecifiedValue<ClipRule>),
    Color(SpecifiedValue<Color>),
    // ...
}
I changed the definition of SpecifiedValues to have two arrays, one
to store which properties are specified, and another only with the
values for the properties that are actually specified:
pub struct SpecifiedValues {
    indices: [u8; PropertyId::UnsetProperty as usize],
    props: Vec<ParsedProperty>,
}
There is a thing that is awkward in Rust, or which I haven't found how
to solve in a nicer way: given a ParsedProperty, find the
corresponding PropertyId for its discriminant. I did the obvious
thing:
impl ParsedProperty {
    fn get_property_id(&self) -> PropertyId {
        use ParsedProperty::*;

        match *self {
            BaselineShift(_) => PropertyId::BaselineShift,
            ClipPath(_)      => PropertyId::ClipPath,
            ClipRule(_)      => PropertyId::ClipRule,
            Color(_)         => PropertyId::Color,
            // ...
        }
    }
}
Initialization
First, we want to initialize an empty SpecifiedValues, where every
element of the the indices array is set to the sentinel value that
means that the corresponding property is not set:
impl Default for SpecifiedValues {
    fn default() -> Self {
        SpecifiedValues {
            indices: [PropertyId::UnsetProperty.as_u8(); PropertyId::UnsetProperty as usize],
            props: Vec::new(),
        }
    }
}
That sets the indices field to an array full of the same
PropertyId::UnsetProperty sentinel value. Also, the props array
is empty; it hasn't even had a block of memory allocated for it yet.
That way, SVG elements without style properties don't use any extra
memory.
Which properties are specified and what are their indices?
Second, we want a function that will give us the index in props for
some property, or that will tell us if the property has not been set
yet:
impl SpecifiedValues {
    fn property_index(&self, id: PropertyId) -> Option<usize> {
        let v = self.indices[id.as_usize()];

        if v == PropertyId::UnsetProperty.as_u8() {
            None
        } else {
            Some(v as usize)
        }
    }
}
(If someone passes id = PropertyId::UnsetProperty, the array access
to indices will panic, which is what we want, since that is not a
valid property id.)
Change a property's value
Third, we want to set the value of a property that has not been set, or change the value of one that was already specified:
impl SpecifiedValues {
    fn replace_property(&mut self, prop: &ParsedProperty) {
        let id = prop.get_property_id();

        if let Some(index) = self.property_index(id) {
            self.props[index] = prop.clone();
        } else {
            self.props.push(prop.clone());
            let pos = self.props.len() - 1;
            self.indices[id.as_usize()] = pos as u8;
        }
    }
}
In the first case in the if, the property was already set and we
just replace its value. In the second case, the property was not set;
we add it to the props array and store its resulting index in
indices.
Results
Before:
sizeof Element: 1808
sizeof SpecifiedValues: 824
After:
sizeof Element: 1056
sizeof SpecifiedValues: 72
The pathological file from the last time used 463,412,720 bytes in memory before these changes. After the changes, it uses 314,526,136 bytes.
I also measured memory consumption for a normal file, in this case one with a bunch of GNOME's symbolic icons. The old version uses 17 MB; the new version only 13 MB.
How to keep fine-tuning this
For now, I am satisfied with SpecifiedValues, although it could
still be made smaller:
-
The crate tagged-box converts an enum like
ParsedPropertyinto an enum-of-boxes, and codifies the enum's discriminant into the box's pointer. This way each variant occupies the minimum possible memory, although in a separately-allocated block, and the container itself uses only a pointer. I am not sure if this is worth it; eachParsedPropertyis 64 bytes, but the flat arrayprops: Vec<ParsedProperty>is very appealing in a single block of memory. I have not checked the sizes of each individual property to see if they vary a lot among them. -
Look for a crate that lets us have the properties in a single memory block, a kind of arena with variable types. This can be implemented with a bit of
unsafe, but one has to be careful with the alignment of different types. -
The crate enum_set2 represents an array of field-less enums as a compact bit array. If we changed the representation of
SpecifiedValue, this would reduce theindicesarray to a minimum.
If someone wants to dedicate some time to implement and measure this, I would be very grateful.
Next steps
According to Massif, the next thing is to keep making Element
smaller. The next thing to shrink is ComputedValues. The obvious
route is to do exactly the same as I did for SpecifiedValues. I am
not sure if it would be better to try to share the style
structs between elements.
Añade sonidos de fondo a tu escritorio con Kbeat – Plasmoides de KDE (137)
La Comunidad KDE nunca deja de sorprenderme, y cuando pienso que no se puede hacer más innovaciones al escritorio me sorprenden con una. Y es que ha aparecido un plasmoide que añade sonidos de fondo a tu escritorio con Kbeat, una pequeña pero maravillosa tontería disponible para Plasma, el entorno de trabajo de KDE.
Añade sonidos de fondo a tu escritorio con Kbeat – Plasmoides de KDE (137)
Debo reconocer que estos días voy algo escaso de temas, y aunque parezca extraño, con el tiempo un poco limitado por motivos estudiantiles. Lo cierto es que he rebuscado un poco entre la magnífica y mutante KDE Store y he encontrado una pequeña joya que me ha encantado.
Se trata de Kbeat, un pequeño plasmoide creado por el prolífico Adhe y que proporciona una serie de sonidos realajantes para utilizar de fondo al utilizar el ordenador. Su funcionamiento es muy sencillo, simplemente se selecciona el sonido (un bosque, el mar, una tormenta, una fogata, etc) y éste entra en bucle, proporcionando un ambiente especial a tus horas de trabajo. Evidentemente puedes pararlo y se integra en cualquier barra de tareas.

Y como siempre digo, si os gusta el plasmoide podéis “pagarlo” de muchas formas en la nueva página de KDE Store, que estoy seguro que el desarrollador lo agradecerá: puntúale positivamente, hazle un comentario en la página o realiza una donación. Ayudar al desarrollo del Software Libre también se hace simplemente dando las gracias, ayuda mucho más de lo que os podéis imaginar, recordad la campaña I love Free Software Day de la Free Software Foundation donde se nos recordaba esta forma tan sencilla de colaborar con el gran proyecto del Software Libre y que en el blog dedicamos un artículo.
Más información: KDE Store
¿Qué son los plasmoides?
Para los no iniciados en el blog, quizás la palabra plasmoide le suene un poco rara pero no es mas que el nombre que reciben los widgets para el escritorio Plasma de KDE.
En otras palabras, los plasmoides no son más que pequeñas aplicaciones que puestas sobre el escritorio o sobre una de las barras de tareas del mismo aumentan las funcionalidades del mismo o simplemente lo decoran.
openSUSE Tumbleweed – Review of the week 2020/11 & 12
Dear Tumbleweed users and hackers,
Last week I missed, for personal reasons, to write up the report. So, slacking in one week means I have to catch up the other week. Of course, you are all eager to hear/read what is happening in Tumbleweed. In the period since covered, we have released 7 Snapshots (0305, 0306, 0307, 0309, 0311, 0312 and 0314). The major changes were:
- Linux kernel 5.5.7
- Python 3.8.2, with a lot of python modules being updated
- Mesa 20.0.1
- KDE Applications 19.12.3
- KDE Plasma 5.18.3
Thins currently being staged or close to be shipped:
- RPM: change of database format to ndb
- Linux kernel 5.5.10
- Qt 5.15.0 (currently betas being tested)
- Ruby 2.7 – possibly paired with the removal of Ruby 2.6
- GCC 10 as the default compiler
- Removal of Python 2
- GNU Make 4.3
Crea tu blog o web con un simple script de bash
Bashblog es un simple script escrito en bash que nos permite crear nuestro blog o web en nuestro servidor de una manera sencilla, simple y sin dependencias extras

Ejemplo de web utilizando bashblog
Ahora están muy de moda los generadores de sitio estáticos como Jekyll, Pelican, Hugo y muchos otros que existen para crear sitios web estáticos, frente a los dinámicos que requieren más funcionalidades.
Esos generadores de sitios web, están escrito en lenguajes como Ruby y otros y requieren de ciertas dependencias a la hora de crear nuestros sitios en un servidor propio.
Frente a esas opciones hoy quiero hablaros sobre la herramienta bashblog, un script escrito en Bash creado por Carlos Fenollosa, que sirve para crear nuestro propio blog.
La idea es ejecutarlo en una carpeta pública de nuestro servidor, y ejecutarlo. Este script nos permite crear los artículos en nuestro editor favorito y al guardarlos, creará todo lo necesario para generar el archivo index.html en nuestro servido y generar así nuestro blog.
Lo podemos adaptar fácilmente a nuestras especificaciones, como: nuestro nombre, nombre del blog, descripción, url, formas de contacto, etc.
Y nos genera el archivo css, que podemos editar para adaptarlo a nuestros gustos, nos genera un feed, al que se pueden suscribir nuestros lectores, soporta etiquetado de artículos, etc.
En el siguiente video tutorial alojado en archive.org en formato .webm lo puedes ver en funcionamiento y ver lo sencillo y completo que es el script.
También está disponible en YouTube para quien prefiera esta plataforma:
https://www.youtube.com/watch?v=7Gh6Rt1NKFQ
¿Quizás es la herramienta que estabas buscando para crear tu pequeña web o blog personal?

Highlights of YaST Development Sprint 95
Contents
Due to recent events, many companies all over the world are switching to a remote working model, and SUSE is not an exception. The YaST team is distributed so, for many members, it is not a big deal because they are already used to work in this way. For other folks it might be harder. Fortunately, SUSE is fully supporting us in this endeavor, so the YaST team has been able to deliver quite some stuff during this sprint, and we will keep doing our best in the weeks to come.
Before jumping into what the team has recently done, we would also like to bring your attention to the migration of our blog from the good old openSUSE Lizards blog platform to the YaST website. So, please, if you use some feeds reader, update the YaST blog URL to the new one.
Now, as promised, let’s talk only about software development. These days we are mainly focused on fixing bugs to make the upcoming (open)SUSE releases shine. However, we still have time to introduce some important improvements. Among all the changes, we will have a look at the following ones:
- New possibilities for pervasive encryption.
- Improvements in the mechanism to install missing packages during storage system analysis.
- Better handling of some conflicting attributes in AutoYaST.
- Several usability improvements in the iSCSI LIO Server module.
Expanding the Possibilities of Pervasive Encryption
Some months ago, in this dedicated blog post, we introduced the joys and benefits of the so-called pervasive encryption available for s390 mainframes equipped with a Crypto Express cryptographic coprocessor. As you may remember (and you can always revisit the post if you don’t), those dedicated pieces of hardware ensure the information at-rest in any storage device can only be read in the very same system where that information was encrypted.
But, what is better than a cryptographic coprocessor? Several cryptographic coprocessors! An s390 logical partition (LPAR) can have access to multiple crypto express adapters, and several systems can share every adapter. To configure all that, the concept of cryptographic domains is used. Each domain is protected by a master key, thus preventing access across domains and effectively separating the contained keys.
Now YaST detects when it’s encrypting a device in a system with several cryptographic domains. If that’s the case, the dialog for pervasive encryption allows specifying which adapters and domains must be used to generate the new secure key.

To succeed, all the used adapters/domains must be set with the same master key. If that’s not the case, YaST detects the circumstance and displays the corresponding information.

Install Missing Packages during Storage System Analysis
As our reader surely knows, YaST always ensures the presence of all the needed utilities when performing any operation in the storage devices, like formatting and/or encrypting them. If some necessary tool is missing in the system, YaST has always shown the following dialog to alert the user and to allow to install the missing packages with a single click.

But the presence of those tools was only checked at the end of the process, when
YaST needed them to modify the devices. For example, in the screenshot above,
YaST asked for btrfsprogs & friends because it wanted to format a new
partition with that file system.
If the needed utility was already missing during the initial phase in which the storage devices are analyzed, the user had no chance to install the corresponding package. For example, if a USB stick formatted with Btrfs would have been inserted, the user would get an error like this when executing the YaST Partitioner or when opening the corresponding YaST module to configure the bootloader.

Now that intimidating error is replaced by this new pop-up that allows to install the missing packages and restart the hardware probing. As usual, with YaST, expert users can ignore the warning and continue the process if they understand the consequences outlined in the new pop-up window.

We took the opportunity to fix other small details in the area, like better reporting when the YaST Partitioner fails to install some package, a more up-to-date list of possibly relevant packages per technology, and improvements in the source code organization and the automated tests.
Reporting Conflicting Storage Attributes in AutoYaST Profiles
If you are an AutoYaST user, you undoubtely know that it is often too quiet and offers little information about inconsistencies or potential problems in the profile. For simple sections, it is not a problem at all, but for complicated stuff, like partitioning, it is far from ideal.
In (open)SUSE 15 and later versions, and given that we had to reimplement the partitioning support using the new storage layer, we decided to add a mechanism to report some of those issues like missing attributes or invalid values. There is a high chance that, using an old profile in newer AutoYaST versions, you have seen some of those warnings.
Recently, a user reported a problem that caused AutoYaST to
crash. While debugging the problem, we found both raid_name and lvm_group
attributes defined in one of the partition sections. Obviously, they are
mutually exclusive, but it is quite easy to overlook this situation. Not to
mention that AutoYaST should not crash.
From now on, if AutoYaST detects such an inconsistency, it will automatically select one of the specified attributes, informing the user about the decision. You can see an example in the screenshot below.

For the time being, this check only applies to those attributes which determine
how a device is going to be used (mount, raid_name, lvm_name,
btrfs_name, bcache_backing_for, and bcache_caching_for), but we would like
to extend this check in the future.
Usability Improvements in iSCSI-LIO-server Module
Recently, one of our developers detected several usability problems in the iSCSI LIO Server module, and he summarized them in a bug report. Apart from minor things, like some truncated and misaligned texts, he reported the UI to be quite confusing: it is not clear when authentication credentials are needed, and some labels are misleading. To add insult to injury, we found a potential crash when clicking the Edit button while we were addressing those issues.
As usual, a image is worth a thousand words. Below you can see how the old and confusing UI looked like.

Now, let’s compare it with the new one, which is better organized and more approachable. Isn’t it?

Conclusion
It is possible that, during the upcoming weeks, we need to make some further adjustments to our workflow, especially when it comes to video meetings. But, at this point, everything is working quite well, and we are pretty sure that we will keep delivering at a good pace.
So, take care, and stay tuned!
Menu Z, nuevo lanzador de aplicaciones – Plasmoides de KDE (136)
Y más lanzadores de aplicaciones. Buscar y ejecutar los programas en el entorno de trabajo Plasma de la Comunidad KDE es altamente personalizable. Hoy os presento Menu Z, otro lanzador de aplicaciones que simula el lanzador de Windows 10.
Menu Z, nuevo lanzador de aplicaciones – Plasmoides de KDE (136)
Seguimos con las posibilidades de personalización de Plasma 5 en cuanto a lanzadores de aplicaciones. Al lanzador tradicional, a su versión reducida, al lanzador de aplicaciones a pantalla completa y a Tiled Menu, el clon del menú de Windows, se les han unido poco a poco otros lanzadores como UMenu, Minimal Menu, Simple Menu o Ditto Menu.
A todos los anteriores, y muchos más que hay en la Store, se les une Menu Z, un lanzador de aplicaciones que simula el de Windows 10, con lo que es ideal para transformaciones extremas del escritorio. Se trata de una creación de Adhe, un desarrollador que le ha cogido el gusto a hacer este tipo de contribuciones.

Y como siempre digo, si os gusta el plasmoide podéis “pagarlo” de muchas formas en la nueva página de KDE Store, que estoy seguro que el desarrollador lo agradecerá: puntúale positivamente, hazle un comentario en la página o realiza una donación. Ayudar al desarrollo del Software Libre también se hace simplemente dando las gracias, ayuda mucho más de lo que os podéis imaginar, recordad la campaña I love Free Software Day de la Free Software Foundation donde se nos recordaba esta forma tan sencilla de colaborar con el gran proyecto del Software Libre y que en el blog dedicamos un artículo.
Más información: KDE Store
¿Qué son los plasmoides?
Para los no iniciados en el blog, quizás la palabra plasmoide le suene un poco rara pero no es mas que el nombre que reciben los widgets para el escritorio Plasma de KDE.
En otras palabras, los plasmoides no son más que pequeñas aplicaciones que puestas sobre el escritorio o sobre una de las barras de tareas del mismo aumentan las funcionalidades del mismo o simplemente lo decoran.