
 Member
 baltolkien
Mix de novedades de aplicaciones KDE de abril 2020
Ya llego al final de los cambios en las aplicaciones que llegaron el pasado mes de abril al ecosistema de aplicaciones KDE. Al conjunto de aplicaciones ya comentadas (Dolphin, Okular, KMail, Gwenview, Elisa, Kdenlive, KDE Connect, Spectacle y Krita) se les une hoy un artículo donde reúne aquellas aplicaciones que ofrecen solo una o dos novedades. Bienvenidos así al mix de novedades de aplicaciones KDE de abril de 2020, donde aparecen aplicaciones como Localize, Konsoloe, Yakuake, Smb4K y KIO GDrive.
Mix de novedades de aplicaciones KDE de abril 2020
Son pequeñas mejoras que hacen que trabajar con la propuesta de la Comunidad KDE sea más sencilla.
- Lokalize, la utilidad que se puede usar para traducir archivos gettext y xliff, permite el uso de correcciones gramaticales con Language-Tool, lo que ayudará a los traductores resaltando los errores gramaticales existentes en el texto.
- Konsole, el emulador de terminal que se usa para ejecutar instrucciones, procesos y programas desde la línea de órdenes, ahora permite usar la tecla Alt + una tecla de número para saltar directamente a cualquiera de las primeras 9 pestañas.
-
Yakuake, una ventana de terminal que puede bajar desde la parte superior del escritorio Plasma pulsando F12, no llega con dos novedaeds:
-
Ahora permite que cuando abra nuevas pestañas o divida paneles en esta versión de Yakuake, puedas iniciarlas en el mismo directorio que la pestaña o división actual.
-
Permite el cambio de tamaño de la ventana verticalmente arrastrando su barra inferior.
-

-
Smb4K, el gestor de carpetas compartidas vía Samba, corrige varios problemas y bloqueos, especialmente en el montador. También hace que se vuelva a poder compilar Smb4K con Qt versión 5.9 o inferior.
-
KIO GDrive, el protocolo que te permite sincronizar carpetas remotas de Google Drive con las aplicaciones de KDE añade la implementación de la funcionalidad de unidades compartidas de Google Drive. Además, incluye una nueva acción «Copiar URL de Google en el portapapeles» en el menú de contexto de Dolphin.
Más información: KDE
Lemmy la alternativa federada y de software libre para Reddit
Lemmy es un clon de sitios como Reddit, pero con espíritu federado y de software libre escrito en Rust. Donde sea sencillo crear nodos y que esten interconectados.

No sé si el universo se expande, lo que sí puedo asegurar es que el Fediverso sí se expande. Cada vez hay más servicios y software que se integran dentro del llamado fediverso.
Así tenemos por ejemplo, Mastodon o Pleroma como reemplazo a Twitter. Pixelfed como reemplazo a Instagram. Peertube como reemplazo a YouTube.
Y otras opciones como Plume, FunkWhale, y muchas otras opciones de diferente propósito que federan utilizando protocolos libres como es ActivityPub.
Ya que el software es libre, usuarios de todo el mundo tienen la oportunidad de abrir nodos de los diferentes servicios. Nodos que son capaces de comunicarse entre si, por lo que usuarios de distintos nodos serán capaces de interactuar sin problemas.
A toda esta pléyade de instancias de los distintos servicios que comforman el fediverso, se une Lemmy, una alternativa a servicios en los que compartir y puntuar enlaces como Reddit o Hacker News. Lemmy está desarrollado en lenguaje Rust y el código está publicado bajo una licencia AGPL-3.0.
La verdad es que no soy usuario de servicios como estos, pero no quería dejar de informar de esta nueva opción para quienes sí los utilizáis y queréis quizás darle una oportunidad y probar. Permite que un usuario de un servidor, pueda suscribirse a foros de otros servidores y poder compartir con usuarios de otros nodos.
Está en fase previas de desarrollo, por lo que habrá funcionalidades que falten y se vayan añadiendo, errores en ciertas partes, etc. Además de que todavía no habrá muchos nodos disponibles en los que registrarse, por lo que puedes abrirte una cuenta en la instancia del propio desarrollador (que a día de hoy tiene unos 1260 usuarios registrados):
También te puede interesar el probar a instalar tu propia instancia en tu servidor. Si es así, está disponible mediante Docker, Ansible o Kubernetes. Te recuerdo de nuevo, que está en periodo prematuro de desarrollo, por lo que si montas tu instancia, prepárate para lidiar con problemas y actualizaciones.
Echa un vistazo a su repositorio o su documentación para profundizar más en esta nueva pieza en el tablero del Fediverso.

Fotografía: Chema Madoz
Las novedades de Krita de abril de 2020
Calculo que en un par de artículos terminará esta serie de entradas en las que comento los cambios en las aplicaciones que llegaron el pasado mes de abril. Al conjunto de aplicaciones ya comentadas (Dolphin, Okular, KMail, Gwenview, Elisa, Kdenlive, KDE Connect y Spectacle) se les une otra aplicación que hace las delicias de los creadores artísticos. Es hora de hablar de las novedades de Krita de abril de 2020, una aplicación de dibujo artístico que me atrevo a decir que no tiene rival ni en el mundo del Software Libre ni en el privativo
Las novedades de Krita de abril de 2020
Krita formaba parte de Calligra, la suite ofimática de KDE que pronto tendrá su protagonismo en el blog, pero debido a su ritmo de desarrollo se vieron obligados a desligar sus evolución. Y es que Krita se ha convertido en una Killer App en cuanto a diseño artístico, algo que es muy importante ya que marca el camino a seguir entre software libre y administraciones: la colaboración que beneficia al conjunto de la sociedad.

De esta forma, que nos encontramos con las siguientes novedades de Krita de abril de 2020:
- Actualizaciones técnicas entre bastidores en esta versión, lo que significa más eficiencia en torno al uso de recursos.
- Contornos de pincel más suaves, que no parpadean al situar el cursor sobre el lienzo.
- El «Aerógrafo» y el «Ritmo del aerógrafo» se han añadido al pincel de mezcla de colores.
- El pincel de mezcla de colores también contiene una nueva preferencia que permite usar los distintos sensores para aplanar la forma del pincel.
- Nueva función «dividir la capa en la máscara de selección» le permite crear una nueva capa para cada color de la capa activa.
Y en esta ocasión los desarrolladores nos han obsequiado con un vídeo demostrativo de esta nueva versión:
Las novedades de Spectacle de abril de 2020
Ya se van acabado las entradas en las que comento la serie de cambios en las aplicaciones que llegaron el pasado mes de abril. Al conjunto de aplicaciones ya comentadas (Dolphin, Okular, KMail, Gwenview, Elisa, Kdenlive y KDE Connect) se les une otra aplicación que suelo utilizar varias veces al día. Es hora de hablar de las novedades de Spectacle de abril de 2020. Una pequeña aplicación que destaca por su simpleza y por su potencia.
Las novedades de Spectacle de abril de 2020
 Para quienes no lo conozcan, Spectacle es el software de captura de pantallas de KDE que viene incorporado en el escritorio Plasma de la Comunidad KDE. Sustituyó a KSnapshot, una de esas pequeñas pero potentes aplicaciones que pueblan el ecosistema KDE.
De esta forma, que nos encontramos con las siguientes novedades de Spectacle de abril de 2020 que incorpora funcionalidades de usabilidad y resuelve algunos problemas:
- Resuelto el problema que impedía copiar una captura de pantalla en el portapapeles al lanzar Spectacle desde la línea de órdenes con la opción «–nonotify».
- Resuelto también los problemas al tratar de arrastrar una captura de pantalla desde Spectacle hasta un patrón de nombre de archivo por omisión que incluyera subcarpetas.
- Mejoras es en los botones «Valores predeterminados» y «Revertir»: ahora se puede usar para retroceder a una configuración anterior, e incluso para eliminar todas las configuraciones personalizadas anteriores y restaurar todo a su valor predeterminado.
- Además, Spectacle no solo recordará la configuración predeterminada, sino que además podrá recordar el área de la captura de pantalla que se realizó en último lugar. Esto es úitl para ser consistente, haciendo que sea más fácil crear capturas con la misma forma y tamaño que las anteriores.
Como vemos, y como es habitual, pocos pero interesantes cambios, siguiendo la línea de la Comunidad KDE. Esto no para, esto es KDE.
Más información: KDE

Jekyll features - PlantUML base64 plugin (gems)
Your are a software engineer who love code? Then maybe you also love with diagrams (I said maybe!). There is lot of diagrams and we need it to capture requirement, draft code base, network topology, timeline and more. So diagram is important.
This blog is built using Jekyll and I am looking for some solution to allow me to draw diagram if needed with combination of markdown syntax, this should be possible.
I prefer to use PlantUML compare to others tools that available. It will convert my plain text to diagram. Thus plain text is useful for revision. PlantUML support lots of diagram such as sequence diagram, use case diagram, class diagram, activity diagram, component diagram, state diagram, object diagram, deployment diagram, timing diagram, gantt chart and many more.. there is existed few plugins on rubygems but this plugin need a little touch-up.
I fork "jekyll-remote-plantuml" and change a litle bits :smirk:
So because I know storing generated image into repo will make that repo grow bigger in term of size so I decide to format the image into base64 each time building jekyll website and cache downloaded image during CI/CD
It quite silly, I do some code modification to accomplish my objective. So thank you original developer of jekyll-remote-plantuml gem for awesome work.
What and why?
My plugins named as jekyll-plantuml-base64 do everything same as what jekyll-remote-plantuml do but the image will be converted into base64.
Why base64? Because I don’t need to store this image on my repository and there is a trick to cached this image during CI/CD to speed up the built process next time.
How to install ?
Option 1: To install this plugin on Jekyll, you just have to follow the guideline of Jekyll documentation
Option 2: Use rubygems, by adding gem 'jekyll-plantuml-base64', '~> 0.1.4.36' on your gemfile then bundle install
Option 3: Pull the gems directly from git by adding gem 'jekyll-remote-plantuml', '0.1.4.36', git: 'https://github.com/RobbiNespu/jekyll-remote-plantuml' on your gemfile and then bundle install
How to use ?
To use the jekyll-plantuml-base64 plugin, you just have to wrap you text between % plantuml % and % endplantuml % tags.
For example, to create a basic shema between Bob and Alice, you can write the following code
which will generated:

As you see this image created (retrieve the binary from a remote provider), stored and re-formated as base64 before displayed on you website.
Cool huh?

Der schusselige WLAN-Client
Das Lenovo Thinkpad E470 ist ein wunderbarer Laptop und openSUSE Leap funktioniert darauf hervorragend, wäre da nicht ein kleines Problem mit dem WLAN: Der Laptop ist etwas schusselig was das Passwort für das WLAN angeht. Immer wieder scheint er es zu vergessen und fragt per Dialog nach. Scheinbar scheint er einen dann aber nicht zu verstehen, und fragt immer wieder. Gibt man aber erst einmal auf, bricht den Verbindungsversuch ab und bittet ihn kurz darauf nochmal die Verbindung aufzubauen, so erinnert er sich plötzlich und verbindet sich ohne weitere Nachfragen.
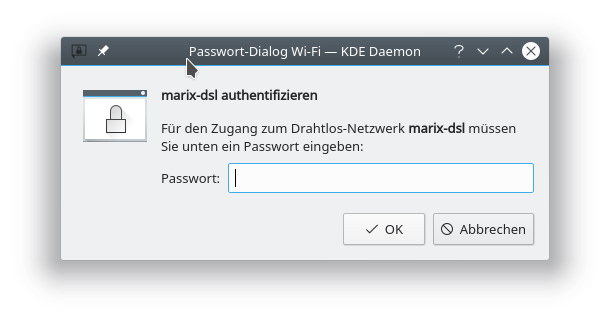
Beim Versuch dem Problem auf den Grund zu gehen stellte ich schnell fest, dass es offensichtlich nicht am seit vielen Jahren immer wieder migrierten Nutzer liegt, denn das Problem tritt auch für einen neuen Nutzer auf. Es ist aber auch nie zu hundert Prozent zuverlässig reproduzierbar, was die Fehlersuche zusätzlich erschwert. So dachte ich zunächst, dass es eventuell mit der Initialisierung der Hardware zu hat, da es sehr häufig nach einem Neustart des Rechners auftauchte. Auch trat das Problem eigentlich immer nur bei einem automatischen Verbindungsaufbau auf, also z.B. wenn das Netzwerk komplett deaktiviert wurde. War die WLAN-Hardware hingegen ohne aufgebaute Verbindung aktiv und ich wählte das Netzwerk über das Netzwerkapplet von KDE aus, so verband sich der Rechner zuverlässig. Allerdings habe ich das Problem aber nie nach einem Suspend beobachtet, was diese Theorie zumindest unwahrscheinlicher machte.
Eine Nachfrage auf der Mailingliste von openSUSE brachte mich dann mit einem Verweis auf eine Diskussion auf der deutschsprachigen Liste auf die Lösung des Problems: Anscheinend verursacht die MAC address randomization das Problem. Seit jene abgeschaltet ist trat das Problem nicht mehr auf.
Ein einfacher weg die MAC address randomization abzuschalten findet sich auf https://blog.muench-johannes.de/networkmanager-disable-mac-randomization-314.
Es ist lediglich die Datei /etc/NetworkManager/conf.d/100-disable-wifi-mac-randomization.conf mit folgendem Inhalt anzulegen:
[connection]
wifi.mac-address-randomization=1

[device]
wifi.scan-rand-mac-address=no
Wieso dieses Vorgehen in einem Netzwerk ohne MAC-Adressen-Filter notwendig sein sollte ist mir zwar schleierhaft, aber solange es hilft…
Die randomisierten MAC-Adressen zu deaktivieren hat natürlich eine Auswirkung auf die Privatsphäre. Da dieser Rechner aber ausschließlich zuhause oder bei öffentlichen Auftritten genutzt wird ist dies in diesem Fall verschmerzbar.
Actualización de mayo del 2020 de KDE Frameworks
Hoy toca entrada recurrente ya que llegamos a la actualización mensual de rigor que demuestra que los desarrolladores de KDE no dejan de trabajar ni encerrados en sus casa. Así que se congratulan en anunciar la actualización de abril del 2020 de KDE Frameworks. Con esta se llega a la versión 5.70, un suma y sigue de compromiso y constancia que no parece que tenga un final cercano.
Actualización de mayo del 2020 de KDE Frameworks
 A pesar de que para los usuarios corrientes esta noticia sea algo confusa ya que no se trata de realzar una nueva aplicación ni de una nueva gran funcionalidad del escritorio, el desarrollo de KDE Frameworks tiene repercusiones directas en él a medio y largo plazo.
La razón de esta afirmación es que KDE Frameworks es básicamente la base de trabajo de los desarrolladores para realizar sus aplicaciones, es como el papel y las herramientas de dibujo para un artista: cuanto mejor sea el papel y mejores pinceles tenga, la creación de una artista será mejor.
De esta forma, las mejoras en KDE Frameworks facilitan el desarrollo del Software de la Comunidad KDE, haciendo que su funcionamiento, su estabilidad y su integración sea la mejor posible.
Ayer sábado 9 de mayo de 2020 fue lanzado KDE Frameworks 5.70, la nueva revisión del entorno de programación sobre el que se asienta Plasma 5, el escritorio GNU/Linux de la Comunidad KDE, y las aplicaciones que se crean con para él.
Hay que recordar que los desarrolladores de KDE decidieron lanzar actualizaciones mensuales de este proyecto y lo están cumpliendo con puntualmente. La idea es ofrecer pocas pero consolidadas novedades, a la vez que se mantiene el proyecto evolucionando y siempre adaptándose al vertiginoso mundo del Software Libre.
Una gran noticia para la Comunidad KDE que demuestra la evolución continua del proyecto que continua ganando prestigio en el mundo de los entornos de trabajo Libres.
Más información: KDE
¿Qué es KDE Frameworks?
Para los que no lo sepan, KDE Frameworks añade más de 70 librerías a Qt que proporcionan una gran variedad de funcionalidades necesarias y comunes, precisadas por los desarrolladores, testeadas por aplicaciones específicas y publicadas bajo licencias flexibles. Como he comentado, este entorno de programación es la base para el desarrollo tanto de las nuevas aplicaciones KDE y del escritorio Plasma 5.

Aquí podéis encontrar un listado con todos estos frameworks y la serie de artículos que dedico a KDE Frameworks en el blog,
Recuerda que puedes ver una introducción a Frameworks 5.0 en su anuncio de lanzamiento.

Migration des comptes de la communauté

Chère communauté openSUSE,
Le système d'authentification propulsant les services suivants devrait changer ce mois-ci. Voici une liste des services susceptibles d'être affectés. Un e-mail à ce sujet a été envoyé sur la liste de diffusion du projet openSUSE. Plus d'informations sur ce sujet seront publiées sur la Page wiki de migration de compte.
-
Build Services https://build.opensuse.org
-
Bugzilla (2020-05-07 au 2020-05-10) https://bugzilla.opensuse.org/ (qui est la même instance que bugzilla.suse.com)
Ces comptes de communauté (anciennement appelés compte Bugzilla ou compte client Novell) migrent d'un ancien système pris en charge par MicroFocus vers un nouveau système pris en charge et hébergé par SUSE.
Nous sommes en train de finaliser cette indépendance également sur le plan technique. Les comptes de la communauté (alias les comptes Bugzilla) passent maintenant d'un système fourni par MicroFocus à SUSE au centre de données de Nuremberg.
Cette action ne doit pas être confondue avec un e-mail envoyé aux utilisateurs et contributeurs avec un compte openSUSE concernant le changement de compte SUSE. L'ancienne arborescence client SUSE hébergée par MicroFocus est maintenant en transition vers le contrôle SUSE.
Il sera cependant divisé en deux parties:
- Comptes SCC et Partner Net
Cela sera établi à partir d'une connexion hébergée par OKTA.
- Les services openSUSE, y compris Bugzilla et OBS, mais aussi les services de développement SUSE.
Ce sera le compte qui succédera à l'ancien compte bugzilla, migré de Microfocus vers SUSE. Il sera nécessaire de définir un nouveau mot de passe pour ce compte.
Définition d'un nouveau mot de passe
Vous avez deux options pour définir un nouveau mot de passe:
Définissez un mot de passe via notre portail de migration
- Veuillez vous rendre sur https://idp-migrate.opensuse.org
- Connectez-vous avec votre ancien compte de communauté (informations d'identification Bugzilla)
- En cas de succès, vous serez redirigé vers le nouveau portail IDP et devrez définir un nouveau mot de passe
E-mail de réinitialisation du mot de passe (nécessite une adresse e-mail valide dans votre compte)
- Si votre compte a une adresse e-mail valide, veuillez vous rendre sur le portail IDP
- Dans le menu, sélectionnez "Mot de passe oublié" et entrez votre nom d'utilisateur pour demander un e-mail de réinitialisation de mot de passe
- Suivez les instructions dans l'e-mail pour définir un nouveau mot de passe.
Après cela, vous pouvez gérer votre compte via la migration du service IDP-Portal.
Les services utilisant les comptes de communauté migreront pas à pas. Cela signifie que pendant quelques jours, vous devez utiliser les informations d'identification anciennes et nouvelles jusqu'à la migration des services.
OBS et Bugzilla sont les premiers services à basculer le 11 mai.
En cas de problème, veuillez vérifier quel service devrait être mis à jour et migré.
Les travaux de migration de SUSE affecte openSUSE

Le partenariat de SUSE avec EQT a commencé l'année dernière - et maintenant SUSE commence à séparer de plus en plus de services de MicroFocus.
SUSE et openSUSE coopèrent et partagent non seulement du code, mais ils partagent souvent les mêmes services. En conséquence, openSUSE est également affecté par une partie du travail de séparation qui se passe actuellement dans les coulisses.
Ce week-end, la migration de l'outil officiel de suivi des bogues pour les problèmes liés à openSUSE (https://bugzilla.opensuse.org/) est l'un des objectifs. L'équipe SUSE-IT migre ce service en même temps que celui de suivi des bogues pour SUSE vers de nouveaux systèmes situés dans un nouvel emplacement. Comme la base de données s'est développée au cours des 25 dernières (!) années, le temps d'arrêt prévu couvre tout le week-end:
Vendredi (2020-05-08) jusqu'au dimanche soir (2020-05-10)
Mais il y a plus à l'ordre du jour: le système de gestion des identités, également partagé entre SUSE et openSUSE, doit également changer. Cette modification de l'IDM comprendra au moins également un changement de mot de passe pour tout le monde disposant d'un compte "openSUSE".
Remarque: d'autres changements sont prévus sur l'IDM qui seront couverts dans des messages séparés.
Veuillez donc surveiller les informations supplémentaires fournies via les canaux habituels:
- Discord,
- Forum,
- IRC channels,
- Mailing lists,
- Matrix,
- personal Emails,
- Telegram,
- Twitter,
- ...

Community Account Migration
Dear openSUSE Community,
The authentication system behind the following services are expect to changed this month. Here is a list of services the might be affected. An email about this topic was sent out on the openSUSE Project Mailing List. More information about this topic will be updated on the Account Migration Wiki page.
Build Services https://build.opensuse.org
Bugzilla (2020-05-07 through 2020-05-10)
[https://bugzilla.opensuse.org/](https://bugzilla.opensuse.org/) (which is the same instance as bugzilla.suse.com)
These Community Accounts (formerly known as Bugzilla Account or Novell Customer Account) are migrating from an older system supported by MicroFocus to a newer system supported and hosted by SUSE.
We are now in the process of finalizing this independence also on the technical level. The Community Accounts (a.k.a. Bugzilla Accounts) are now moving from a system provided by MicroFocus back to SUSE to the Nuremberg data center.
This action is not to be confused with an email that went out to users and contributors with an openSUSE account regarding SUSE Account Change. The old SUSE Customer tree hosted by MicroFocus is now transitioning to SUSE control.
It will however be split into two parts:
- SCC and Partner Net accounts
This will be established starting using a OKTA hosted login.
- openSUSE services including Bugzilla and OBS, but also SUSE development services.
This will be the successor account of former bugzilla account, migrated from Microfocus to SUSE. There will be the need to set a new password for this account.
Define a new password
You have two options to set a new password:
Set a password via our migration portal
   Please go to [https://idp-migrate.opensuse.org](https://idp-migrate.opensuse.org)
   Login with your old Community Account (Bugzilla credentials)
   Upon success, you will be redirected to the new IDP-Portal and have to set a new password
Password reset mail (requires a valid mail address in your account)
   If your account has a valid mail address, please go to the IDP-Portal
   From the menu, select "Password forgotten" and enter your username to request a password reset mail
   Follow the instructions in the mail to define a new password.
After that, you can manage your account via the IDP-Portal Service Migration.
The services using the Community Accounts will migrate step-by-step. This means that for some days you need to use the old and new credentials until the services are migrated.
OBS and Bugzilla are the first services to switch on May 11th.
In case of problems, please check which service is expected to be up and migrated.