
 Member
 llunak
Linux perf and KCachegrind
Recently I finally gave Linux perf a try. Not quite sure why I didn't use it before, IIRC when I tried it somewhen long ago, it was probably difficult to set up or something. Using perf record has very little overhead, but I wasn't exactly thrilled by perf report. I mean, it's text UI, and it just gives a list of functions, so if I want to see anything close to a call graph, I have to manually expand one function, expand another function inside it, expand yet another function inside that, and so on. Not that it wouldn't work, but compared to just looking at what KCachegrind shows and seeing ...
When figuring out how to use perf, while watching a talk from Milian Wolff, on one slide I noticed a mention of a Callgrind script. Of course I had to try it. It was a bit slow, but hey, I could finally look at perf results without feeling like that's an effort. Well, and then I improved the part of the script that was slow, so I guess I've just put the effort elsewhere :).
And I thought this little script might be useful for others. After mailing Milian, it turns out he just created the script as a proof of concept and wasn't interested in it anymore, instead developing Hotspot as UI for perf. Fair enough, but I think I still prefer KCachegrind, I'm used to this, and I don't have to switch the UI when switching between perf and callgrind. So, with his agreement, I've submitted the script to KCachegrind. If you would find it useful, just download this do something like:
$ perf record -g ...$ perf script -s perf2calltree.py > perf.out$ kcachegrind perf.out

使用 Ansible 建立 容器化 GitLab with openSUSE in Azure 小記
- 2 CPU / 8 GB MEM - 比對 VM 的話最便宜的就是 B2ms
- 安裝容器服務以及啟動
- 要有一個獨立磁碟將 container 的設定與資料存起來
- 掛載起來的時候, 要進行切割分割區以及建立 file system
- 掛載到指定目錄
- 下載 gitlab-ce 的 container image 並執行他, 開通 port 80 and port 443
- 以上的方式要以非互動的方式來進行
- 使用 gitlab 群組來進行安裝
- 因為想配合 Azure Dynamic Inventory 方式
- 這個 playbook 目前沒有處理 security group, 暫時先用手動開, 後面視需求看要不要加進去
- 在 Azure portal 上面開啟機器 security group 的 port 80
使用 ansible 管理 Azure Kubernetes Service (AKS) instance 小記
- 必須先有 client_id 以及 client_secret
- 有 ssh public key

Weblate blog moved
I've been publishing updates about Weblate on my blog for past seven years. Now the project has grown up enough to deserve own space to publish posts. Please update your bookmarks and RSS readers to new location directly on Weblate website.
The Weblate website will receive another updates in upcoming weeks, I'm really looking forward to these.
New address for Weblate blog is https://weblate.org/news/.
New address for the RSS feed is https://weblate.org/feed/.

openSUSE 42.3 to 15.0 Upgrade notes

Table to json with jq and awk
The problem
Say you have a table that looks like this:
AGGREGATE_NEEDED    1
ARCH    x86_64
BASE_TEST_ISSUES    NUMBER
BUILD   :NUMBER:PACKAGE
DISTRI  DISTRIBUTION
FLAVOR  Server-DVD-Incidents-Install
INCIDENT_ID 99999
It’s just that it contains about 78 or more entries. Of course for a very skilled engineer or a person with a lot of tricks under the hood, this might be a very trivial task in vim or something like this, I guess that with a couple of replaces here and there, you’d get somewhere; but I’m not skilled, other than at eating.
The Solution
So I took my Key Value table saved it to a file and after googling a bit, now I’m more versed into awk :D:
    cat FILE.txt | \
    awk 'BEGIN { print "{" } \
        { printf "\"%s\":\"%s\",", $1,$2} \
        END { print "\"MANUALLY_GENERATED_ISO_POST\":1 }" }'
        | jq > x86_64-ready.json'"}'
I guess this could have been done easier and prettier, but fits my need and might save you too at some point.
Just make sure you have jq installed ok?
EasyTAG: Organize your music with openSUSE
Audio files in formats such as MP3, AAC, and Ogg Vorbis have made music ubiquitous and portable. With the explosive growth of storage capacity, you can store huge libraries of music. But how do you keep all that music organized? Just tag your music. Then you can access it easily locally and in the cloud. EasyTAG is a great choice for tagging music and is available in openSUSE.
Many audio file types support tagging, including:
- MP4, MP3, MP3, MP2
- Ogg Speex, Ogg Vorbis, Ogg Opus
- FLAC
- MusePack
- Monkey Audio
Installing EasyTAG
EasyTAG is easy to install from openSUSE repositories:

Or use Zypper in a terminal as Root:
# zypper install easytag
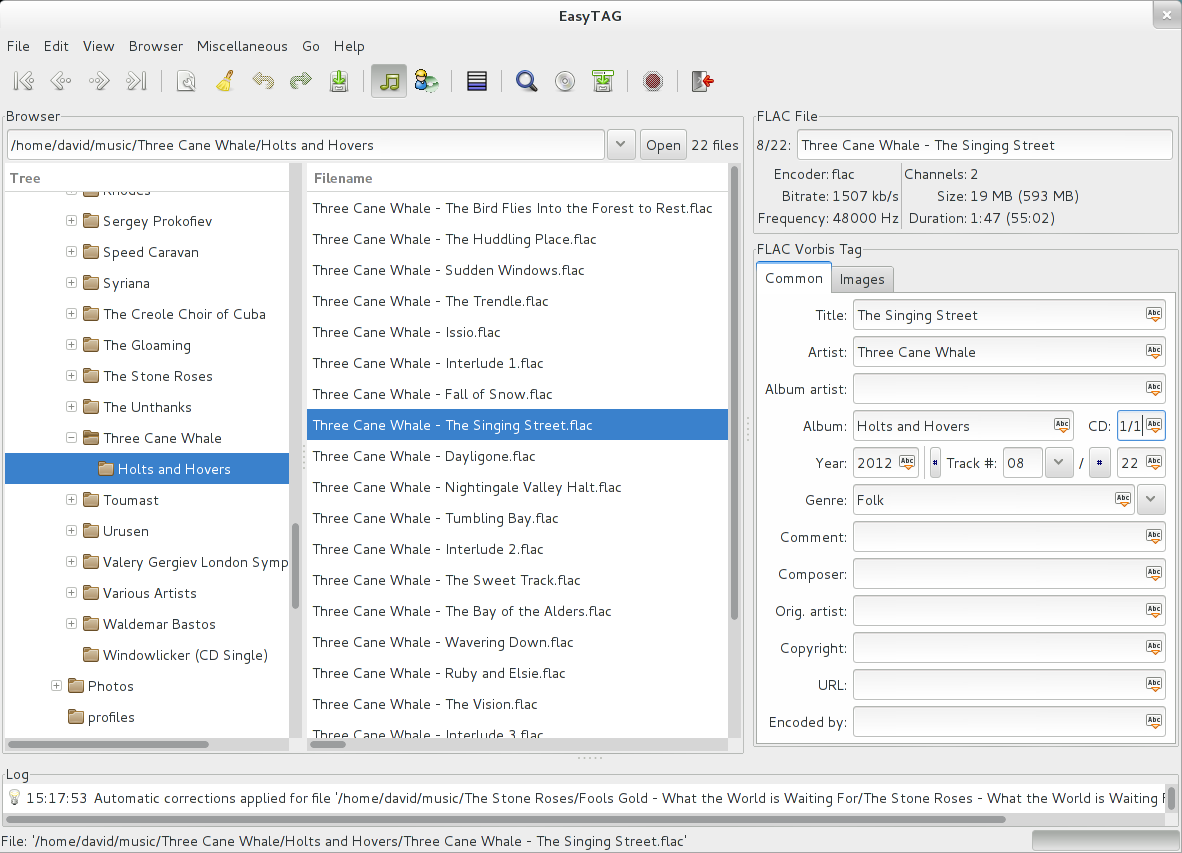
Then launch the program from the Software tool or the application menu for your desktop. EasyTAG’s straightforward interface works well in most desktop environments.
Tagging music
Select a folder where you have music you want to tag. By default, EasyTAG will also load subfolders. You can select each file and add tag information such as the artist, title, year, and so on. You can also add images to a file in JPG or PNG format, which most players understand.
Files you have altered appear in bold in the file listing. To save each, press Ctrl+S. You can also select the entire list and use Ctrl+Shift+S to save all the files at once.
One of the most powerful features of EasyTAG is the file scanner. The scanner recognizes patterns based on a template you provide. Once you provide the right template and scan files, EasyTAG automatically tags all of them for you. Then you can save them in bulk. This saves a lot of time and frustration when dealing with large libraries.
When you upload your tagged files to a cloud service, your tags allow you to quickly find and play the music you want anytime.
This article is an adaption of EasyTAG: Organize your music on Fedora under Creative Commons License.
EasyTAG: Organisiere deine Musik unter openSUSE
Audiodateien in Formaten wie MP3, AAC und Ogg Vorbis haben Musik allgegenwärtig und tragbar gemacht. Mit dem explosionsartigen Wachstum der Speicherkapazität kannst du riesige Musikbibliotheken speichern. Aber wie hältst du all diese Musik organisiert? Tagge einfach deine Musik. Dann kannst du einfach lokal und in der Cloud darauf zugreifen. EasyTAG ist eine gute Wahl für die Kennzeichnung von Musik und ist unter openSUSE verfügbar.
Viele Audiodateitypen unterstützen das Tagging, einschließlich:
- MP4, MP3, MP3, MP2
- Ogg Speex, Ogg Vorbis, Ogg Opus
- FLAC
- MusePack
- Monkey Audio
Installation von EasyTAG
EasyTAG ist einfach aus openSUSE-Repositories zu installieren:
Oder benutze Zypper in einem Terminal als Root:
# zypper install easytag
Dann startest du das Programm über das Anwendungsmenü auf deinem Desktop. Die unkomplizierte Benutzeroberfläche von EasyTAG eignet sich für die meisten Desktop-Umgebungen.
Musik taggen
Wähle einen Ordner aus, in dem du Musik hast, die du markieren möchtest. Standardmäßig lädt EasyTAG auch Unterordner. Du kannst jede Datei auswählen und Tag-Informationen wie Künstler, Titel, Jahr usw. hinzufügen. Du kannst auch Bilder im JPG- oder PNG-Format zu einer Datei hinzufügen, was die meisten Player auch verstehen.
Von dir geänderte Dateien werden in der Dateiliste fett gedruckt. Um alle zu speichern, drückst du Strg+S. Du kannst auch die gesamte Liste auswählen und mit Strg+Shift+S alle Dateien auf einmal speichern.
Eine der leistungsfähigsten Funktionen von EasyTAG ist der Dateiscanner. Der Scanner erkennt Muster auf der Grundlage einer von dir bereitgestellten Vorlage. Sobald du die richtigen Vorlagen und Scan-Dateien zur Verfügung gestellt hast, markiert EasyTAG automatisch alle für dich. Dann kannst du sie in großen Mengen speichern. Das spart viel Zeit und Frustration im Umgang mit großen Bibliotheken.
Wenn du deine getaggten Dateien zu einem Cloud-Service hochlädst, ermöglichen dir deine Tags, die gewünschte Musik jederzeit schnell zu finden und abzuspielen.
Dieser Artikel ist eine Adaption & Übersetzung von EasyTAG: Organize your music on Fedora unter der Creative Commons Lizenz.
使用容器化方式, 建立Ansible 與三大雲端平台工具 azure-cli , awscli 與 gcloud with openSUSE Leap 小記
- 工具為 azure-cli
- 設定檔擺放位置 ~/.azure
- 可以用非互動方式進行安裝
- 工具為 awscli
- 設定檔擺放位置 ~/.aws
- 可以用非互動方式進行安裝
- 工具為 Google Cloud SDK ( gcloud )
- 設定檔擺放位置 ~/.config/gcloud
- 要使用非互動方式進行安裝
- 使用版本化封存檔的 Google SDK 來進行安裝 https://cloud.google.com/sdk/docs/downloads-versioned-archives
- 要調整容器內的環境變數 CLOUDSDK_CORE_DISABLE_PROMPTS 1 來避免互動
- 將 /google-cloud-sdk/path.bash.inc 與 /google-cloud-sdk/completion.bash.inc 放入 ~/.bashrc
- 已經安裝 ansible, azure-cli, awscli, gcloud
- /root 目錄下已經建立 ~/.azure , ~/.aws , ~/.config/gcloud , ansible.cfg , hosts 以及 playbook目錄.
- 進到容器之後就可以開始使用, 接下來就是進行各平台的登入驗證, 將取得相關驗證並開始作業
- 各個設定檔請參考上面的資訊
- 我個人是還有 -v 掛載 playbook 目錄 :)


Leap 15.1, the release that nobody talks about
openSUSE Leap 15.1 is almost ready for release! (1) This is always a high point of the year for me. I started researching what was new in this release. However, there is not much buzz around this release. I found only a few articles on Softpedia (2), Phoronix (3) and the announcement by Ludwig Nussel (4).
When I tried to establish what was new (5) in Leap 15.1, I started to understand why. Leap 15.1 mostly features minor updates. Still there are updates that are noteworthy. In the table below I highlighted in green the updated packages that are really new. In blue, I highlighted new packages that are also present in updated Leap 15 installations.
| Package name | Leap 15 | Leap 15 | Leap 15.1 | Tumbleweed |
| with updates | ||||
| Amarok | 2.9.0 | 2.9.0 | 2.9.0 | 2.9.0 |
| Audacity | 2.2.2 | 2.2.2 | 2.2.2 | 2.3.1 |
| Calibre | 3.23.0 | 3.27.1 | 3.40.1 | 3.40.1 |
| Calligra suite | 3.1.0 | 3.1.0 | 3.1.0 | 3.1.0 |
| Chromium browser | 66 | 73 | 73 | 73 |
| Darktable | 2.4.3 | 2.4.3 | 2.6.2 | 2.6.2 |
| Digikam | 5.9.0 | 5.9.0 | 6.0.0 | 6.1.0 |
| Flatpack | 0.10.4 | 0.10.4 | 1.2.3 | 1.2.4 |
| GIMP | 2.8.22 | 2.8.22 | 2.8.22 | 2.6.12 |
| Gnome Applications | 3.26 | 3.26 | 3.26 | 3.30 |
| GNU Cash | 3.0 | 3.0 | 3.0 | 3.4 |
| Hugin | 2018.0.0 | 2018.0.0 | 2018.0.0 | 2018.0.0 |
| Inkscape | 0.92.2 | 0.92.2 | 0.92.2 | 0.92.4 |
| KDE Applications | 17.12 | 17.12.3 | 18.12.3 | 19.04.0 |
| KDE Plasma 5 desktop | 5.12.5 | 5.12.8 | 5.12.8 | 5.15.4 |
| Krita | 4.0.3 | 4.0.3 | 4.1.8 | 4.1.8 |
| LibreOffice | 6.0.4 | 6.1.3 | 6.1.3 | 6.2.3 |
| Linux kernel | 4.12.14 | 4.12.14 | 4.12.14* | 5.0.9 |
| Mozilla Firefox | 60.0 | 60.6.1 | 60.6.1 | 66.0.3 |
| Mozilla Thunderbird | 52.7 | 60.6.1 | 60.6.1 | 60.6.1 |
| Pidgin | 2.13 | 2.13 | 2.13 | 2.13 |
| Rapid Photo Downloader | 0.9.9 | 0.9.9 | 0.9.14 | 0.9.14 |
| Scribus | 1.4.7 | 1.4.7 | 1.4.7 | 1.4.7 |
| Shotwell | 0.28.3 | 0.28.3 | 0.28.3 | 0.30.2 |
| VLC | 3.0.2 | 3.0.2 | 3.0.6 | 3.0.6 |
| YaST | 4.0.74 | 4.0.87 | 4.1.68 | 4.2.0 |
Software package updates
Calibre is updated to 3.40 and includes some improvements to Kobo drivers, support for the Kindle Whitepaper 2018, a bunch of improvement for the Edit book functionality, the Content station has a new “Copy to library” function and some usability improvements of the Tag browser.
Darktable is updated to 2.6, including a new retouch module, a new filmic module, a new module to handle duplicates in the darkroom, you can now change the cropped area in the perspective correction module, the mask blur feature has been extended with a guided-filter to fine tune it and the color balance module has two new modes based on ProPhotoRGB and HSL.
Digikam is updated to 6.0. This means that you can now manage video files in the same way as you would manage photos. In the album management, you can now use virtual folders (RAW/JPG/PNG) to sort items in a list. Digikam 6.0 uses libraw 0.19, which enables support for over 200 new RAW files. This includes support for iPhone 8, 8+ and X and support for Samsung S7, S7 Edge and S8. There are also many improvements for connecting with external web services. Finally, Digikam now uses a separate database for fussy and duplicate search, improving performance and reliability.
Flatpack is updated to 1.2.3, which includes many security improvements.
KDE applications got a big update to 18.12. Dolphin (file manager) received many improvements, including the ability to hide the Places panel and dock the Terminal panel. The folder view and settings dialog have been updated. Ocular (PDF and document viewer) has a new typewriter annotation feature that enables you to type everywhere on a page. Konsole (terminal application) now has full support for emoji. The Gwenview (image viewer) has seen many improvements, including the crop tool, the reduce red eye tool, improved zooming and better drag and drop functionality. Spectacle (screenshot tool) gained the ability to sequentially number screenshot files and now remembers the lastest save settings. With the rectangular region selection mode, you can select a part of the screen . Ark (unzip tool) now supports the tar.zst archive file standard.
Krita is updated to 4.1.8 and introduces the new reference images tool that lets you place and edit a reference image to help you with drawing. Another help with drawing is provided by the improved vanishing point assistant. Krita 4.1 features many animation improvements and a better color picker tool.
LibreOffice 6.1 offers 2 new icon themes ‘Colibre’ and ‘Karasa Jaga’, it loads documents with many images faster, the gradient tool has been improved and new fill gradients are available, you can now add page numbers and page counts in the header and footer sections of Writer, you can insert a Signature line in Writer, you can now sort images anchored to cells in Calc, the merge cells dialog box has become much clearer in Calc, you can now use CSVs as data sources in Calc and a new page menu has been added in Impress.
Linux kernel has received some back-ports of Graphics hardware from the Linux kernel 4.19, including better support for AMD Vega cards.
Rapid Photo Downloader (from the Graphics repository) is updated to 0.9.14. Canon’s latest RAW file format CR3 is supported on systems that have ExifTool 10.87 or newer.
YaST has received several improvements and is updated to 4.1.68. YaST has improved the default partitioning proposal for systems with less than 12 GB, YaST received some UI improvements including better support for 4K monitors, the YaST Firewall module has been adapted to work with Firewalld, the Partitioner can now directly format full disks and create MD RAIDs on top of disks without partitions.
Installation options
Besides the standard installation options (full ISO, KDE live ISO, Gnome live ISO, network installer) there is now full support for Raspberry Pi installations. The server installation now features an option for a transactionally updated system. Furthermore there are the more traditional server installations for X86_64 and JeOS (the minimal server installation for the Cloud). You can find the Beta versions of Leap 15.1 here.
Published on: 4 May 2019