
 Member
Decentralized HA

I've been playing with different ideas until I came across namecoin, a decentralized DNS based on bitcoin technology.
Then, I had this idea about combining it with DNS Round Robin for High Availability, and so have Decentralized DNS Round Robin for High Availability, or in short, Decentralized HA.
Thus, I downloaded the namecoin daemon and namecoin clients from namecoin.org and started syncronizing the blockchain network... which was terrible slow, 48h!
In the middle of that I got impatient and I just bought the "namecoin domain" jordia65.bit from peername.com, which will add such domain into the blockchain for you (kind of a service proxy if you can't wait for the whole blockchain to be downloaded).
Note you can not use any domain but a special zone domain, which is .bit. More at https://bit.namecoin.org/
Anyway, after buying the domain, they also gave me good support, as my request was a bit special. I didn't want just jordia65.bit to map into an IP address, but to map to 2 IP adresses, to mimic what I would do with a classic DNS Round Robin setup, which would be to have at least 2 A records.
This is the domain in the namecoin blockchain:
https://namecha.in/name/d/jordia65
The 2 IP addresses are real servers running in a cloud. Actually they are floating ip addresses, but that is another story.
Until here, all good. Then the fun started :) . The trick is to use a DNS daemon which queries the namecoin daemon. namecoin already provides that, which is called nmcontrol *
However, that daemon was not expecting 2 IP addresses per domain, and here is where I did my contribution: https://github.com/namecoin/nmcontrol/pull/121/
With that, I was able to put down one of the servers and firefox redirected me to the other one automatically. And the whole beauty of this, is that this does not require a central server for storing neither the domain name nor the list of IP addresses to balance, and this list can also be updated on a decentralized way.
Since setting up all this can be a bit difficult for a "regular user", I also did some tests on setting up an http proxy, with apache2, so that the proxy will be the one trying to resolve the jordia65.bit domain ... and it worked :) ! Also the HA part.
Thus, you could set up your firefox to use that proxy and you would be able to browse .bit domains with high availability.
However, as you may have guessed, adding a proxy has a drawback, which is that it introduces a "single point of failure". If the proxy is taken down, you would not be able to reach any internet at all.
All this is "experimental" and so it will need some more testing and engineering, but all in all, I am very proud of the results and I had a lot of fun with this project :)
(*) Actually it seems nmcontrol has been deprecated in favor of https://github.com/namecoin/ncdns , but nmcontrol was easier to hack.

 federico1
Code Hospitality
Recently on the Greater than Code podcast there was an episode called "Code Hospitality", by Nadia Odunayo.
Nadia talks about thinking of how to make people comfortable in your code and in your team/organization/etc., and does it in terms of thinking about host/guest relationships. Have you ever stayed in an AirBnB where the host carefully prepares some "welcome instructions" for you, or puts little notes in their apartment to orient/guide you, or gives you basic guidance around their city's transportation system? We can think in similar ways of how to make people comfortable with code bases.
This of course hit me on so many levels, because in the past I've written about analogies between software and urbanism/architecture. Software that has the Quality Without A Name talks about Christopher Alexander's architecture/urbanism patterns in the context of software, based on Richard Gabriel's ideas, and Nikos Salingaros's formalization of the design process. Legacy Systems as Old Cities talks about how GNOME evolved parts of its user-visible software, and makes an analogy with cities that evolve over time instead of being torn down and rebuilt, based on urbanism ideas by Jane Jacobs, and architecture/construction ideas by Stewart Brand.
I definitely intend to do some thinking on Nadia's ideas for Code Hospitality and try to connect them with this.
In the meantime, I've just rewritten the README in gnome-class to make it suitable as an introduction to hacking there.
Encrypted installation media
Hackweek project: create encrypted installation media
- You’re still carrying around your precious autoyast config files on an unencrypted usb stick?
- You have a customized installation disk that could reveal lots of personal details?
- You use ad blockers, private browser tabs, or even
torbut still carry around your install or rescue disk unencrypted for everyone to see? - You have your personal files and an openSUSE installation tree on the same partition just because you are lazy and can’t be bothered to tidy things up?
- A simple Linux install stick is just not geekish enough for you?
Not any longer!
mksusecd can now (well, once this pull request has been merged) create fully encrypted installation media (both UEFI and legacy BIOS bootable).
Everything (but the plain grub) is on a LUKS-encrypted partition. If you’re creating a customized boot image and add sensitive data via --boot or add an add-on repo or autoyast config or some secret driver update – this is all safe now!
You can get the latest mksusecd-1.54 already here to try it out! (Or visit software.opensuse.org and look for (at least) version 1.54 under ‘Show other versions’.
It’s as easy as
mksusecd --create crypto.img --crypto --password=xxx some_tumbleweed.iso
And then dd the image to your usb stick.
But if your Tumbleweed or SLE/Leap 15 install media are a bit old (well, as of now they are) check the ‘Crypto notes’ in mksusecd --help first! – You will need to add two extra options.
This is how the first screen looks then

Hackweek0x10: Fun in the Sun
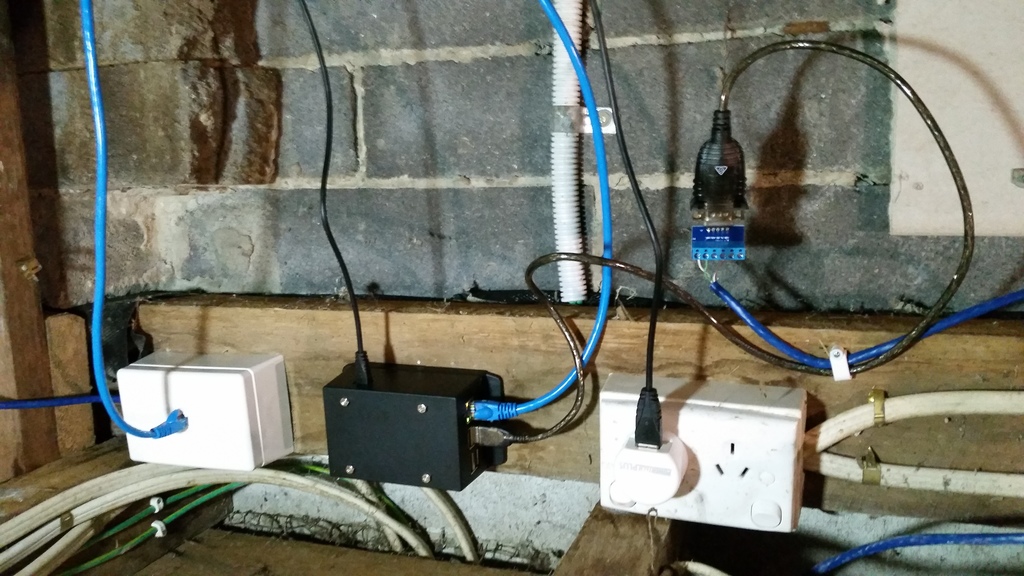
We recently had a 5.94KW solar PV system installed – twenty-two 270W panels (14 on the northish side of the house, 8 on the eastish side), with an ABB PVI-6000TL-OUTD inverter. Naturally I want to be able to monitor the system, but this model inverter doesn’t have an inbuilt web server (which, given the state of IoT devices, I’m actually kind of happy about); rather, it has an RS-485 serial interface. ABB sell addon data logger cards for several hundred dollars, but Rick from Affordable Solar Tasmania mentioned he had another client who was doing monitoring with a little Linux box and an RS-485 to USB adapter. As I had a Raspberry Pi 3 handy, I decided to do the same.
Step one: Obtain an RS-485 to USB adapter. I got one of these from Jaycar. Yeah, I know I could have got one off eBay for a tenth the price, but Jaycar was only a fifteen minute drive away, so I could start immediately (I later discovered various RS-485 shields and adapters exist specifically for the Raspberry Pi – in retrospect one of these may have been more elegant, but by then I already had the USB adapter working).
Step two: Make sure the adapter works. It can do RS-485 and RS-422, so it’s got five screw terminals: T/R-, T/R+, RXD-, RXD+ and GND. The RXD lines can be ignored (they’re for RS-422). The other three connect to matching terminals on the inverter, although what the adapter labels GND, the inverter labels RTN. I plugged the adapter into my laptop, compiled Curt Blank’s aurora program, then asked the inverter to tell me something about itself:
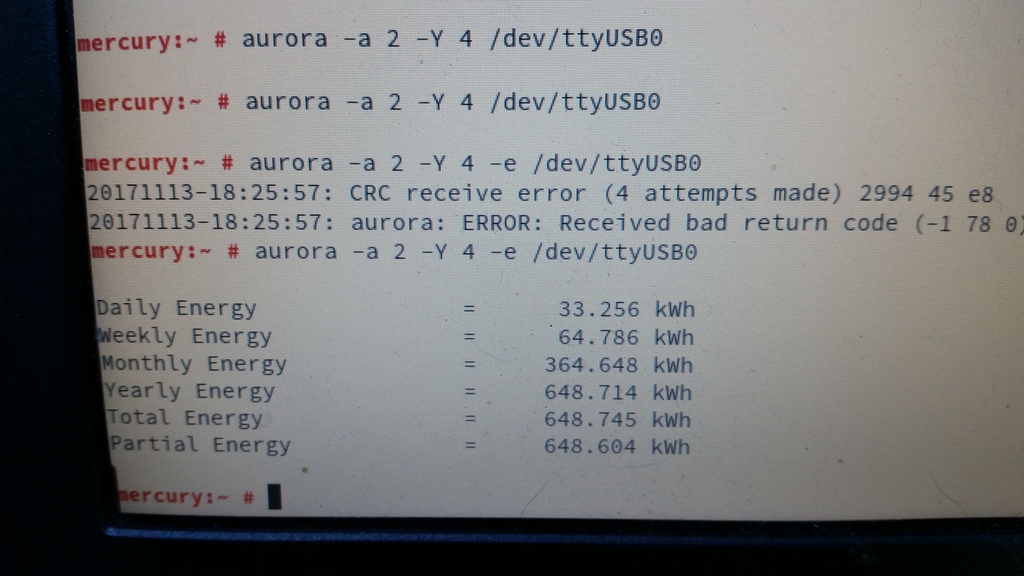 Interestingly, the comms seem slightly glitchy. Just running
 aurora -a 2 -e /dev/ttyUSB0 always results in either “No response after 1 attempts” or “CRC receive error (1 attempts made)”. Adding “-Y 4” makes it retry four times, which is generally rather more successful. Ten retries is even more reliable, although still not perfect. Clearly there’s some tweaking/debugging to do here somewhere, but at least I’d confirmed that this was going to work.
So, on to the Raspberry Pi. I grabbed the openSUSE Leap 42.3 JeOS image and dd’d that onto a 16GB SD card. Booted the Pi, waited a couple of minutes with a blank screen while it did its firstboot filesystem expansion thing, logged in, fiddled with network and hostname configuration, rebooted, and then got stuck at GRUB saying “error: attempt to read or write outside of partition”:
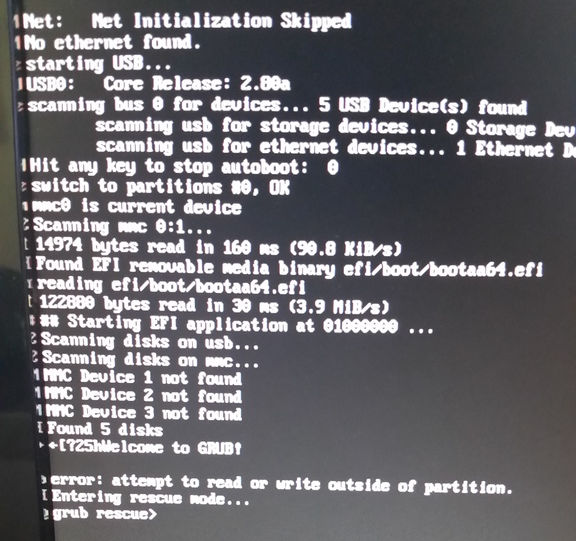
Apparently that’s happened to at least one other person previously with a Tumbleweed JeOS image. I fixed it by manually editing the partition table.
Next I needed an RPM of the aurora CLI, so I built one on OBS, installed it on the Pi, plugged the Pi into the USB adapter, and politely asked the inverter to tell me a bit more about itself:
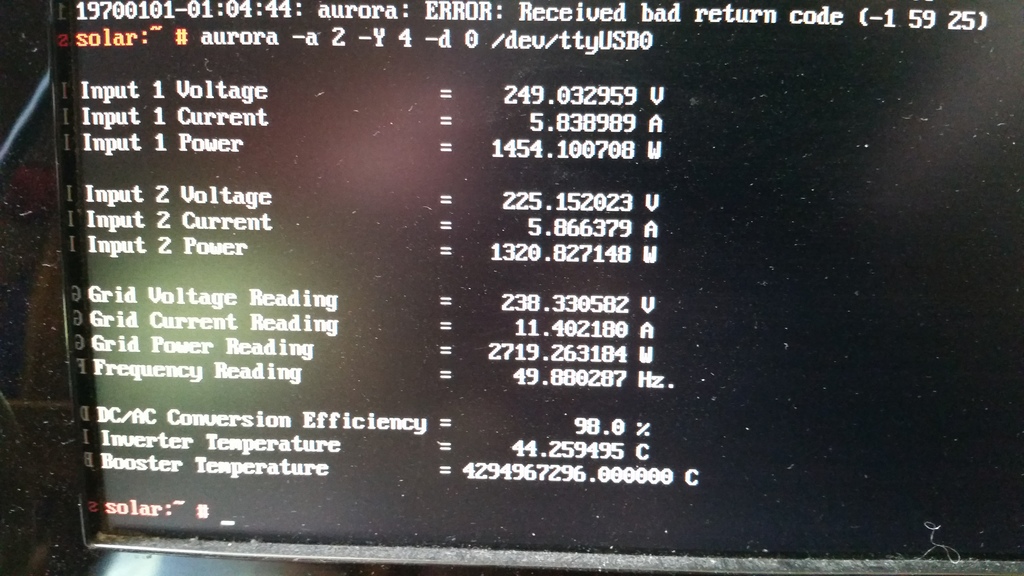
Everything looked good, except that the booster temperature was reported as being 4294967296°C, which seemed a little high. Given that translates to 0x100000000, and that the south wall of my house wasn’t on fire, I rather suspected another comms glitch. Running aurora -a 2 -Y 4 -d 0 /dev/ttyUSB0 a few more times showed that this was an intermittent problem, so it was time to make a case for the Pi that I could mount under the house on the other side of the wall from the inverter.
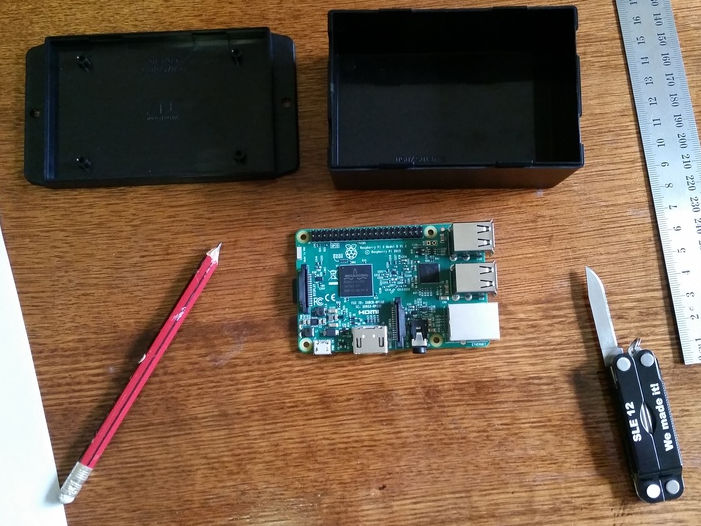
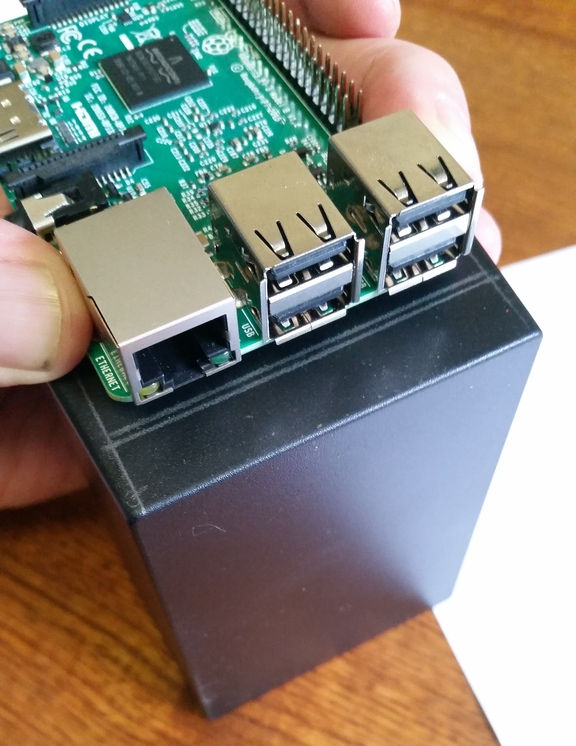
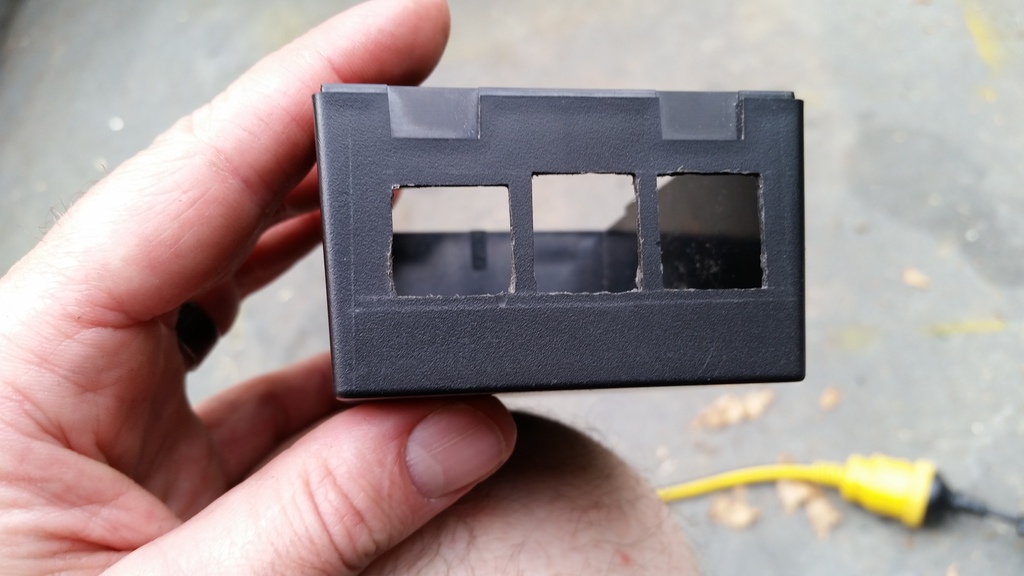
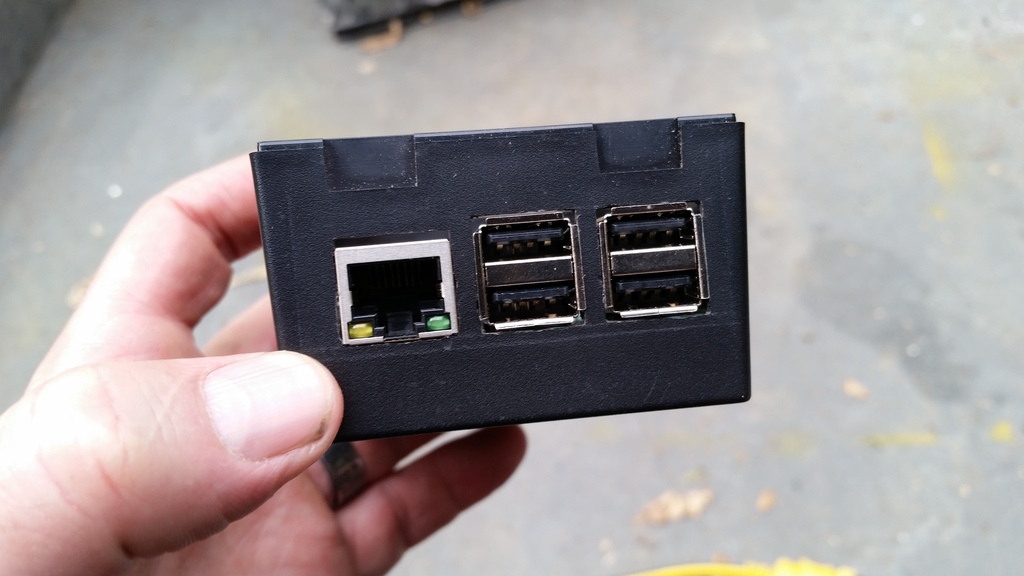
I picked up a wall mount snap fit black plastic box, some 15mm x 3mm screws, matching nuts, and 9mm spacers. The Pi I would mount inside the box part, rather than on the back, meaning I can just snap the box-and-Pi off the mount if I need to bring it back inside to fiddle with it.
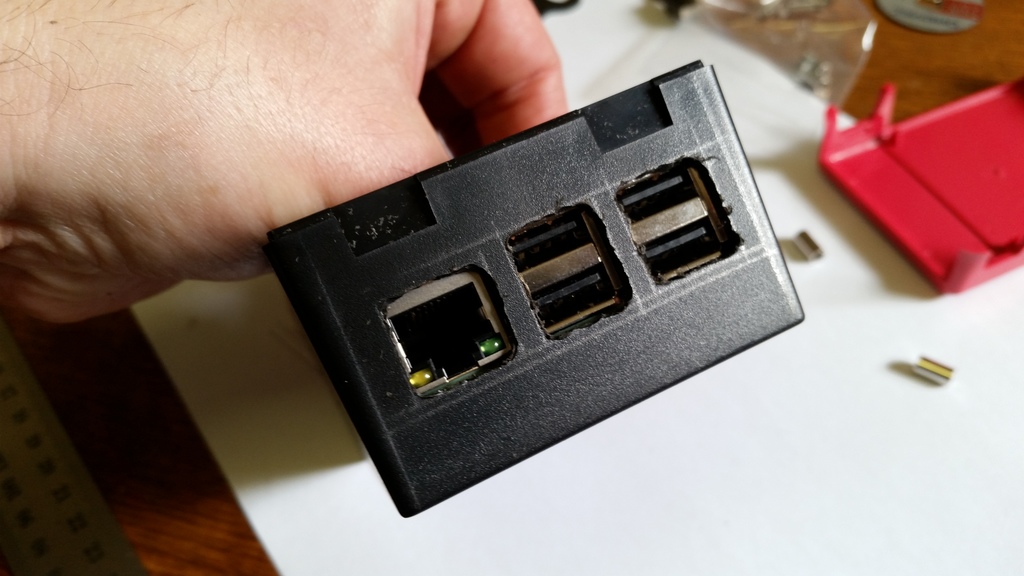
Then I had to measure up and cut holes in the box for the ethernet and USB ports. The walls of the box are 2.5mm thick, plus 9mm for the spacers meant the bottom of the Pi had to be 11.5mm from the bottom of the box. I measured up then used a Dremel tool to make the holes then cleaned them up with a file. The hole for the power connector I did by eye later after the board was in about the right place.
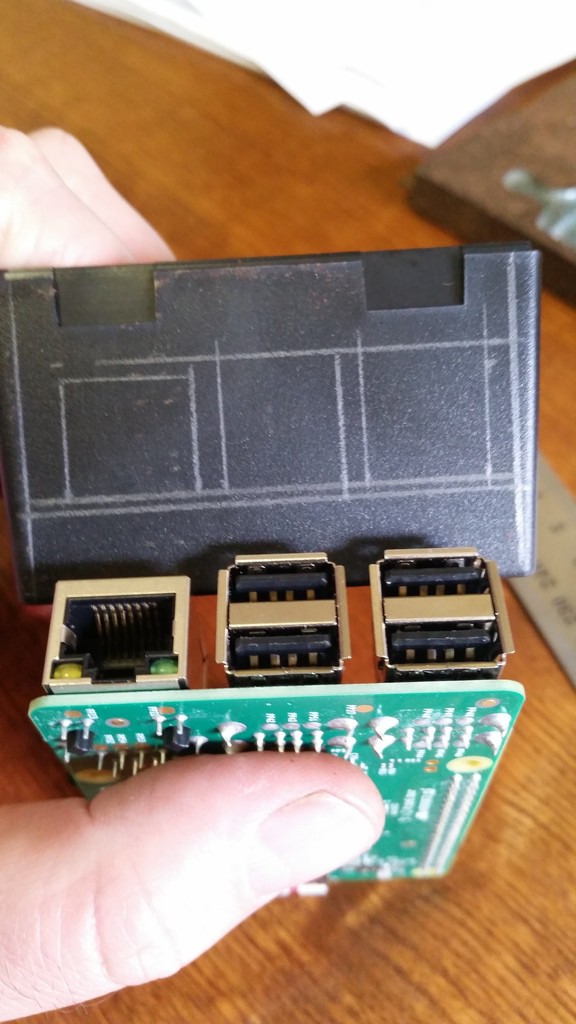

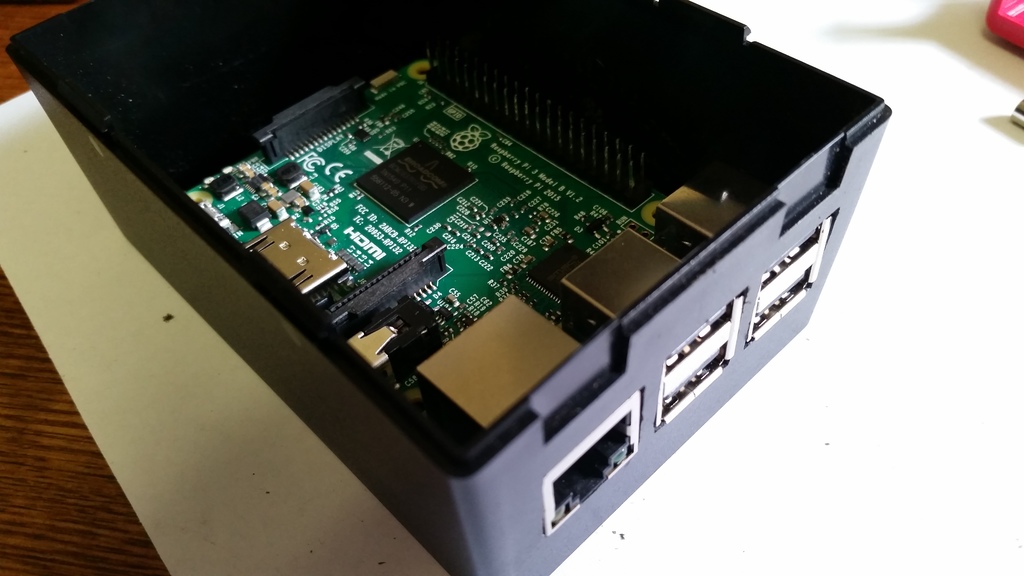
I didn’t measure for the screw holes at all, I simply drilled through the holes in the board while it was balanced in there, hanging from the edge with the ports. I initially put the screws in from the bottom of the box, dropped the spacers on top, slid the Pi in place, then discovered a problem: if the nuts were on top of the board, they’d rub up against a couple of components:
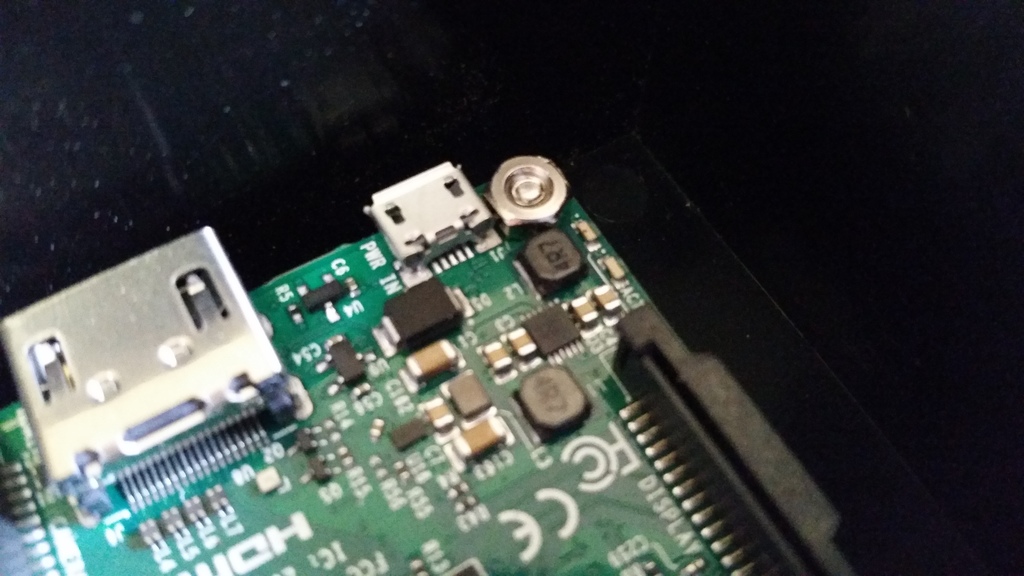
So I had to put the screws through the board, stick them there with Blu Tack, turn the Pi upside down, drop the spacers on top, and slide it upwards into the box, getting the screws as close as possible to the screw holes, flip the box the right way up, remove the Blu Tack and jiggle the screws into place before securing the nuts. More fiddly than I’d have liked, but it worked fine.
One other kink with this design is that it’s probably impossible to remove the SD card from the Pi without removing the Pi from the box, unless your fingers are incredibly thin and dexterous. I could have made another hole to provide access, but decided against it as I’m quite happy with the sleek look, this thing is going to be living under my house indefinitely, and I have no plans to replace the SD card any time soon.
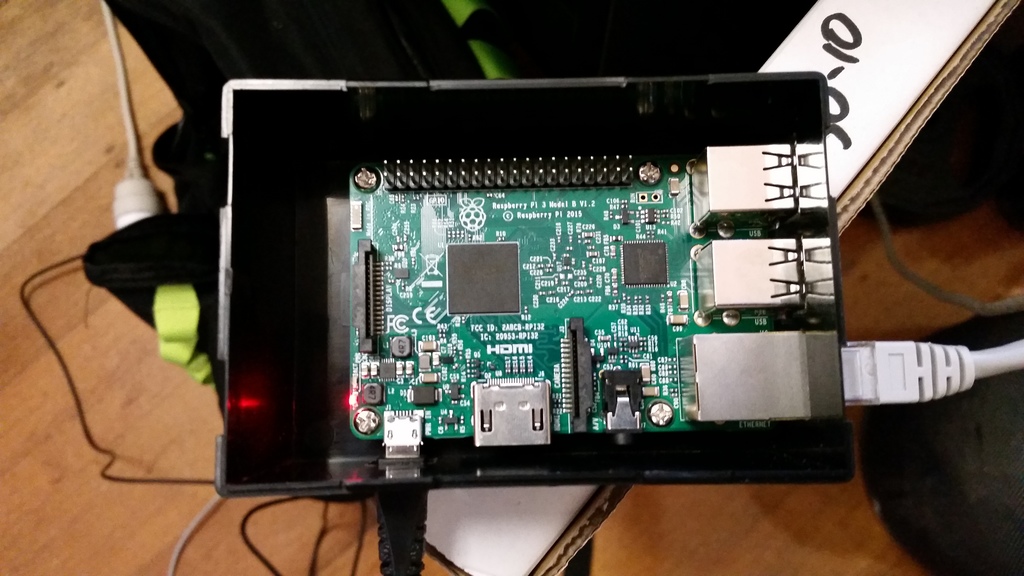

All that remained was to mount it under the house. Here’s the finished install:
After that, I set up a cron job to scrape data from the inverter every five minutes and dump it to a log file. So far I’ve discovered that there’s enough sunlight by about 05:30 to wake the inverter up. This morning we’d generated 1KW by 08:35, 2KW by 09:10, 8KW by midday, and as I’m writing this at 18:25, a total of 27.134KW so far today.
Next steps:
- Figure out WTF is up with the comms glitches
- Graph everything and/or feed the raw data to pvoutput.org

Dell Precision 5520; NVIDIA Optimus PRIME with openSUSE TW and Leap
- disabling one of the devices in BIOS, which may result in improved battery life if the NVIDIA device is disabled, but may not be available with all BIOSes and does not allow GPU switching
- using the official Optimus support (PRIME) included with the proprietary NVIDIA driver, which offers the best NVIDIA performance but does not allow GPU switching unless in offload mode which doesn't work yet.
- using the PRIME functionality of the open-source nouveau driver, which allows GPU switching and powersaving but offers poor performance compared to the proprietary NVIDIA driver.
- using the third-party Bumblebee program to implement Optimus-like functionality, which offers GPU switching and powersaving but requires extra configuration.
1) First we will need to disable open source nuoveau driver. You can follow the link here which will walk you through the hard way of installing and setting up the NVIDIA driver.
2) Once the NVIDIA driver is installed and nuoveau is blacklisted and the module is not loading it should look like this.
# lsmod | grep nvidia
nvidia_drm 53248 3
nvidia_modeset 843776 9 nvidia_drm
nvidia 13033472 1190 nvidia_modeset
drm_kms_helper 192512 2 i915,nvidia_drm
drm 417792 6 i915,nvidia_drm,drm_kms_helper
3) You can now begin the process of setting up your xorg.conf file to use both the Intel integrated GPU (iGPU) and the dedicated NVIDIA GPU (dGPU) in the output mode which is explained in the NVIDIA devtalk forum link above.
The below is the /etc/X11/xorg.conf I use with my Dell Precision 5520 running openSUSE TW
Section "Module"The BusID for both cards can be discovered with this command:
Load "modesetting"
EndSection
Section "Device"
Identifier "nvidia"
Driver "nvidia"
BusID "PCI:1:0:0"
Option "AllowEmptyInitialConfiguration"
EndSection
Section "Device" Identifier "Intel" Driver "modesetting" BusID "PCI:0:2:0" Option "AccelMethod" "sna"
EndSection
# lspci | grep -e VGA -e NVIDIA
00:02.0 VGA compatible controller: Intel Corporation HD Graphics 530 (rev 06)
01:00.0 3D controller: NVIDIA Corporation GM107GLM [Quadro M1200 Mobile] (rev a2)
4) Once you have your xorg.conf file setup right you will also need to setup your ~/.xinitrc file like this.
xrandr --setprovideroutputsource modesetting NVIDIA-0Of course I'm setup for KDE. If you want to load Gnome instead then change startkde to startx in your ~/.xinitrc file.
xrandr --auto
if [ -d /etc/X11/xinit/xinitrc.d ]; then
for f in /etc/X11/xinit/xinitrc.d/*; do
[ -x "$f" ] && . "$f"
done
unset f
fi
exec dbus-launch startkde
exit 0
5) Reboot, Login, and enjoy your new setup with discrete NVIDIA graphics with Optimus.
Have a lot of fun!
Note: Nvidia PRIME on Linux Currently does not work like MS Windows where it offloads 3D and performance graphics to the Nvidia GPU. It works in an output method. The definition of the two methods is
"Output" allows you to use the discrete GPU as the sole source of rendering, just as it would be in a traditional desktop configuration. A screen-sized buffer is shared from the dGPU to the iGPU, and the iGPU does nothing but present it to the screen.
"Offload" attempts to mimic more closely the functionality of Optimus on Windows. Under normal operation, the iGPU renders everything, from the desktop to the applications. Specific 3D applications can be rendered on the dGPU, and shared to the iGPU for display. When no applications are being rendered on the dGPU, it may be powered off. NVIDIA has no plans to support PRIME render offload at this time.
So in "Output" mode this will cause the dGPU to always be running.. I've not tested to see how this affects the battery life. 🙂 time will tell. I'll update the post to let everyone know.
Rust+GNOME Hackfest in Berlin, 2017
Last weekend I was in Berlin for the second Rust+GNOME Hackfest, kindly hosted at the Kinvolk office. This is in a great location, half a block away from the Kottbusser Tor station, right at the entrance of the trendy Kreuzberg neighborhood — full of interesting people, incredible graffitti, and good, diverse food.

My goals for the hackfest
Over the past weeks I had been converting gnome-class
from the old lalrpop-based parser into the new Procedural
Macros framework for Rust, or proc-macro2 for short. To do this the
parser for the gnome-class mini-language needs to be rewritten from
being specified in a lalrpop grammar, to using Rust's syn
crate.
Syn is a parser for Rust source code, written as a set of nom combinator parser macros. For gnome-class we want to extend the Rust language with a few conveniences to be able to specify GObject classes/subclasses, methods, signals, properties, interfaces, and all the goodies that GObject Introspection would expect.
During the hackfest, Alex Crichton, from the Rust core team, kindly took over my baby steps in compiler writing and made everything much more functional. It was invaluable to have him there to reason about macro hygiene (we are generating an unhygienic macro!), bugs in the quoting system, and general Rust-iness of the whole thing.
I was also able to talk to Sebastian Dröge about his work in writing GObjects in Rust by hand, for GStreamer, and what sort of things gnome-class could make easier. Sebastian knows GObject very well, and has been doing awesome work in making it easy to derive GObjects by hand in Rust, without lots of boilerplate — something with which gnome-class can certainly help.
I was also looking forward to talking again with Guillaume Gomez, one of the maintainers of gtk-rs, and who does so much work in the Rust ecosystem that I can't believe he has time for it all.

Extend the Rust language for GObject? Like Vala?
Yeah, pretty much.
Except that instead of a wholly new language, we use Rust as-is, and we just add syntactic constructs that make it easy to write GObjects without boilerplate. For example, this works right now:
#![feature(proc_macro)]

extern crate gobject_gen;

#[macro_use]
extern crate glib;
use gobject_gen::gobject_gen;

gobject_gen! {
    // Derives from GObject
    class One {
    }

    impl One {
        // non-virtual method
        pub fn one(&self) -> u32 {
            1
        }

        virtual fn get(&self) -> u32 {
            1
        }
    }

    // Inherits from our other class
    class Two: One {
    }

    impl One for Two {
        // overrides the virtual method
        // maybe we should use "override" instead of "virtual" here?
        virtual fn get(&self) -> u32 {
            2
        }
    }
}

#[test]
fn test() {
    let one = One::new();
    let two = Two::new();

    assert!(one.one() == 1);
    assert!(one.get() == 1);
    assert!(two.one() == 1);
    assert!(two.get() == 2);
}
This generates a little boatload of generated code,
including a good number of unsafe calls to GObject functions
like g_type_register_static_simple(). It also creates all the
traits and paraphernalia that Glib-rs would create for the Rust
binding of a normal GObject written in C.
The idea is that from the outside world, your generated GObject classes are indistinguishable from GObjects implemented in C.
The idea is to write GObject libraries in a better language than C, which can then be consumed from language bindings.
Current status of gnome-class
Up to about two weeks before the hackfest, the syntax for this mini-language was totally ad-hoc and limited. After a very productive discussion on the mailing list, we came up with a better syntax that definitely looks more Rust-like. It is also easier to implement, since the Rust parser in syn can be mostly reused as-is, or pruned down for the parts where we only support GObject-like methods, and not all the Rust bells and whistles (generics, lifetimes, trait bounds).
Gnome-class supports deriving classes directly from the basic GObject, or from other GObject subclasses in the style of glib-rs.
You can define virtual and non-virtual methods. You can override virtual methods from your superclasses.
Not all argument types are supported. In the end we should support argument types which are convertible from Rust to C types. We need to finish figuring out the annotations for ownership transfer of references.
We don't support GObject signals yet; I think that's my next task.
We don't support GObject properties yet.
We don't support defining new GType interfaces yet, but it is planned. It should be easy to support implementing existing interfaces, as it is pretty much the same as implementing a subclass.
The best way to see what works right now is probably to look at the examples, which also work as tests.
Digression on macro hygiene
Rust macros are hygienic, unlike C macros which work just through textual substitution. That is, names declared inside Rust macros will not clash with names in the calling code.
One peculiar thing about gnome-class is that the user gives us a few
names, like a class name Foo and some things inside it, say, a
method name bar, and a signal baz and a property qux.
From there we want to generate a bunch of boilerplate for GObject
registration and implementaiton. Some of the generated names in that
boilerplate would be
Foo              // base name
FooClass         // generated name for the class struct
Foo::bar()       // A method
Foo::emit_baz()  // Generated from the signal name
Foo::set_qux()   // Generated property setter
foo_bar()        // Generated C function for a method call
foo_get_type()   // Generated C function that all GObjects have
However, if we want to actually generate those names inside our gnome-class macro and make them visible to the caller, we need to do so unhygienically. Alex started started a very interesting discussion on macro hygiene, so expect some news in the Rust world soon.
TL;DR: there is a difference between a code generator, which gnome-class mostly intends to be, and a macro system which is just an aid in typing repetitive code.

People for whom to to be thankful
During the hackfest, Nirbheek has been porting librsvg from Autotools to the Meson build system, and dealing with Rust peculiarities along the way. This is exactly what I needed! Thanks, Nirbheek!
Sebastian answered many of my questions about GObject internals and how to use them from the Rust side.
Zeeshan took us to a bunch of good restaurants. Korean, ramen, Greek, excellent pizza... My stomach is definitely thankful.
Berlin
I love Berlin. It is a cosmopolitan, progressive, LGBTQ-friendly city, with lots of things to do, vast distances to be traveled, with good public transport and bike lanes, diverse food to be eaten along the way...
But damnit, it's also cold at this time of the year. I don't think the weather was ever above 10°C while we were there, and mostly in a constant state of not-quite-rain. This is much different from the Berlin in the summer that I knew!

This is my third time visiting Berlin. The first one was during the Desktop Summit in 2011, and the second one was when my family and I visited the city two years ago. It is a city that I would definitely like to know better.
Thanks to the GNOME Foundation...
... for sponsoring my travel and accomodation during the hackfest.
![]()

Hackweek 0x10 Conclusion
Well it’s over, SUSE’s 16th hackweek. Here’s a quick post to sum up how my Hackweek went compared to my plans.
Small Bits and Pieces
I had a few small things on my list to look at. I didn’t get around to look at WeKan, but I understand other colleagues did and got it working on openSUSE. I plan to learn from them about whether or not the tool has much potential for my user cases.
I did get around to having fun with the large interactive whiteboard in SUSE’s Nürnberg office. Working with a bunch of colleagues we had a lot of fun, first booting it with SLE 15 Beta 2 but deciding that running an Enterprise operating system wasn’t really the best idea and replacing that with openSUSE Tumbleweed.
We found both Linux distributions booted a lot faster than Windows and had exceptionally good support for all of the involved hardware (including the touchscreen). However, just like Windows, it seems with this specific embedded system in the touch screen, we couldn’t get the embedded HDMI interface to set the resolution to 4K, despite the screen supporting 4K. Given this wouldn’t work in either Windows or *SUSE Linux after a day of hacking around we gave up and the screen is likely to be sent back to the manufacturer.
What about Kubic Desktop?
So my big idea was taking the container focused openSUSE Kubic and seeing if I could turn it into a GNOME powered Chromebook-like operating system, with user applications coming from Flatpak.
The short version is IT WORKS

It was an interesting journey. On the Kubic side of things I quickly abandoned the idea of building everything ‘clean’ in OBS first and instead just took the existing Tumbleweed Kubic Media and manually hacking the resulting installation into something that I wanted.
Our support for transactional updates got a very good workout, being used and abused to install well over 1606 packages from Tumbleweed onto the Kubic host to provide a fully fledged desktop install.
It surprised me how little I had to modify, with minor tweaks to the btrfs subvolume configuration required to get gdm working. I learned alot about PackageKit and gnome-software getting it configured just the way I wanted.
By the end, my resulting prototype VM was so promising I repeated the process on my GPD Pocket. I’m now running a Kubic Desktop installation, with automated operating system updates, and if an update ever did go wrong would have seamless rollback to the exact state of the system root filesystem.
It was really nice to prove that, even though the project as a whole is still in a very early stage, Tumbleweed Kubic is a powerful flexible platform for hacking on and getting used to this new, transactional way of looking at an operating system and it’s software management.
With a little more time and polish, I’m supremely confident we could build this into a ‘grandmother-friendly’ openSUSE desktop operating system, where the user wouldn’t even need to know that such a thing as a ‘root account’ existed, but they would still benefit from the fully tested rolling nature of openSUSE Tumbleweed.
A journey into Flatpaks
A fancy desktop operating system is nothing without apps. And as this idea aimed to have a system where it’s users shouldn’t need to worry about doing something as root, I needed a solution that provided apps that could be installed and run reliably in userspace.
As openSUSE does not (yet) have support for isolated snaps (due to Canonicals AppArmor patches still not fully available in the upstream Kernel), that left AppImage and Flatpak for consideration as a source of these applications.
As AppImage has a pretty terrible user experience story, without any kind of standard ‘AppStore’ interface, requiring users download executables from random websites, then to chmod a+x a file in the commandline before executing said file, that ruled them out as an option for this project; Though it was nice to see an AppImage running first time on the first Kubic Desktop prototypes.
But as originally planned, Flatpak seemed to have the answers to everything I needed. With solid gnome-software integration I knew I could build something that would offer users all of the applications in Flathub. Despite my previous concerns of these technologies I had high hopes.
“Everything is possible if you think in Opportunities”
The slogan attributed to the international purveyor of furniture in flat-packed form, Ikea, is really appropriate for Flatpak.
After a few days of playing with Flatpaks, I’m starting to see the opportunities and possibilities. It was really nice to be able to easily install Atom, Signal, and more with ease, when due to issues like licenses & crazy build environment requirements we haven’t (yet) been able to offer that software as part of openSUSE Tumbleweed.
But the ecosystem as a whole is flawed, possibly broken, and is in no way a software delivery system I can put any faith in at the moment. Flatpaks like Audacity would totally fail to start, claiming not to be able to read configuration files that were clearly present on the system. Other Flatpaks like Gydl complained about a lack of network, which was clearly a fault of that specific application when others were streaming YouTube just fine. And applications like libreoffice are clearly advertised on Flathub, just to not appear in gnome-software due to missing metadata.
With so many failures on a relatively small software selection, Flathub really, desperately, need to impose quality controls on their repository and stop shipping broken packages. And when they do, as they are right now, they need to have a way of actually reporting bugs against those packages. It’s nice their website has a guide on how to report Legal or Security issues, but that’s no good if users can’t get the apps to work in the first place.
As I played around with apps I got the feeling more and more that applications needed much tinkering and tuning to be able to fully support the Flatpak-way of doing things, and I think that is going to hold the Flatpak ecosystem back, unless tools like gnome-builder somehow become the predominant tooling for application development on Linux.
I was also dreadfully dissapointed with the performance, with applications taking significantly longer to load on my GPD Pocket compared to the same app provided by openSUSE Tumbleweeds rpms. On faster machines I didn’t notice, but it really put a dent in my idea of using Flatpaks for ‘netbook’ style usecases.
So I see the potential there, but at the moment I’m left feeling it will be unrealised potential.
With all that said, I’d like to extend a huge thank you to the folks in #flatpak IRC on Freenode. They were very friendly, a huge help, and I do believe they will work hard to address these problems I bumped into. Who knows, I may even help them out, they certainly are a nice enough bunch that I feel obligated to do so no matter what happens to the “Kubic Desktop”.
Next Steps
As you will see from the instructions below, installing your own Kubic Desktop isn’t a trivial process at the moment. If I have time, or if others feel like moving this idea forward with me, we really need to look into the following:
- Polishing the Product & Image definitions in OBS for Kubic to remove as many of the installation steps below as possible. This would either mean extending the existing images & installation routine to support a Kubic desktop, or producing new images for a Kubic desktop.
- As part of the above, remove the conflicts that stop additional patterns being installed with the openSUSE-TW-Kubic product.
- Make libzypp-plugin-appdata a recommended dependency so that a system can run with only flatpaks showing in gnome-software instead of always showing the distribution packages also.
- To get a complete GNOME installation I chose to use openSUSE’s “gnome” pattern. Finding (or tuning) a GNOME pattern that just installs GNOME without any applications would be nicer, as right now they clutter the installation more than I envision for the idea.
- Fix the transactional-update tool to support all of zyppers additional commandline switches (like –from when using ‘dup’).
- Working with Flathub so they can setup openQA and start testing their Flatpaks before distributing them.
Install your own Kubic Desktop
These instructions aren’t for the faint of heart, but if you’d like to setup your own prototype Kubic desktop to play with you can follow the guide below
- Download the latest snapshot of Tumbleweed Kubic and boot the media, choosing the ‘Installation’ option
- Follow the installation wizard as normal, but customise the Partition configuration. You need a
btrfsroot filesystem with two additional subvolumes@/var/lib/gdmand@/var/lib/flatpak - Choose to install a
Plain System - Once installed and rebooted, login as root and run the following command;
zypper ar http://download.opensuse.org/tumbleweed/repo/oss tw-repo - Edit
/etc/zypp/zypp.confand setsolver.onlyRequires = false - Run
transactional-update pkg in patterns-gnome-gnome flatpak gsettings-backend-dconf - Accept any dependency warnings but choosing option
1and deinstalling the problematic packages - Once installed then reboot - transactional updates don’t apply until the next reboot.
- Once rebooted, run the following commands
-
systemctl set-default graphicalto set the system to boot into a graphical mode in the future -
useradd -m $USERNAMEwith$USERNAMEbeing whatever you want your useraccount to be called to create a user account -
passwd $USERNAMEto set the password for that user account -
rm -Rf /var/cache/app-infoto remove any trace of AppData from the official Tumbleweed repos to force gnome-software to rely only on Flatpak -
transactional-update shellto create an interactive shell that will let you modify the otherwise read-only root filesystem -
rpm -e --nodeps libzypp-plugin-appdatato remove the libzypp plugin that creates the app-info AppData -
zypper al libzypp-plugin-appdatato prevent anything installing that package again -
exitto exit the interactive shell and create a snapshot which will effectively be a custom ‘transactional update’ next time you reboot - then reboot to activate the above changes
-
- You should now be presented with standard gdm login screen with your
$USERNAMEaccount being offered, login - Before doing anything else, run the following commands to setup access to flatpak and tune gnome-software to run how we want it
gsettings set org.gnome.software install-bundles-system-wide falsegsettings set org.gnome.software allow-updates falsegsettings set org.gnome.software download-updates falsegsettings set org.gnome.software enable-software-sources falsegsettings set org.gnome.software first-run trueflatpak remote-add --user --if-not-exists flathub https://flathub.org/repo/flathub.flatpakrepo
- Now load up “Software” in GNOME and enjoy your experimental Kubic Desktop experience
- To update the system just run
transactional-update dupas root, or ideally put it in a cron job/systemd timer and forget about it and trust it to do everything automatically for you
If you are interested in working on this idea and taking it beyond the fun little experiments I’ve started here, please feel free to get in touch using the links at the bottom of this blog.
Thanks for reading!
OpenStack Summit Sydney - Slides and Videos

Hackweek 0x10 - Day 0
It’s here again, SUSE’s 16th Hackweek. A week where all of SUSE Engineering is given time away from their regular grind to work on whatever they want. And of course as this is SUSE we’re talking about, a lot of Hackweek involves the openSUSE Community also.
My Plans for Hackweek 0x10
This Hackweek I have a few small things I hope to spend a little bit of time on, and one huge exciting project I intend to throw most of my efforts in
In SUSE’s Nürnberg office there is a rather large, impressive interactive whiteboard/touchscreen for SUSE Engineering to use. However it’s currently running an inferior operating system, but seems to be reasonably hackable with easy access to the Intel-based embedded PC as part of the screen. So I’m keen to grab openSUSE Leap and make the big screen great again.
I also hear a few people will be looking at WeKan as a possible open alternative to Trello. As I’m not a huge fan of Trello, but interested in using Kanban Boards for organising a lot of what I’m doing, I plan on seeing how hard it is to get WeKan running on openSUSE if I have time; Which is unlikely, because..
The Big Idea - Kubic Desktop
These days I’m working on openSUSE Kubic. While the Project is still in its early stages, we have an exciting platform designed to run containers, with a rolling OS, safely and smoothly updated with atomic, transactional updates.
But my hackweek idea is to take these basic attributes of Kubic and repurpose them as a desktop. An Kubic Desktop should be able to provide a nice reliable GNOME environment, which can be reliably and automatically updated.
It could be a perfect way of leveraging all the existing technologies openSUSE has with Tumbleweed, OBS, and openQA to build a linux operating system which might be useful in “Chromebook”-like usecases.
The openSUSE distributions are sometimes criticised as not being suitable for “your grandmothers desktop”, which is often a fair critism and one that openSUSE shouldn’t be ashamed of - it’s not our communities core areas of interest. But a Kubic desktop could be an answer to leverage what we’re best at for that very scenario.
The only obvious problem is going to be “user space” applications. Installing packages is not a trivial task when the OS is locked down like an appliance. So for that, because I’ve already decided Kubic will have a GNOME desktop and it’s closely aligned with my favourite desktop, I’m going to try use Flatpak.

Why not?
Everybody should know that I am not a great fan of Flatpak or similar approaches to containerised application packaging.
But doing stuff that is weird, unusual, new, and sometimes counterinuative to everything you think is ‘right’ is exactly the sort of thing Hackweek is about.
So I’m excited about learning what I’m going to learn over these next days. Whether I learn to love Flatpak or find a new bunch of concerns about such technologies remains to be seen.
Will probably be a few days before I get around to the Flatpak part of the equation - first steps will be setting up a project in OBS and building basic OS images based on Tumbleweed’s GNOME LiveCD’s, but with Kubic’s read-only filesystem and transactional updates.
Expect updates to this blog once I have something fun to share.
Have a lot of fun!

Understanding Go panic output
My code has a bug. 😭
panic: runtime error: invalid memory address or nil pointer dereference
[signal SIGSEGV: segmentation violation code=0x1 addr=0x30 pc=0x751ba4]
goroutine 58 [running]:
github.com/joeshaw/example.UpdateResponse(0xad3c60, 0xc420257300, 0xc4201f4200, 0x16, 0x1, 0x0, 0x0, 0x0, 0x0, 0x0, ...)
        /go/src/github.com/joeshaw/example/resp.go:108 +0x144
github.com/joeshaw/example.PrefetchLoop(0xacfd60, 0xc420395480, 0x13a52453c000, 0xad3c60, 0xc420257300)
        /go/src/github.com/joeshaw/example/resp.go:82 +0xc00
created by main.runServer
        /go/src/github.com/joeshaw/example/cmd/server/server.go:100 +0x7e0
This panic is caused by dereferencing a nil pointer, as indicated by the first line of the output. These types of errors are much less common in Go than in other languages like C or Java thanks to Go’s idioms around error handling.
If a function could fail, the function must return an error as its
last return value. The caller should immediately check for errors
from that function.
// val is a pointer, err is an error interface value
val, err := somethingThatCouldFail()
if err != nil {
    // Deal with the error, probably pushing it up the call stack
    return err
}

// By convention, nearly all the time, val is guaranteed to not be
// nil here.
However, there must be a bug somewhere that is violating this implicit API contract.
Before I go any further, a caveat: this is architecture- and operating system-dependent stuff, and I am only running this on amd64 Linux and macOS systems. Other systems can and will do things differently.
Line two of the panic output gives information about the UNIX signal that triggered the panic:
[signal SIGSEGV: segmentation violation code=0x1 addr=0x30 pc=0x751ba4]
A segmentation fault (SIGSEGV) occurred because of the nil pointer
dereference. The code field maps to the UNIX siginfo.si_code
field, and a value of 0x1 is SEGV_MAPERR (“address not mapped to
object”) in Linux’s siginfo.h file.
addr maps to siginfo.si_addr and is 0x30, which isn’t a valid
memory address.
pc is the program counter, and we could use it to figure out where
the program crashed, but we conveniently don’t need to because a
goroutine trace follows.
goroutine 58 [running]:
github.com/joeshaw/example.UpdateResponse(0xad3c60, 0xc420257300, 0xc4201f4200, 0x16, 0x1, 0x0, 0x0, 0x0, 0x0, 0x0, ...)
        /go/src/github.com/joeshaw/example/resp.go:108 +0x144
github.com/joeshaw/example.PrefetchLoop(0xacfd60, 0xc420395480, 0x13a52453c000, 0xad3c60, 0xc420257300)
        /go/src/github.com/joeshaw/example/resp.go:82 +0xc00
created by main.runServer
        /go/src/github.com/joeshaw/example/cmd/server/server.go:100 +0x7e0
The deepest stack frame, the one where the panic happened, is listed
first. In this case, resp.go line 108.
The thing that catches my eye in this goroutine backtrace are the
arguments to the UpdateResponse and PrefetchLoop functions,
because the number doesn’t match up to the function signatures.
func UpdateResponse(c Client, id string, version int, resp *Response, data []byte) error
func PrefetchLoop(ctx context.Context, interval time.Duration, c Client)
UpdateResponse takes 5 arguments, but the panic shows that it takes
more than 10. PrefetchLoop takes 3, but the panic shows 5. What’s
going on?
To understand the argument values, we have to understand a little bit about the data structures underlying Go types. Russ Cox has two great blog posts on this, one on basic types, structs and pointers, strings, and slices and another on interfaces which describe how these are laid out in memory. Both posts are essential reading for Go programmers, but to summarize:
- Strings are two words (a pointer to string data and a length)
- Slices are three words (a pointer to a backing array, a length, and a capacity)
- Interfaces are two words (a pointer to the type and a pointer to the value)
When a panic happens, the arguments we see in the output include the “exploded” values of strings, slices, and interfaces. In addition, the return values of a function are added onto the end of the argument list.
To go back to our UpdateResponse function, the Client type is an
interface, which is 2 values. id is a string, which is 2 values (4
total). version is an int, 1 value (5). resp is a pointer, 1
value (6). data is a slice, 3 values (9). The error return value
is an interface, so add 2 more for a total of 11. The panic output
limits the number to 10, so the last value is truncated from the
output.
Here is an annotated UpdateResponse stack frame:
github.com/joeshaw/example.UpdateResponse(
    0xad3c60,      // c Client interface, type pointer
    0xc420257300,  // c Client interface, value pointer
    0xc4201f4200,  // id string, data pointer
    0x16,          // id string, length (0x16 = 22)
    0x1,           // version int (1)
    0x0,           // resp pointer (nil!)
    0x0,           // data slice, backing array pointer (nil)
    0x0,           // data slice, length (0)
    0x0,           // data slice, capacity (0)
    0x0,           // error interface (return value), type pointer
    ...            // truncated; would have been error interface value pointer
)
This helps confirm what the source suggested, which is that resp was
nil and being dereferenced.
Moving up one stack frame to PrefetchLoop: ctx context.Context is
an interface value, interval is a time.Duration (which is just an
int64), and Client again is an interface.
PrefetchLoop annotated:
github.com/joeshaw/example.PrefetchLoop(
    0xacfd60,       // ctx context.Context interface, type pointer
    0xc420395480,   // ctx context.Context interface, value pointer
    0x13a52453c000, // interval time.Duration (6h0m)
    0xad3c60,       // c Client interface, type pointer
    0xc420257300,   // c Client interface, value pointer
)
As I mentioned earlier, it should not have been possible for resp to
be nil, because that should only happen when the returned error is
not nil. The culprit was in code which was erroneously using the
github.com/pkg/errors Wrapf() function instead of Errorf().
// Function returns (*Response, []byte, error)

if resp.StatusCode != http.StatusOK {
    return nil, nil, errors.Wrapf(err, "got status code %d fetching response %s", resp.StatusCode, url)
}
Wrapf() returns nil if the error passed into it is nil. This
function erroneously returned nil, nil, nil when the HTTP status
code was not http.StatusOK, because a non-200 status code is not an
error and thus err was nil. Replacing the errors.Wrapf() call
with errors.Errorf() fixed the bug.
Understanding and contextualizing panic output can make tracking down errors much easier! Hopefully this information will come in handy for you in the future.
Thanks to Peter Teichman, Damian Gryski, and Travis Bischel who all helped me decode the panic output argument lists.
Update
From the Go 1.17 release notes:
The format of stack traces from the runtime (printed when an uncaught panic occurs, or when runtime.Stack is called) is improved. Previously, the function arguments were printed as hexadecimal words based on the memory layout. Now each argument in the source code is printed separately, separated by commas. Aggregate-typed (struct, array, string, slice, interface, and complex) arguments are delimited by curly braces. A caveat is that the value of an argument that only lives in a register and is not stored to memory may be inaccurate. Function return values (which were usually inaccurate) are no longer printed.
And from the 1.18 release notes:
Go 1.17 generally improved the formatting of arguments in stack traces, but could print inaccurate values for arguments passed in registers. This is improved in Go 1.18 by printing a question mark (
?) after each value that may be inaccurate.
A colleague recently had a crash similar to our example above. The relevant methods looked like this:
func (s *Service) GetCount(repo string) (count int64, errors []error)
func (s *Service) request(method string, url string, body []byte) (status int, response []byte, errors []error)
where s.GetCount(...) calls s.request(...).
The stack trace looked like this:
github.com/example/service.(*Service).request(0x0, {0x118368d?, 0xc000cd9b20?}, {0xc000588180?, 0x1?}, {0x0, 0x0, 0x0})
	/go/src/github.com/example/service/service.go:38 +0xdc
github.com/example/service.(*Service).GetCount(0xc000896700?, {0xc00084bed0?, 0x1ba03c0?})
	/go/src/github.com/example/service/service.go:69 +0xdc
You can see right away that the new output is a big improvement. The aggregated types (strings and slices in this example) are grouped together. Return values are omitted entirely.
Here it is again with my annotations:
github.com/example/service.(*Service).request(
    0x0,                          // *Service receiver, nil pointer (!)
    {0x118368d?, 0xc000cd9b20?},  // method string: pointer and length
    {0xc000588180?, 0x1?},        // url string: pointer and length
    {0x0, 0x0, 0x0}               // body []byte: pointer, length, capacity
)
	/go/src/github.com/example/service/service.go:38 +0xdc

github.com/example/service.(*Service).GetCount(
    0xc000896700?,                // *Service receiver, pointer
    {0xc00084bed0?, 0x1ba03c0?}   // repo string: pointer and length
)
	/go/src/github.com/example/service/service.go:69 +0xdc
Pretty clearly here you can see that the nil *Service receiver in the call to request is the problem. Something on line 38 is trying to dereference it and causing the crash.
But wait. GetCount calls request and its receiver is not nil (0x0). What’s going on?
The release notes above say that the stack trace could include “inaccurate values for arguments passed in registers” and signifies this by putting a question mark after such values.
GetCount does nothing with the receiver value other than passing it along to the request method. This means that when GetCount gets the receiver passed in as a register, it does not need to load it into RAM and we get the potentially inaccurate value in our stack trace.
request does do something with the value – dereferences it – requiring it to be loaded into RAM. That’s why the value is accurate in the request stack frame.