
 Member
 dragotin
SMB on openSUSE Conference
The annual openSUSE Conference 2017 is upcoming!  Next weekend it will be again in the Z-Bau in Nuremberg, Germany.
The conference program is impressive and if you can make it, you should consider stopping by.
Stefan Schäfer from the Invis server project and me will organize a workshop about openSUSE for Small and Medium Business (SMB).
SMB is a long running concern of the heart of the two of us: Both Stefan, who even does it for living, and me have both used openSUSE in the area of SMB for long and we know how well it serves there. Stefan has even initiated the Invis Server Project, which is completely free software and builds on top of the openSUSE distributions. The Invis Server adds a whole bunch of extra functionality to openSUSE that is extremely useful in the special SMB usecase. It came a long way starting as Stefans own project long years ago, evolving as proper maintained openSUSE Spin in OBS with a small, but active community.
The interesting question is how openSUSE, Invis Server and other smaller projects like for example Kraft can unite and offer a reliable maintained and comprehensive solution for this huge group of potential users, that is now locked in to proprietary technologies mainly while FOSS can really make a difference here.
In the workshop we first will introduce the existing projects briefly, maybe discuss some technical questions like integration of new packages in the openSUSE distributions and such, and also touch organizational question like how we want to setup and market openSUSE SMB.
Participants in the workshop should not expect too much presentation. We rather hope for a lively discussion with many people bringing in their projects that might fit, their experiences and ideas. Don’t be shy :-)

ICC Examin 1.0 on Android
![]() ICC Examin allows since version 1.0 ICC Color Profile viewing on the Android mobile platform. ICC Examin shows ICC color profile elements graphically. This way it is much easier to understand the content. Color primaries, white point, curves, tables and color lists are displayed both numerically and as graphics. Matrices, international texts, Metadata are much easier to read.
ICC Examin allows since version 1.0 ICC Color Profile viewing on the Android mobile platform. ICC Examin shows ICC color profile elements graphically. This way it is much easier to understand the content. Color primaries, white point, curves, tables and color lists are displayed both numerically and as graphics. Matrices, international texts, Metadata are much easier to read.
Features:
* most profile elements from ICC specification version 2 and version 4
* additionally some widely used non standard tag are understood

ICC color profiles are used in photography, print and various operating systems for improving the visual appearance. A ICC profile describes the color response of a color device. Read more about ISO 15076-1:2010 Standard / Specification ICC.1:2010-12 (Profile version 4.3.0.0), color profiles and ICC color management under www.color.org .
The ICC Examin App is completely rewritten in Qt/QML. QML is a declarative language, making it easy to define GUI elements and write layouts with fewer code. In recent years the Qt project extended support from desktop platforms to mobiles like Nokias Meego, Sailfish OS, iOS, Android, embedded devices and more. ICC Examin is available as a paid app in the Google Play Store. Sources are currently closed in order to financially support further development. This ICC Examin version continues to use Oyranos CMS. New is the dependency to RefIccMAX for parsing ICC Profile binaries. In the process both the RefIccMAX library and the Oyranos Color Management System obtained changes and fixes in git for cross compilation with Android libraries. Those changes will be in the next respective releases.
The FLTK Toolkit, as used in previous versions, was not ported to the Android or other mobile platforms. Thus a complete rewrite was unavoidable. The old FLTK based version is still maintained by the same author.
CEPHALOCON 2017 - CANCELLED
The Ceph community has always been based on the principles of openness, inclusion, and a level playing field for all participants. We have worked hard to ensure that no matter what time zone you’re in, who you are, or how technically knowledgeable you are there is always a way for you to participate and contribute to the Ceph community.
It is our sincere hope that the people of the United States will course-correct their leadership to conform to the principles that the country was founded on, and has served so well throughout history. In the meantime, we wont be hosting any events that require members of our community to travel to the U.S. and potentially suffer harassment, digital privacy violations, or rejection at the border.
Though these are `SAD` news for the community, I fully support the decision and the statement. I'm looking forward for a new date for a Cephalocon, propably in Canada, Mexico or around the next OpenStack Summit in Sydney end of this year. It would be really good if the full Ceph community - including the developers - could get together at least once in a while.
Tracing IDispatch::Invoke calls in COM applications
In practice, it is use of the services that Microsoft Office offers to third-party applications that we want to trace and dump symbolically.
Binaries are available at https://people.collabora.com/~tml/injectdll/injectdll.zip (for 32-bit applications) and https://people.collabora.com/~tml/injectdll/injectdll64.zip (64-bit). The zip archive contains an executable, injectdll.exe (injectdll64.exe in the 64-bit case) and a DLL.
Unpack the zip archive somewhere. Then go there in Command Prompt, and in case the program you want to trace the IDispatch::Invoke use of is something you know how to start from the command line, you can enter this command:
injectdll.exe x:\path\to\program.exe “program arg1 arg2 …”
where program.exe is the executable you want to run, and arg1 arg2 … are command-line parameters it takes, if any.
If program.exe is a 64-bit program, instead download injectdll64.zip, and run injectdll64.exe, otherwise similar.
if you can’t start the program you want to investigate from the command line, but you need to inspect it after it has already started, just pass only the process id of the program to injectdll.exe instead. (Or injectdll64.exe) This is somewhat less likely to succeed, depending on how the program uses IDispatch.
In any case, the output (symbolic trace) will go to the standard output of the program being traced, which typically is nowhere at all, and not useful. It will not go to the standard output of the injectdll.exe program.
In order to redirect the output to a file, set an environment variable DEVIARE_LOGFILE that contains the full pathname to the log file to produce. This environment variable must be visible in the program that is being traced; it is not enough to set it in the Command Prompt window where you run injectdll.exe.
Obviously all this is a work in progress, and as needed will be hacked on further. For instance, the name "injectdll" is just the name of the original sample program in upstream Deviare-InProc; we should really rename it to something specific for this use case.
HAProxy - Speeding up SSL
I have been a haproxy user for quite a few years now. Even using snapshots in production for a very long time. Especially after support was added to terminate SSL connections directly in haproxy. Getting rid of stunnel was so nice.
For a very long time i was doing really well with this setup. But over time more and more services were put behind haproxy and the connections/s and the total amount of connections went up. We started to see some performance issues. Which at first sounds weird … if you look at the benchmarks on the haproxy website they can do thousands if not hundred thousands of connections per seconds.
Fun things to do with driver updates
Today: And what if I want to remove some files?
It’s easy and obvious to add new files with a driver update (DUD). But what if you need to remove some files? Or, related: can you replace some read-only file by a writable copy?
Let’s for this article assume you want to modify the Xorg configuration. Say,
/usr/share/X11/xorg.conf.d/10-evdev.conf troubles you.
The direct way would be to write an update.pre script than removes the file and include this into a DUD.
update.pre is run right after the DUD has updated the files in the installation system.
For example:
echo \
  rm /usr/share/X11/xorg.conf.d/10-evdev.conf \
  > update.pre
mkdud --create test1.dud --dist tw --name "remove 10-evdev.conf" update.pre
But when we try test1.dud we run into this:
Driver Update: remove 10-evdev.conf
Driver Updates added:
  remove 10-evdev.conf
[...]
rm: cannot remove '/usr/share/X11/xorg.conf.d/10-evdev.conf': Read-only file system
So, we see the catch: much of the installation system resides on a read-only file system! You can’t just go and modify things.
But how does the driver update process manage to add new files to the installation system then? It does so by restructuring the file system using symlinks. In the process all directories that need to be modified are replaced by writable copies.
In other words: if you include the file you want to remove in the DUD – you will be able to remove it. It’s actually sufficient to include the directory the file resides in to make this work.
So, let’s try this:
mkdir -p /tmp/dud/usr/share/X11/xorg.conf.d
echo \
  "rm /usr/share/X11/xorg.conf.d/10-evdev.conf" \
  > update.pre
mkdud --create test2.dud --dist tw --name "remove 10-evdev.conf" update.pre /tmp/dud
Now we don’t get any error applying test2.dud and when we login to the installation system, we see:
console:vm9732:/ # ls -l /usr/share/X11/xorg.conf.d
total 0
console:vm9732:/ #
Tip
For easy testing a DUD, boot the machine with
startshell=1 sshd=1 password=*** dud=<URL>
startshell=1wi ll stop the installation workflow after the installation system has been fully prepared just beforeYaSTwill be started.sshd=1will start an SSH daemon and you’ll be able to connect to the machine and look around.
A similar trick can be used to make files writable (watch out for correct shell quoting):
mkdir -p /tmp/dud/usr/share/X11/xorg.conf.d
echo \
  cp --remove-destination '$(readlink -f /usr/share/X11/xorg.conf.d/10-evdev.conf)' \
  /usr/share/X11/xorg.conf.d/10-evdev.conf \
  > update.pre
mkdud --create test3.dud --dist tw --name "make 10-evdev.conf writable" update.pre /tmp/dud
We can verify the result:
console:vm9732:/ # ls -l /usr/share/X11/xorg.conf.d
total 4
-rw-r--r-- 1 root root 1099 Apr 24 13:06 10-evdev.conf
console:vm9732:/ #
The file is now writable.
Version d’openSUSE Leap, après 42.3 : la 15
La version d’openSUSE Leap qui suivra la 42.3 sera la version 15 !
Cela pour suivre les nouveaux numéros de version de SUSE Linux Enterprise (SLE). Jusqu’à présent ils en étaient à la version 12 ce qui avait empêché openSUSE de suivre ce numéro car openSUSE 12 avait déjà existé.
On aura donc eu et on devrait avoir : 12.3, 13.1, 13.2, 42.1, 42.2, 42.3, 15.0, 15.1, 15.2…
openSUSE Leap 42.3 est prévu pour juillet de cette année et openSUSE Leap 15 sera prévu pour 2018.
– Source-
Mailing-list [en] : https://lists.opensuse.org/opensuse-project/2017-04/msg00014.html
Sur Phoronix [en] : http://www.phoronix.com/scan.php?page=news_item&px=openSUSE-Leap-15-Versioning
Time-stamping Output and Profiling
Time-stamping
Sometimes you need to get the time stamps for each line printed by a programm.
How to do it? Fortuntely there is a tool called ts (like Time Stamp).
In openSUSE it is not installed by default, but is available in the standard repositories in the moreutils package:
sudo zypper in moreutils
When using time-stamping it is a good idea to get rid of buffering which might prevent from getting the correct time. So the usual usage pattern should be something like this:
unbuffer <command> | ts
See man ts for more details, it has few but very usefull options. It can display
absolute or relative time, define the precision, etc…
Profiling
If you can get exact time stamps for each output line then it is easy to find the line which took too long time.
In this example I was writing a new test for the s390 YaST module. I noticed that one test
took much more time than the others. So I used ts to get the real numbers,
the full command in this case was unbuffer rake test:unit | ts -i %.s:
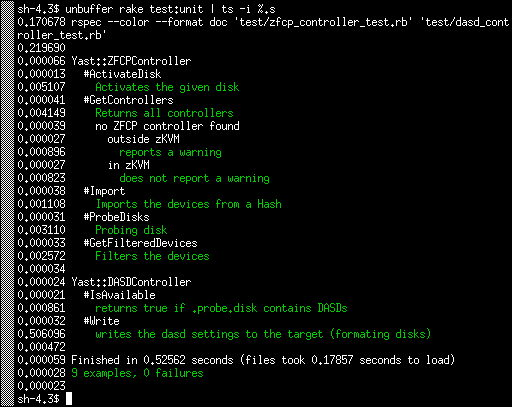
As you can see the tests usually take just few miliseconds, 5 ms at most. Except the Write test which takes more than 500ms. I was wondering why.
Debugging
So how to find the place where the test took most of the time? You could use the Ruby profiler:
ruby -rprofile -S rspec <test_file>
But I found the output too detailed without finding any relevant information, probably because it measures the CPU time, not the real time…
The alternative approach is simply to add the puts call somewhere in the tested
code. So you can measure how long it takes to reach this specific point.
Using the usual bisect approach you can find the problematic place quite quickly.
In this case the problematic place was surprisingly calling the sleep(500)
function here
which obviously adds 500ms to the test time. The fix was easy, simply
mock the sleep call in the test and return immediately.
The result is that the Write test now also takes few miliseconds just like the others:
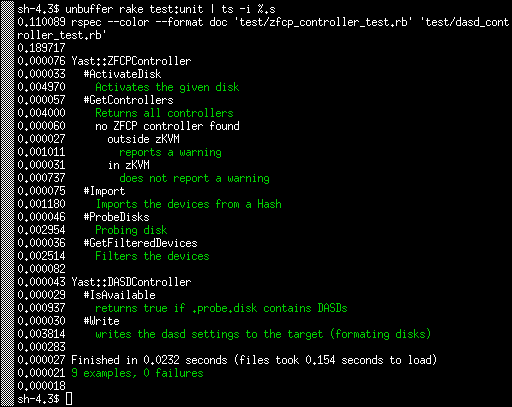
The test as a whole is now more than 20x faster. :wink:
Conclusion
In this case the real improvement was small, saving half a second is not a game changing feature.
But I used this approach in the past in the YaST registration module where the problem was caused by running a SLP network discovery without mocking it. That took much more time and scanning the local network in tests is at least not nice.
SUSE Hack Week 15
The first project remained unfinished. I wanted to fill out Tim Urban's Life Calendar (you might have seen that on his excellent blog "Wait But Why"), but realized that it's not trivial to map dates to weeks in your life. So I wrote a small tool to calculate that, stopped after I had a failing test and had a rough feeling for how to put the dots on the life calendar.
The second project was something I always wanted to do, implement Conway's Game of Life. I had once started an implementation in 68000 assembler on the Amiga many years ago, but never finished it. Technology has advanced, so I decided to do at as ASCII pixel art. Who needs high resolution? The result turned out to be a bit more generic, as a command line tool to manipulate pixel matrices stored in text files, the Pixelist. While I was at it, I also implemented Langton's Ant and a simulation of diffusion limited aggregation.
GivenFilesystem is a Ruby gem I maintain for writing unit tests dealing with files on disk. It's quite convenient, if you test code, which writes files on disk and you want to have a well-defined environment without side effects for testing this code. There were some open pull requests. I reviewed and merged them and released given_filesystem 0.2.0.
I already wrote about Inqlude, where I used Hack Week to finally publish the new Inqlude web site, which is based on the work Nanduni did during last year's Google Summer of Code. It's a great improvement. I also did some cleanup work, including reviewing the open issues. So we have a nice roadmap now. There is some interesting work to do. People who want to help with that are always welcome.
Trollolo is another side project I work on from time to time. We use it for supporting our Scrum work flows at SUSE in Trello, such as generating burndown charts. I didn't get around to write code, but I consolidated some of the ideas floating around and put them into issues. This also is a nice opportunity, if you want to have some fun with writing a bit of Ruby code for a small project. Issues are up for takers.
Finally I worked a bit on the next iteration of my attempt to make git support multiple authors. This would make life with git in a pair programming situation much nicer. Based on the feedback I got on my first iteration and at the Git Merge conference, I started to work on a version which puts the data into the trailers of the commit messages. This is less intrusive and with a bit of tooling it achieves similar results as the version which worked directly on the commit headers. I have something working, but it needs a rework of the trailer handling code. I'll continue to work on that when I find some more time to do that.
pam-python is avaliable for openSUSE
Last week I came across pam_python, a PAM module that lets you write PAM modules in Python. It seems interesting to play in this direction, but I had to install it manually. It seems that there was no official packages for openSUSE until now…
Yesterday I built version 1.0.6 for Tumbleweed. Please test it. It’s in our security repo. Feel free to send submit requests.
After installing it we will get /lib64/security/pam_python.so PAM modul. It’s just an interface between PAM and your own plugin (that you have to implement). To test it, you will need to add PATH of your plugin to the /etc/pam.d/login file (in case of getty-access test, for example), like described here.
This code can be used as an example. It will close access for all getty.
> cat /lib64/security/access.py

def pam_sm_authenticate(pamh, flags, argv):
  if str(pamh.service) == "login":
    return pamh.PAM_AUTH_ERR
You will also need to add this line to the /etc/pam.d/login file:
auth required pam_python.so access.py
This is just an example with login service or getty. Pam-python supports also, for example, ssh- and kdm-services. It supports many other interesting things. For more info look at documentation page.