
Memasang openSUSE Leap pada MacBook Air
Intro
Oke, ditulisan ini saya bukan mau pamer punya MacBook baru atau gimana, saya cuma mau berbagi pengalaman saja lewat tulisan gimana saya memasang openSUSE Leap pada MacBook saya, jadi saya akan menceritakan sedikit kronologis dahulu kenapa saya memutuskan buat memasang openSUSE Leap di MacBook.
Jadi, sebenarnya sehari-hari saya menggunakan openSUSE Leap 42.2 yang terpasang di laptop ASUS saya, baik untuk bekerja maupun ngoprek, gak tau ngapa pokoknya saya udah melekat sama si openSUSE ini.
Sampai akhirnya, pak boss vavai, atasan saya menawarkan kepada setiap tim untuk menggunakan MacBook air ini untuk keseharian bekerja supaya lebih fleksibel dan lebih enak. Pokoknya sampai saya memutuskan, buat beli si MBA ini, tulisan lengkapnya bisa dibaca disini. Sebuah Jurnal Tentang MacBook Air.
Di salah satu tulisan tersebut ada rencana saya untuk memasang openSUSE pada laptop, hanya saja belum kesampean karena waktunya kurang fleksibel buat dipasang.
Sayapun galau, kurang betah pakai mac (walaupun sekarang sering dipakai), salah satu alasannya karena libre officenya ndak responsif (lemot sekali) dan entah kenapa saya gak bisa lepas dari si openSUSE ini. Karena kangen, dan sudah dikomporin juga di grup Telegram openSUSE Translator supaya cepet pasang openSUSE nya di si Mac. Akhirnya saya memutuskan untuk memasang openSUSE Leap 42.2 dan dual boot dengan si MacOS dan it’s running well. Manchayyyy!
Mau tutorialnya? Monggo disimak.
Persiapan
Pada saat memasang si Leap ini, saya sempat menemukan beberapa kendala. Supaya hal serupa tidak terjadi sama temen-temen yang ingin memasang leap pada MBA nya, ini saya buat beberapa persiapan supaya lebih lancar instalasinya walaupun tidak menutup kemungkinan error bisa datang kapan saja :-). Sebelum instalasi saya sarankan membaca satu persatu dari tahapan, kecuali anda males baca.
Kopi
Begini, saya menyarankan minum kopi ini supaya gak ngantuk pada saat instalasi, kebetulan waktu saya instalasi mulainya malem dan khawatir kalo ngantuk salah format partisi, bisa-bisa partisi mac kehajar, ya terpaksa si mac nya kudu dipasang ulang kalau mau make. Pertimbangannya sih kesitu 
Keberanian
Saya pikir, memasang sistem operasi selain mac di MacBook ini butuh keberanian. Mungkin kebanyakan orang berfikir, saya sudah beli Mac mahal-mahal kenapa masih pakai yang lain. Lha, salah!.
Toh kalo kita yang punya mah, sah-sah saja kalau mau diapa-apakan, gak usah takut gakbisa ataupun error. Kalaupun ada error atau apa (jangan sampe), ya itu pelajaran buat sampean, hitung-hitung bisa sekalian belajar nemu hal baru. Intinya jangan pernah takut untuk mencoba suatu hal yang baru.
Backup, Backup, Backup!
Kalo di agama ada sosok yang diagungkan berkali-kali. Ibumu, ibumu, ibumu, baru ayahmu. Kalau di IT ada juga,. Backup, backup, backup. baru eksekusi (apasih ini). Ya, tujuan dari backup ini sebenernya supaya memperkecil kemungkinan anda nyesel. Kalau suatu saat terjadi hal yang tidak diingikan pada mac anda (amit-amit jangan sampe) setidaknya anda punya data cadangan yang untuk merestore kembali. Daripada daripada, mendingan mendingan.
Update MacOS
Update MacOS ini sebenarnya sifatnya kosmetik, jadi boleh iya boleh enggak, tapi disarankan kalau ada update terbaru sebaiknya diupdate. Kalau mau update silakan buka Launcpad | kemudian App Store. Disitu tinggal sampeyan update.
Penyimpanan Paket Offline
Saya sarankan anda menyiapkan sebuah media penyimpanan seperti USB / HDD External untuk menyimpan paket offline untuk kebutuhan setelah instalasi dilakukan, kebetulan si MacBook Air ini setelah instalasi, wirelessnya tidak terdeteksi. Jadi sebaiknya dipersiapankan sebaik mungkin. Paket offline yang akan dipersiapkan nanti itu seperti rEFInd untuk pemilihan boot pada startup dan Driver wireless untuk si MacBook air.
Download Driver Wireless
Jadi, seperti yang sebelum saya bilang, si driver wireless MBA ini nantinya ndak bakal terdeteksi di openSUSE, jadi anda ndak bisa melakukan update repo, update paket, ataupun instal paket ke repo online. Tapi, kalau driver anda langsung terdeteksi ya berarti itu keberuntungan anda. Seenggaknya sudah mempersiapkan :-). Download semua paket yang ada pada link berikut :
http://download.opensuse.org/repositories/home:/cornertwist:/stockKernel/openSUSE_Leap_42.2/x86_64/
Ingat, download semuanya! disitu ada 3 paket semestinya.
Download rEFInd
rEFInd ini suatu aplikasi yang mempermudah supaya grub MacOS anda bisa terdeteksi pada saat startup, aplikasi ini nanti akan dipasang pada openSUSE setelah instalasi selesai, banyak format yang ditawarkan si rEFInd ini, karena si openSUSE menggunakan format RPM, jadi dowload saja binary RPM nya pada link berikut :
http://www.rodsbooks.com/refind/getting.html
Resize Hardisk
Nah ini tahap yang harus diperhatikan, karena si mac mengambil penuh partisi hardisk yang ada, anda harus merelakan sebagian space hardisk untuk openSUSE (yaiyalah, pasti. kalo gak mau instal dimana). Di MacOS Sierra anda dapat dengan mudah melakukan resize hardisk via GUI.
Buka Launchpad | Disk Utility,
Pilih APPLE SSD bla bla bla.. | trus dibagian tengah pilih menu Partition. nah itu tinggal di resize dah enaknya sabaraha giga. Kalau saya karena HDD cuma 120 GB. Jadi untuk si openSUSE saya berikan partisi 25 GB. Tapi dideteksinya sama si openSUSE cuma 22 GB an 

Resize HDD 25 GB
Mudah kan, sudah siap ke tahap selanjutnya? Mari..
Installer openSUSE
Saya gak tahu bahasa indonesia nya installer, jadi kudu pakai bahasa inggris. Tapi, itu gak penting, yang penting anda siapkan sebuah installer openSUSE Leap 42.2 anda. Pastikan ISO openSUSE sudah diburning menjadi installer pada sebuah USB atau DVD.
Kalau menggunakan USB bisa membuat installer menggunakan DD di Mac. Jalakan perintah beriku sebagai user root di Mac :
dd if=/Users/dhenandi/Downloads/openSUSE-Leap-42.2-DVD-x86_64.iso of=/dev/disk2
Saya sarankan siapkan kedua media tersebut. Karena sewaktu instalasi menggunakan USB saya menemukan kendala pada saat pemilihan partisi. Terpaksa saya harus menggunakan DVD sebagai media instalasi.
Untuk burn ISO di mac ke DVD mudah, yang penting ada HDD External saja.
Kendalanya, kalau dilihat dari pesannya “Set disk label of /dev/sdc to GPT“. Si /dev/sdc ini USB saya sebagai installer. Mosok iya dipindahin ke GPT. lha terus installernya gimana??.
Ketika saya coba teruskan, eh malah bener pas instalasi error. Pas booting ulang, Boot ke UEFI USBnya hilang, dan harus DD ulang. Lama bro burning pake dd di mac dan error. Pusing

Penampakan error ada di baris ke 3
Do’a
Nah, persiapan secara prinsip sudah cukup. Sebelum memulai ada baiknya berdoa terlebih dahulu supaya saat proses ndak ada hal yang tidak diinginkan. Karena kayaknya saya lupa do’a jadi banyak masalah :-D.
Booting ke DVD / USB
Kalau anda menggunakan USB, pastikan USB anda sudah tercolok ke port USB, dan kalau menggunakan DVD pastikan DVD externalnya juga sudah tercolok ke port USB.
Restart Macbook Air. Nah kalau sudah mulai melakukan restart, pencet Alt atau Option sampai muncul pilihan boot ke HDD atau DVD/USB (UEFI).
Nah Kalau sudah silakan booting ke USB/DVD anda.
Instalasi openSUSE
Nah, di tahap ini lakukan instalasi openSUSE seperti biasa, layaknya instal linux di laptop lain, dan harap diperhatikan dibagian pemilihan partisi pada saat Expert Partitioner.
Pertama, kalau Mac Anda ndak mau hilang, jangan utak atik partisi Default si Mac. Paham?
Sek, saya lanjut. Jadi pokoknya nanti jangan diapa-apakan termasuk partisi EFI nya si Mac jangan dihapus. Karena nanti partisi antara EFI Mac dan openSUSE berbeda.
Kedua, pada saat pemartisian minimal ada 3 partisi. Root, Swap dan EFI Partition. Kalau hardisk saya tadi 25 GB (Terdeteksi 22, sekian GB). Saya kasih alokasi seperti berikut :
20 GB : Partisi root (/)
150 MB : Partisi EFI (/boot/efi)
Sisanya (sekitar 2 GB) : swap
Status partisi EFI ini wajib!. Kalau ndak ada ya ndak bisa booting nanti. Itu beberapa hal penting. Untuk tipe partisinya bebas mau menggunakan apa, kalau saya masih menggunakan Ext4 walaupun openSUSE defaultnya Btrfs.
Ketiga, sebelum instalasi dimulai, pastikan semua konfigurasi oke dan anda bisa mensruput kopi anda yang belum habis!.
Tahap Finalisasi
Yaay, sekarang openSUSE anda sudah terpasang bukan? Entah desktop apa yang anda gunakan, GNOME atau KDE, kalau sudah bisa terpasang intinya saya ikut senang. Tapi disana belum bisa ngapa-ngapain ini kudu ada tahap finalisasinya. Cekidot.
Instalasi Driver Wireless
Sebelumnya saya sudah menyarankan untuk download paket offline dari driver wireless MBA. Kalau ndak salah ada 3 paket. Nah itu install paket nya manual dengan perintah rpm -Uvh namapaket.rpm.
Kalau ada peringatan signature bisa diabaikan saja.
Dan, Voilaaaa … Semestinya wireless sudah terdeteksi. Tinggal aktifkan saja NetworkManager nya.
Aktivasi NetworkManager
Nah, supaya wireless dapat terkoneksi ke Access Point, pastikan Network Manager nya sudah diaktifkan. Kalau belum, silakan aktifkan dengan cara berikut :
Buka YaST | System | Network Settings | Pada Bagian Global Option pastikan Network Setup Method nya ke NetworkManager.
Kalau sudah simpen, dan Tadaaaa. Selamat, openSUSE sudah dapat terkoneksi ke Wireless
Instalasi rEFInd
Tahap selanjutnya yaitu instalasi rEFInd. Kalau anda mau bisa booting ke MacOS anda lagi, instal paket rEFInd yang sebelumnya sudah didownload dengan perintah yang sama pada saat instalasi Driver Wireless, pakai rpm -Uvh namapaket.rpm.
Kalau sudah selesai, coba restart MacBook anda, dan semestinya ada pilihan boot ke Mac atau openSUSE. :-).
Setelah Memasang openSUSE
Nah, setelah semua selesai tinggal lakukan seperti biasa layaknya setelah instalasi linux seperti update repo, update paket. Instalasi aplikasi yang dibutuhkan, dll. Sebelumnya saya sudah pernah buat tulisan “Hal yang dilakukan setelah Memasang openSUSE Leap 42.2“. Mungkin bisa dijadikan sebagai referensi juga :-D.
Tombol Backtick dan Tilde Tidak Dapat Digunakan
Nah, biasanya setelah instalasi sistem operasi Linux di MacBook, ada satu kendala yang terjadi yaitu tombol tilde / backtick diatas tab tidak berjalan. Untuk mengatasi nya saya punya referensi artikel dari senior saya. Silakan dicek disini :
Optimalisasi Baterai
MacBook Air ini terkenal dengan pemakaian baterai yang tahan lama, memang saya sendiri merasakan kesaktian si baterai MBA ini. Joss lah! Namun mungkin daya tahan pemakaian di Linux ini tidak terlalu sama dengan ketika kita menggunakan MacOS, namun setidaknya kita bisa lakukan optimalisasi baterai MacBook Air ini supaya lebih hemat. Tutorialnya bisa disimak disini.
https://help.ubuntu.com/community/MacBookAir6-2/Saucy#Finetuning_Powersave_functions
Link diatas pakai ubuntu, tinggal disesuaikan saja sama openSUSE.
Kesan-kesan
Secara prinsip saya sangat nyaman menggunakan openSUSE baik di laptop lama saya yang ASUS ataupun MacBook Air ini, karena memang saya sudah jatuh cinta :-D. So far penggunaan berjalan dengan lancar, penggunaan tombol fungsi yang ada di f1 s/d f12 berjalan dengan lancar, pencahayaan, backlit keyboard dll berjalan dengan lancar juga. Belum ada nemu bug, karena jujur saja, saya sendiri pin sekarang jarang menggunakan openSUSE. Salah satu alasannya, partisi si MacOS ini ndak bisa kebaca di Linux, karena data saya semuanya ada di Mac. Saya sih belum nemu caranya :-D.
Kalau sudah nemu caranya dan nemu bug juga akan saya laporkan. Pokoknya mantap lah!. Saya sendiri menyarankan untuk tidak takut mencoba hal baru, selama itu positif. Karena pengalaman baru dimulai ketika kita sendiri berani mencoba hal yang baru.
Oke, itu tips dari saya terkait pemasangan openSUSE Leap pada MacBook Air. Semoga memberikan manfaat dan ..
Selamat, openSUSE Leap sudah terpasang di MacBook Air anda!

mac.di.opensuse.in
Referensi
https://en.opensuse.org/SDB:Installation_on_a_Mac
The post Memasang openSUSE Leap pada MacBook Air appeared first on dhenandi.com.


 Member
 dmulder
vSphere Client on openSUSE 42.2
I needed vSphere client on linux, but vmware only builds a Windows version. Here is my work-around:
First, install vSphere Client via wine. I personally used vSphere Client (and server) 5.1.
WINEARCH=win32 WINEPREFIX=$HOME/.vmware-client ./winetricks msxml3 dotnet35sp1 vcrun2005 vcrun2008 vcrun2010
WINEARCH=win32 WINEPREFIX=$HOME/.vmware-client wine VMware-viclient-all-5.1.0-2306356.exe
When you get the hcmon install failure, copy the entire contents of your wine bottle to a tmp directory, complete the installation (says it failed), then mv the contents back.
cp $HOME/.vmware-client $HOME/.vmware-client2rm -rf $HOME/.vmware-client
mv $HOME/.vmware-client2 $HOME/.vmware-clientNow you can run the vSphere Client with:
WINEARCH=win32 WINEPREFIX=$HOME/.vmware-client wine ~/.vmware-client/drive_c/Program Files/VMware/Infrastructure/Virtual Infrastructure Client/Launcher/VpxClient.exe
The biggest drawback is that the console doesn’t work, so install VMware Remote Console.
The remote console can connect to a vSphere server and provide the console functionality that’s broken in the client. Just provide it the host url, username, etc on the command line:
> /usr/bin/vmrc –help
Usage:
vmrc [OPTION…]Help Options:
-h, –help Show help optionsApplication Options:
-v, –version Display the program version
-X, –fullscreen Start in fullscreen mode
-M, –moid=moid A managed object id indicating the VM to connect to
-U, –user=username Username used to authenticate to the remote host
-P, –password=password Password used to authenticate to the remote host
-D, –datacenter=datacenter Datacenter containing the VM to open
-H, –host=host:port Remote host containing VMs you wish to access

GMime 2.99.0 released
After a long hiatus, I am pleased to announce the release of GMime 2.99.0!
See below for a list of new features and bug fixes.
About GMime
GMime is a C library which may be used for the creation and parsing of messages using the Multipurpose Internet Mail Extension (MIME), as defined by numerous IETF specifications.
GMime features an extremely robust high-performance parser designed to be able to preserve byte-for-byte information allowing developers to re-seralize the parsed messages back to a stream exactly as the parser found them. It also features integrated GnuPG and S/MIME v3.2 support.
Built on top of GObject (the object system used by the GNOME desktop), many developers should find its API design and memory management very familiar.
Noteworthy changes in version 2.99.0
- Overhauled the GnuPG support to use GPGME under the hood rather than a custom wrapper.
- Added S/MIME support, also thanks to GPGME.
- Added International Domain Name support via GNU's libidn.
- Improved the GMimeMessage APIs for accessing the common address headers. They now all return an InternetAddressList.
- g_mime_init() no longer takes any flag arguments and the g_mime_set_user_charsets() API has also been dropped. Instead, GMimeParserOptions and GMimeFormatOptions have taken the place of these APIs to allow customization of various parser and formatting options in a much cleaner way. To facilitate this, many parsing functions and formatting functions have changed to now take these options arguments.
- InternetAddress now has a 'charset' property that can be set to override GMime's auto-detection of the best charset to use when encoding names.
- GMimeHeaderIter has been dropped in favor of a much simpler index-based API on GMimeHeaderList.
- GMimeHeaderList no longer caches the raw message/mime headers in a stream. Instead, each GMimeHeader now has its own cache. This means that changing the GMimeHeaderList or any of its GMimeHeaders no longer invalidates the entire cache.
- GMimeParser has been fixed to preserve (munged or otherwise) From-lines that sometimes appear at the start of the content of message/rfc822 parts.
- GMimeParser now also scans for encapsulated PGP blocks within MIME parts as it is parsing them and sets a flag on each GMimePart that contains one of these blocks.
- GMimePart now has APIs for dealing with said encapsulated PGP blocks.
Developers interested in migrating to the upcoming GMime 3.0 API (of which GMime 2.99.0 is a preview) should take a look at the PORTING document included with the source code as it contains a fairly comprehensive list of the API changes that they will need to be aware of.
Getting the Source Code
You can download official public release tarballs of GMime at https://download.gnome.org/sources/gmime/ or ftp://ftp.gnome.org/pub/GNOME/sources/gmime/.
If you would like to contribute to the GMime project, it is recommended that you grab the source code from the official GitHub repository at https://github.com/jstedfast/gmime. Cloning this repository can be done using the following command:
git clone https://github.com/jstedfast/gmime.git
Documentation
API reference documentation can be found at https://developer.gnome.org/gmime/2.99/.
Documentation for getting started can be found in the README.md.
MailKit 1.14 released
I am pleased to announce the release of MailKit 1.14!
See below for a list of new features and bug fixes.
About MailKit
MailKit is a C# library which is built on top of MimeKit and is intended to be used for interfacing with IMAP, POP3 and SMTP servers.
MailKit features incredibly robust IMAP, POP3 and SMTP clients with network APIs that are all capable of being canceled. API's that might transfer significant amounts of data between the client and server also include the ability to report progress. Asynchronous API's are also available.
Built on top of .NET, MailKit can be used with any of the .NET languages including C#, VB.NET, F#, and more. It will also run on any platform that Mono or the new .NET Core runtime have been ported to including Windows, Linux, Mac OS, Windows Phone, Apple TV, Apple Watch, iPhone/iPad, Xbox, PlayStation, and Android devices.
Noteworthy changes in version 1.14
- Improved IMAP's BODYSTRUCTURE parser to sanitize the Content-Disposition values. (issue #486)
- Improved robustness of IMAP's BODYSTRUCTURE parser in cases where qstring tokens have unescaped quotes. (issue #485)
- Fixed IMAP to properly handle NIL as a folder name in LIST, LSUB and STATUS responses. (issue #482)
- Added ImapFolder.GetHeaders() to allow developers to download the entire set of message headers.
- Added SMTP support for International Domain Names in email addresses used in the MAIL FROM and RCPT TO commands.
- Modified SmtpClient to no longer throw a NotSupportedException when trying to send messages to a recipient with a unicode local-part in the email address when the SMTP server does not support the SMTPUTF8 extension. Instead, the local-part is passed through as UTF-8, leaving it up to the server to reject either the command or the message. This seems to provide the best interoperability.
Installing via NuGet
The easiest way to install MailKit is via NuGet.
In Visual Studio's Package Manager Console, simply enter the following command:
Install-Package MailKit
Getting the Source Code
First, you'll need to clone MailKit from my GitHub repository. To do this using the command-line version of Git, you'll need to issue the following command in your terminal:
git clone --recursive https://github.com/jstedfast/MailKit.git
Documentation
API documentation can be found at http://mimekit.net/docs.
A copy of the xml formatted API documentation is also included in the NuGet and/or Xamarin Component package.
MimeKit 1.14 released
I am pleased to announce the release of MimeKit 1.14!
See below for a list of new features and bug fixes.
About MimeKit
MimeKit is a C# library which may be used for the creation and parsing of messages using the Multipurpose Internet Mail Extension (MIME), as defined by numerous IETF specifications.
MimeKit features an extremely robust high-performance parser designed to be able to preserve byte-for-byte information allowing developers to re-seralize the parsed messages back to a stream exactly as the parser found them. It also features integrated DKIM-Signature, S/MIME v3.2, OpenPGP and MS-TNEF support.
Built on top of .NET, MimeKit can be used with any of the .NET languages including C#, VB.NET, F#, and more. It will also run on any platform that Mono or the new .NET Core runtime have been ported to including Windows, Linux, Mac OS, Windows Phone, Apple TV, Apple Watch, iPhone/iPad, Xbox, PlayStation, and Android devices.
Noteworthy changes in version 1.14
- Added International Domain Name support for email addresses.
- Added a work-around for mailers that didn't provide a disposition value in a Content-Disposition header.
- Added a work-around for mailers that quote the disposition value in a Content-Disposition header.
- Added automatic key retrieval functionality for the GnuPG crypto context.
- Added a virtual DigestSigner property to DkimSigner so that consumers can hook into services such as Azure. (issue #296)
- Fixed a bug in the MimeFilterBase.SaveRemainingInput() logic.
- Preserve munged From-lines at the start of message/rfc822 parts.
- Map code page 50220 to iso-2022-jp.
- Format Reply-To and Sender headers as address headers when using Header.SetValue().
- Fixed MimeMessage.CreateFromMailMessage() to set the MIME-Version header. (issue #290)
Installing via NuGet
The easiest way to install MimeKit is via NuGet.
In Visual Studio's Package Manager Console, simply enter the following command:
Install-Package MimeKit
Getting the Source Code
First, you'll need to clone MimeKit from my GitHub repository. To do this using the command-line version of Git, you'll need to issue the following command in your terminal:
git clone --recursive https://github.com/jstedfast/MimeKit.git
Documentation
API documentation can be found at http://mimekit.net/docs.
A copy of the xml formatted API documentation is also included in the NuGet and/or Xamarin Component package.
Canonical gibt Unity 8 auf und setzt auf IoT und Cloud
Kein Aprilscherz: Canonical gibt Unity 8 auf und wechselt für Ubuntu 18.04 LTS zurück auf Gnome.
Fokus auf IoT und Cloud
In einem Blog Post hat Mark Shuttleworth, Gründer von Canonical, geschrieben:
I’m writing to let you know that we will end our investment in Unity8, the phone and convergence shell. We will shift our default Ubuntu desktop back to GNOME for Ubuntu 18.04 LTS.
Übersetzung:
Ich schreibe um euch wissen zu lassen, dass wir unsere Beteiligung an Unity8, der Smartp...
Canonical ditches Unity 8 and focusses on IoT and Cloud
No april's fool: Canonical ditches Unity 8 and switches to Gnome as default desktop for Ubuntu 18.04 LTS.
Focus on IoT and Cloud
In a blog post Mark Shuttleworth, founder of Canonical is "writing to let you know that we will end [Canonical's] investment in Unity8, the phone and convergence shell. [Canonical] will shift [the] default Ubuntu desktop back to GNOME for Ubuntu 18.04 LTS".
Additionally Shuttleworth announces that Canonical will further "invest in the areas which are contri...

FOSSASIA 2017
On January 12, Douglas DeMaio from openSUSE contact me if I have time to go to FOSSASIA 2017 schedule in Singapore on 17-19 March. I checked my calendar and the date was available for me. So I reply his email and said I will go there to represent openSUSE at booth.
openSUSE become Silver sponsor for FOSSASIA 2017, and also have 2 talks by my colleagues Gary Lin from SUSE Labs Taipei and Zhao Qiang from SUSE Beijing on Day 2. I (only) became a booth-person this time :-)
Doug sent me some stickers to bring to the crowd which consists of:
94 webcam covers
128 Tumbleweed stickers
108 Leap stickers
213 openSUSE stickers
174 OBS stickers
175 Portus stickers
116 Alex the Geeko stickers
56 small black Geeko stickers
78 power by openSUSE stickers
30 openSUSE pamphlets
5 SUSE Jobs fliers
I prepared 3 standing banners for this occasion.
On March 16, 2017 afternoon I went to Singapore from my home in Jakarta Indonesia


- What is the different between openSUSE and other distribution, what is the advantages?
- What is the different between Leap and Tumbleweed?
- Is openSUSE still alive? :-)
- Is there any development tools included on openSUSE?
- Is there any live usb image for openSUSE?
- Could you give me that geeko toy/doll?
- Do you still have the laptop camera cover?
- Do you still have that Alex the geeko stickers?
- Could you use BSD? .... What?
- Is there any tools for CAD or design included in distribution?
- What is open build service?

Actually I prepare a small application to record their comment and twit it directly through opensuseid account on twitter. But this plan didn't run well :-(


Security Issues due to bad Mail Practices: The LyonMUN case
So many associations use GMail for their general communication with members. Often, this comprises the sending of newsletters. Recently, the organisers of the UN politics simulation MUN LyonMUN leaked this way by accident a large number of participants mail addresses (mine as well). I decided to raise awareness of the security risks by a little experiment and also to test the reaction of the organisers.
Incident
On Friday 0:251, I received a mail from the organisers of this year’s [Model United Nations] (MUN) conference in Lyon called LyonMUN. The mail has been sent from lyonmun2017@gmail.com to 222 people, that either participated in earlier editions in the conference or already signed up for this year’s edition. Purpose of the mailing: promote the upcoming edition and urge people to pay the conference fees.
The problems in here are:
- The sender mail address is difficult to verify (I come back to this later).
- All 222 people have now the mail addresses of all others. That means, many personal mail addresses have been assumably accidentally leaked by the organisers.
Due to the way mail works, you cannot undo a mail once it has been sent. The only possible measures are to inform the data subjects in a transparent manner on the incident and potential security implications and to take precautions to prevent future incidents.
I made a bad experience when I made during the last year’s edition LyonMUN 2016 in the role of a participant the remark that one aspect of their conference may intimidate the participants: They offered to allow sending anonymously roses to individual participants with a message read out loud by the organisers in front of the assembly without prior consent of the receiver. I thought this may open doors to potential bullying. The then president of LyonMUN Mélanie Villar and now secretary general just made a IMHO snide remark and that’s all what happened. I was certainly a bit disappointed and expected a debate taking into account that promoting debating is one of the purposes of MUN associations and events.
For that reason, I though of a more creative approach to initiate a discourse. It is not like security in the internet is not a topic for LyonMUN. On their website, the press team posted not even 2 weeks ago an article concerning cyber defence. Unfortunately, LyonMUN has apparently not adopted adequate measures on their own. Let’s see what happened!
One Round-Mail and a lot of Confusion
So I decided to answer the newsletter and send my response to the original sender, but most importantly also to about 200 of those 221 other people listed in the newsletter:
Hello everyone!
how are you? :) Do you think it makes sense to attend LyonMUN more than once? A reminder less than 24h before they start assigning positions (whatever that means) is maybe a bit too last minute…
All the best–
Robert
- I made an afford to adopt an informal, backslapper writing style.
- I used my personal mail address.
- I asked a question to provoke a reaction of other participants. A question that an organiser would never ask.
- I slightly criticised the timing of the original mailing. Something most organisers would refrain from.
Still, I received mails from 4 out of 200 people that think that I am part of the organiser team:
- One person to ask to be assigned to a French-speaking committee.
- Two persons from outside of the EU asking for an invitation letter to support the visa request.
- One person asking: “If I pay today in the afternoon, then will be assigned to me a country as well?”
I have not expected to receive such mails. I replied in the first two cases that I could not do anything and put the actual organiser in CC, so that they would get the question and could address it properly. Eventually, I received a mail from the organisers explaining that the newsletter was actually only supposed to be a payment reminder.
Asking for Money
I hoped for an excuse to have leaked my personal mail address (or the fact that I participated). To render the issues even more evident, I escalated the situation and decided to reply in the third case with a request for payment:
Hello Maxi [name changed],
have you sent the money to
Robert Riemann
IXXI Lyon
IBAN FR7762756778270183266949365 ?If so, I can assign you. :)
Kind regards,
Robert
- As before, I put the organiser team in CC to ensure they can intervene. I sent this mail again from my personal mail address.
- To make it look more professional, I used my work as institution which is, of course, totally unrelated to the MUN business.
- I generated a random French IBAN using a webservice. Those of you, who are interested in secure banking, may know that IBAN numbers include a checksum to detect transcription error. Read more on it on Wikipedia. I changed one number, so that the checksum breaks. Then, I tested the IBAN and confirmed it is indeed invalid. This way, I can be sure that the account does not exist and already the attempt to enter the IBAN would deliver an error in many online banking interfaces.
In reaction, I got two messages from the organisers:
-
Mélanie Villar, that we “should all know and love” (quote from her presentation) sent me via Facebook a message request:
Hey Robert, pourquoi tu donnes un faux IBAN par mail???
C’est quoi ce délire -
Nicolas Klingelschmitt, the LyonMUN 2017 director, wrote me a very appropriate message that I try to summarise here:
- He appreciates my alert addressing the leak of mail addresses.
- He explains I would have received the mail due to my informal consent for few promotional mails.
- He criticises with emphasis my move to ask participants for money while pretending to be organiser and calls this practice scam that is punishable in France and remarks that LyonMUN may fill a legal complaint.
- He asks me for clarification on my actions.
I asked Nicolas Klingelschmitt then to quote from his mail which he denied while inviting me at the same time for a discussion and I guess we might actually meet at some point here in Lyon. :)
I further brought some light into my intentions that were subsequently acknowledged with the remark that my method would be highly inappropriate from their point of view. More interestingly, they mentioned that their GMail account would have been locked for some time which would postpone the sending of a dedicated ERRATUM mail.
ERRATUM
Eventually, an erratum mail was sent to everyone with an excuse of the data leak, a notice on how to stop subsequent mailings from Lyon MUN and this paragraph:
If anyone ever tries to contact you on behalf of the LyonMUN organisation (especially for financial concerns) while not using one of our official email addresses, please disregard it and let us know.
I just sent a request for payment and they still mention only the potential of fraud. I think it is appropriate to admit that unauthorised mails have been sent. Further, they advise to check the sender mail address. How should that be possible?
Conclusion: We are not done yet.
From a security point of view, there are still rather easy attack vectors. Note, that the official sender mail address is LyonMun2017@gmail.com. I just registered the GMail addresses LyonMUN.helpdesk and LyonMUN2018. Next year, it is I that has the official mail address and I could send requests for payments on their behalf to those 222 people. Further, I could try to make pass the helpdesk address as official mail address. The potential participants have no effective mean to distinguish here between official and fraud mail address.
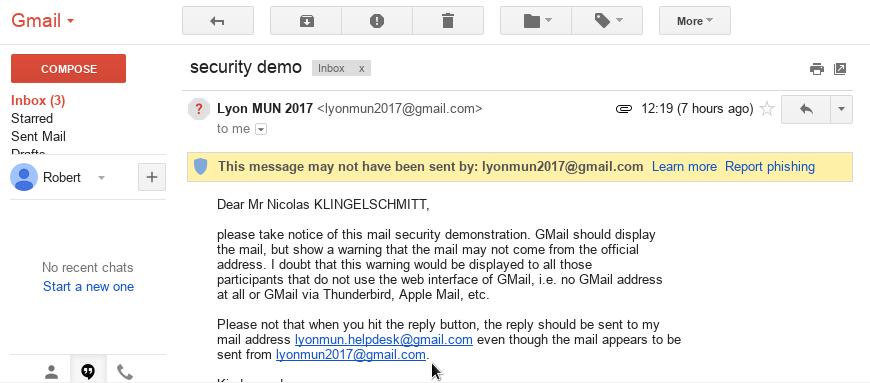
Moreover, one could just send mails from the official mail address. Not all mails are scanned for authorised outgoing mail servers (read about DKIM). GMail does display a warning, most others probably won’t.
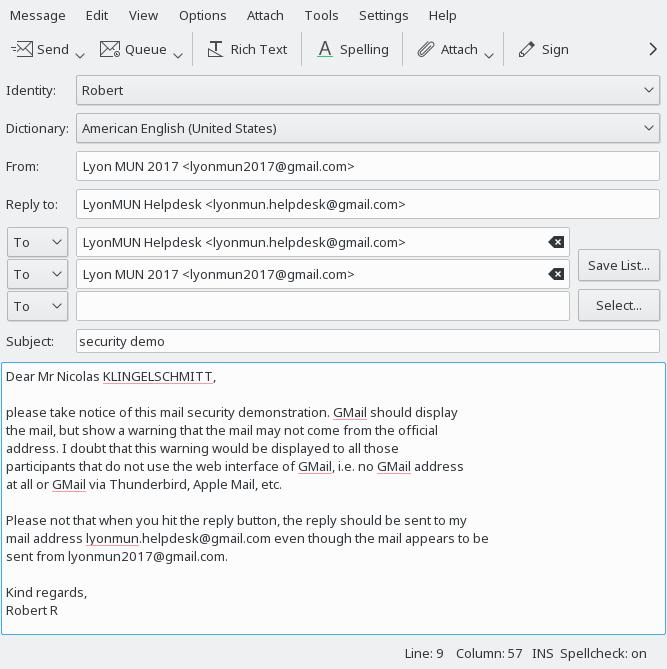
To be perfectly secure, inform participants right away to find the payment information uniquely on the website (that should use https/SSL). Further, I advise to use mail addresses ending on @lyonmun.com. As such, it is more complicated to create similar-looking mail addresses. Further, this may also solve the issue to find oneself blocked to send mails.
Unfortunately, even with DKIM, the impersonation of mail senders cannot be prevented in all cases. To prevent the latter, one could use an intranet instead of mails, e.g. based on Discourse. I wrote an article about it earlier.
-
Maybe the sender was tired after working past midnight and less attentive of what s/he is doing. ↩︎