
 rriemann
INSA Pedagogy Colloquium
Last week, I got the chance to present at the 5th Colloquium on Pedagogy my field report on the education of first years engineering students at INSA Lyon as I observed it during my soon 2 years teaching experience.
You may also want to read a communication entitled What does Active Learning Mean for Mathematicians? published in the Notices of the American Mathematical Society (AMS, Vol. 64, Nr. 2) earlier this year (2017).

Fun with FreeIPA and a slightly more complex DNS setup
The Plan
+---------+    +------------------------+    +---------------------------+
| FreeIPA | -> | upstream hidden master | -> | public facing dns servers |
+---------+    +------------------------+    +---------------------------+
Sounds simple enough right? Well …
The Fun
Let’s get right too it … FreeIPA only sends out notifications to the NS records listed in the zone. But our hidden master is not reachable from the outside and should not be listed as an NS.
‘But bind has “also-notify” just use that.’ you might say now. Which is correct. So a quick check on the ldap scheme reveals there is no setting in the LDAP tree for it. Ok… the nice solution is dead.
 Member
Recipe Icon
Initially I was going to do a more elaborate workflow tutorial, but time flies when you're having fun on 3.24. With the release out, I'd rather publish this than let it rot. Maybe the next one!
Docker at Travis
Travis CI
The Travis CI service offers a free Continuous Integration (CI) service for open source projects hosted at GitHub.
Ubuntu 12.04 LTS
Unfortunately it runs Ubuntu 12.04 LTS at the worker nodes. That means if your software needs some newer tools or libraries you have to find it in some external repository. You might be lucky with the Ubuntu LaunchPad, but in the worst case you will need to backport the package by yourselves.
Other Distributions?
But what if you need a newer Ubuntu version for your build? Or a completely different distribution like openSUSE or Fedora?
Originally that was not possible with Travis, but fortunately they allow using Docker containers at build for some time. That means you can run even a completely different distribution for building your software.
Travis and Docker Tricks
Building for Several Distributions in Paralell
Travis allows to setup a build matrix which can run the build in different environments. The usual use case is to run the tests using different versions of compilers or interpreters.
But you can easily use this feature for using different Docker images
with different distributions. You just define different Dockerfile and
building script for each environment.
We use this feature in snapper and the code is built for five different distributions in parallel!
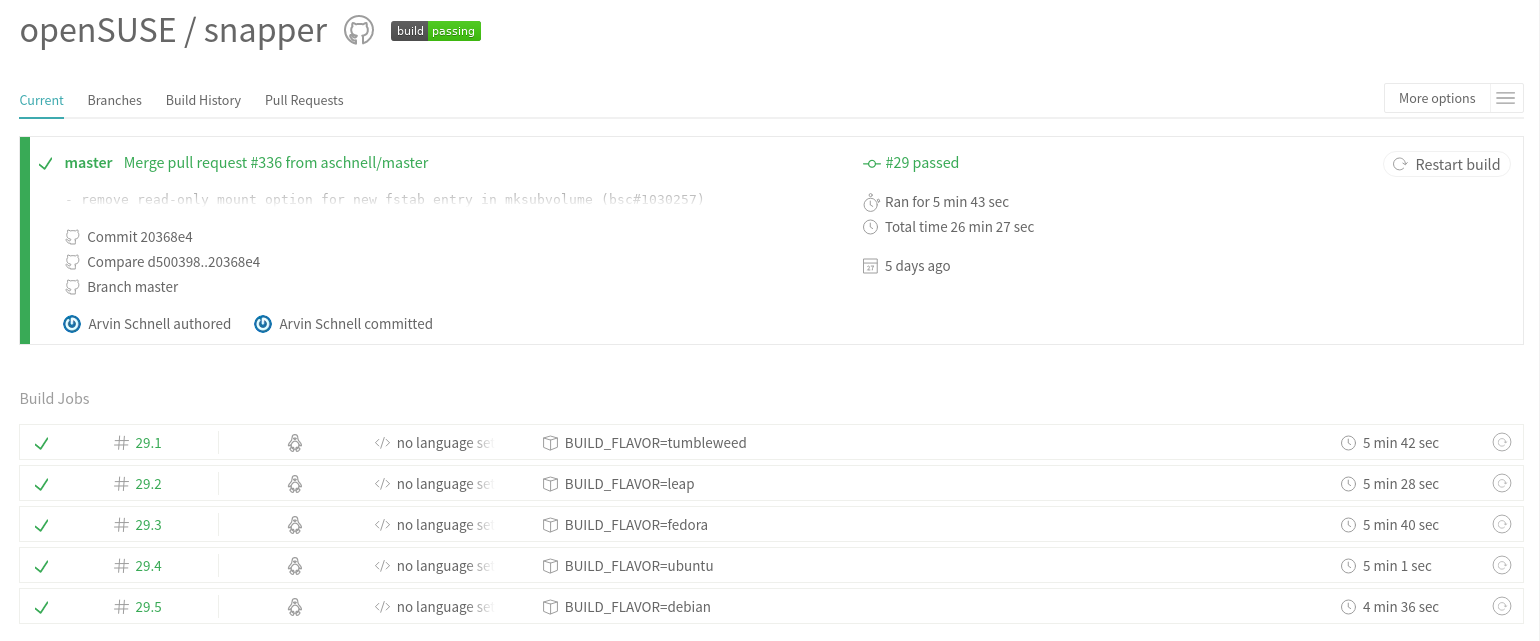
As you can see the code is built for Debian, Ubuntu, Fedora, openSUSE Leap and openSUSE Tumbleweed. That means we know that the code still builds on all these distributions even before merging a change!
See the Dockerfile.* and .travis.* source files for more details.
Building Docker Images at Docker Hub
The Docker Hub is a platform for publishing and sharing the the Docker images.
The snapper example above builds the Docker image locally and then runs it. But what if you need to build the same image many times? What if your software changes a lot? Or you have several packages which run in the same environment?
Then it makes sense to build the image only once and then reusing everywhere where needed. That is exactly the case for YaST, we have about one hundred repositories which build in the same environment.
Actually we split the environment into two parts - one for Ruby based packages and one for C++ based packages. The reason is to have a smaller Docker image for faster downloads.
So at Travis we either download the Ruby image or the C++ image. You can check the sources for both Docker images at GitHub (Ruby image, C++ image).
Local Build
Normally you cannot reproduce the Travis builds locally as Travis uses a customized Ubuntu image which is not available for download. That means even if you build your software on Ubuntu 12.04 you might still get a slightly different results at Travis.
With Docker you can download or build the very same Docker image and run it locally. Just run the same Docker commands as in Travis.
(Technically it still will not be 100% the same as at Travis, e.g. Docker uses the host system kernel so there still might be some differences but it is very very close…)
Try it in Your Projects!
So hopefully these hints will be helpful for somebody and will allow you to run CI also for your project. And if Travis does not fit your needs then there are similar alternatives available…

VMware Workstation 12.x.x for latest openSUSE Tumbleweed
So what if for example (which is what happened this month with a newer library version of curl) that we have a newer version of library than what is supported by VMware Workstation. So you go ahead and launch vmware, but no VMware Workstation windows opens. The first thing you can do is inspect the log craeted at /tmp/vmware-<your_home_user>/vmware-apploader-<some_number>.log. It will show you in the beginning which libraries it will be using from either SYSTEM or SHIPPED with VMware Workstation. From the output this month we have the following which is suspect in our log.
017-03-24T08:59:45.773-06:00| appLoader| I125: Marking libxml2.so.2 node as SHIPPED.Since libcurl.so.4 was marked as SYSTEM we know that it is trying to use the library from our installed packages. libcurl had some recent upgrades. We can try to mitigate this in two ways.
2017-03-24T08:59:45.773-06:00| appLoader| I125: Marking libview.so.3 node as SHIPPED.
2017-03-24T08:59:45.773-06:00| appLoader| I125: Marking libXrandr.so.2 node as SYSTEM.
2017-03-24T08:59:45.789-06:00| appLoader| I125: System libcurl.so.4 has OpenSSL version OpenSSL/1.0.2k, ours is OpenSSL/1.0.2k.
2017-03-24T08:59:45.789-06:00| appLoader| I125: System libcurl.so.4 has version 7.53.1 (need 7.51.0) and has been compiled with c-ares support (SSL compatibility? yes).
2017-03-24T08:59:45.789-06:00| appLoader| I125: Marking libcurl.so.4 node as SYSTEM.
We can execute from the command line forcing to use all SHIPPED libraries from VMware Workstation.
# VMWARE_USE_SHIPPED_LIBS=force vmware &We can force the one library to be run from the SHIPPED libraries by running the following.
# export LD_LIBRARY_PATH=/usr/lib/vmware/lib/libcurl.so.4:$LD_LIBRARY_PATH
# vmware &Both ways are acceptable, but in some cases the later can have better performance in my experience.
Hopefully this can help with future changes in openSUSE Tumbleweed and ensure that you can continue to run VMware Workstation no matter the outcome of the installed packages.
Enjoy!
Enable ALT Keys for openSUSE YaST on Mac Terminal
Intro
YaST (Yet Another Setup Tools) is installation and configuration tool for SUSE Linux Distribution, like openSUSE or SLE. It’s easy to use to attractive your system quickly because it has a graphical interface.
YaST can be used with Graphical Interface or Command Line with Terminal. If you using graphical interface, you just need to click and following YaST Wizard. But, if you have a SUSE Linux Server with text mode you still can using YaST by command line interface.
By default, using YaST in CLI Mode, you should press “Tab” keys to move to another menu and it’s wasting your time because if you missed it, you must repeat it :-D.
But, to avoid that you can use ALT Shortcut in YaST CLI Mode. Example :
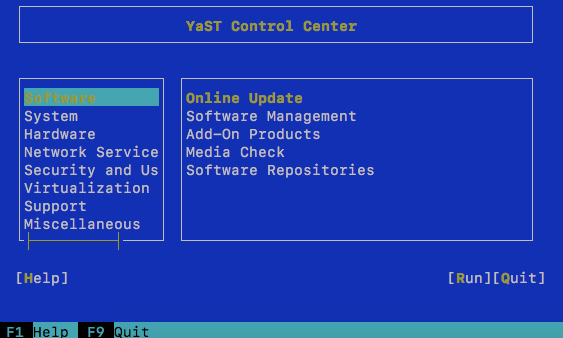
YaST Command Line
Look at the above picture :
In traditional ways, if you want to move your cursor from “Software” menu to “Help” menu. You must press tab, tab, tab, and tab until help menu. But, in SUSE ways, you can do it easy, you just need to press ALT + Yellow Words.
If you want go to “Help” menu you just need to press “ALT+ H”
if you want go to “Run” menu you just need to press “ALT + R”
Easy right? 
The Problem
The problem is if you using MacBook or OSX Family, ALT Keys (Option) in keyboard didn’t work for YaST. You must configure it on preference Mac Terminal.
Solution
If you want be able to enable ALT Function for YaST, please follow this instructions :
- Open your Mac Terminal, then Click Terminal beside your Apple Logo and Click Preferences.
- In Profiles section, click Keyboard Tab, and checklist “Use Option as Meta Key“.

Configuration for ALT
Now, you can use ALT as shortcut YaST. Hope this helpful
The post Enable ALT Keys for openSUSE YaST on Mac Terminal appeared first on dhenandi.com.

GSoC 2017
Hi! It has been a lot of time ago since the last post. I am writing because today starts the GSoC application period for the next summer. So if you are a university student and the idea of working in open source during your holidays appeals you, hurry up! You still have 2 weeks to look for a organisation and a project you like, approach the mentors and write a proposal. You should try to write the proposal as soon as possible so the mentors have time to review it.
Here you find the list of organisations that participate this year: https://summerofcode.withgoogle.com/organizations
On it you’ll find openSUSE, that participates this year too. You can find more information in opensuse 101: http://101.opensuse.org and in the organisation page.
This year I’ll also participate in GSoC, but this time as a mentor for openSUSE. So if you have any question regarding GSoC or openSUSE fell free to add them in the comments section of this page. 

Heatbed mod for the TinyBoy2
As long as one sticks to printing PLA, a printer without heatbed is ok, but for ABS or PETG a heatbed is a must.
The TinyBoy2 bed is actually a heatbed, although the wiring is missing, and a thermistor is required as well. The SMELZI controller board has a PWM controlled MOSFET, which is connected to the „HOT-BED“ socket, so making the bed a heatbed is straightforward.
Required Tools:
- Soldering Iron (80W minimum)
- Hex screwdriver
- 2.5 mm Drill
- File or handheld milling machine (Dremel) or …
PARTS:
- 100k SMD thermistor (size 0805, or 1206)
- pair of thick wires (35 cm) for the heater
- pair of thin wires for the thermistor
- 2,54 mm 1×2 connector (e.g. Dupont connector)
- M3x6 screw
- thin sheet of plastic, ~10×30 mm
1. Adding the thermistor

Added SMD thermistor, 1206 is slightly to large for a 0805 footprint …
2. Soldering the wires to the bed
As the bed is aluminium, soldering anything to it can be tricky, and you need a powerful soldering iron to get the solder to temperature. I ended up using two soldering irons simultaneously, one on each end of the solder blob.
The two wires for the heater go to the larger pads, the thermistor sensing cable has to be connected to the smaller pads. As we are connecting resistors here, direction does not matter.
3. Creating a strain relief for the wires
The wires will be bent all the time while the bed moves in the Y direction, so we need a strain relief or the cables will break after short time of operation.
I drilled a 2.5 mm hole into the red bed bracket/slide and pushed a M3 screw into it. The strain relief is created from a small sheet of plastic, size 10×30. Pick 3 small holes into the plastic, at 5, 15 and 25 mm from the edge. Wrap it around the cables, the holes should line up. After assembling, it should look similar to this:

Heater cables (red), temperature sensing cables (striped)
It is important the cables do not extend beyond the edge of the slide, otherwise the cables will colide with the case.
4. Creating a duct from the top to the bottom

I chose to exend the hole for the extruder stepper, which allows the cable to move freely when the board moves:


Remove the extruder before creating the hole, its just 4 screws and will simplify working in the constrained space a lot!
5. Connecting the cables to the controller

TinyBoy2 firmware upgrade to Marlin 1.1.0-RC8/RCBugFix
The TinyBoy2 is a Indiegogo backed 3d printer. On the plus side, it is very small (16×18 cm² desk space), and it does it jobs.
Like a lot of crowd funded projects, there is essentially no after campaign support. The firmware is a hacked version of Marlin 1.1.0-RC3. The code for the firmware which is shipped with the hardware is supplied as a code drop, but there is no changelog, and the diff to the upstream RC3 contains a lot of awkward changes, e.g. changes to the display SPI code, although the TB2 display uses I₂C. The diff between the code drop and RC3 is 53 files changed, 2196 lines removed, 2072 lines added.
As I wanted to update my printer to a recent firmware (RC3 was tagged December 2015) to get all the new features and bugfixes, and also to change the FW behaviour, I started with the current Marlin GIT, and added the necessary changes on top.
The nice part is that current Marlin is completely capable to drive the printer, support is mostly added by creating a suitable Configuration and setting the right pins for steppers, PWM, encoder and so on. The changes have been submitted upstream, or you can just pull the patched tree from my Marlin github repo.
Download the compiled firmware
In case you do not want to compile the FW yourself, I have prepared 4 variants: L10/L16, both with and without heatbed support:
-----BEGIN PGP SIGNED MESSAGE-----
Hash: SHA1

bd1af0b14e81c344d5ecac27a7c8ba09aaa96a0c  Marlin_TB2_L10_HeatBed.hex
fd754b2b9f0ff7271eb53c9cc9f022eee1b247b8  Marlin_TB2_L10.hex
f330e4ec2a3fcc32510c15b8f9c776731aa98598  Marlin_TB2_L16_HeatBed.hex
cc239598f0fe9ba0ccccb31b007c896c1595dea9  Marlin_TB2_L16.hex
-----BEGIN PGP SIGNATURE-----

iF0EARECAB0WIQSwWRWIpJbl0W4DemNvf0o9jP6qUwUCWM3KjQAKCRBvf0o9jP6q
U4HkAJ9GOBOmfTw1XUSQlTs745P7qKvO2wCfY/xWHpbGTfzuS7GZLDvTPnEjc7I=
=ce7+
-----END PGP SIGNATURE----
Flashing the firmware
Although it is possible to use Arduino to flash the firmware, I consider it much to bloated for the task, and as it uses avrdude behind the curtains, I prefer to call avrdude directly:
Backup shipped FW (sorry, not verified):
avrdude -p m1284p -b 57600 -c arduino -P /dev/ttyUSB0 -U flash:r:Backup.hex:i
Update to new FW:
avrdude -p m1284p -b 57600 -c arduino -P /dev/ttyUSB0 -U flash:w:Marlin.hex
(Update 2017-03-19 18:49 UTC: Added flashing paragraph)
openSUSE at Chemnitzer LinuxTage 2017
I went to Chemnitzer LinuxTage last weekend. That was a successful open source event.
openSUSE has got a lot of positive feedback. Some people changed from Ubuntu to openSUSE Tumbleweed and are happy.
There was some misunderstanding with the new release development of openSUSE Leap. Some people thought that would be a second rolling release by openSUSE. After explaining that we want to do that only in the development phase for achieving a more stable operating system and we will have a release day every year again, these cusomers have been happy again and like this idea. More stability is a good reason. 
invis server had his meeting about their new project openSUSE SMB. One openSUSE customer was interested for this project and I brought him to Stefan. Some booth visitors want to visit our next oSC in Nuremberg.
We had more customers than in the year before. Somtimes guys asked how to change to us and to contribute. Linux beginners wanted to have live CDs. We burned flash drives with Tumbleweed live images for them.
Sunday we had a raffle at our booth. The award was a big chameleon. You can see the winner on the picture.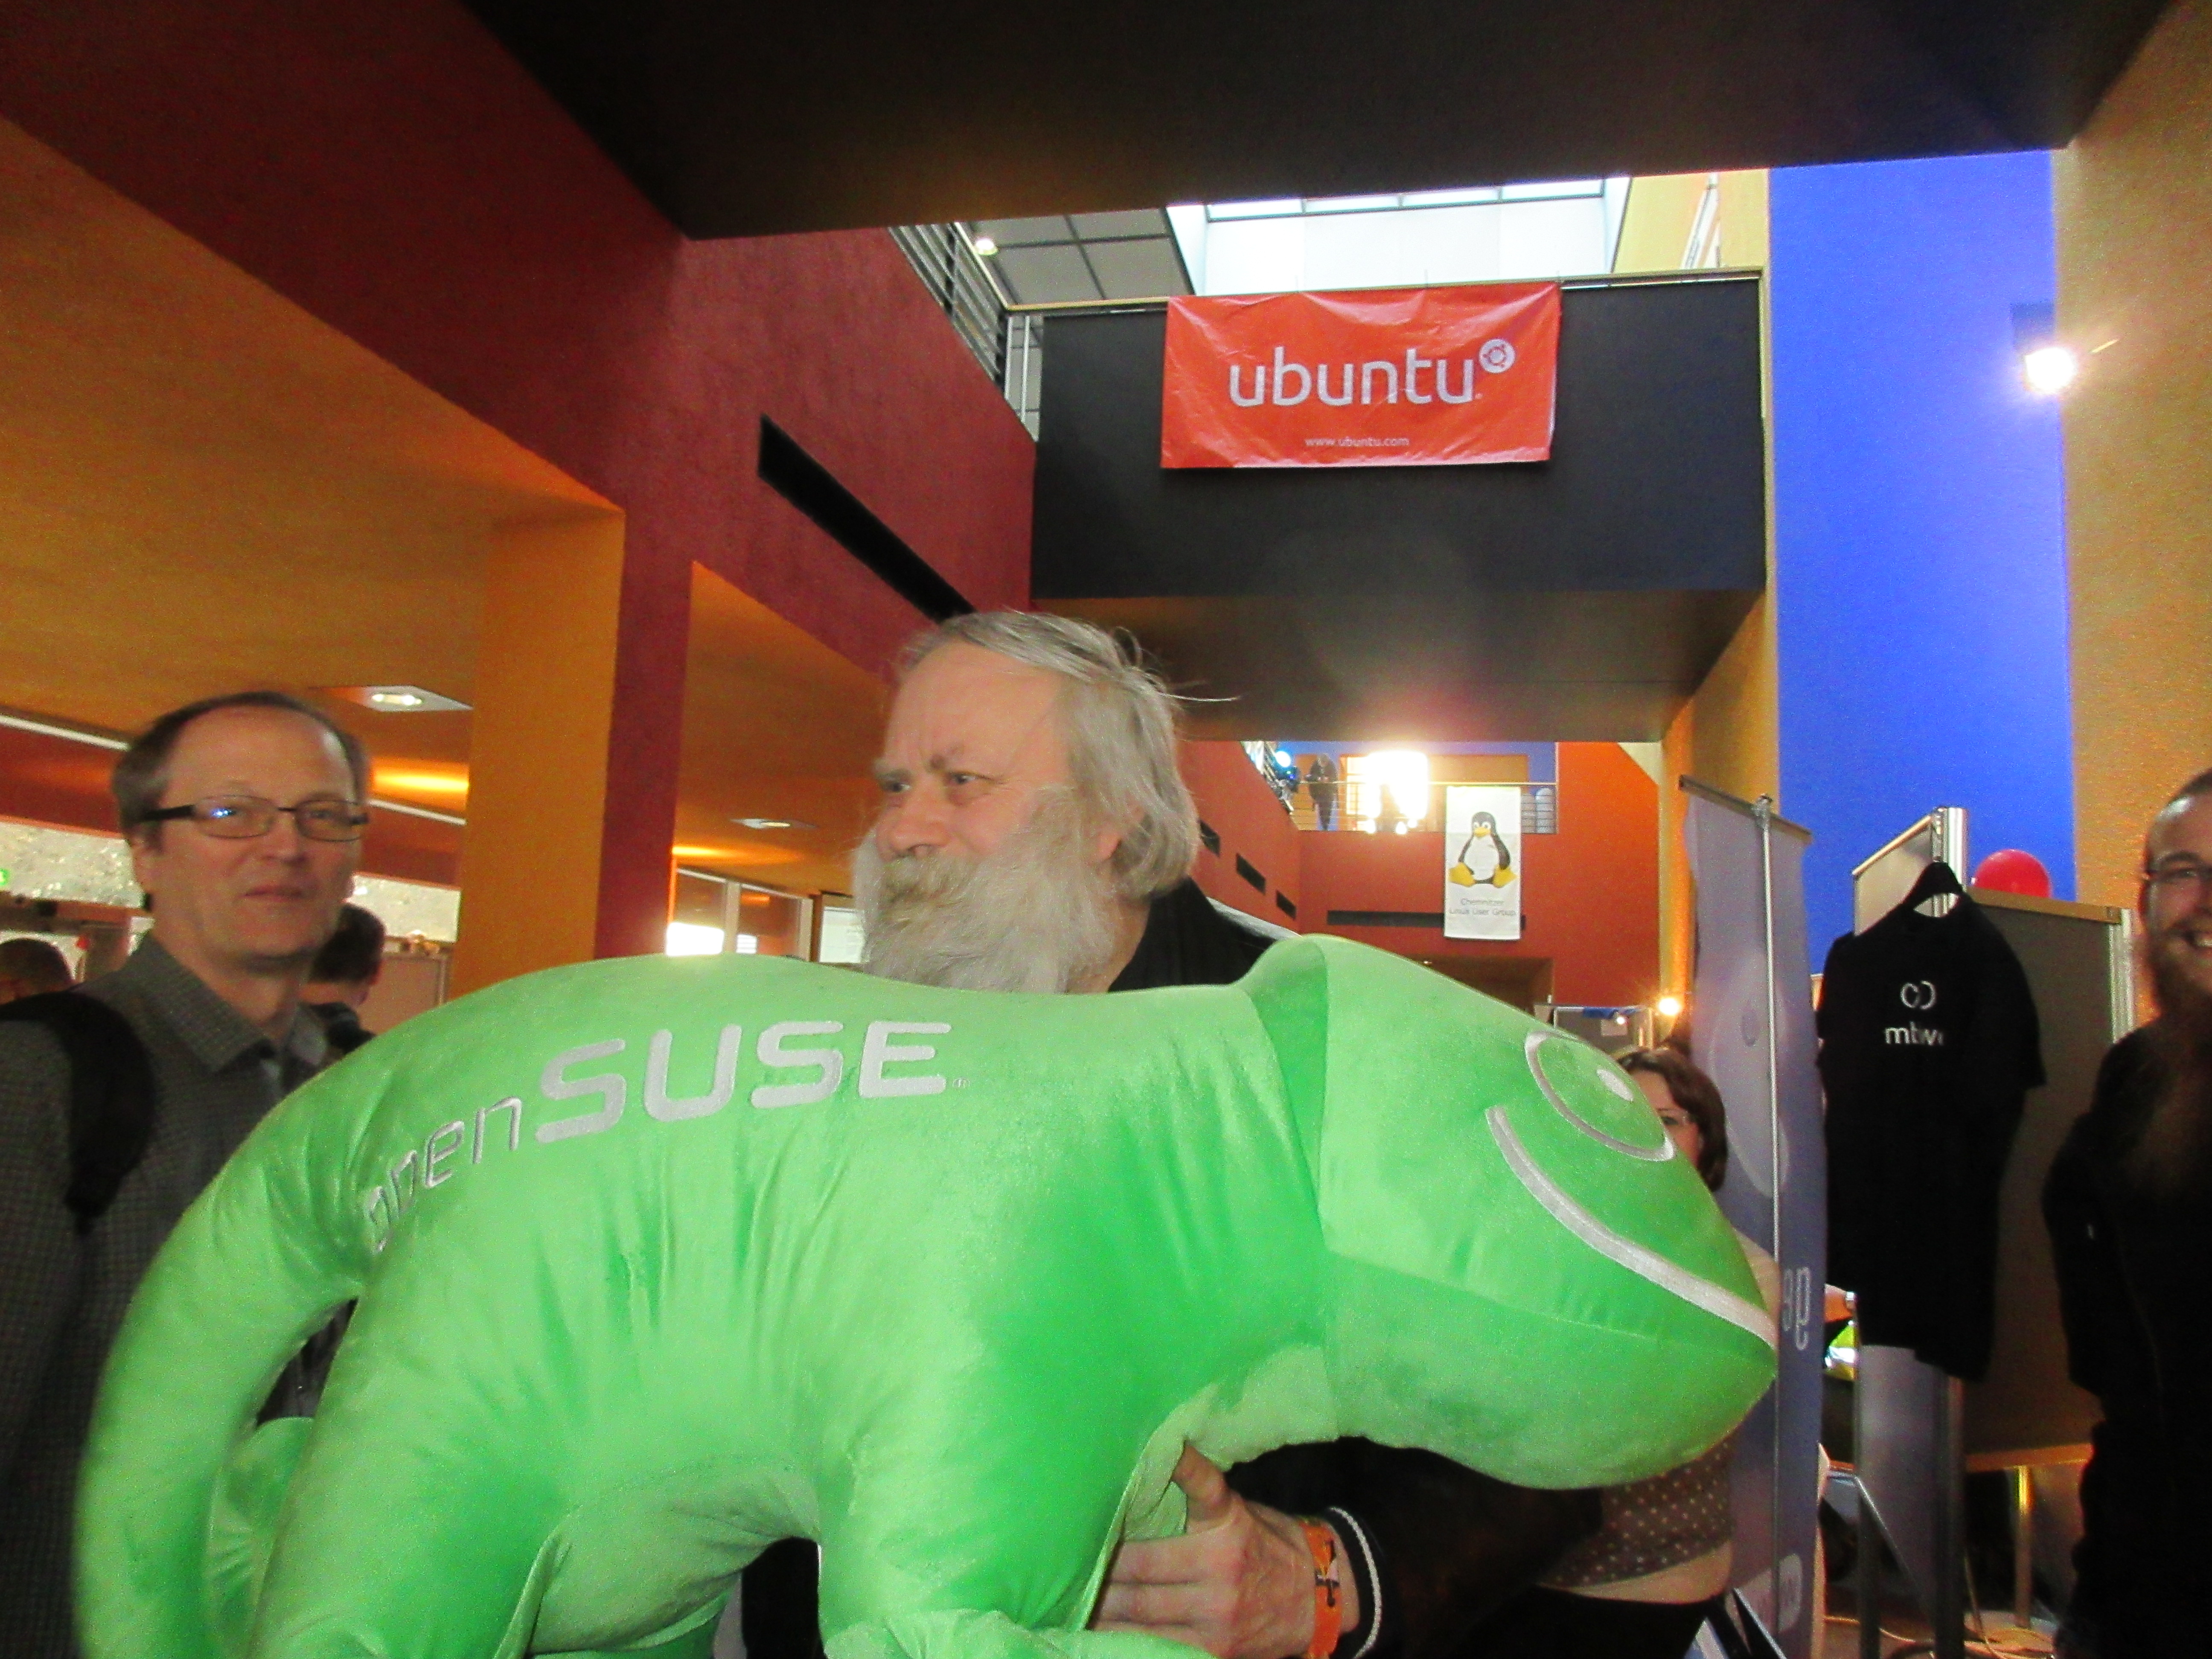 At the end I took part of the raffle by Thomas Krenn AG.
They produce server hardware and storage. Their first award was a low energy server which I won. That‘ s ideal for students like me. The best thing is that this server hardware is supported by openSUSE.
Chemnitzer LinuxTage was a fantasic open source event like every year. Thanks for the sponsoring!
The post openSUSE at Chemnitzer LinuxTage 2017 first appeared on Sarah Julia Kriesch.