
 Member
 dmulder
YaST and Python, the new bindings
YaST has had python bindings for about 10 years, but there has been no maintainer for the last 4 years, and they’ve slowly gone kaput.
That has changed. Python+YaST is back. The syntax is (or should be) backwards compatible with <= 3.x of the yast-python-bindings, but you can now write python yast via code very similar to the ruby code.
There are also lots of examples now (thanks to noelp and his hackweek project).
We’re working on a couple of yast modules via the yast-python-bindings:
https://github.com/dmulder/yast-gpmc
https://github.com/noelpower/yast-aduc/tree/wip-aduc

London UX Hackfest
Thanks to the GNOME Foundation, a handful of designers and developers got together last week in London to refocus on the core element of the GNOME experience, the shell. Allan and Cassidy have already summed up everything in their well written blog posts, so I'd like to point to some pretty pictures and the video above.
Stay tuned for some higher fidelity proposals in the areas of app switching & launching and the lock/login experience.

IKEA Trådfri first impressions

Most recently, I’ve gotten myself a few items from IKEA new product range of smartlight. It’s called trådfri (Swedish for wireless). These lights can be remote-controlled using a smartphone app or other kinds of switches. These products are still fairly young, so I thought I’d give them a try. Overall. the system seems well thought-through and feels fairly high-end. I didn’t notice any major annoyances.
First Impressions

My first impressions are actually pretty good. Initially, I bought a hub which is used to control the lights centrally. This hub is required to be able to use the smartphone app or update the firmware of any component (more on that later!). If you just want to use one of the switches or dimmers that come separately, you won’t need the hub.
Setting everything up is straight-forward, the documentation is fine and no special skills are needed to install these smartlights. Unpacking unfortunately means the usual fight with blister packaging (will it ever stop?), but after that, a few handy surprises awaited me. What I liked:
- The light is nice and warm. The GU10 bulbs i got give 400 lumens and are dimmable. For my taste, they could be a bit darker at the lower end of the scale, but overall, the light feels comfy warm and not too cold, but not too yellow either. The GU10 bulbs I got are spec’ed at 2700 Kelvin. No visible flickering either.
- Trådfri components are relatively inexpensive. A hub, dimmer and 4 warm-white GU10 bulbs set me back about 75€. It is way cheaper than comparable smartlights, for example Philips Hue. As needs are fairly individual exact prices are best looked up on IKEA’s website by yourself.
- The hub has a handy cable storage function, you can roll up excessive cable inside the hub — a godsend if you want to have the slightest chance of preventing a spaghetti situation.
- The hub is USB-powered, 1A power supply suffices, so you may be able to plug it into the USB port of some other device, or share a power supply.
- The dimmer can be removed from the cradle. The cradle can be stuck on any flat surface, it doesn’t need additional cabling, and you can easily take out the dimmer and carry it around.
- The wireless technology used is ZigBee, which is a standard thing and also used by other smarthome technologies, most notably, Philips Hue. I already own (and love) some Philips Hue lights, so in theory I should be able to pair up the Trådfri lights with my already existing Hue lights. (This is a big thing for me, I don’t want to have different lighting networks around in my house, but rather concert the whole lighting centrally.)
Pairing IKEA Trådfri with Philips Hue
Let’s call this “work in progress”, meaning, I haven’t yet been able to pair a Trådfri bulb with my Hue system. I’ll dig some more into it, and I’m pretty sure I’ll make it work at some point. If you’re interested in combining Hue and Trådfri bulbs, I’ll suffice with a couple of pointers:
- https://www.smarthomegeeks.co.uk/how-to/add-ikea-tradfri-philips-hue/
- https://developers.meethue.com/content/philips-hue-and-ikea-tr%C3%A5dfri
If you want to try this yourself, make sure you get the most recent lights from the store (the clerk was helpful to me and knowledgable, good advice there!). You’ll also likely need a hub at least for updating the firmware. If you’re just planning to use the bulbs together with a Hue system, you won’t need the hub later on, so that may seem like 30€ down the drain. Bit of a bummer, but depending on how many lights you’ll be buying, given the difference in price between IKEA and Philips, it may well be worth it.
\edit: After a few more tries, the bulb is now paired to the Philips Hue system. More testing will ensue, and I’ll either update this post, or write a new one.
Pool Dive

Decentralized HA

I've been playing with different ideas until I came across namecoin, a decentralized DNS based on bitcoin technology.
Then, I had this idea about combining it with DNS Round Robin for High Availability, and so have Decentralized DNS Round Robin for High Availability, or in short, Decentralized HA.
Thus, I downloaded the namecoin daemon and namecoin clients from namecoin.org and started syncronizing the blockchain network... which was terrible slow, 48h!
In the middle of that I got impatient and I just bought the "namecoin domain" jordia65.bit from peername.com, which will add such domain into the blockchain for you (kind of a service proxy if you can't wait for the whole blockchain to be downloaded).
Note you can not use any domain but a special zone domain, which is .bit. More at https://bit.namecoin.org/
Anyway, after buying the domain, they also gave me good support, as my request was a bit special. I didn't want just jordia65.bit to map into an IP address, but to map to 2 IP adresses, to mimic what I would do with a classic DNS Round Robin setup, which would be to have at least 2 A records.
This is the domain in the namecoin blockchain:
https://namecha.in/name/d/jordia65
The 2 IP addresses are real servers running in a cloud. Actually they are floating ip addresses, but that is another story.
Until here, all good. Then the fun started :) . The trick is to use a DNS daemon which queries the namecoin daemon. namecoin already provides that, which is called nmcontrol *
However, that daemon was not expecting 2 IP addresses per domain, and here is where I did my contribution: https://github.com/namecoin/nmcontrol/pull/121/
With that, I was able to put down one of the servers and firefox redirected me to the other one automatically. And the whole beauty of this, is that this does not require a central server for storing neither the domain name nor the list of IP addresses to balance, and this list can also be updated on a decentralized way.
Since setting up all this can be a bit difficult for a "regular user", I also did some tests on setting up an http proxy, with apache2, so that the proxy will be the one trying to resolve the jordia65.bit domain ... and it worked :) ! Also the HA part.
Thus, you could set up your firefox to use that proxy and you would be able to browse .bit domains with high availability.
However, as you may have guessed, adding a proxy has a drawback, which is that it introduces a "single point of failure". If the proxy is taken down, you would not be able to reach any internet at all.
All this is "experimental" and so it will need some more testing and engineering, but all in all, I am very proud of the results and I had a lot of fun with this project :)
(*) Actually it seems nmcontrol has been deprecated in favor of https://github.com/namecoin/ncdns , but nmcontrol was easier to hack.

Code Hospitality
Recently on the Greater than Code podcast there was an episode called "Code Hospitality", by Nadia Odunayo.
Nadia talks about thinking of how to make people comfortable in your code and in your team/organization/etc., and does it in terms of thinking about host/guest relationships. Have you ever stayed in an AirBnB where the host carefully prepares some "welcome instructions" for you, or puts little notes in their apartment to orient/guide you, or gives you basic guidance around their city's transportation system? We can think in similar ways of how to make people comfortable with code bases.
This of course hit me on so many levels, because in the past I've written about analogies between software and urbanism/architecture. Software that has the Quality Without A Name talks about Christopher Alexander's architecture/urbanism patterns in the context of software, based on Richard Gabriel's ideas, and Nikos Salingaros's formalization of the design process. Legacy Systems as Old Cities talks about how GNOME evolved parts of its user-visible software, and makes an analogy with cities that evolve over time instead of being torn down and rebuilt, based on urbanism ideas by Jane Jacobs, and architecture/construction ideas by Stewart Brand.
I definitely intend to do some thinking on Nadia's ideas for Code Hospitality and try to connect them with this.
In the meantime, I've just rewritten the README in gnome-class to make it suitable as an introduction to hacking there.
Encrypted installation media
Hackweek project: create encrypted installation media
- You’re still carrying around your precious autoyast config files on an unencrypted usb stick?
- You have a customized installation disk that could reveal lots of personal details?
- You use ad blockers, private browser tabs, or even
torbut still carry around your install or rescue disk unencrypted for everyone to see? - You have your personal files and an openSUSE installation tree on the same partition just because you are lazy and can’t be bothered to tidy things up?
- A simple Linux install stick is just not geekish enough for you?
Not any longer!
mksusecd can now (well, once this pull request has been merged) create fully encrypted installation media (both UEFI and legacy BIOS bootable).
Everything (but the plain grub) is on a LUKS-encrypted partition. If you’re creating a customized boot image and add sensitive data via --boot or add an add-on repo or autoyast config or some secret driver update – this is all safe now!
You can get the latest mksusecd-1.54 already here to try it out! (Or visit software.opensuse.org and look for (at least) version 1.54 under ‘Show other versions’.
It’s as easy as
mksusecd --create crypto.img --crypto --password=xxx some_tumbleweed.iso
And then dd the image to your usb stick.
But if your Tumbleweed or SLE/Leap 15 install media are a bit old (well, as of now they are) check the ‘Crypto notes’ in mksusecd --help first! – You will need to add two extra options.
This is how the first screen looks then

Hackweek0x10: Fun in the Sun
We recently had a 5.94KW solar PV system installed – twenty-two 270W panels (14 on the northish side of the house, 8 on the eastish side), with an ABB PVI-6000TL-OUTD inverter. Naturally I want to be able to monitor the system, but this model inverter doesn’t have an inbuilt web server (which, given the state of IoT devices, I’m actually kind of happy about); rather, it has an RS-485 serial interface. ABB sell addon data logger cards for several hundred dollars, but Rick from Affordable Solar Tasmania mentioned he had another client who was doing monitoring with a little Linux box and an RS-485 to USB adapter. As I had a Raspberry Pi 3 handy, I decided to do the same.
Step one: Obtain an RS-485 to USB adapter. I got one of these from Jaycar. Yeah, I know I could have got one off eBay for a tenth the price, but Jaycar was only a fifteen minute drive away, so I could start immediately (I later discovered various RS-485 shields and adapters exist specifically for the Raspberry Pi – in retrospect one of these may have been more elegant, but by then I already had the USB adapter working).
Step two: Make sure the adapter works. It can do RS-485 and RS-422, so it’s got five screw terminals: T/R-, T/R+, RXD-, RXD+ and GND. The RXD lines can be ignored (they’re for RS-422). The other three connect to matching terminals on the inverter, although what the adapter labels GND, the inverter labels RTN. I plugged the adapter into my laptop, compiled Curt Blank’s aurora program, then asked the inverter to tell me something about itself:
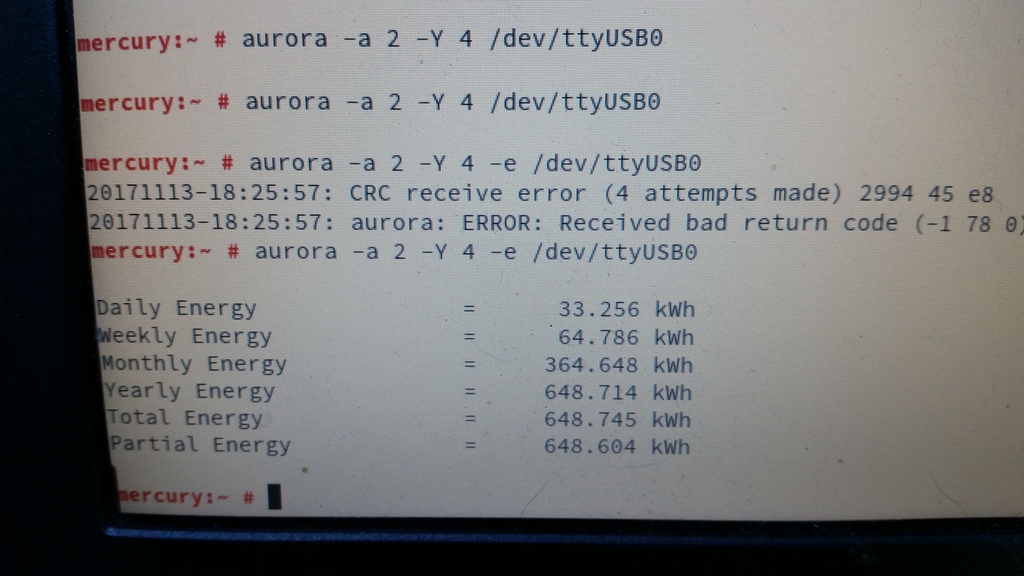 Interestingly, the comms seem slightly glitchy. Just running
 aurora -a 2 -e /dev/ttyUSB0 always results in either “No response after 1 attempts” or “CRC receive error (1 attempts made)”. Adding “-Y 4” makes it retry four times, which is generally rather more successful. Ten retries is even more reliable, although still not perfect. Clearly there’s some tweaking/debugging to do here somewhere, but at least I’d confirmed that this was going to work.
So, on to the Raspberry Pi. I grabbed the openSUSE Leap 42.3 JeOS image and dd’d that onto a 16GB SD card. Booted the Pi, waited a couple of minutes with a blank screen while it did its firstboot filesystem expansion thing, logged in, fiddled with network and hostname configuration, rebooted, and then got stuck at GRUB saying “error: attempt to read or write outside of partition”:
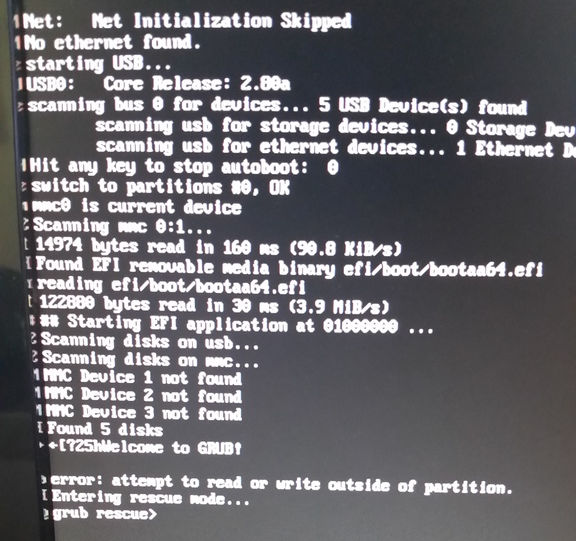
Apparently that’s happened to at least one other person previously with a Tumbleweed JeOS image. I fixed it by manually editing the partition table.
Next I needed an RPM of the aurora CLI, so I built one on OBS, installed it on the Pi, plugged the Pi into the USB adapter, and politely asked the inverter to tell me a bit more about itself:
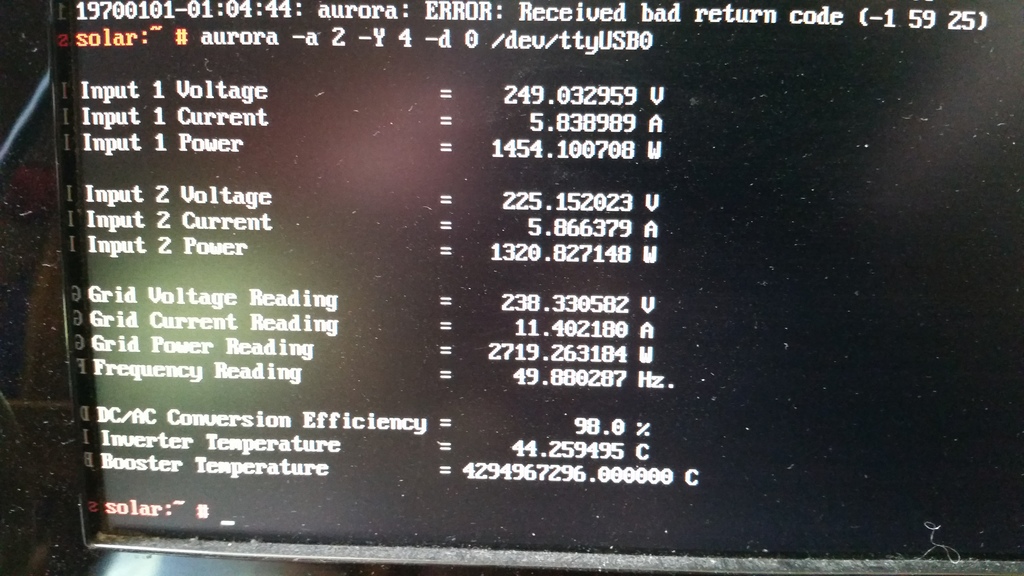
Everything looked good, except that the booster temperature was reported as being 4294967296°C, which seemed a little high. Given that translates to 0x100000000, and that the south wall of my house wasn’t on fire, I rather suspected another comms glitch. Running aurora -a 2 -Y 4 -d 0 /dev/ttyUSB0 a few more times showed that this was an intermittent problem, so it was time to make a case for the Pi that I could mount under the house on the other side of the wall from the inverter.
I picked up a wall mount snap fit black plastic box, some 15mm x 3mm screws, matching nuts, and 9mm spacers. The Pi I would mount inside the box part, rather than on the back, meaning I can just snap the box-and-Pi off the mount if I need to bring it back inside to fiddle with it.
Then I had to measure up and cut holes in the box for the ethernet and USB ports. The walls of the box are 2.5mm thick, plus 9mm for the spacers meant the bottom of the Pi had to be 11.5mm from the bottom of the box. I measured up then used a Dremel tool to make the holes then cleaned them up with a file. The hole for the power connector I did by eye later after the board was in about the right place.
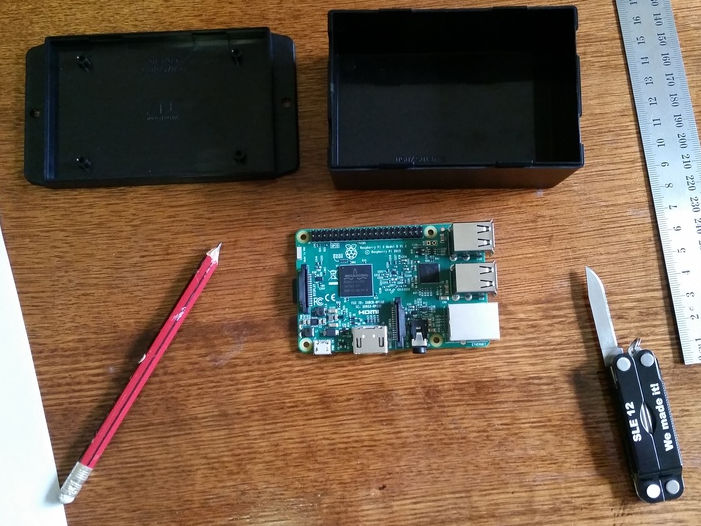
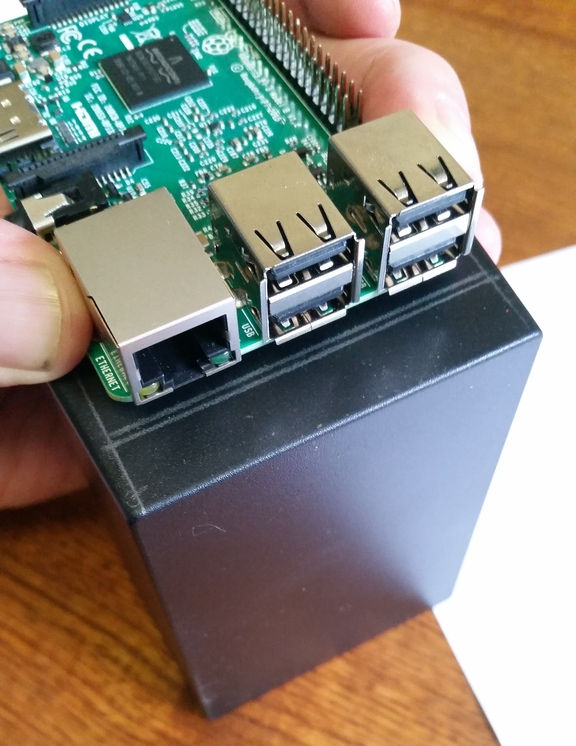
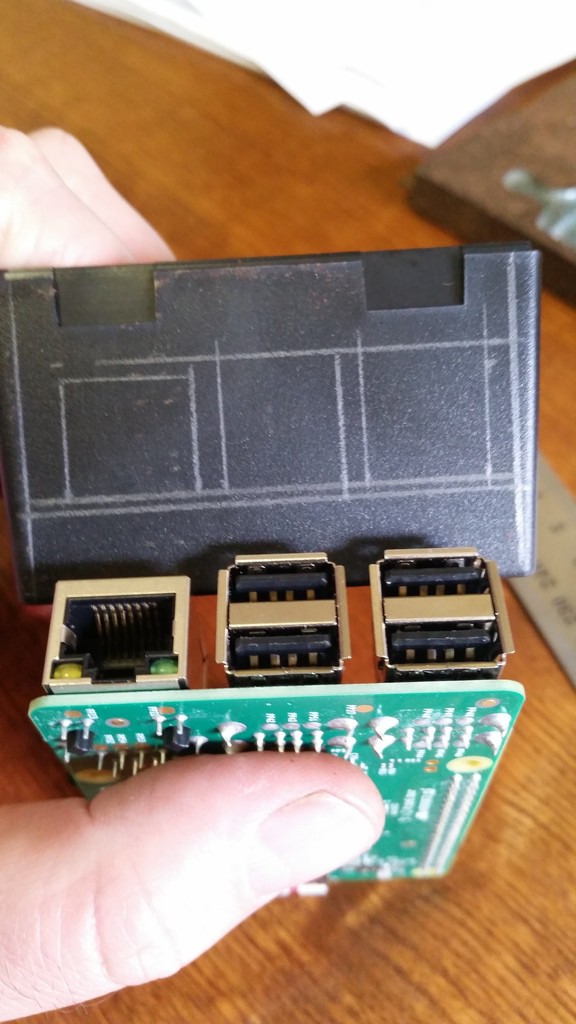
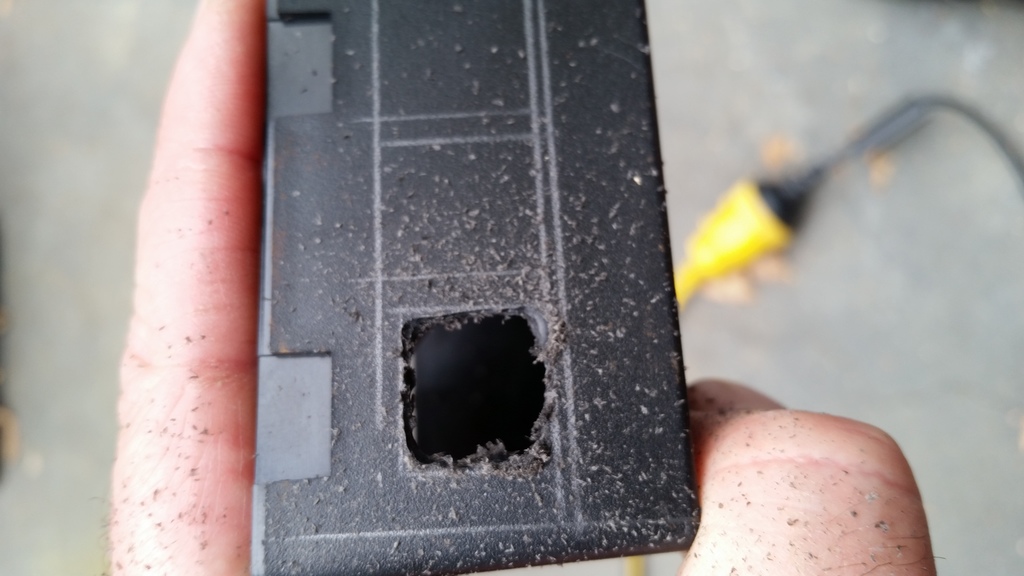
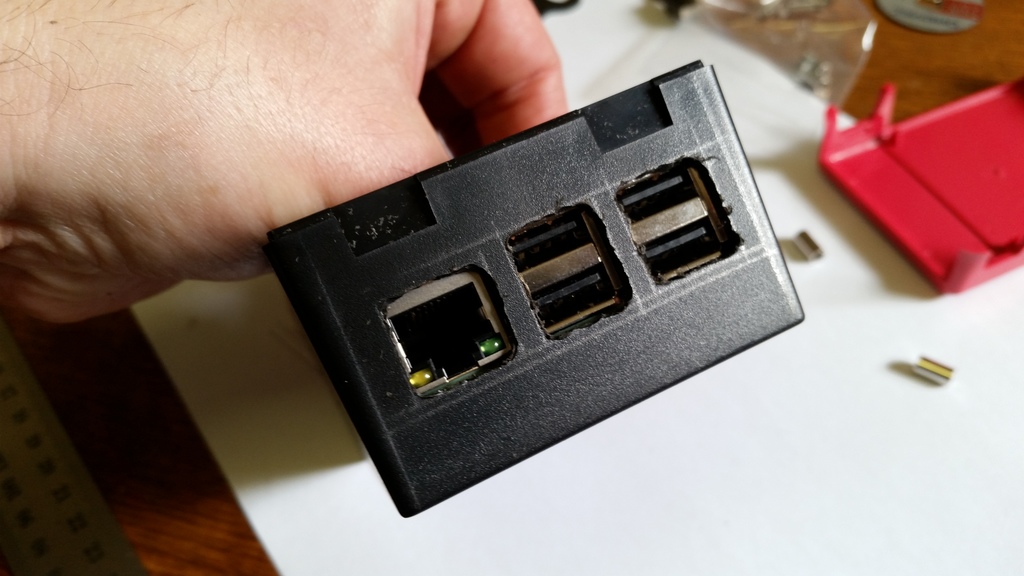
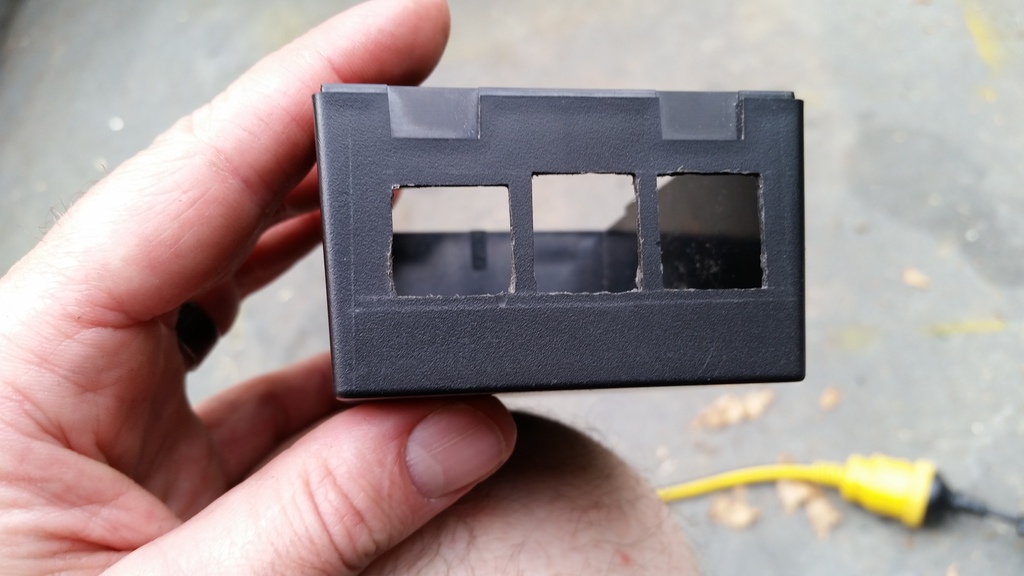
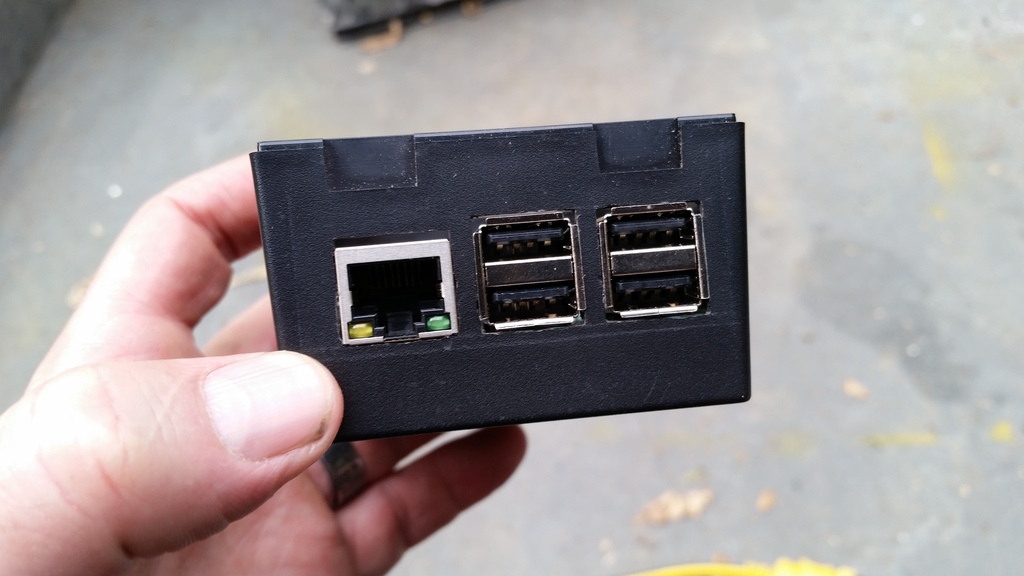
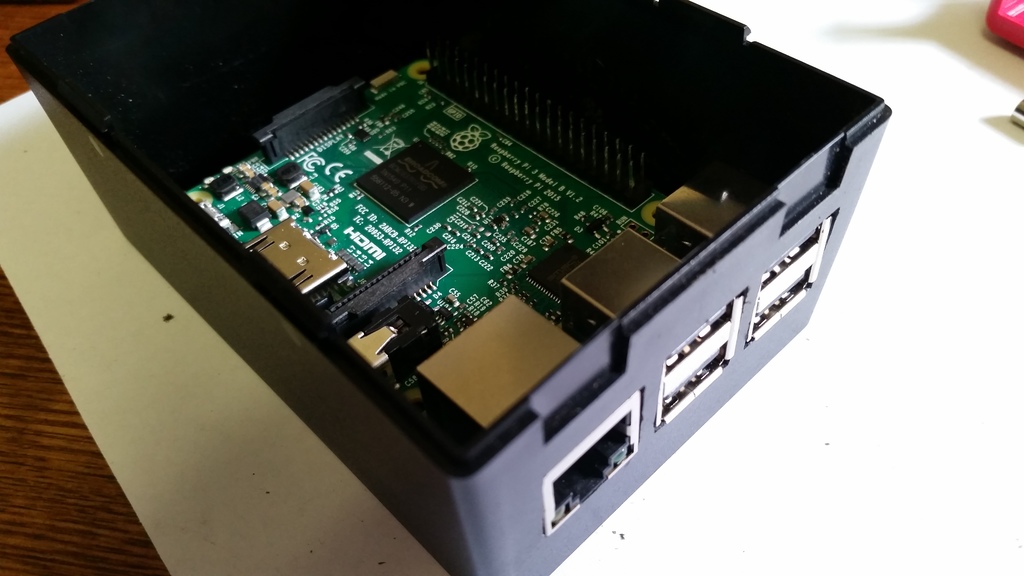
I didn’t measure for the screw holes at all, I simply drilled through the holes in the board while it was balanced in there, hanging from the edge with the ports. I initially put the screws in from the bottom of the box, dropped the spacers on top, slid the Pi in place, then discovered a problem: if the nuts were on top of the board, they’d rub up against a couple of components:
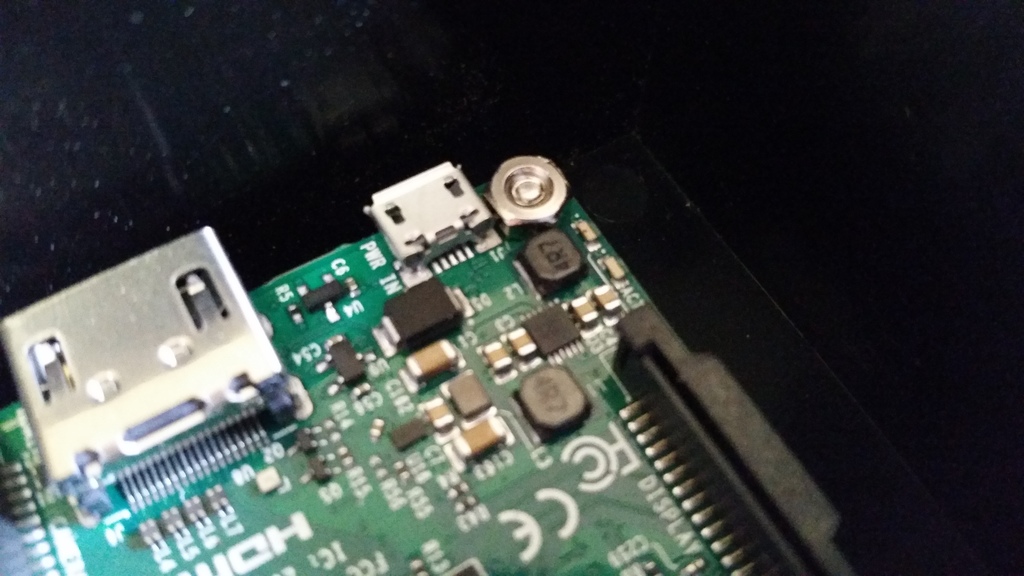
So I had to put the screws through the board, stick them there with Blu Tack, turn the Pi upside down, drop the spacers on top, and slide it upwards into the box, getting the screws as close as possible to the screw holes, flip the box the right way up, remove the Blu Tack and jiggle the screws into place before securing the nuts. More fiddly than I’d have liked, but it worked fine.
One other kink with this design is that it’s probably impossible to remove the SD card from the Pi without removing the Pi from the box, unless your fingers are incredibly thin and dexterous. I could have made another hole to provide access, but decided against it as I’m quite happy with the sleek look, this thing is going to be living under my house indefinitely, and I have no plans to replace the SD card any time soon.
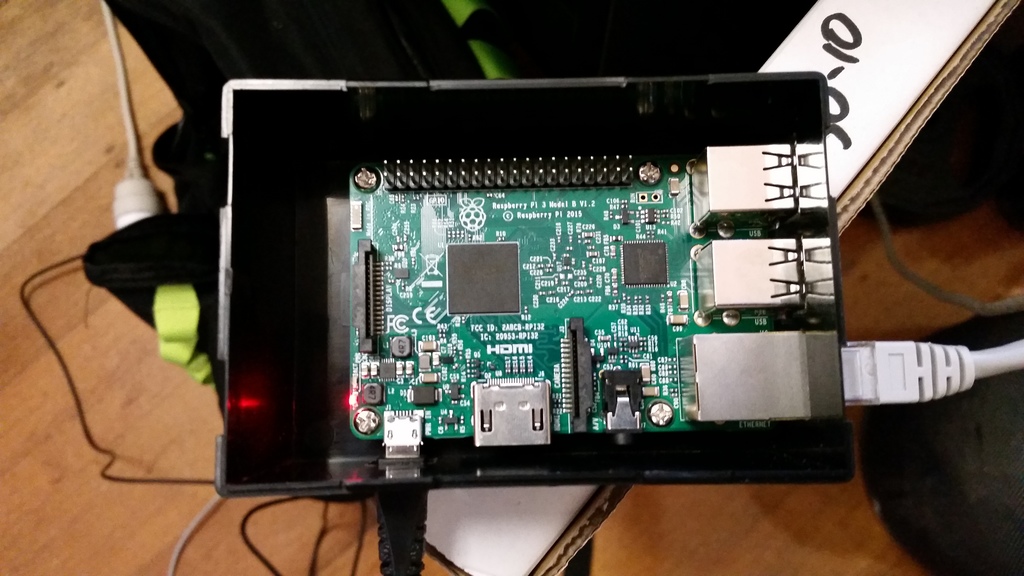
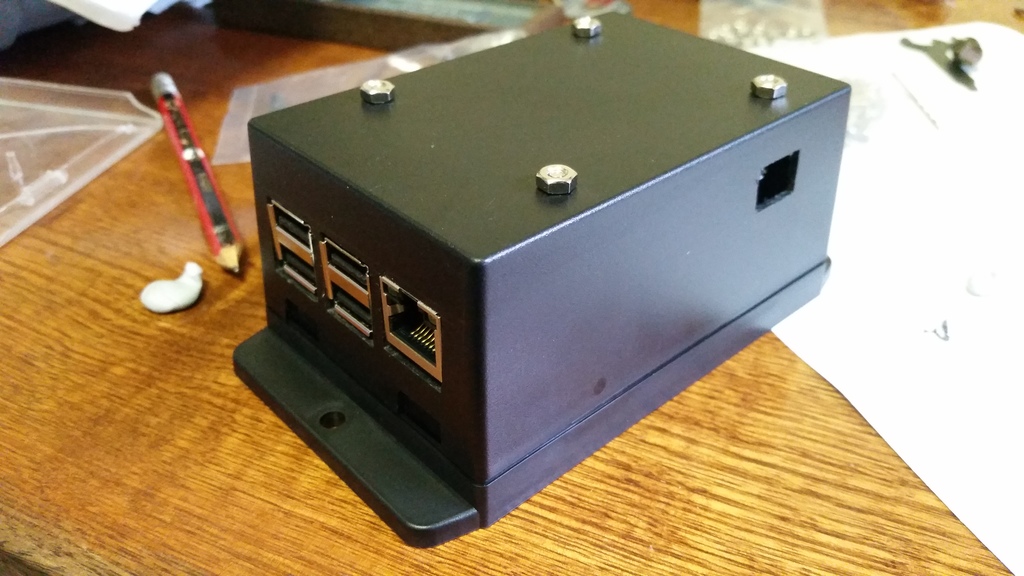
All that remained was to mount it under the house. Here’s the finished install:
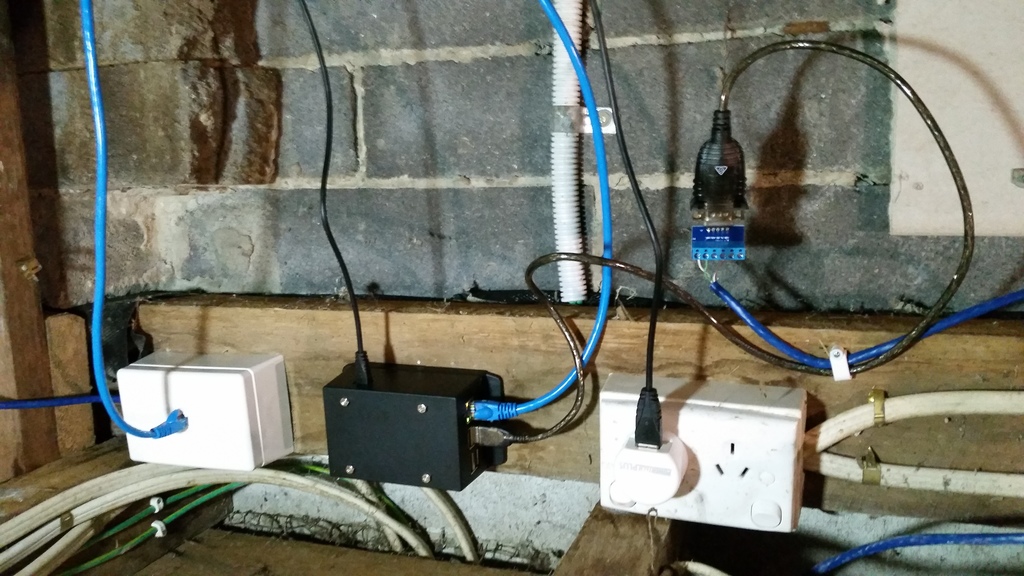
After that, I set up a cron job to scrape data from the inverter every five minutes and dump it to a log file. So far I’ve discovered that there’s enough sunlight by about 05:30 to wake the inverter up. This morning we’d generated 1KW by 08:35, 2KW by 09:10, 8KW by midday, and as I’m writing this at 18:25, a total of 27.134KW so far today.
Next steps:
- Figure out WTF is up with the comms glitches
- Graph everything and/or feed the raw data to pvoutput.org

Dell Precision 5520; NVIDIA Optimus PRIME with openSUSE TW and Leap
- disabling one of the devices in BIOS, which may result in improved battery life if the NVIDIA device is disabled, but may not be available with all BIOSes and does not allow GPU switching
- using the official Optimus support (PRIME) included with the proprietary NVIDIA driver, which offers the best NVIDIA performance but does not allow GPU switching unless in offload mode which doesn't work yet.
- using the PRIME functionality of the open-source nouveau driver, which allows GPU switching and powersaving but offers poor performance compared to the proprietary NVIDIA driver.
- using the third-party Bumblebee program to implement Optimus-like functionality, which offers GPU switching and powersaving but requires extra configuration.
1) First we will need to disable open source nuoveau driver. You can follow the link here which will walk you through the hard way of installing and setting up the NVIDIA driver.
2) Once the NVIDIA driver is installed and nuoveau is blacklisted and the module is not loading it should look like this.
# lsmod | grep nvidia
nvidia_drm 53248 3
nvidia_modeset 843776 9 nvidia_drm
nvidia 13033472 1190 nvidia_modeset
drm_kms_helper 192512 2 i915,nvidia_drm
drm 417792 6 i915,nvidia_drm,drm_kms_helper
3) You can now begin the process of setting up your xorg.conf file to use both the Intel integrated GPU (iGPU) and the dedicated NVIDIA GPU (dGPU) in the output mode which is explained in the NVIDIA devtalk forum link above.
The below is the /etc/X11/xorg.conf I use with my Dell Precision 5520 running openSUSE TW
Section "Module"The BusID for both cards can be discovered with this command:
Load "modesetting"
EndSection
Section "Device"
Identifier "nvidia"
Driver "nvidia"
BusID "PCI:1:0:0"
Option "AllowEmptyInitialConfiguration"
EndSection
Section "Device" Identifier "Intel" Driver "modesetting" BusID "PCI:0:2:0" Option "AccelMethod" "sna"
EndSection
# lspci | grep -e VGA -e NVIDIA
00:02.0 VGA compatible controller: Intel Corporation HD Graphics 530 (rev 06)
01:00.0 3D controller: NVIDIA Corporation GM107GLM [Quadro M1200 Mobile] (rev a2)
4) Once you have your xorg.conf file setup right you will also need to setup your ~/.xinitrc file like this.
xrandr --setprovideroutputsource modesetting NVIDIA-0Of course I'm setup for KDE. If you want to load Gnome instead then change startkde to startx in your ~/.xinitrc file.
xrandr --auto
if [ -d /etc/X11/xinit/xinitrc.d ]; then
for f in /etc/X11/xinit/xinitrc.d/*; do
[ -x "$f" ] && . "$f"
done
unset f
fi
exec dbus-launch startkde
exit 0
5) Reboot, Login, and enjoy your new setup with discrete NVIDIA graphics with Optimus.
Have a lot of fun!
Note: Nvidia PRIME on Linux Currently does not work like MS Windows where it offloads 3D and performance graphics to the Nvidia GPU. It works in an output method. The definition of the two methods is
"Output" allows you to use the discrete GPU as the sole source of rendering, just as it would be in a traditional desktop configuration. A screen-sized buffer is shared from the dGPU to the iGPU, and the iGPU does nothing but present it to the screen.
"Offload" attempts to mimic more closely the functionality of Optimus on Windows. Under normal operation, the iGPU renders everything, from the desktop to the applications. Specific 3D applications can be rendered on the dGPU, and shared to the iGPU for display. When no applications are being rendered on the dGPU, it may be powered off. NVIDIA has no plans to support PRIME render offload at this time.
So in "Output" mode this will cause the dGPU to always be running.. I've not tested to see how this affects the battery life. 🙂 time will tell. I'll update the post to let everyone know.
Rust+GNOME Hackfest in Berlin, 2017
Last weekend I was in Berlin for the second Rust+GNOME Hackfest, kindly hosted at the Kinvolk office. This is in a great location, half a block away from the Kottbusser Tor station, right at the entrance of the trendy Kreuzberg neighborhood — full of interesting people, incredible graffitti, and good, diverse food.

My goals for the hackfest
Over the past weeks I had been converting gnome-class
from the old lalrpop-based parser into the new Procedural
Macros framework for Rust, or proc-macro2 for short. To do this the
parser for the gnome-class mini-language needs to be rewritten from
being specified in a lalrpop grammar, to using Rust's syn
crate.
Syn is a parser for Rust source code, written as a set of nom combinator parser macros. For gnome-class we want to extend the Rust language with a few conveniences to be able to specify GObject classes/subclasses, methods, signals, properties, interfaces, and all the goodies that GObject Introspection would expect.
During the hackfest, Alex Crichton, from the Rust core team, kindly took over my baby steps in compiler writing and made everything much more functional. It was invaluable to have him there to reason about macro hygiene (we are generating an unhygienic macro!), bugs in the quoting system, and general Rust-iness of the whole thing.
I was also able to talk to Sebastian Dröge about his work in writing GObjects in Rust by hand, for GStreamer, and what sort of things gnome-class could make easier. Sebastian knows GObject very well, and has been doing awesome work in making it easy to derive GObjects by hand in Rust, without lots of boilerplate — something with which gnome-class can certainly help.
I was also looking forward to talking again with Guillaume Gomez, one of the maintainers of gtk-rs, and who does so much work in the Rust ecosystem that I can't believe he has time for it all.

Extend the Rust language for GObject? Like Vala?
Yeah, pretty much.
Except that instead of a wholly new language, we use Rust as-is, and we just add syntactic constructs that make it easy to write GObjects without boilerplate. For example, this works right now:
#![feature(proc_macro)]

extern crate gobject_gen;

#[macro_use]
extern crate glib;
use gobject_gen::gobject_gen;

gobject_gen! {
    // Derives from GObject
    class One {
    }

    impl One {
        // non-virtual method
        pub fn one(&self) -> u32 {
            1
        }

        virtual fn get(&self) -> u32 {
            1
        }
    }

    // Inherits from our other class
    class Two: One {
    }

    impl One for Two {
        // overrides the virtual method
        // maybe we should use "override" instead of "virtual" here?
        virtual fn get(&self) -> u32 {
            2
        }
    }
}

#[test]
fn test() {
    let one = One::new();
    let two = Two::new();

    assert!(one.one() == 1);
    assert!(one.get() == 1);
    assert!(two.one() == 1);
    assert!(two.get() == 2);
}
This generates a little boatload of generated code,
including a good number of unsafe calls to GObject functions
like g_type_register_static_simple(). It also creates all the
traits and paraphernalia that Glib-rs would create for the Rust
binding of a normal GObject written in C.
The idea is that from the outside world, your generated GObject classes are indistinguishable from GObjects implemented in C.
The idea is to write GObject libraries in a better language than C, which can then be consumed from language bindings.
Current status of gnome-class
Up to about two weeks before the hackfest, the syntax for this mini-language was totally ad-hoc and limited. After a very productive discussion on the mailing list, we came up with a better syntax that definitely looks more Rust-like. It is also easier to implement, since the Rust parser in syn can be mostly reused as-is, or pruned down for the parts where we only support GObject-like methods, and not all the Rust bells and whistles (generics, lifetimes, trait bounds).
Gnome-class supports deriving classes directly from the basic GObject, or from other GObject subclasses in the style of glib-rs.
You can define virtual and non-virtual methods. You can override virtual methods from your superclasses.
Not all argument types are supported. In the end we should support argument types which are convertible from Rust to C types. We need to finish figuring out the annotations for ownership transfer of references.
We don't support GObject signals yet; I think that's my next task.
We don't support GObject properties yet.
We don't support defining new GType interfaces yet, but it is planned. It should be easy to support implementing existing interfaces, as it is pretty much the same as implementing a subclass.
The best way to see what works right now is probably to look at the examples, which also work as tests.
Digression on macro hygiene
Rust macros are hygienic, unlike C macros which work just through textual substitution. That is, names declared inside Rust macros will not clash with names in the calling code.
One peculiar thing about gnome-class is that the user gives us a few
names, like a class name Foo and some things inside it, say, a
method name bar, and a signal baz and a property qux.
From there we want to generate a bunch of boilerplate for GObject
registration and implementaiton. Some of the generated names in that
boilerplate would be
Foo              // base name
FooClass         // generated name for the class struct
Foo::bar()       // A method
Foo::emit_baz()  // Generated from the signal name
Foo::set_qux()   // Generated property setter
foo_bar()        // Generated C function for a method call
foo_get_type()   // Generated C function that all GObjects have
However, if we want to actually generate those names inside our gnome-class macro and make them visible to the caller, we need to do so unhygienically. Alex started started a very interesting discussion on macro hygiene, so expect some news in the Rust world soon.
TL;DR: there is a difference between a code generator, which gnome-class mostly intends to be, and a macro system which is just an aid in typing repetitive code.

People for whom to to be thankful
During the hackfest, Nirbheek has been porting librsvg from Autotools to the Meson build system, and dealing with Rust peculiarities along the way. This is exactly what I needed! Thanks, Nirbheek!
Sebastian answered many of my questions about GObject internals and how to use them from the Rust side.
Zeeshan took us to a bunch of good restaurants. Korean, ramen, Greek, excellent pizza... My stomach is definitely thankful.
Berlin
I love Berlin. It is a cosmopolitan, progressive, LGBTQ-friendly city, with lots of things to do, vast distances to be traveled, with good public transport and bike lanes, diverse food to be eaten along the way...
But damnit, it's also cold at this time of the year. I don't think the weather was ever above 10°C while we were there, and mostly in a constant state of not-quite-rain. This is much different from the Berlin in the summer that I knew!

This is my third time visiting Berlin. The first one was during the Desktop Summit in 2011, and the second one was when my family and I visited the city two years ago. It is a city that I would definitely like to know better.
Thanks to the GNOME Foundation...
... for sponsoring my travel and accomodation during the hackfest.
