
 rriemann
Node Script to Display Cookies
With some advice from StackOverflow, I wrote a short node script that I placed in the file $HOME/bin/get-cookies.js with the executive bit set via chmod +x $HOME/bin/get-cookies. It relies on the library puppeteer to control a browser instance of headless Chromium, which must be installed first via npm i puppeteer.
Then, you can call get-cookies.js https://google.com to get all installed cookies upon request of the page given as a parameter (here: https://google.com). Note that Puppeteer creates its own Chromium user profile which it cleans up on every run.
Source Code of ‘get-cookies.js’
#!/usr/bin/env node

const puppeteer = require('puppeteer');

const url = process.argv[2];

(async () => {
  const browser = await puppeteer.launch({ headless: true, args: ['--disable-dev-shm-usage'] });
  try {
    const page = await browser.newPage();
    await page.goto(url, { waitUntil: 'networkidle2' });

    var cookies = await page._client.send('Network.getAllCookies');
    cookies = cookies.cookies.map( cookie => {
      cookie.expiresUTC = new Date(cookie.expires * 1000);

      return cookie;
    });

    var persistantCookies = cookies.filter(c => {
      return !c.session;
    });

    console.log({
      persistantCookies: persistantCookies,
      persistantCookiesCount: persistantCookies.length,
    });
  } catch(error) {
    console.error(error);
  } finally {
    await browser.close();
  }
})();

Kubic now available on ARM
![]()
We are proud to announce that Kubic officially supports AArch64, the 64-bit ARMv8! What does it mean? What are the differences with x86_64? How would you install and use it? Please read this blog post to answer those questions!
Kubic supports AArch64 - What does it mean?
It simply means that Kubic on AArch64 uses same sources and follows the same workflow used for Kubic on x86_64. It is built in OBS along openSUSE Tumbleweed, tested in openQA and released to official openSUSE download server, if tests are good enough.
Thanks to new AArch64 machines used in OBS and also a new powerful machine in openQA, but especially thanks to the hard work of a bunch of people from Kubic and openSUSE communities, openSUSE Tumbleweed for AArch64 is now officially supported and is no more a best effort port. Kubic, which is an openSUSE Tumbleweed flavor, is also granted of this new status.
What are the differences between AArch64 and x86_64 flavors for Kubic?
The differences are the same as Tumbleweed for x86_64 and Tumbleweed for AArch64, as Kubic is fully based on Tumbleweed packages and is released at the same time as Tumbleweed. It means:
- x86 and ARM snapshots may differ due to bugs found in openQA or due to the time when ARM take the Factory snapshot
- Some packages are architecture specific or may not build for aarch64: e.g. kubernetes-dashboard
- Some ARM systems do not support UEFI and are not able to boot from Kubic ISO, such as: Pine64 and Raspberry Pi 3 boards.
How to install Kubic on AArch64?
UEFI capable systems
If your AArch64 system supports UEFI, as most server class systems do, including Overdrive 1000, D05 or ThunderX2 for the most known, you just need to use the ISO installer as you would do on x86_64 and follow the Kubic documentation on Portal:Kubic for any Kubic specific information.
Additionnaly, you can use AutoYaST profile for an automated installation, and also PXE/tftpboot.
On AArch64, Kubic usage, and thus documentation, only differs from x86_64 for download links and RPM repositories. So, if your familiar with Kubic on x86_64, it will be a very smooth transistion to AArch64.
non-UEFI systems: WIP images for Raspberry Pi 3 and Pine64 boards
If your AArch64 system does not support UEFI, you cannot use ISO to install Kubic and you will need a special image to boot from. Kubic offers MicroOS and kubeadm images for some non-UEFI boards. Currently only Pine64 and Raspberry Pi 3 images are built. Those images are available on devel:kubic:images ARM repo but are still work in progress. Find details on Kubic:MicroOS#Images_for_non-UEFI_ARM_boards wiki page. Please note that those images are not tested in openQA and published as soon as built. So, the quality may vary from one build to another. Please also note that current Pine64 Kubic image needs u-boot to be updated manually to get it booting properly. This will be fixed later on.
Here is a quick how-to to start the cri-o MicroOS image on the Raspberry Pi 3 board:
- Download the targeted image from devel:kubic:images ARM repo
- Uncompress the image:
unxz -k openSUSE-Tumbleweed-Kubic.aarch64-*-MicroOS-cri-o-RaspberryPi-Build*.raw.xz - Copy it to a µSD card with
ddtool:dd if=openSUSE-Tumbleweed-Kubic.aarch64-*-MicroOS-cri-o-RaspberryPi-Build*.raw of=/dev/sdcard_device bs=2M; sync(double check the sdcard device to not overwrite your HDD!) - Create a USB stick (partition label must be
cidata) withmeta-dataanduser-datafiles on it. This allows you to, at least, setup your network and define root/user details. More details on Kubic:MicroOS/cloud-init - Plug the µSD card on your Raspberry Pi 3, as well as the USB stick for cloud-init configuration, optionnaly a screen and a USB keyboard and/or a serial cable, and power it up. You can follow the boot on the screen and/or on the serial. 1st boot is a bit longer, because of the µSD auto-repartition.
- You will end-up with the following screen and will be able to login to the system:
Welcome to openSUSE Tumbleweed Kubic (aarch64) - Kernel 4.20.0-1-default (ttyS0).

SSH host key: SHA256:N9/yefOKr4MDWfBCieWCtsksJaqEsBQ2DvR1lC4ZBJo (DSA)
SSH host key: SHA256:AFWw989O4kNZBxzo8RSiYG9c7dQwGzIJgwkxQQvKXFg (ECDSA)
SSH host key: SHA256:7z+GpfK8MA+sGqjppiJzC4o2lAlprieYknjAUnJB+fg (ED25519)
SSH host key: SHA256:qMSdqn8z4p7MSQfhh11oXscFrX6rqqCWCVM8etoYacU (RSA)
eth0: 192.168.0.44 2a01:e0a:d7:1620:b070:e21e:e75:6b4


localhost login:
- You can also use ssh to login to your system remotly:
ssh root@RPi3_IP - Now, MicroOS is installed on your Pi 3 and you can start working with your Kubic MicroOS!
What’s now?
Once your system is installed, either as regular UEFI system, or using a dedicated ready-to-boot image, as a kubeadm node or as a MicroOS system, you can start working with it.

Do not forget Kubic uses transactional updates. So, please use transactional-update command instead of zypper, for example: transactional-update dup instead of zypper dup, and reboot after each changes! More information available on Kubic:MicroOS/Design#Transactional_Updates wiki page.
kubeadm test
- Initialize kubeadm (adjust network as needed):
kubeadm init --cri-socket=/var/run/crio/crio.sock --pod-network-cidr=10.244.0.0/16 - Configure kubectl:
mkdir -p ~/.kube cp -i /etc/kubernetes/admin.conf ~/.kube/config - Configure flannel (podman network):
kubectl apply -f https://raw.githubusercontent.com/coreos/flannel/bc79dd1505b0c8681ece4de4c0d86c5cd2643275/Documentation/kube-flannel.yml - Wait a bit (about 1 min) and get cluster info:
kubectl config view --flatten=true kubectl get pods --all-namespaces - Confirm node is ready:
kubectl get nodes
MicroOS test
Podman
If you already know docker, moving to podman will be very smooth, as you would just need to replace docker with podman for most commands.
Run the podman hello world container:
- Search openSUSE images on default registry:
podman search --no-trunc hello
INDEX       NAME                                                 DESCRIPTION                                                                                         STARS   OFFICIAL   AUTOMATED
docker.io   docker.io/library/hello-world                        Hello World! (an example of minimal Dockerization)                                                  807     [OK]
docker.io   docker.io/library/hello-seattle                      Hello from DockerCon 2016 (Seattle)!                                                                2       [OK]
docker.io   docker.io/tutum/hello-world                          Image to test docker deployments. Has Apache with a 'Hello World' page listening in port 80.        59                 [OK]
docker.io   docker.io/dockercloud/hello-world                    Hello World!                                                                                        14                 [OK]
docker.io   docker.io/ansibleplaybookbundle/hello-world-apb      An APB which deploys a sample Hello World! app                                                      0                  [OK]
docker.io   docker.io/ansibleplaybookbundle/hello-world-db-apb   An APB which deploys a sample Hello World! app backed with a persistent database.                   0                  [OK]
docker.io   docker.io/wouterm/helloworld                          A simple Docker image with an Nginx server showing a custom message, based on tutum/hello-world.   0                  [OK]
docker.io   docker.io/karthequian/helloworld                     A simple helloworld nginx container to get you started with docker.                                 12                 [OK]
docker.io   docker.io/hivesolutions/hello_appier                 Simple hello world application for Appier.                                                          0                  [OK]
docker.io   docker.io/microsoft/mcr-hello-world                  Hello World! (an example of minimal Dockerization).                                                 1
docker.io   docker.io/openshift/hello-openshift                  Simple Example for Running a Container on OpenShift                                                 31
docker.io   docker.io/crccheck/hello-world                       Hello World web server in under 2.5 MB                                                              6                  [OK]
docker.io   docker.io/seabreeze/sbz-helloworld                   A HelloWorld example to run on SeaBreeze.                                                           1                  [OK]
docker.io   docker.io/nginxdemos/hello                           NGINX webserver that serves a simple page containing its hostname, IP address and port ...          9                  [OK]
docker.io   docker.io/infrastructureascode/hello-world           A tiny "Hello World" web server with a health check endpoint.                                       0                  [OK]
docker.io   docker.io/gramercylabs/docker-helloworld             hello world                                                                                         0                  [OK]
docker.io   docker.io/seabreeze/sbz-helloworld-sidecar           Sidecar hello world example for SeaBreeze.                                                          0                  [OK]
docker.io   docker.io/seabreeze/azure-mesh-helloworld            Azure Service Fabric Mesh HelloWorld!                                                               1                  [OK]
docker.io   docker.io/google/nodejs-hello                                                                                                                            24                 [OK]
docker.io   docker.io/dongxuny/hellotencent                      Auto build                                                                                          0                  [OK]
docker.io   docker.io/ppc64le/hello-world                        Hello World! (an example of minimal Dockerization)                                                  2
docker.io   docker.io/silasbw/hello                                                                                                                                  0
docker.io   docker.io/milsonian/hellohttp                        Basic hello world http app in golang                                                                0                  [OK]
docker.io   docker.io/yaros1av/hello-core                        Hello from ASP.NET Core!                                                                            1
docker.io   docker.io/widdix/hello                               Hello World!                                                                                        0
- Pull
hello-worldcontainer withpodman pull hello-world:
Trying to pull docker.io/hello-world:latest...Getting image source signatures
Copying blob 3b4173355427: 1.05 KiB / 1.05 KiB [============================] 1s
Copying config de6f0c40d4e5: 1.47 KiB / 1.47 KiB [==========================] 0s
Writing manifest to image destination
Storing signatures
de6f0c40d4e5d0eb8e13fa62ccbbdabad63be2753c9b61f495e7f1f486be1443
- Run it with
podman run hello-world
Hello from Docker!
This message shows that your installation appears to be working correctly.
You can also run the opensuse/tumbleweed container:
- Pull
opensuse/tumbleweedcontainer withpodman pull opensuse/tumbleweed:
Trying to pull docker.io/opensuse/tumbleweed:latest...Getting image source signatures
Copying blob 4a91c0fbbc27 41.67 MB / 41.67 MB [=============================] 8s
Copying config 5140b500a548 658 B / 658 B [=================================] 0s
Writing manifest to image destination
Storing signatures
5140b500a5485224cd7c10a6d991b9aa2cfa577ccfc5e325fb0033dd0211a73f
- Start a
bashinside withpodman run -it opensuse/tumbleweed bash(typeexitto exit from this container, once you are done)
:/ #
Docker
As docker is no more the default for Kubic, but still available, you need to start the docker service manually with systemctl start docker
See CRI-O is now our default container runtime interface blog post for more information.
Run the docker hello world container:
- Search
helloin containers list withdocker search --no-trunc hello:
NAME                                       DESCRIPTION                                                                                         STARS               OFFICIAL            AUTOMATED
hello-world                                Hello World! (an example of minimal Dockerization)                                                  807                 [OK]
tutum/hello-world                          Image to test docker deployments. Has Apache with a 'Hello World' page listening in port 80.        59                                      [OK]
openshift/hello-openshift                  Simple Example for Running a Container on OpenShift                                                 31
google/nodejs-hello                                                                                                                            24                                      [OK]
dockercloud/hello-world                    Hello World!                                                                                        14                                      [OK]
karthequian/helloworld                     A simple helloworld nginx container to get you started with docker.                                 12                                      [OK]
nginxdemos/hello                           NGINX webserver that serves a simple page containing its hostname, IP address and port ...          9                                       [OK]
crccheck/hello-world                       Hello World web server in under 2.5 MB                                                              6                                       [OK]
hello-seattle                              Hello from DockerCon 2016 (Seattle)!                                                                2                   [OK]
ppc64le/hello-world                        Hello World! (an example of minimal Dockerization)                                                  2
seabreeze/azure-mesh-helloworld            Azure Service Fabric Mesh HelloWorld!                                                               1                                       [OK]
microsoft/mcr-hello-world                  Hello World! (an example of minimal Dockerization).                                                 1
yaros1av/hello-core                        Hello from ASP.NET Core!                                                                            1
seabreeze/sbz-helloworld                   A HelloWorld example to run on SeaBreeze.                                                           1                                       [OK]
infrastructureascode/hello-world           A tiny "Hello World" web server with a health check endpoint.                                       0                                       [OK]
gramercylabs/docker-helloworld             hello world                                                                                         0                                       [OK]
seabreeze/sbz-helloworld-sidecar           Sidecar hello world example for SeaBreeze.                                                          0                                       [OK]
hivesolutions/hello_appier                 Simple hello world application for Appier.                                                          0                                       [OK]
wouterm/helloworld                          A simple Docker image with an Nginx server showing a custom message, based on tutum/hello-world.   0                                       [OK]
dongxuny/hellotencent                      Auto build                                                                                          0                                       [OK]
ansibleplaybookbundle/hello-world-db-apb   An APB which deploys a sample Hello World! app backed with a persistent database.                   0                                       [OK]
silasbw/hello                                                                                                                                  0
milsonian/hellohttp                        Basic hello world http app in golang                                                                0                                       [OK]
ansibleplaybookbundle/hello-world-apb      An APB which deploys a sample Hello World! app                                                      0                                       [OK]
widdix/hello                               Hello World!                                                                                        0
- Pull
hello-worldcontainer withdocker pull hello-world:
Using default tag: latest
latest: Pulling from library/hello-world
3b4173355427: Pull complete
Digest: sha256:2557e3c07ed1e38f26e389462d03ed943586f744621577a99efb77324b0fe535
Status: Downloaded newer image for hello-world:latest
- Run it with
docker run hello-world
Hello from Docker!
This message shows that your installation appears to be working correctly.
You can also run the opensuse/tumbleweed container:
- Pull
opensuse/tumbleweedcontainer withdocker pull opensuse/tumbleweed:
Using default tag: latest
latest: Pulling from opensuse/tumbleweed
Digest: sha256:c8a83a8333890dc692289441da212270f74525afeb2a37da7a98ab8261060a1b
Status: Downloaded newer image for opensuse/tumbleweed:latest
- Start a
bashinside withdocker run -it opensuse/tumbleweed bash(typeexitto exit from this container, once you are done)
:/ #
What’s next?
Please keep in mind that small ARM boards, such as Raspberry Pi 3, have not much RAM (1 GB is the bare minimum recommended for MicroOS) and if system starts to swap, you will have very low performances. Depending on your needs, you may want to opt for a system with more RAM, and more powerful CPU. A list of known working system is available on Portal:ARM wiki page.
Thanks for using Kubic on AArch64 and please join in, send us your feedback, code, and other contributions, and remember, have a lot of fun!

 Member
Garmin Vivofit 2 Battery Replacement
Network Diagramming with LibreOffice Draw on openSUSE
Using Kwin on LXQt with openSUSE
ROSA Linux | Review from an openSUSE User
Intellivision | A New, Family Friendly, Console
How to enable PSP with Traefik
If you are reading this, it is possibly because you already know what Traefik is and you want to use it without running it as root (main proces pid 1) or any other privileged user. If security is a big consern, enabling Kubernetes PodSecurityPolicy - PSP is considered to be one of the best-practices when it comes to safety mechanisms.
To do that, we were experimenting with building a container image for Traefik that uses libcap-progs and authbind configurations. If you are curious enough, feel free to read our source-code. Last but not least, this image not officially part of openSUSE (yet) but after some testing (yes sir, we test our container images) we hope to make there.
How to use it
First off, you need a working Kubernetes cluster. If you want to follow along with this guide, you should setup a cluster by yourself.
This means either using openSUSE Kubic along with kubeadm or following the upstream Traefik instructions you can also use minikube on your machine, as it is the quickest way to get a local Kubernetes cluster setup for experimentation and development. In thend, we assume that you have kubectl binary installed in your system.
$ sudo zypper in minikube kubernetes-client
$ minikube start --vm-driver=kvm2

Starting local Kubernetes v1.13.2 cluster...
Starting VM...
Downloading Minikube ISO
 181.48 MB / 181.48 MB [============================================] 100.00% 0s
Getting VM IP address...
Moving files into cluster...
Downloading kubeadm v1.13.2
Downloading kubelet v1.13.2
Finished Downloading kubeadm v1.13.2
Finished Downloading kubelet v1.13.2
Setting up certs...
Connecting to cluster...
Setting up kubeconfig...
Stopping extra container runtimes...
Starting cluster components...
Verifying kubelet health ...
Verifying apiserver health ...
Kubectl is now configured to use the cluster.
Loading cached images from config file.

Everything looks great. Please enjoy minikube!
By now, your client and your cluster should already be configured:
$ kubectl get nodes

NAME       STATUS   ROLES    AGE    VERSION
minikube   Ready    master   103s   v1.13.2
Authorize Traefik to use your Kubernetes cluster
The new kubernetes versions are using RBAC (Role Based Access Control) that allows Kubernetes resources to communicate with its API under a controlled manner. There are two ways to set permissions to allow the Traefik resources to communicate with the k8s APIs:
- via RoleBinding (namespace specific)
- via ClusterRoleBinding (global for all namespaced)
For the shake of simplicity, we are going to use ClusterRoleBinding in order to grant permission at the cluster level and in all namespaces. The following ClusterRoleBinding allows any user or resource that is part of the ServiceAccount to use the traefik ingress controller.
---
apiVersion: v1
kind: ServiceAccount
metadata:
  name: traefik-ingress-controller
  namespace: kube-system
---
kind: ClusterRole
apiVersion: rbac.authorization.k8s.io/v1beta1
metadata:
  name: traefik-ingress-controller
rules:
  - apiGroups:     ['policy']
    resources:     ['podsecuritypolicies']
    verbs:         ['use']
    resourceNames: ['traefik-ingress-controller']
  - apiGroups:
      - ""
    resources:
      - pods
      - services
      - endpoints
      - secrets
    verbs:
      - get
      - list
      - watch
  - apiGroups:
      - extensions
    resources:
      - ingresses
    verbs:
      - get
      - list
      - watch
  - apiGroups:
      - extensions
    resources:
      - ingresses/status
    verbs:
      - update
---
kind: ClusterRoleBinding
apiVersion: rbac.authorization.k8s.io/v1beta1
metadata:
  name: traefik-ingress-controller
roleRef:
  apiGroup: rbac.authorization.k8s.io
  kind: ClusterRole
  name: traefik-ingress-controller
subjects:
- kind: ServiceAccount
  name: traefik-ingress-controller
  namespace: kube-system
$ kubectl apply -f rbac.yaml

serviceaccount/traefik-ingress-controller created
clusterrole.rbac.authorization.k8s.io/traefik-ingress-controller created
clusterrolebinding.rbac.authorization.k8s.io/traefik-ingress-controller created
Notice that part of definition of the ClusterRole is to force it to use (verb) the podsecuritypolicy.
Enable PSP
We are going to enable a PodSecurityPolicy that disallow root user to run our Traefik container:
---
apiVersion: extensions/v1beta1
kind: PodSecurityPolicy
metadata:
  name: traefik-ingress-controller
spec:
  allowedCapabilities:
    - NET_BIND_SERVICE
  privileged: false
  allowPrivilegeEscalation: true
  # Allow core volume types.
  volumes:
    - 'configMap'
    - 'secret'
  hostNetwork: false
  hostIPC: false
  hostPID: false
  runAsUser:
    # Require the container to run without root privileges.
    rule: 'MustRunAsNonRoot'
  supplementalGroups:
    rule: 'MustRunAs'
    ranges:
      # Forbid adding the root group.
      - min: 1
        max: 65535
  fsGroup:
    rule: 'MustRunAs'
    ranges:
      # Forbid adding the root group.
      - min: 1
        max: 65535
  readOnlyRootFilesystem: false
  seLinux:
    rule: 'RunAsAny'
  hostPorts:
    - max: 65535
      min: 1
$ kubectl apply -f podsecuritypolicy.yaml

podsecuritypolicy.extensions/traefik-ingress-controller created
You can verify that is loaded by typing:
$ kubectl get psp
NAME                         PRIV    CAPS               SELINUX    RUNASUSER          FSGROUP     SUPGROUP    READONLYROOTFS   VOLUMES
traefik-ingress-controller   false   NET_BIND_SERVICE   RunAsAny   MustRunAsNonRoot   MustRunAs   MustRunAs   false            configMap,secret
Deploy our experimental Traefik image
I am going to deploy Traefik as a deployment kind using NodePort.
kind: Deployment
apiVersion: extensions/v1beta1
metadata:
  name: traefik-ingress-controller
  namespace: kube-system
  labels:
    k8s-app: traefik-ingress-lb
spec:
  replicas: 1
  selector:
    matchLabels:
      k8s-app: traefik-ingress-lb
  template:
    metadata:
      labels:
        k8s-app: traefik-ingress-lb
        name: traefik-ingress-lb
    spec:
      serviceAccountName: traefik-ingress-controller
      terminationGracePeriodSeconds: 60
      containers:
      - image: registry.opensuse.org/devel/kubic/containers/container/kubic/traefik:1.7
        name: traefik-ingress-lb
        ports:
        - name: http
          containerPort: 80
        - name: admin
          containerPort: 8080
        args:
        - --api
        - --kubernetes
        - --logLevel=INFO
        securityContext:
          capabilities:
              drop:
              - ALL
              add:
              - NET_BIND_SERVICE
          runAsUser: 38
As you can see our Traefik image is using authbind and setcap to enable a normal user (with 38 uid) to open ports lower than 1024.
$ kubectl apply -f deployment.yaml

deployment.extensions/traefik-ingress-controller created
To verify that is up and running, list your pods at kube-system namespace:
kubectl -n kube-system get pods | grep traefik

traefik-ingress-controller-87cbbbfb7-stlzm   1/1     Running   0          41s
In addition, you can also query for the deployments:
$ kubectl -n kube-system get deployments

NAME                         READY   UP-TO-DATE   AVAILABLE   AGE
coredns                      2/2     2            2           106m
traefik-ingress-controller   1/1     1            1           27m
To verify that Traefik is running as normal user (name should be traefik with UID 38):
traefikpod=$(kubectl -n kube-system get pods | grep traefik | awk '{ print $1 }')
kubectl -n kube-system exec -it $traefikpod -- whoami && id

traefik
uid=1000(tux) gid=100(users) groups=100(users),469(docker),472(libvirt),474(qemu),475(kvm),1003(osc)
So far we do not have a service to access this. It is just a Pod, which is part of the deployment.
$ kubectl -n kube-system expose deployment traefik-ingress-controller --target-port=80 --type=NodePort

service/traefik-ingress-controller exposed
You can verify this by quering for services under the kube-system namespace:
$ kubectl get svc -n kube-system

NAME                         TYPE        CLUSTER-IP      EXTERNAL-IP   PORT(S)                       AGE
kube-dns                     ClusterIP   10.96.0.10      <none>        53/UDP,53/TCP                 107m
traefik-ingress-controller   NodePort    10.105.27.208   <none>        80:31308/TCP,8080:30815/TCP   2s
We see that the traefik-ingress-controller service is becoming available on every node at
port 31308 – the port number will be different in your cluster. So the external IP is the IP of any node of our cluster.
You should now be able to access Traefik on port 80 of your Minikube cluster by requesting for port 31308:
$ curl $(minikube ip):31308

404 page not found
Note: We expect to see a 404 response here as we haven’t yet given Traefik any configuration.
The last step would be to create a Service and an Ingress that will expose the Traefik Web UI. From now on you can actually use the official Traefik documentation:
kubectl apply -f https://raw.githubusercontent.com/containous/traefik/master/examples/k8s/ui.yaml
Now lets setup an entry in our /etc/hosts file to route traefik-ui.minikube to our cluster.
In production you would want to set up real DNS entries. You can get the IP address of your minikube instance by running minikube ip:
echo "$(minikube ip) traefik-ui.minikube" | sudo tee -a /etc/hosts
We should now be able to visit traefik-ui.minikube:<NODEPORT> in the browser and view the Traefik web UI.
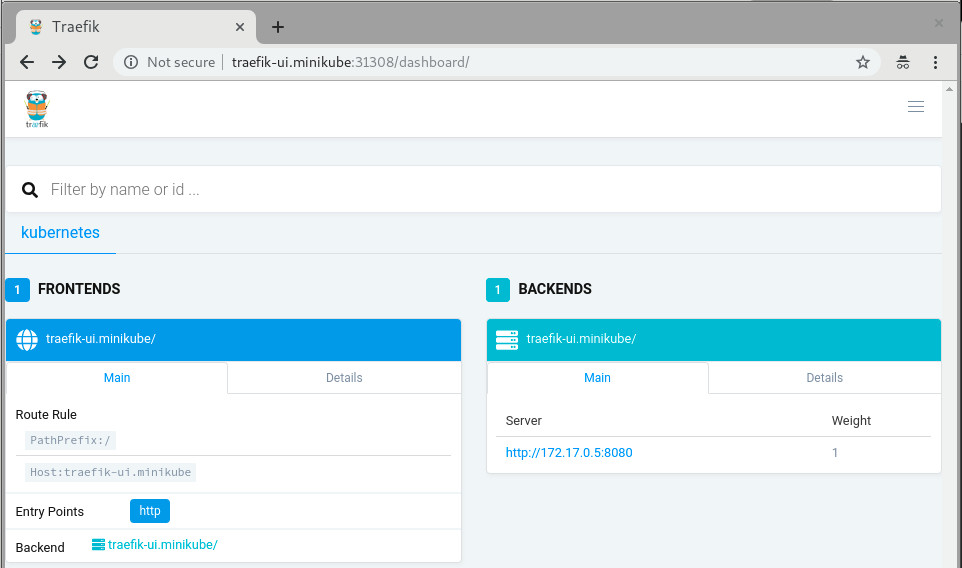
Now, you should be able to continue reading the official traefik documentation and do all the cool stuff but with better security.
More fun?
In case you are using a full-blown kubernetes cluster using Kubic (meaning: have more than one nodes available at your disposal), feel free to setup a LoadBalancer at your hypervisor in which your hosting your Kubic virtual-machines:
sudo zypper in nginx

cat /etc/nginx/nginx.conf

load_module '/usr/lib64/nginx/modules/ngx_stream_module.so';
events {
     worker_connections  1024;
}

stream {
     upstream stream_backend {
         # server <IP_ADDRESS_OF_KUBIC_NODE>:<TRAEFIK_NODEPORT>;
         server worker-0.kubic-init.suse.net:31380;
         server worker-1.kubic-init.suse.net:31380;
         server worker-2.kubic-init.suse.net:31380;
     }

   server {
     listen ultron.suse.de:80;
     proxy_pass stream_backend;
   }
}
And then start the load balancer: sudo systemctl start nginx.
This means that anyone that visits my machine (that is ultron.suse.de in this example) will be redirected to one of my kubernetes nodes at nodeport (31380).
Have fun

Librsvg's GObject boilerplate is in Rust now
The other day I wrote about how most of librsvg's library code is in Rust now.
Today I finished porting the GObject boilerplate for the main
RsvgHandle object into Rust. This means that the C code no longer
calls things like g_type_register_static(), nor implements
rsvg_handle_class_init() and such; all those are in Rust now. How
is this done?
The life-changing magic of glib::subclass
Sebastian Dröge has been working for many months on refining utilities to make it possible to subclass GObjects in Rust, with little or no unsafe code. This subclass module is now part of glib-rs, the Rust bindings to GLib.
Librsvg now uses the subclassing functionality in glib-rs, which takes care of some things automatically:
- Registering your GObject types at runtime.
- Creating safe traits on which you can implement
class_init,instance_init,set_property,get_property, and all the usual GObject paraphernalia.
Check this out:
use glib::subclass::prelude::*;

impl ObjectSubclass for Handle {
    const NAME: &'static str = "RsvgHandle";

    type ParentType = glib::Object;

    type Instance = RsvgHandle;
    type Class = RsvgHandleClass;

    glib_object_subclass!();

    fn class_init(klass: &mut RsvgHandleClass) {
        klass.install_properties(&PROPERTIES);
    }

    fn new() -> Self {
        Handle::new()
    }
}
In the impl line, Handle is librsvg's internals object — what used
to be RsvgHandlePrivate in the C code.
The following lines say this:
-
const NAME: &'static str = "RsvgHandle";- the name of the type, for GType's perusal. -
type ParentType = glib::Object;- Parent class. -
type Instance,type Class- Structs with#[repr(C)], equivalent to GObject's class and instance structs. -
glib_object_subclass!();- All the boilerplate happens here automatically. -
fn class_init- Should be familiar to anyone who implements GObjects!
And then, a couple of the property declarations:
static PROPERTIES: [subclass::Property; 11] = [
    subclass::Property("flags", |name| {
        ParamSpec::flags(
            name,
            "Flags",
            "Loading flags",
            HandleFlags::static_type(),
            0,
            ParamFlags::READWRITE | ParamFlags::CONSTRUCT_ONLY,
        )
    }),
    subclass::Property("dpi-x", |name| {
        ParamSpec::double(
            name,
            "Horizontal DPI",
            "Horizontal resolution in dots per inch",
            0.0,
            f64::MAX,
            0.0,
            ParamFlags::READWRITE | ParamFlags::CONSTRUCT,
        )
    }),
    // ... etcetera
];
This is quite similar to the way C code usually registers properties for new GObject subclasses.
The moment at which a new GObject subclass gets registered against the
GType system is in the foo_get_type() call. This is the C code in
librsvg for that:
extern GType rsvg_handle_rust_get_type (void);

GType
rsvg_handle_get_type (void)
{
    return rsvg_handle_rust_get_type ();
}
And the Rust function that actually implements this:
#[no_mangle]
pub unsafe extern "C" fn rsvg_handle_rust_get_type() -> glib_sys::GType {
    Handle::get_type().to_glib()
}
Here, Handle::get_type() gets implemented automatically by
Sebastian's subclass traits. It gets things like the type name and
the parent class from the impl ObjectSubclass for Handle we saw
above, and calls g_type_register_static() internally.
I can confirm now that implementing GObjects in Rust in this way, and exposing them to C, really works and is actually quite pleasant to do. You can look at librsvg's Rust code for GObject here.
Further work
There is some auto-generated C code to register librsvg's error enum and a flags type against GType; I'll move those to Rust over the next few days.
Then, I think I'll try to actually remove all of the library's entry points from the C code and implement them in Rust. Right now each C function is really just a single call to a Rust function, so this should be trivial-ish to do.
I'm waiting for a glib-rs release, the first one that will have the
glib::subclass code in it, before merging all of the above into
librsvg's master branch.
A new Rust API for librsvg?
Finally, this got me thinking about what to do about the Rust bindings
to librsvg itself. The rsvg crate uses the gtk-rs
machinery to generate the binding: it reads the GObject
Introspection data from Rsvg.gir and generates a Rust binding
for it.
However, the resulting API is mostly identical to the C API. There is
an rsvg::Handle with the same methods as the ones from C's
RsvgHandle... and that API is not particularly Rusty.
At some point I had an unfinished branch to merge rsvg-rs into
librsvg. The intention was that librsvg's build procedure
would first build librsvg.so itself, then generate Rsvg.gir as
usual, and then generate rsvg-rs from that. But I got tired of
fucking with Autotools, and didn't finish integrating the projects.
Rsvg-rs is an okay Rust API for using librsvg. It still works
perfectly well from the standalone crate. However, now
that all the functionality of librsvg is in Rust, I would like to take
this opportunity to experiment with a better API for loading and
rendering SVGs from Rust. This may make it more clear how to refactor
the toplevel of the library. Maybe the librsvg project can provide
its own Rust crate for public consumption, in addition to the usual
librsvg.so and Rsvg.gir which need to remain with a stable API and
ABI.

The Big App Icon Redesign
The Revolution is Coming
As you may have heard, GNOME 3.32 is going to come with a radical new icon style and new guidelines for app developers. This post aims to give some background on why this was needed, our goals with the initiative, and our exciting plans for the future.
The Problem
Our current icon style dates back all the way to the early 00s and the original Tango. One of the foundational ideas behind Tango was that each icon is drawn at multiple sizes, in order to look pixel-perfect in every context. This means that if you want to make an app icon you’re not drawing one, but up to 7 separate icons (symbolic, 16px, 22px, 24px, 32px, 48px, and 512px).


Making these icons takes quite a bit of experience and craftsmanship, and many of our high-detail icons are more art than design. However, as a part of our design system the style has not succeeded, and is in dire need of reform. Some of the major issues:
- Many of the sizes aren’t being used anywhere in the OS, and haven’t been for the better part of a decade. Since we use either large sizes or symbolics in most contexts, the pixel-hinted small sizes are rarely seen by anyone.
- Only a handful of people have the skills to draw icons in this style, and it can take weeks to do a single app icon. This means that iterating on the style is very hard, which is one of the reasons why our icon style has been stagnant for years.
- Very few third-party apps are following the guidelines. Our icons are simply too hard to draw for mere mortals, and as a result even the best third-party GNOME apps often have bad icons.
- We (GNOME Designers) don’t have the bandwidth to keep up with icon requests from developers, let alone update or evolve the style overall.
- The wider industry has moved on from the detailed icon styles of the 2000s, which gives new users the impression that our software is outdated.
- Cross-platform apps tend to ship with very simple, flat icons these days. The contrast between these icons and our super detailed ones can be quite jarring.


A New Beginning
One of the major project-wide goals GNOME over the past years has been empowering app developers. A big reason for this initiative is that we realized that the current style is holding us back as an ecosystem. Just as Builder is about providing a seamless development workflow, and Flatpak is about enabling direct distribution, this initiative is about making good icons more attainable for more apps.
So, what would a system designed from the ground up to empower app developers/designers to make good icons look like?
The first step is having clearer guidelines and more constraints. The old style was all about eyeballing it and doing what feels right. That’s fine for veteran designers used to the style, but makes it inaccessible to newcomers. The new style comes with a grid, a set of recommended base shapes, and a new color palette. We have also updated the section on app icons in the HIG with a lot more detailed information on how to design the icons.


The style is very geometric, making it easy to reuse and adapt elements from other icons. We’re also removing baked-in drop shadows in favour of drawing them automatically from the icon’s alpha channel in GTK/Shell depending on the rendering context. In most cases 3rd party icons don’t come with baked in shadows and this makes icons easier to draw and ensures consistent shadows.
Another cornerstone of this initiative is reducing the number of icons to be drawn: From now on, you only need one full color icon and a monochrome symbolic icon.
The color icon is optimized for 64px (with a nominal size of 128px for historical reasons), but the simple geometric style without 1px strokes means that it also looks good larger and smaller.


Welcome to the Future
Having this single source of truth makes it orders of magnitude easier to iterate on different metaphors for individual icons, update the style as a whole, and a number of other exciting things we’re working towards.
We’ve also been working on improving design tooling as part of this initiative. Icon Preview, a new app by Zander Brown, is designed to make the icon design workflow smoother and faster. It allows you to quickly get started from a template, preview an icon in various contexts as you’re designing it, and then finally optimizing and exporting the SVG to use in apps. The latter part is not quite ready yet, but the app already works great for the former two use cases.
Let’s Make Beautiful App Icons!
If you’re a graphics designer and wish to bring consistency to the world of application icons, familiarize yourselves with the style, grab Icon Preview, Inkscape and instead of patching up poor icons downstream with icon themes, please come join us make beautiful upstream application icons!