
 sebas
sebasLunar Eclipse Blood Moon

Tonight, I spent some time on the balkony with my SLR, a glass of Shiraz and the most significant lunar eclipse of the century.

The first steps to a more modern infrastructure
Introduction
This is a small write-up of our ongoing effort to move our infrastructure to modern technologies like Kubernetes. It all started a bit before the Hack Week 17 with the microservices and serverless for the openSUSE.org infrastructure project. As it mentions, the trigger behind it is that our infrastructure is getting bigger and more complicated, so the need to migrate to a better solution is also increasing. Docker containers and Kubernetes (for container orchestration) seemed like the proper ones, so after reading tutorials and docs, it was time to get our hands dirty!
Installing and experimenting with Kubernetes / CaaSP
We started by installing the SUSE CaaSP product on the internal Heroes VLAN. It provides an additional admin node which sets up the Kubernetes cluster. The cluster is not that big for now. It consists of the admin node, three kube-master nodes behind a load balancer and four kube-minions (workers). The product was in version 2 when we started, but version 3 became available which is the one we're using right now. It worked flawlessly, and we were even able to install the Kubernetes dashboard on top of it, which was our first Kubernetes-hosted webapp.
Since the containers inside Kubernetes are on their own internal network, we needed also a loadbalancer to expose the services to our VPN. Thus, we experimented with Ingress for load balancing of the applications deployed inside Kubernetes, also successfully. A lot of experiments around deployments, scaling and permissions took place afterwards, to get us more familiarized with the new concepts, which of course ended up in us destroying our cluster multiple times. We were surprised to see though the self-healing mechanisms taking over.
Although the experiments took place only with static pages so far, it still allowed us to learn a lot about Docker itself, eg how to create our own images and deploy them to our cluster. It's worth also mentioning the amazing kctl tool, just take a look at its README to realize how much more useful it is compared to the official kubectl.
Time to move to the next layer.
Installing and experimenting with Cloud Foundry / CAP
The next step was to install yet another SUSE product, this time the Cloud Application Platform, which offers a Platform as a Service solution based on the software named Cloud Foundry. The first blocker was met here though. CAP requires a working Kubernetes storageclass, which means that we needed to have a persistent storage backend. A good solution would be to use a distributed filesystem solution like Ceph, but due to the time limitations of Hack Week, we decided to go with a simpler solution for now, and the simplest was an NFS server. The CAP installation was smooth from that point, and we managed to login to our Cloud Foundry installation via the command line tool, as well as via the Stratos webUI. A wildcard domain *.cf.mydomain.tld was also needed here.
The idea was quite straightforward here: go to your git repository, and type a simple command like: cf push -m 256M -k 512M myapp. This would deploy a new app directly to Cloud Foundry, giving it 256MB of RAM and 512MB of disk space. As a bonus, it created a domain myapp.cf.domain.tld immediately! So the benefits here were quite obvious, no need to build our own container image with the app and set up a mechanism to deploy it, and no need for the manual step of setting up a DNS. The Ingress LB for Kubernetes that was mentioned before is also obsolete now, as Cloud Foundry handles this as well. The command cf scale could also give us the ability to scale up/down (increase/decrease memory/disk) or scale in/out (increase/decrease number of instances) as well.
Time for stress testing
Hack Week 17 was over, so the next days we deployed a few static apps (and one dynamic that needed also a memcached backend), by giving them the absolute minimal disk/RAM (around 10MB ram and 10MB to 256MB disk, depending on the webapp). We triggered a number of bots that started requesting the webpages in a loop, and the results were really impressive: even with such minimal resources and only one instance running, we saw only an increase on the CPU usage to max 15%!
As a second step, we put some static webapps of low importance running in the cluster and we let them public. We're not going to reveal which ones yet though, feel free to guess :) We plan to monitor the resource usage and activity for a few days, and if everything is fine to even put some more important webapps in.
Future tasks
There are a lot of future tasks that need to be resolved before we fully hit production. First of all, as mentioned, the NFS storageclass needs to be replaced with a proper distributed filesystem solution. SUSE Enterprise Storage product is a good candidate for it. Furthermore, we'd need to integrate our LDAP server with both CaaSP and CAP accounts. Last but not least, we are very close on making dynamic webpages with relational database needs working.
The overall progress is tracked in a trello board, and of course the internal heroes documentation has more info about the setup. Volunteers are always welcome, feel free to contact us in case you'd like to jump onboard.
Thanks to anybody who helped on setting up the cluster, the SUSE CaaSP and CAP teams for replying to our tons of questions. Special thanks go to Dimitris Karakasilis and Panagiotis Georgiadis for joining me before, during and after Hack Week 17 and still being around, making this from a simple idea to a production-ready project.
On behalf of the openSUSE Heroes team,
Theo Chatzimichos

 Member
I'm going to Akademy, again
A little bit less than a month and I will be at Akademy again, KDE's annual conference. This is the place where you can meet one of the most amazing open source communities. To me it's kind of my home community. This is where I have learned a lot about open source, where I contributed tons of code and other work, where I met a lot of awesome friends. I have been to most Akademy events, including the first KDE conference "Kastle" in 2003. But I missed the one last year. I'm more than happy to be back this year in Vienna on August 11.

Akademy will start with the conference on the weekend, August 11-12. I was in the program committee this year and I think we have put together an exciting program. You will see what's going on in KDE, what the community is doing on their goals of privacy, community onboarding, and productivity, hear about the activities of KDE e.V., get to know some of the students who work as part of one of the mentoring programs such as the Google Summer of Code, and much more.
It's a special honor to me to present the Akademy Awards this year together with my fellow award winners from last year. It was hard to choose because there are so many people who do great stuff in KDE. But we have identified a set of people who definitely deserve this prize. Join us at the award ceremony to find out who they are.
Being at Akademy is always special. It's such an amazing group of people hold together by a common idea, culture, and passion. You could never hire such a fantastic group. So I feel lucky that I got and took the opportunity to work with many of these people over the years.
It's also very rewarding to see new people join the community. Akademy always has this special mix of KDE dinosaurs, the young fresh people who just joined, and everything in between. The mentoring KDE does with great care and enthusiasm pays off, with interest.
Vienna is calling. I'll quickly answer the call. See you there.

A hash table re-hash
Hash tables! They're everywhere. They're also pretty boring, but I've had GLib issue #1198 sitting around for a while, and the GNOME move to GitLab resulted in a helpful reminder (or two) being sent out that convinced me to look into it again with an eye towards improving GHashTable and maybe answering some domain-typical questions, like "You're using approach X, but I've heard approach Y is better. Why don't you use that instead?" and "This other hash table is 10% faster in my extremely specific test. Why is your hash table so bad?".
And unfairly paraphrased as those questions may be, I have to admit I'm curious too. Which means benchmarks. But first, what exactly makes a hash table good? Well, it depends on what you're looking for. I made a list.
A miserable pile of tradeoffs
AKA hard choices. You have to make them.
Simple keys vs. complex keys: The former may be stored directly in the hash table and are quick to hash (e.g. integers), while the latter may be stored as pointers to external allocations requiring a more elaborate hash function and additional memory accesses (e.g. strings). If you have complex keys, you'll suffer a penalty on lookups and when the hash table is resized, but this can be avoided by storing the generated hash for each key. However, for simple keys this is likely a waste of memory.
Size of the data set: Small data sets may fit entirely in cache memory. For those, a low instruction count can be beneficial, but as the table grows, memory latency starts to dominate, and you'll get away with more complex code. The extra allowance can be used to improve cache efficiency, perhaps with bucketization or some other fancy scheme. If you know the exact size of the data set in advance, or if there's an upper bound and memory is not an issue, you can avoid costly resizes.
Speed vs. memory generally: There are ways to trade off memory against speed directly. Google Sparsehash is an interesting example of this; it has the ability to allocate the table in small increments using many dynamically growing arrays of tightly packed entries. The arrays have a maximum size that can be set at compile time to yield a specific tradeoff between access times and per-entry memory overhead.
Distribution robustness: A good hash distribution is critical to preventing performance oopsies and, if you're storing untrusted input, thwarting deliberate attacks. This can be costly in the average case, though, so there's a gradient of approaches with power-of-two-sized tables and bitmask moduli at the low end, more elaborate hash functions and prime moduli somewhere in the middle, and cryptographically strong, salted hashes at the very high end. Chaining tables have an additional advantage here, since they don't have to deal with primary clustering.
Mode of operation: Some tables can do fast lookups, but are slower when inserting or deleting entries. For instance, a table implementing the Robin Hood probing scheme with a high load factor may require a large number of entries to be shifted down to make room for an insertion, while lookups remain fast due to this algorithm's inherent key ordering. An algorithm that replaces deleted entries with tombstones may need to periodically re-hash the entire table to get rid of those. Failed lookups can be much slower than successful ones. Sometimes it makes sense to target specific workloads, like the one where you're filtering redundant entries from a dataset and using a hash table to keep track of what you've already seen. This is pretty common and requires insertion and lookup to be fast, but not deletion. Finally, there are more complex operations with specific behavior for key replacement, or iterating over part of the dataset while permuting it somehow.
Flexibility and convenience: Some implementations reserve part of the keyspace for internal use. For instance, Google Sparsehash reserves two values, one for unused entries and one for tombstones. These may be -1 and -2, or perhaps "u" and "t" if your keys are strings. In contrast, GHashTable lets you use the entire keyspace, including storing a value for the NULL key, at the cost of some extra bookkeeping memory (basically special cases of the stored hash field — see "complex keys" above). Preconditions are also nice to have when you slip up; the fastest implementations may resort to undefined behavior instead.
GC and debugger friendliness: If there's a chance that your hash table will coexist with a garbage collector, it's a good idea to play nice and clear keys and values when they're removed from the table. This ensures you're not tying up outside memory by keeping useless pointers to it. It also lets memory debuggers like Valgrind detect more leaks and whatnot. There is a slight speed penalty for doing this.
Other externalities: Memory fragmentation, peak memory use, etc. goes here. Open addressing helps with the former, since the hash table then only makes a few big allocations which the allocator can satisfy with mmap() and simply munmap() when they're not needed anymore. Chaining hash tables make lots of heap allocations, which can get interspersed with other allocations leaving tiny holes all over when freed. Bad!
A note on benchmarks
This isn't the first time, or the second time, or likely even the 100th time someone posts a bunch of hash table benchmarks on the Internet, but it may be the second or third time or so that GHashTable makes an appearance. Strange maybe, given its install base must number in the millions — but on the other hand, it's quite tiny (and boring). The venerable hash table benchmarks by Nick Welch still rule the DuckDuckGo ranking, and they're useful and nice despite a few significant flaws: Notably, there's a bug that causes the C++ implementations to hash pointers to strings instead of the strings themselves, they use virtual size as a measure of memory consumption, and they only sample a single data point at the end of each test run, so there's no intra-run data.
He also classifies GHashTable as a "Joe Sixpack" of hash tables, which is uh… pretty much what we're going for! See also: The Everyman's Hash Table (with apologies to Philip).
Anyway. The first issue is easily remedied by using std::string in the C++ string tests. Unfortunately, it comes with extra overhead, but I think that's fair when looking at out-of-the-box performance.
The second issue is a bit murkier, but it makes sense to measure the amount of memory that the kernel has to provide additional physical backing for at runtime, i.e. memory pages dirtied by the process. This excludes untouched virtual memory, read-only mappings from shared objects, etc. while still capturing the effects of allocator overhead and heap fragmentation. On Linux, it can be read from /proc/<pid>/smaps as the sum of all Private_Dirty and Swap fields. However, polling this file has a big impact on performance and penalizes processes with more mappings unfairly, so in the end I settled on the AnonRSS field from /proc/<pid>/status, which works out to almost the same thing in practice, but with a lower and much more fair penalty.
In order to provide a continuous stream of samples, I wrote a small piece of C code that runs each test in a child process while monitoring its output and sampling AnonRSS a hundred times or so per second. Overkill, yes, but it's useful for capturing those brief memory peaks. The child process writes a byte to stdout per 1000 operations performed so we can measure progress. The timestamps are all in wall-clock time.
The tests themselves haven't changed that much relative to Welch's, but I added some to look for worst-case behavior (spaced integers, aging) and threw in khash, a potentially very fast C hash table. I ran the below benchmarks on an Intel i7-4770 Haswell workstation. They should be fairly representative of modern 64-bit architectures.
Some results
As you may have gathered from the above, it's almost impossible to make an apples-to-apples comparison. Benchmarks don't capture every aspect of performance, and I'm not out to pick on any specific implementation, YMMV, etc. With that in mind, we can still learn quite a bit.
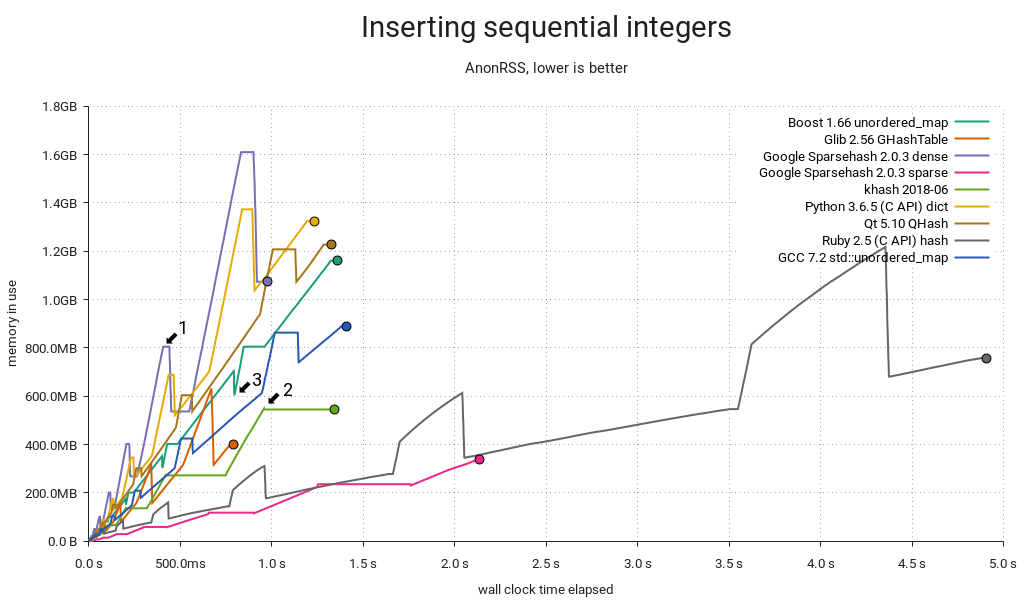
"Sequential" here means {1, 2, …}. The integer tests all map 64-bit integers to void *, except for the Python one, which maps PyLong_FromLong() PyObjects to a single shared PyObject value created in the same manner at the start of the test. This results in an extra performance hit from the allocator and type system, but it's a surprisingly good showing regardless. Ruby uses INT2FIX() for both, which avoids extra allocations and makes for a correspondingly low memory overhead. Still, it's slow in this use case. GHashTable embeds integers in pointers using GINT_TO_POINTER(), but this is only portable for 32-bit integers.
When a hash table starts to fill up, it must be resized. The most common way to do this is to allocate the new map, re-inserting elements from the old map into it, and then freeing the old map. Memory use peaks when this happens (1) because you're briefly keeping two maps around. I already knew that Google Sparsehash's sparse mode allows it to allocate and free buckets in small increments, but khash's behavior (2) surprised me — it realloc()s and rearranges the key and value arrays in-place using an eviction scheme. It's a neat trick that's probably readily applicable in GHashTable too.
Speaking of GHashTable, it does well. Suspiciously well, in fact, and the reason is g_direct_hash() mapping input keys {1, 2, …} to corresponding buckets {1, 2, …} hitting the same cache lines repeatedly. This may sound like a good thing, but it's actually quite bad, as we'll see later in this post. Normally I'd expect khash to be faster, but its hash function is not as cache-friendly:
#define kh_int64_hash_func(key) (khint32_t)((key)>>33^(key)^(key)<<11)
Finally, it's worth mentioning Boost's unique allocation pattern (3). I don't know what's going on there, but if I had to guess, I'd say it keeps supplemental map data in an array that can simply be freed just prior to each resize.
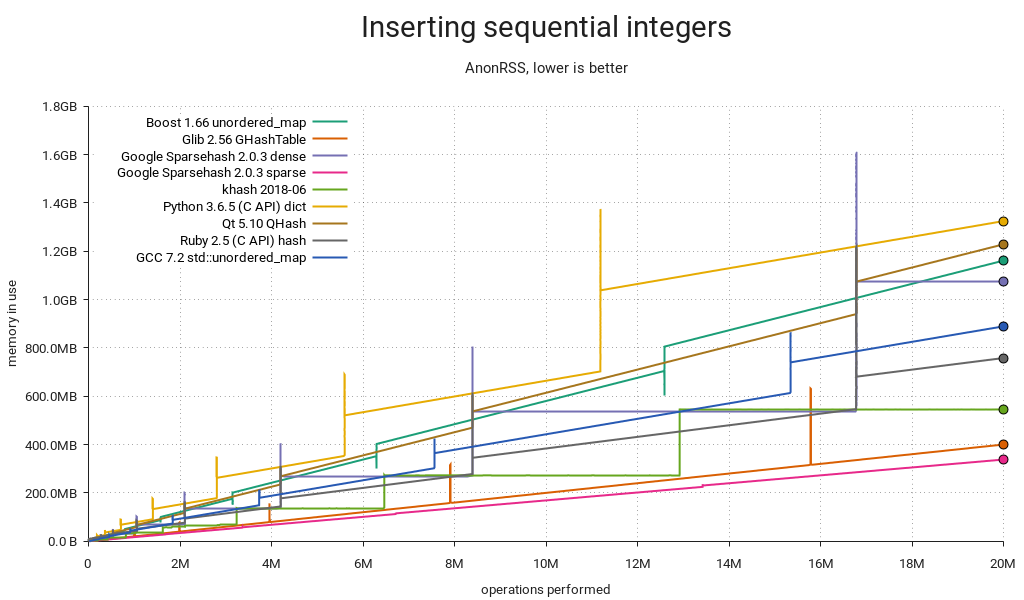
This is essentially the same plot, but with the time dimension replaced by insertion count. It's a good way to directly compare the tables' memory use over their life cycles. Again, GHashTable looks good due to its dense access pattern, with entries concentrated in a small number of memory pages.
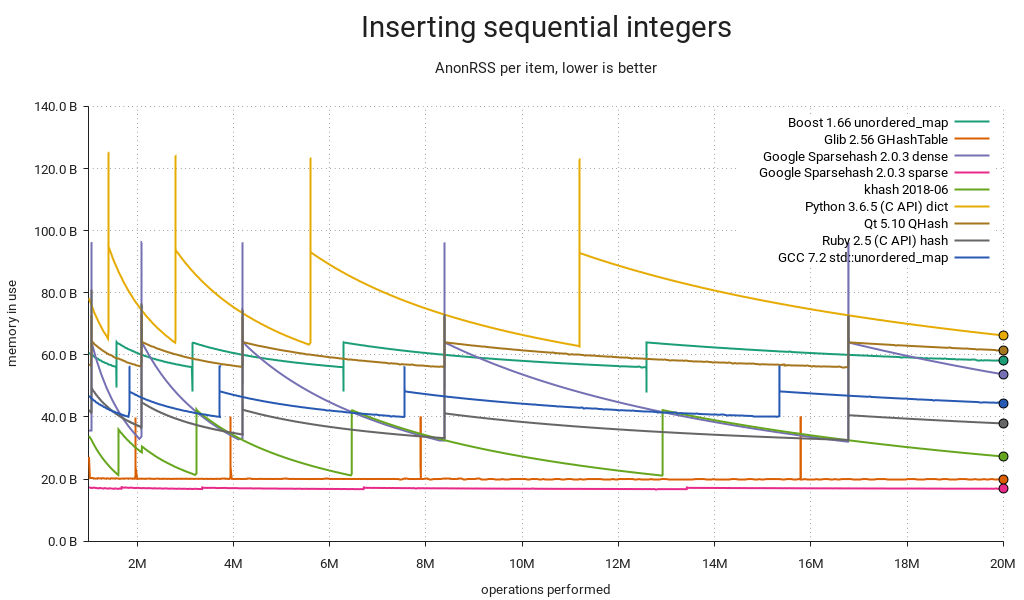
Yet another way of slicing it. This one's like the previous plot, but the memory use is per item held in the table. The fill-resize cycles are clearly visible. Sparsehash (sparse) is almost optimal at ~16 bytes per item, while GHashTable also stores its calculated hashes, for an additional 4 bytes.
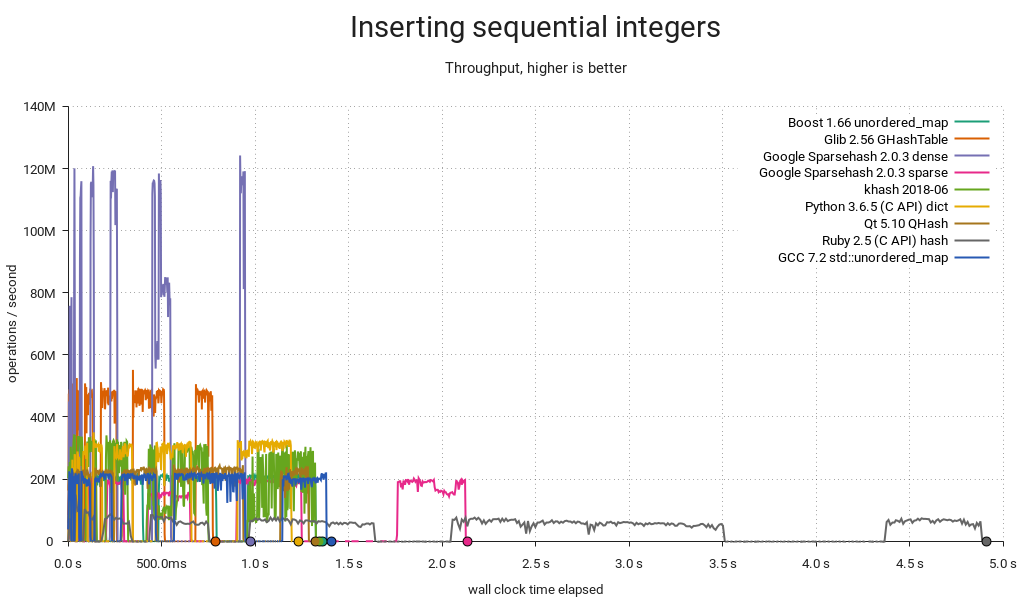
Still noisy even after gnuplot smoothing, this is an approximation of the various tables' throughput over time. The interesting bits are kind of squeezed in there at the start of the plot, so let's zoom in…
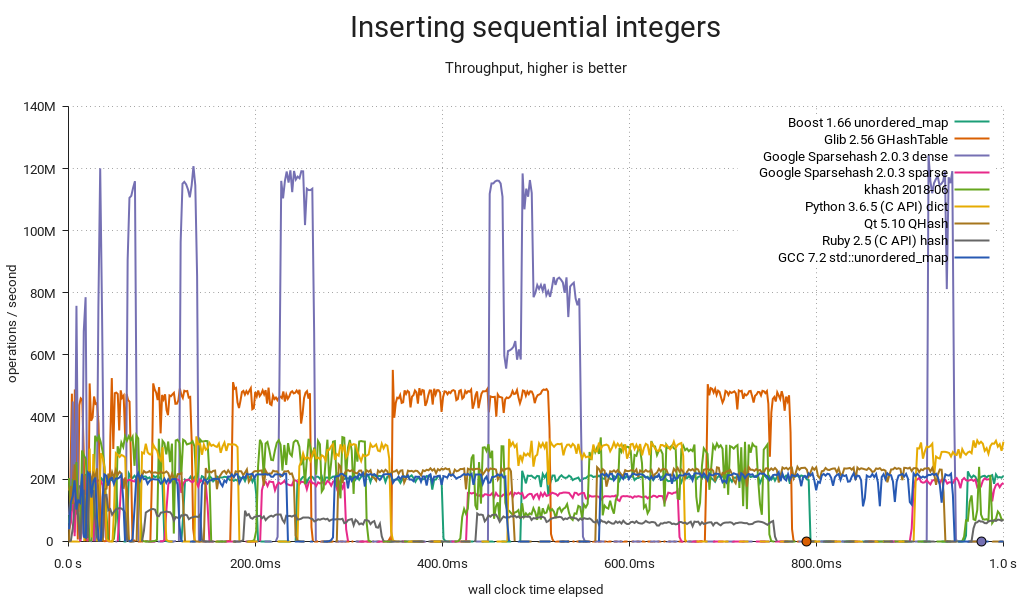
Hash table operations are constant time, right? Well — technically yes, but if you're unlucky and your insertion triggers a resize, you may end up waiting for almost as long as all the previous insertions put together. If you need predictable performance, you must either find a way to set the size in advance or use a slower-and-steadier data structure. Also noteworthy: Sparsehash (dense) is by far the fastest at peak performance, but it struggles a bit with resizes and comes in second.
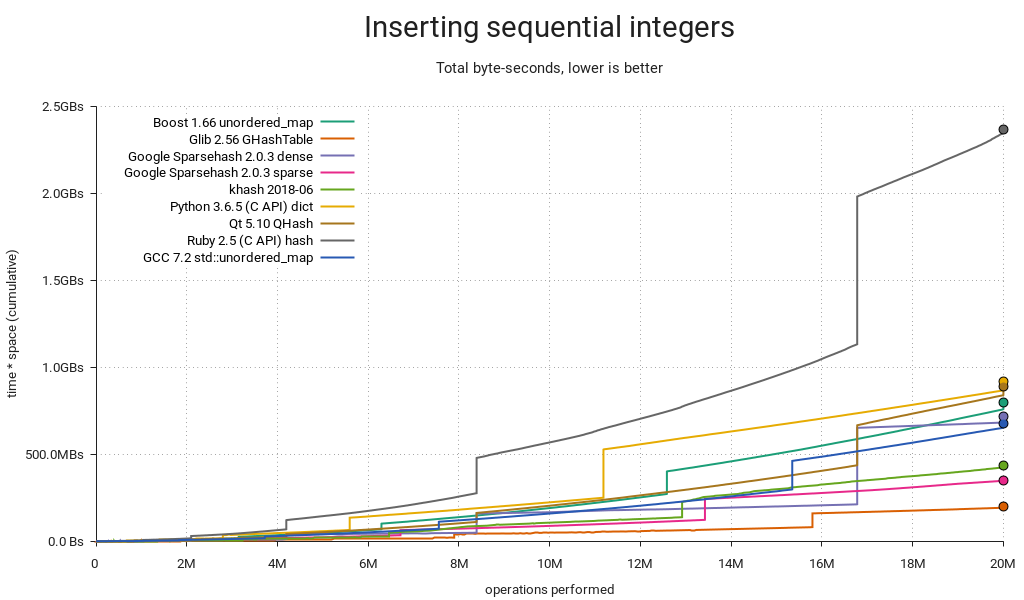
This one merits a little extra explanation: Some hash tables are fast and others are small, but how do you measure overall resource consumption? The answer is to multiply time by memory, which gets you a single dimension measured in byte-seconds. It's more abstract, and it's not immediately obvious if a particular Bs measurement is good or bad, but relatively it makes a lot of sense: If you use twice as much memory as your competitor, you can make up for it by being twice as fast. Since both resources are affected by diminishing returns, a good all-rounder like GHashTable should try to hit the sweet spot between the two.
Memory use varies over time, and consequently it's not enough to multiply the final memory consumption by total run time. What you really want is the area under the graph in the first plot (memory use over time), and you get there by summing up all the little byte-second slices covered by your measurements. You plot the running sum as you sweep from left to right, and the result will look like the above.
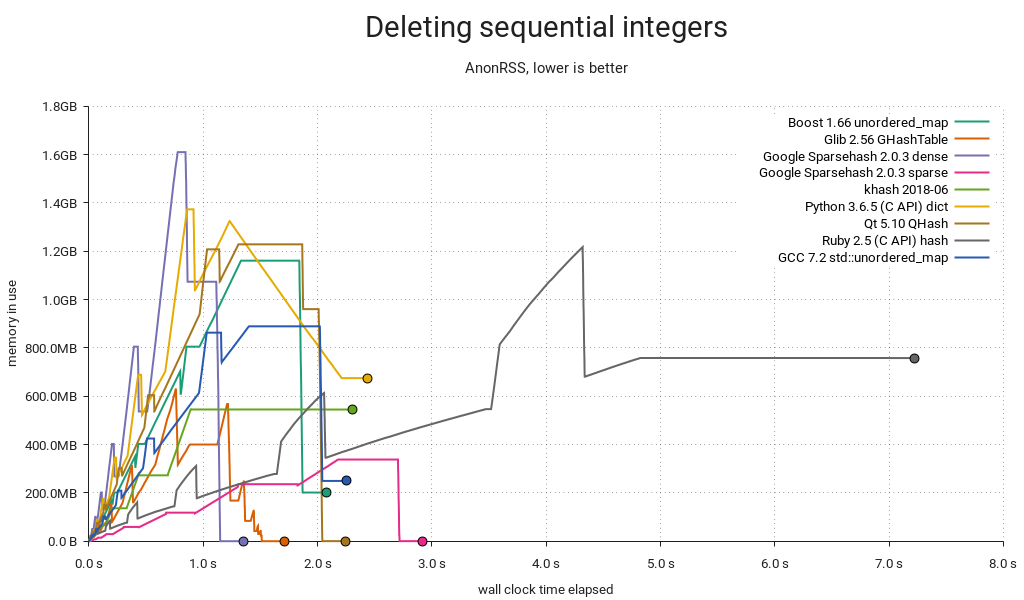
It's not enough to just insert items, sometimes you have to delete them too. In the above plot, I'm inserting 20M items as before, and then deleting them all in order. The hash table itself is not freed. As you can probably tell, there's a lot going on here!
First, this is unfair to Ruby, since I suspect it needs a GC pass and I couldn't find an easy way to do it from the C API. Sorry. Python's plot is weird (and kind of good?) — it seems like it's trimming memory in small increments. In GLib land, GHashTable dutifully shrinks as we go, and since it keeps everything in a handful of big allocations that can be kept in separate memory maps, there is minimal heap pollution and no special tricks needed to return memory to the OS. Sparsehash only shrinks on insert (this makes it faster), so I added a single insert after the deletions to help it along. I also put in a malloc_trim(0) without which the other C++ implementations would be left sitting on a heap full of garbage — but even with the trim in, Boost and std::unordered_map bottom out at ~200MB in use. khash is unable to shrink at all; there's a TODO in the code saying as much.
You may have noticed there are horizontal "tails" on this one — they're due to a short sleep at the end of each test to make sure we capture the final memory use.
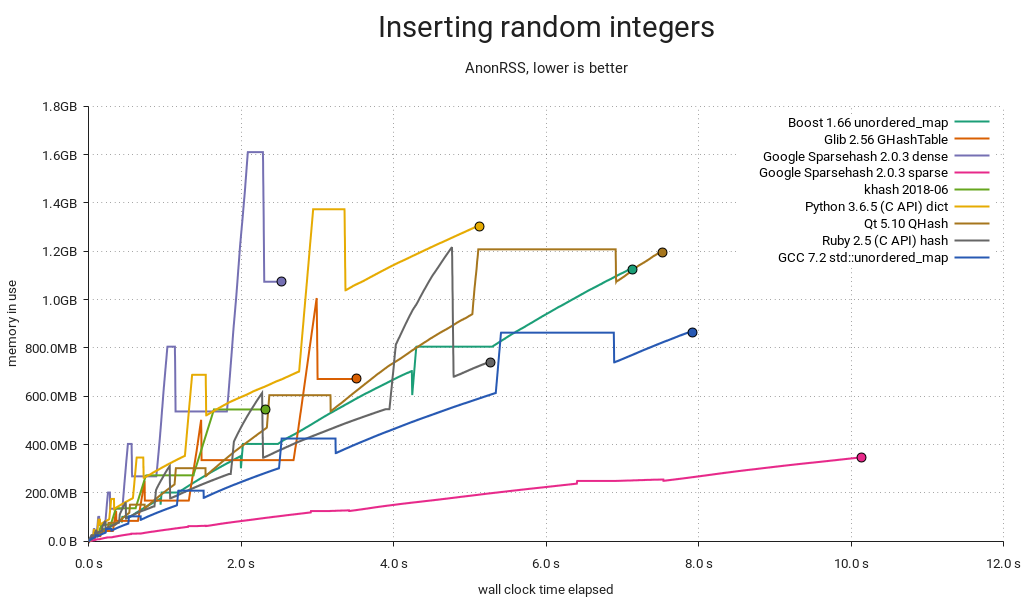
Another insertion test, but instead of a {1, 2, …} sequence it's now integers pseudorandomly chosen from the range [0 .. 2²⁸-1] with a fixed seed. Ruby performs about the same as before, but everyone else got slower, putting it in the middle of the pack. This is also a more realistic assessment of GHashTable. Note that we're making calls to random() here, which adds a constant overhead — not a big problem, since it should affect everyone equally and we're not that interested in absolute timings — but a better test might use a pregenerated input array.
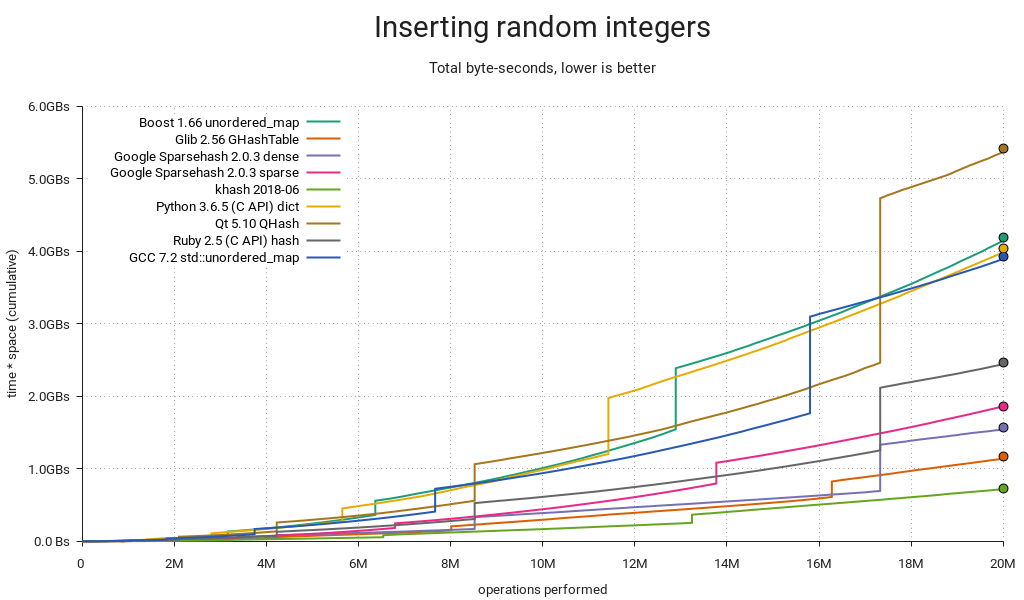
GHashTable is neck-and-neck with Sparsehash (dense), but they're both outmatched by khash.
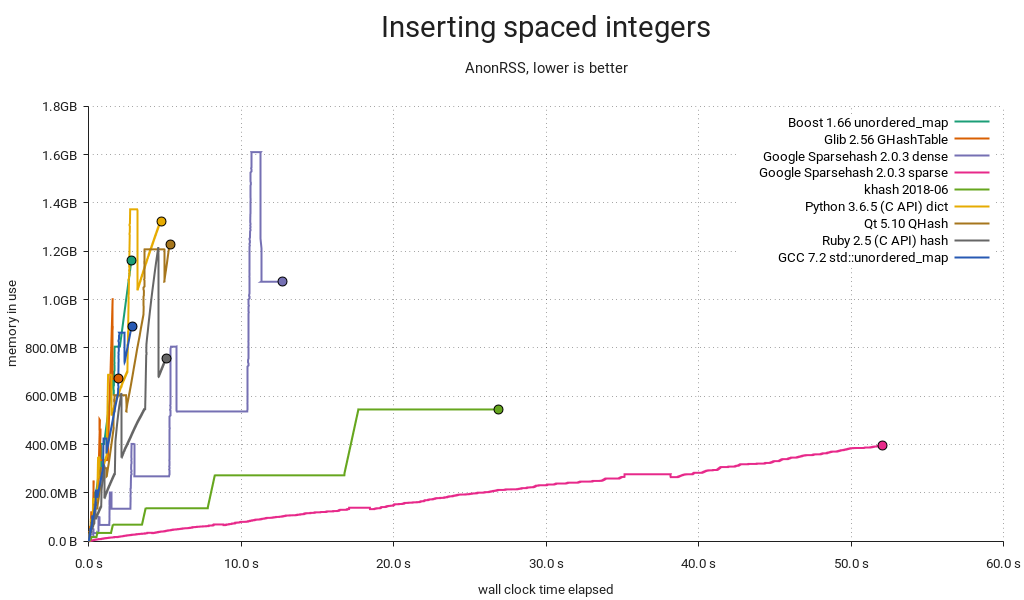
With spaced integers in the sequence {256, 512, 768, …}, the wheels come off Sparsehash and khash. Both implementations use table sizes that are powers of two, likely because it makes the modulo operation faster (it's just a bitmask) and because they use quadratic probing, which is only really efficient in powers of two. The downside is that integers with equal low-order bits will be assigned to a small number of common buckets forcing them to probe a lot.
GHashTable also uses quadratic probing in a power-of-two-sized table, but it's immune to this particular pattern due to a twist: For each lookup, the initial probe is made with a prime modulus, after which it switches to a bitmask. This means there is a small number of buckets unreachable to the initial probe, but this number is very small in practice. I.e. for the first few table sizes (8, 16, 32, 64, 128, 256), the number of unreachable buckets is 1, 3, 1, 3, 1, and 5. Subsequent probing will reach these.
So how likely is this kind of key distribution in practice? I think it's fairly likely. One example I can think of is when your keys are pointers. This is reasonable enough when you're keeping sets of objects around and you're only interested in knowing whether an object belongs to a given set, or maybe you're associating objects with some extra data. Alignment ensures limited variation in the low-order key bits. Another example is if you have some kind of sparse multidimensional array with indexes packed into integer keys.
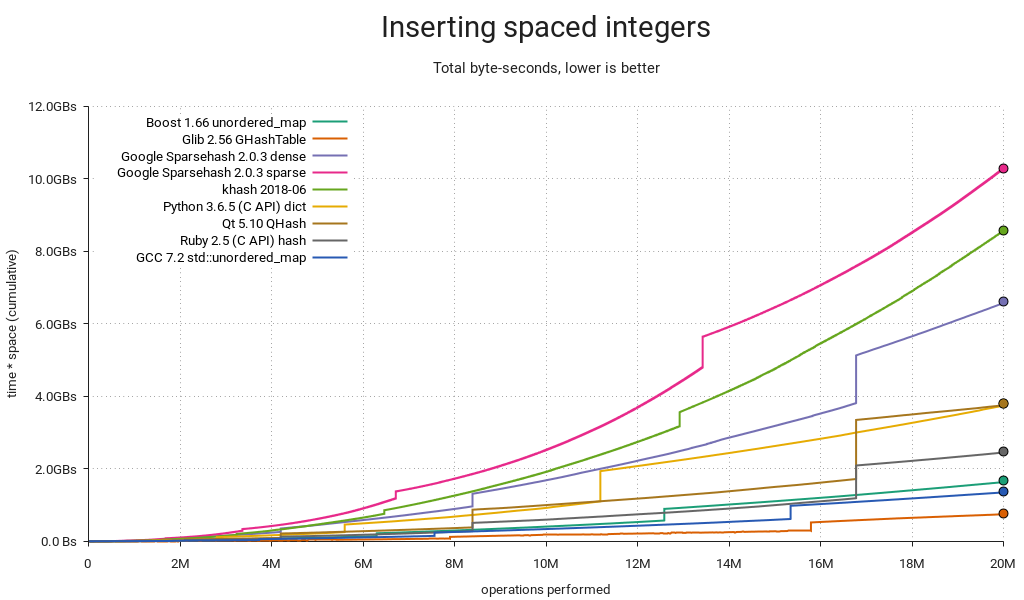
Total resource consumption is as you'd expect. I should add that there are ways around this — Sparsehash and khash will both let you use a more complex hash function if you supply it yourself, at the cost of lower performance in the general case.
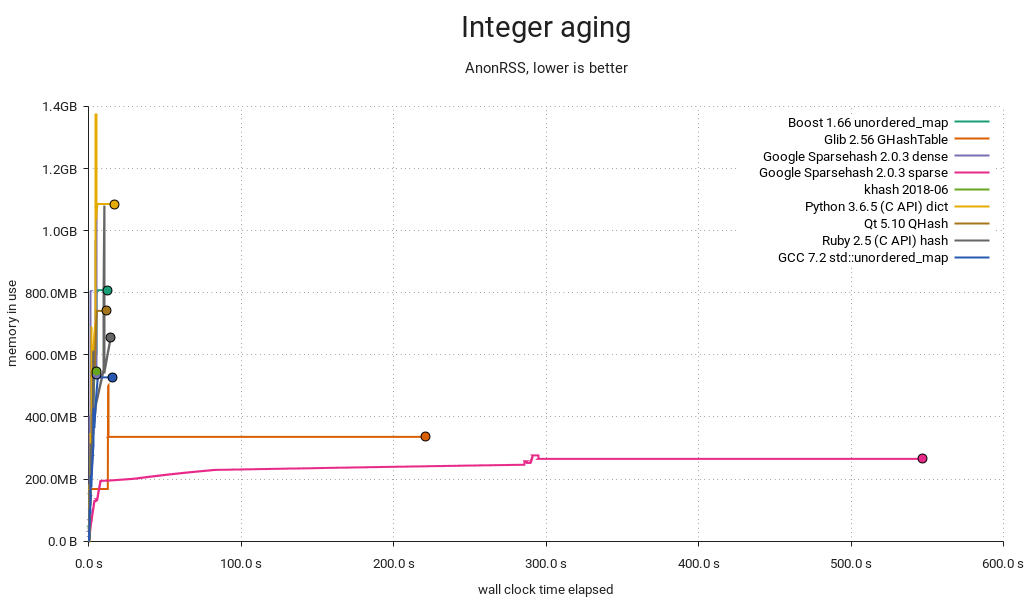
Yikes! This is the most complex test, consisting of populating the table with 20M random integers in the range 0-20M and then aging it by alternatingly deleting and inserting random integers for another 20M iterations. A busy database of objects indexed by integer IDs might look something like this, and if it were backed by GHashTable or Sparsehash (sparse), it'd be a painfully slow one. It's hard to tell from the plot, but khash completes in only 4s.
Remember how I said GHashTable did suspiciously well in the first test? Well,

We're paying the price. When there are a lot of keys smaller than the hash table modulus, they tend to concentrate in the low-numbered buckets, and when tombstones start to build up it gets clogged and probes take forever. Fortunately this is easy to fix — just multiply the generated hashes by a small, odd number before taking the modulo. The compiler reduces the multiplication to a few shifts and adds, but cache performance suffers slightly since keys are now more spread out.
On a happier note…
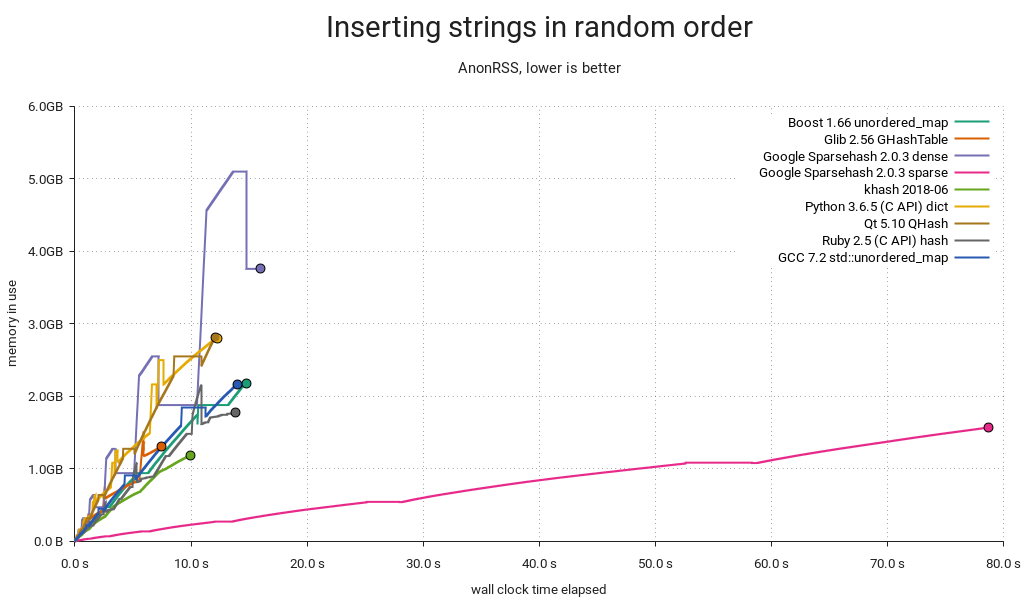
All the tests so far have been on integer keys, so here's one with strings of the form "mystring-%d" where the decimal part is a pseudorandomly chosen integer in the range [0 .. 2³¹-1] resulting in strings that are 10-19 bytes long. khash and GHashTable, being the only tables that use plain C strings, come out on top. Ruby does okay with rb_str_new2(), Python and QHash are on par using PyDict_SetItemString() and QString respectively. The other C++ implementations use std::string, and Sparsehash is really not loving it. It almost looks like there's a bug somewhere — either it's copying/hashing the strings too often, or it's just not made for std::string. My impression based on a cursory search is that people tend to write their own hash functions/adapters for it.
GHashTable's on its home turf here. Since it stores the calculated hashes, it can avoid rehashing the keys on resize, and it can skip most full key compares when probing. Longer strings would hand it an even bigger advantage.
Conclusion
This post is really all about the details, but if I had to extract some general lessons from it, I'd go with these:
- Tradeoffs, tradeoffs everywhere.
- Worst-case behavior matters.
- GHashTable is decent, except for one situation where it's patently awful.
- There's some room for improvement in general, cf. robustness and peak memory use.
My hash-table-shootout fork is on Github. I was going to go into detail about potential GHashTable improvements, but I think I'll save that for another post. This one is way too long already. If you got this far, thanks for reading!
Update: There's now a follow-up post.
GSoC Half Way Throug
As you may already know, openSUSE participates again in GSoC, an international program that awards stipends to university students who contribute to real-world open source projects during three months in summer. Our students started working already two months ago. Ankush, Liana and Matheus have passed the two evaluations successfully and they are busy hacking to finish their projects. Go on reading to find out what they have to say about their experience, their projects and the missing work for the few more weeks. :grinning:
Ankush Malik
Ankush is improving people collaboration in the Hackweek tool and he has already made many great contributions like the emoticons, similar project section and notifications features. In fact, the Hackweek 17 was just last week, so in the last days a lot of people have already been using these great new features. There were a lot of good comments about his work! :cupid: and we also received a lot of feedback, as you can for example see in the issues list.
But even more important than all the functionality, is all Ankush is learning while coding and working with his mentors and the openSUSE community, such as working with AJAX in Ruby on Rails, good coding practices and better coding style.
The last part of his project will include some more new features. If you want to find out more about his project and the challenges that Ankush expects to have, read his interesting blog post: https://medium.com/@ankushmalik631/how-my-gsoc-project-is-going-4942614132a2

Xu Liana
Liana is working on integrating Cloud Pinyin (the most popular input method in China) on ibus-libpinyin. For her, GSoC is being an enjoyable learning process full of challenges. With the help of her mentors she has learnt about autotools and she builds now her code without graphical build tools :muscle: For the few more weeks, she plans to learn about algorithmics that are useful for the project and, after finish the coding part, she would like to go deeper in the fundamentals of compiling. Read it from her owns word in her blog post: https://liana.hillwoodhome.net/2018/07/14/the-first-half-of-the-project-during-gsoc-libpinyin
Matheus de Sousa Bernardo
Matheus is working in Trollolo, a cli-tool which helps teams using Trello to organize their work. He has been mainly focused on the restructuring of commands and the incomplete backup feature. The discussion with his mentors made him take different implementation paths than the ones he had in mind at the beginning, learning the importance of keeping things simple. It has been complicated for Matheus to find time for both the GSoC project and his university duties. But he still has some more weeks to implement the more challenging feature, the automation of Trollolo! :boom:
Check his blog post with more details about the project: https://matheussbernardo.me/gsoc/2018/07/08/midterm
I hope you enjoyed reading about the work and experiences of the openSUSE students and mentors. Keep tuned as there are still some more hacking weeks and the students will write a last blog post summarizing their GSoC experience. :wink:

Deploying Samba smb.conf via Group Policy
I’ve been working on Group Policy deployment in Samba. Samba master (not released) currently now installs a samba-gpupdate script, which works similar to gpupdate on Windows (currently in master it defaults to –force, but that changes soon).
Group Policy can also apply automatically by setting the smb.conf option ‘apply group policies’ to yes.
Recently, I’ve written a client side extension (CSE) which applies samba smb.conf settings to client machines. I’ve also written a script which generates admx files for deploying those settings via the Group Policy Management Console.
You can view the source, and follow my progress here: https://gitlab.com/samba-team/samba/merge_requests/32


Hackweek Project Docker Registry Mirror
As part of SUSE Hackweek 17 I decided to work on a fully fledged docker registry mirror.
You might wonder why this is needed, after all it’s already possible to run a docker distribution (aka registry) instance as a pull-through cache. While that’s true, this solution doesn’t address the needs of more “sophisticated” users.
The problem
Based on the feedback we got from a lot of SUSE customers it’s clear that a simple registry configured to act as a pull-through cache isn’t enough.
Let’s go step by step to understand the requirements we have.
On-premise cache of container images
First of all it should be possible to have a mirror of certain container images locally. This is useful to save time and bandwidth. For example there’s no reason to download the same image over an over on each node of a Kubernetes cluster.
A docker registry configured to act as a pull-through cache can help with that. There’s still need to warm the cache, this can be left to the organic pull of images done by the cluster or could be done artificially by some script run by an operator.
Unfortunately a pull-through cache is not going to solve this problem for nodes running inside of an air-gapped environment. Nodes operated in such an environment are located into a completely segregated network, that would make it impossible for the pull-through registry to reach the external registry.
Retain control over the contents of the mirror
Cluster operators want to have control of the images available inside of the local mirror.
For example, assuming we are mirroring the Docker Hub, an operator might be
fine with having the library/mariadb image but not the library/redis one.
When operating a registry configured as pull-through cache, all the images of
the upstream registry are at the reach of all the users of the cluster. It’s
just a matter of doing a simple docker pull to get the image cached into
the local pull-through cache and sneak it into all the nodes.
Moreover some operators want to grant the privilege of adding images to the local mirror only to trusted users.
There’s life outside of the Docker Hub
The Docker Hub is certainly the most known container registry. However there are
also other registries being used: SUSE operates its own registry, there’s Quay.io,
Google Container Registry (aka gcr) and there are even user operated ones.
A docker registry configured to act as a pull-through cache can mirror only one registry. Which means that, if you are interested in mirroring both the Docker Hub and Quay.io, you will have to run two instances of docker registry pull-through caches: one for the Docker Hub, the other for Quay.io.
This is just overhead for the final operator.
A better solution
During the last week I worked to build a PoC to demonstrate we can create a docker registry mirror solution that can satisfy all the requirements above.
I wanted to have a single box running the entire solution and I wanted all the different pieces of it to be containerized. I hence resorted to use a node powered by openSUSE Kubic.
I didn’t need all the different pieces of Kubernetes, I just needed kubelet so
that I could run it in disconnected mode. Disconnected means the kubelet
process is not connected to a Kubernetes API server, instead it reads PODs
manifest files straight from a local directory.
The all-in-one box
I created an openSUSE Kubic node and then I started by deploying a standard docker registry. This instance is not configured to act as a pull-through cache. However it is configured to use an external authorization service. This is needed to allow the operator to have full control of who can push/pull/delete images.
I configured the registry POD to store the registry data to a directory on the machine by using a Kubernetes hostPath volume.
On the very same node I deployed the authorization service needed by the docker registry. I choose Portus, an open source solution created at SUSE a long time ago.
Portus needs a database, hence I deployed a containerized instance of MariaDB
on the same node. Again I used a Kubernetes hostPath to ensure the persistence
of the database contents. I placed both Portus and its MariaDB instance into the
same POD. I configured MariaDB to listen only to localhost, making it reachable
only by the Portus instance (that’s because they are in the same
Kubernetes POD).
I configured both the registry and Portus to bind to a local unix socket, then I deployed a container running HAProxy to expose both of them to the world.
The HAProxy is the only container that uses the host network. Meaning it’s actually listening on port 80 and port 443 of the openSUSE Kubic node.
I went ahead and created two new DNS entries inside of my local network:
-
registry.kube.lan: this is the FQDN of the registry -
portus.kube.lan: this is the FQDN of portus
I configured both the names to be resolved with the IP address of my container host.
I then used cfssl to generate a CA and
then a pair of certificates and keys for registry.kube.lan and portus.kube.lan.
Finally I configured HAProxy to:
- Listen on port 80 and 443.
- Automatically redirect traffic from port 80 to port 443.
- Perform TLS termination for registry and Portus.
- Load balance requests against the right unix socket using the Server Name Indication (SNI).
By having dedicated FQDN for the registry and Portus and by using HAProxy’s SNI
based load balancing, we can leave the registry listening on a standard port
(443) instead of using a different one (eg: 5000). In my opinion that’s a big
win, based on my personal experience having the registry listen on a non standard
port makes things more confusing both for the operators and the end users.
Once I was over with these steps I was able to log into https://portus.kube.lan
and perform the usual setup wizard of Portus.
Mirroring images
We now have to mirror images from multiple registries into the local one, but how can we do that?
Sometimes ago I stumbled over this tool, which can be used to copy images from multiple registries into a single one. While doing that it can change the namespace of the image to put it all the images coming from a certain registry into a specific namespace.
I wanted to use this tool, but I realized it relies on the docker open-source engine to perform the pull and push operations. That’s a blocking issue for me because I wanted to run the mirroring tool into a container without doing nasty tricks like mounting the docker socket of the host into a container.
Basically I wanted the mirroring tool to not rely on the docker open source engine.
At SUSE we are already using and contributing to skopeo, an amazing tool that allows interactions with container images and container registries without requiring any docker daemon.
The solution was clear: extend skopeo to provide mirroring capabilities.
I drafted a design proposal with my colleague Marco Vedovati, started coding and then ended up with this pull request.
While working on that I also uncovered a small glitch
inside of the containers/image library used by skopeo.
Using a patched skopeo binary (which include both the patches above) I then mirrored a bunch of images into my local registry:
$ skopeo sync --source docker://docker.io/busybox:musl --dest-creds="flavio:password" docker://registry.kube.lan
$ skopeo sync --source docker://quay.io/coreos/etcd --dest-creds="flavio:password" docker://registry.kube.lan
The first command mirrored only the busybox:musl container image from the
Docker Hub to my local registry, while the second command mirrored all the
coreos/etcd images from the quay.io registry to my local registry.
Since the local registry is protected by Portus I had to specify my credentials while performing the sync operation.
Running multiple sync commands is not really practical, that’s why we added
a source-file flag. That allows an operator to write a configuration file
indicating the images to mirror. More on that on a dedicated blog post.
At this point my local registry had the following images:
docker.io/busybox:muslquay.io/coreos/etcd:v3.1quay.io/coreos/etcd:latestquay.io/coreos/etcd:v3.3quay.io/coreos/etcd:v3.3- … more
quay.io/coreos/etcdimages …
As you can see the namespace of the mirrored images is changed to include the FQDN of the registry from which they have been downloaded. This avoids clashes between the images and makes easier to track their origin.
Mirroring on air-gapped environments
As I mentioned above I wanted to provide a solution that could be used also to run mirrors inside of air-gapped environments.
The only tricky part for such a scenario is how to get the images from the upstream registries into the local one.
This can be done in two steps by using the skopeo sync command.
We start by downloading the images on a machine that is connected to the internet. But instead of storing the images into a local registry we put them on a local directory:
$ skopeo sync --source docker://quay.io/coreos/etcd dir:/media/usb-disk/mirrored-images
This is going to copy all the versions of the quay.io/coreos/etcd image into
a local directory /media/usb-disk/mirrored-images.
Let’s assume /media/usb-disk is the mount point of an external USB drive.
We can then unmount the USB drive, scan its contents with some tool, and
plug it into computer of the air-gapped network. From this computer we
can populate the local registry mirror by using the following command:
$ skopeo sync --source dir:/media/usb-disk/mirrored-images --dest-creds="username:password" docker://registry.secure.lan
This will automatically import all the images that have been previously downloaded to the external USB drive.
Pulling the images
Now that we have all our images mirrored it’s time to start consuming them.
It might be tempting to just update all our Dockerfile(s), Kubernetes
manifests, Helm charts, automation scripts, …
to reference the images from registry.kube.lan/<upstream registry FQDN>/<image>:<tag>.
This however would be tedious and unpractical.
As you might know the docker open source engine has a --registry-mirror.
Unfortunately the docker open source engine can only be configured to mirror the
Docker Hub, other external registries are not handled.
This annoying limitation lead me and Valentin Rothberg to create this pull request against the Moby project.
Valentin is also porting the patch against libpod,
that will allow to have the same feature also inside of
CRI-O and podman.
During my experiments I figured some little bits were missing from the original PR.
I built a docker engine with the full patch
applied and I created this /etc/docker/daemon.json configuration file:
{
  "registries": [
    {
      "Prefix": "quay.io",
      "Mirrors": [
        {
          "URL": "https://registry.kube.lan/quay.io"
        }
      ]
    },
    {
      "Prefix": "docker.io",
      "Mirrors": [
        {
          "URL": "https://registry.kube.lan/docker.io"
        }
      ]
    }
  ]
}
Then, on this node, I was able to issue commands like:
$ docker pull quay.io/coreos/etcd:v3.1
That resulted in the image being downloaded from registry.kube.lan/quay.io/coreos/etcd:v3.1,
no communication was done against quay.io. Success!
What about unpatched docker engines/other container engines?
Everything is working fine on nodes that are running this not-yet merged patch, but what about vanilla versions of docker or other container engines?
I think I have a solution for them as well, I’m going to experiment a bit with that during the next week and then provide an update.
Show me the code!
This is a really long blog post. I’ll create a new one with all the configuration files and instructions of the steps I performed. Stay tuned!
In the meantime I would like to thank Marco Vedovati, Valentin Rothberg for their help with skopeo and the docker mirroring patch, plus Miquel Sabaté Solà for his help with Portus.
Detail Considered Harmful
Ever since the dawn of times, we've been crafting pixel perfect icons, specifically adhering to the target resolution. As we moved on, we've kept with the times and added these highly detailed high resolution and 3D modelled app icons that WebOS and MacOS X introduced.


As many moons have passed since GNOME 3, it's fair to stop and reconsider the aesthetic choices we made. We don't actually present app icons at small resolutions anymore. Pixel perfection sounds like a great slogan, but maybe this is another area that dillutes our focus. Asking app authors to craft pixel precise variants that nobody actually sees? Complex size lookup infrastructure that prominent applications like Blender fail to utilize properly?

For the platform to become viable, we need to cater to app developers. Just like Flatpak aims to make it easy to distribute apps, and does it in a completely decetralized manner, we should emphasize with the app developers to design and maintain their own identity.
Having clear and simple guidelines for other major platforms and then seeing our super complicated ones, with destructive mechanisms of theming in place, makes me really question why we have anyone actually targeting GNOME.
The irony of the previous blog post is not lost on me, as I've been seduced by the shading and detail of these highres artworks. But every day it's more obvious that we need to do a dramatic redesign of the app icon style. Perhaps allowing to programatically generate the unstable/nightlies style. Allow a faster turnaround for keeping the style contemporary and in sync what other platforms are doing. Right now, the dated nature of our current guidelines shows.

Time to murder our darlings…
HackWeek 17 - Continuing with the REST API
The Libyui REST API Project
I spent the 17th HackWeek working on the previous project - libyui REST API for testing the applications.
You can read some rationale in the blog post for the previous Hackweek.
In short it allows inspecting the current user interface of a programm via a REST API. The API can be used from many testing frameworks, there is a simple experimental wrapper for the Cucumber framework.
Examples
The REST API can be also used directly from the command line, this is a short example how it works:
First start an YaST module, specify the port which will be used by the REST API:
YUI_HTTP_PORT=14155 /usr/sbin/yast timezone
Inspecting with cURL
Then you can inspect the current dialog directly from the command line
# curl http://localhost:14155/dialog
{
  "class" : "YDialog",
  "hstretch" : true,
  "type" : "main",
  "vstretch" : true,
  "widgets" :
  [
    {
      "class" : "YVBox",
      "help_text" : "...",
      "hstretch" : true,
      "id" : "WizardDialog",
      "vstretch" : true,
      "widgets" :
      [
        {
          "class" : "YReplacePoint",
          "id" : "topmenu",
...
You can also send some action, like pressing the Cancel button:
curl -i -X POST "http://localhost:14155/widgets?action=press_button&label=Cancel"
Using the Cucumber Wrapper
The experimental Cucumber wrapper allows writing the tests in a native English language. The advantage is that people not familiar with YaST internals can write the tests easily. And even non-developers could use it.
Feature: To install the 3rd party packages I must be able to add a new package
  repository to the package management.

  Scenario: Adding a new repository

    Given I start the "/usr/sbin/yast2 repositories" application
    Then the dialog heading should be "Configured Software Repositories"

    When I click button "Add"
    Then the dialog heading should be "Add On Product"

    When I click button "Next"
    Then the dialog heading should be "Repository URL"
    Then continue...
What Has Been Improved
Here is a short summary what has been improved since the last HackWeek.
More Details and More Actions
The HTTP server now returns more details about the UI like the table content, the combo box values, etc… Maybe something is still missing but adding more details for specific widgets should be rather easy.
Also some more actions have been added, now it is possible to set a combo box value or select the active radio button via the REST API.
Processing the Server Requests
Originally the HTTP server was processing the data only when the UI.UserInput
call was waiting for the input. That was quite limiting as the HTTP requests
might have timed out before before reaching that point.
Now the server is responsive also during the other UI calls and even when there is no UI call processed at all. So the API is not blocked when YaST is doing some time consuming action like installing packages. The response now contains the current progress state as displayed in the UI.
Moreover it even works when there is no UI dialog open yet!
# cat ./test.rb
sleep(30)
# YUI_HTTP_PORT=14155 /usr/sbin/yast2 ./test.rb &
[1] 23578
# curl -i "http://localhost:14155/dialog"
HTTP/1.1 404 Not Found
Connection: Keep-Alive
Content-Length: 34
Content-Encoding: application/json
Date: Fri, 13 Jul 2018 05:37:42 GMT

{ "error" : "No dialog is open" }
Text Mode (Ncurses UI) Support
This is the most significant change, now the ncurses texmode UI also supports the embedded REST Server!
So you can see the updated Cucumber test used for testing in the Qt UI from the last HackWeek running in the text mode!
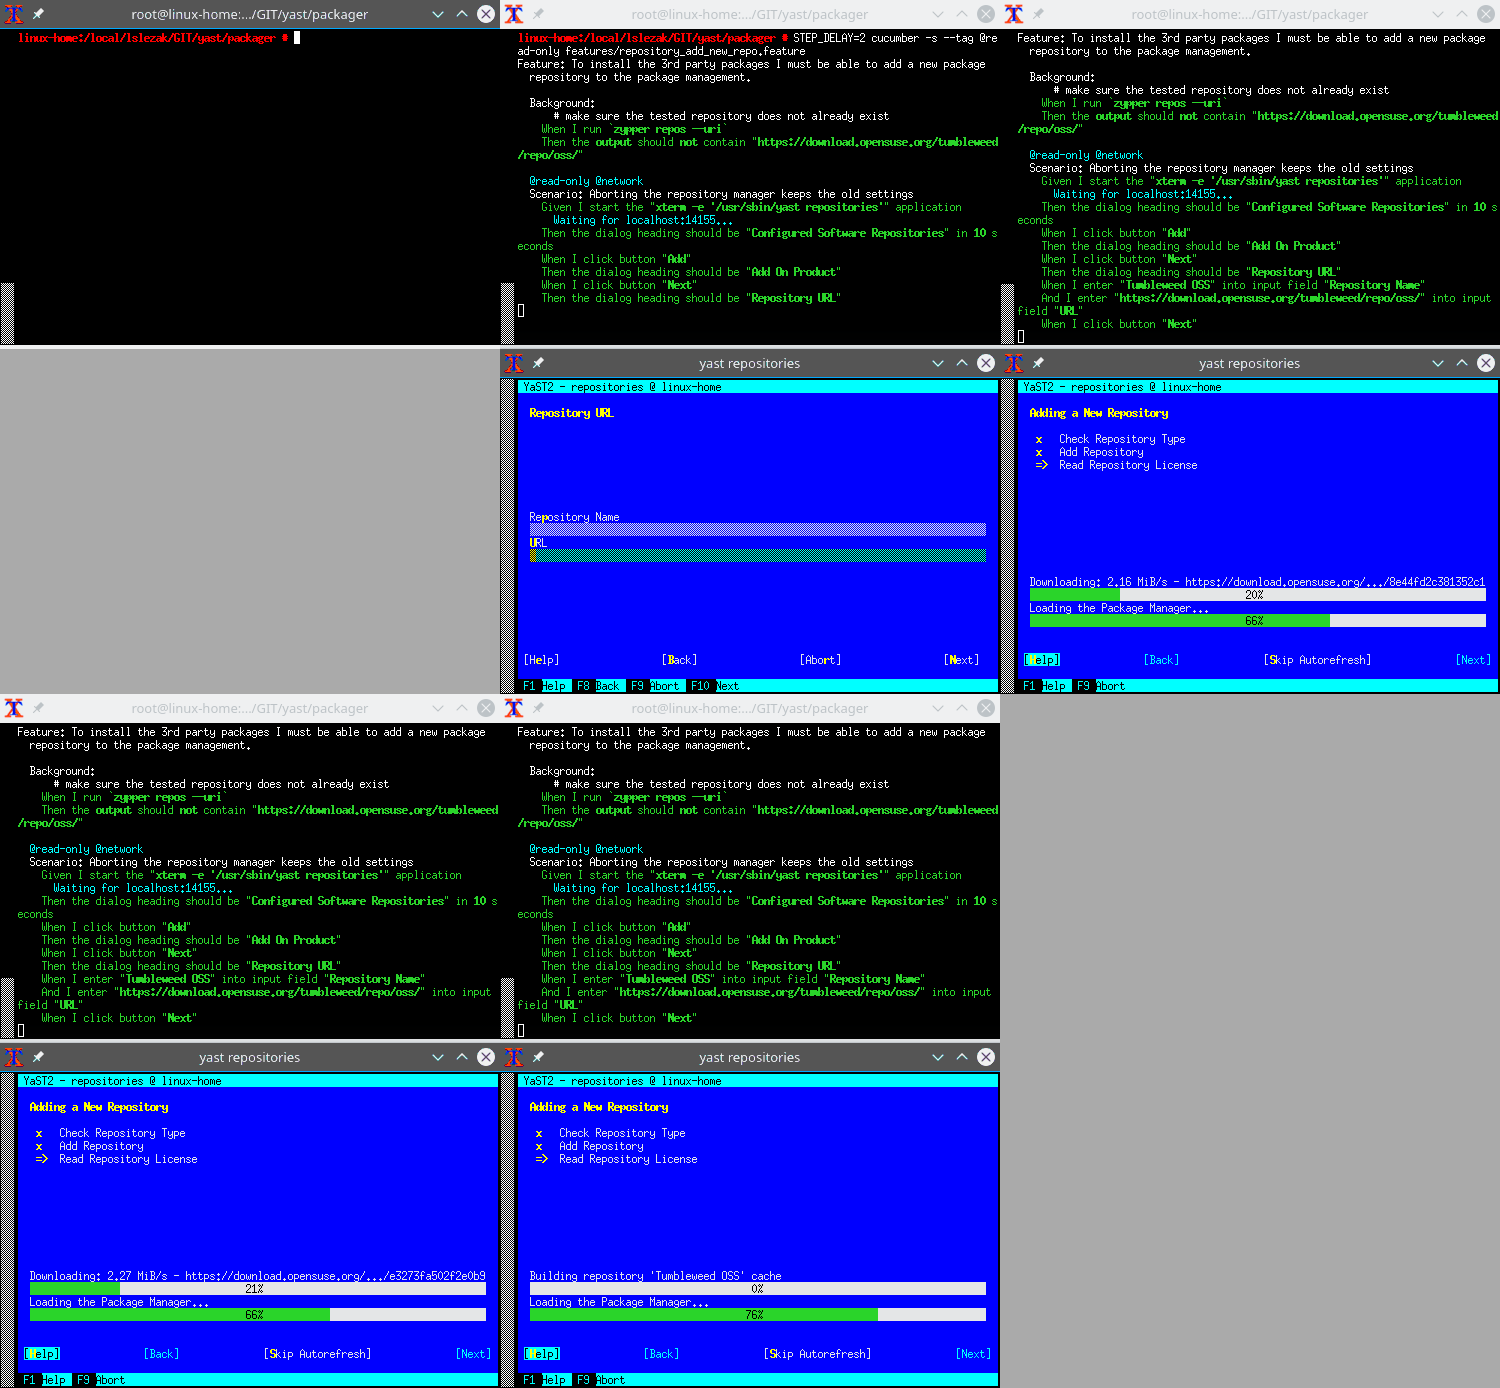
The only problematic part is that the Cucumber and YaST fight for the terminal
output. That means we cannot run the YaST module directly but use some wrapper.
In this case we run it in a new xterm session. But for the real automated
tests it would be better to run it in a screen or tmux session in background
so it works also without any X server.
Also some more complex scenarios work in the text mode, like a complete openSUSE Leap 15.0 installation running inside a VirtualBox VM:
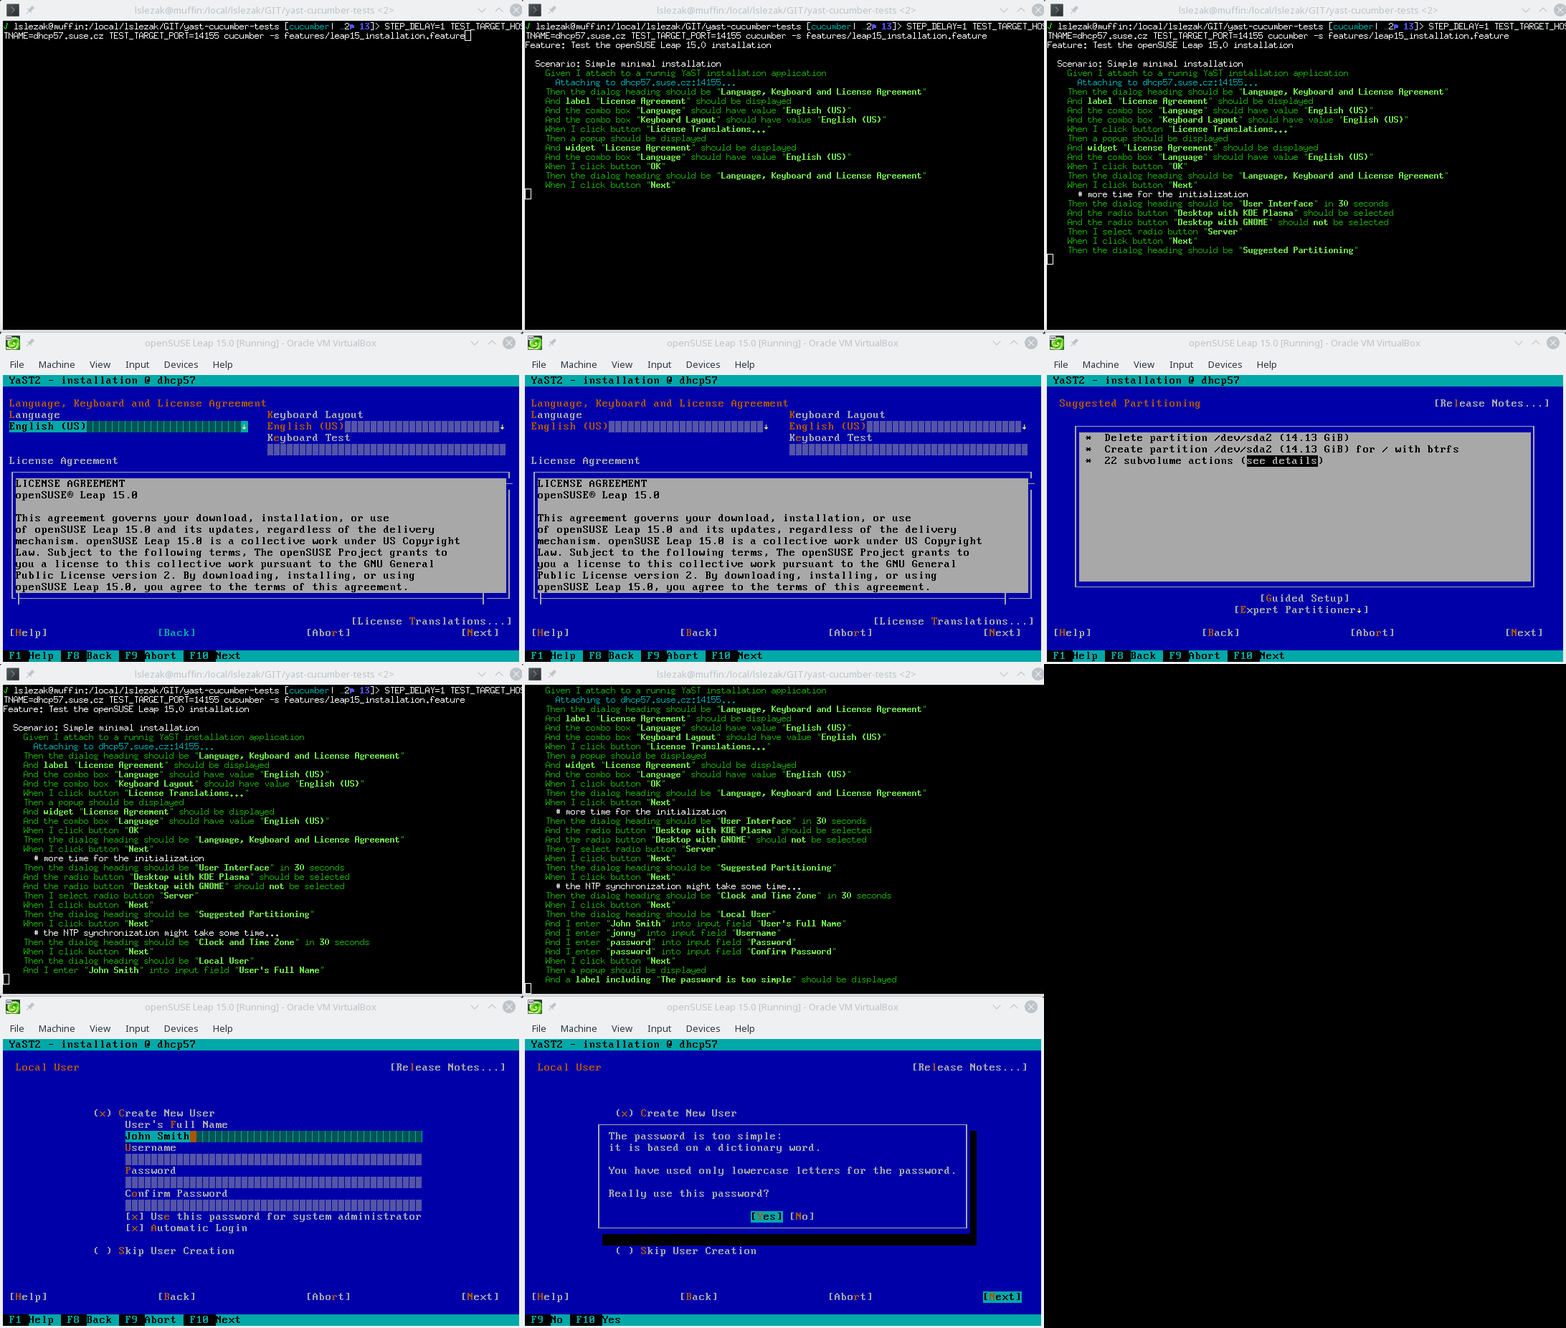
In theory the REST API should work the same way in both graphical and text mode, from the outside you should not see a difference. Unfortunately in reality there are some differences you need to be aware…
The Text Mode Differences
Some differences are caused by the different UI implementation - like the
Ncurses UI does not implement the Wizard widget and the main window has different
properties. For example the main navigation buttons like Back or Next
have YPushButton class in the text mode but in the graphical mode
they have YQWizardButton class and the dialog content is wrapped in an
additional YWizard object.
Another difference might be that YaST (or the libyui application in general) might display a different content in the graphical mode and in the text mode. For example the YaST time zone selection displays a nice clickable map in the graphics mode:
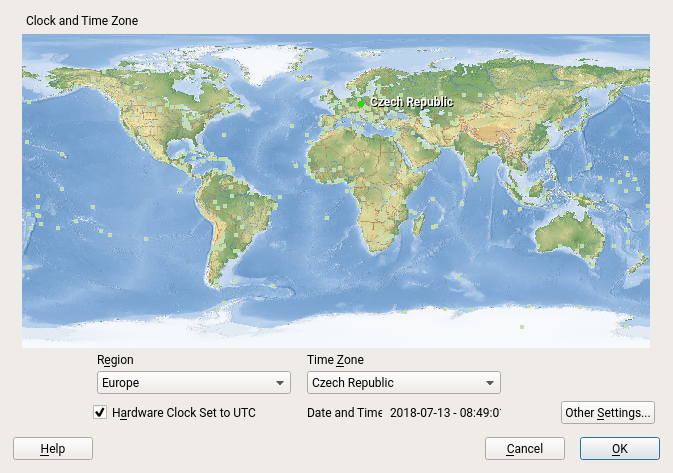
Obviously the world map cannot be displayed in the text mode:
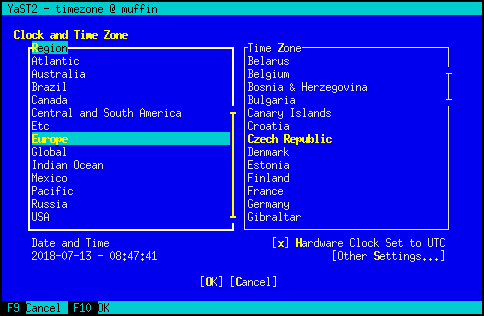
But the bigger difference is that in the graphical mode the time zone is selected
using the ComboBox widgets while in the text mode there are SelectionBox
widgets!
What is Still Working :smiley:
The original support for generic libyui applications is still present. That means the REST API is not bound to YaST but can be used by any libyui application.
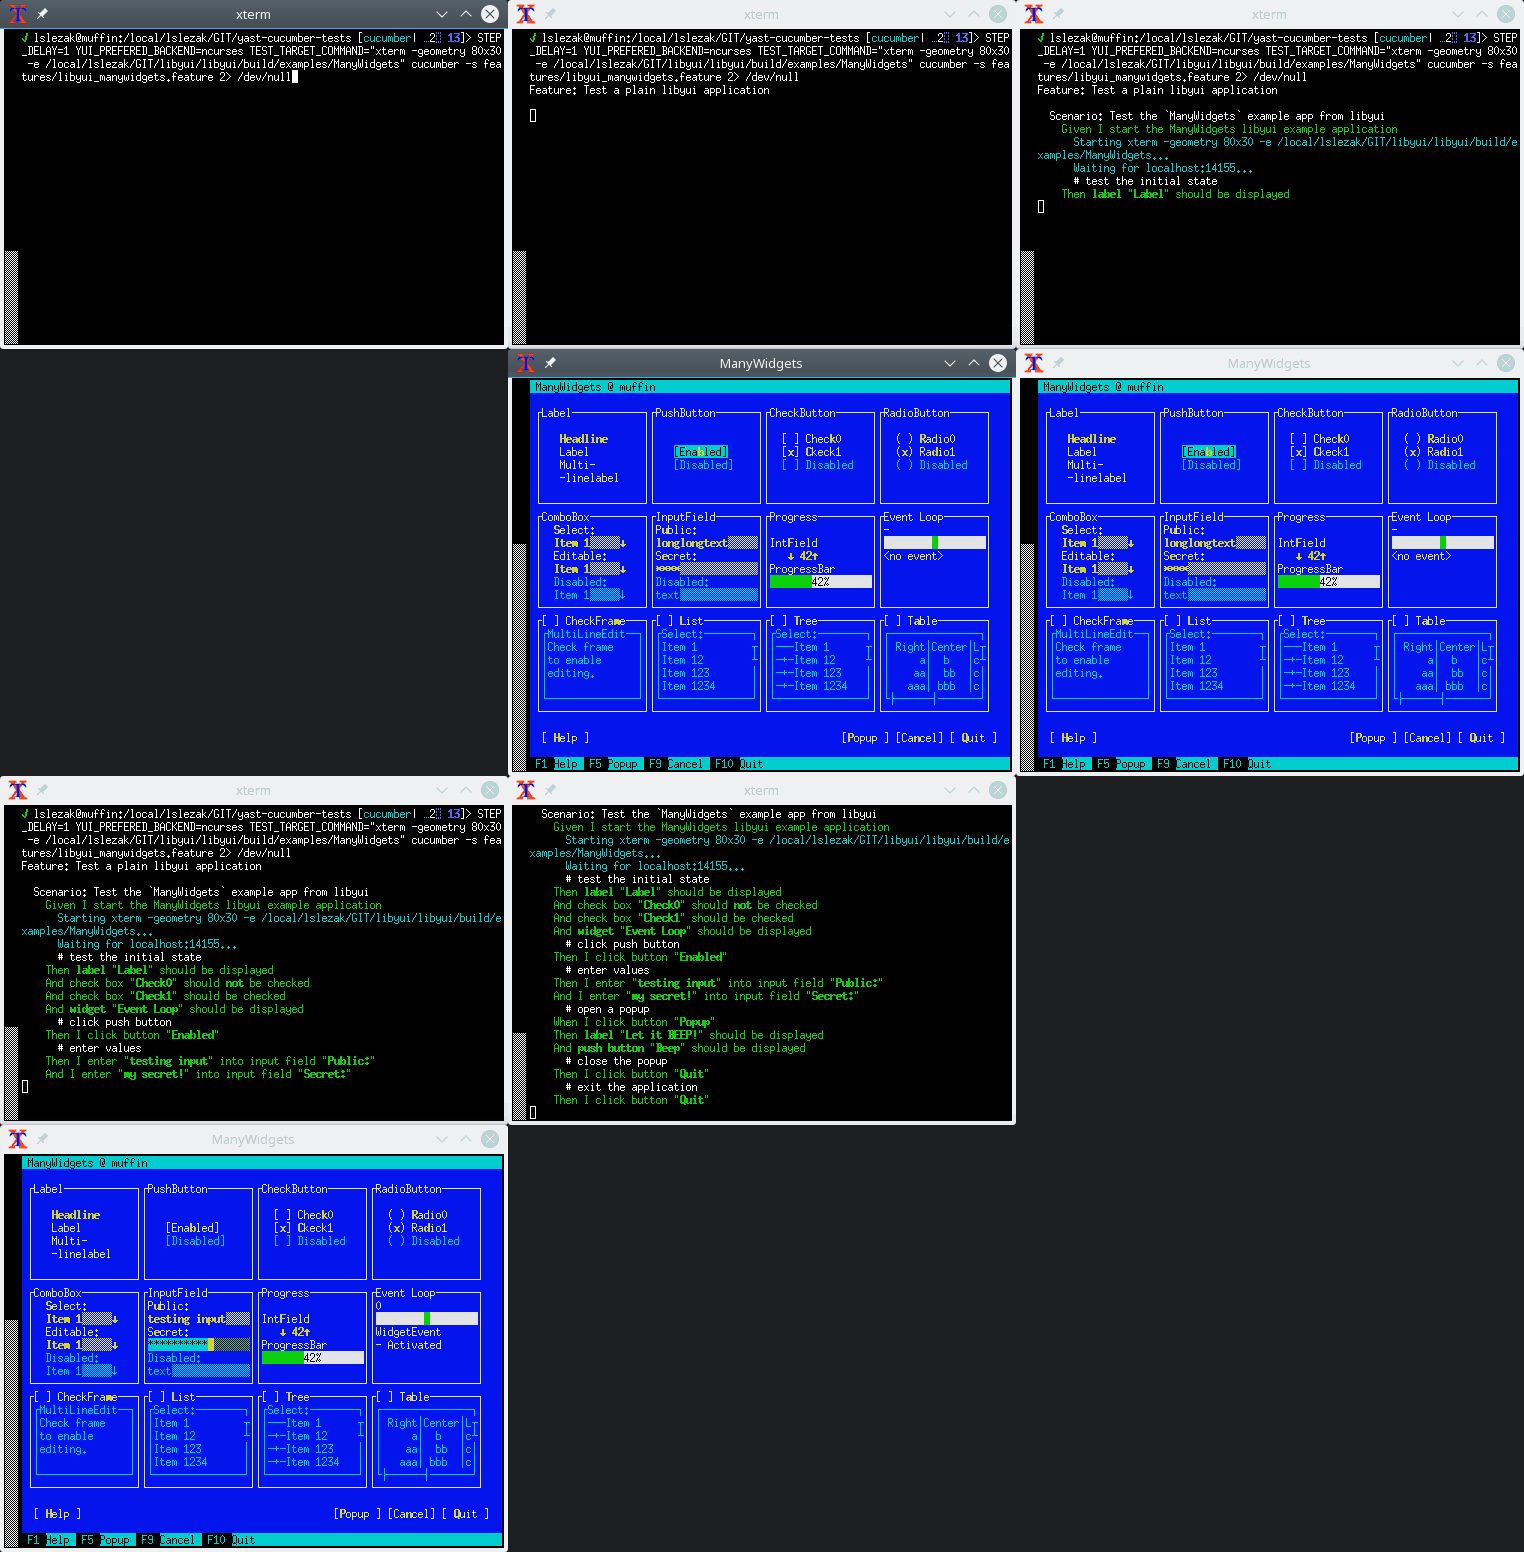
Here is a test for the libyui ManyWidgets example which is a standalone C++ application not using YaST at all:
Prepared Testing Packages
If you want to test this libyui feature in openSUSE Leap 15.0 then you can install the packages from the home:lslezak:libyui-rest-api OBS project. See more details here.
Sources
The source code is available in the http_server branches in the libyui/libyui, libyui/ncurses and libyui/qt Git repositories.
TODO
There are lots of missing things, but the project is becoming more usable for the basic application testing.
The most important missing features:
- Trigger
notifyorimmediateevents - if a widget with these properties is changed via the API these UI events are not created. Which usually means after changing a widget via the API the dialog is not updated as when the change is done by user. - Authentication support
- Move the web server to a separate plugin so it is an optional feature which can be added only when needed
- SSL (HTTPS) support
- IPv6 support
- and many more…
I will continue with the project at the next HackWeek if possible…
Freedom and Fairness on the Web
But how does this look like with software we don't run ourselves, with software which is provided as a service? How does this apply to Facebook, to Google, to Salesforce, to all the others which run web services? The question of freedom becomes much more complicated there because software is not distributed so the means how free and open source software became successful don't apply anymore.
The scandal around data from Facebook being abused shows that there are new moral questions. The European General Data Protection Regulation has brought wide attention to the question of privacy in the context of web services. The sale of GitHub to Microsoft has stirred discussions in the open source community which relies a lot on GitHub as kind of a home for open source software. What does that mean to the freedoms of users, the freedoms of people?
I have talked about the topic of freedom and web services a lot and one result is the Fair Web Services project which is supposed to give some definitions how freedom and fairness can be preserved in a world of software services. It's an ongoing project and I hope we can create a specification for what a fair web service is as a result.
I would like to invite you to follow this project and the discussions around this topic by subscribing to the weekly Fair Web Services Newsletter I maintain for about a year now. Look at the archive to get some history and sign up to get the latest posts fresh to your inbox.
The opportunities we have with the web are mind-boggling. We can do a lot of great things there. Let's make sure we make use of these opportunities in a responsible way.