
 Member
 einar77
I have a problem...
Every day, a sizable number of people posts problems on the KDE Community Forums and the ever-helpful staff does their best to solve whatever issues they’re facing. But what exactly does one do when this happens? This post provides more insights on the process.
NOTE: The following applies to my workflow for the Kontact & PIM subforum.
Step 1: Someone posts a problem
The questions posted are various, and range from simple tasks (“how I do XXX”) to very specific workflows. It covers a large spectrum.
The first thing I do when reading a post, is to go through a “mental checklist”:
- Is this known already?
- Are there enough information?
- What distro is this user on?
Answering point 1 means I have to keep up with development of KDE software, or if I don’t know, check the mailing lists and blog posts to see if other people have raised the issue (checking Bugzilla is a last resort, due to the very large number of bugs posted there). It also helps running the latest KDE software.
If point 2 isn’t satisfied, I ask a few more questions following the General Troubleshooting guidelines. These include conditions for reproduction of the issue, if it still occurs with a new user account, and so on.
Point 3 is related to point 2: not all distros are equal, so knowing on which distro the user in may reveal distribution-specific issues that need to be addressed directly downstream.
Step 2: Going deeper
If the issue isn’t solved even like this, “we need to go deeper”. Usually, time permitting, I try to reproduce the issue myself if it is within my reach (for example, if it doesn’t involve company secrets on an internal server ;).
If I can reproduce it, I tell the user to file a bug, or workarounds, if I found any. If I can’t, I ask a few more details. Usually this can lead to the issue being solved, or to a bug report being filed.
Step 3: Communicating
Sometimes the issue is unclear, or it is behavior where the line between feature and bug is very blurred. In this case, I need to get information straight from the horse’s mouth. I hop on IRC, and I address the developers directly, usually pointing at the forum thread, and asking for details.
Sometimes they follow up directly, sometimes they report me useful information, and sometimes they tell me its’ a feature or a bug. In either case, I report the information to the thread starter. In rare cases, the issue is simple enough that it gets fixed shortly afterwards.
Stem 4: Following up
Unfortunately not all bugs can be addressed straight away, so sometimes issues stay lingering for a long period of time. However, sometimes a commit or two may fix it, with or without a bug being filed. If I notice this (I do read kde-commits from time to time ;) I follow up on the thread writing about it being fixed, workarounded, or whatever.
What’s the point of this post, anyway?
Good question. ;) I mean this to show how much work can go into a “simple” user support request post on the KDE Community Forums. This is even more important to point out since apparently, frustration can make people tell that others’ work is worthless.
So, if you ever bump in any of the forum staff, be sure to offer them a beverage of their choice. ;)

Ruby Call Graph
I made it to help me orient myself in unfamiliar legacy code and to help identify cohesive parts that could be split out.
Yes, it is quick and dirty.
Example
One file in YaST has around 2700 lines and 73 methods. The call graph below was made with$ ./call-graph ../yast/packager/src/modules/Packages.rb
$ dot -Tpng -oPackages.png ../yast/packager/src/modules/Packages.dot$ convert Packages.png -resize 1200 Packages-small.png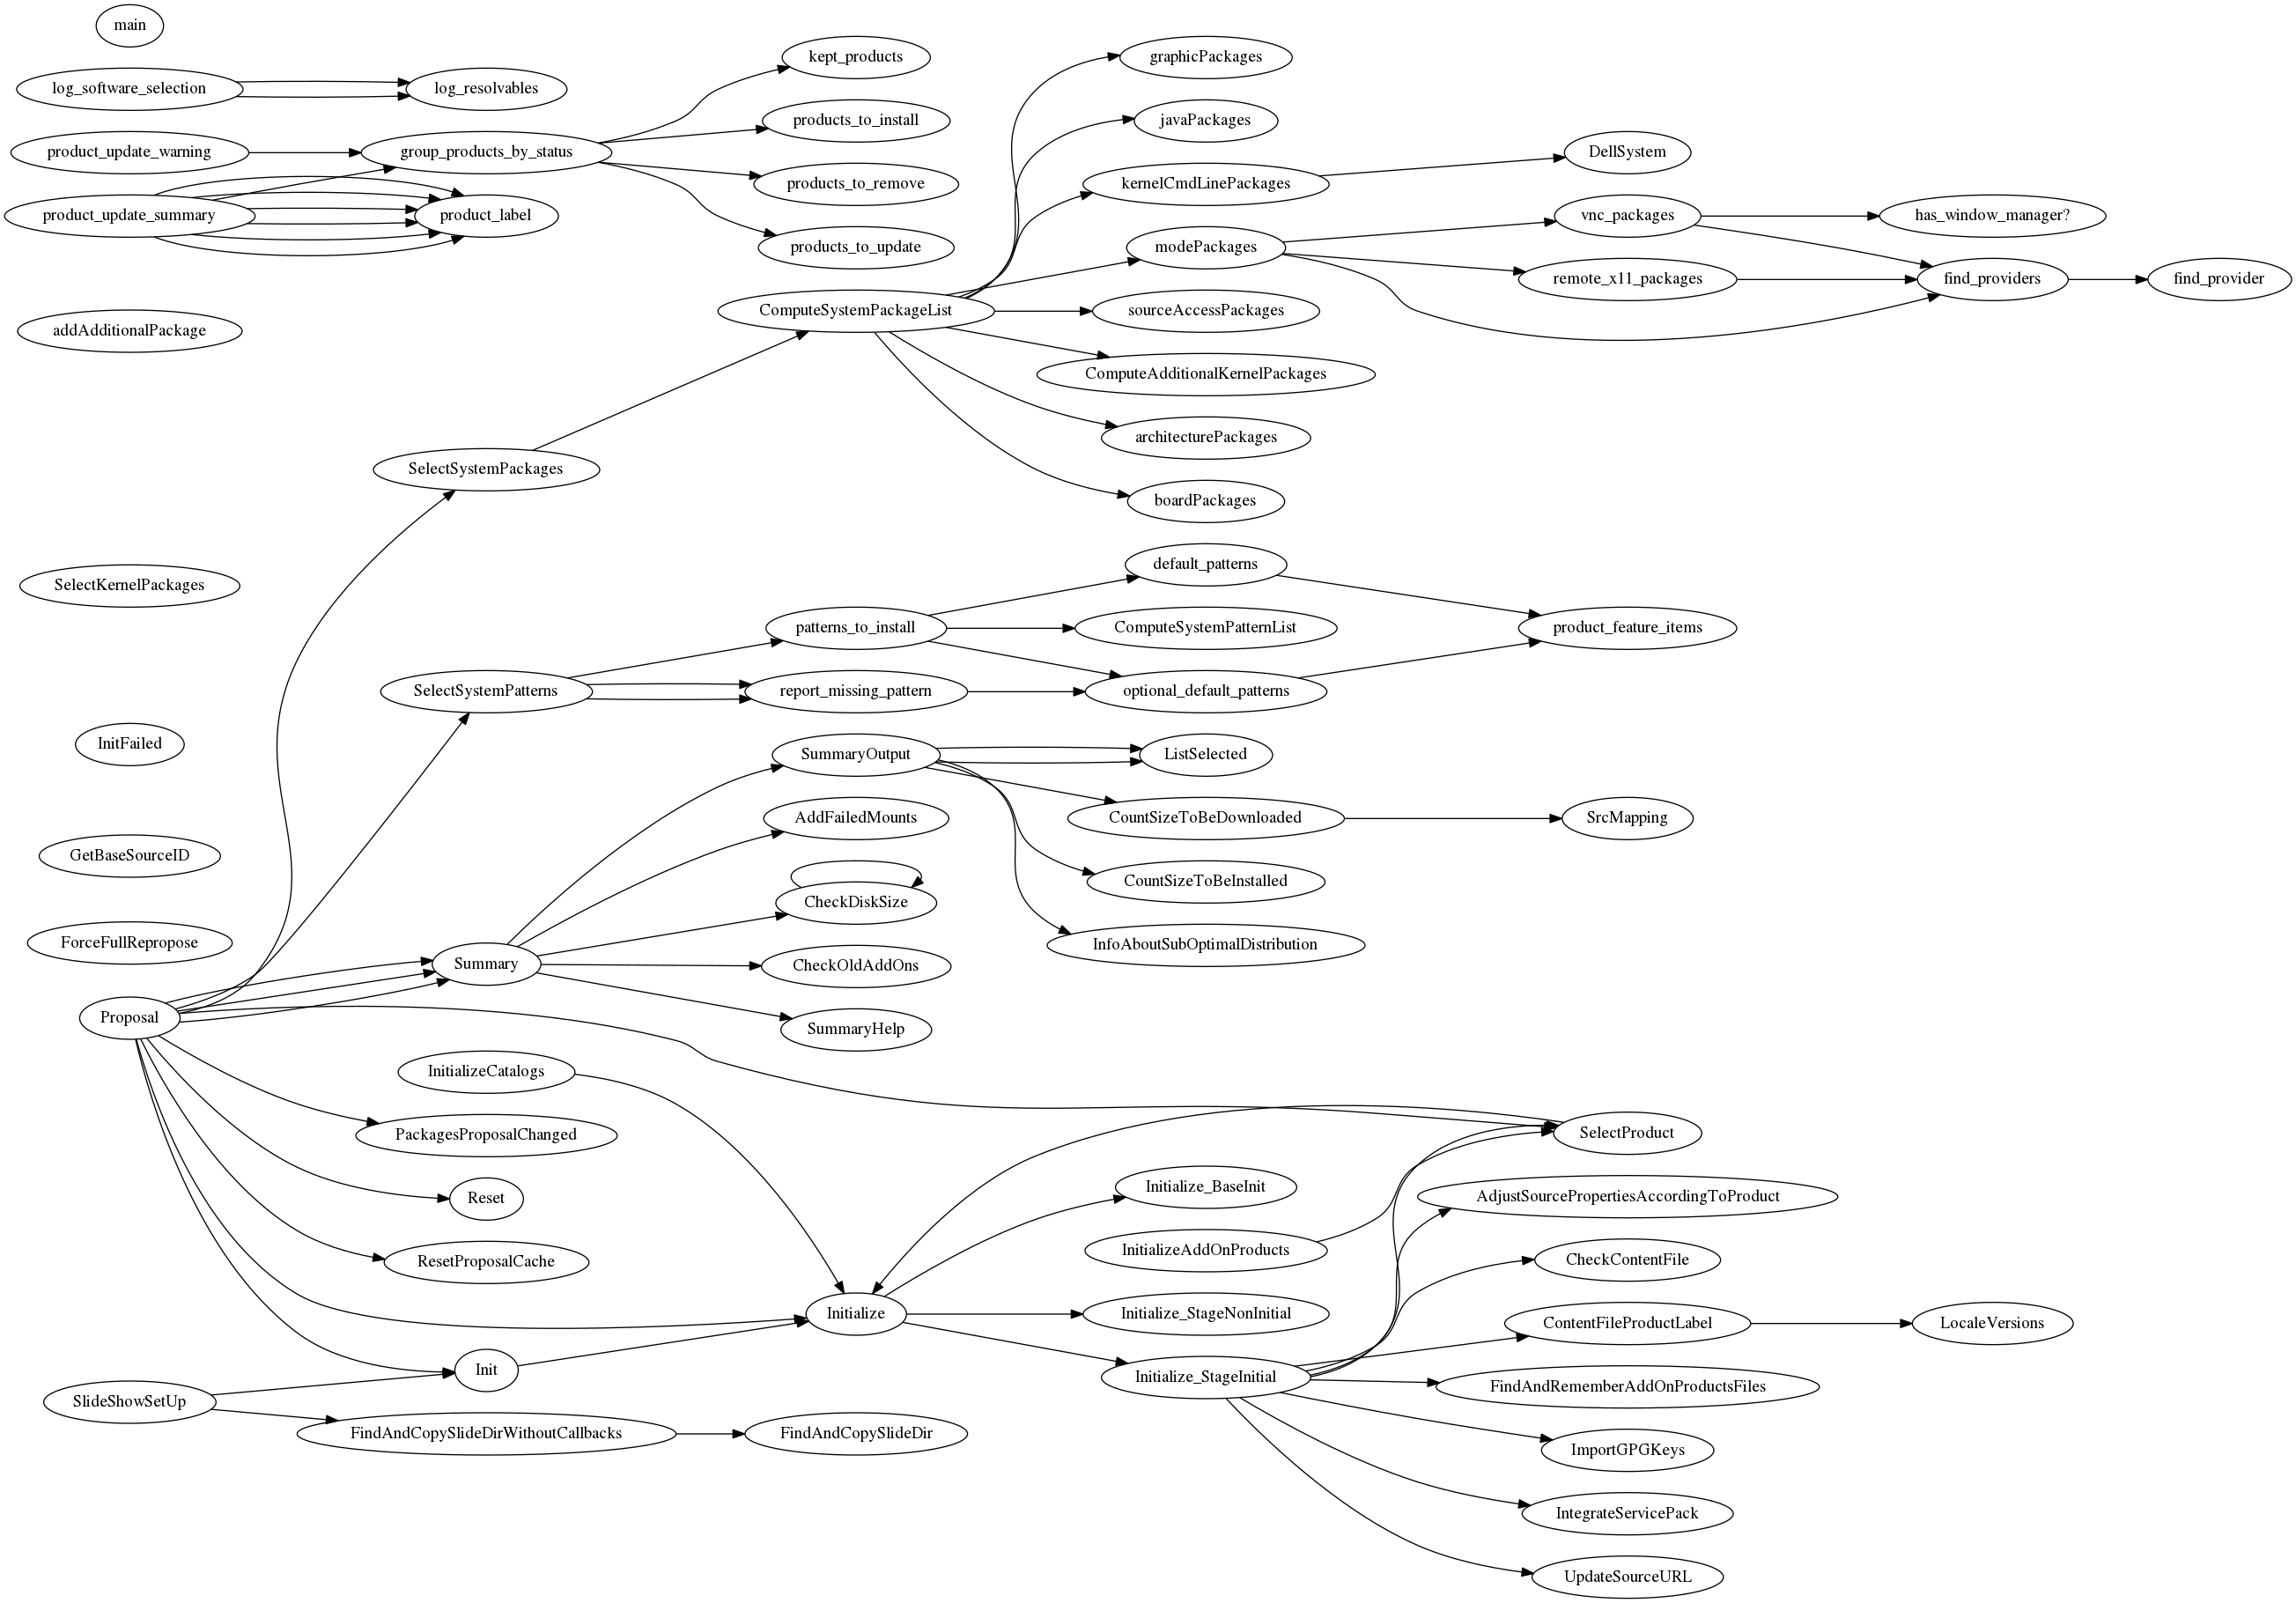
Requirements
- Ruby
- parser gem
- Graphviz
License
MIT
YodaQA’s abilities are enlarged by traffic domain
Guest post by Petr Marek (source)

Everybody driving a car needs the navigation to get to the destination fast and avoid traffic jam. One of the biggest problems is how to enter fast the destination and how to find where are the congestions, what is the traffic situation. YodaQA Traffic is a project attempting to answer the traffic related questions quickly and efficiently. Drivers may ask questions in natural language like: “What is the traffic situation in the Evropská street?” or “What is the fastest route from Opletalova street to Kafkova street?” You can try out the prototype (demo available only for limited time) – try to ask for example “traffic situation in the Wilsonova street” .
YodaQA Traffic still has some limitations. Currently we only have a browser version not suitable for smart phones. It is answering traffic questions for Prague’s streets only.
But as usual, this whole technology demo is open source – you can find it in the branch f/traffic-flow of our Hub project.
How does it work and where we get the data from?
All YodaQA are first analyzed to recognize and select traffic questions. We do it in two steps. The first step is to recognize the question topic. We use six topics like traffic situation, traffic incident or fastest route. The topic is determined by comparing semantic similarity of the user’s question with a set of reference questions. We estimate the similarity with our Dataset-STS Scoring API. Each reference question is labeled by a “topic”. The Sentence Pair Similarity algorithm selects the reference question “topic” with the highest similarity to the question.
Next we need to recognize the location, i.e. to recognize the street name. This is handled by another tool called the Label-lookup which we normally use for entity linking in YodaQA. It compares questions words with a list of all street names in the Prague. We exported the list of streets names in Prague from OpenStreetMap. We do not do exact match, we try to select the closest street name from the list.
The last step is to decide whether the question is really the traffic question, because the Dataset-STS API and Label-lookup can find topic and street name even in a pure movie question like “When was the Nightmare on Elm Street released?”. The Dataset-STS and Label-lookup return not only topic or street name but also the score, fortunately. We created dataset of over 70 traffic questions and over 300 movies questions and founded the minimal score thresholds, with which the recognition makes the lowest classification error on this dataset.
Once we know the type of question and the location we start a small script accessing the traffic situation data from HERE Maps. The only complication is that the the API doesn’t return traffic situation for particular street, but bounding box only. To overcome this problem we have to find a bounding box for a desired location, using an algorithm we developed for this purpose. Then we call the traffic flow API to acquire the information for all streets in the bounding box. Finally, we filter out the traffic situation for the desired street.
It was great fun to work on this application, it is not perfect but it shows how to create intelligent assistants helping people solving various everyday situations. We are also excited to see, how the users will use the new functionality of YodaQA and how it will help them.
YodaQA’s abilities are enlarged by traffic domain
Guest post by Petr Marek (source)
Everybody driving a car needs the navigation to get to the destination fast and avoid traffic jam. One of the biggest problems is how to enter fast the destination and how to find where are the congestions, what is the traffic situation. YodaQA Traffic is a project attempting to answer the traffic related questions quickly and efficiently. Drivers may ask questions in natural language like: “What is the traffic situation in the Evropská street?†or “What is the fastest route from Opletalova street to Kafkova street?†You can try out the prototype (demo available only for limited time) – try to ask for example “traffic situation in the Wilsonova street†.
YodaQA Traffic still has some limitations. Currently we only have a browser version not suitable for smart phones. It is answering traffic questions for Pragueâ€ s streets only.
But as usual, this whole technology demo is open source – you can find it in the branch f/traffic-flow of our Hub project.
How does it work and where we get the data from?
All YodaQA are first analyzed to recognize and select traffic questions. We do it in two steps. The first step is to recognize the question topic. We use six topics like traffic situation, traffic incident or fastest route. The topic is determined by comparing semantic similarity of the userâ€s question with a set of reference questions. We estimate the similarity with our Dataset-STS Scoring API. Each reference question is labeled by a “topicâ€. The Sentence Pair Similarity algorithm selects the reference question “topic†with the highest similarity to the question.
Next we need to recognize the location, i.e. to recognize the street name. This is handled by another tool called the Label-lookup which we normally use for entity linking in YodaQA. It compares questions words with a list of all street names in the Prague. We exported the list of streets names in Prague from OpenStreetMap. We do not do exact match, we try to select the closest street name from the list.
The last step is to decide whether the question is really the traffic question, because the Dataset-STS API and Label-lookup can find topic and street name even in a pure movie question like “When was the Nightmare on Elm Street released?â€. The Dataset-STS and Label-lookup return not only topic or street name but also the score, fortunately. We created dataset of over 70 traffic questions and over 300 movies questions and founded the minimal score thresholds, with which the recognition makes the lowest classification error on this dataset.
Once we know the type of question and the location we start a small script accessing the traffic situation data from HERE Maps. The only complication is that the the API doesnâ€t return traffic situation for particular street, but bounding box only. To overcome this problem we have to find a bounding box for a desired location, using an algorithm we developed for this purpose. Then we call the traffic flow API to acquire the information for all streets in the bounding box. Finally, we filter out the traffic situation for the desired street.
It was great fun to work on this application, it is not perfect but it shows how to create intelligent assistants helping people solving various everyday situations. We are also excited to see, how the users will use the new functionality of YodaQA and how it will help them.

DIY motorized blinds for $40
I have some 2” wooden blinds in my house that I’ve been wanting to motorize. Why? I’m lazy and I thought it would be cool to have.
The best commercial solution for retrofitting existing blinds seems to be Somfy. They have wireless battery-powered systems and fancy-looking remotes. For new motorized blinds, Bali seems to be popular, and they use Somfy for the motorization. There are also some kickstarter things (MOVE, MySmartBlinds), but the last time I looked those didn’t really do what I want. Somfy likely has a good product, but it’s very expensive. It looks like it would cost about $150 per blind, which is just way too much for me. They want $30 just for the plastic wand that holds the batteries (8 x AA). We’re talking about a motor and a wireless controller to tell it what to do. It’s not rocket surgery, so why should it cost $150?
My requirements are:
- Ability to tilt the blinds to one of three positions (up, middle, down) remotely via some wireless interface. I don’t care about raising or lowering the entire blind.
- There must be some API for the wireless interface such that I can automate them myself (close at night, open in morning)
- Tilt multiple blinds at the same time so they look coordinated.
- Be power efficient – one set of batteries should last more than a year.
Somfy satisfies this if I also buy their “Universal RTS Interface” for $233, but that only makes their solution even more expensive. For the 6 blinds I wanted to motorize, it would cost about $1200. No way.
I’ve been meaning to get into microcontrollers for a while now, and I thought this would be the perfect project for me to start. About a year ago I bought a RedBear BLE Nano to play with some Bluetooth stuff, so I started with that. I got a hobby servo and a bunch of other junk (resistors, capacitors, etc) from Sparkfun and began flailing around while I had some time off around Christmas. The Arduino environment on the BLE Nano is a little weird, but I got things cobbled together relatively quickly. The servo was very noisy, and it’s difficult to control the speed, but it worked. Because I wanted to control multiple devices at once, BLE was not a really great option (since AFAIK there is no way to ‘broadcast’ stuff in a way that is power-efficient for the listeners), and I started looking at other options. Eventually I ran across the Moteino.
The Moteino is an Arduino clone paired with a RFM69W wireless radio, operating at either 915Mhz or 433Mhz. It also has a very efficient voltage regulator, making it suitable for battery powered applications. The creator of the board (Felix Rusu) has put in a lot of work to create libraries for the Moteino to make it useful in exactly my type of application, so I gave it a try. The RFM69 library is lovely to work with, and I was sending messages between my two Moteinos in no time. The idea is to have one Moteino connected via USB to a Linux box (I already have a BeagleBone Black) as a base station which will relay commands to the remote devices. I got my servo working again with the Moteino quickly, as most of the code Just Worked.
I started out with a hobby servo because I knew it would be easy to control, but the noise and lack of speed control really bothered me. I needed to try something else. I considered higher quality servos, a gear motor with encoder or limit switches, stepper motors, worm gear motors, etc. I was going to end up building 6 of these things to start with, so cost was definitely a big factor. I ended up settling on the 28BYJ-48 stepper motor because it is extremely cheap (about $2), relatively quiet, and let me control the speed of rotation very precisely. There is a great Arduino library for stepper motors, AccelStepper, which lets you configure acceleration/deceleration, maximum speed, etc. It also has an easy-to-use API for positioning the motor. I found a 5mm x 8mm aluminum motor coupling to connect the motor to the blinds shaft. I then used a zip tie and a piece of rubber to secure the motor to the blinds rail. This doesn’t look very professional, but it’s not something you really see (my blinds have a valance that covers the rail). A better solution involving some kind of bracket would be great, but would increase the cost and require a lot more time. Using the stepper, I was able to smoothly, quietly, and cost-effectively control the blinds.
I then started to look into power consumption. If you don’t do put anything to sleep, the power usage is pretty high. The LowPower library from Felix makes it easy to put the CPU to sleep, which helps a lot. When sleeping, the CPU uses very little power (about 3µA I think), and the radio will wake you up via interrupt if a message arrives. The radio uses roughly 17mA in receive mode, however, so that means we’d only get about a week of battery life if we used a set of high-quality AAs (3000mAh / 17mA = 176h). We need to do a lot better.
The RFM69 has a useful feature called Listen Mode that some folks on the LowPowerLabs forums have figured out how to use. In this mode, you can configure the radio to cycle between sleeping and receiving in order to reduce power consumption. There are a lot of options here, but it was discovered that you only need to be in the RX phase for 256µS in order for a message to be detected. When the radio is asleep it uses about 4µA. So if you sleep for 1s and receive for 256µS, that means your average power consumption for the radio is about 12µA. This is a dramatic improvement, and it means that the device can still respond in roughly one second, which is certainly adequate for my application. Of course, you can always trade even more responsiveness for power efficiency, and people using this method on coin cell batteries certainly do that. There is one user on the forums who has an application with an expected battery life of over 100 years on a single coin cell! I have an extension of the RFM69 library, RFM69_WL, which collected some of the other listen mode code that was floating around and extends it so you can set your own sleep/RX durations.
I’ve measured/calculated my average power consumption to be about 46µA if I run the motor for 12s per day. That comes out to over 7 years of life on a set of 4 AA batteries (Energizer Ultimate Lithium), which is an almost unbelievable number. There are several factors I am not really considering, however, such as RF noise (which wakes the radio causing increased power consumption), so the real life performance might not be very close to this. Still, if I can get 2 years on a set of 4 AAs I’ll be pretty happy.
Usually when you buy a 28BYJ-48 it will include a driver board that has a ULN2003A, some connectors, and a set of LEDs for showing which phase of the stepper is active. This is fine for testing and development, but it was going to be pretty clunky to use this in a final solution. It was time to design my first PCB!
I found out early on that it was pretty difficult to talk to other people about problems with your project without having a schematic, so I made one of those. I started with Fritzing, but moved to EAGLE when it was time to do the PCB. It seemed to be the standard thing to use, and it was free. EAGLE has a pretty steep learning curve, but some tutorials from Sparkfun helped a lot. I also got some help from the folks on the LowPowerLabs forums (TomWS, perky), who I suspect do this kind of thing for a living. You can get the EAGLE schematic and board design here.
View post on imgur.com
View post on imgur.com
I ordered my first batch of boards from Seeed Studio, as well as a bunch of supporting components from Digikey. The PCB orders typically take a little over two weeks, which is quite a bit more waiting than I’m accustomed to. I was pretty excited when they arrived, and started checking things out. I soon realized I had made a mistake. The component I had in my design for the motor connector (which is a JST-XH 5-pin) was the wrong pitch and size, so the socket I had didn’t fit. Whoops. The hardware world does not play well with my “just try some stuff” mentality from working with software. I found an EAGLE library for the JST-XH connectors, used the correct part, and ordered another batch of PCBs. This time I actually printed out my board on paper to make sure everything matched up. I had run across PCBShopper while waiting for my first batch of boards, so I decided to use a different fabricator this time. I chose Maker Studio for the second order, since I could pay about the same amount and get red boards instead of green. Another two weeks went by, and finally last week I received the boards. I assembled one last weekend using my fancy (and cheap!) new soldering station. It didn’t work! Shit! The Moteino was working fine, but the motor wasn’t moving. Something with the motor driver or connection was hosed. After probing around for a pretty long time, I finally figured out that the socket was installed backwards. It seems the pins in the EAGLE part I found were reversed. Ugh. With a lot of hassle, I was able to unsolder the connector from the board and reverse it. The silkscreen outline doesn’t match up, but whatever. It works now, which was a big relief.
View post on imgur.com
I thought about putting the board in some kind of plastic enclosure, but it was hard to find anything small enough to fit inside the rail while also being tall enough to accomodate the Moteino on headers. I’m planning to just use some extra-wide heat shrink to protect the whole thing instead, but haven’t done that yet.
Below are some photos and videos, as well as the entire list of parts I’ve used and their prices. Each device costs about $40, which is a pretty big improvement over the commercial options (except maybe the kickstarter stuff). Also important is that there are no wires or electronics visible, which was critical for the Wife Acceptance Factor (and my own, honestly).
I’m sure a real EE will look at this and think “pfft, amateur!”. And that’s fine. My goals were to learn and have fun, and they were definitely accomplished. If I also produced something usable, that’s a bonus.
View post on imgur.com
View post on imgur.com
View post on imgur.com
Bill of Materials
| 28BYJ-48-12V | $2.08 |
| DIP socket | $0.19 |
| Motor Coupling, 5mm x 8mm | $1.26 |
| Electrolytic Capacitor, 100µF | $0.30 |
| Ceramic Capacitor, 0.1µF (2) | $0.24 |
| DC Barrel Jack, PJ-002B | $0.93 |
| DC Barrel Jack Plug, PP3-002B | $1.36 |
| 2M Resistor | $0.04 |
| 2.7M Resistor | $0.06 |
| Motor Plug Socket | $0.21 |
| Tactile Button | $0.10 |
| PCB | $0.99 |
| Moteino | $22.95 |
| AA Holder | $1.24 |
| Energizer Ultimate AA (4) | $6.00 |
| Total | $37.95 |
In order to talk to the devices from a host computer, you’ll also need a Moteino USB ($27). To program the non-USB Moteinos you’ll need a FTDI adapter. LowPowerLabs sells one of those for $15, but you may be able to find a better deal elsewhere.

Moving on from ownCloud
Yes, I’ll be leaving ownCloud, Inc. - but not the community. As the numbers from my last post make clear, the ownCloud community is doing awesome. It is growing at an exponential rate and while that in itself poses challenges, the community is healthy and doing great.

I joined in 2014, when ownCloud, Inc. had about 36 employees. The community grew that year, according to our history page, from 1 million users to 2.2 while the number of average coders per month went from 62 to 76. For me, the coolest thing that year was the ownCloud Contributor Conference, that brought together 100 contributors for a week of hacking at the university of Berlin. A stressful, but awesome week. Though, my first meeting most of my colleagues was some months earlier at the Stuttgart meetup and my first release was ownCloud 7 not long before the event.
2015 was more of that - our history page has a great overview and I’m darn proud of having been a part of all those things. 2016 brought ownCloud 9, a major release, which was accompanied by an overhaul of owncloud.org, I hope you like our new website!
Not everything is finished, of course. We’re still smack in the middle of awesome work with Collabora and Spreed as well as the WDLabs PiDrive project - I just finished and published this page about it. All great stuff which has great momentum and will certainly move forward.
Myself, I’ll stay around in the community. I’ll talk about the awesome stuff that is coming next early June but until then, don’t hesitate to contact me if you’ve got any questions about ownCloud or anything else. You can still catch me on jos@opensuse.org ;-)
Semantic Sentence Pair Scoring
The blog has been a little bit silent – a typical sign of us working too hard to worry about that! But we’ll satisfy some of your curiosity in the coming weeks as we have about six posts in the pipeline.
The thing I would like to mention first is some fundamental research we work on now. I stepped back from my daily Question Answering churn and took a little look around and decided the right thing to focus for a while are the fundamentals of the NLP field so that our machine learning works better and makes more sense. Warning: We’ll use some scientific jargon in this one post.
So, in the first months of 2016 I focused huge chunk of my research on deep learning of natural language. That means neural networks used on unstructured text, in various forms, shapes and goals. I have set some audacious goals for myself, fell short in some aspects but still made some good progress hopefully. Here’s the deal – a lot of the current research is about processing a single sentence, maybe to classify its sentiment or translate it or generate other sentences. But I have noticed that recently, I have seen many problems that are about scoring a pair of two sentences. So I decided to look into that and try to build something that (A) works better, (B) actually has an API and we can use it anywhere for anything.
My original goal was to build awesome new neural network architectures that will turn the field on its head. But I noticed that the field is a bit of a mess – there is a lot of tasks that are about the same thing, but very little cross-talk between them. So you get a paper that improves the task of Answer Sentence Selection, but could the models do better on the Ubuntu Dialogue task then, or on Paraphrasing datasets? Who knows! Meanwhile, each dataset has its own format and a lot of time is spent only in writing the adapter code for it. Training protocols (from objectives to segmentation to embedding preinitializations) are inconsistent, and some datasets need a lot of improvement. Well, my goal turned to sorting out the field, cross-check the same models on many tasks and provide a better entry point for others than I had.
Software: Getting a few students of the 3C group together, we have created the dataset-sts platform for all tasks and models that are about comparing two sentences using deep learning. We have a pretty good coverage (of both tasks and models), and more brewing in some side branches. It’s in Python and uses the awesome Keras deep learning library.
Paper: To kick things off research-wise, we have posted a paper Sentence Pair Scoring: Towards Unified Framework for Text Comprehension where we summed up what we have learned early in the process. A few highlights:
- We have a lofty goal of building an universal text comprehension model, a sort of black box that eats your sentences and produces embeddings that correspond to their meaning, which you can use for whatever task you need to do. Long way to go, but we have found that a simple neural model trained on very large data is doing pretty good in this exact setting, and even if applied to tasks and data that look very different from the original. Maybe we are on to something.
- Our framework is state-of-art on the Ubuntu Dialogue dataset of 1M techsupport IRC dialogs, beating Facebook’s memory network models.
- It’s hard to compare neural models because if you train a model 16 times with the same data, the result will always be somewhat different. Not a big deal with large test datasets, but a very big deal with small test datasets which are still popular in the research community. Almost all papers ignore this! If you look at evolution of performance of models in some areas like Answer Sentence Selection, we have found that most differences over the last year are deep below per-train variance we see.
Please take a look, and tell us what you think! We’ll shortly cover a follow-up paper here that we also already posted, and we plan to continue the work by improving our task and model coverage further, fixing a few issues with our training process and experimenting with some novel neural network ideas.
More to come, both about our research and some more product-related news, in a few days. We will also talk about how the abstract-sounding research connects with some very practical technology we are introducing.

Using Salt like Ansible
Introduction
When we were looking for a configuration management engine to integrate with SUSE Manager, we discussed Ansible with some colleagues that were familiar with it.
At the end, we ended choosing Salt for SUSE Manager 3, but I still often get the question “Why not Ansible?”.
The first part of the answer had to do that the master-minion architecture of Salt results in a bunch of interesting features and synergies with the way SUSE Manager operates: real-time management, event-bus, etc. Salt is much more of a framework than a simple “command line tool”. The minion/master pair is one of the tools built over that framework, but not the only one.

For example, you can create more scalable topoligies using the concept of syndics:

Or manage dumb devices with the concept of Salt proxies:

It is worth to learn the whole framework.
However, for a small DevOp team collaborating via git, the model of running Ansible from their workstations to a bunch of nodes defined in a text file is very attractive, and gives you a nice way to learn and experiment with it.
The second part of the answer is: Salt allows you to do this too. It is called salt-ssh. So lets take this Ansible tutorial and show how you would do the same with salt-ssh.
Install
This means there’s usually a “central” server running Ansible commands, although there’s nothing particularly special about what server Ansible is installed on. Ansible is “agentless” - there’s no central agent(s) running. We can even run Ansible from any server; I often run Tasks from my laptop.
The salt package is made of various components, among others:
-
salt: the framework, libraries, modules, etc. -
salt-minion: the minion daemon, runs on the managed hosts. -
salt-master: the master daemon, runs on the management server. -
salt-ssh: a tool to manage servers over ssh.
If you want to run Salt like Ansible, you only need to install salt-ssh in your machine (the machine where you want to run tasks from).
You don’t need anything else than Python on the hosts you will manage.
Well, there are a couple of other packages required
ssh $HOST zypper -n install python-pyOpenSSL python-xml
Salt is available out of the box on openSUSE Leap and Tumbleweed so if you are using them just type:
zypper in salt-ssh
For other platforms, please refer to the install section of the Salt documentation.
Self contained setup
It is common to put all the project in a single folder. In Ansible you can put the hosts file in a folder, and the playbooks in a subfolder. To accomplish this with salt-ssh.
- Create a folder for your project, eg:
~/Project. - Create a file named
Saltfilein your~/Project.
salt-ssh:
    config_dir: etc/salt
    max_procs: 30
    wipe_ssh: True
Here we tell Salt that the configuration directory is now relative to the folder. You can name it as you want, but I prefer myself to stick to the same conventions, so /etc/salt becomes ~/Project/etc/salt.
Then create ~/Project/etc/salt/master:
root_dir: .
file_roots:
  base:
    - srv/salt
pillar_roots:
  base:
    - srv/pillar
And create both trees:
mkdir -p srv/salt
mkdir -p srv/pillar
Salt will also create a var directory for the cache inside the project tree, unless you chose a different path. What I do is to put var inside .gitignore.
Managing servers
Ansible has a default inventory file used to define which servers it will be managing. After installation, there’s an example one you can reference at /etc/ansible/hosts.
The equivalent file in salt-ssh is /etc/salt/roster.
That’s good enough for now. If needed, we can define ranges of hosts, multiple groups, reusable variables, and use other fancy setups, including creating a dynamic inventory.
Salt can also provide the roster with custom modules. Funnily enough, ansible is one of them.
As I am using a self-contained setup, I create ~/Project/etc/salt/roster:
node1:
  host: node1.example.com
node2:
  host: node2.example.com
Basic: Running Commands
Ansible will assume you have SSH access available to your servers, usually based on SSH-Key. Because Ansible uses SSH, the server it’s on needs to be able to SSH into the inventory servers. It will attempt to connect as the current user it is being run as. If I’m running Ansible as user vagrant, it will attempt to connect as user vagrant on the other servers.
salt-ssh is not very different here. Either you already have access to the server, otherwise it will optionally ask you for the password and deploy the generated key-pair etc/salt/pki/master/ssh/salt-ssh.rsa.pub to the host so that you have access to it in the future.
So, in the Ansible tutorial, you did:
$ ansible all -m ping
127.0.0.1 | success >> {
    "changed": false,
    "ping": "pong"
}
The equivalent in salt-ssh would be:
salt-ssh '*' test.ping
node1:
    True
node2:
    True
Just like the Ansible tutorial covers, salt-ssh also has options to change the user, output, roster, etc. Refer to man salt-ssh for details.
Modules
Ansible uses “modules” to accomplish most of its Tasks. Modules can do things like install software, copy files, use templates and much more.
If we didn’t have modules, we’d be left running arbitrary shell commands like this:
ansible all -s -m shell -a 'apt-get install nginx'
However this isn’t particularly powerful. While it’s handy to be able to run these commands on all of our servers at once, we still only accomplish what any bash script might do.
If we used a more appropriate module instead, we can run commands with an assurance of the result. Ansible modules ensure indempotence - we can run the same Tasks over and over without affecting the final result.
For installing software on Debian/Ubuntu servers, the “apt” module will run the same command, but ensure idempotence.
ansible all -s -m apt -a 'pkg=nginx state=installed update_cache=true'
127.0.0.1 | success >> {
    "changed": false
}
The equivalent in Salt is also called “modules”. There are two types of modules: Execution modules and State modules. Execution modules are imperative actions (think of install!). State modules are used to build idempotent declarative state (think of installed).
There are two execution modules worth to mention:
- The
cmdmodule, which you can use to run shell commands when you want to accomplish something that is not provided by a built-in execution module. Taking the example above:
salt-ssh '*' cmd.run 'apt-get install nginx'
- The
statemodule, which is the execution module that allows to apply state modules and more complex composition of states, known asslsfiles.
salt-ssh '*' pkg.install nginx
You don’t need to use the apt module, as it implements the virtual pkg module. So you can use the same module on every platform.
On Salt you would normally use the non-idempotent execution modules from the command line and use the idempotent state module in sls files (equivalent to Ansible’s playbooks).
If you still want to apply state data like ansible does it:
salt-ssh '*' state.high '{"nginx": {"pkg": ["installed"]}}'
Basic Playbook
Playbooks can run multiple Tasks and provide some more advanced functionality that we would miss out on using ad-hoc commands. Let’s move the above Task into a playbook.
The equivalent in Salt is found in states.
Create srv/salt/nginx/init.sls:
nginx:
  pkg.installed
To apply this state, you can create a top.sls and place it in srv/salt:
base:
  `*`:
    - nginx
This means, all hosts should get that state. You can do very advanced targetting of minions. When you write a top, you are defining what it will be the highstate of a host.
So when you run:
salt-ssh '*' state.apply
You are applying the highstate on all hosts, but the highstate of each host is different for each one of them. With the salt-ssh command you are defining which hosts are getting their configuration applied. Which configuration is applied is defined by the top.sls file.
You can as well apply a specific state, even if that state does not form part of the host highstate:
salt-ssh '*' state.apply nginx
Or as we showed above, you can use state.high to apply arbitrary state data.
Handlers
Salt has a similar concept called events and reactors which allow you to define a fully reactive infrastructure.
For the example given here, a simple state watch argument will suffice:
nginx:
  pkg.installed: []
  service.running:
    - watch: pkg: nginx
Note:
The full syntax is:
someid:
  pkg.installed:
    name: foo
But if name is missing, someid is used, so you can write:
#+BEGIN_SRC yaml foo: pkg.installed #+END_END
More Tasks
Looking at the given Ansible example:
{% raw %}
---
- hosts: local
  vars:
   - docroot: /var/www/serversforhackers.com/public
  tasks:
   - name: Add Nginx Repository
     apt_repository: repo='ppa:nginx/stable' state=present
     register: ppastable

   - name: Install Nginx
     apt: pkg=nginx state=installed update_cache=true
     when: ppastable|success
     register: nginxinstalled
     notify:
      - Start Nginx

   - name: Create Web Root
     when: nginxinstalled|success
     file: dest={{ docroot }} mode=775 state=directory owner=www-data group=www-data
     notify:
      - Reload Nginx

  handlers:
   - name: Start Nginx
     service: name=nginx state=started

    - name: Reload Nginx
      service: name=nginx state=reloaded
{% endraw %}
You can see that Ansible has a way to specify variables. Salt has the concept of pillar which allows you to define data and then make that data visible to hosts using a top.sls matching just like with the states. Pillar data is data defined on the “server” (there is a equivalent grains for data defined in the client).
Edit srv/pillar/paths.sls:
{% raw %}
docroot: /var/www/serversforhackers.com/public
{% endraw %}
Edit srv/pillar/top.sls and define who will see this pillar (in this case, all hosts):
base:
  '*':
    - paths
Then you can see which data every host sees:
salt-ssh '*' pillar.items
node1:
    ----------
    docroot:
        /var/www/serversforhackers.com/public
node2:
    ----------
    docroot:
        /var/www/serversforhackers.com/public
With this you can make sensitive information visible on the hosts that need it. Now that the data is available, you can use it in your sls files, you can add to
{% raw %}
nginx package:
  pkg.installed

nginx service:
  service.running:
    - watch: pkg: 'nginx package'

nginx directory:
  file.directory:
    - name: {{ pillar['docroot'] }}

{% endraw %}
Which can be abbreviated as:
{% raw %}
nginx:
  pkg.installed: []
  service.running:
    - watch: pkg: nginx

{{ pillar['docroot'] }}:
  file.directory
{% endraw %}
Roles
Roles are good for organizing multiple, related Tasks and encapsulating data needed to accomplish those Tasks. For example, installing Nginx may involve adding a package repository, installing the package and setting up configuration. We’ve seen installation in action in a Playbook, but once we start configuring our installations, the Playbooks tend to get a little more busy.
There is no 1:1 concept in Salt as it already organizes the data around a different set of ideas (eg: gains, pillars), but for the utility of the specific Ansible tutorial, lets look at a few examples.
Files
Every thing you add to the file_roots path (defined in etc/salt/master) can be accessed using the Salt file server. Lets say we need a template configuration file, you can put it in ’srv/salt/nginx/myconfig` (you can use jinja2 templating on it), and then refer to it from the state:
/etc/nginx/myconfig:
  file.managed:
    - source: salt://nginx/myconfig
Template
You can use Jinja2 templating in states and files, and you can refer to grain and pillar data from them. Salt already include a long list of built-in grains you can use (see grains.items) and you can also create your own grain modules to gather other data.
A common use of pillar data is to distribute passwords to the configuration files. While you can define pillar data in the srv tree, because you can also define external pillars you can source your data from anywhere.
Running the role
As mentioned before, you can apply the state by either making it part of the host highstate or apply it explicitly.
Let’s create a “master” yaml file which defines the Roles to use and what hosts to run them on: File server.yml:
---
- hosts: all
  roles:
    - nginx
This is equivalent to the top.sls file in srv/salt (with a less powerful matching system).
base:
  `*`:
    - nginx
Then we can run the Role(s):
salt-ssh '*' state.apply
Would apply what top.sls defines.
Facts
These are equivalent to grains, and you can see what grains you have available by calling:
salt-ssh '*' grains.items
You can use them from Jinja2 as grains:
{% raw %}
{% if grains['os_family'] == 'RedHat' %}
...
{% endif %}
{% endraw %}
If you need a custom grain definition, you can write your own and distribute them from the server.
Vault
The equivalent in Salt would be to use the Pillar. If you need encryption support you have various options:
- Use a external pillar which fetches the data from a vault service
- Use the renderer system and add the gpg renderer to the chain. (Disclaimer: I haven’t tried this myself).
Example: Users
You will need a pillar:
admin_password: $6$lpQ1DqjZQ25gq9YW$mHZAmGhFpPVVv0JCYUFaDovu8u5EqvQi.Ih
deploy_password: $6$edOqVumZrYW9$d5zj1Ok/G80DrnckixhkQDpXl0fACDfNx2EHnC
common_public_key: ssh-rsa ALongSSHPublicKeyHere
And then refer to it from the user state:
{% raw %}
admin:
  user.present:
    - password: {{ pillar['admin_password'] }}
    - shell: /bin/bash

sshkeys:
  ssh_auth.present:
    - user: admin
    - name: {{ pillar['common_public_key'] }}
{% endraw %}
In order to refresh the pillar data, you can use:
salt-ssh '*' saltutil.refresh_pillar
Recap
So, this is how you use Salt in a way similar to Ansible. The best part of this is that you can start learning about Salt without having to deploy a Salt master/minion infrastructure.
The master/minion infrastructure brings a whole new set of possibilities. The reason we chose Salt is because here is where it starts, and not where it ends.
Thanks & Acknowledgements
- Chris Fidao for the original Ansible tutorial.
- Konstantin Baikov for corrections and suggestions.

LetsEncrypt on openSUSE Leap
I’ve been running my personal blog on rootco.de for a few months now. The server is a minimal install of openSUSE Leap 42.1 running on a nice physical machine hosted at the awesome Hetzner, who offer openSUSE Leap as an OS on all of their Physical and Virtual server hosting. I use the standard Apache available in Leap, with Jekyll to generate this blog. You can actually see the source to this Jekyll blog on GitHub. And to manage it all I use the awesome SaltStack and keep all of my Salt configuration in GitHub also so you can see exactly how my system is setup.
Why am I sharing all of this? Well this weekend there was something I needed to fix.
http://rootco.de was running without HTTPS.
So What?
This site is a blog about Free Software & Open Source stuff, why on earth does it need to be running HTTPS?.
Because every single web service that can be HTTPS, should be HTTPS. There are lots of good articles going back years as to why, but the simplest reasons is that it helps ensure the content you visit when you go to my blog is the content I intended for my blog. It’s very hard for someone to tamper with the content delivered from a HTTPS website. While I’m not (yet) currently hosting any interactive services on my server, if I do I want to ensure they’re secured by HTTPS so the data I’m sending to my server is done so as securely as possible.
And in this day and age, there is rarely an excuse to not use HTTPS for everything. Certificates used to be expensive and complicated to setup, but thanks to the wonderful project LetsEncrypt anyone can now get certificates for their domains for FREE.
Getting Stated with LetsEncrypt
I started as anyone should, by reading the Getting Started Guide.
As there is not (yet) a certbot package for openSUSE Leap, I had to use the certbot-auto wrapper script.
The documentation recommends you install it using the following commands:
$ git clone https://github.com/certbot/certbot
$ cd certbot
$ ./certbot-auto --help
As I’m actually using SaltStack to manage my system, all I did instead was add the following to my Salt State for the rootco.de Web Server.
certbot:
  git.latest:
    - name: https://github.com/certbot/certbot
    - target: /opt/certbot
    - user: root
You can see the git commit HERE.
I then ran the following on my salt master to tell SaltStack to pull down the changes and apply them to the rootco.de Web Server.
$ git -C /srv/salt pull
$ salt 'luke.rootco.de' state.highstate --state-output=changes
NOTE: I could have just waited, I actually have the above running as a cronjob every 30 minutes to make sure my server configuration stays as I have defined it in SaltStack
I then sanity checked the contents of /opt/certbot before proceeding. I really hate randomly downloading code from GitHub, so I spent a bit of time making sure what I downloaded made sense and matched what I expected, while wishing someone would take the time to package this up on the openSUSE Build Service so I could trust them and stop worrying. Once I was happy, I ran the following command to request a certificate for rootco.de and www.rootco.de:
$ /opt/certbot/certbot-auto certonly --webroot -w /srv/www/htdocs \
-d rootco.de -d www.rootco.de
The wizard automatically detected I was running openSUSE, installed a few packages it needed, then asked me for an email address, and that was it! I had my certificate created and on my server at /etc/letsencrypt/live/rootco.de/fullchain.pem. I followed the advice to backup /etc/letsencrypt as it contains lots of important configuration and the certificates/keys for my system. Now I had to get Apache to actually use the certificate.
Configuring Apache on Leap for LetsEncrypt
Because I was a little rusty, I reminded myself of the openSUSE Leap Apache Documentation. Good thing too, because I can completely forgotten that to tell Apache to use SSL you needed to run the following command:
$ a2enflag SSL
With that set, I went about setting up an Apache vhost configuration for SSL on rootco.de:
<VirtualHost _default_:443>
	DocumentRoot "/srv/www/htdocs"
	ErrorLog /var/log/apache2/error_log
	TransferLog /var/log/apache2/access_log
	SSLEngine on
	# Path to the LetsEncrypt created certificate fullchain.pem
	SSLCertificateFile /etc/letsencrypt/live/rootco.de/fullchain.pem
	# Path to the LetsEncrypt created private key privkey.pem
	SSLCertificateKeyFile /etc/letsencrypt/live/rootco.de/privkey.pem
	CustomLog /var/log/apache2/ssl_request_log   ssl_combined
</VirtualHost>
Now, because I absolutely hate making any change to the rootco.de Server directly and want everything managed by SaltStack, I actually put this in my Salt States folder, and modified the rootco.de Web Server state to automatically deploy the file to the appropriate place on the server. You can see the git commit for that HERE. As I am impaitent and didn’t want to wait for my automatic deployment, I again manually refreshed the Salt States on my master and used salt to deploy this new configuration:
$ git -C /srv/salt pull
$ salt 'luke.rootco.de.' state.highstate --state-output=changes
A quick systemctl restart apache2 on the server later and I was in business - https://rootco.de was live!
That’s great but…
LetsEncrypt certificates have a duration of 90 days. I want https://rootco.de to be running for a lot longer than that, so I needed to find a solution.
The LetsEncrypt Documentation talked about a renew function so I gave it a quick try:
$ /opt/certbot/certbot-auto renew --dry-run
This seemed to work fine so I added a simple cron job to run the following every 60 days:
$ /opt/certbot/certbot-auto renew >/dev/null 2>&1
I picked 60 days as LetsEncrypt certificates only let you renew 30 days before expiration, and I want to hit their servers as little as possible while still ensuring the certificate always gets updated before it expires. >/dev/null 2>&1 is there because I really don’t care about the logs - if it works, I will never need to look at it, and if it’s broken I’m going to have to be running the command manually anyway to figure out what went wrong.
Doing a cronjob in SaltStack is so easy, I used it rather than editing the crontab for root myself.
So now my server is running with HTTPS, with a nice shiny LetsEncrypt certificate for both https://rootco.de and https://www.rootco.de, and the whole thing will auto renew ever 60 days. And if something goes horribly wrong and my server gets messed up, all of this is easily redeployable using SaltStack, which is a nice extra bonus for me.
One last thing
LetsEncrypt is awesome. This service is really revolutionary and is the sort of thing which shouldn’t be taken for granted, so please help them out by Donating to LetsEncrypt.
A tip for dealing with the first GSOC weeks.
And many students are still busy with exams and other things. You are ambitious, of course, so you make promises to your mentor and then--you might not be able to follow through on that. You're too busy studying or this family-and-friends thing gets in the way. Now what?

It is fine to make mistakes or miss a deadline...
Please understand that we get this! It is not a surprise and you're not alone. The key here is to communicate with your mentors. That way, they know why you're busy and when you will be back.Not having time for something, even if you promised - really, that is OK. When you have a job in the future it will happen all the time that more urgent things come up and you can't meet a deadline. Key is that you TALK about it. Make sure people know.
Let me give you a short anecdote - something that didn't even happen that early in my career...
At some point early in my job at a new company, I was on on a business trip and I missed my train. It was quite stupid: I got out in the wrong station. The result was that I had to buy a new ticket, spending over USD 180. I was quite upset about it and afraid to tell my manager about my blunder. I did the easiest thing: just avoid talking to my boss at all. As he was in the US and I was in Europe, that was not hard at all... But, after three weeks of finding all kinds of excuses to get out of our regular calls, he gave me a direct call and said: "what the heck is going on?". I admitted the whole thing and, of course, he was quite upset. But not at the USD 180. That is nothing on the budget of his or any team in any company. The costs of me not talking to him, now that he was serious about and I had to promise to never do that, ever, again.
... if you communicate about it
So what can you learn from my mistake? The rule, especially in the beginning of your career, is to over-communicate. Especially when it comes to new employees, many managers are anxious and worried about what is going on. Telling them often, even every day, how things are going and what you're doing is something they will never complain about.You can practice during GSOC: sending a daily ping about the state to your mentor, even if it is "hey, I had no time yesterday, and won't have any today". And a weekly, bigger report on what you worked on is also a very good thing to get going.
Understand that it is not unprofessional to miss a deadline or make a mistake, but it IS unprofessional if it comes as a surprise to others when they find out later on!
Especially if there's some kind of issue or you got stuck: you don't have to ask for help right away, though you should not wait to long--topic for another blog. But it is important that management knows. It makes them feel in control and believe me, the nightmare of every manager is to not be in control! If you do these things when you start working I promise you: it will score you points with your boss and help your career.