
 Member
 Ana06
Ana06
GSoC 2017
Hi! It has been a lot of time ago since the last post. I am writing because today starts the GSoC application period for the next summer. So if you are a university student and the idea of working in open source during your holidays appeals you, hurry up! You still have 2 weeks to look for a organisation and a project you like, approach the mentors and write a proposal. You should try to write the proposal as soon as possible so the mentors have time to review it.
Here you find the list of organisations that participate this year: https://summerofcode.withgoogle.com/organizations
On it you’ll find openSUSE, that participates this year too. You can find more information in opensuse 101: http://101.opensuse.org and in the organisation page.
This year I’ll also participate in GSoC, but this time as a mentor for openSUSE. So if you have any question regarding GSoC or openSUSE fell free to add them in the comments section of this page. 

Heatbed mod for the TinyBoy2
As long as one sticks to printing PLA, a printer without heatbed is ok, but for ABS or PETG a heatbed is a must.
The TinyBoy2 bed is actually a heatbed, although the wiring is missing, and a thermistor is required as well. The SMELZI controller board has a PWM controlled MOSFET, which is connected to the „HOT-BED“ socket, so making the bed a heatbed is straightforward.
Required Tools:
- Soldering Iron (80W minimum)
- Hex screwdriver
- 2.5 mm Drill
- File or handheld milling machine (Dremel) or …
PARTS:
- 100k SMD thermistor (size 0805, or 1206)
- pair of thick wires (35 cm) for the heater
- pair of thin wires for the thermistor
- 2,54 mm 1×2 connector (e.g. Dupont connector)
- M3x6 screw
- thin sheet of plastic, ~10×30 mm
1. Adding the thermistor

Added SMD thermistor, 1206 is slightly to large for a 0805 footprint …
2. Soldering the wires to the bed
As the bed is aluminium, soldering anything to it can be tricky, and you need a powerful soldering iron to get the solder to temperature. I ended up using two soldering irons simultaneously, one on each end of the solder blob.
The two wires for the heater go to the larger pads, the thermistor sensing cable has to be connected to the smaller pads. As we are connecting resistors here, direction does not matter.
3. Creating a strain relief for the wires
The wires will be bent all the time while the bed moves in the Y direction, so we need a strain relief or the cables will break after short time of operation.
I drilled a 2.5 mm hole into the red bed bracket/slide and pushed a M3 screw into it. The strain relief is created from a small sheet of plastic, size 10×30. Pick 3 small holes into the plastic, at 5, 15 and 25 mm from the edge. Wrap it around the cables, the holes should line up. After assembling, it should look similar to this:

Heater cables (red), temperature sensing cables (striped)
It is important the cables do not extend beyond the edge of the slide, otherwise the cables will colide with the case.
4. Creating a duct from the top to the bottom

I chose to exend the hole for the extruder stepper, which allows the cable to move freely when the board moves:


Remove the extruder before creating the hole, its just 4 screws and will simplify working in the constrained space a lot!
5. Connecting the cables to the controller

TinyBoy2 firmware upgrade to Marlin 1.1.0-RC8/RCBugFix
The TinyBoy2 is a Indiegogo backed 3d printer. On the plus side, it is very small (16×18 cm² desk space), and it does it jobs.
Like a lot of crowd funded projects, there is essentially no after campaign support. The firmware is a hacked version of Marlin 1.1.0-RC3. The code for the firmware which is shipped with the hardware is supplied as a code drop, but there is no changelog, and the diff to the upstream RC3 contains a lot of awkward changes, e.g. changes to the display SPI code, although the TB2 display uses I₂C. The diff between the code drop and RC3 is 53 files changed, 2196 lines removed, 2072 lines added.
As I wanted to update my printer to a recent firmware (RC3 was tagged December 2015) to get all the new features and bugfixes, and also to change the FW behaviour, I started with the current Marlin GIT, and added the necessary changes on top.
The nice part is that current Marlin is completely capable to drive the printer, support is mostly added by creating a suitable Configuration and setting the right pins for steppers, PWM, encoder and so on. The changes have been submitted upstream, or you can just pull the patched tree from my Marlin github repo.
Download the compiled firmware
In case you do not want to compile the FW yourself, I have prepared 4 variants: L10/L16, both with and without heatbed support:
-----BEGIN PGP SIGNED MESSAGE-----
Hash: SHA1

bd1af0b14e81c344d5ecac27a7c8ba09aaa96a0c  Marlin_TB2_L10_HeatBed.hex
fd754b2b9f0ff7271eb53c9cc9f022eee1b247b8  Marlin_TB2_L10.hex
f330e4ec2a3fcc32510c15b8f9c776731aa98598  Marlin_TB2_L16_HeatBed.hex
cc239598f0fe9ba0ccccb31b007c896c1595dea9  Marlin_TB2_L16.hex
-----BEGIN PGP SIGNATURE-----

iF0EARECAB0WIQSwWRWIpJbl0W4DemNvf0o9jP6qUwUCWM3KjQAKCRBvf0o9jP6q
U4HkAJ9GOBOmfTw1XUSQlTs745P7qKvO2wCfY/xWHpbGTfzuS7GZLDvTPnEjc7I=
=ce7+
-----END PGP SIGNATURE----
Flashing the firmware
Although it is possible to use Arduino to flash the firmware, I consider it much to bloated for the task, and as it uses avrdude behind the curtains, I prefer to call avrdude directly:
Backup shipped FW (sorry, not verified):
avrdude -p m1284p -b 57600 -c arduino -P /dev/ttyUSB0 -U flash:r:Backup.hex:i
Update to new FW:
avrdude -p m1284p -b 57600 -c arduino -P /dev/ttyUSB0 -U flash:w:Marlin.hex
(Update 2017-03-19 18:49 UTC: Added flashing paragraph)
openSUSE at Chemnitzer LinuxTage 2017
I went to Chemnitzer LinuxTage last weekend. That was a successful open source event.
openSUSE has got a lot of positive feedback. Some people changed from Ubuntu to openSUSE Tumbleweed and are happy.
There was some misunderstanding with the new release development of openSUSE Leap. Some people thought that would be a second rolling release by openSUSE. After explaining that we want to do that only in the development phase for achieving a more stable operating system and we will have a release day every year again, these cusomers have been happy again and like this idea. More stability is a good reason. 
invis server had his meeting about their new project openSUSE SMB. One openSUSE customer was interested for this project and I brought him to Stefan. Some booth visitors want to visit our next oSC in Nuremberg.
We had more customers than in the year before. Somtimes guys asked how to change to us and to contribute. Linux beginners wanted to have live CDs. We burned flash drives with Tumbleweed live images for them.
Sunday we had a raffle at our booth. The award was a big chameleon. You can see the winner on the picture.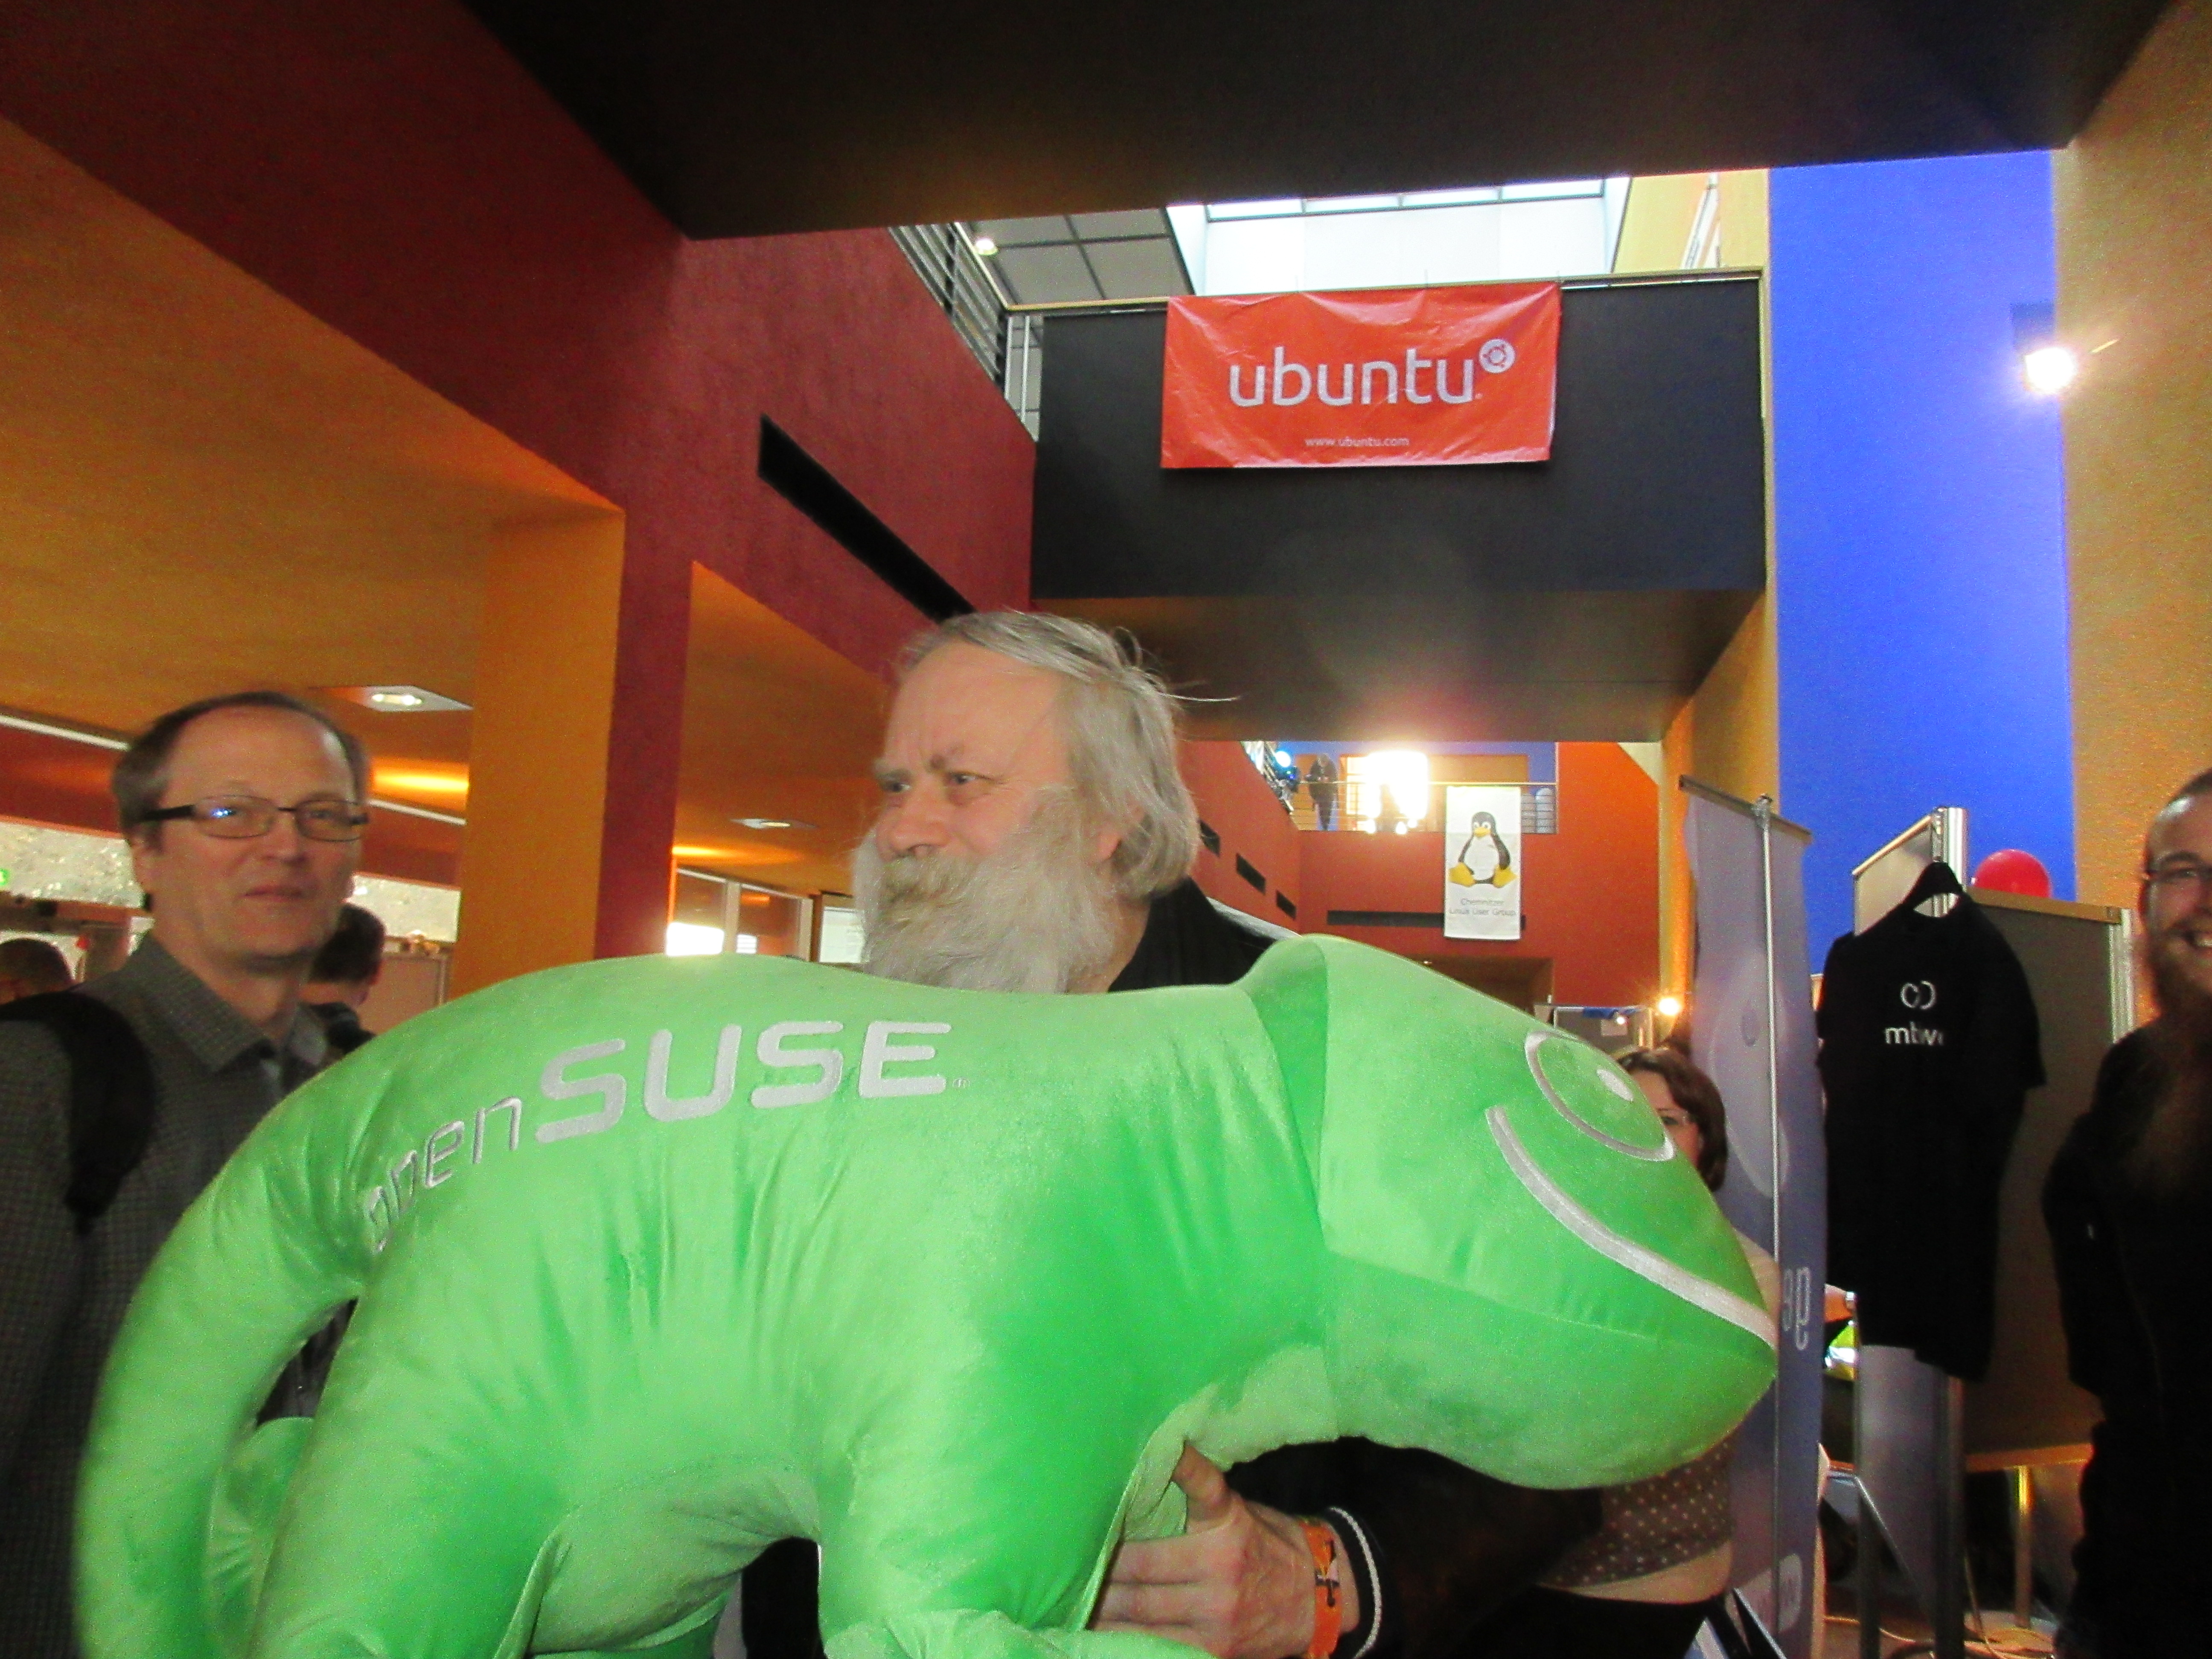 At the end I took part of the raffle by Thomas Krenn AG.
They produce server hardware and storage. Their first award was a low energy server which I won. That‘ s ideal for students like me. The best thing is that this server hardware is supported by openSUSE.
Chemnitzer LinuxTage was a fantasic open source event like every year. Thanks for the sponsoring!
The post openSUSE at Chemnitzer LinuxTage 2017 first appeared on Sarah Julia Kriesch.
Fun things to do with driver updates
Today: But what if I need a new kernel?
A driver update (DUD) can of course update a single driver. But if that’s not enough and you need a whole new kernel to run an installation?
There are two parts to solve:
- replace the kernel used during installation and
- get the new kernel installed
We’ll need two tools for this (both available in Tumbleweed or here: mksusecd and mkdud).
1. Replace the kernel used during installation
For this it’s important to know which kernel packages you’ll actually need. Typically it will be kernel-default and kernel-firmware. But older SUSE distributions (SLE 11 comes to mind) had the kernel packages split into kernel-default and kernel-default-base – you’ll need them both.
To make things confusing, modern SUSE distributions also have kernel-default-base – but it’s an alternative to kernel-default. In this case we don’t need it.
If unsure, check kernel-default. If it contains the actual kernel (e.g. /boot/vmlinuz) then you don’t need kernel-default-base.
On some architectures modules are also taken from xen-kmp-default. If that’s important for you, you can add this package to the kernel list as well.
In fact you can add any number of kernel packages or kmps you like.
In the past, sometimes a different kernel flavor was used. For example PowerPC had kernel-ppc64 for a while. Simply use the flavor you need.
It’s a good idea to gather all the kernel rpms into a single directory for easier use:
> mkdir k
> cp kernel-default.rpm kernel-firmware.rpm k
> cp kernel-default-base.rpm k    # only if needed
# add any kernel-related rpms you need
Then, take your SUSE installation iso and run
> mksusecd --create new.iso \
  --kernel k/* -- \
  original_dvd1.iso
Note that the --kernel option accepts a variable number of arguments, so you have to add an isolated -- to terminate the argument list properly.
The output could look like this:
> mksusecd --create new.iso \
  --kernel k/* -- \
  SLES-11-SP4-DVD-ppc64-GM-DVD1.iso
kernel version: 3.0.101-63-ppc64 --> 3.0.101-94-ppc64
CHRP bootable (ppc64)
building: 100%
calculating sha1...
The command above will actually get the list of required modules from the old installation iso. If you are missing some driver or the new kernel comes with some additional driver, the module will not be added to the new iso.
But there’s the --modules option. It will add the listed modules together with any implicitly required modules via module dependencies.
For example, let’s add the airport wifi-module to our PowerPC iso:
> mksusecd --create new.iso \
  --kernel k/* \
  --modules airport -- \
  SLES-11-SP4-DVD-ppc64-GM-DVD1.iso
kernel version: 3.0.101-63-ppc64 --> 3.0.101-94-ppc64
kernel modules added:
  airport, cfg80211, orinoco
CHRP bootable (ppc64)
building: 100%
calculating sha1...
As you can see, it automatically adds orinoco and cfg80211 as well.
2. Get the new kernel installed
This is relatively simple. A driver update can do this:
> mkdud --create foo.dud \
  --dist sle11 \
  --install repo \
  k/*
This creates a driver update for SLE 11 (which also applies to SP4) and the kernel rpms are installed via an auto-generated add-on repo (--install repo).
Now we have the driver update that installs our kernel packages. But how do we use it?
We integrate it into our iso above!
> mksusecd --create new.iso \
  --initrd foo.dud \
  --kernel k/* -- \
  SLES-11-SP4-DVD-ppc64-GM-DVD1.iso
mksusecd has an --initrd option that directly accepts driver updates and integrates them into the iso.
3. Can I have a choice?
Maybe you just want to test this new kernel or sometimes need the old one and sometimes the new one. Can you make an installation iso that lets you choose the kernel?
Oh yes! 
> mksusecd --create new.iso \
  --add-entry 3.0.101-94 \
  --initrd foo.dud \
  --kernel k/* -- \
  SLES-11-SP4-DVD-ppc64-GM-DVD1.iso
This does not replace the old kernel but adds a new boot entry Installation - 3.0.101-94.
So you can install with old or the new kernel.
grub2-set-default and submenus
Today, after some googling, I found out that even though you have unique "menuentry" titles, a plain "grub2-set-default my\ menu\ entry" still does not work, unless you give the path to the submenu.
This is done in grub2 syntax like this:
grub2-set-default "1>openSUSE Leap 42.2, with Linux 4.4.46-11-default"The "1>" tells grub2 to look for the menuentry in the submenu, which is the second toplevel item. For SUSE / openSUSE the second toplevel item is always, AFAICT, the "Advanced options for $VERSION" menu, where the additional kernels live.
An alternative for my case would have been
grub2-set-default "1>1"Which would be "the second entry from the submenu which is the second toplevel item" (counting from zero). But you need to look at the config file and count the entries.
The entries have an additional ID that looks like it is costructed like:
gnulinux-$(uname -r)-advanced-${UUID_OF_ROOTFS}in my case:
gnulinux-4.4.46-11-default-advanced-b073628b-5ddc-4a2d-9943-0f2999dfdaaaStill looks unwieldy, but you might be able to automatically determine that from a script.
How my savings are affected on Jet when I buy more things from it?
Jet is an e-commerce competitor to Amazon. I have been using Jet as a service for some time now and really love it. As a user, I use Jet to buy my groceries and some small ingredients daily.
What attracted me to the Jet was its free delivery for 35$ without any need for the requirement for Amazon Prime. I figured that if I can avoid the subscription cost and I can still buy my stuff, hey why not?
What really kept me hooked on to Jet was these factors
- No subscription and free shipping for a base amount of purchase
- Discounts and savings
- An above average customer service.
As I use Jet more and more, I wanted to find out how my savings were affected over time. What I really wanted to know was if I as a user was saving more over time or less given its dynamic pricing.
I will make a few assumptions here:
- I will not include any discount coupons applied as not all orders had discounts (in fact, I had applied only 1 discount coupon).
- I will not include any shipping discounts applied as well.
- I will not include taxes applied as part of my purchase as well.
- To normalize, all my savings will be displayed as the % of the amount I bought.
This is what I found from my own purchase behavior.

Observations
- As I buy more things on Jet, my savings on Jet.com go lower.
- There are peaks in the savings which help keep the users hooked into making purchases.
Takeaways from this for a customer acquisition and retention strategy
- First time users can be discounted heavily to make sure that they try the products for the first time.
- To build retention loops, the next few subsequent products can be discounted more than the first time so that users return to use their products in the hopes of gaining more values.
- As the users get used to the product, discounts can be reduced to recover the costs that were initially spent to acquire users.
Danbooru Client 0.6.1 released
A new version of Danbooru Client is now available!
What is Danbooru Client?
Danbooru Client is an application to access Danbooru-based image boards (Wikipedia definition).
It offers a convenient, KF5 and Qt5-based GUI coupled with a QML image view to browse, view, and download images hosted in two of the most famous Danbooru boards (konachan.com and yande.re).
Highlights of the new version
- Unbreak konachan.com support (change in URL format)
Coming up next
HTTPS support! This is something that I didn’t think up in the first release but that it is sorely needed nowadays. Ah? You wanted to know about multiple API support? Well… so far the code has been a bit bitrotting, as I kind of lack the motivation to work on it. If I pick it up again, I hope to finish it.
Release details
Currently, there is only a source tarball. For security, I have signed it with my public GPG key (A29D259B) and I have also provided a SHA-512 hash of the release.

Getting Started in Android Development: Part 3: Reducing Bloat
So far we have seen Part 1: Building the First App, and Part 2: Publishing the first App.
That Feeling When you build a brilliant piece of software and the users are ripping it from your fingers to the sound of raving reviews:
- dad: I'm home! Have you seen my first app I've e-mailed you about?
- kid: Hi. Yup.
- dad: So?? Do you like it? Have you given it any stars?
- kid: Just one. It can do almost nothing and it takes up too much space.
And the kid is right. App description: Press a button and get a random number between 1 and 6. App size: 6MB. Six. Megabytes.
In this post we will reduce that over a hundred times to 44KB.
Thanks to SUSE, my employer, for sponsoring a company-wide Hack Week which this project was a part of!
Debug or Release Build?
I did not manage to make a release build in the Android Studio IDE. So I tried from the command line. (J. Reidinger has pointed out that I should read Configure Build Variants.)
$ sudo zypper install java-1_8_0-openjdk-devel       # to provide javac
$ ./gradlew assemble
[downloads some deps at first... 280MB]
[lots of output for normal build too]
$ (cd app/build/outputs/apk; stat -c "%'9s %n" *.apk)
1,443,734 app-debug.apk
1,337,890 app-release-unsigned.apk
Apparently my hopes that a release build would be significantly smaller were unfounded. The APK has 1.5MB and takes up 6MB when installed.
Shrink Your Code and Resources
First I searched the web for "minify android app" and eventually arrived at Shrink Your Code and Resources in the IDE manual.
Using minifyEnabled true in build.gradle shrunk the signed release build from 1,347,038 bytes to 786,674, which results in 2.39MB installed size. (Did not find a way to install this build from the IDE, used adb install -r ./app/app-release.apk.)
Changing proguardFiles from proguard-android.txt to proguard-android-optimize.txt slightly shrinks the APK to 771,406 bytes.
Adding shrinkResources true: 745,490 bytes, 2.21MB installed.
Code Bloat: Activity Base Class
It seems that now the main reason for bloat is the sheer amount of included code: 5 methods of mine vs 4823(!) methods from the android.* classes.
Changed the base class of the main activity from android.support.v7.app.AppCompatActivity to android.app.Activity but then adb install says "Failure [INSTALL_FAILED_UPDATE_INCOMPATIBLE]". adb uninstall net.vidner.justrollonedie solved it. But I wonder what would happen if my users on the app store wanted to update. Fortunately I have none :D
The base class change improved the sizes to 661,870 APK, 1.62MB installed.

Code Bloat: API Version
I thought a 4x reduction in installed size was good enough, even if still bloated. I decided to fix one more thing before pushing an update to the store: the minimal required Android platform. (In the process of tinkering with a demo OpenGL app I discovered that android-8, supporting my old 2.2 Froyo phone, gets automatically downloaded if I declare it in the app manifest.)
So I did, and the side effect was perfect: all boilerplate code was gone and I ended up with a 17,282 byte APK, 44KB (kilobytes!) installed. Still too much for a microcontroller ;-) but good enough for Android.
Figuring out how to downgrade my code and layout and styles to still run on the older API seemed tricky at first, but then I simply generated a scratch project for android-9 and copied the differences. Then I changed one style name with the help of the API version filter (see screenshot).
Get the App, Get the Source
The source code for Just Roll One Die is on GitHub under a MIT license. You can try out Just Roll One Die on Google Play.
Hackweek 15 - the YaST Integration Tests
Hackweek 15
I decided to spend the last SUSE Hackweek with YaST and find a way which would allow us to write and run YaST integration tests easily. See the details in the project Hackweek page.
Some time ago I found the cucumber-cpp project. It is a cucumber support for the C++ programming language.
The reason is that the YaST UI uses the libyui library which is written in C++. If we want to control and check the YaST UI we need to implement it on the libyui level.
The Hackweek Result
Here are some Cucumber test examples which I was able to run in a real system. The source code for the tests and the details how to run them can be found at the lslezak/cucumber-yast GitHub repository.
Currently only the graphical (Qt) UI is adapted, the textmode (ncurses) will not work and crash (because of the ABI incompatibility).
The code is available in my GitHub forks of libyui, libyui-qt and small improvement was done for the cucumber-cpp library. The experimental RPM packes are available in the home:lslezak:cucumber OBS repository.
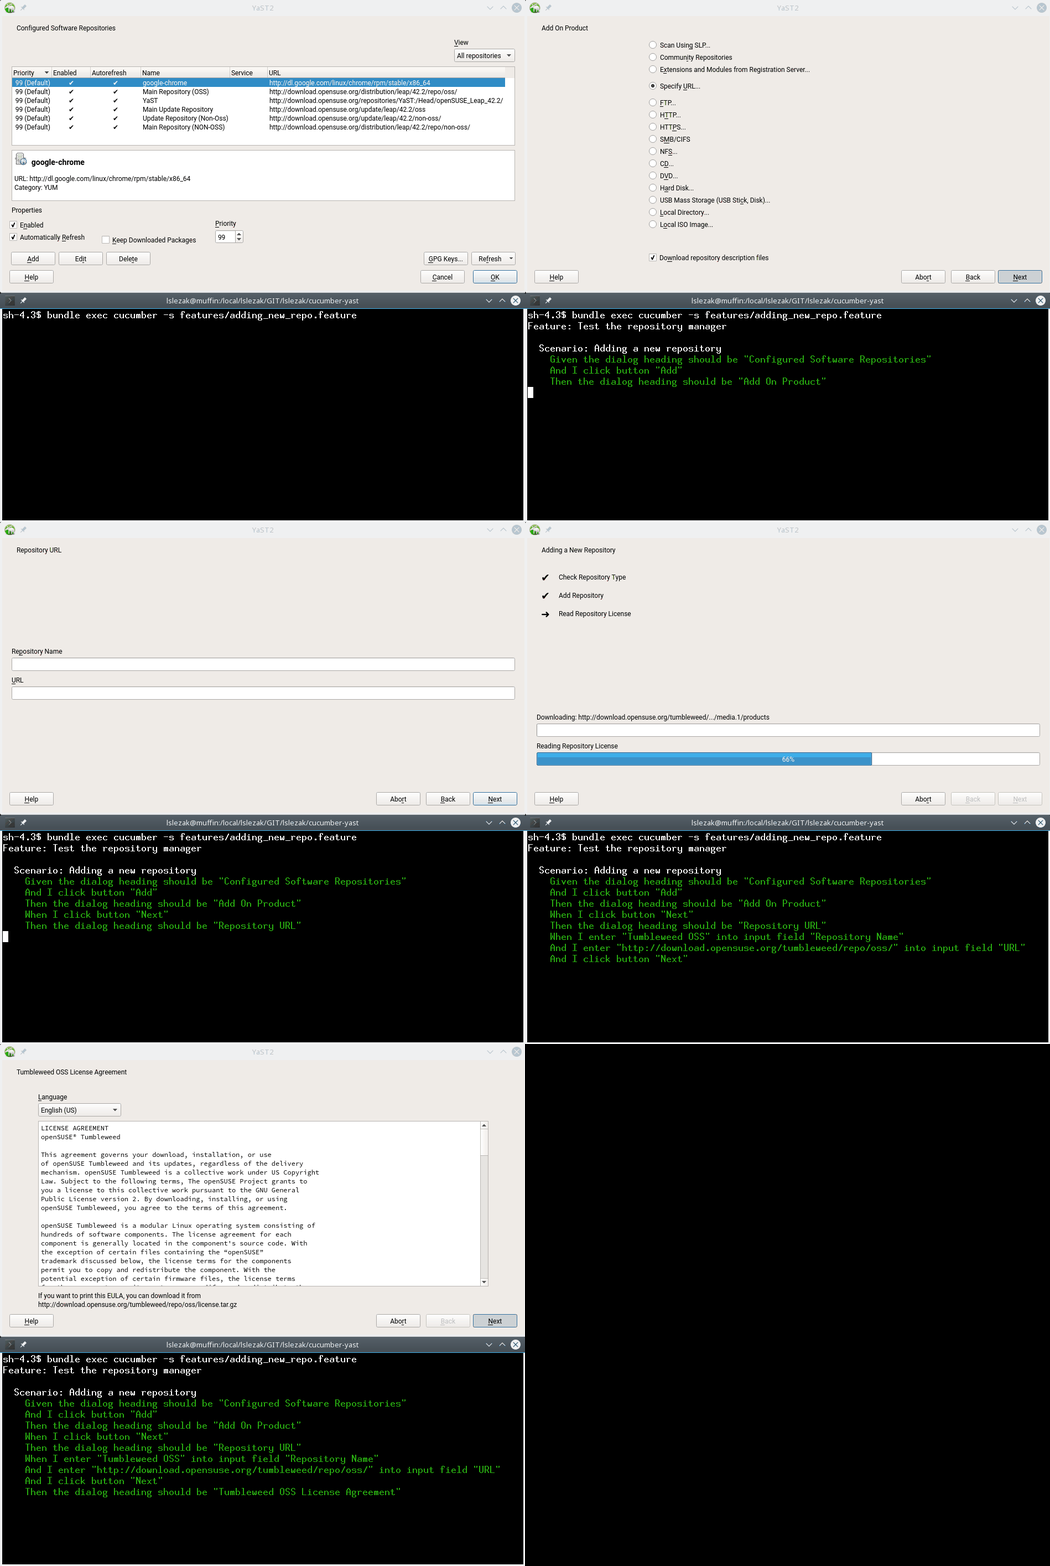
Running a Cucumber Test in Installed system
Here is the output of the adding_new_repo.feature Cucumber test.
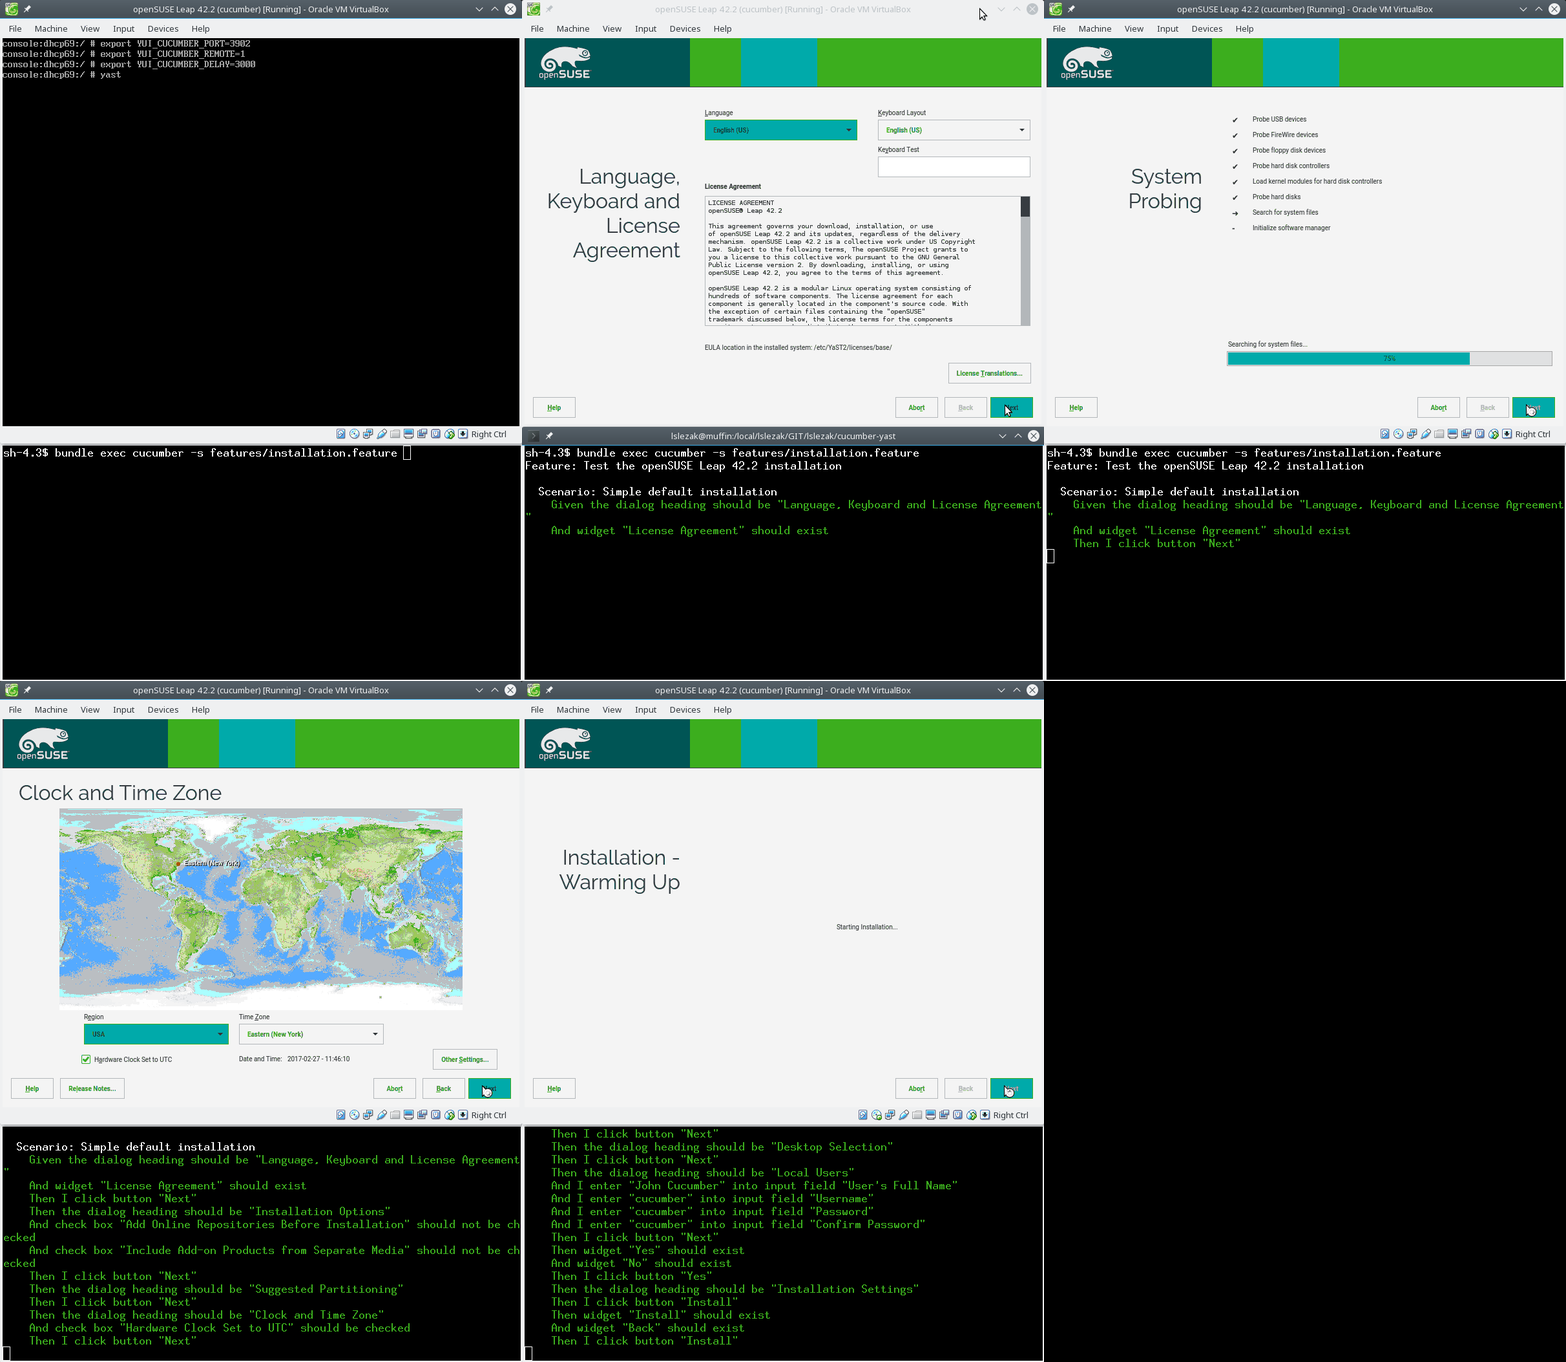
Running a Cucumber Test During Installation
This needs a patched openSUSE Leap 42.2 installer so it is not trivial to reproduce…
In this case the installation is running in a VirtualBox virtual machine and the test is running outside on my workstation. The test source is here.
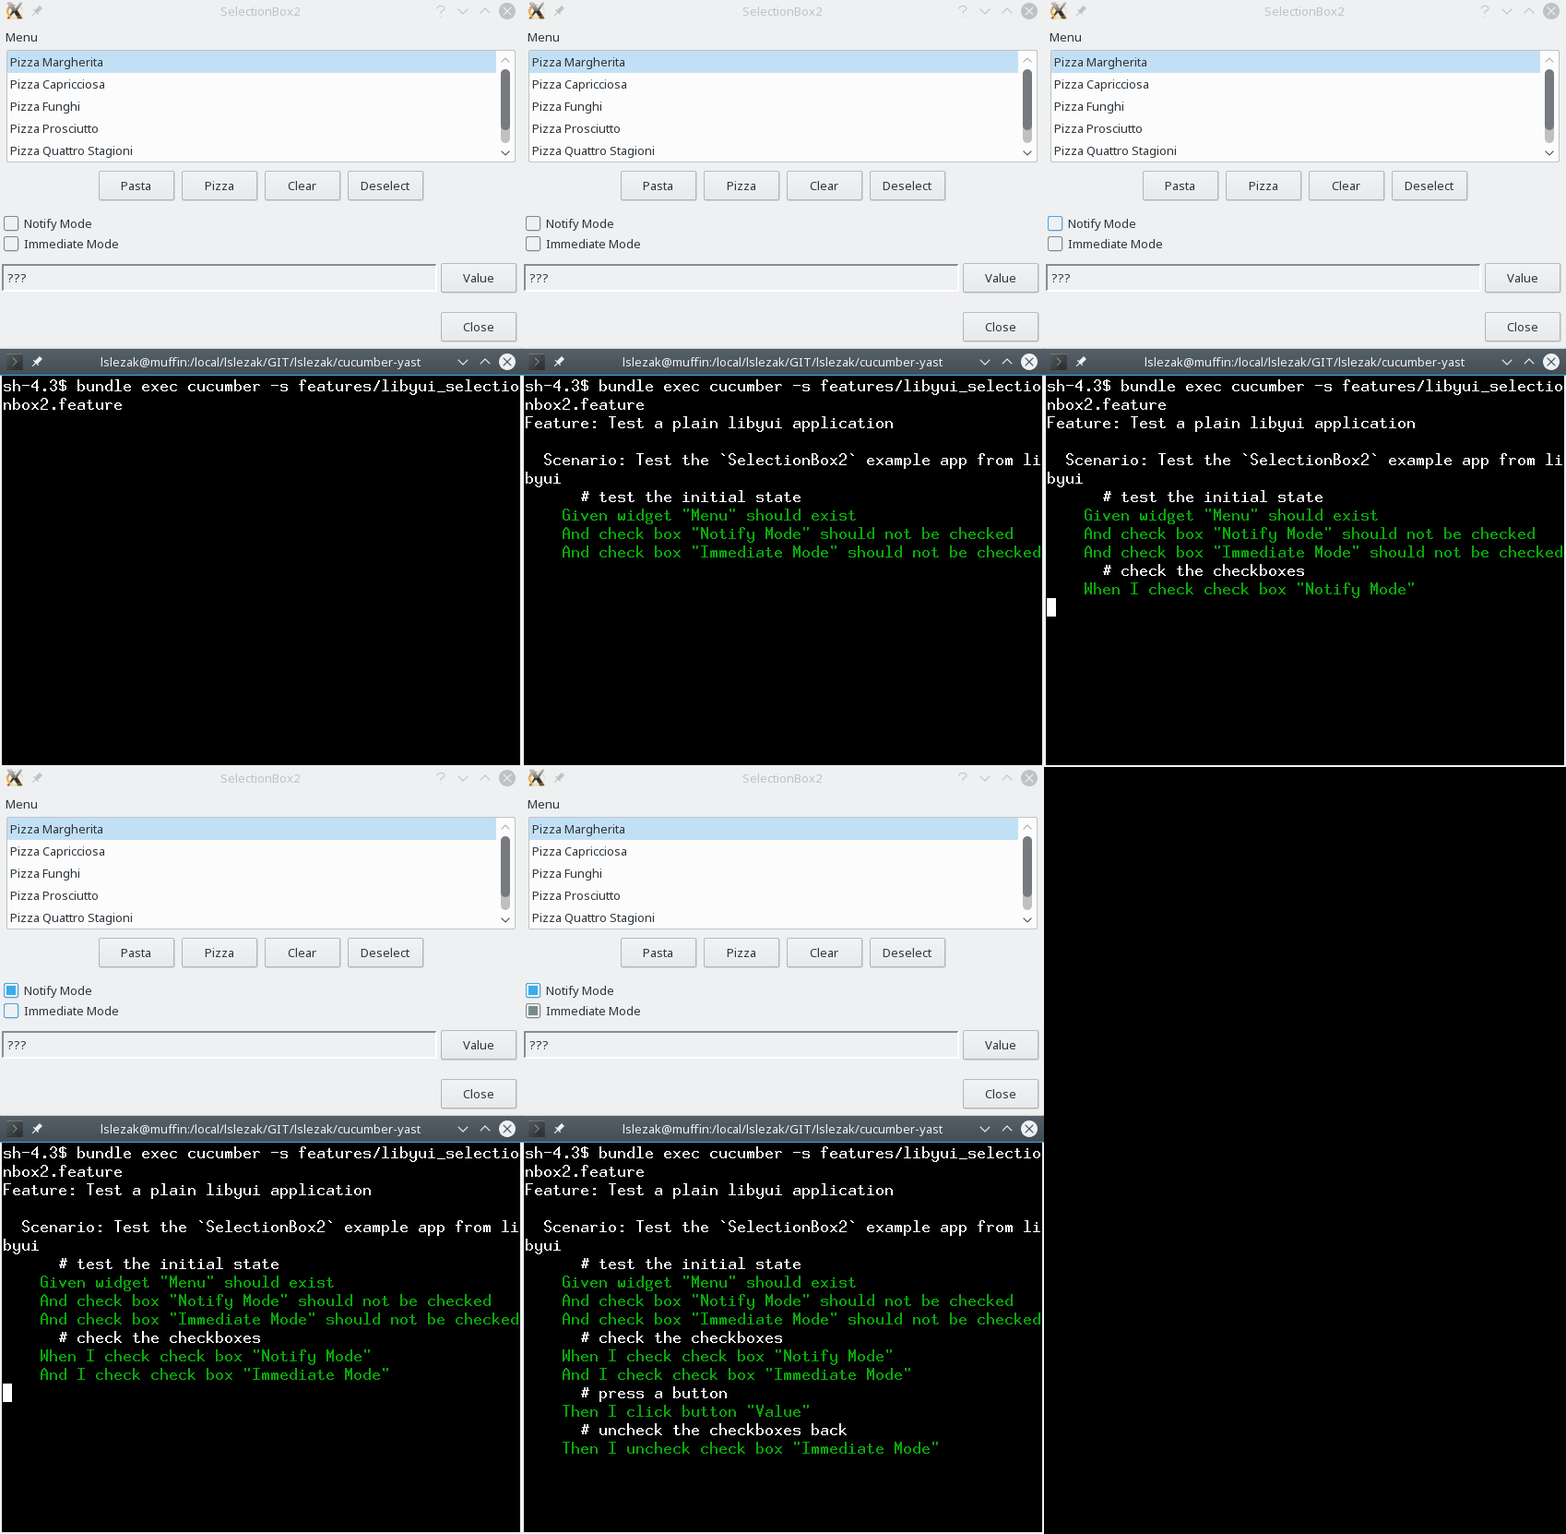
Running a Cucumber Test for a Plain Libyui Application
The Cucumber tests can be written actually for any application which uses the libyui framework, not only for YaST. This might be interesting for the other users of the libyui framework, for example the Mageia tools.
Here is a test for the libyui SelectionBox2.cc example.
What I Learnt
- Using boost for implementing a simple TCP server is probably an overkill,
after seeing this boost::asio example
:flushed: I decided to use plain and simple
socket()/bind()/listen()C functions. - Synchronizing with the application is crucial, you cannot verify the UI
state until it is fully built by the application. In case of YaST it
is when
UI.UserInput(or similar) function is called. - I refreshed my C++ knowledge, I even used a C++ template in the code :wink:
Technical details
- The cucumber-cpp library uses the Cucumber wire protocol which basically sends JSON messages over a TCP port. The advantage is that it is possible to test the application running at another machine. This is useful for testing the YaST installation.
- I had to reimplement the server part as the cucumber-cpp library can only test an application represented by a single C++ object. Because YaST uses a plugin architecture where the parts are loaded dynamically and they cannot be easily accessed from outside so the server part must have been implemented directly on the libyui level.
- The advantage of this solution is that the integration tests are available to any libyui based application, not only YaST.
TODO
- Add more matchers
- Support for more UI calls (e.g.
UI.PollInput) - Support the other UIs (ncurses, GTK)
- Support for the packager widget (in the
libyui-*-pkgsubpackages) - Increase the Cucumber timeout - when a step takes too much time (e.g. installing packages) then the test runner times out
- Closing the application crashes the test (the TCP port is closed and cucumber reports broken pipe)
- The application needs to be already running, it is difficult to ensure clean initial state or restart the application for another test scenario
The last two issues are quite tricky, it seems we will need to run some wrapper and communicate with YaST in the tests indirectly. In that case we probably should use some simpler communication protocol like the Test Anything Protocol (TAP). I was told that this protocol is already supported by openQA so it should be easy to use it also there…