
 Member
 lnussel
Firewall Zone Switcher Updated
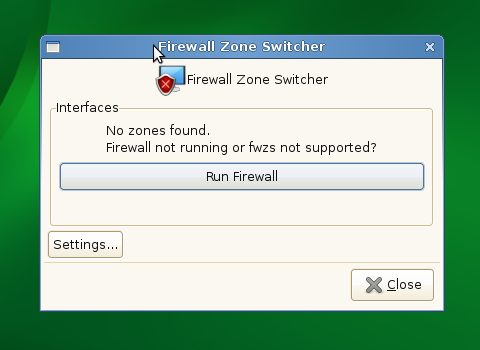
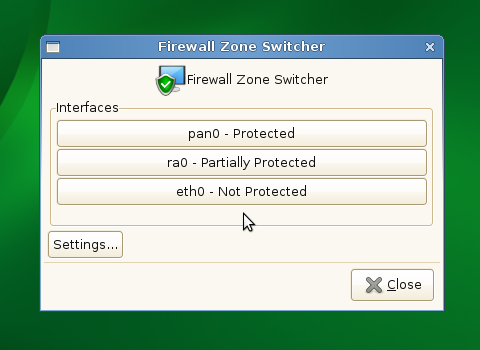
I have updated the Firewall Zone Switcher.
It now starts with a main window by default instead of
directly going to the system tray. There’s a settings dialog that
allows to enable the system tray icon and optionally also enables
starting the applet on log-in. Furthermore the daemon now uses
PolicyKit for access control and the applet supports i18n.

Packages for openSUSE 11.1 are available from the openSUSE build service. You also need to update SuSEfirewall2 from that repo. Source code repo is available at gitorious.
Awesometastic

The HTML/js UI is pretty slick even !
The code is not merged yet, but I packaged the extension and it's now installable from within F-Spot (> 0.6.0.0) from the "Extension Manager" dialog.
More details can be found on Anton's blog.
[Update 2009/09/15. The code is now merged]
Clicks with touchpad trick (11.2 M6)
If you are running the openSUSE 11.2 Milestone 6 (Gnome 2.27.5, Kernel 2.6.31-rc6-3-default) and find out that clicks of touchpad do not work, then this might help you a bit.
First of all, go to the Control Center, and look up for the Mouse item. Then click on Touchpad (obviously not using your computer’s touchpad, heh) and mark the option Enable mouse clicks with touchpad. That’d work fine 
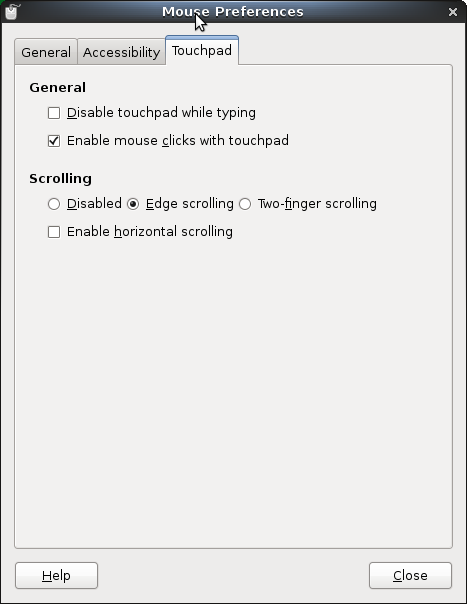
I must thank my friend Pedro Villavicencio of Ubuntu for letting me know about this solution.
Yahoo Mail and free IMAP
If you are using yahoo mail, like me, then you missed for a long time IMAP access for your inbox. They provide just POP3 access and I don't want that. I would like to have/access the messages also via web interface and also to have them on my computer for offline access. So, the solution is Zimbra Desktop and you can use it on Windows, Linux or Mac.
"Zimbra software is open source, meaning we make both the software code and the application itself available to anyone at no charge. Also, Zimbra Desktop is a full version; there are no missing features or catches"
For a complete list of features see this link: http://www.zimbra.com/products/desktop_features.html
If you have any issue with it you can find the answer on their wiki.
Here is just a screenshot:

It's gonna be legendary
 F-Spot 0.6.1.0 is out!
This one is coming quite soon after 0.6, and contains only fixes, cleanups and translation updates.
It aims to be a packager friendly release, as it drops some bundled code, some dependencies, a few megs of code, and more than a megabyte of installed size !
So, if you were using or packaging 0.6.0.0, jump in now, enjoy the .1.
[Update: I pushed 0.6.1.1 to avoid a reported build issue]

Tomboy 0.15.6 Released, ~/.tomboy is no more
 "Light Hearts", Copyright Ellery Armstrong, Milk Teeth Photography, Used With Permission
Yesterday I released Tomboy 0.15.6 on Linux, Mac OS X, and Windows. The biggest change is invisible to most users: we've gotten rid of ~/.tomboy.
Anybody who's backed up their notes or created Rube Goldberg-esque sync solutions is familiar with this hidden directory holding note files, user-installed add-ins, and various bits of configuration. As of today, ~/.tomboy is no more. We've separated out notes, configuration, temporary files, and even the log, and relocated them according to FreeDesktop.org standards on Linux, and appropriate conventions on Mac OS X and Windows. Everything will be automatically be moved. Details available on this wiki page.
The benefits of this move to users are:
- Users who are already trained to back up directories like ~/.config and ~/.local won't have to remember to add ~/.tomboy to that list (same argument for ~/Library on Mac OS X)
- Folks who want to set up their own ad-hoc note sync will now have a much easier time, because they can just sync the notes folder. Use any popular method of synchronizing a directory (rsync, iFolder, UbuntuOne, Dropbox, whatever), and combine that with our NoteDirectoryWatcher add-in, and you should be good to go. You'll miss some benefits of our sync infrastructure, like conflict handling, but you'll gain one big feature missing from Tomboy: automatic synchronization.
If you maintain some tool that expects Tomboy note files to live in ~/.tomboy, please update it to also look in (by default) ~/.local/share/tomboy. Thanks!
In the previous release I cleaned up the Search UI according to input from Andreas and Kalle at GCDS:
 The original Search UI: Pretty with a lot of wasted space and one useless feature (click for full window)
 The updated Search UI: Cleaner, lest wasted space (click for full window)
Other changes since the last time I blogged:
- New underline formatting add-in from Mark Wakim
- Keyboard shortcuts for changing font size
- Improvements to HTML export
- Less command line output unless you run Tomboy with --debug (this actually has a positive impact on performance, by the way)
- Add "Get More Add-Ins..." button in the Preferences UI
- In SSH sync, we no longer force port 22 if no port is specified
This post brought to you by the Tomboy Blogposter add-in.
Education Team Meeting 2009-08-26
We would like to announce, The Education team is meeting on 2009-08-26,
14:30 UTC. We would like to invite all interested parties to join us in
discussing what this years openSUSE for Education group will focus on.
Switching distros
Switching from Ubuntu to OpenSuse .
How many people annoyed with bugs in distro that they used for a while finally give up and go elsewhere ?
I know that is not many, as it involves some time to learn new one, but I know one that moved in opposite direction and few more that have some sort of plan B that include some other distro as an option.

Announcing ENOS 2009
Pelo terceiro ano consecutivo, toda a comunidade portuguesa de openSUSE reúne-se num só espaço com o intuito de dinamizar o projecto openSUSE em Portugal.
O ENOS 2009 (acrónimo para "Encontro Nacional de openSUSE 2009"), organizado pela comunidade portuguesa de openSUSE e pela Associação de Informática de Castelo Branco, decorrerá na magnífica cidade de Castelo Branco, Sábado 26 de Setembro, tendo como ponto de encontro o Instituto Português da Juventude de Castelo Branco pelas 10 horas.
O objectivo do ENOS é dar a oportunidade aos utilizadores portugueses de openSUSE de se juntarem assim como dar aos participantes uma visão introspectiva dos últimos desenvolvimentos do projecto openSUSE e estimulá-los a participarem na comunidade, tudo num ambiente bastante informal e aberto.

Para além do convívio, troca de ideias e discussões dos mais diversificados temas possíveis, também decorreram durante o dia apresentações e BoF's tais como:
- O projecto openSUSE desde à 365 dias (Carlos Gonçalves, openSUSE)
- Integração de Open Source vs Software Proprietário (Engº João Batista, Novell Portugal)
- Linux na pós-produção áudio (Ricardo Antunes, UrbanaFM)
- BoF: Moonlight (Andreia Gaita)
- BoF: Packaging com o Build Service (Carlos Gonçalves)
Também este ano será possível submeter-se aos exames de certificação LPI, através da empresa nacional DRI, Master Affiliate do LPI em Portugal, com um desconto de 50% nas certificações - os interessados deveram informar a organização com pelo menos 8 dias de antecedência da sua intenção.
Assim, convidam-se todas as comunidades, associações e instituições, empresas e individuais a participarem.
Embora o encontro seja totalmente livre, agradece-se o registo na página do evento ou por email para eventos () opensusept () org por forma a ter uma ideia do número expectável de participantes.
Para informação mais detalhada, queira por favor consultar a página oficial do evento em http://pt.opensuse.org/Eventos/ENOS
Com os melhores cumprimentos,
A organização do ENOS 2009
English Version (note: it differs slightly from the above in Portuguese)
For the third consecutive year, all the Portuguese openSUSE community users will be meeting will the main goal of boosting the openSUSE project in Portugal.
ENOS 2009 is the third yearly edition of the event and will be held in the Institudo Português da Juventude (IPJ), Castelo Branco, Portugal on Saturday, 26 September.
- About
- Schedule
- 10:00 - Gathering at Institudo Português da Juventude
- 11:00 - ENOS kicks off
- 11:15 - 11:50 - The openSUSE project since 365 days ago (Carlos Gonçalves)
- 11:50 - 12:00 - Coffe Break
- 12:00 - 12:45 - Open Source vs Proprietary Software Integration (Eng. João Batista) Batista)
- 13:00 - 14:30 - Lunch
- 14:30 - 17:00 - IPJ
- 14:30 - 16:00 - Audio post production on Linux (Ricardo Antunes)
- 16:00 - 16:30 - (pending talk)
- 16:30 - 16:45 - Coffe Break
- 16:45 - 17:30 - Birds of a Feather
- 16:45 - 17:10 - BoF: Moonlight (Andreia Gaita)
- 17:10 - 17:30 - BoF: Packaging with Build Service (Carlos Gonçalves)
- 17:30 - 18:30 - Activity (suprise)
- 18:30 - 19:30 - Ideas & Discussion ; openSUSE Install Party ; LPI Certification
- +19:30 - Castelo Branco at night

- LPI
The ENOS organization has the pleasure to announce that we agreed with the LPI Master Affiliate DRI to allow interested people to certificate themselves with the LPI certification during the ENOS meeting (50% discount), which is a really good opportunity to everyone get their own LPI certification!
- Invitation
For more detailed and up-to-date information please see the official event page.
- The Community
- Mailing list: opensuse-pt@opensuse.org
- IRC: #opensuse-pt on irc.freenode.net
- Web: http://opensusept.org
- Thanks To
Looking forward to see you there!
1-Click Bug Reporting?
First off, let me blow the dust off of my Lizards blog account 
Now that ![]() work and school has started to settle down, I’ve gotten back in to testing openSUSE’s newest version, 11.2. One of the things that annoyed me a little, though, was having to open Firefox to report or search for a bug in Bugzilla. So with a little inspiration from the Windows 7 beta’s links to “report a problem” everywhere, I created a desktop icon and panel launcher to automatically launch Firefox and open the “enter new bug” page on our Bugzilla.
work and school has started to settle down, I’ve gotten back in to testing openSUSE’s newest version, 11.2. One of the things that annoyed me a little, though, was having to open Firefox to report or search for a bug in Bugzilla. So with a little inspiration from the Windows 7 beta’s links to “report a problem” everywhere, I created a desktop icon and panel launcher to automatically launch Firefox and open the “enter new bug” page on our Bugzilla.
You can download this icon here (right-click and Save Link As). Perhaps this is something that should be included with the pre-release versions of the OS starting in 11.3? What do ya’ll think?
Update: Due to a suggestion by Pavol Rusnak, it’s now in openFATE – #307492