
Graph of Storage Devices
With openSUSE 11.1 on the road we developers can use some time for new ideas. One idea on my mind for month was to show the dependencies of storage devices in a graph. Using graphviz and QGraphicsScene a first version was running within few days.
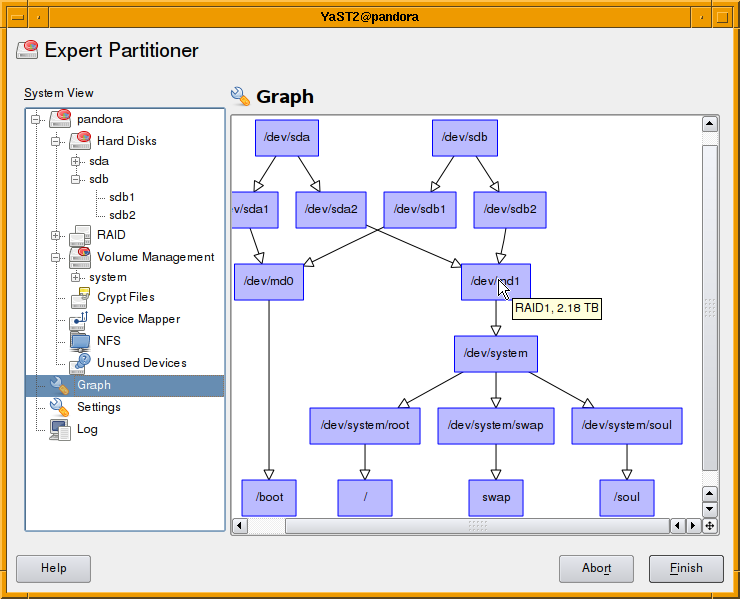
It’s far from finished. Some items still missing are:
- Use different shapes and colors for different devices types.
- Some basic user-interaction.
Will be available in Factory within the next weeks. Further improvements are welcome.
 Member
Modding the openSUSE flashlight

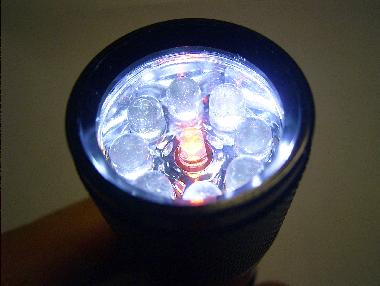
The boxed version of openSUSE 11.1 comes bundled with a LED-flashlight. Nice black and sturdy aluminum, Modern design with 9 white LEDs, no old-fashioned bulb that would produce more heat than illumination. Not flimsy, not heavy, just practical and quite bright. Batteries included. Exactly what I like.
But alas, this high-tech-toy is not perfect. The LEDs produce a strange unnatural light, which makes people look really sick. It gives a bluish-greenish tint to everything. This I don’t like. Okay, it is state of the art with regard to white LEDs, so this is no real reason to complain. Still, it leaves room for improvement.
Let us adjust the color of the light, so that objects look more natural. This posting explains you how to do it in 3 easy (or 4 not so easy) steps.
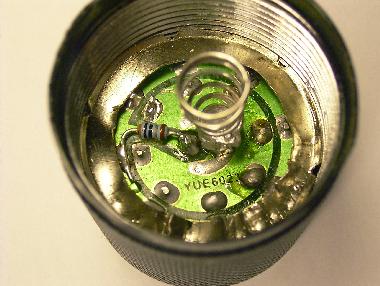
1 Disassembly
Unscrew the flashlight at the front end. Looking into the cap, you see a
printed circuit board (PCB) tucked down by a metal sheet ring.
I used a pair of good and pointed pliers to bite a notch in the ring to make it collapse. Then it can be pulled out easily. The PCB follows.
2 Reverse engineering
(This is the not so easy step. You can skip it. Step 3 will tell you right away
what you need.)
Inspecting the PCB, I find no resistors there, all LEDs are in parallel and are directly connect to the switch and battery pack. The battery pack provides 3×1.5 = 4.5 Volts — this is a bit too much for any LEDs. Blue and white ones have higheer voltages than other colors, but no datasheet I find for reference goes beyond 3.1V for white or 3.4V for blue. An Ohmmeter tells us, that the push-button switch at the back is only a switch, no resistors there. To see
what is really going on, we remove one of the LEDs, and solder a short length of thin two-wire cable in its place.
We also solder a 1cm piece of flexible wire onto one of the outer pads of the PCB to make contact with the housing. With this, we can reassemble the flashlight without metal ring and front glass, pulling the wires through the now vacant opening in the reflector.
Switching on, we can measure 3.5V at the wires. So all the LEDs in parallel are strong enough to pull down the voltage to an almost sane value, exploiting the internal resistance of those cheap AAA cells. Good.
I test one of my own white LEDs at the wires. It draws 35mA, which is above the nominal 20mA, but it seems to survive. Good. It is definitly brighter than the original LED, which only drew 18mA. Mine also has a larger viewing angle.
With this information, we can estimate that the original LEDs are rated ca. 2000-3000mcd, 3.3V, 15mA, and have ca. 12° viewing angle.
Now let us try to mix a more natural white.
A true white light radiates throughout the entire color spectrum. The human eye can adapt quite well to variations here. Covering a wide spectrum is important. Covering it evenly and without gaps is not.
For judging color quality, I collected a few photos, paintings, magazines, books and several other colorful objects and a white sheet of paper on my desk. You may use different objects. The idea is to compare colors under several lighting conditions. First we study colors in daylight, then with artificial light, and finally with an old fashioned flashlight (with a light bulb).
Now we test our flashlight and several different LEDs. We hold each LED in
parallel to the flashlight, and illuminate the objects and the piece of paper. Covering the exta LED with a finger is a fast way to see what kind of difference we may get.
The original impression was blue-ish. So let us start with yellow, the complementary color of blue.
First, we solder a yellow LED 10000mcd with an estimated 100 Ohm resistor to the wires. In my case it was not much effect. Doing some math, we find that we can risk a 47 Ohm resistor. Better, but red objects are still much to dark.
Next we test a red LED 12000mcd with 47 Ohm. Its viewing angle is wider and
the red was too strong for me. Back to 100 Ohm. Colors are quite good, but everything has a pink-ish touch, when compared to artificial light.
Finally, we try an orange LED 8000mcd with 47 Ohm. that looks quite good to me. Your results may vary, depending on the exact type of LEDs you are using.
This LED has a nominal voltage of 2.0V and current of 20mA, so the nominal resistor value should be (3.5V-2.0V)*0.020mA = 75 Ohm. Okay, It survived with 45 Ohms already, so we can try to lower the value a bit more (if we have one to spare). Let us try 30 Ohm for 5 minutes.
It survives and does not get too hot. The colors are quite nice, although the beam has an orange halo due to the wider viewing angle of the new LED.
We can cure this by replacing one (or a few) of the other LEDs with stronger white LEDs with the same 20° viewing angle as the orange LED has.
I also noted that shadows had green and orange edges, as I was holding my orange LED next to the white LEDs. To avoid these colorful shadows, we should place the orange LED in the center of the others. To reduce the halo, we apply at least one new white LED.
Now we have a plan.
3 Modding
Goal:
Have blue counteracted by sufficient orange. We may not get a perfectly balanced white but that does not matter.

Material:
- One orange LED 4000-8000mcd, 20° viewing angle. 600-610nm, 2.0V (e.g. Art Nr. 15601 or 13601 from www.leds.de)
- A small 30 Ohm resistor, smd-version if you dare.
- Optionally one (or more) white LED(s) ca 7000mcd, 20° viewing angle, 3.1V (e.g. Art Nr. 15005 from www.leds.de)
All in all ca. 0.50 EUR. (Or ca. 2 EUR if you want to replace all white LEDs too.)
Procedure:
- Remove the spring from the center pin by heating it with a soldering iron.
- Remove the center LED by heating both pins.
- Use a pointed knive to cut a gap into the circuit path leading from edge to center. Do not cut into your fingers. (Yes they are softer than the copper, but still, don’t do that.)
- Solder the 30 Ohm resistor across the gap. (Again, solder the copper, not your fingers, even if they have cuts by now.)
- Replace the center LED with the orange LED. The flat side (shorter wire) faces towards the resistor.
- Optionally replace some of the other LEDs bright white LEDs. The flat side
(shorter wire) faces outwards. - Solder the spring back in place, make sure it does not touch the other center LED pin, where the resistor is.
4 Re-Assembly
Take out the plastic glass from the cap, clean it. Put it back.
Fit the plastic reflector over the LEDs, this assembly into the cap.
Bring the metal ring back into shape. Maybe repair the ring by soldering.
Ideally, it snaps into the threading and can be screwed downwards.
If not, push it down onto the PCB using a screwdriver.
The ring should hold the PCB tight, we need good electrical contact
between the PCB and the housing.
Test your flashlight.
Was it worth it?
 _Marcus_
Saturday evening
What I want to mention is however that on the way back there were 3 young men sitting beside me in the bus who wanted me to take along into the nightlife of Nuernberg ... Age around 20ish. To places like Schmelztiegel and WON (World of Nightlive, a disco), both having visitors of average age of 18 or less ... Well guys, sorry to disappoint you, but I am not just tired from the day, I also am nearly double this age. (It is a bit sad though, since I would enjoy saturday nightlive occasionly ... but ... well.)
Work heavy week as usual, notably we brainstormed enhancements for the GPG key import dialog when adding new repositories to YaST2. It is difficult to secure and it is difficult to make it right, so that users can do good choices (and not just click "OK" to every question). We did not find an all dancing and singing solution, but hopefully some improvements can be done.
Wine 1.1.13 released, some more GPHOTO Nikon property additions and fixes done.

Ein paar Hinweise zur Migration eine openSUSE auf ein RAID5
Möchte man ein System auf ein RAID5 migrieren reichen dafür die drei Festplatten. Für Ubuntu ist dies auf Netzpiraten.ch schön beschreiben.
Ist der Grund für die Migration ein Hardwarefehler, so dass man die Ausgangsfestplatte anschließend tauschen möchte, kann man, statt wie auf Netzpiraten.ch beschreiben, auch erst einmal ein RAID5 mit nur zwei Platten anlegen. Dies entspricht zwar eigentlich einem RAID1 mit unnötig umständlicher Paritätsberechnung, lässt sich aber später problemlos zu einem echten RAID5 erweitern und bietet bereits während der Wartezeit auf den Austausch die gewünschte Fehlertoleranz.
Ein solches, einem RAID1 entsprechendes RAID5, weigert sich YaST allerdings anzulegen. Nutzt man allerdings die auf Netzpiraten.ch oder im The Software-RAID HOWTO beschreibenen Befehle gelingt dies problemlos.
mdadm --create /dev/md0 -n2 -l5 /dev/sdb3 /dev/sdc3
Die hierfür zuvor notwendige Partitionierung lässt sich am besten aus dem laufenden openSUSE-System mit YaST machen. Um die Dateien zu kopieren lässt sich das RAID unter Knoppix einbinden. Dort kann man die Dateien mit cp --archive kopieren.
Möchte man das RAID5 später um eine Festplatte, zum Beispiel die zuvor eingesparte Dritte, erweitern, hilft die Beschreibung auf isomerica.net. Wer ext3 verwendet muss nur statt xfs_growfs resize2fs verwenden. Der komplette Vergrößerungsvorgang kann komplett aus dem laufenden System erfolgen. Hierbei hilft watch den Fortschritt zu beobachten.
Da man bei diesen Aktionen auch durchaus mal die falsche Partition zerstören kann empfiehlt sich generell ein vorheriges Backup. Auch etwas Training in VirtualBox kann nicht schaden bevor man sich auf sein Live-System stürzt, dort können viele Unklarheiten beseitigt werden solange man noch ein komplett laufendes System hat.
About memory ownership in SWIG and Python
About libyui and libyui-bindings
libyui-bindings provides SWIG based bindings for Ruby, Python and Perl to access libyui functionality. libyui is the YaST user interface library, allowing to write dialogs in a generic way so they can be displayed in text (ncurses) or graphical (Qt) environments.Reference counting
The core of the problem is libyui relying on YaST data structures. These data structures implement reference counting, so one doesn't have to release allocated memory explicitly. That all fine, as long as you use YaST's YCP programming language to code dialogs. But coding YCP is not necessarily something a lot of developers are looking forward to.Thats where libyui-bindings enter stage and remove the YCP restriction. I've blogged about it ealier and Jan-Simon was especially active in providing lot of Python examples.
Competing on memory ownership
Now Python is a nice scripting language but has the bad habit of doing reference counting itself. This makes coding Python extensions in C quite awkward and clashes with libyui. Speaking of bad habits, libyui also has one - claiming ownership of memory passed as pointers to some functions.Fun starts when freeing memory. libyui and Python enter a nasty fight which Linux ends with a SIGSEGV. Jan-Simon reported this as a bug and provided a nice test case.
Swig typemaps
After some googling and reading the SWIG documentation a couple of times, SWIGs DISOWN typemap was the solution. Documentation for this is sparse and well hidden within the Chicken language chapter. Grrr.SWIG typemaps apply to function parameters and match the parameter type and name. One cannot specify per-function typemaps, only per-parameter. Fixing the bug required libyui to explicitly name parameters claiming ownership of memory. All such parameters within the libyui API are now ending with _disown.
Solving the case
Applying the typemap is done using the %apply directive:
%apply SWIGTYPE *DISOWN { YItem *item_disown };
%apply SWIGTYPE *DISOWN { YEvent *event_disown };
%apply SWIGTYPE *DISOWN { YTableCell *cell_disown };
%apply SWIGTYPE *DISOWN { YWidgetID *newId_disown };
%apply SWIGTYPE *DISOWN { YTableHeader *header_disown };
%apply SWIGTYPE *DISOWN { YTableHeader *header_disown };
%apply SWIGTYPE *DISOWN { YWidget *parent_disown };
Now Python gives up ownership for structures passed through a _disown parameter to libyui and all libyui Python examples run without coredumps. Case closed.
KDE Four Live 1.1.96
KDE Project:
A new version of the KDE Four Live CD with KDE 4.2 RC 1 packages is up. </twitter>

Community Content Required
At the launch of 11.0 there were several little projects started by the community these projects were actually really helpful and we would like to think contributed to the uptake and success of the 11.0 release. Now I will admit that I can’t substantiate this with any hard (or soft) facts, but none the less that’s our gut feeling 
So what are the projects in question? Well they are: Helping Hands, openSUSE-Tutiorials and openSUSE TV. Funny I can hear some people moaning and groaning that these are GNOME Team projects, WRONG!! These projects have indeed been started by members of the GNOME Team, but they are for the whole distribution and project. I know suseROCKs has tried in the past to try and get some contributions from other teams, so don’t blame the GNOME Team for the content blame yourselves.
Actually on second thought, drop the whole blame game thing. A better solution is to start a fresh and keep up the momentum. I am basically asking members of the openSUSE Community (that means ALL of you!) to step up and take the wild Geeko by the reigns and help teach all those non-believers that it really is easy to use, has some brilliant features (easily found and hidden), and generally a great distro and project to use and be involved in.
So if we take each item in turn:
1) Helping Hands: HH (as we affectionately call it) is aimed at giving an insight into certain aspects of the distro that a user may come across or wish to use. In the past we have had sessions on Inkscape, Evolution, Banshee, general GNOME usage and other applications. We are hoping to have one on packaging RPMs and using the Build Service in the not so distant future. We would love to see members of the KDE community enlighten us (yes some of the GNOME users are scared of things that begin with K) about things that are going on in there, I know there are loads of great things I’m just really knowledgeable in them or even know 25% of them. We would also like members of XFCE and any other desktop environment that’s out there to do the same. You can focus on a specific application, a suite of applications or anything that will be helpful to users. If possible get someone from upstream join in, it makes things much more interesting and actually opens eyes on both sides of the fence as to what is going on. If you are interested (why wouldn’t you be?) and are willing to help out (you know you want to) then please let wither myself (FunkyPenguin) or suseROCKs know on IRC, we hang out in most of the openSUSE channels.
2) openSUSE-Tutiorials: oS-T is aimed at being a repository of insights, tips & tricks etc on applications and other things with the distro. Why not just use the Wiki? Well in a nutshell there are times when the Wiki just isn’t suited, and this way topics can be easily grouped so are ultimately easily searchable. Not only by the big search engines, but also by any user who visits the site. Content is moderated prior to being published, and before you start screaming of a conspiracy to silence the truth it is actually to try and ensure that those items published are actually of good quality and will genuinely be of use. For more info on publishing something for oS-T then please ask either decriptor or suseROCKs on IRC (again they loiter in most channels).
3) openSUSE TV: oS TV is aimed at providing a medium to show all the wonderous videos that we have on and about openSUSE. These don’t have to be any of the official videos that are done at conferences but can also include screencasts, interviews and almost any other form of video that we have about openSUSE (both distro and project). The channel is part of the blip.tv service and as such is aimed at all platforms, not just Linux. We want to try and grow our user base and community which means looking at the competing Operating Systems. I am hoping to do a series of interviews at the upcoming FOSDEM show similar to those that I did in Nurenberg for Hack Week III; I have pencilled in the title of “Face to Face @ FOSDEM’09”. So if you’re going to be at the event (try and make it if you can because it is really a great event), and you have a specific topic you’d like to speak about then let me know. I would love to get more content on there, screencast would be great as would videos from LUG meetings where openSUSE is used/showcased etc. Remember oS TV is about the community, for the community, by the community. So your input is needed!
There is no reason why you can’t do an item on all three of the above and have them linked. For an example you could do a HH item on the KDE desktop (general first look etc), you could also do a screencast of that item and have the screencast posted to oS TV and to finish it up you could have an oS-T article on tuning your desktop to get the best out of it. If you feel that any of these are wrong/bad/need improving/$COMMENT then please keep those comments to yourself!! In all seriousness, they can only improve with your help so please let us know all and any feedback that you may have. Most importantly, please join in

openSUSE forums has reached 20K members
The openSUSE forums has reached another key milestone. After hitting the 10K members in September 2008, we now did it again – Member 20.000 registered yesterday at 20:37 UTC.

Congratulations to the openSUSE forums team!
If you haven’t signed up for the forums yet, please do so. Sharing your knowledge with other openSUSE users at the openSUSE forums is a great way to contribute to the openSUSE community in a non-developing capacity.
One of the most unknown, yet most useful feature of MonoDevelop is the Go to File dialog.
Some weeks ago I did several performance improvements, and introduced support for acronym matching. The filtering algorithm tries to find the best match, not only by searching substrings, but also by splitting the search string in several parts and trying to match them through all the words that compose the string being checked. This is an example:

When filtering files, the algorithm tries to match the file name, and if it fails, then it tries to match the whole file path. This allows filtering by directory. Following the example, if I type 'xml/ccomdata', it will fill find results under the MonoDevelop.XmlEditor.Completion directory. When there are several files with the same name, the list shows the parent directory name next to the file (inside brackets), so you can decide which one is the good one. Besides filtering, the dialog automatically highlights what it considers the best match.
After several weeks of use, I'm very happy about how the matching algorithm is working. Most of the time it manages to highlight the file I'm looking for by just typing 3 or 4 letters.
BTW, the same dialog supports searching by type name, using the same algorithm. In this case the shortcut is Control+Shift+T.

GreenIT: Power Consumption and -Optimization of PCs
"GreenIT: Power Consumption and -Optimization of PCs"
In the middle of last year, I participated in a seminar called "GreenIT" at university. The result was a 17 paged whitepaper called "GreenIT: Power Consumption and -Optimization of PCs". It took quite some time to finish this up, so it would be a waste of time if I would not publish it. A shortened table of contents looks like this:
- Introduction
- ACPI
- System as a Whole
- System Components
- Software Policies
- Conclusion
Please note: If you are only interested in how things are implemented in Linux, this might not be that interesting for you. It does not include any specific operating system details. It's rather general, although of a technical nature, and thus can be applied to any operating system out there.
If you are lazy of reading through the whole document, you might consider having a look at the corresponding presentation slides. However, you need to be able to speak, or at least to read, the German language for the slides to be useful for you.