
 Member
 baltolkien
Ponencia «Python y Qt» en Akademy-es 2024 de València esLibre Edition #akademyes
Me enorgullece seguir presentando los vídeo de la pasada Akademy-es. Hoy sigo con la ponencia «Python y Qt» realizada en Akademy-es 2024 de València esLibre Edition #akademyes donde vemos al incansable José Millán hablar de la relación de estas dos herramientas para desarrolladores. Un excelente punto de partida para poder conocer de forma virtual el gran evento de la comunidad española de KDE.
Ponencia «Python y Qt» en Akademy-es 2024 de València esLibre Edition #akademyes
Hoy me complace presentar un gran trabajo de equipo que se inició con los técnicos de GNU/Linux València, que utilizando los dispositivos de Slimbook, consiguieron grabar con éxito todas las ponencias de Akademy-es.
Posteriormente, David Marzal y Jon Intxaurbe se encargaron de ir montando la ponencias para poder publicarlas, de momento, en Kockatoo Tube. Están todas, con subtítulos y todo, así que poco a poco las voy a ir promocionando en el blog.
Sigo la serie con la charla de José Millán, tesorero de KDE España donde explica la relación que tiene el lenguaje de programación Python con las librerías Qt, una de las bases sobre las que se sustenta el ecosistemas de aplicaciones y entornos de trabajo de la Comundidad KDE.
La charla donde se explicará la fructífera relación entre el lenguaje de programación Python y las librerías Qt. Se comentarán específicamente las librerías PyQt y PySide, y se mostrarán algunos ejemplos.
Gracias a Jon por su inestimable ayuda en la edición de estos vídeos. En comunidad somos más fuertes.
¿Qué es el Akademy-es?
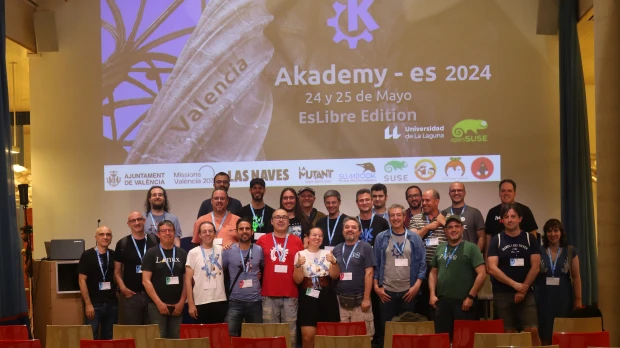
Akademy-es es el encuentro anual de desarrolladores, colaboradores y usuarios de KDE en España, que se celebra desde el año 2006 en distintas ciudades del territorio español y con esta se llegará a la decimasexta edición, lo cual significa una cifra más que aceptable.
Más información: KDE España
La entrada Ponencia «Python y Qt» en Akademy-es 2024 de València esLibre Edition #akademyes se publicó primero en KDE Blog.

New Agama blog and Agama 10
New blog for Agama!
Recently we started a new documentation site for Agama. After some discussions we decided to also start the Agama related blog there as well to avoid confusion between YaST and Agama. Since now we use this blog only for the YaST related posts, for the Agama news check the new place. We also imported the old Agama related posts from this YaST blog so you can find everything at one place.
So where you can find the new blog? It is here!
https://agama-project.github.io/blog
Enjoy! :jack_o_lantern:
Agama version 10
And to give you one more reason to look at the new Agama blog we have just published the Agama version 10 blog post there! :wink:
Ya disponible Thunderbird 8 para Android
¿Cuándo saldrá Thunderbird para Android? la respuesta es: ¡hoy!
Después de dos años de trabajo, la comunidad de Thunderbird, el cliente de correo de software libre para el escritorio, anuncia que ya está disponible desde hoy (30/10/2024) la versión 8 disponible para sistemas Android.
Hace poco más de dos años, se anunció los planes de llevar Thunderbird a Android adoptando el software ya existente de cliente de correo electrónico llamado K-9 Mail.
El proceso llevó un poco más de tiempo del que se había previsto originalmente, ¡pero la espera finalmente ha terminado! La primera versión estable de Thunderbird para Android ya está disponible.
Thunderbird para Android
- Notas del lanzamiento: https://github.com/thunderbird/thunderbird-android/releases/tag/THUNDERBIRD_8_0
- Foro de soporte oficial: Thunderbird para Android tiene su propia página de foro official Mozilla Support (SUMO). Encuentra la ayuda que necesitas para configurar y utilizar la versión más nueva de Thunderbird desde su comunidad en un sitio optimizado para dispositivos móviles.
- Importar ajustes: Ya sea que esté importando su información desde K-9 Mail o Thunderbird en el escritorio, transfiera su información rápida y fácilmente con su guía.
- Requisitos del sistem: Thunderbird para Android está disponible para sistemas Android 5 y superiores.
-
Dónde instalar: Puedes descargar Thunderbird para Android desde:
- Google Play Store
- GitHub Releases (apk)
- La página web de Thunderbird website (desde un dispositivo con Android)
- Pronto también desde F-Droid
- Participa: Thunderbird para Android prospera gracias al apoyo de la comunidad, ¡y tu puede ser parte de ella! Gracias a quien participa de una u otra manera. Diferentes formas de aportar.
- Apoya el proyecto: Thunderbird recibe el 100 % del apoyo de donantes. Tu donación ayuda a desarrollar nuevas aplicaciones (como esta), mejorar la velocidad y la estabilidad, promover Thunderbird y la libertad del software, y brindar descargas libres a millones de personas.. Dona desde su página web o en la propia aplicación.
- Sugerir nuevas funciones: Si tienes grandes ideas para funciones futuras, puedes compartirlas en Mozilla Connect, donde los miembros de la comunidad pueden votarlas y comentarlas. Thunderbird utiliza los comentarios que se envían para dar forma a su hoja de ruta de trabajo para el futuro.
Como usuario de Thunderbird en mi equipo de escritorio y de K9 en mi dispositivo móvil, estoy encantado de que ambos proyectos se hayan unido y hayan creado una gran herramienta que espero que poco a poco vaya ganando en funcionalidades y madurez.
En cuanto esté disponible en F-Droid la actualizo, de momento quienes utilizamos esta tienda de aplicaciones de software libre tenemos que esperar.
¿Ya la tienes en tu Android? ¿Cuáles han sido tus primeras impresiones? Compártelas en los comentarios.

A syslog-ng container image based on Alpine Linux
Recently, someone suggested I should check out Alpine Linux and prepare a syslog-ng container image based on it. While not supported by the syslog-ng project, an Alpine-based syslog-ng container image already exist as part of the Linuxserver project.
Read more at https://www.syslog-ng.com/community/b/blog/posts/a-syslog-ng-container-image-based-on-alpine-linux
syslog-ng logo
¿A qué hora y dónde ver el III Seminario Anual GNULinux?
Como ya comenté ayer, el próximo viernes se inicia un nuevo evento online deonde el Software Libre es el protagonista. Esto ya fue anunciado en el blog hace un tiempo pero esta semana estoy dedicando algunas entradas a su difusión.Este evento será retransmitido a todo el mundo utilizando los servicios de Telegram y Youtube tiene como objetivo mostrar, enseñar y demostrar las bondades de Linux, GNU/Linux.
¿A qué hora y dónde ver el III Seminario Anual GNULinux?
El proximo viernes 1 de noviembre se inicia el III Seminario Anual GNULinux y con la finalidad de aclarar el tema de horarios y donde verlo, los organizadores han realizado este vídeo donde queda bastante claro.
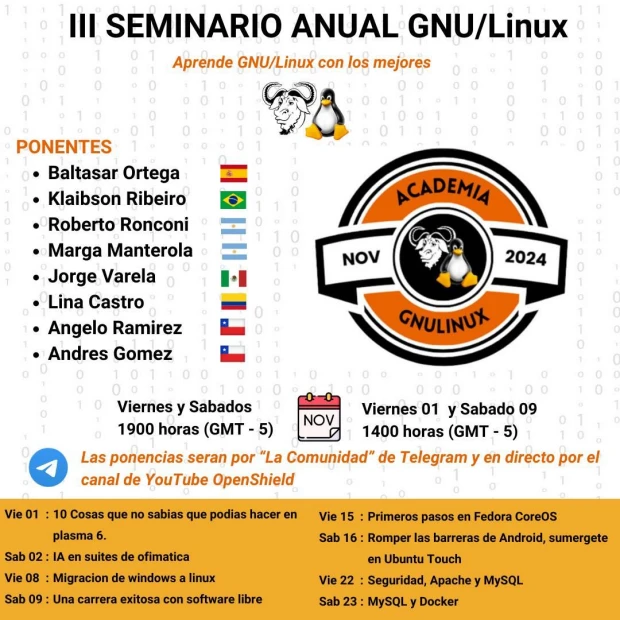
Para que lo tengamos claro, al menos el primer fin de semana, aquí os dejo la captura de la primera tanda de ponencias:

III Seminario Anual GNU/Linux
Todos los fines de semana de noviembre tienes una cita con el mundo GNU/Linux en forma de ponencia en directo con divulgadores de todo el mundo hispano hablante con la nueva edición del seminario Anual GNU/Linux.
De esta forma, la Comunidad OpenShield está organizando 8 presentaciones con las que iniciarse, aprender, profundizar y, en general, conocer un poco más el abanico de posibilidades que te ofrece el mundo del Conocimiento Libre al módico precio de un poco de tu tiempo (que no es poco).
El objetivo de este evento es mostrar, enseñar y demostrando las bondades de Linux, GNU/Linux. Pero lo mejor es que veáis el vídeo presentación:
Esta es la lista de participantes:
🗣 Klaibson Ribeiro 🇧🇷 🏢 Comunidad Brasileña del Software Libre de Brasil 📝 La IA en Suites de ofimatica
🗣 Roberto Ronconi 🇦🇷 🏢 Independiente 📝 Migración de Windows a GNULinux
🗣 Baltasar Ortega (un servidor) 🇪🇸 🏢 Comunidad KDE España 📝 10 cosas que no sabías que podías hacer con Plasma 6
🗣 Angelo Ramírez 🇨🇱 🏢 Bit Technology 📝 Seguridad, Apache, MySQL
🗣 Andres Gomez 🇨🇱 🏢 Bit Technology 📝 MySQL, Docker
🗣 Lina Castro 🇨🇴 🏢 Cencosud 📝 Romper las barreras de Android, sumérgete en Ubuntu Touch
🗣 Marga Manterola 🇦🇷 🏢 Aprendiendo con Marga 📝 Una carrera exitosa con sofware libre
🗣️ Jorge Varela🇲🇽 🏢 Red Hat Latinoamérica 📝 Primeros pasos en Fedora CoreOS
¿Qué os parece?
Más información: III Seminario GNU/Linux
La entrada ¿A qué hora y dónde ver el III Seminario Anual GNULinux? se publicó primero en KDE Blog.
Releasing version 10
As you can see we have a new place for our Agama blog! So let's start with announcing the Agama version 10 release at this new place! 🎉
We released the Agama version 10 quite some time ago, but we did not announce it yet because of lack of time. So if you downloaded the Agama installer recently then you are already using this new version.
We decided to separate the Agama blog posts from the YaST blog as those tools are quite different and to avoid confusion about what is what in the future. So welcome at the new blogging place for Agama!
QR codes with Agama URL
Let's start with some cool and fancy stuff! 😃
We found out that it is possible to display QR code even on a Linux text console. As QR codes can contain an URL then why not use it also for Agama? If you use a mobile phone for connecting to the running Agama instance this makes the process much easier.

The QR code is not displayed on standard 80x25 or 80x24 terminals because there is not enough space, it is displayed only on bigger screens.
Syntax highlighting
You can edit the current Agama configuration in a text editor using the agama config edit command.
This opens a text editor (Vim by default) with the current Agama configuration in the JSON format.
Previously the configuration was displayed as a plain text file without any syntax highlighting. Now you can enjoy JSON syntax highlighting which makes editing a bit more pleasant.


You can use any another text editor for editing the configuration but as the Live ISO content is limited it only offers Joe as an alternative.
EDITOR=joe agama config edit
You can install more editors using the usual zypper install command. But be careful, see the
warning below.
Product selection
We changed a bit the list of products which can be installed with Agama. Since version 10 it is possible to install openSUSE Leap 16.0 Alpha. We also created a SLES 16 flavor but for now it is not available for public.
The product selection dialog now contains the product icons so the product selection should be more intuitive. Many thanks to Luboš Kocman for implementing this!

Improvements in storage
Agama now supports creating LVM volume groups, logical volumes, thin pools and thin logical volumes in automatic installations. Reusing volume groups or logical volumes is not supported yet.
Also the existing partitions can be deleted automatically. There are two options, unconditional delete and delete only if needed. The first option always deletes the specified partition, the second option deletes it only when there is not enough space to create the needed partitions.
Always delete a partition:
{


  "search": "/dev/vda1",


  "delete": true


}
Delete a partition only when needed:
{


  "search": "/dev/vda1",


  "deleteIfNeeded": true


}
See more details in the auto_storage documentation.
Installation repository URL
By default Agama installs the packages from the repositories specified in the product configuration. Those normally point to the official SUSE/openSUSE installation repositories.
But for testing purposes, especially in the openQA tests, you might need to install the packages from some testing or staging repository to test the latest versions which are not published in those official repositories yet.
From now Agama supports using the agama.install_url boot parameter for overriding the default
installation repositories. You can use multiple URLs separated by comma:
agama.install_url=https://example.com/1,https://example.com/2
Internal changes
There are lots of internal changes in Agama so we mention here only the most important ones.
Typescript support
The Agama web UI started in plain Javascript. But that is quite fragile, you can easily by mistake pass wrong arguments to a function or call a missing method on an object. Such a mistake would cause a crash. The Typescript language avoids all these kinds of problems.
Recently we added support for writing parts of the web UI in Typescript. We do not plan to do any big refactoring at once, the files will be gradually switched from Javascript to Typescript when touching them.
TanStack Query state management
In the web frontend we started using the TanStack Query framework for the state management. It provides a mechanism based on promises to fetch or update the state automatically. It takes care of caching, re-fetching, error handling, etc. so you do not have to implement these features by yourselves.
Live ISO free space
In Agama 9 we fixed locking the package management system so now you can easily install additional packages into the Live ISO system. But it turned out that the available space for installing new packages was just about 0.5GB. That was not much if you wanted to install some big debugging packages or use your own compiled Agama HTTP server (the Rust binaries with debug information can be huge).
In Agama 10 we increased the available space to about 3.5GB which should be enough in most cases.
Because the Live ISO system runs in a RAM disk then any changes to the file system, like installing packages or editing the files, will take the RAM space. Make sure your system has enough RAM for storing the new or updated files otherwise the Agama installer might crash later!
Technically it was a bit tricky because when building the ISO image Kiwi computes the file system size automatically and does not allow to set a custom value. As a workaround we create a big sparse file during the image build which just takes a tiny fraction of its real size so the final ISO size is basically the same. To free even some more space the file is automatically deleted when booting the Live ISO.
Puppeteer
For writing the integration tests we originally used the Playwright framework. It works nice, it has great features, but there is one major problem for us: it does not work with original unmodified Firefox browser. For running the tests it downloads a specially patched Firefox binary. That means we cannot use it for testing Agama because we need to test it with the Firefox version we have in our distribution.
Unfortunately the Chromium browser which works fine unmodified cannot be compiled on S390 and PowerPC architectures. That means we would not be able to test Agama in SUSE Linux Enterprise on these architectures.
That is why we replaced Playwright with the Puppeteer framework in Agama 10.
HTTP backend in CLI
When moving to the new HTTP-based architecture without Cockpit we took some shortcuts. One of them was not using HTTP clients in the command-line interface (CLI) but using the old DBus API.
This was fixed in Agama 10 so now also the command-line now uses the same HTTP API as the web frontend. This should avoid possible inconsistencies between those two user interfaces.
Conclusion
Your contributions and opinions are important sources for feedback about the new release. So don't
hesitate to contact the YaST team at the
YaST Development mailing list,
our #yast channel at Libera.chat or the
Agama project at GitHub if you find any problem or have an
idea for improvement.
Have a lot of fun!

Tumbleweed Monthly Update - October 2024
This month, the rolling-release ran like a well-tuned engine as it powered through important updates and bug fixes with precision and speed. Updates were available for GNOME, systemd, qemu and more alongside important security patches. Various CVEs were addressed, particularly for Firefox, openssl, and virtualbox packages, to improve systems’ security. Desktop components for GNOME and KDE were also refreshed this month.
In addition to all the package updates this month, the rolling release received a fresh visual overhaul that revamped Tumbleweed’s logo and new wallpapers with both day and night themed variants.
As always, remember to roll back using snapper if any issues arise.
Happy updating and tumble on!
For more details on the change logs for the month, visit the openSUSE Factory mailing list.
New Features and Enhancements
-
LibreSSL 4.0: Major version 4.0 brings several significant changes and removals. Notably, the cms command in
openssl(1)now supports theCRLfileoption to specify additional CRLs during verification. The update also changes protocol handling in libtls, completely ignoring unsupported TLSv1.0 and TLSv1.1 protocols. The potentially dangerousEVP_PKEY*_check(3)functions were removed, and the Whirlpool hash function is no longer supported. -
bind 9.20.3: a new
WALLETrecord type was added and allows mapping domain names to cryptocurrency wallets. The release also introduces query response logging features that provide summaries through the responses category and an important change was made that includes the ability to fall back fromIXFRtoAXFRduring DNS record transfers if too many records cause a failure. Bug fixes address issues such as incorrect statistics in forward-only zones, a static-stub bug that causes misdirected queries and improvements to long-running processes like DNSSEC validation and zone file operations. - GNOME 47.1: Enhancements to gnome-shell include improved accessibility for quick settings, better tablet UI accent color usage and more accurate inset box shadows. Various layout fixes, padding adjustments and a crash fix are included with translation updates. The gnome-shell-extensions package adds missing top-bar indicators in the classic mode and gnome-sudoku users will enjoy the several UI fixes, including improvements to tooltips in light mode along with better handling of the undo function. The update of gnome-text-editor introduces fixes for documents defaulting to implicit trailing newlines and improves text wrapping on small screens. An update of gnome-bluetooth resolves a crash when canceling pairing and adds support for the Kawai CA501 music keyboard, alongside other improvements. With gnome-control-center, a fix was made for an accessibility regression in background name handling; the package also added improvements to various modules like Appearance, Color, and Users.
- xz 5.6.3: Key changes include a fix for x86-64 inline assembly compatibility with older versions of GNU Binutils and a build fix for GCC 4.2 on OpenBSD/sparc64. The xzdec tool now correctly displays errors if unsupported options like -M are used, and lzmainfo addresses integer overflow issues when rounding dictionary and uncompressed sizes. In terms of build improvements, the Autotools-based build system now handles link-time optimization (-flto) better, and Solaris users benefit from a fix in version.sh for regenerating configure files. The CMake system also sees improvements, including preferring C11 over C99 compilers, and avoiding unnecessary threading flags when linking against shared liblzma. Additionally, translations have been updated for Catalan, Simplified Chinese, and Brazilian Portuguese.
- KDE Plasma 6.2.1: A fix was made for Breeze with checkbox sizing when no text or icons are present. Discover addresses a crash related to null channels in Snap packages for those who use it and Plasma Addons improves the web browser applet’s scale selection. KWin saw multiple fixes, including optimized rendering with custom geometry, proper handling of X11 keyboard modifiers and preventing crashes related to window stacking and timestamps. Powerdevil introduces improvements in brightness control and fixing issues with display sliders. Spacebar fixed an issue with SMS sending to further refine communication capabilities in Plasma Mobile environments.
- KDE Gear 24.08.2: Dolphin fixes issues related to trailing slashes in URLs and ampersand display in filenames while Elisa resolves a problem preventing tracks without metadata from playing. Video editor Kdenlive had multiple bug fixes to include title producer updates, crash fixes and improved handling of effects and keyframes. Improvements in screenshot sharpness were made to Spectacle along with user interface elements like the blur and pixelate tools.
- Qt 6.8.0: This release provides key updates across the Qt framework, improving performance and stability. Core libraries like libQt6Core and libQt6Gui receive bug fixes and performance boosts. Qt Multimedia improves support for system Eigen headers and optimizes x86 compatibility. Qt WebEngine and Qt WebView enhance web rendering and include patches to prevent build failures on ARM systems. Graphics modules like Qt Quick 3D and Qt ShaderTools provide better 3D rendering and shader handling. Overall, this update enhances functionality across UI, multimedia, and web components.
-
NetworkManager 1.50.0: In this update, support for
dhclientwas deprecated, and it is no longer built by default unless explicitly enabled. The internal DHCP client, which has been the default since version 1.20, is now recommended. The package now considers /etc/hosts when performing reverse DNS lookups for the system hostname. Support has been added for multiple gateways on a single network throughndisc, andchannel-widthconfiguration for Wi-Fi AP mode is now supported. Other enhancements include improved handling of VLANs on bridge ports and better handling of malformed LLDP packages to avoid crashes. -
cups 2.4.11: This update addresses several issues related to Internet Printing Protocol (IPP) response validation, PostScript Printer Description (PPD) value processing and enhancements in the Web UI. Notable changes include updating the maximum file descriptor limit for
cupsdto 64k-1 and fixing thelpoptions -dcommand for discovered but unadded printers. Support for checkboxes in the Web UI was also enhanced, along with improved printer state notifications and IPP Everywhere printer setups. Several commits related to IPP validation and PPD string processing were also included that address issues such as localized string handling.
Key Package Updates
-
systemd 256.7: This version contribution by 26 developers with 83 commits. Key improvements include refined support for managing
nspawncontainers, handling ofld.so.cacheand better logging mechanisms in the query response systems. The release also addresses issues with seccomp synchronization and improves error handling in the ARP protocol (sd-ipv4acd). - kernel-source 6.11.3: Key updates include improvements in static call handling, specifically in module failures and static key decrements. Several SCSI fixes address issues like input/output errors on empty drive resets and PCI queue mapping overwrites. On the graphics side, the Intel and AMD GPU drivers see optimizations that include fixes for power management and display rendering. Networking updates include fixes for Realtek PHY drivers, VLAN handling, and preventing potential underflow conditions in packet length initialization. The update also introduces various memory leak fixes, improvements to Bluetooth, and enhancements to netfilter and IPv4/IPv6 handling.
-
gpg2 2.5.1: New commands like
--add-recipientsand--change-recipientsprovide added flexibility in managing recipients, and the--proc-all-sigsoption has been added for signature processing. Improvements include fixes for key retrieval, PKCS#12 parsing updates and a resolution for theKEYTOCARDcommand when using loopback pinentry. The version update also now leverages the process spawn Application Programming Interfaces from libgpg-error for greater system compatibility. - gtk4 4.16.3: This update enhances how default cursor themes are handled by searching within XDG directories to ensure better compatibility with Wayland environments. The default cursor size now matches the gsettings schema and provides a more consistent user experience. The fallback process for portal settings was refined as settings_portal is cleared when switching to fallback without portal settings. This release also includes updated translations.
-
php8 8.3.13: Some essential fixes arrived in this package for its core and extensions. The Calendar extension addresses overflows in date functions like
jdtounix, while CLI updates prevent duplicate HTTP headers. The core updates resolve segmentation faults, memory leaks and assertion errors, which stabilize nested frames and hash tables. In DOM, null pointer and memory leak issues are fixed for smoother XML handling. LDAP now handles memory leaks inldap_modify_batchand SOAP patches address segmentation faults and memory leaks. -
wicked 0.6.77: This release enhances IPv4/IPv6 node generation and interface-specific settings. It improves sysctl inheritance across interfaces, including loopback, but excludes settings like
use_tempaddrandaccept_dad. Routing updates resolve destination processing issues, and manpage enhancements clarify configuration details. New options include anignore-rfc3927-1-6setting for DHCP4. Compatibility improvements address deprecatedINTERFACETYPE=dummy, and the package update fixes data leaks in ethtool operations.
Bug Fixes and Security Updates
Several key security vulnerabilities were addressed this month:
-
Firefox 131.0.3:
- CVE-2024-9936 was a vulnerability that allowed attackers to manipulate selection node cache, potentially causing crashes.
- CVE-2024-9392 could allow arbitrary cross-origin page loading in Firefox and Thunderbird versions below 131.
-
libnbd 1.20.3:
- CVE-2024-7383 allows man-in-the-middle attacks due to improper TLS certificate verification when connecting to NBD servers.
-
Openssl:
- CVE-2024-9143 was a flaw that may cause out-of-bounds memory access that potentially leads to crashes or remote code execution, but was a low likelihood.
- CVE-2023-50782 was a flaw that amy have allowed a remote attacker to decrypt captured messages in TLS servers that use RSA key exchanges leading to exposure of confidential or sensitive data.
-
qemu 9.1.0:
- CVE-2024-8612 may leak uninitialized data and lead to potential information exposure.
-
virtualbox 7.1.4:
- CVE-2024-21248 allows low-privileged attackers to compromise the system that could potentially lead to unauthorized data access, modification or partial denial of service.
- CVE-2024-21273 allows high-privileged attackers to gain unauthorized access to all data, potentially impacting other products.
- CVE-2024-21259 allows high-privileged attackers to potentially take over the system, impacting confidentiality, integrity and availability.
- CVE-2024-21263 allows low-privileged attackers to cause a complete denial of service and gain unauthorized read access to some data.
-
libarchive 3.7.6:
- CVE-2024-20696 and CVE-2024-26256 were remote code execution vulnerabilities.
-
webkit2gtk3 2.46.1:
- Apple users benefit from fixes for CVE-2024-40866 and CVE-2024-44187.
-
gnome-shell:
- CVE-2024-36472 could allow the launching of a portal helper based on network responses that would enable untrusted JavaScript execution that could potentially cause resource consumption or other impacts.
-
oath-toolkit 2.6.11.12:
- CVE-2024-47191 could allow root privilege escalation via improper users file access to include symlink handling.
-
unbound 1.21.1
- CVE-2024-8508 allows denial of service that could cause excessive CPU usage during name compression.
Conclusion
October 2024 brought significant updates to Tumbleweed users and gave them a secure and performant system. Updating critical packages like systemd, pgp, php, GTK4 and more keeps your system up-to-date with the latest snapshots. Stay updated with the latest snapshots by subscribing to the openSUSE Factory mailing list.
Stay updated with the latest snapshots by subscribing to the openSUSE Factory mailing list. For those Tumbleweed users who want to contribute or want to engage with detailed technological discussions, subscribe to the openSUSE Factory mailing list . The openSUSE team encourages users to continue participating through bug reports, feature suggestions and discussions.
Contributing to openSUSE Tumbleweed
Your contributions and feedback make openSUSE Tumbleweed better with every update. Whether reporting bugs, suggesting features, or participating in community discussions, your involvement is highly valued.
Some more Power t-shirts
Recently I posted about two of my Power t-shirts. Many people responded. Some wanted to get one of the t-shirts from me, others asked me what else do I have. I cannot give you the t-shirts, but I can show you a few more :-) I must admit that only one of them has Power printed on it, but the other two are also Power-related.

Genesi t-shirt
The oldest t-shirt is from Genesi. They had various Power machines, and I worked on Linux support of these systems. The first one was the Pegasos, which was a quite capable workstation. It was faster with a lot lower power consumption than x86 systems of the time. The other one was more embedded category, the EFIKA. I used it for measurement automation.

Summit t-shirt
The next t-shirt only mentions nVidia. However, for a couple of years Summit was the fastest supercomputer on Earth, utilizing 9216 POWER9 22-core CPUs and 27648 nVidia GPUs. Even six years later it is the 9th fastest supercomputer.

OpenPOWER READY t-shirt
Finally a “real” Power t-shirt by the OpenPOWER Foundation: “OpenPOWER ready”. It is a program by the foundation, collecting both hardware and software ready to be used with OpenPOWER systems: OpenPOWER Ready Mark.
I proudly wear any of these t-shirts as they remind me about important events in POWER history. However, recently I try to wear them less, as I do not know how many more washes they can survive.
PS: no, I do not want to sell them either. Oh, well, probably for a price no sane person wants to pay ;-) Or, if you do not mind something recent, Power 10 t-shirts are available at https://logostore-globalid.us/product/428389
KDE estará presente en el III Seminario Anual GNU/Linux
El próximo viernes se inicia un nuevo evento online deonde el Software Libre es el protagonista. Esto ya fue anunciado en el blog hace un tiempo pero esta semana quiero dedicar algunas entradas a su difusión ya que la Comunidad KDE estará presente en el III Seminario Anual GNU/Linux organizado por la Comunidad OpenShield. Este evento, que será retransmitido a todo el mundo utilizando los servicios de Telegram y Youtube, pretende mostrar, enseñar y demostrar las bondades de Linux, GNU/Linux.
KDE estará presente en el III Seminario Anual GNU/Linux
Hace un tiempo que me invitaron y, por supuesto, acepté, a participar en el III Seminario Anual GNU/Linux represenando a la Comunidad KDE. El nombre de la charla es sencillo ya que mi objetivo es mostrar lo que puedes hacer con Plasma y que lo convierten en el escritorio más eficiente para cualquier usuario.
De esta forma, no os perdáis «10 cosas que no sabías que podías hacer en Plasma 6» a lo que yo pondría el subtítulo «o sí» ya que no creo que encuentre a un usaurio que no conozca esos 10 trucos.

La fecha es el viernes 1 de noviembre a las 21:00 hora peninsular española. En breve pongo los canales para su visualización.

III Seminario Anual GNU/Linux
Todos los fines de semana de noviembre tienes una cita con el mundo GNU/Linux en forma de ponencia en directo con divulgadores de todo el mundo hispano hablante con la nueva edición del seminario Anual GNU/Linux.
De esta forma, la Comunidad OpenShield está organizando 8 presentaciones con las que iniciarse, aprender, profundizar y, en general, conocer un poco más el abanico de posibilidades que te ofrece el mundo del Conocimiento Libre al módico precio de un poco de tu tiempo (que no es poco).
El objetivo de este evento es mostrar, enseñar y demostrando las bondades de Linux, GNU/Linux. Pero lo mejor es que veáis el vídeo presentación:
Esta es la lista de participantes:
🗣 Klaibson Ribeiro 🇧🇷 🏢 Comunidad Brasileña del Software Libre de Brasil 📝 La IA en Suites de ofimatica
🗣 Roberto Ronconi 🇦🇷 🏢 Independiente 📝 Migración de Windows a GNULinux
🗣 Baltasar Ortega (un servidor) 🇪🇸 🏢 Comunidad KDE España 📝 10 cosas que no sabías que podías hacer con Plasma 6
🗣 Angelo Ramírez 🇨🇱 🏢 Bit Technology 📝 Seguridad, Apache, MySQL
🗣 Andres Gomez 🇨🇱 🏢 Bit Technology 📝 MySQL, Docker
🗣 Lina Castro 🇨🇴 🏢 Cencosud 📝 Romper las barreras de Android, sumérgete en Ubuntu Touch
🗣 Marga Manterola 🇦🇷 🏢 Aprendiendo con Marga 📝 Una carrera exitosa con sofware libre
🗣️ Jorge Varela🇲🇽 🏢 Red Hat Latinoamérica 📝 Primeros pasos en Fedora CoreOS
¿Qué os parece?
Más información: III Seminario GNU/Linux
La entrada KDE estará presente en el III Seminario Anual GNU/Linux se publicó primero en KDE Blog.
