
 Member
 baltolkien
Visor meteorológico Aero Weather – Plasmoides para Plasma 6 (26)
Tras un parón debido al salto de Qt5/KF5 a Qt6/KF6 que realizó la Comunidad KDE hace ya más de año y medio. Es por ello que decidí retomar esta sección aunque renombrándola ya que en ella solo hablaría de Plasmoides para Plasma 6. Así que hoy os presento el visor meteorológico Aero Weather con el que llegamos al número 26 de la serie.
Visor meteorológico Aero Weather – Plasmoides para Plasma 6 (26)
Como he comentado en otras ocasiones, de plasmoides tenemos de todo tipo funcionales, de configuración, de comportamiento, de decoración o, como no podía ser de otra forma, de información sobre nuestro sistema como puede ser el uso de disco duro, o de memoria RAM, la temperatura o la carga de uso de nuestras CPUs.
Así que espero que le deis la bienvenida a Aero Weather, un visor meteorológico paraKDE Plasma, creado por XcurcX que viene a complementar el abanico de estos widgets para nuestro entorno de trabajo favorito que nos ofrece estas características:
- Tarjeta de clima directa en el escritorio
- Widget de panel compacto
- Condiciones actuales y pronóstico multi-día
- Estados de carga, sin conexión y error con mensajes de reintento
- Opción de color de fuente personalizada
- Ubicación automática por IP o coordenadas manuales
- Soporte para Celsius y Fahrenheit
Este plasmoide es una modificación de Chaac Minimal Weather de zayronxio (creador muy conocido del blog), distribuido bajo GPL-3.0+ con atribución.

Y como siempre digo, si os gusta el plasmoide podéis «pagarlo» de muchas formas en la página de KDE Store, que estoy seguro que el desarrollador lo agradecerá: puntúale positivamente, hazle un comentario en la página o realiza una donación. Ayudar al desarrollo del Software Libre también se hace simplemente dando las gracias, ayuda mucho más de lo que os podéis imaginar, recordad la campaña I love Free Software Day de la Free Software Foundation donde se nos recordaba esta forma tan sencilla de colaborar con el gran proyecto del Software Libre y que en el blog dedicamos un artículo.
Más información: KDE Store
¿Qué son los plasmoides?
Para los no iniciados en el blog, quizás la palabra plasmoide le suene un poco rara pero no es mas que el nombre que reciben los widgets para el escritorio Plasma de KDE.
En otras palabras, los plasmoides no son más que pequeñas aplicaciones que puestas sobre el escritorio o sobre una de las barras de tareas del mismo aumentan las funcionalidades del mismo o simplemente lo decoran.
Aquí bajo os muestro los últimos publicados en el blog:
-
Visor meteorológico Aero Weather – Plasmoides para Plasma 6 (26)
 Calendario original para tu escritorio, Almanac Asimetric – Plasmoides para Plasma 6 (2)
 -
Controla tu batería en Plasma con Battery Plasmoid Boero – Plasmoides para Plasma 6 (27)
 Calendario original para tu escritorio, Almanac Asimetric – Plasmoides para Plasma 6 (2)
 -
Lanzador estilo MacOS para KDE Plasma: Tahoe Launcher – Plasmoides para Plasma 6 (25)
 Calendario original para tu escritorio, Almanac Asimetric – Plasmoides para Plasma 6 (2)
 -
Mejoras en el nuevo Bouncy Ball de Plasma 6
 Calendario original para tu escritorio, Almanac Asimetric – Plasmoides para Plasma 6 (2)
 -
El rebote infinito de Bouncy Ball aterriza en Plasma 6 – Plasmoides para Plasma 6 (24)
 Calendario original para tu escritorio, Almanac Asimetric – Plasmoides para Plasma 6 (2)
 -
Ejecuta una orden desde tu escritorio, Run Command – Plasmoides de KDE (248)
 Sigo con estas pequeñas aplicaciones que se conocen como applets,… Lee más: Ejecuta una orden desde tu escritorio, Run Command – Plasmoides de KDE (248)


La entrada Visor meteorológico Aero Weather – Plasmoides para Plasma 6 (26) se publicó primero en KDE Blog.
Nuevo Slimbook Creative, renovando su modelo de gama alta
En esta semana de los Slimbook Days es un buen momento para promocionar su nuevo Slimbook Creative su portátil de gama alta especialmente diseñando para los usuarios más exigentes: creativos y jugones. Esta actualización nos ofrece mejoras en el rendimiento, el diseño, la personalización y la portabilidad. Todo un póquer de ases en cuanto a mejoras.
Nuevo Slimbook Creative, renovando su modelo de gama alta
Antes de empezar quiero destacar no penséis que hago toda esta publicidad porque reciba una compensación económica, simplemente porque confío en esta empresa que no olvida que el Software Libre es algo más que Software y que busca ofrecer no solo productos sino un excelente servicio pos-venta, algo que en muchas ocasiones olvidamos que es importante.
Dentro de la gama de ordenadores de sobremesa, la empresa valenciana Slimbook presentó en el2025 su Slimbook Creative, su nueva apuesta por ofrecer un ultrabook de gama alta que intenta cubrir las necesidades de los usuarios más exigentes.

Pues bien, este 2026 ha decidido renovar este dispositivo y aprovechar para mejorar cuatro de sus características fundamentales como son rendimiento, diseño, personalización y portabilidad, las cuales detallo a continuación:
Rendimiento
Esta nueva generación incorpora una de las CPUs más destacadas de la nueva serie con IA de AMD: el Ryzen AI 9 365, un procesador diseñado para combinar alto rendimiento con capacidades avanzadas de inteligencia artificial gracias a su NPU dedicada. Todo pensado para poder utilizar IA en modo local de forma efectiva, que creo que es el siguiente sueño húmedo de los que no queremos depender de empresas de dudosa ética.
Además, incorpora la nueva NVIDIA GeForce RTX 5070, que amplía enormemente las posibilidades del equipo: renderizado 3D, creación de contenido, diseño gráfico, vídeo, proyectos de inteligencia artificial o sesiones de juego exigentes.

Diseño
La pantalla sigue siendo uno de sus puntos fuertes: un panel de 2560 × 1600 píxeles, formato 16:10 y 180 Hz, que ofrece una experiencia visual fluida y de alta calidad tanto para trabajo creativo como para entretenimiento.
Entre las novedades más visibles encontramos el nuevo teclado RGB, configurable con efectos dinámicos que permiten personalizar completamente la estética del equipo.

Personalización
Creative no solo destaca por su potencia y portabilidad, sino también por sus amplias posibilidades de configuración. Puedes adaptar el equipo a tus necesidades concretas, eligiendo entre diferentes opciones de memoria, almacenamiento y otros componentes clave.
Un portátil pensado tanto para profesionales como para usuarios exigentes que buscan un equilibrio entre rendimiento, diseño, versatilidad y portabilidad.

Portabilidad
Pese a ser un portátil muy potente, el nuevo Creative no quiere ser una carga así que ha reducido su tamaño respecto a la versión anterior, ofreciendo 15,3″ de pantalla en un chasis más pequeño y ligero sin sacrificar rendimiento ni batería.
Y no solo ha cambiado su tamaño, también ha reducido su peso a solo 1,9 kg, con un chasis metálico negro resistente y una batería de 99 Wh, superando a la mayoría de equipos con la misma configuración, que suelen pesar alrededor de 2,5 kg y usar materiales menos robustos.

Para finalizar os comparto algunas de las características:
-
Procesador y Gráficos
-
CPU: AMD Ryzen
 AI 9 365 (10 núcleos, 20 hilos, hasta 5.0 GHz) con NPU de 50 TOPS para tareas de Inteligencia artificial.
 -
GPU Dedicada: NVIDIA GeForce RTX 5070 (8GB GDDR7) con un TGP de 115W (+15W Dynamic Boost).
-
GPU Integrada: AMD Radeon 880M.
- Extras: Incluye MUX Switch (permite alternar entre dGPU, iGPU y modo híbrido).
-
CPU: AMD Ryzen
-
Pantalla
- Tamaño: 15.3 pulgadas con relación de aspecto 16:10.
- Resolución: 2.5K (2560 x 1600p).
- Frecuencia: 180 Hz.
- Calidad de imagen: 100% sRGB, 400 nits de brillo y contraste 1200:1.
- Diseño: Bisagra con apertura de 180º.
-
Memoria y Almacenamiento
- RAM: Hasta 128 GB DDR5 a 5600MHz (2 slots SO-DIMM reemplazables).
- Almacenamiento: Hasta 8 TB totales (2 slots M.2 NVMe PCIe 4.0 x4).
- Conectividad y Puertos
- Puertos Traseros: 1x USB-C Thunderbolt 4 (40Gbps, DP 2.1a, PD 3.1), 1x HDMI 2.1 (conectado a dGPU), 1x HDMI 2.1 (conectado a iGPU), 1x Mini DisplayPort 2.1a.
- Puertos Laterales: 3x USB-A 3.2 Gen 2, 1x USB-C 3.2 Gen 2 (DP 1.4a, PD 3.0), Jack combo 3.5mm.
- Red: Ethernet RJ45 (1 Gbps), Wi-Fi 6 / 6E y Bluetooth 5.2.
- Lector de tarjetas: SD/SDHC/SDXC (UHS-I).
-
Batería y Otros
- Batería: 99.9 Wh (la capacidad máxima permitida para viajar en avión).
- Carga rápida: Alcanza el 40% en solo 30 minutos.
- Construcción: Chasis de aluminio en color negro mate.
- Peso: Aproximadamente 1.9 kg.
- Seguridad: Webcam HD 1080p con infrarrojos (IR) para desbloqueo facial por hardware.
- Teclado: Retroiluminado RGB con 1.4mm de recorrido.
 AI 9 365 (10 núcleos, 20 hilos, hasta 5.0 GHz) con NPU de 50 TOPS para tareas de Inteligencia artificial.
Más información: Anuncio Slimbook Creative | Slimbook Creative |Tienda
La entrada Nuevo Slimbook Creative, renovando su modelo de gama alta se publicó primero en KDE Blog.
Cuarta actualización de Plasma 6.6
Me alegra compartir con todos vosotros la cuarta actualización de Plasma 6.6, iniciando así una serie de revisión de software que le dotará de más estabilidad, mejores traducción y resolución de errores. Estas actualizaciones son 100% recomendables y casi obligatorias para cualquier usuario ya que lo único que hacen es mejorar la versión sin comprometer sus funcionalidades.
Cuarta actualización de Plasma 6.6
No existe Software creado por la humanidad que no contenga errores. Es un hecho incontestable y cuya única solución son las actualizaciones. Es por ello que en el ciclo de desarrollo del software creado por la Comunidad KDE se incluye siempre las fechas de las mismas siguiendo una especie de serie de Fibonacci.
Así que me congratula en presentar que hoy martes 7 de abril de 2026, varias semanas después de liberar el código de Plasma 6.6 la Comunidad KDE presenta la cuarta actualización de errores.

Más información: KDE
Las novedades generales de Plasma 6.6
Aprovecho para realizar un listado de las novedades generales de Plasma 6.6:
- Nuevo Teclado Virtual: Se estrena «Plasma Keyboard», un teclado en pantalla completamente renovado y mejorado para dispositivos táctiles.
- OCR en Spectacle: La herramienta de capturas de pantalla ahora puede reconocer y extraer texto de las imágenes capturadas.
- Plasma Setup: Un nuevo asistente de configuración inicial que permite crear cuentas de usuario y configurar la red de forma independiente al proceso de instalación del sistema.
- Temas Globales Propios: Ahora puedes convertir tu configuración actual en un «Tema Global» personalizado, que además es compatible con el cambio automático entre modo día y noche.
- Intensidad de color: Posibilidad de ajustar la intensidad del color de los cuadros de las ventanas.
-
Selector de emojis: Nuevo selector de tonos de piel para los emojis (
Meta+.). - Conexión por QR: Si tienes una cámara, puedes conectarte a redes Wi-Fi escaneando códigos QR.
- Control de volumen rápido: Puedes ajustar el volumen de una aplicación específica pasando el puntero sobre su icono en el gestor de tareas y usando la rueda del ratón.
- Lista de ventanas: Nueva opción para abrir la lista al pasar el ratón (Open on hover) y filtrado de ventanas por actividad o escritorio.
-
Propiedades rápidas: Manteniendo
Alty haciendo doble clic en un archivo del escritorio se abren sus propiedades. - Filtros para Daltonismo: Se añade un filtro de escala de grises, sumando un total de 4 filtros para diferentes tipos de deficiencia visual.
- Modo de seguimiento en Lupa: Nuevo modo que mantiene el puntero siempre centrado en la pantalla mientras se usa el zoom.
- Mejoras en Wayland: Soporte para «Teclas lentas» (Slow Keys) y ajuste estándar de «Movimiento reducido».
- Escritorios Virtuales: Posibilidad de tener escritorios virtuales solo en la pantalla principal.
- Gestión de Energía: Brillo de pantalla automático para dispositivos con sensores de luz ambiental.
- Gaming: Soporte opcional para usar mandos de juegos como dispositivos de entrada comunes (ratón/teclado).
- Monitor del Sistema: Ahora permite elegir la prioridad de los procesos.
- Animaciones: Mayor fluidez en pantallas con altas tasas de refresco.
La entrada Cuarta actualización de Plasma 6.6 se publicó primero en KDE Blog.
Controla tu batería en Plasma con Battery Plasmoid Boero – Plasmoides para Plasma 6 (27)
Tras un parón debido al salto de Qt5/KF5 a Qt6/KF6 que realizó la Comunidad KDE hace ya más de año y medio. Es por ello que decidí retomar esta sección aunque renombrándola ya que en ella solo hablaría de Plasmoides para Plasma 6. Así que hoy os presento un plasmoide que controla tu batería en Plasma llamado Battery Plasmoid Boero con el que llegamos al número 27 de la serie.
Controla tu batería en Plasma con Battery Plasmoid Boero – Plasmoides para Plasma 6 (27)
Como he comentado en otras ocasiones, de plasmoides tenemos de todo tipo funcionales, de configuración, de comportamiento, de decoración o, como no podía ser de otra forma, de información sobre nuestro sistema como puede ser el uso de disco duro, o de memoria RAM, la temperatura o la carga de uso de nuestras CPUs.
Así que espero que le deis la bienvenida a Battery Plasmoid Boero, un plasmoide de boeroboy que nos permite controlar de forma más exhaustiva el funcionamiento la batería de nuestro portátil, mostrando gráficos de uso, carga, descarga, modo de funcionamiento, etc.

Este plasmoide casi puede desplazar la oficial, solo le falta la opción de bloquear la suspensión de forma manual y darte la información si alguna aplicación lo está haciendo. Seguro que en una versión posterior lo incorporará.
Y como siempre digo, si os gusta el plasmoide podéis «pagarlo» de muchas formas en la página de KDE Store, que estoy seguro que el desarrollador lo agradecerá: puntúale positivamente, hazle un comentario en la página o realiza una donación. Ayudar al desarrollo del Software Libre también se hace simplemente dando las gracias, ayuda mucho más de lo que os podéis imaginar, recordad la campaña I love Free Software Day de la Free Software Foundation donde se nos recordaba esta forma tan sencilla de colaborar con el gran proyecto del Software Libre y que en el blog dedicamos un artículo.
Más información: KDE Store
¿Qué son los plasmoides?
Para los no iniciados en el blog, quizás la palabra plasmoide le suene un poco rara pero no es mas que el nombre que reciben los widgets para el escritorio Plasma de KDE.
En otras palabras, los plasmoides no son más que pequeñas aplicaciones que puestas sobre el escritorio o sobre una de las barras de tareas del mismo aumentan las funcionalidades del mismo o simplemente lo decoran.
Aquí bajo os muestro los últimos publicados en el blog:
-
Controla tu batería en Plasma con Battery Plasmoid Boero – Plasmoides para Plasma 6 (27)Calendario original para tu escritorio, Almanac Asimetric – Plasmoides para Plasma 6 (2)
-
Visor meteorológico Aero Weather – Plasmoides para Plasma 6 (26)Calendario original para tu escritorio, Almanac Asimetric – Plasmoides para Plasma 6 (2)
-
Lanzador estilo MacOS para KDE Plasma: Tahoe Launcher – Plasmoides para Plasma 6 (25)Calendario original para tu escritorio, Almanac Asimetric – Plasmoides para Plasma 6 (2)
-
Mejoras en el nuevo Bouncy Ball de Plasma 6Calendario original para tu escritorio, Almanac Asimetric – Plasmoides para Plasma 6 (2)
-
El rebote infinito de Bouncy Ball aterriza en Plasma 6 – Plasmoides para Plasma 6 (24)Calendario original para tu escritorio, Almanac Asimetric – Plasmoides para Plasma 6 (2)
-
Ejecuta una orden desde tu escritorio, Run Command – Plasmoides de KDE (248)Sigo con estas pequeñas aplicaciones que se conocen como applets,… Lee más: Ejecuta una orden desde tu escritorio, Run Command – Plasmoides de KDE (248)
La entrada Controla tu batería en Plasma con Battery Plasmoid Boero – Plasmoides para Plasma 6 (27) se publicó primero en KDE Blog.
Mejoras de interfaz y estabilidad – Esta semana en Plasma
Es increíble el trabajo de promoción que está realizando Nate (ahora con ayuda de otros desarrolladores) en su blog, desde hace más del tiempo que puedo recordar. Cada semana hace un resumen de las novedades más destacadas, pero no en forma de telegrama, sino de artículo completo. Su cita semanal no falla y voy a intentar hacer algo que es simple pero requiere constancia. Traducir sus artículos al castellano utilizando los magníficos traductores lo cual hará que la gente que no domine el inglés esté al día y que yo me entere bien de todo. Bienvenidos pues a «Ajuste sencillo de la sensibilidad del micrófono» de Esta semana en Plasma. Espero que os guste.
Mejoras de interfaz y estabilidad – Esta semana en Plasma
Nota: Artículo original en Blogs KDE. Traducción realizada utilizando Perplexity. Esta entrada está llena de novedades de la Comunidad KDE. Mis escasos comentarios sobre las mejoras entre corchetes. Por cierto, ya se nota que la resaca de 6.6 ya está pasando, grandes cosas nos vienen para 6.7.
¡Bienvenido a una nueva edición de This Week in Plasma!
Esta ha sido una semana algo tranquila, llena principalmente de mejoras de interfaz y estabilidad, quizá porque muchos colaboradores de KDE se están preparando para el mega‑sprint de la próxima semana en Graz. Por la misma razón, espera que la publicación de la próxima semana sea breve o inexistente.
Mejoras en la interfaz de usuario
Plasma 6.7
Los elementos del menú con tema Breeze en todo el ecosistema de software de KDE ahora cambian visualmente al hacer clic en ellos. breeze MR #605 (Akseli Lahtinen) [Una pequeña ayuda visual].
Varios tooltips en Plasma ahora siguen el estilo del tema activo de Plasma como se espera. libplasma MR #1435 (Nicolas Fella)
Se ha mejorado el soporte del efecto Mouse Mark para pantallas táctiles: ahora puedes dibujar múltiples líneas a la vez si tienes una pantalla con capacidad multitáctil. kwin MR #8951 (Tin Dao) [Aprovechando el hardware].
La sincronización de ajustes con el Gestor de inicio de sesión de Plasma ahora incluye el conjunto actual de distribuciones de teclado. KDE Bugzilla #516778 (Oliver Beard)
Se ha simplificado la interfaz de la página de código QR del widget Portapapeles: ahora el botón de copiar está en la cabecera, en lugar de estar solo en su propia fila. plasma-workspace MR #6451 (Tobias Fella) [Mola observar como evoluciona una idea de la que te sientes parte].


Se ha eliminado la función que obligaba a los widgets Administrador de tareas y Bandeja del sistema a usar un espaciado y tamaño de icono grandes en modo táctil/tableta; simplemente no funcionó y causaba errores de tamaño irresolubles. KDE Bugzilla #511439 (Nate Graham)
Se ha mejorado la precisión del posicionamiento de widgets en el escritorio: arrastrar un widget a un lugar donde no quepa ahora mostrará su rectángulo de vista previa en el lugar más cercano donde sí quepa, que es donde acabará. plasma-workspace MR #6452 (Tobias Fella)
Discover ahora usa terminología consistente cuando te pide reiniciar. KDE Bugzilla #517630 (Nate Graham)
Frameworks 6.25
Intentar pegar cuando el portapapeles está vacío ahora falla silenciosamente en lugar de mostrar una notificación al respecto. kio MR #2168 (Tobias Fella)
Corrección de errores importantes
[No comento las correcciones de errores ya que son bastante evidentes].
Plasma 6.6.4
Se ha endurecido Plasma contra bloqueos al intentar cargar un widget roto. libplasma MR #1456 (Harald Sitter)
Se ha corregido un caso en el que el demonio KDED en segundo plano podía fallar con un error de protocolo Wayland al cambiar la resolución de pantalla. KDE Bugzilla #516217 (Xaver Hugl)
Se ha corregido un problema extraño que corrompía cierto texto formateado con estilos Markdown mientras el teclado en pantalla de Plasma estaba activado pero no visible. KDE Bugzilla #516511 (Devin Lin)
Se ha corregido un caso en el que la página Estilo de Plasma de Ajustes del sistema podía bloquearse en ciertas distribuciones que envían Qt 6.11 con las aserciones activadas. plasma-workspace MR #6458 (Ismael Asensio)
Se han arreglado los gráficos de uso para ciertas GPUs NVIDIA que estaban rotos en la aplicación y widgets Monitor del sistema. libksysguard MR #465 (Bernhard Friedreich)
Los popups para editar widgets en modo de edición de Plasma ahora funcionan con pantalla táctil. KDE Bugzilla #509880 (Marco Martin)
Se ha endurecido KWin contra aplicaciones XWayland que se redimensionaban incorrectamente en sistemas con archivos de configuración que contienen valores de escala inapropiados. kwin MR #9049 (Xaver Hugl)
Se ha desplegado una corrección más completa para los menús contextuales de iconos de la Bandeja del sistema que a veces tenían esquinas negras cuadradas feas. KDE Bugzilla #513307 (Nate Graham)
Plasma 6.7
Se han realizado dos correcciones técnicas al proceso de configuración de VPNs OpenConnect (Aviral Singh y Alexander Becker, KDE Bugzilla #385395 y KDE Bugzilla #518289)
Mejoras de rendimiento y aspectos técnicos
Plasma 6.7
Se ha implementado soporte para el protocolo Wayland xx‑fractional‑scale‑v2, que mejora la fidelidad visual reduciendo las brechas entre elementos adyacentes. kwin MR #9023 (Vlad Zahorodnii)
Se continúa con el trabajo para añadir soporte de Vulkan. kwin MR #9027 (Diego Gomez)
Cómo puedes ayudar
KDE se ha vuelto importante en el mundo, y tu tiempo y contribuciones han ayudado a llegar hasta aquí. A medida que crecemos, necesitamos tu apoyo para mantener KDE sostenible.
¿Te gustaría ayudar a preparar este informe semanal? Preséntate en la sala de Matrix y únete al equipo.
Más allá de eso, puedes ayudar a KDE involucrándote directamente en cualquier otro proyecto. Donar tiempo es realmente más impactante que donar dinero. Cada colaborador marca una gran diferencia en KDE — ¡no eres un número ni un engranaje en una máquina! No tienes que ser programador, existen muchas otras oportunidades.
También puedes ayudar haciendo una donación. Esto ayuda a cubrir costes operativos, salarios, gastos de viaje para colaboradores y, en general, a mantener KDE llevando Software Libre al mundo.
La entrada Mejoras de interfaz y estabilidad – Esta semana en Plasma se publicó primero en KDE Blog.

Linux Saloon 194 | News Flight Night
Japan

Last year we went to Japan to finally visit friends after two decades of planning to. Because they live in Fukuoka, we only ended up visiting Hiroshima, Kyoto and Osaka afterwards. We loved it there and as soon as cheap flights became available, booked another one for Tokio, to be legally allowed to cross off Japan as visited.
Now if I were to book the trip today, I probably wouldn't. It's quite a gamble given the geopolitical situation and Asia running out of oil. But making it back, it's been as good as the first one. Visiting only Tokio with a short trip to Kawaguchiko in the Sakura blooming season worked out great.
At the start of the year, I promised myself I'd shoot my Fuji more. And no, I don't mean the volcano, I mean the X-T20. I haven't exactly kept that promise, usually just falling back on my iPhone instead. Luckily, I didn't chicken out of carrying the extra weight for this trip, and I think it really paid off! I did stick strictly to my 35mm lens, since my desire to haul heavy gear has definitely faded over the years. And honestly, after walking over 120km in just a few days, my back was already reminding me I'm not getting any younger, even with the minimal setup!
While the difference in quality isn't quite visible on Pixelfed or my photo website (I don't post to Instagram anymore), working through the set on a 4K display has been a pleasure. Bigger sensor is a bigger sensor.
Check out more photos on photo.jimmac.eu -- use arrow keys of swipe to navigate the set.
I also managed to get both of my weeklybeats tracks done on the flight so that's a bonus too!
Japan is probably quite difficult to live in, but as a tourist you get so much to feast your eyes on. It's like another planet. I hope to find more time to draw some of the awesome little cars and signs and white tiles and electric cables everywhere.
Llegan los Slimbook Days 2026
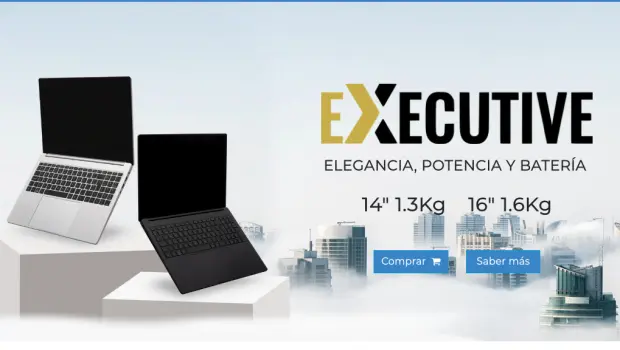
Hace casi tres meses que no hablo de Slimbook, la marca de dispositivos 100% compatibles con GNU/Linux que me tienen robado el corazón. Como ya sabréis soy usuario habitual de la marca y tengo la convicción que debemos promocionar las empresas que confían en el Sotware Libre. En lo que llevamos de año solo le había dedicado un artículo presentando la renovada la gama Executive de Slimbook, así que hoy quiero dedicarle otro. De esta forma os comento que llegan los Slimbooks Days 2026 que empieza la semana que viene. ¿Tienes curiosidad? Sigue leyendo.
Llegan los Slimbook Days 2026
En el mundo de las ordenadores de sobremesa o de escritorio la posibilidad de disfrutar de un sistema operativo libre es algo relativamente sencillo. De hecho, su conquista apenas tiene el problema del arranque y las tarjetas gráficas, el resto se soluciona rápido y bien (aunque las impresoras pueden ser un dolor de muelas).
No obstante siempre es de agradecer que algunas compañías como Slimbook se preocupen no solo de ofrecerte una alternativa que asegura su compatibilidad absoluta con los sistemas del GNU y el pingüino sino que te los afinen como solo los profesionales saben hacer (y si no me creéis os remito a este artículo donde un producto puesto a punto por los chicos y chicas de Slimbook barría en las pruebas de rendimiento a ordenadores en principio más potentes).
En esta ocasión aparecen en el blog por que este mes de abril nos han preparado una semana especial con descuentos, que han llamado Slimbook Days.
De esta forma, a lo largo de la semana del 8 al 12 de abril cada día tendréis la oportunidad de conseguir un modelo de la familia Slimbook con un descuento para utilizar en la web:
A modo de anticipo os pongo los modelos que pondrán a vuestra disposición y el precio de descuento:
[40€ de descuento]
[125€ de descuento]
ONE R7 255 / EVO 14 / EVO 15 / EXECUTIVE
[100€ de descuento]
NUEVO CREATIVE AI9 + RTX 5070
[100€ de descuento por lanzamiento ya en la web]
Una buena oferta si tienes pensado adquirir un nuevo dispositivo y una tentación grande si no.
Por cierto, y como suelo comentar en estos casos, esto tampoco es una entrada patrocinada. Mi relación con Slimbook es de cliente habitual, amistad e intereses mutuos (el dominio del mundo por parte de la filosofía GNU/Linux).
Más información: Slimbook
La entrada Llegan los Slimbook Days 2026 se publicó primero en KDE Blog.

Planet News Roundup
This is a roundup of articles from the openSUSE community listed on planet.opensuse.org.
The community blog feed aggregator lists the featured highlights below from March 27 to April 2.
Blogs this week highlight the end of the nearly eight-year openSUSE Leap 15 era with Leap 15.6 reaching end of life, the March 2026 Tumbleweed monthly update covering three Plasma 6.6 point releases and kernel advances to 6.19.9, and the switch to systemd-boot as the default bootloader for fresh Tumbleweed installations. Blogs also cover the Claude Code source leak and its supply chain security lessons, syslog-ng benchmarks hitting 7 million events per second, accessibility improvements in Plasma 6.6, progress on Thunderbird’s Linux system tray integration and more.
Here is a summary and links for each post:
FSF Newsletter Roundup – April 2026
Victorhck compiles and translates highlights from the Free Software Foundation’s April 2026 newsletter, which marks the FSF’s 40th anniversary this month. Topics include Discord’s controversial age verification policies, Google’s friction-heavy process for installing unverified Android apps, and payment provider Nexi terminating its contract with the FSFE after the organization refused to hand over donor data without explanation.
Tumbleweed Monthly Update - March 2026
The openSUSE News publishes its March 2026 Tumbleweed monthly summary. The month saw three Plasma 6.6 point releases, kernel updates from 6.19.5 to 6.19.9, Mesa 26.0.2 fixing RDNA 4 visual corruption, and significant CVE attention for FreeRDP, curl, and the kernel.
Aero Weather Widget – Plasmoids for Plasma 6 (26)
The KDE Blog presents Aero Weather, a desktop weather viewer widget for KDE Plasma created by XcurcX. The plasmoid displays current conditions and multi-day forecasts with customizable font colors and supports automatic IP-based location or manual coordinates.
Tahoe Launcher – A macOS-Style Launcher for KDE Plasma – Plasmoids for Plasma 6 (25)
The KDE Blog showcases Tahoe Launcher, which is a minimalist macOS-style application launcher for KDE Plasma featuring a grid layout with transparency and blur effects. The widget is built natively in QML for low resource consumption and allows users to customize the grid dimensions, icon sizes, and search bar design.
Quick Update on the Package Version Tracking Feature in OBS
The Open Build Service Blog shares updates to the package version tracking feature as part of the Foster Collaboration beta program. The API now allows querying upstream and local package versions, and individual packages can opt out of version tracking when upstream monitoring is not relevant.
Closing Out a Roughly 8-Year Era
The openSUSE News announces that the openSUSE Leap 15 series is reaching its end of life after nearly eight years, starting with 15.0 on May 25, 2018. Leap 15.6 will stop receiving maintenance and security updates at the end of this month.
My New Toy: April 1 syslog-ng Performance Tests
Peter Czánik’s Blog presents benchmark results showing syslog-ng reaching 7 million events per second, though he immediately clarifies this is a synthetic lab measurement that does not represent real-world production performance. The post introduces sngbench, his open-source benchmarking tool for comparing syslog-ng performance across architectures and operating systems.
This Month in KDE Linux: March 2026
The KDE Blog summarizes Nate Graham’s March 2026 progress report on Adventures in Linux and KDE. Key improvements include better automatic rollback after failed updates, improved memory management to prevent total system freezes, and easier iPhone/iPad connectivity for photo transfers.
Thunderbird and the System Tray on Linux
Victorhck highlights progress from Thunderbird’s March 2026 development digest regarding the long-requested system tray integration for Linux. Contributor Christophe Henry has been working on a cross-platform approach spanning JavaScript, C++, and Rust to unify unread mail indicators and tray icon behavior.
Automating Test Management with QASE
Zoltán Balogh’s Blog breaks from his usual open-source focus to review QASE, a cloud-based test management tool, finding its API to be its strongest feature. He explains why the open-source world generally lacks dedicated test management tools, which he notes that community-driven projects like openSUSE and Debian tend to crowdsource quality engineering through staged releases rather than formal test plans.
Claude Code Leak: Exposes Half a Million Lines of AI
Alessandro’s Blog analyzes the March 31 incident in which a source map file accidentally published to npm exposed the entire Claude Code codebase, which was roughly 1,900 files and over 512,000 lines of TypeScript. Alessandro frames the incident as a cautionary lesson about build pipeline security and supply chain risks, arguing that the future of AI lies in mastering the orchestration layer around models, not just the models themselves.
My New Toy: Back to High-End Audio
Peter Czánik’s Blog shares how installing software synthesizers and connecting his HP Z2 Mini AI workstation to his HiFi system reminded him of how much better high-end audio sounds compared to the laptop speakers and meeting-oriented headphones he had been using for months. The post is part of his ongoing series about adventures with his AI mini workstation.
KDE Express Episode 71: esLibre2026 – Digital Self-Defense Guide with Enxeñería Sen Fronteiras
The KDE Blog covers episode 71 of the KDE Express podcast featuring Laura Salgueiro Sánchez from Enxeñería Sen Fronteiras promoting a talk at esLibre2026. The session will present a digital self-defense guide aimed at helping anyone improve their online security and recover digital sovereignty without requiring prior cybersecurity knowledge.
What is Better, Windows or Linux? My Experience 1 Year Later
The KDE Blog highlights a video by content creator GCtech sharing his experience after a full year of using Linux as his primary operating system. He praises Linux’s resource efficiency for reviving older hardware, its transparency and security model, while acknowledging gaps in professional software like Adobe and some limitations with AAA gaming.

Accessibility Improvements in Plasma 6.6
The KDE Blog details the accessibility enhancements in Plasma 6.6, including a new grayscale filter joining three existing color blindness correction filters. The magnification feature gains a new tracking mode that keeps the pointer centered on screen, and Slow Keys returns on Wayland to help users with motor difficulties avoid accidental keypresses.
Easy Microphone Sensitivity Adjustment – This Week in Plasma
The KDE Blog translates and covers the latest “This Week in Plasma” development report. Plasma 6.7 gains a microphone test-and-adjust feature, notification portal support for Flatpak apps, and a multi-GPU swapchain implementation in KWin.
openSUSE Tumbleweed Weekly Review – Week 13 of 2026
Victorhck and dimstar report on a slow week for Tumbleweed with only two snapshots (0324 and 0326) reaching the mirrors due to the transition from grub2-bls to systemd-boot as the default bootloader for fresh installations. Notable updates delivered include KDE Plasma 6.6.3, ffmpeg 8.1, FreeRDP 3.24.1, Linux kernel 6.19.9, and qemu 10.2.2. Upcoming changes in the pipeline include GNOME 50, Qt 6.11.0, Mozilla Firefox 149.0, GCC 16, and glibc 2.43.
View more blogs or learn to publish your own on planet.opensuse.org.
Capturas y grabación de pantalla en Plasma 6.6
El pasado 17 de febrero fue lanzado Plasma 6.6, el mejor escritorio del universo conocido (según nosotros). Ha pasado mucho tiempo y es el momento de hablar de sus mejoras, y hoy es el momento de hablar de lascCapturas y grabación de pantalla en Plasma 6.6, unas funcionalidades que no paran de mejorar versión a versión.
Capturas y grabación en Plasma 6.6
Tras comprobar que esta nueva versión de Plasma 6 sigue centrada en la mejora de la usabilidad y la accesibilidad, hoy quiero destacar las nuevas opciones que nos encontramos a la hora capturar o grabar la pantalla. Y es que Spectacle está demostrando ser un más que digno sucesor de KSnapshot.

En esta nueva versión, Spectacle puede reconocer y extraer texto de las imágenes que escanea. Entre otros usos, esto facilita la creación de textos alt para usuarios con discapacidad visual.
Eso si, para que aparezca debes instalar los paquetes tesseract-ocr y el paquete de idioma tesseract-ocr-spa.
Según la distribución debes abrir una consola y escribir:
Arch Linux: sudo pacman -S tesseract tesseract-data-spa tesseract-data-eng
Fedora: sudo dnf install tesseract tesseract-langpack-spa
Ubuntu/KDE Neon: sudo apt install libtesseract-devtesseract-ocr tesseract-ocr-spa
Igual debes matar alguna sesión de spectacle en la consola para que se borre la caché:
pkill spectacle
A continuación, debes activarlo en Spectacle:
- Abre Spectacle.
- Entra en Opciones > Configura Spectacle
- Ve a la sección General y abajo estará la opción Reconecimiento de texto (OCR)
- Selecciona el idioma y listo.
Como viene siendo habitual el equipo de promo nos obsequia con un vídeo demostrativo:
En cuanto a las grabaciones, ahora puedes filtrar ventanas de una grabación de pantalla eligiendo una opción especial en el menú emergente que aparece al hacer clic derecho en la barra de título de las ventanas. También tenemos vídeo:
Más información: Plasma 6.6
-
Capturas y grabación de pantalla en Plasma 6.6

-
Mejoras en la accesibilidad de Plasma 6.6

-
Las nuevas funcionalidades de Plasma 6.6

-
3 novedades destacadas de Plasma 6.6

-
Tercera actualización de Plasma 6.6

-
Segunda actualización de Plasma 6.6


La entrada Capturas y grabación de pantalla en Plasma 6.6 se publicó primero en KDE Blog.