 Member
Upgrading openSUSE Leap with zypper-upgradedistro

 Victorhck
7 hábitos para una edición de texto más eficiente con el editor Vim
Aquí tienes unos consejos recopilados en 7 hábitos para editar texto de una manera más eficiente usando el editor de texto Vim según su creador Bram Moolenaar

Comparto por el blog la traducción que he realizado del artículo «Vim: Seven habits of effective text editing» escrito por Bram Moolenaar, el creador y desarrollador principal del editor Vim, en noviembre de 2000.
En el texto, Bram comparte algunos consejos para utilizar el editor de texto (enfocado a Vim) de una manera más eficiente con tres sencillos pasos y siete hábitos de edición. También tu puedes ahorrarte trabajo con el editor Vim.
Este artículo es una nueva entrega del curso “improVIMsado” que desde hace meses vengo publicando en mi blog sobre el editor Vim y que puedes seguir en estos enlaces:
- https://victorhckinthefreeworld.com/tag/vim/
- https://victorhck.gitlab.io/comandos_vim/articulos.html
Y para aprender Vim (de la manera más inteligente) aquí tienes esta útil guía:

Si pasas mucho tiempo escribiendo texto sin formato, escribiendo programas o código HTML, puedes ahorrar mucho de ese tiempo utilizando un buen editor y usándolo de manera efectiva. Este artículo te mostrará pautas y trucos para hacer tu trabajo de una manera más rápida y con menos errores.
El editor de texto de código abierto Vim (Vi IMproved) será el utilizado aquí para presentar las ideas de una edición más efectiva, pero también se aplican a otros editores. Escoger el editor adecuado es, en realidad, el primer paso hacia una edición de texto más efectiva.
Parte 1: Editar un archivo
1. Muévete con rapidez
La mayor parte del tiempo se emplea en leer, comprobar errores y buscar el lugar adecuado en el que trabajar, en vez de insertar nuevo texto o en cambiarlo. Navegar por el texto, es una tarea que se realiza a menudo, por tanto deberías aprender cómo hacerlo de manera rápida.
Es muy frecuente que quieras buscar algún texto que sabes que está por ahí. O buscar todas las líneas de texto donde aparece cierta palabra o frase. Simplemente puedes utilizar el comando /patrón para encontrar el texto deseado, pero hay maneras más interesantes:
- Si ves una palabra en especial y quieres buscar dónde otras sitios donde se utilice la misma palabra, utiliza el comando
*. Tomará la palabra que se encuentre debajo del cursor y buscará la siguiente. - Si activas la opción
incsearch, Vim mostrará la primera coincidencia del patrón buscado, mientras la estés escribiendo. Esto ayuda a mostrar rápidamente si se produce algún error en el patrón. - Si activas la opción
hlsearch, Vim resaltará todas las coincidencias del patrón marcándolas con un fondo amarillo. Esto da un rápido vistazo de dónde te llevará el comando de búsqueda. En un texto de un código, sirve para mostrar dónde es utilizada una variable. No es necesario mover el cursor para ver todas las coincidencias.
En texto estructurado hay incluso más posibilidades de moverse de una manera rápida por el texto. Vim tiene comandos específicos para programas en C (y lenguajes similares como C++ y Java):
- Utiliza
%para saltar de un la apertura de un paréntesis a su pareja de cierre. O de un «#if» a su pareja «#endif». De hecho,%puede saltar a diferentes parejas de elementos. Es muy útil comprobar si las construcciones () y {} están equilibradas correctamente. - * Utiliza
[{para volver al «{» del comienzo del bloque de código actual. - * Utiliza
gdpara saltar del uso de una variable a su declaración local en el archivo.
Por supuesto existen muchos más. La cuestión es que necesitas aprender estos comandos.
Podrías objetar que no es posible que aprendas todos estos comandos, (hay cientos de comandos de movimientos diferentes, algunos simples, otros más inteligentes) y que te llevaría semanas de entrenamiento aprenderlos todos.
Bueno, no necesitas hacerlo, en vez de eso, identifica cual es tu forma específica de editar y aprender solo esos comandos que hacen que tu edición de texto sea más efectiva.
Hay tres pasos básicos:
- 1. Mientras estás editando, permanece atento en las acciones que repites y/o en las que pasas mucho tiempo.
- 2. Busca si existe un comando en el editor que haga esa acción de una manera más rápida. Lee la documentación, pregunta a un amigo o busca cómo otras personas hacen eso.
- 3. Entrena utilizando el comando. Hazlo hasta que tus dedos escriban el comando sin necesidad de pensarlo.
Vamos a utilizar un ejemplo para mostrar cómo funciona:
1. Te encuentras que cuando estás editando archivos de programas en lenguaje C, a menudo dedicas mucho tiempo a buscar dónde está definida una función. Actualmente utilizas el comando * para buscar otros lugares en los que aparece el nombre de la función, pero acabas pasando por un montón de coincidencias en donde la función es utilizada en vez de dónde está definida. Llegas a la conclusión de que debe haber una manera más rápida de hacer esto.
2. Echando un vistazo a la guía rápida, encuentras un comentario sobre saltar a etiquetas. La documentación muestra cómo puede utilizarse esto para saltar a la definición de una función, ¡justo lo que estabas buscando!
3. Experimentas un poco con la generación de un archivo de etiquetas, utilizando el programa ctags que viene incluido en Vim. Aprendes a utilizar el comando CTRL-] y te das cuenta que al usarlo te ahorra mucho tiempo. Para hacerlo más sencillo, añades unas cuantas líneas a tu archivo Makefile para generar de manera automática el archivo de etiquetas.
Un par de cosas a considerar cuando sigas estos tres pasos:
- «Quiero hacer el trabajo, no tengo tiempo para ir mirando la documentación para encontrar algún comando nuevo». Si piensas así, te quedarás estancado en la edad de piedra de la computación. Algunas personas utilizan Notepad para todo, y después se preguntan por qué otras personas hacen su trabajo en la mitad de tiempo…
- No te excedas. Si siempre tratas de encontrar el comando perfecto para cada pequeña cosa que haces, tu mente no tendrá tiempo para pensar en el trabajo que estabas haciendo. Simplemente escoge aquellas acciones que te llevan más tiempo del necesario y entrena los comandos hasta que no necesites pensar en ello cuando los uses. Así puedes concentrarte en el texto.
En las siguientes secciones encontrarás sugerencias de acciones con las que la mayoría de la gente tiene que lidiar. Puedes usarlas como inspiración para usar los tres pasos básicos para tu propio trabajo.
2. No lo escribas dos veces
Hay un número limitado de palabras que escribimos. E incluso un número limitado de párrafos o frases. Especialmente en los programas de ordenador. Obviamente, no querrás escribir lo mismo dos veces.
A menudo querrás cambiar simplemente una palabra por otra. Si esto hay que hacerlo en todo el archivo, puedes utilizar el comando :s (sustituir). Si únicamente es necesario cambiarlo en algunos casos, un método más rápido es utilizar el comando * para encontrar la siguiente coincidencia de la palabra y utilizar cw para cambiar la palabra. Después escribir n para encontrar la siguiente palabra y . (punto) para que repita el comando anterior cw.
El comando . repite el último cambio. Un cambio, en este contexto, se refiere a insertar, borrar o reemplazar un texto. Poder repetir esta acción es una utilidad muy potente. Si organizas tu edición de texto en torno a ello, muchos cambios se convertirán simplemente en pulsar únicamente la tecla . para realizar los cambios. Ten cuidado si haces otros cambios entre medias, porque el comando reemplazará el cambio que estabas repitiendo. En su lugar, quizás te podría interesar marcar la ubicación usando el comando m, continuar con tu cambio repetido y regresar más tarde a esa ubicación para cambiar lo que fuera necesario.
Algunos nombres de funciones o de variables pueden ser muy complicadas de escribir. ¿Puedes escribir rápidamente «XpmCreatePixmapFromData» sin ningún error y sin volver a revisar cómo se escribe? Vim tiene una utilidad de completado automático que hace que eso sea sencillo.
Busca palabras en el archivo que estás editando, y también en los archivos #include. Puedes escribir «XpmCr» y después pulsar CTRL-N y Vim la completará a «XpmCreatePixmapFromData» para ti. No solo hacer esto te ahorra mucho tiempo de escritura, también evita que cometas errores y tener que solucionarlos más tarde cuando el compilador te muestre un mensaje de error.
Cuando estás escribiendo una frase o una oración muchas veces, hay incluso una manera más rápida de hacerlo. Vim tiene una utilidad con la que grabar una macro. Escribe qa para empezar a grabar la macro en el registro ‘a’.
Después escribes tus comandos de manera normal y para finalizar pulsas q de nuevo para detener la grabación de la macro. Cuando quieras repetir la macro grabada, simplemente escribe @a. Hay 26 registros disponibles para esto.
En la grabación de la macro puedes repetir muchas acciones diferentes, no solo insertar texto. Ten esto en cuenta cuando sepas que vas a repetir algo.
Una cosa a tener en cuenta cuando grabes una macro, es que los comandos serán repetidos exactamente como los escribiste. Cuando te muevas por el texto, debes tener en cuenta que el texto por el que te muevas podría ser diferente cuando el comando sea repetido al reproducir la macro.
Moverse cuatro caracteres a la izquierda podría funcionar en el texto donde estás grabando la macro, pero podrían ser cinco caracteres cuando se repitan los comandos. A menudo es necesario utilizar comandos para moverse por los diferentes textos (palabras, frases) o moverse a un caracter específico.
Cuando los comandos que necesitas repetir se van haciendo más complejos, escribirlos bien a la primera se vuelve más difícil. En vez de grabarlos, deberías escribir un script o una macro. Esto es muy útil para crear plantillas para partes de tu código, por ejemplo, la cabecera de una función. Puedes hacer esto, tan inteligente como quieras.
3. Arréglalo cuando esté mal
Es normal cometer errores al escribir. Nadie puede evitarlo. El truco consiste en detectarlos y corregirlos rápidamente. El editor debería poder ayudarte con esto. Pero necesitas decirle lo que está mal y lo que está bien.
A menudo cometerás los mismos errores una y otra vez. Tus dedos simplemente no hacen lo que quieres. Esto puede corregirse con las abreviaturas. Veamos algunos ejemplos:
:abbr Lunix Linux:abbr accross across:abbr hte the
Las palabras se corregirán de manera automática después de que las hayas escrito.
El mismo método puede ser utilizado para escribir una palabra larga, escribiendo únicamente unos pocos caracteres. Es especialmente útil para palabras que te resultan difíciles de escribir y así evitar escribirlas mal. Algunos ejemplos:
:abbr pn pingüino:abbr MS Mandrake Software
Sin embargo, este método tiende a expandir la palabra completa cuando quizás no lo necesitas, lo que hace difícil saber cuándo realmente quieres únicamente escribir «MS» en tu texto. Es mejor utilizar palabras cortas que por sí mismas no tengan significado propio.
Para encontrar errores en tu texto, Vim tiene un método inteligente de resaltado. En realidad, esto estaba destinado a ser utilizado para resaltar la sintaxis de los programas, pero también puede detectar y resaltar errores.
El resaltado de sintaxis muestra los comentarios en color. Esto no parece una funcionalidad muy importante, pero una vez que comienzas a utilizarlo, verás que se convierte en una gran ayuda. Rápidamente puedes localizar texto que debería ser un comentario, pero no está resaltado como debería (quizás olvidaste añadir el marcador que indica que es un comentario).
O viste una línea de código resaltada como un comentario (olvidaste insertar un «*/*»). Estos son los errores que son difíciles de localizar en un texto simplemente en blanco y negro y que pueden hacer que pierdas mucho tiempo tratando de depurar el código.
El resaltado de sintaxis, también puede encontrar paréntesis a los que le falta una pareja. Un paréntesis «)» sin pareja de apertura, es resaltado con un fondo rojo. Puedes utilizar el comando % para ver cómo coinciden e insertar un «(» o «)» en la posición correcta.
Otros errores comunes también se detectan rápidamente, por ejemplo, usar «#included <stdio.h>» en lugar de «#include <stdio.h>». Es fácil pasar por alto el error en blanco y negro, pero rápidamente se da cuenta de que «include» está resaltado mientras que «included» no lo está.
Un ejemplo más complejo: para el texto en inglés hay una larga lista de todas las palabras que se usan. Cualquier palabra que no esté en esta lista podría ser un error. Con un archivo de sintaxis se pueden resaltar todas las palabras que no están en la lista. Con algunas macros adicionales, se pueden agregar palabras a la lista de palabras, para que ya no se marquen como un error. Esto funciona tal como cabría esperar en un procesador de textos.
En Vim, se implementa con scripts y se pueden ajustar aún más para tu propio uso: por ejemplo, para verificar solo los comentarios en un programa en busca de errores ortográficos.
Parte 2: Editar más archivos
4. Un archivo rara vez viene solo
La gente no trabaja en un solo archivo. En su mayoría, hay muchos archivos relacionados y se editan varios uno tras otro, o incluso varios al mismo tiempo. Deberías poder aprovechar tu editor para hacer que trabajar con varios archivos sea más eficiente.
El método de las etiquetas mencionado anteriormente, también funciona para saltar entre archivos. La uso más normal, es generar un archivo de etiquetas para el proyecto completo en el que estés trabajando. Puedes saltar rápidamente entre todos los archivos del proyecto para encontrar las definiciones de funciones, estructuras, tipos de definiciones, etc.
El tiempo ahorrado frente a la búsqueda manual es inmenso, crear un archivo de etiquetas es la primera cosa que hago cuando estoy navegando por unprograma.
Otro método muy potente, es encontrar todas las ocurrencias de un nombre en un grupo de archivos, utilizando el comando :grep. Vim realiza una lista de todas las coincidencias, y salta a la primera. Con el comando :cn te llevará a cada una de las siguientes coincidencias. Esto es muy útil cuando necesitas cambiar ek número de argumentos en la llamada de una función.
Los archivos Include contienen información útil. Pero encontrar el que contiene la declaración que necesitas ver, puede llevar mucho tiempo. Vim conoce los archivos include y puede buscar en ellos la palabra que buscas. La acción más común es buscar el prototipo de una función.
Coloca el cursor sobre el nombre de la función en su archivo y escribe [I: Vim mostrará una lista de todas las coincidencias para el nombre de la función en los archivos incluidos. Si necesita ver más contexto, puede saltar directamente a la declaración. Se puede usar un comando similar para verificar si incluyó los archivos de encabezado correctos.
En Vim puedes dividir el área en el que se muestra el texto en pantalla en varias partes para editar archivos diferentes. Así puedes comparar el contexto de dos o más archivos y copiar/pegar texto entre ellos. Hay muchos comandos para abrir y cerrar ventanas, saltar entre ellas, ocultar de manera temporal archivo, etc.
De nuevo deberás utilizar los tres pasos básicos que se mencionan al comienzo para seleccionar el grupo de comandos que quieres aprender a utilizar.
Hay más usos de ventanas múltiples. El método de previsualización de etiquetas es un muy buen ejemplo. Esto abre una ventana de visualización especial, mientras el cursor se mantiene en el archivo en el que estás trabajando. El texto en la ventana de previsualización muestra, por ejemplo, la declaración de la función para el nombre dela función que está bajo el cursor. Si mueves el cursor a otro nombre y lo mantienen durante un segundo, la ventana de previsualización ahora mostrará la definición de ese nombre. Podría ser también el nombre de una estructura o una función que está declarada en un archivo incluido en tu proyecto.
5. Trabajemos juntos
Un editor es para editar texto. Un programa de correo electrónico es para enviar y recibir correos electrónicos. Un sistema operativo es para ejecutar programas. Cada programa tiene su propia tarea y debería ser bueno haciéndola. La potencia llega cuando tenemos diferentes programas que pueden trabajar juntos.
Un ejemplo simple: Necesitas escribir un informe de no más de 500 palabras. Seleccionas el párrafo actual mediante la selección visual y lo escribes en el programa «wc»: vip:w !wc -w. El comando externo «wc -w» es utilizado para contar las palabra. ¿Fácil, no?
Siempre habrá alguna funcionalidad que necesites que no esté en el editor. Hacer posible filtrar texto con otro programa significa que puedes añadir esa funcionalidad de manera externa. Siempre ha sido el espíritu de Unix tener programas separados que hagan bien su trabajo y trabajen juntos para realizar una tarea más grande. Desafortunadamente, la mayoría de los editores no funcionan muy bien junto con otros programas.
Por ejemplo, no puedes reemplazar el editor de correo electrónico en Netscape por otro. Terminas usando un editor con pocas funcionalidades. Otra tendencia es incluir todo tipo de funcionalidades dentro del editor. Emacs es un buen ejemplo de dónde puede terminar eso. (Algunas personas lo llaman un sistema operativo que también se puede usar para editar texto).
Vim intenta integrarse con otros programas, pero esto sigue siendo una lucha. Actualmente es posible utilizar Vim como el editor en MS-Developer Studio y Sniff. Algunos programas de correo electrónico que admiten el uso de un editor externo, como Mutt, pueden utilizar Vim. La integración con Sun Workshop está en progreso. Generalmente esto es un área que tiene que ser mejorada en el futuro más cercano. Solo así conseguiremos un sistema que sea mejor que la suma de sus partes.
6. El texto es estructurado
A menudo trabajarás con texto que tienen algún tipo de estructura, pero diferente de lo que admiten los comandos disponibles. Así que, tendrás que recurrir a los «bloques de compilación» del editor y crear tus propias macros y complementos para trabajar con ese texto. Aquí ya estamos llegando a las cosas más complicadas.
Una de las cosas más simples es acelerar el ciclo de edición-compilación-solución. Vim tiene el comando :make, que inicia la compilación, comprueba los errores que produce y te permite saltar a la ubicación de esos errores para solucionar los problemas. Si utilizas un compilador diferente, los mensajes de error no se reconocerán.
En vez de regresar a antiguo sistema de «anotarlos a mano», deberías ajustar la opción ‘errorformat’. Esto le dice a Vim cuales son tus errores y cómo obtener el nombre del archivo y el número de línea de estos. Funciona para mensajes de error complicados de gcc, así que seguramente serías capaz de hacerlo funcionar en casi cualquier compilador.
A veces adaptarse a un tipo de archivos es únicamente una cuestión de ajustar algunas opciones o escribir algunas macros. Por ejemplo, para saltar a las páginas de manual, puedes escribir una macro que guarde la palabra bajo el cursor, limpie el buffer y después lea la página del manual para esa palabra en el buffer. Esa es una manera simple y eficiente de buscar referencias cruzadas.
Utilizando los tres pasos básicos, puedes trabajar de una manera más efectiva con cualquier tipo de archivo estructurado. Simplemente piensa en las acciones que quieres realizar con el archivo, encuentra los comandos del editor que lo hacen y comienza a utilizarlos. Es realmente tan simple como parece. Simplemente tienes que hacerlo.
Parte 3: Afilar la sierra
7. Conviértelo en un hábito
Aprender a conducir un coche conlleva esfuerzo. ¿Es esa una razón para seguir usando tu bicicleta? No, te das cuenta que necesitas invertir tiempo para aprender una nue
va habilidad. La edición de texto no es algo diferente. Necesitas aprender nuevos comandos y convertirlos en un hábito.
Por otra parte, no deberías tratar de aprender cada comando que ofrece un editor. Eso sería una completa pérdida de tiempo. La mayoría de personas sólo necesitan aprender un 10 o 20% de los comandos para sus trabajos. Pero es un conjunto de comandos diferentes para cada persona.
Es necesario que aprendas de vez en cuando y te preguntes si hay alguna tarea repetitiva que pudiera ser automatizada. Si realizas una tarea solo una vez y no crees que tengas que volver a realizarla de nuevo, no intentes optimizarla. Pero probablemente te des cuenta que estás repitiendo algo muchas veces a la hora. Entonces busca la documentación para encontrar el comando que haga eso deuna manera más rápida. O escribe una macro que la realice.
Cuando es una tarea más extensa, como alinear una clase especial de texto específico, podrías buscar en foros o por Internet para ver si alguien más ya lo solucionó antes que tu.
Los pasos básicos esenciales es la última parte. Puedes pensar en una tarea repetitiva, encontrar una solución idónea para ella y después del fin de semana olvidar cómo lo hiciste. Eso no funciona.
Tendrás que repetir la solución hasta que tus dedos lo hagan de forma automática. Solo entonces conseguirás el nivel de eficiencia que necesitas. No intentes aprender muchas cosas a la vez. Pero el realizar unas pocas cosas al mismo tiempo sí funcionará. Para conseguir que tus dedos se adapten con trucos que no utilizas a menudo, quizás deberías escribirlos para poder echarles un vistazo más tarde cuando los necesites.
De todas formas, si mantienes tu meta siempre a la vista, encontrarás maneras de hacer tu edición de texto más y más efectiva.
Un último consejo, para recordarte qué ocurre cuando las personas ignoran todo lo anterior. Todavía veo a gente que pasa la mitas de su día detrás de una pantalla, mirando a la pantalla y después a dos de sus dedos, de nuevo a la pantalla, etc. Y después se preguntan por qué se cansan tanto…
¡Escribe con diez dedos! No solo es más rápido, también es mucho menos cansado. Utilizando una programa para tu ordenador únicamente una hora al día, solo te llevará un par de semanas aprender a mecanografiar.
Epílogo
La idea para el título del artículo, proviene del exitoso libro «Los 7 hábitos de las personas altamente efectivas» de Stephen R. Covey. Lo recomiendo a quien quiera solucionar sus problemas personales y profesionales (¿y quién no quiere?).
Aunque algunas personas dirán que proviene del libro de Dilbert «Siete años de gente altamente defectuosa» del dibujante Scott Adams (¡también recomendado!). Más libros y CD recomendados en https://iccf-holland.org/click1.html.
Acerca del autor
Bram Moolenaar es el autor principal del editor Vim. Escribe las funcionalidades principales de Vim y selecciona qué código por otras personas es incluido. Se graduó en la Universidad Técnica de Delf como técnico de computadoras.
Ahora trabaja principalmente en software, pero todavía sabe cómo manejar un soldador. Es el fundador y tesorero de ICCF Holland, que ayuda a huérfanos en Uganda.
Hace trabajos freelance como arquitectura de sistemas, pero pasa la mayoría de su tiempo trabajando en Vim. Su dirección de correo electrónico es Bram arroba Moolenaar.net.

¡El primer prototipo de Adaptable Linux Platform (ALP) ya está disponible!
Ya puedes probar el primer prototipo de la nueva era de openSUSE ALP (Adaptable Linux Platform), la próxima generación de Linux

La introducción del nuevo proyecto ALP (Adaptable Linux Platform) a las comunidades de SUSE y openSUSE ha iniciado un esfuerzo para construir y diseñar una nueva plataforma centrada en aplicaciones, segura y flexible.
¿Qué es ALP?
Bueno, aunque no me ha quedado muy claro qué es el concepto detrás de ALP, ya que hay conceptos técnicos que se me escapan, quiero compartir la definición y noticias que ofrecen desde SUSE.
Adaptable Linux Platform (ALP) está cambiando de la estructura influenciada y centrada en el estilo UNIX de los sistemas operativos anteriores a un diseño más centrado en la aplicación y la carga de trabajo.
Está evolucionando una plataforma flexible y segura con conceptos avanzados, como se ve en proyectos como MicroOS y SLE Micro, junto con la incorporación de otros componentes. Esta plataforma está diseñada para crear, implementar y administrar fácilmente aplicaciones, independientemente del hardware o el entorno.
La separación de la habilitación de hardware en un sistema operativo host y una capa de aplicación (en contenedores) proporciona una plataforma inmutable para cargas de trabajo y entornos de tiempo de ejecución de cargas de trabajo.
Si bien la prueba de concepto de la plataforma Adaptable Linux no se proporciona con el escritorio, la adición del escritorio a ALP se realizará en las siguientes versiones.
Por tanto, la idea detrás de ALP es permitir que los usuarios se concentren en sus cargas de trabajo mientras se abstraen del hardware y la capa de aplicación. Con el uso de máquinas virtuales y tecnologías de contenedores, Adaptable Linux Platform permite que las cargas de trabajo sean independientes del flujo de código.
Les droites
«Les droites» es el primer prototipo de ALP. Las siglas de ALP, nombran a los Alpes, y de ahí escoger nombres de montañas de ese conjunto montañoso.
El primer prototipo viene con las siguientes características:
- Software: Salt preinstalado y Ansible disponible en repositorios, lo que permite a los usuarios configurar y/o administrar los sistemas ALP de manera flexible y ágil.
- Soporte de hardware: la línea de base de la arquitectura para ALP se establece en x86_64-v2. La consideración anterior de x86_64-v3 se rechazó después de la ronda de comentarios inicial. Estamos considerando el soporte de x86_64-v3 y posiblemente v4 a través de la funcionalidad hwcaps.
- Cifrado de disco completo
Les Droites viene en este primer prototipo con FDE (Full Disk Encryption). Aunque puede que no sea la solución definitiva, es un primer acercamiento y dependerá de las pruebas y la respuesta de la comunidad a esta elección.
FDE cifra el hardware en el disco duro, que cifra y descifra a medida que se accede a ellos; encontrar e implementar la mejor solución para una arquitectura para ALP es fundamental para el proyecto.
Aunque algunas cargas de trabajo todavía están en la fase de trabajo en progreso y siguen los principios de diseño de ALP, algunos componentes ya vienen en contenedores, como GDM o Yast2, y otros seguirán, como Cockpit.
En ALP, estos nuevos servicios en contenedores se conocen como WORKLOADS (CARGAS DE TRABAJO).
ALP pretende necesitar la menor cantidad de intervención posible. Esto utiliza algunas capacidades de autogestión, lo que le permite reconocer instantáneas estables y revertirlas si se encuentra algún comportamiento inesperado después de un parche. Esto asegura que mantiene el cumplimiento mediante la aplicación de parches de acuerdo con las cargas de trabajo y el uso del propio sistema.
Este prototipo viene con un primer acercamiento de las funciones de Autogestión y Zero Touch, se implementará completamente en los próximos lanzamientos.
Estas funcionalidades de autogestión serán configurables:
- Seguridad y actualizaciones periódicas
- Actualizaciones de seguridad
- Actualizaciones críticas de seguridad
- Solo descarga e instalación manual
- Sin actualizaciones automáticas
Estas políticas se pueden configurar para que se instalen según se requiera para adaptarse mejor a los usuarios y los componentes que utilizan ALP.
Probar ALP «Les Droites»
Tienes disponible ALP para descargar en este enlace:
Enlaces de interés
- https://www.suse.com/c/the-first-prototype-of-adaptable-linux-platform-is-live/
- https://www.suse.com/c/alp-prototype-is-evolving-proof-of-concept-expected-in-fall/
- https://documentation.suse.com/alp/all/html/alp/index.html
- https://news.opensuse.org/tag/adaptable-linux-platform

Recopilación del boletín de noticias de la Free Software Foundation – octubre de 2022
Recopilación y traducción del boletín mensual de noticias relacionadas con el software libre publicado por la Free Software Foundation.

La Free Software Foundation (FSF) es una organización creada en Octubre de 1985 por Richard Stallman y otros entusiastas del software libre con el propósito de difundir esta filosofía.
La Fundación para el software libre (FSF) se dedica a eliminar las restricciones sobre la copia, redistribución, entendimiento, y modificación de programas de computadoras. Con este objeto, promociona el desarrollo y uso del software libre en todas las áreas de la computación, pero muy particularmente, ayudando a desarrollar el sistema operativo GNU.
Además de tratar de difundir la filosofía del software libre, y de crear licencias que permitan la difusión de obras y conservando los derechos de autorías, también llevan a cabo diversas campañas de concienciación y para proteger derechos de los usuarios frentes a aquellos que quieren poner restricciones abusivas en cuestiones tecnológicas.
Mensualmente publican un boletín (supporter) con noticias relacionadas con el software libre, sus campañas, o eventos. Una forma de difundir los proyectos, para que la gente conozca los hechos, se haga su propia opinión, y tomen partido si creen que la reivindicación es justa!!
- En este enlace podéis leer el original en inglés: https://www.fsf.org/free-software-supporter/2022/october
- Y traducido en español (cuando el equipo de traducción lo tenga disponible) en este enlace: https://www.fsf.org/free-software-supporter/2022/octubre

Puedes ver todos los números publicados en este enlace: http://www.fsf.org/free-software-supporter/free-software-supporter
Después de muchos años colaborando en la traducción al español del boletín, desde inicios del año 2020 he decidido tomarme un descanso en esta tarea.
Pero hay detrás un pequeño grupo de personas que siguen haciendo posible la difusión en español del boletín de noticias de la FSF.
¿Te gustaría aportar tu ayuda en la traducción? Lee el siguiente enlace:
Por aquí te traigo un extracto de algunas de las noticias que ha destacado la FSF este mes de octubre de 2022
Entrevista con Martin Dougiamas de Moodle
Del 22 de septiembre
Después de un poco de pausa, estamos reiniciando la serie de entrevistas que la FSF comenzó hace diez años, en las que destaca el trabajo de los desarrolladores que eligen las licencias GNU.
Estamos felices de que Martin Dougiamas, CEO de Moodle,se una a nosotros para la primera entrevista después de este largo descanso. En esta entrevista, Martin nos cuenta su experiencia con la educación remota al crecer en Australia Occidental y cómo ha ayudado a informar la dirección del Sistema de gestión de aprendizaje de Moodle (LMS).
Moodle LMS, escrito en el lenguaje de programación PHP, es una plataforma de aprendizaje diseñada para proporcionar a los educadores, administradores y estudiantes un único sistema sólido, seguro e integrado para crear entornos de aprendizaje personalizados. También comparte cómo la GPLv3 ha ayudado a Moodle y su comunidad de educadores, desarrolladores y organizaciones en todo el mundo.
La vigilancia impía de las aplicaciones ‘shameware’ anti-pornografía
Del 22 de septiembre por Dhruv Mehrotra
Parece que las empresas de software privativo están continuamente encontrando nuevas formas de explotar a sus usuarios. El llamado «shameware» es un software diseñado para instalarse en el dispositivo de un usuario e informar toda la actividad en línea directamente a otra persona, ya sea el padre, el cónyuge, el maestro o el líder religioso de alguien.
Este software está diseñado para espiar a sus usuarios las 24 horas del día, y lo hace realizando capturas de pantalla, registrando las aplicaciones de software utilizadas para navegar por Internet y registrando las URL de las páginas web visitadas.
El software también es parte de un ecosistema más amplio de avergonzar a las personas por parte de quienes están en posiciones de poder, lo que hace que las personas se sientan mal consigo mismas y que los expertos científicos consideran que carece de cualquier prueba de un «efecto positivo duradero».
El artículo de WIRED ofrece entrevistas con usuarios que instalaron el software bajo la dirección de los líderes de su iglesia, así como varias pruebas que revelaron cosas como la dependencia del software en las API de accesibilidad, diseñadas específicamente para ayudar a los usuarios con discapacidades, y Pixel de Facebook, que envía datos confidenciales directamente. a Facebook, con el fin de capturar datos cada vez más invasivos sobre la persona en cuyo dispositivo está instalado el Shameware no libre.
Ada & Zangemann listos para reservar en inglés
Del 8 de septiembre por Matthias Kirschner
El director ejecutivo de la Free Software Foundation Europe, Matthias Kirschner, publicó recientemente un libro para ayudar a los niños a conocer los conceptos del software libre y lo que la libertad del software puede significar en sus vidas.
A través de una narración encantadora, a la protagonista Ada le encanta jugar y reparar. Y para el deleite de sus amigos y familiares, incluso descubre algunos trucos muy útiles para modificar la tecnología que la rodea para que funcione de formas nuevas, divertidas y útiles.
Mientras tanto, Zangemann, un desarrollador e inventor de software muy rico, intenta controlar todos los dispositivos que usan los ciudadanos de su ciudad. Ahora disponible para descarga gratuita de gestión de restricciones digitales (sin DRM) en inglés, también puede solicitar copias físicas de No Starch Press, que se enviarán desde los EE. UU. a partir de diciembre.
- https://k7r.eu/ada-zangemann-ready-to-pre-order-in-english/
- https://fsfe.org/activities/childrensbook/
- https://nostarch.com/ada-zangemann
Nextcloud trabaja con los gobiernos para crear el reemplazo de MS Office para la UE
En un nuevo desarrollo prometedor, varios gobiernos europeos están trabajando con Nextcloud, que tiene la licencia GNU Affero General Public License versión 3 (AGPLv3), para crear una plataforma que ayude a los gobiernos a recuperar su independencia de una pequeña cantidad de potente software privativo. empresas mediante la creación de un reemplazo gratuito de Microsoft Office 365 destinado a las organizaciones gubernamentales municipales, estatales y federales dentro de la UE.
Además de lograr la soberanía digital general, otros beneficios esperados incluyen tener un paquete de software de oficina que cumpla con los estándares de privacidad, sea fácil de usar y descentralizado.
- https://betanews.com/2022/08/26/nextcloud-works-with-governments-to-create-ms-office-rival-for-the-eu/
- https://nextcloud.com/blog/european-governments-work-with-nextcloud-to-build-digitally-sovereign-office/

Estas son solo algunas de las noticias recogidas este mes, pero hay muchas más muy interesantes!! si quieres leerlas todas (cuando estén traducidas) visita este enlace:
Y todos los números del «supporter» o boletín de noticias de 2022 aquí:

—————————————————————
Novedades de las aplicaciones de Plasma Mobile Gear 22.09
Tras comentar las novedades generales del sistema para dispositivos móviles en las dos últimas entradas (domingo y lunes), finalizo esta serie con las novedades de Plasma Mobile Gear 22.09, el conjunto de mejoras que fueron publicadas el pasado 27 de septiembre. Cerremos este lanzamiento como se merece.
Novedades de las aplicaciones de Plasma Mobile Gear 22.09
Como comenté hace unos días ha sido lanzado Plasma Mobile Gear 22.09, la cual llega con muchas novedades de las cuales se han ido conociendo en medio de la Akademy-es 2022 de Barcelona.
Hoy toca finalizar de hablar de este lanzamiento comentando las novedades de las aplicaciones que complementan el ecosistema móvil, pero adaptable a otros dispositivos, de Plasma Mobile.
-
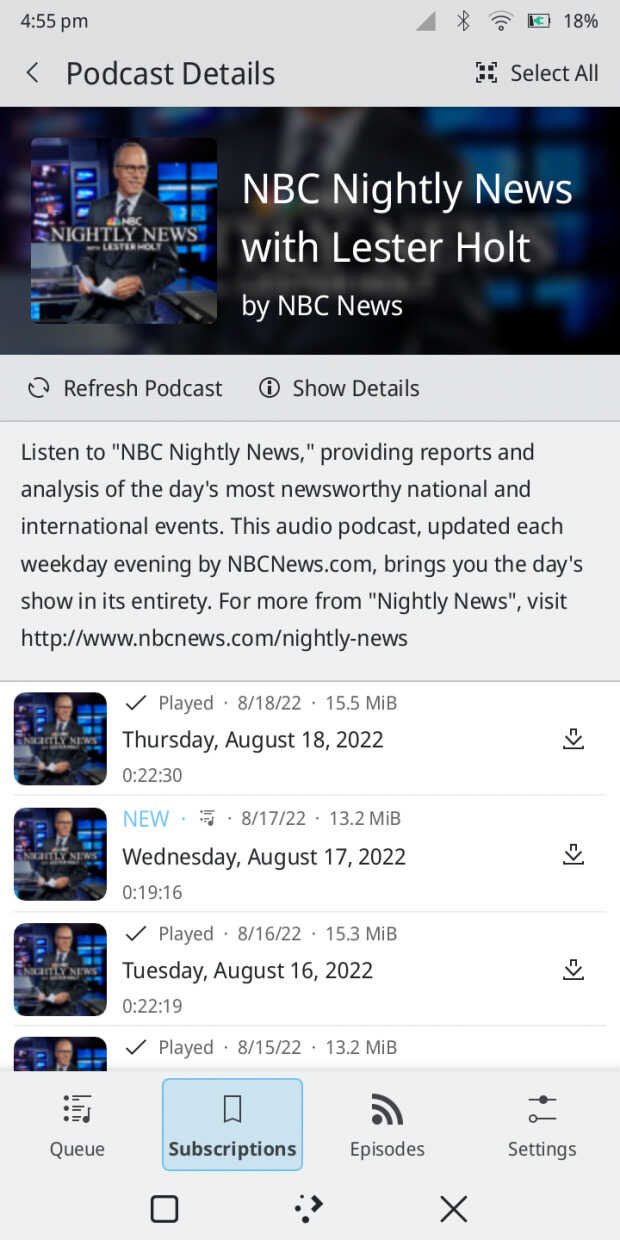
Kasts, el gestor de podcast:
- Se ha simplificado la interfaz combinando la página de podcasts con la de la lista de episodios.
- Se ha trabajado en la mejora de las páginas de información del podcast y de los episodios, añadiendo una barra de botones (desplazando las acciones fuera de la cabecera de la aplicación), y rehaciendo el diseño de la información.
- Añadida la funcionalidad del temporizador de reposo.
- Añadido la posibilidad de enviar todos los estados de los episodios locales al servidor de sincronización (gpodder).
- Nueva opción para marcar una cantidad personalizada de episodios como no reproducidos al añadir un nuevo podcast.
- Añadido el guardado de la posición y el tamaño de la ventana.
-
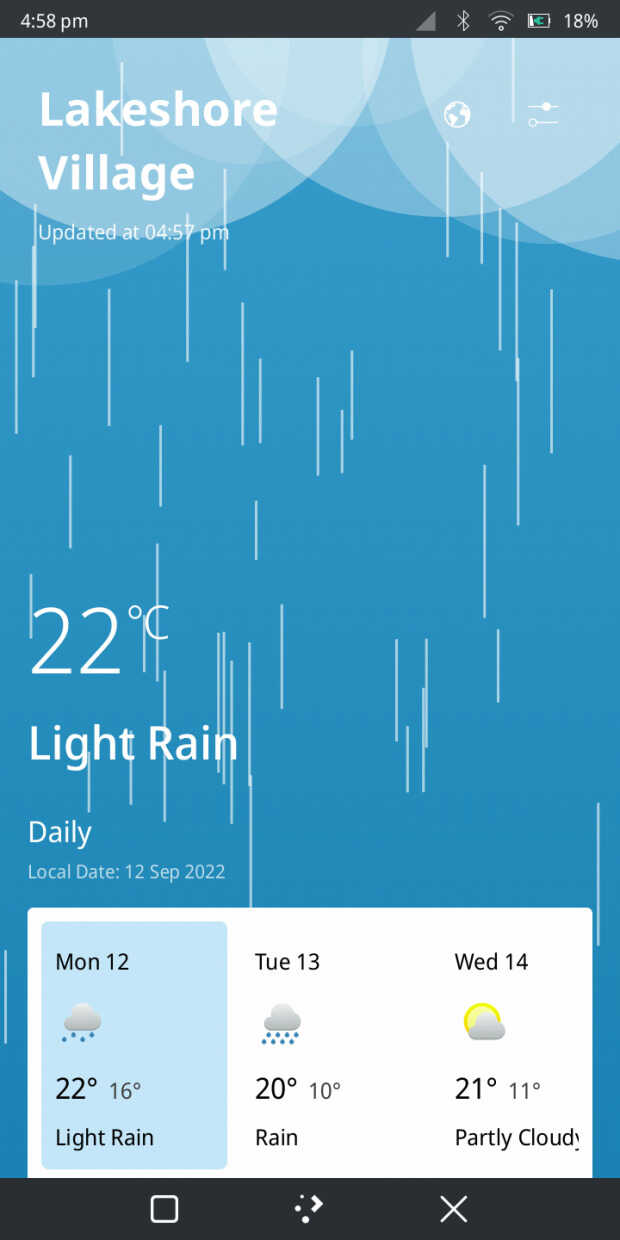
Weather, visualizador del tiempo:
- Adaptados los fondos meteorológicos para que utilicen directamente OpenGL, lo que mejora el rendimiento en los dispositivos de gama baja.
- Mejorado la compatibilidad con las tabletas haciendo que la lista de ubicaciones y los ajustes se muestren como diálogos en pantallas más grandes.
- Solucionados losproblemas con la vista dinámica de la ubicación del tiempo que no cambia si se elimina.
-
Terminal (QMLKonsole):
- Mejorada para el uso de la tableta, añadiendo una barra de pestañas y moviendo los ajustes a un diálogo cuando hay suficiente espacio.
-
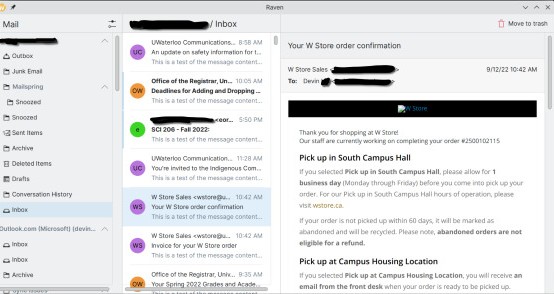
Raven, cliente de correo (nueva aplicación):
- Se ha renovado el cliente de correo nativo para Plasma Mobile, basado en el trabajo de Carl con Pelikan, y ya tenemos un prototipo para un cliente de correo electrónico compatible con Akonadi. Raven es actualmente funcional como un lector de correo electrónico básico, y está previsto que comparta componentes con el próximo soporte de correo de Kalendar.
-
Clock, el reloj del sistema:
- Eliminada la animación del temporizador del segundero ya que distrae
-
Neochat, el cliente de mensajería instantánea:
- Implementado el soporte para configurar las notificaciones por sala.
- Añadido un selector de espacio a la lista de salas, que permite filtrar la lista de salas para las salas incluidas en el espacio seleccionado (proyecto GSoC).
- Modificado el diseño de la línea de tiempo para que se vea mejor cuando la ventana es muy amplia.
- Mejoras en las traducciones, el diseño y la estabilidad de NeoChat.
¿Qué es Plasma Mobile?

Para los que no lo conozcan Plasma Mobile es la alternativa libre a interfaz gráfica para smartphones de la Comunidad KDE, hablé de él hace un tiempo y, poco a poco, se está convirtiendo en un clásico del blog.
Su idea es muy simple, tras conquistar tu escritorio KDE la Comunidad también quiere conquistar tu teléfono móvil… aunque todavía lo tenga complicado por todas las limitaciones de hardware que todavía tiene este campo de la tecnología.
No obstante, confiemos que de igual forma se han ido conquistando los ordenadores de sobremesa, portátiles y servidores, lleguemos un día que podamos tener libertad total en nuestros smartphones.
Y para cuando eso ocurra la Comunidad KDE estará preparada para ello y por eso está confeccionando un catálogo más que decente de aplicaciones con tecnología adaptativa.
La entrada Novedades de las aplicaciones de Plasma Mobile Gear 22.09 se publicó primero en KDE Blog.
Hifi Made in Hungary: NCS Audio
Last weekend, I visited a special audio event in Budapest. Two local companies demonstrated their products built into a single audio system. The music was played from TIDAL using an audio PC and DAC made by Bodor Audio and a pair of speakers by NCS Audio.
If you read one of my earlier blogs, you know that I listen to a pair of Heed Enigma 5 speakers. It was a love at first sight during my university years. These speakers are omnidirectional which means that they have beautiful spatial sound. And best of all, they sound 3D not just in a single sweet spot, but almost everywhere in the room.
However, as I later learned the hard way and verified in a number of good discussions, omnidirectional speakers are, unfortunately, not omnivorous. They can amplify recording problems and some music sound a bit strange on them, like percussion music. That said, as they are just perfect for most of the music I listen to, I definitely do not want to replace my current speakers, especially because not even speakers costing an order of magnitude more can provide this level of spatial sound. But I keep my ears open if I can find speakers I can use when omnidirectional does not work for one reason or another.
All components of my current system were made in Hungary. This is also a reason why I was happy to learn about this audio event: most parts of the system we listened to was also made in Hungary. I am perfectly satisfied with my current audio sources, so my focus was on the speakers at the event, as apparent from my mini-review below.
NCS Audio Reference One Mk3

NCS Audio Reference One speakers
I must admit that I do not know much about the technical details of HiFi. I am a lot more interested in what I hear. So in this blog, I only write about what I heard at the event, but nothing about the technical parameters of the speakers. You can find those on the Reference One Mk3 product page at https://www.ncsaudio.eu/reference-one/.
As you could guess from my current pair of speakers, spatial sound is important to me. From the speakers I listened to in the past decades, only omnidirectional speakers provided me the kind of 3D sound I like. And the Reference One is no exception: not even in the perfect listening spot could it provide the level of spatial sound as omnidirectional speakers. However, the Reference One was a lot closer to the sound I like than most other traditional speakers I listened to.
When I listened to the first songs on the Reference One, I had the feeling that there is too much bass and that is why I cannot hear the acoustic guitar playing. Yes, I know, hearing the expression “too much bass” sounds strange from me, but it rather means “not enough middle” in this case. However, when I listened to the same song back at home, it turned out that I was only partially right. It was not a problem with the speaker but with the recording. Whenever the deep bass voice of the singer appeared, the sound engineers lowered the volume for everything else. I did not have a chance to listen to Apocalyptica or Pink Floyd at the event, but I bet they also sound nice. :-)
I mentioned that percussion music sounds a bit strange on my speakers. My guess is that the brain expects drums & and other short sharp noises to be directional, but it’s not what it gets with omnidirectional speakers. This is why I was especially curious how they sound on the Reference One speakers. There were a couple of percussion-heavy songs during the event and they sounded perfectly. The opening of Copland’s Fanfare for the Common Man sounded just unbelievably good.
We listened to many different kinds of music at the event. The Reference One was a true omnivore, no matter the genre: jazz, rock, classical or experimental, everything sounded well on these speakers. So, will I get a Reference One any time soon? Let’s just put it this way: not yet. I really love how it sounds, no questions about that. However, these speakers are way too large for my current music room, and can easily fill rooms three or four times bigger than mine. Also, my guess is that unlike me, my neighbors would probably not appreciate the level of bass the Reference One can provide. ;-)

openQA: emulated aarch64 worker
Are you in dire need of an aarch64 worker on your own openQA instance, but no suitable hardware lying around? If speed is not your main concern, then don’t worry - you can just enable a qemu-emulated aarch64 worker on your openQA instance (probably x86_64). In this post we’re gonna explore how to setup an emulated aarch64 qemu worker on your own openQA instance in less than 10 minutes.
¿Cómo enviar un informe de un «bug» en KDE? Ahora es más sencillo
La comunidad de KDE ha simplificado la forma en la que poder reportar errores o bugs que encontremos en su software

Una queja recurrente a la que se enfrenta la comunidad de desarrolladores y colaboradores de KDE es que es demasiado difícil enviar informes de errores.
Nate Graham en su blog, nos informa que para solucionar eso, la comunidad de KDE ha puesto en marcha unas soluciones para que ahora informar de errores o bugs en KDE sea una tarea sencilla, veamos cómo.
Un obstáculo a la hora de rellenar un informe de error era la lista gigante y aterradora de productos disponibles en https://bugs.kde.org/enter_bug.cgi.
¡Pues ya no! Eso está solucionado, ya que esta página ahora está organizada en categorías lógicas con texto fácil de usar, por lo que debería ser mucho más fácil encontrar el lugar correcto para el informe de errores si utilizas ese método. Esto ya se ha implementado y está disponible de inmediato con tu cuenta en KDE (si no tienes deberías abrirte una).
También hay otras formas de realizarlo, por ejemplo, todas las aplicaciones de KDE tienen un elemento de menú «Informar un error» que te llevará automáticamente al lugar correcto. Mediante el menú «Ayuda» → «Informar de fallo».
Sin embargo, dos elementos importante de KDE no lo tenían: Configuración del sistema y Plasma. En Configuración del sistema, el elemento del menú te dirigía al producto genérico, no al componente específico de la página en la que se encuentra. Y Plasma no tenía una funcionalidad como esta en absoluto.
¡Eso ya está arreglado ahora! A partir de Plasma 5.27, el menú de las tres rayas horizontales (también llamado «menú de hamburguesa») de la Configuración del sistema ahora tiene un elemento de menú «Informar un error en la página actual» que te llevará exactamente a la URL del informe de error para la página en la que te encuentras.
Y en Plasma, las páginas «Acerca de» de los plasmoides ahora tienen un botón «Informar un error» que también te llevará directamente al lugar correcto para informar un error en ese plasmoide específico.
Pero quedan más cosas por mejorar:
- Hacer que la nueva página de categoría «informar un error» en Bugzilla sea más bonita con un mejor CSS
- Incluir también la versión de Plasma del usuario y la distribución en la URL para que esos campos en la página web se puedan completar previamente.
- También implementar estas cosas para los efectos y scripts de KWin, que tienen sus propios componentes de Bugzilla.
Ahora es más fácil que cualquier persona, sin necesidad de muchos conocimientos técnicos ayude a pulir y mejorar el funcionamiento y rendimiento del escritorio Plasma y todas las aplicaciones que desarrolla la comunidad KDE.

Más novedades de Plasma Mobile Gear 22.09
Finalizadas las charlas de Akademy 2022 de Barcelona e iniciándose los talleres donde se perfilará el trabajo del siguiente año de los diferentes grupos de desarrollo, es un buen momento de seguir hablando de más novedades de Plasma Mobile Gear 22.09, el cual estuvo disponible el 27 de septiembre. Es hora de conocer las novedades más destacas de este lanzamiento.
Más novedades de Plasma Mobile Gear 22.09
Como comenté hace unos días ha sido lanzado Plasma Mobile Gear 22.09, la cual llega con muchas novedades de las cuales día unas pinceladas en medio de Akademy-es 2022 de Barcelona.
Sigamos con los detalles algunas de ellas:
-
Pantalla principal:
- Añadido Halcyon, la nueva pantalla de inicio por defecto. Halcyon busca la simplicidad y permite utilizarla con una sola mano. También ha actualizado el diseño de la configuración de la pantalla de inicio, facilitando el cambio entre la antigua pantalla de inicio (Folio) y la nueva.


-
Dialer (marcador):
- Mejorada la aceptación de llamadas, la visualización de las notificaciones y la retroalimentación háptica, el cambio de los modos de audio de las llamadas de forma automática y también CI/CD para comprobar los cambios de los desarrolladores.
- Implementado el soporte de superposición de la pantalla de bloqueo para la pantalla de llamadas entrantes.
- Nuevo control de deslizamiento para responder a las llamadas.
- Soporte para el bloqueo de llamadas de números desconocidos. Esto permite cambiar la lógica de las notificaciones según la libreta de direcciones o los números de llamada que coincidan con un patrón.
- Introducida una corrección de regresión para soportar la inhibición del la suspensión cuando la llamada está activa.
-
Configuración:
- Se han varios módulos de configuración al nuevo estilo de formulario móvil y se ha modificado el módulo de configuración de energía para incluir más información sobre la batería.
-
Otras mejoras:
- Ahora se permite que Plasma Mobile se instale junto con el Plasma Desktop normal, simplificando la configuración necesaria. Ahora sólo tienes que cambiar el «Tema Global» en la Configuración a «Plasma Mobile», y entrar en la sesión de Plasma Mobile
¿Qué es Plasma Mobile?
Para los que no lo conozcan Plasma Mobile es la alternativa libre a interfaz gráfica para smartphones de la Comunidad KDE, hablé de él hace un tiempo y, poco a poco, se está convirtiendo en un clásico del blog.
Su idea es muy simple, tras conquistar tu escritorio KDE la Comunidad también quiere conquistar tu teléfono móvil… aunque todavía lo tenga complicado por todas las limitaciones de hardware que todavía tiene este campo de la tecnología.
No obstante, confiemos que de igual forma se han ido conquistando los ordenadores de sobremesa, portátiles y servidores, lleguemos un día que podamos tener libertad total en nuestros smartphones.
Y para cuando eso ocurra la Comunidad KDE estará preparada para ello y por eso está confeccionando un catálogo más que decente de aplicaciones con tecnología adaptativa.
La entrada Más novedades de Plasma Mobile Gear 22.09 se publicó primero en KDE Blog.
Las novedades de Plasma Mobile Gear 22.09
Hoy, en medio de Akademy 2022 de Barcelona es un buen momento para hablar de las novedades de Plasma Mobile Gear 22.09, el cual está disponible desde el 27 de septiembre. Es hora de conocer las novedades más destacas de este lanzamiento.
Las novedades de Plasma Mobile Gear 22.09
Como comenté hace unos días ha sido lanzado Plasma Mobile Gear 22.09, la cual llega con muchas novedades de las cuales día unas pinceladas en medio de Akademy-es 2022 de Barcelona.
Veamos hoy con detalles algunas de ellas:
-
Nucleo o motor (shell):
- Se está preparando para que Plasma Mobile utilice Plasma 5.26 (bendita convergencia) que será lanzado el próximo 11 de octubre.
-
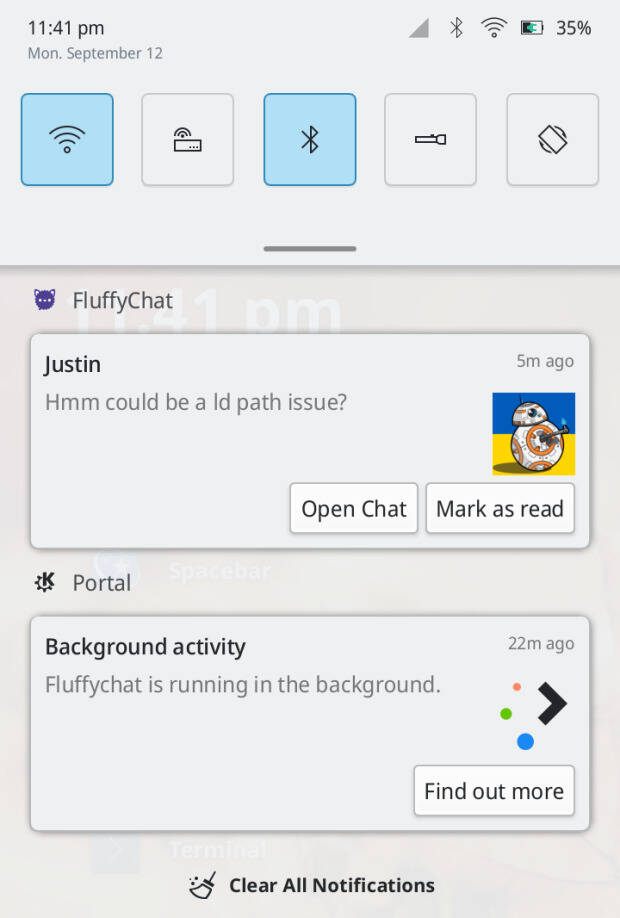
Cajón de acciones (action drawer):
- Se ha añadido un botón «Borrar todas las notificaciones» a la lista de notificaciones para borrar rápidamente las notificaciones. También se ha añadido un ajuste rápido de «no molestar» para activar/desactivar las notificaciones que aparecen como ventanas emergentes.
- Añadido avisos más descriptivos en la configuración rápida de los datos móviles. Ahora pueden notificar a los usuarios si no tienen una tarjeta SIM insertada o no tienen un APN configurado.
-
Barra de navegación:
- Añadido soporte en KWin para informar de si las aplicaciones admiten la aparición del teclado virtual por sí mismas, y Devin ha integrado esta API en la barra de navegación: ahora se muestra un botón de alternancia de teclado si la aplicación actual no admite teclados (útil para las aplicaciones que utilizan XWayland)
-
Conmutador de tareas:
- Añadido un botón para cerrar todas las aplicaciones.
¿Qué es Plasma Mobile?
Para los que no lo conozcan Plasma Mobile es la alternativa libre a interfaz gráfica para smartphones de la Comunidad KDE, hablé de él hace un tiempo y, poco a poco, se está convirtiendo en un clásico del blog.
Su idea es muy simple, tras conquistar tu escritorio KDE la Comunidad también quiere conquistar tu teléfono móvil… aunque todavía lo tenga complicado por todas las limitaciones de hardware que todavía tiene este campo de la tecnología.
No obstante, confiemos que de igual forma se han ido conquistando los ordenadores de sobremesa, portátiles y servidores, lleguemos un día que podamos tener libertad total en nuestros smartphones.
Y para cuando eso ocurra la Comunidad KDE estará preparada para ello y por eso está confeccionando un catálogo más que decente de aplicaciones con tecnología adaptativa.
La entrada Las novedades de Plasma Mobile Gear 22.09 se publicó primero en KDE Blog.