KVMにbridgeしたときにうまく通信ができない時に確認することその1
この記事はopenSUSE Advent Calendar 2019の24日目です
※2020/01/26 追記 この設定をしてしまうと、Dockerが動かなくなってしまいます。詳細は現在調査中。まとまりましたら報告させて頂きます。※
GeekoMagazine 2019 冬号に、仮想サーバーをさくっと建てる方法を書かせていただいております。よろしくお願いいたします。
さて、私は実際にこの方法で立てた仮想サーバーを活用しているのですが、最近、家のルーターがipv4アドレスを仮想サーバーに割り振ってくれなくなってしまいました。
結論 ホストがbridgeしたパケットをフィルタリングするのを無効にする
sysctlで以下の設定を行った所、無事、DHCPでipv4が割り振られました。
net.bridge.bridge-nf-call-ip6tables = 0
net.bridge.bridge-nf-call-iptables = 0
net.bridge.bridge-nf-call-arptables = 0
1行づつ、sysctl -w で設定してもよいですし、ファイルに記述して、sysctl -p でそのファイルを読み込んでもOKです。
ただ、/etc/sysctl.d/ にファイルを配置しても、起動時に読み込んでくれません・・・ここは追って調査して、記事にしたいと思います。
これらは、bridgeのフィルタリングを無効にする設定とのことです。
もしかしたら、最近のカーネルのアップデートなどで設定が消えてしまったのかもしれません。私が忘れているだけで、以前はこの設定をしていたかもしれず、記事から抜けてしまっていて申し訳ないです・・・

 cabelo
Certbot : Certificados https gratuitos e renovação automática.

Let’s Encrypt é uma autoridade de certificação aberta e automatizada que usa o protocolo ACME (Ambiente de Gerenciamento de Certificado Automático) para fornecer certificados TLS / SSL gratuitos para qualquer cliente compatível. Esses certificados podem ser usados para criptografar a comunicação entre seu servidor web e seus usuários. Há dezenas de clientes disponíveis, escritos em várias linguagens de programação e muitas integrações com ferramentas administrativas, serviços e servidores populares.
O cliente ACME mais popular, o Certbot, é agora desenvolvido pela Electronic Frontier Foundation. Além de verificar a propriedade do domínio e obter certificados, o Certbot pode configurar automaticamente TLS / SSL em servidores web Apache e Nginx .
O certificado disponibiliza as principais vantagens/características:
- 100% Gratuito
- Instalação simples e com atualizações automáticas
- Transparência
- Seguro.
- Visa uma política de cooperativismo
Neste tutorial veremos como utilizar a ferramenta Certibot na plataforma OpenSuSE Linux. A seguir uma breve receita de bolo para quem não conhece o recurso.
Primeiramente garanta o funcionamento correto dos módulo do Apache rewrite e ssl.
zypper install certbot python-certbot-apache
Configure o seu domínio e subdomínio corretamente no servidor DNS. Também configure o ServerName em VirtualHost no arquivo de configuração do Apache conforme o exemplo abaixo:
        DocumentRoot /srv/www/htdocs/SEUDOMINIO
        ServerName SEUDOMINIO.com.br
Atenção especial ao rewrite para forçar o uso de https:
RewriteEngine on
RewriteCond %{SERVER_NAME} =SEUDOMINIO.com.br
RewriteRule ^ https://%{SERVER_NAME}%{REQUEST_URI} [END,NE,R=permanent]
Agora com o Apache configurado corretamente, utiliza o comando Certibot, conforme o exemplo abaixo:
$ sudo certbot certonly --apache
Saving debug log to /var/log/letsencrypt/letsencrypt.log
Plugins selected: Authenticator apache, Installer apache

Which names would you like to activate HTTPS for?
- - - - - - - - - - - - - - - - - - - - - - - - - - - - - - - - - - -  - - -
1: SEUDOMINIO.com.br
2: www.SEUDOMINIO.com.br
- - - - - - - - - - - - - - - - - - - - - - - - - - - - - - - - - - -  - - -
Select the appropriate numbers separated by commas and/or spaces, or
 leave input blank to select all options shown (Enter 'c' to cancel):
Obtaining a new certificate Performing the following challenges:
http-01 challenge for SEUDOMINIO.com.br
http-01 challenge for www.SEUDOMINIO.com.br
http-01 challenge for www.SEUDOMINIO.com.br
Waiting for verification...
Challenge failed for domain SEUDOMINIO.com.br
Challenge failed for domain www.SEUDOMINIO.com.br


IMPORTANT NOTES:
 - Congratulations! Your certificate and chain have been saved at:
   /etc/letsencrypt/live/SEUDOMINIO.com.br/fullchain.pem
   Your key file has been saved at:
   /etc/letsencrypt/live/SEUDOMINIO.com.br/privkey.pem
   Your cert will expire on 2020-03-22. To obtain a new or tweaked
   version of this certificate in the future, simply run certbot
   again. To non-interactively renew *all* of your certificates, run
   "certbot renew"
 - If you like Certbot, please consider supporting our work by:

   Donating to ISRG / Let's Encrypt:   https://letsencrypt.org/donate
   Donating to EFF:                    https://eff.org/donate-le
Para renovar o(s) Certificado(s) basta utilizar os comandos certibot new:
$ sudo certibot renew
Adicione os certificados conforme o exemplo abaixo nos arquivos .conf:
ServerAlias SEUDOMINIO.com.br
SSLCertificateFile /etc/letsencrypt/live/SEUDOMINIO.com.br/fullchain.pem
SSLCertificateKeyFile /etc/letsencrypt/live/SEUDOMINIO.com.br/privkey.pem
Include /etc/letsencrypt/options-ssl-apache.conf
e PRONTO!

 Member
KDE vs XFCE vs Gnome
Chris Titus recently vlogged about an article showing that KDE 5.17 is now smaller than XFCE 4.14 in memory usage. The article says that in their tests, XFCE actually uses more RAM than KDE. I was very interested in this, but I couldn’t quite believe it and so I ran my own tests.
First of all, we need to compare apples to apples. I created an OpenSUSE VM using Vagrant with KVM/libvirt. It had 4 cores and 4192MB of RAM. This VM has no graphical interface at all. As soon as I got it up, I took the first “No X” measurement. After patching using zypper dup, I took the second “No X” reading. Every reading in this blog post was using the free -m command. I then shut down the VM and cloned it 3 times so each copy should be completely the same.
I installed the desktop environments into their respective VMs using the following commands:
zypper in -t pattern kde


zypper in -t pattern xfce


zypper in -t pattern gnome
After desktop environment was done, I then installed the lightdm display manager. This wasn’t actually necessary with Gnome because it installs gdm as a dependency.
After that, I started the display manager with:
systemctl set-default graphical && systemctl isolate graphical
Once I logging into the graphical environment, I ran xterm and then free -m for the first reading. I then rebooted each machine, and logged in for the second reading. I then installed and started libreoffice-writer. I created a new spreadsheet. That is the “Libreoffice” reading. Finally, I closed LibreOffice and took the third reading.
The results are a little surprising. The averages speak for themselves. KDE does use more than XFCE but not to a shocking amount. In fact, according to the average, only about 68MB. What’s really surprising is how much more Gnome uses than the either two — nearly 200MB more that KDE!
Finally, I also did a df -kh after installing libreoffice-writer on each. KDE is in fact that disk hog by a wide margin and that’s even comparing it to Gnome + gdm + lightdm.
| Desktop | Test No | RAM (MB) | Disk (GB) | Version |
| No X | 1 | 54 | ||
| No X | 2 | 58 | ||
| Average | 56 | |||
| Gnome | 1 | 471 | 3.34.2 | |
| Gnome | 2 | 501 | ||
| Gnome | 3 | 508 | ||
| Gnome | Libreoffice | 547 | 1.9 | |
| Average | 507 | |||
| KDE | 1 | 327 | 5.17.4 | |
| KDE | 2 | 284 | ||
| KDE | 3 | 291 | ||
| KDE | Libreoffice | 330 | 2.3 | |
| Average | 308 | |||
| XFCE | 1 | 216 | 4.14 | |
| XFCE | 2 | 230 | ||
| XFCE | 3 | 241 | ||
| XFCE | Libreoffice | 272 | 1.8 | |
| Average | 240 |
openSUSE Tumbleweed – Review of the week 2019/51
Dear Tumbleweed users and hackers,
The year 2019 is slowly coming to the end, yet Tumbleweed keeps on rolling (so far). During that week we could publish three snapshots (1213, 1214 and 1216).
The changes contained therein were:
- KDE Applications 19.12.0
- PHP 7.4
One complete snapshot was built (but not released) using kernel 5.4. Unfortunately, we had to revert this update again, as kexec functionality was non-functional with our signed kernel. The issue is being analyzed and fixes are being looked for. Unfortunately, with the holiday season, I can’t predict when this will happen.
Other than that, we still have a few things piling up in stagings, like:
- Python 3.8
- Rust 1.39
- systemd 244
- Qt 5.14
- Kubernetes 1.17
Unfortunately, there is also an openQA/Networking issue present at the moment. Our openQA workers are unable to connect to multiple sites (all *.opensuse.org) and thus fail to test any of the snapshots/staging areas. We are busy trying to find resources that can fix this up, but this proves not so easy over this period. I hope we can soon resume testing activity with working network setup and restart rolling Tumbleweed
Linux kernel preemption and the latency-throughput tradeoff
What is preemption?
Preemption, otherwise known as preemptive scheduling, is an operating system concept that allows running tasks to be forcibly interrupted by the kernel so that other tasks can run. Preemption is essential for fairly scheduling tasks and guaranteeing that progress is made because it prevents tasks from hogging the CPU either unwittingly or intentionally. And because it’s handled by the kernel, it means that tasks don’t have to worry about voluntarily giving up the CPU.
It can be useful to think of preemption as a way to reduce scheduler latency. But reducing latency usually also affects throughput, so there’s a balance that needs to be maintained between getting a lot of work done (high throughput) and scheduling tasks as soon as they’re ready to run (low latency).
The Linux kernel supports multiple preemption models so that you can tune the preemption behaviour for your workload.
The three Linux kernel preemption models
Originally there were only two preemption options for the kernel:
running with preemption on or off. That setting was controlled by the
kernel config option, CONFIG_PREEMPT. If you were running Linux on a
desktop you were supposed to enable preemption to improve interactivity
so that when you moved your mouse the cursor on the screen would respond
almost immediately. If you were running Linux on a server you ran with
CONFIG_PREEMPT=n to maximise throughput.
Then in 2005, Ingo Molnar introduced a third option named
CONFIG_PREEMPT_VOLUNTARY that was designed to offer a middle point on
the latency-throughput spectrum – more responsive than disabling
preemption and offering better throughput than running with full
preemption enabled. Nowadays, CONFIG_PREEMPT_VOLUNTARY is the default
setting for pretty much all Linux distributions since openSUSE
switched at the
beginning of this year.
Unfortunately, choosing the best Linux kernel preemption model is not straightforward. Like with most performance topics, the best way to pick the right option is to run some tests and use cold hard numbers to make your decision.
What are the differences in practice?
To get an idea of how much the three config options lived up to their intended goals, I decided to try each of them out by running the cyclictest and sockperf benchmarks with a Linux 5.4 kernel.
If you’re interested in reproducing the tests on your own hardware, here’s how to do it.
$ git clone https://github.com/gormanm/mmtests.git
$ cd mmtests
$ ./run-mmtests.sh --config configs/config-workload-cyclictest-hackbench `uname -r`
$ mv work work.cyclictest && cd work.cyclictest/log && ../../compare-kernels.sh | less
$ cd ..
$ ./run-mmtests.sh --config configs/config-network-sockperf-pinned `uname -r`
$ mv work work.sockperf && cd work.sockperf/log && ../../compare-kernels.sh | less
cyclictest records the maximum latency between when a timer expires and the thread that set the timer runs. It’s a fair indication of worst-case scheduler latency.

The above results show that the best (lowest) latency is achieved when
running with CONFIG_PREEMPT. It’s not a universal win, as you can see
from the first data point. But overall, CONFIG_PREEMPT does a decent job
of keeping those latencies down. CONFIG_PREEMPT_VOLUNTARY is a good
middle ground and exhibits slightly worse latency while
CONFIG_PREEMPT_NONE shows the the worst (highest) latencies of all.
Based on the descriptions of the kernel config options given in the
preemption models section, I’m sure we can all agree these are roughly
the results we expected to see.
Next, let’s look at sockperf’s TCP throughput results. sockperf is a network benchmark that measures throughput and latency over TCP and UDP. For this experiment, we’re only interested in the throughput scores.

It’s a little hard to make out some of the results, but each of the
different message sizes shows that CONFIG_PREEMPT_NONE achieves the
best throughput, followed by CONFIG_PREEMPT_VOLUNTARY and with
CONFIG_PREEMPT coming last. Again, this is the expected result.
Things get a little weirder with sockperf’s UDP throughput results.

Here, CONFIG_PREEMPT_VOLUNTARY consistently achieves the highest
throughput. I haven’t dug into exactly why this might be the case, but
my best guess is that preemption doesn’t matter as much for UDP
workloads because it’s stateless and doesn’t exchange multiple messages
between sender and receiver like TCP does.
If you’ve got any ideas to explain the UDP throughput results please leave them in the comments!

2001 Ford F-350 Radiator Replacement
LibreOffice で OpenType フォントの機能を使ってみる
LibreOffice Advent Calendar と openSUSE Advent Calendar の 22 日目です。毎年、二重投稿ですみません。
今日もちょっと小ネタで LibreOffice で OpenType フォントの機能(feature)の使い方です。※ feature の訳が機能で良いかはいつも困ります
スライドなどで、Noto Sans JP (Noto Sans CJK JP) や源ノ角ゴシックを使うと、IPA Pゴシックや、Meiryo UI、Migu 1C などのプロポーショナル日本語フォントに慣れていると、ちょっと間隔が空き過ぎと思う人はいるのではないでしょうか?
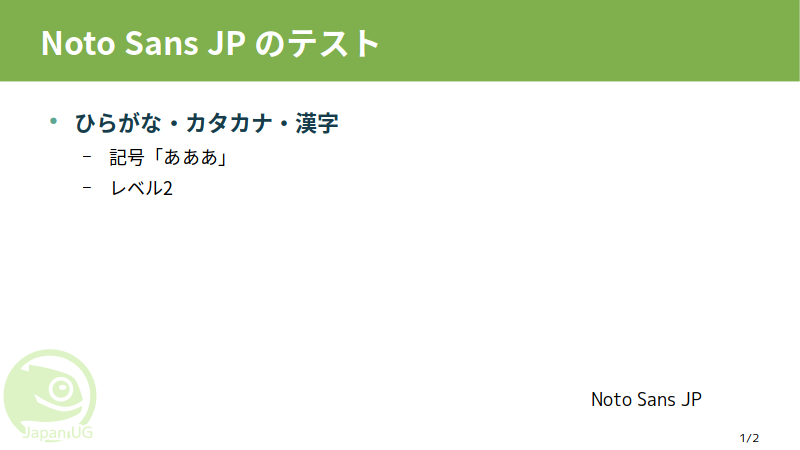
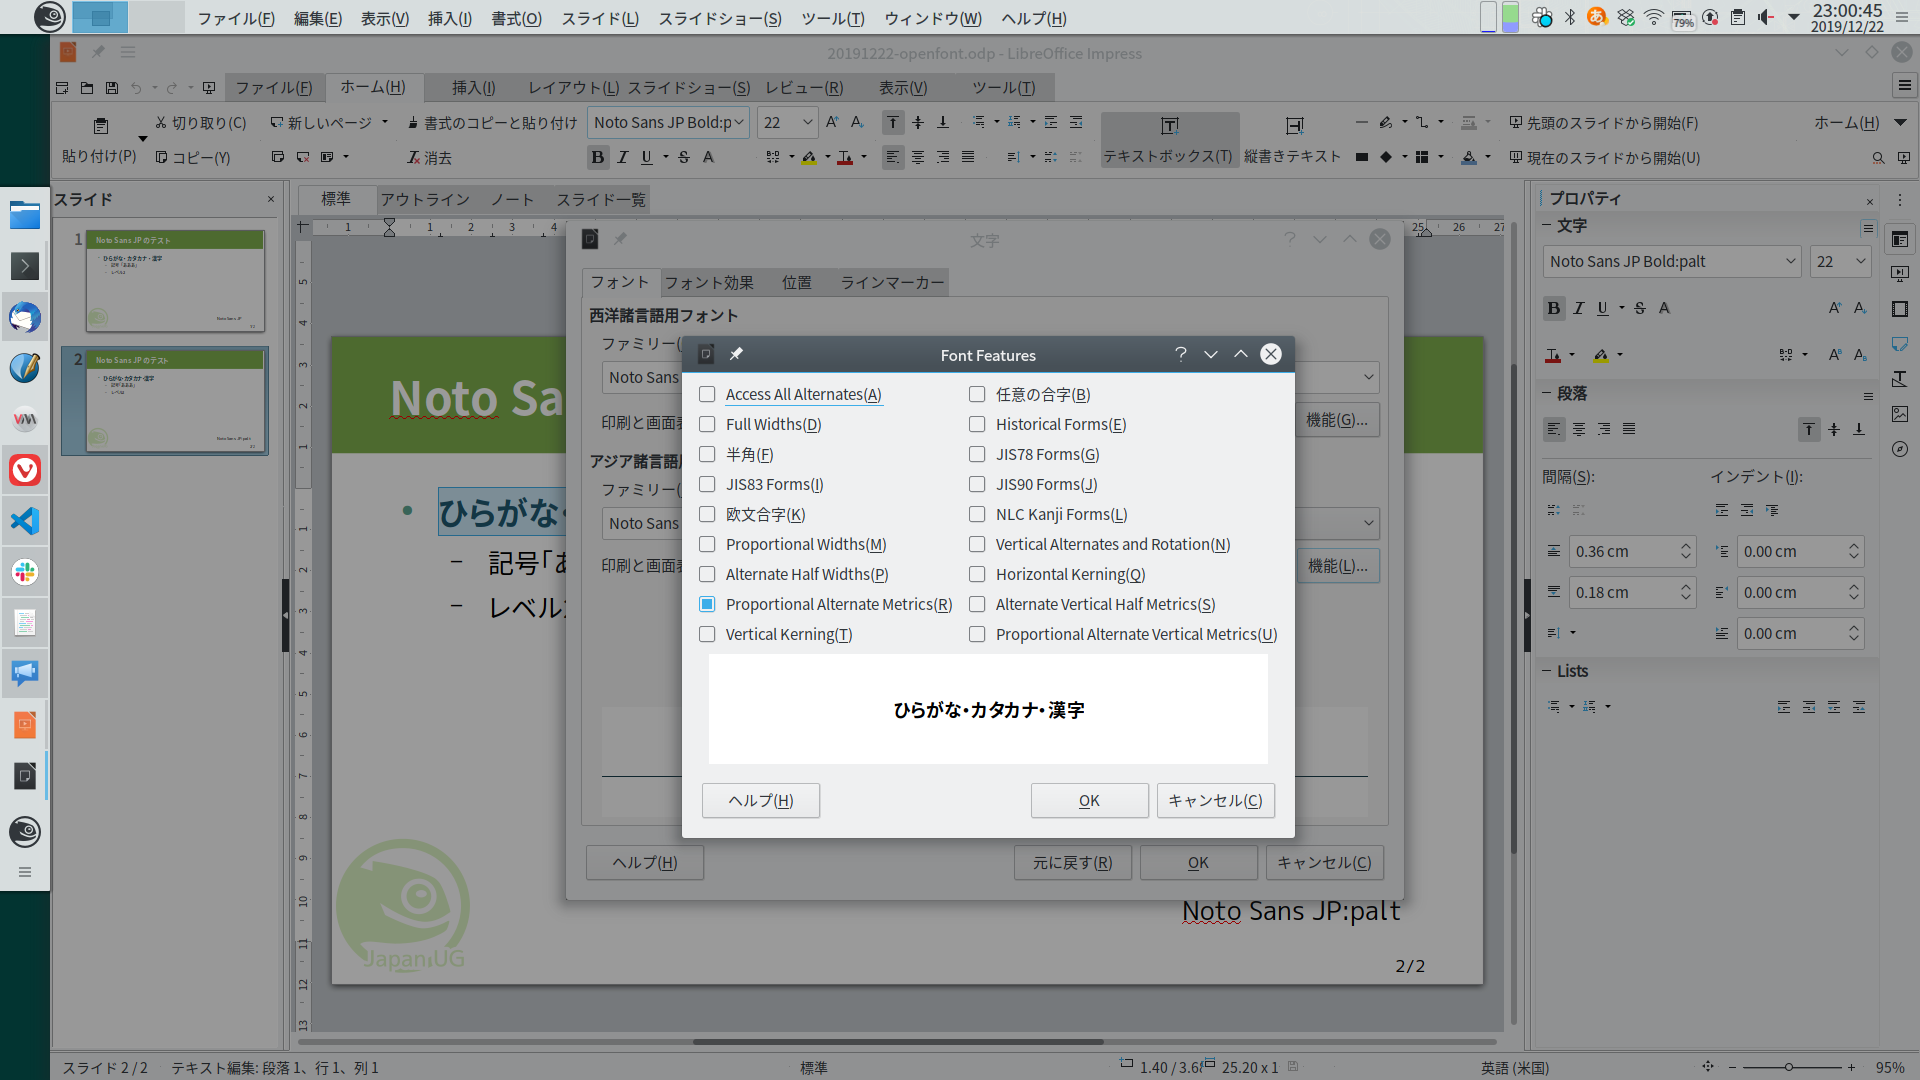
実は、Noto Sans JP フォントには、プロポーショナルなフォントの文字送り情報が含まれており、OpenType フォントの機能の Proportional Alternate Metrics をサポートするソフトウェアで使用することができます。最近の LibreOffice でもサポートされています。先ほどのスライドはこんな感じになります。見慣れた感じになりますね。
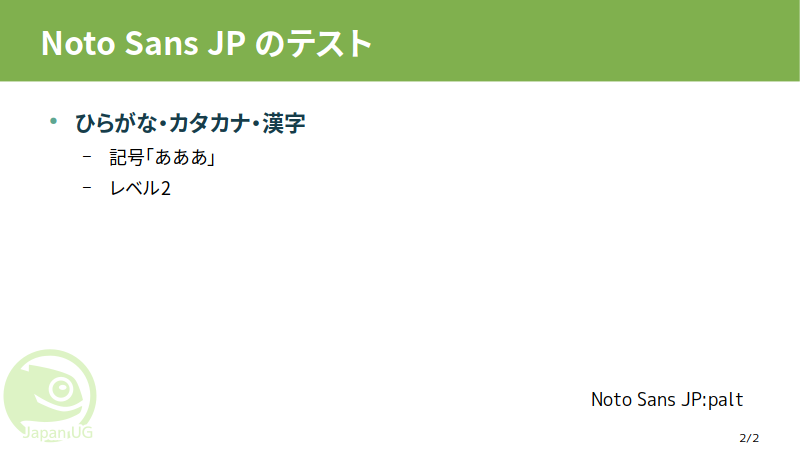
palt を使うには、フォント設定ダイアログの「機能」ボタンを押してダイアログを出し「Proportional Alternate Metrics」を選ぶか、フォント名の最後に「:palt」を付けます。他にも色々な機能がありますが、LibreOffice ではすべての機能に対応しているわけではないようです(選択しても有効にならないものあり)。
OpenType フォントの機能について、詳しく知りたい方は以下のページをチェックしてみて下さい。
https://helpx.adobe.com/jp/fonts/using/open-type-syntax.html#palt

#LuJam une implémentation du DNS RPZ pour combattre la #Cybersécurité, un article par #76Actu de #Rouen avec #openSUSE #kvm et #Raspberry & #AlpineLinux
Nos amis de 76Actu ont fait un excellent article sur le sujet https://actu.fr/normandie/rouen_76540/marre-virus-ordinateur-solution-miracle-dune-association-rouen_30339622.html Nous profitions de cette oaccasion pour leur souhaiter une bonne continuation, Joyeux Noël, Excellente Année 2020 ! Que la Force soit avec vous !
The post #LuJam une implémentation du DNS RPZ pour combattre la #Cybersécurité, un article par #76Actu de #Rouen avec #openSUSE #kvm et #Raspberry & #AlpineLinux appeared first on Network Users Institute - Cybersécurité, Intégration de Linux & Logiciels Libres à Rouen, Normandie..