
 Member
 sogal
sogalMises à jour de GNOME, LLVM, Samba, Ruby dans Tumbleweed
Deux instantanés openSUSE Tumbleweed ont été publiés cette semaine, mettant à jour plusieurs bibliothèques et une nouvelle version de GNOME, Ruby, Samba, Mozilla et le compilateur LLVM.
L'instantané 20191018 a fourni des mises à jour mineures pour Mozilla Firefox 69.0.3 et Thunderbird 68.1.2. La mise à jour de Firefox a corrigé un bug qui invitait les utilisateurs de Yahoo mail à télécharger des fichiers en cliquant sur les courriels et la mise à jour Thunderbird a corrigé quelques problèmes ainsi que l'importation de contacts dans le carnet d'adresses à partir d'un fichier CSV. La suite logicielle GNOME a été mise à jour vers la version 3.34, qui pourrait être la version qui entrera dans openSUSE Leap 15.2. Cette version de GNOME, nommée Thessaloniki, inclut des mises à jour visuelles pour un certain nombre d'applications et les paramètres de sélection d'arrière-plan ont également fait l'objet d'une refonte, ce qui facilite la sélection d'arrière-plans personnalisés. Les développeurs utilisant GNOME 3.34 remarqueront davantage de sources de données dans Sysprof facilitant le profilage des performances des applications. Les améliorations apportées à Builder incluent un inspecteur intégré D-Bus. Les liaisons Javascript pour GNOME ont également été mises à jour avec la version gjs 1.58.1 et la version gtk3 3.24.12 a corrigé un décalage de pointeur sous X11 et Wayland. L'environnement d'exécution Python2 a été supprimé avec la mise à jour de samba 4.11.0; python 3.4 ou une version ultérieure est désormais requise.
L'instantané 20191018 apportait une mise à jour du nouveau langage de programmation vala 0.46.3 qui se concentre sur les développeurs GNOME. Le langage de programmation ruby 2.6.5 a corrigé une vulnérabilité d'injection de code avec trois autres Vulnérabilités et expositions courantes. La paquet Snapper d'OpenSUSE 0.8.5 a été mis à jour pour permettre le suivi des commentaires dans les fichiers de configuration. Le noyau Linux a été mis à jour en 5.3.6. NetworkManager 1.18.4 a amélioré la gestion des règles de routage, des règles ajoutées en externe et des règles reprises après le redémarrage d'un service NetworkManager. Le package NetworkManager-applet 1.8.24 a ajouté la prise en charge de l'authentification SAE (WPA3 Personnel). Des correctifs de régression ont été apportés aux versions 2.62.1 de glib2 et de glib-networking; ce dernier a également inclus deux corrections de fuite mémoire. Les autres paquets remarquables mis à jour dans l'instantané étaient webkit2gtk3 2.26.1, libsoup 2.68.2, grilo 0.3.10 et dconf 0.34.0.
Selon le commentateur de clichés Tumbleweed, l’instantané a une cote stable de 92.
La plupart des mises à jour de l'instantané 20191016 concernaient des paquets YaST2. Un plantage causé par une méthode de widget a été corrigé dans yast2-network 4.2.23 et au moins 10 langues ont été mises à jour dans le package yast2-trans. Les personnes peuvent contribuer au projet en traduisant via l'instance openSUSE's Weblate. Il y avait une poignée d'autres paquets mis à jour dans l'instantané, mais le plus important à noter est une nouvelle version majeure de llvm9. La nouvelle version majeure du compilateur nécessite uniquement une base python3 au lieu des paquets python3 complets. L'optimiseur LLVM convertira désormais les appels à memcmp en appels à bcmp dans certaines circonstances. La version majeure ne considère plus non plus la cible RISCV comme "expérimentale". Il est maintenant construit par défaut, plutôt que d'avoir besoin d'être activé avec LLVM\ EXPERIMENTAL\ TARGETS_TO_BUILD.
Cet instantané a enregistré une note stable de 91, selon le commentateur de clichés Tumbleweed.
Updated via GHActions
Tags: opensuse

Skia branch merged to master
All(?) the necessary info about how to enable it etc. are in this mail, but there are things that better fit a blog post than a mail, and in this case that's going to be a table and a picture showing how well it may perform. Note that these results are from running visualbackendtest, which is not really a benchmark, so these numbers should be taken with a grain of salt. It's just a test that draws a gradient, several big polygons (each circle is actually 720 lines) and short text.

| Render method | FPS |
|---|---|
| Linux gen (X11) | 86 |
| Linux gtk3 | 70-90 |
| Linux OpenGL | 45 |
| Linux Skia Vulkan (GPU) | 65-90 |
| Linux Skia raster (CPU) | 5 |
| Windows GDI | 64 |
| Windows OpenGL | 40-60 |
| Windows Skia Vulkan (GPU) | 175-185 |
| Windows Skia raster (CPU) | 75-85 |

Broken Headband on Bluetooth Headphones | Repair Instead of Replace

Moving gnome-shell's styles to Rust
Gnome-shell uses CSS processing code that dates from HippoCanvas, a CSS-aware canvas from around 2006. It uses libcroco to parse CSS, and implements selector matching by hand in C.
This code is getting rather dated, and libcroco is unmaintained.
I've been reading the code for
StTheme
and
StThemeNode,
and it looks very feasible to port it gradually to Rust, by using the
same crates that librsvg uses, and eventually removing libcroco
altogether: gnome-shell is the last module that uses libcroco in
distro packages.
Strategy
StTheme and StThemeNode use libcroco to load CSS stylesheets and
keep them in memory. The values of individual properties are just
tokenized and kept around as a linked list of CRTerm; this struct
represents a single token.
Later, the drawing code uses functions like
st_theme_node_lookup_color(node, "property_name") or
st_theme_node_lookup_length() to query the various properties that
it needs. It is then that the type of each property gets
determined: prior to that step, property values are just tokenized,
not parsed into usable values.
I am going to start by porting the individual parsers to Rust, similar to what Paolo and I did for librsvg. It turns out that there's some code we can share.
So far I have the parser for colors implemented in Rust. This removes a little bunch of code from the C parsers, and replaces it with a little Rust code, since the cssparser crate can already parse CSS colors with alpha with no extra work — libcroco didn't support alpha.
As a bonus, this supports hsl() colors in addition to rgb() ones
out of the box!
After all the parsers are done, the next step would be to convert the representation of complete stylesheets into pure Rust code.
What can we expect?
A well-maintained CSS stack. Firefox and Servo both use the crates in question, so librsvg and gnome-shell should get maintenance of a robust CSS stack "for free", for the foreseeable future.
Speed. Caveat: I have no profile data for gnome-shell yet, so I don't know how much time it spends doing CSS parsing and cascading, but it looks like the Rust version has a good chance of being more efficient.
The selectors crate has some very interesting optimizations from Mozilla Servo, and it is also now used in Firefox. It supports doing selector matching using Bloom filters, and can also avoid re-cascading child nodes if a change to a parent would not cause its children to change.
All the parsing is done with zero-copy parsers thanks to Rust's string
slices; without so many malloc() calls in the parsing code path,
the parsing stage should really fly.
More CSS features. The selectors crate can do matching on
basically all kinds of selectors as defined by recent CSS specs; one
just has to provide the correct hooks into the calling code's
representation of the DOM tree. The kind of matching that StTheme
can do is somewhat limited; the rustification should make it match
much more closely to what people expect from CSS engines in web
browsers.
A well-defined model of property inheritance. StThemeNode's
model for CSS property inheritance is a bit ad-hoc and inconsistent.
I haven't quite tested it, but from looking at the code, it seems that
not all properties get inherited in the same way. I hope to move it
to something closer to what librsvg already does, which should make it
match people's expectations from the web.
In the meantime
I have a merge request ready to simply move the libcroco source code directly inside gnome-shell's source tree. This should let distros remove their libcroco package as soon as possible. That MR does not require Rust yet.
My playground is here:
- Gnome-shell branch to rustify the styles
- Stylish, a Rust library that will implement gnome-shell's styling code.
This does not compile yet! I'll plug things together tomorrow.
(Oh, yes, the project to redo Firefox's CSS stack in Rust used to be called Stylo. I'm calling this Stylish, as in Styles for the Shell.)
Ubuntu 19.10 | Review from an openSUSE User
Aruba IAP-105 Wireless Access Point Setup

अगला openSUSE Asia Summit भारत में होगा
पिचले सितंबर को Bali, Indonesia के Udayana University में openSUSE Asia Summit 2019 घटित हुआ। लगातार दो दिनों तक दुनिया के कोने कोने से आए हुए इंजीनियरों, डेवलपर्स, डिजाइनरों और कइ तरह के openSUSE योगदानकर्ताओं ने मिलकर तकनीकी प्रदर्शन तथा अन्य कार्यशालाएँ आयोजित कीं।
इस सम्मेलन के द्वारा openSUSE समुदाय अपने उपयोगकर्ताओं और योगदानकर्ताओं को एक साथ लाता हें ताकि इन में openSUSE प्रोजैक्ट को लेकर बातचीत हो सके। बोर्ड के सदस्य समुदाय को प्रोजैक्ट से संबंधित जानकारी देते हैं। नए उपयोगकर्ता इस सम्मेलन से बहुत लाभ उठा सकते हैं।

सम्मेलन के समापन समारोह से पहले यह घोषित कि गइ की अगला सम्मेलन, याने कि openSUSE Asia Summit 2020, मानव रचना इंटरनेशनल इंस्टिट्यूट ऑफ़ रिसर्च एंड स्टडीस (Manav Rachna Int'l Institute of Research & Studies), फरीदाबाद, हरियाणा, भारत (Faridabab, Haryana, India) में होगा। इंस्टिट्यूट की प्रतिनिधि, शोभा त्यागी, ने विस्तार से अपना प्रस्ताव बाताया जोकी सम्मेलन के आयोजकों ने स्वीकार किया।

將GCP Stackdriver Alert 傳送到 telegram 小記


- 這邊的命名規則不給輸入 - , 所以我用底線


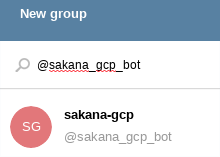
- Bot 名稱( 顯示名稱 ): sakana-gcp
- Bot 使用者名稱(帳號): sakana_gcp_bot
- 預設是 Enable, 就是 bot 可以被加入群組
- 如果被要求輸入 bot , 要輸入的是 bot 使用者名稱, @sakana_gcp_bot


- 這邊的 YOUR_TOKEN 就是剛剛 @botfather 給的 TOKEN
- 如果result 是空的, 就把 bot 從群組踢出去再加入一次, 再試試看
- -X 是 request , -d 是 data
- 注意雙引號各把 host 以及 data 內容標示住

- 要有 npm 套件, 等等在 container 內建立, 不影響自己環境
- trigger 是名稱
- region 的部分, asia-east 只有 asia-east2
- Project 後面請用自己的 project ID


- Alert Policy 建立可以參考之前的文章 http://sakananote2.blogspot.com/2019/11/stackdriver-gce-cpu.html


- 登入該台 VM, 使用 # stress-ng -c 4 --cpu-method all 進行壓測

- Bot 的管控
- Cloud function with iam policy binding

- 感謝 ikala Ken 與 ikala Lee Wei 提供相關資訊
openSUSE Tumbleweed – Review of the week 2019/47
Dear Tumbleweed users and hackers,
Another week, in which openQA did block some of the snapshots – and some issues it was unfortunately not able to see. Anyway, during the week 2019/47 we have released three snapshot into the wild (1116, 1118 and 1119), containing those changes:
- Mesa 19.2.4: fixes critical rendering issues from earlier Mesa 19.2.3. As this rendering issue did not happen on all graphics adapters, openQA had no chance of spotting it
- Linux kernel 5.3.11
- KDE Plasma 5.17.3
- Subversion 1.13.0
- binutils 2.33.1
The things being worked on include:
- openssl 1.1.1d: will be part of snapshot 1121 and later)
- rpm 4.15.0: the new python dependency generator is nasty, as it adds much more dependencies that were the before (probably a good thing), exposing new build cycles
- Python 3.8
- Rust 1.39.0: break Firefox and Thunderbird so far
- Perl 5.30.1
-
libxml 2.9.10: breaksperl -XML-LibXSLT (on i586 only, invalid free() )

Highlights of YaST Development Sprints 88 and 89
The Contents
- The System Role selection dialog got usability improvements
- and we added a CustomStatusItemSelector to the widget library in the process.
- Snapper gained machine-readable output
- Storage:
- remote encrypted devices are activated properly at boot time
- random and pervasive encryption also supported in AutoYaST
- improved support for AutoYaST Guided Partitioning
A More User Friendly Role Selector Dialog
Step by step, we continue improving the user experience making use of the newly added widgets to libyui. This sprint was the turn to update the role selection dialog to use the new item selector introduced during the sprint 87. Apart from looking better as it can be seen in the screenshots below, there are two immediate improvements:
- the vertical scroll, when present, is respected after selecting a role (instead of “jumping to the beginning”), and
- the selected role (if any) will be visible when arriving at the dialog even when the list is quite long or the available space too short.
| Before | After |

What is more, updating the dialog was also useful for us to realize about some needed improvements for the widget itself, mentioned in the next section. Quite a productive change :smiley:
When one Bit is not Enough: The CustomStatusItemSelector
A few weeks ago, we wrote about the new ItemSelector widget that is finding its way into YaST user interfaces. It turned out that just a simple on/off status is not enough in some cases, so we had to extend that concept. For example, software modules may have dependencies, and we want to show the difference between one that was explicitly selected by the user and one that was auto-selected because some other software module requires it.


This kind of shook the foundations of the underlying classes; all of a sudden a bit is no longer just a bit, but it needs to be broken down into even smaller pieces. Well, we cheated; we now use integer values instead. Most of the class hierarchy still only uses 0 and 1, but the new YCustomStatusItemSelector also supports using higher numbers for application-defined purposes.
For each possible status value, the application defines the name of the icon to be displayed (for graphical UIs like the Qt UI), the text equivalent (for text mode / the NCurses UI), and an optional nextStatus which tells the widget what status to cycle to when the user changes the status of an item with a mouse click or with the keyboard. A value of -1 lets the application handle this.
So this is not a one-trick-pony that is useful only for that one use case (the software modules), but a generic tool that might find good uses in other places all over YaST as well.
Snapper and Machine-readable Output
Most likely you already know snapper, a great tool to work with your filesystem snapshots. Some third-party scripts and tools (e.g., YaST) use the snapper CLI to get some information, but generally, snapper generates an output intended to be human-readable. Sometimes that could cause some troubles in scripts checking the snapper output. Now on, snapper also offers CLI options to generate its output in a machine-readable format, i.e., CSV and JSON. Please, check this post for more information about those new options.
Fix Boot Problems with Remote Encrypted Devices
Since we adopted systemd, the management during system boot of encrypted devices on top of network-based devices like iSCSI or FCoE disks has been less than optimal. But now we are happy to announce that we have put all the pieces together to make the experience as smooth as possible.
One of the main responsibilities of systemd is sorting the actions performed during boot and setting the dependencies between them. For example, if there are encrypted devices, systemd will first ask you for the password and activate the devices to afterwards mount the file system contained in those encrypted devices. Systemd should be able to distinguish when an encrypted device is based on a network-based storage device and, thus, can only be initialized after the network is up. In some cases that detection failed (for example network block device based mounts, such as iSCSI and FCoE disks) and systemd got stuck before initializing the network waiting for the device to be available.
Recently, SLE and openSUSE Leap has incorporated support for specifying
the _netdev option in the /etc/crypttab file. With such option,
systemd will recognize the encrypted device as network-based and will
only try to activate it after setting up the network. That’s analogous
to the corresponding _netdev option in /etc/fstab that has been
already there for quite some time and that can be used to defer when a
device is mounted. For it to work properly, the _netdev option must be
present in all the relevant entries of both crypttab and fstab.
And that’s exactly what YaST will do now in openSUSE Tumbleweed and
upcoming releases of both SLE and openSUSE Leap. From now on, the
_netdev option will be added fstab for all mount points depending
(directly or indirectly) on the network. In addition, that option (and
also the noauto and nofail ones) will be propagated from fstab to
all the corresponding crypttab entries.
This should mark the end of a dark age of encrypted iSCSI and FCoE devices timing out during boot.
AutoYaST Support for Random and Pervasive Encryption
Back in October, we announced that YaST got support for new encryption methods like random or pervasive encryption. At that time, AutoYaST was out of scope because we wanted to have a stable (and tested) API first. Fortunately, the time has come and now AutoYaST supports these encryption mechanisms.
Starting in autoyast2 4.2.17, you can specify the encryption method
using a crypt_method element, as shown in the example below. Possible
values are luks1 (regular LUKS1 encryption), pervasive_luks2
(pervasive volume encryption), protected_swap (encryption with
volatile protected key), secure_swap (encryption with volatile secure
key) and random_swap (encryption with volatile random key).
<drive>
 <type config:type="symbol">CT_DISK</type>
 <use>all</use>
 <partitions config:type="list">
  <partition>
   <size>20G</size>
   <mount>/</mount>
   <filesystem config:type="symbol">ext4</filesystem>
   <crypt_method config:type="symbol">luks1</crypt_method> <!-- default method if crypt_key is defined -->
   <crypt_key>S3CR3T</crypt_key>
  </partition>
  <partition>
   <size>1G</size>
   <mount>swap</mount>
   <crypt_method config:type="symbol">random_swap</crypt_method> <!-- set encryption method -->
  </partition>
 </partitions>
</drive>
As we want AutoYaST to be as user-friendly as possible, it will try to help you if you do some mistake setting the encryption configuration as when in the screenshot below.

Finally, the old crypt_fs element is deprecated, although it stills
works for backward-compatibility reasons. Basically, it is equivalent to
setting crypt_method to luks1.
Improve Support for AutoYaST Guided Partitioning
When it comes to partitioning, we can categorize AutoYaST use cases into three different levels:
- Automatic partitioning: the user does not care about the partitioning and trusts in AutoYaST to do the right thing.
- Guided partitioning: the user would like to set some basic settings (use LVM, set an encryption password, etc.)
- Expert partitioning: the user specifies how the layout should look, although a complete definition is not required.
To some extent, it is like using the regular installer where you can skip the partitioning screen and trust in YaST, use the Guided Proposal, or define the partitioning layout through the Expert Partitioner.
The second level (Guided partitioning) was introduced in AutoYaST with the release of SUSE Linux Enteprise 15 (and Leap 15.0) but it was not documented at all. Additionally, although it was working as designed at first sight, it was far from being that useful.
This sprint with invested quite some time improving the documentation (kudos to our awesome documentation team) and the behaviour. Now, if you want to set up an LVM system without having the specify all the details, you can use the following snippet in your profile:
<general>
  <storage>
    <lvm config:type="boolean">true</lvm>
  </storage>
</general>
If you are interested in the available options, you can check the documentation draft.