
 Member
 Diamond_gr
Δημιουργία του διαμερίσματος btrfs root & subvolumes στο openSUSE

Το πρόγραμμα εγκατάστασης του YaST του openSUSE δημιουργεί μια λεπτομερή ρύθμιση παραμέτρων του συστήματος αρχείων btrfs root που έχει σχεδιαστεί για να είναι ευέλικτη και ασφαλής, ενώ εξακολουθεί να είναι αποτελεσματική όταν χρησιμοποιείται με εργαλεία όπως το Snapper.
Μια από τις επιτακτικές απαιτήσεις είναι να παράσχει ένα σαφώς καθορισμένο «σύστημα αρχείων root» που περιέχει ότι μας νοιάζει για «πλήρη επαναφορά συστήματος» (διευκολύνεται από το snapper), ενώ χρησιμοποιεί υποτόμους (subvolumes) για να αποκλείσει όλα όσα δεν θέλουμε στο 'σύστημα αρχείων root', έτσι το snapper δεν καταστρέφει κατά λάθος τα δεδομένα χρήστη κατά την επαναφορά του συστήματος και των εφαρμογών του. Λεπτομέρειες σχετικά με την προεπιλεγμένη διάταξη υποτόμων (subvolumes) μπορούν να βρεθούν στο wiki του openSUSE.
Ωστόσο, αυτό οδηγεί σε επιπλοκές για ορισμένους προχωρημένους χρήστες που επιθυμούν να αναδημιουργήσουν αυτό το χέρι, όπως όταν κάνουν περίπλοκη ανάκτηση του συστήματος, προσαρμοσμένες αυτοματοποιημένες προβλέψεις ή άλλες παρεμβάσεις. (ΣΗΜΕΙΩΣΗ: για την πλήρη επαναφορά του συστήματος είναι συχνά καλύτερο να χρησιμοποιήσετε ένα εργαλείο όπως το ReaR).
Τα παρακάτω βήματα είναι τα βήματα για να δημιουργήσετε με μη αυτόματο τρόπο ένα διαμέρισμα btrfs όπως δημιουργείται με openSUSE που πιστεύεται ότι είναι σωστό αυτή τη στιγμή.
Αυτός ο οδηγός ισχύει για το openSUSE Tumbleweed, το openSUSE Leap 15.1. Ωστόσο, θα πρέπει να προσέξετε να κάνετε διπλό έλεγχο για νέους ή καταργημένους υποτόμους στις διανομές *SUSE καθώς υπάρχει ανάπτυξη.
Οι παλαιότερες εκδόσεις των διανομών SUSE θα πρέπει να προσαρμόσουν αυτές τις οδηγίες για να χειριστούν την παλιά διάταξη υποτόμου /var/* που χρησιμοποιήθηκε προηγουμένως.
Δεν πρέπει να ξεχνάμε ότι αυτός ο οδηγός θα πρέπει να ακολουθείται μόνο από ανθρώπους που πιστεύουν ότι γνωρίζουν τι κάνουν. Είναι συνήθως πολύ πιο εύκολο να χρησιμοποιήσετε τα προεπιλεγμένα εργαλεία του openSUSE όπως το YaST και το ReaR.
ΒΗΜΑ ΠΡΟΣ ΒΗΜΑ
Για αυτό το παράδειγμα θα χρησιμοποιήσουμε το /dev/sda ως δείγμα του δίσκου μας και το /dev/sda1 ως το παράδειγμα του διαμερίσματός μας για ένα σύστημα αρχείων root btrfs.
1. Δημιουργήστε έναν πίνακα διαμερισμάτων και το διαμέρισμα που θα χρησιμοποιηθεί ως το σύστημα αρχείων root χρησιμοποιώντας το αγαπημένο σας εργαλείο (π.χ., yast, parted, fdisk).
2. Διαμορφώστε το /dev/sda1 με σύστημα αρχείων btrfs
3. Προσαρτήστε το νέο διαμέρισμα κάπου έτσι ώστε να μπορέσουμε να το χρησιμοποιήσουμε. Θα χρησιμοποιήσουμε /mnt σε αυτό το παράδειγμα.
4. Δημιουργήστε την προεπιλεγμένη διάταξη υποτόμου (αυτό προϋποθέτει αρχιτεκτονική Intel, οι διαδρομές /boot/grub2/* είναι διαφορετικές για διαφορετικές αρχιτεκτονικές)
btrfs subvolume create /mnt/@/.snapshots
mkdir /mnt/@/.snapshots/1
btrfs subvolume create /mnt/@/.snapshots/1/snapshot
mkdir -p /mnt/@/boot/grub2/
btrfs subvolume create /mnt/@/boot/grub2/i386-pc
btrfs subvolume create /mnt/@/boot/grub2/x86_64-efi
btrfs subvolume create /mnt/@/home
btrfs subvolume create /mnt/@/opt
btrfs subvoulme create /mnt/@/root
btrfs subvolume create /mnt/@/srv
btrfs subvolume create /mnt/@/tmp
mkdir /mnt/@/usr/
btrfs subvolume create /mnt/@/usr/local
btrfs subvolume create /mnt/@/var
5. Απενεργοποιήστε το copy-on-write για το var για να βελτιώσετε την απόδοση οποιωνδήποτε βάσεων δεδομένων και των VM εικόνων μέσα
6. Δημιουργήστε το αρχείο /mnt/@/.snapshots/1/info.xml για τη ρύθμιση του snapper. Συμπεριλάβετε το ακόλουθο περιεχόμενο, αντικαθιστώντας το $DATE με την τρέχουσα ημερομηνία/ώρα του συστήματος.
<?xml version="1.0"?>
<snapshot>
  <type>single</type>
  <num>1</num>
  <date>$DATE</date>
  <description>first root filesystem</description>
</snapshot>
7. Ορίστε το στιγμιότυπο 1 ως προεπιλεγμένο στιγμιότυπο για το σύστημα αρχείων root, αποπροσαρτήστε το και προσαρτήστε ξανά.
8. Θα πρέπει να είστε σε θέση να επιβεβαιώσετε τα παραπάνω που λειτούργησε με την εντολή ls /mnt που θα πρέπει να ανταποκριθεί με ένα κενό αποτέλεσμα.
Συγχαρητήρια, σε αυτό το σημείο το σύστημα αρχείων δημιουργείται με τη σωστή δομή. Αλλά πρέπει να ξέρετε πώς να το προσαρτήσετε σωστά για να το χρησιμοποιήσετε.
9. Τώρα πρέπει να δημιουργήσετε ένα σκελετό του συστήματος αρχείων για να προσαρτήσετε όλους τους υποτόμους.
mkdir -p /mnt/boot/grub2/i386-pc
mkdir -p /mnt/boot/grub2/x86_64-efi
mkdir /mnt/home
mkdir /mnt/opt
mkdir /mnt/root
mkdir /mnt/srv
mkdir /mnt/tmp
mkdir -p /mnt/usr/local
mkdir /mnt/var
10. Προσαρτήστε όλους τους υποτόμους.
mount /dev/sda1 /mnt/boot/grub2/i386-pc -o subvol=@/boot/grub2/i386-pc
mount /dev/sda1 /mnt/boot/grub2/x86_64-efi -o subvol=@/boot/grub2/x86_64-efi
mount /dev/sda1 /mnt/home -o subvol=@/home
mount /dev/sda1 /mnt/opt -o subvol=@/opt
mount /dev/sda1 /mnt/root -o subvol=@/root
mount /dev/sda1 /mnt/srv -o subvol=@/srv
mount /dev/sda1 /mnt/tmp -o subvol=@/tmp
mount /dev/sda1 /mnt/usr/local -o subvol=@/usr/local
mount /dev/sda1 /mnt/var -o subvol=@/var
11. Έχετε τελειώσει, τώρα έχετε δημιουργήσει με επιτυχία μια brtfs δομή συστήματος αρχείων τύπου root και κάνατε προσάρτηση έτοιμη για χρήση. Τώρα μπορείτε να το χρησιμοποιήσετε για ότι θέλετε, όπως η χειροκίνητη μεταφορά αρχείων από μια υπάρχουσα εγκατάσταση του openSUSE.
Μόλις συμπληρωθεί, πρέπει να ληφθεί μέριμνα ώστε το αρχείο /mnt/etc/fstab να περιλαμβάνει επίσης τις κατάλληλες καταχωρήσεις για κάθε ένα από τους υποτόμους εκτός από τα στιγμιότυπα @/.snapshots/1/snapshot που δεν θα πρέπει να προσαρτηθούν όπως παρέχει το αρχικά εγκατεστημένο σύστημα.
Εάν αντιμετωπίσετε κάποιο πρόβλημα, μπορείτε να επικοινωνήσετε με το forum (Αγγλικά) ή στο Facebook (Ελληνικά).
Get rid of Invalid MIT-MAGIC-COOKIE-1 key error

#Rouen #Journée Mensuelle du #Logiciel Libre et de la #cybersécurité Samedi 30 Novembre, 2019 – #openSUSE en VM #FreeBox #QEMU

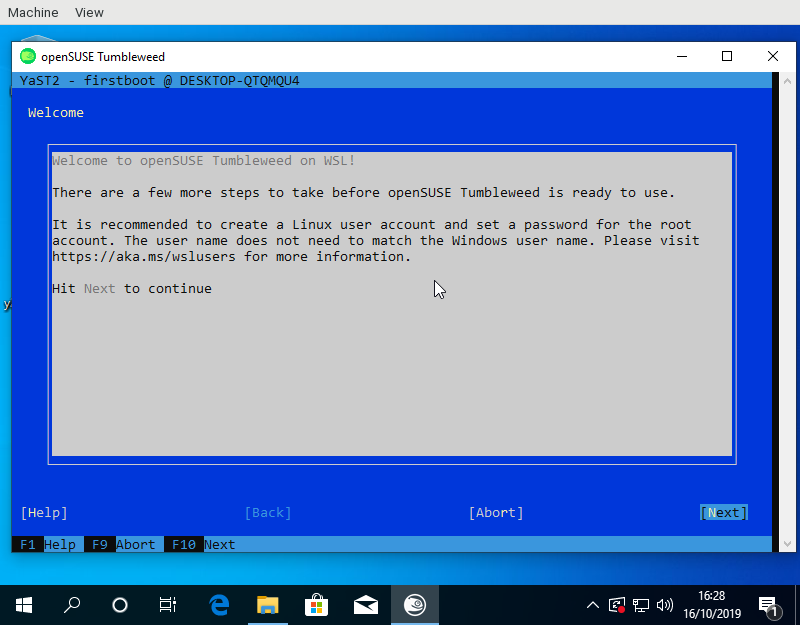
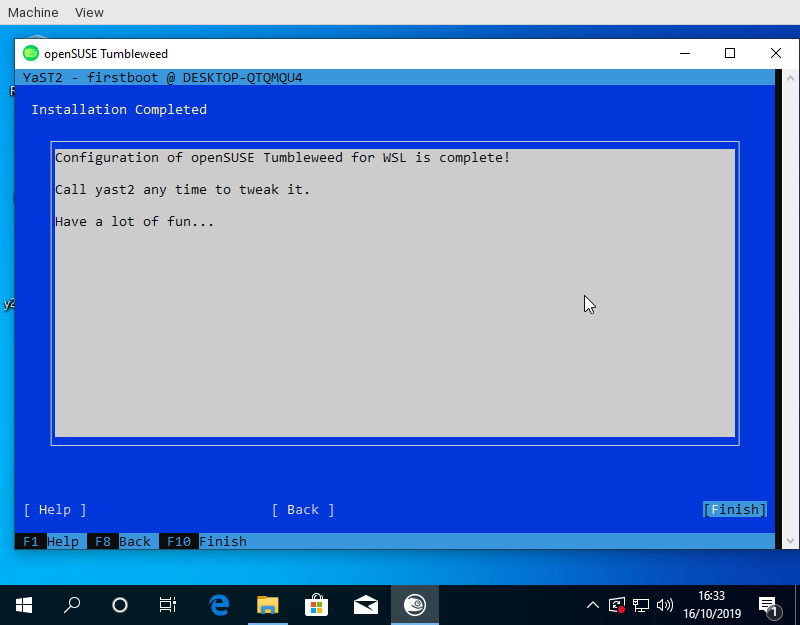
using YaST firstboot wizard in WSL
When starting a WSL distribution for the first time, a text prompt for user name and password appears:

The code for that is partially in the Windows launcher. The Windows side actually prompts for the user name:
https://github.com/microsoft/WSL-DistroLauncher/blob/master/DistroLauncher/DistroLauncher.cpp#L44
and passes it to ‘adduser’:
https://github.com/microsoft/WSL-DistroLauncher/blob/1f8551f7e2ea22bba2e6fb02f01e7a5f7fb757f3/DistroLauncher/DistributionInfo.cpp#L14
That seems to be a Debian specific tool that also prompts for a password. We don’t have it in openSUSE. When done, the Windows part actually calls into the Linux environment again with ‘id -u’ to get the uid of the added user:
https://github.com/microsoft/WSL-DistroLauncher/blob/1f8551f7e2ea22bba2e6fb02f01e7a5f7fb757f3/DistroLauncher/DistributionInfo.cpp#L44
So in order to also prompt for the password we’d have to write a wrapper like the Debian one or implement another prompt in the launcher. Implementing such a prompt in Windows code seems boring to me. When writing a wrapper, I’d do something dialog based to make it look more fancy. There’s already jeos-firstboot that does something similar already and more. But then the WSL image doesn’t have to be really minimal, which means we have YaST!
So even though WSL doesn’t really boot as it has no systemd it would be still possible to run the YaST firstboot wizard on first start. What modules it launches is configurable via xml file. So leaving out hardware/VM specific things like network configuration it works pretty well:

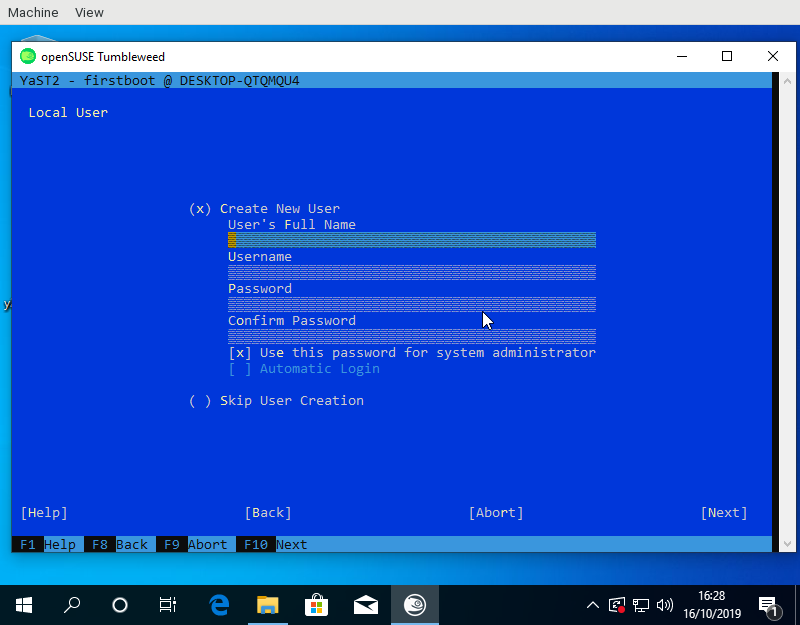
For the launcher to know the name of the created user a small YaST module was needed to write the name into /run/wsl_firstboot_uid. The launcher fetches it from there.
Using the YaST firstboot wizard also allows to use e.g. the existing registration dialogs on SLE or add other useful configuration steps. One feature I have in mind would be for example is the role selection screen to offer some pre defined package selections for WSL use cases.
Tumbleweed and Leap appx files to test this are available from download.opensuse.org. Keep in mind that one needs to import the certificates used by OBS for signing first.
Show a dialog with Kdialog (part 1)

Installer Nextcloud avec PHP7.3-FPM sur openSUSE Leap

Ce tutoriel est issu d'un post sur le forum par squid-f qui nous partage ici sa procédure d'installation. Merci à lui !
En fait, il y a beaucoup de tutos pour ubuntu mais très peu pour openSUSE, d'où ce tutoriel pour openSUSE Leap 15.1.
Avant de commencer, voici les sources qui m’ont bien aidé :
- https://www.c-rieger.de/nextcloud-installation-guide-ubuntu-18-04
- https://decatec.de/home-server/nextcloud-auf-ubuntu-server-18-04-lts-mit-nginx-mariadb-php-lets-encrypt-redis-und-fail2ban
- https://www.howtoforge.com/tutorial/owncloud-nginx-opensuse-leap-42.1
- https://nextcloud.com/support
Installation de NGINX et PHP
J’ai choisi d’installer une autre version de php-fpm que celle d’origine de Leap 15.1 car le module password de Nextcloud ne va bientôt plus supporter php-fpm7.2.
La version 7.3 sera installée grâce à (php7-apcu et imagick sont dans le dépôt extensions) :
zypper ar -f http://download.opensuse.org/repositories/devel:/languages:/php/openSUSE_Leap_15.1/ php-devel

zypper addrepo https://download.opensuse.org/repositories/server:php:extensions:php7/php7_openSUSE_Leap_15.1/server:php:extensions:php7.repo

zypper refresh
Installation de nginx
zypper in nginx
Installation de PHP
En disséquant la documentation de Nextcloud, j’ai abouti à la liste et l’installation des modules suivants :
zypper in php7 php7-APCu php7-bz2 php7-ctype php7-curl php7-dom php7-exif php7-fileinfo php7-fpm php7-gd php7-gmp php7-iconv php7-imagick php7-intl php7-json php7-ldap php7-mbstring php7-mysql php7-opcache php7-openssl php7-pcntl php7-pdo php7-posix php7-tokenizer php7-xmlreader php7-xmlwriter php7-zip php7-zlib ffmpeg-3Tests initiaux NGINX et PHP-FPM
Test de NGINX
- Créer /srv/www/htdocs/index.html avec
sudo nano /srv/www/htdocs/index.htmlet coller le code suivant :
<html>

<body>

<h1> NGINX fonctionne </h1>

</body>

</html>
- Editer /etc/nginx/nginx.conf avec
sudo nano /etc/nginx/nginx.conf
Ajouter index.php dans la ligne ci-dessous vers le début du fichier :
index index.html index.htm index.php;
enlever les symboles " # " de commentaire dans le bloc ci-dessous :
location ~ \.php$ {

root /srv/www/htdocs/;

fastcgi_pass 127.0.0.1:9000;

fastcgi_index index.php;

fastcgi_param SCRIPT_FILENAME /scripts$fastcgi_script_name;

include fastcgi_params;

}
- Tester la syntaxe des modifications avec la commande ci-dessous qui ne doit pas renvoyer d’erreur :
sudo nginx -t
- Démarrer le service
sudo systemctl enable nginx

sudo systemctl start nginx- Dans votre navigateur internet, taper l’adresse
localhostet le message « NGINX fonctionne » doit apparaître
Premier paramétrage et test de PHP-FPM
- Créer /srv/www/htdocs/info.php avec ‘sudo nano /srv/www/htdocs/info.php’ et coller le code suivant :
<?php

phpinfo();

?>- Initialiser les fichiers de configuration
sudo cp /etc/php7/fpm/php-fpm.conf.default /etc/php7/fpm/php-fpm.conf

sudo cp /etc/php7/fpm/php-fpm/php-fpm.d/www.conf.default /etc/php7/fpm/php-fpm/php-fpm.d/www.conf- Editer php-fpm.conf ‘sudo nano /etc/php7/fpm/php-fpm.conf’ et décommenter en enlevant le symbole # de la ligne ci-dessous :
error_log = log/php-fpm.log
- Editer www.conf
sudo nano /etc/php7/fpm/php-fpm.d/www.confet modifier comme ci-dessous, en changeant user et groupet en enlevant le symbole de commentaire qui est cette fois;pour d’autres lignes :
user = nginx
group = nginx
listen.owner = nginx
listen.group = nginx
listen.mode = 0660
Pour améliorer la performance, continuer à modifier www.conf de façon à écouter un socket et non un port. Pour cela, commenter avec ; la ligne listen = 127.0.0.1:9000 et ajouter une ligne pour pointer vers un socket :
;listen = 127.0.0.1:9000
listen = /var/run/php-fpm.sock
Pour être cohérent en PHP-FPM et NGINX quant à l’écoute d’un socket, il faut re-éditer /etc/nginx/nginx.conf et modifier comme suit le bloc location ~ \.php$ en ajoutant la ligne fastcgi_pass pointant le même socket que dans www.conf :
location ~ \.php$ {
    root /srv/www/htdocs/;
    #fastcgi_pass 127.0.0.1:9000;
    fastcgi_pass unix:/var/run/php-fpm.sock;
    fastcgi_index index.php;
    fastcgi_param SCRIPT_FILENAME $document_root$fastcgi_script_name;
    include fastcgi_params;
}- Initialiser...

Refactoring the Length type
CSS length values have a number and a unit, e.g. 5cm
or 6px. Sometimes the unit is a percentage, like 50%, and SVG
says that lengths with percentage units should be resolved with
respect to a certain rectangle. For example, consider this circle
element:
<circle cx="50%" cy="75%" r="4px" fill="black"/>
This means, draw a solid black circle whose center is at 50% of the width and 75% of the height of the current viewport. The circle should have a 4-pixel radius.
The process of converting that kind of units into absolute pixels for the final drawing is called normalization. In SVG, percentage units sometimes need to be normalized with respect to the current viewport (a local coordinate system), or with respect to the size of another object (e.g. when a clipping path is used to cut the current shape in half).
One detail about normalization is that it can be with respect to the horizontal dimension of the current viewport, the vertical dimension, or both. Keep this in mind: at normalization time, we need to be able to distinguish between those three modes.
The original C version
I have talked about the original C code for lengths before; the following is a small summary.
The original C code had this struct to represent lengths:
typedef struct {
    double length;
    char factor;
} RsvgLength;
The parsing code would set the factor field to a
character depending on the length's unit: 'p' for percentages, 'i'
for inches, etc., and '\0' for the default unit, which is pixels.
Along with that, the normalization code needed to know the direction (horizontal, vertical, both) to which the length in question refers. It did this by taking another character as an argument to the normalization function:
double
_rsvg_css_normalize_length (const RsvgLength * in, RsvgDrawingCtx * ctx, char dir)
{
    if (in->factor == '\0')            /* pixels, no need to normalize */
        return in->length;
    else if (in->factor == 'p') {      /* percentages; need to consider direction */
        if (dir == 'h')                                     /* horizontal */
            return in->length * ctx->vb.rect.width;
        if (dir == 'v')                                     /* vertical */
            return in->length * ctx->vb.rect.height;
        if (dir == 'o')                                     /* both */
            return in->length * rsvg_viewport_percentage (ctx->vb.rect.width,
                                                          ctx->vb.rect.height);
    } else { ... }
}
The original post talks about how I found a couple of bugs with
how the directions are identified at normalization time. The function
above expects one of 'h'/'v'/'o' for horizontal/vertical/both, and one or
two places in the code passed the wrong character.
Making the C version cleaner
Before converting that code to Rust, I removed the pesky characters and made the code use proper enums to identify a length's units.
+typedef enum {
+    LENGTH_UNIT_DEFAULT,
+    LENGTH_UNIT_PERCENT,
+    LENGTH_UNIT_FONT_EM,
+    LENGTH_UNIT_FONT_EX,
+    LENGTH_UNIT_INCH,
+    LENGTH_UNIT_RELATIVE_LARGER,
+    LENGTH_UNIT_RELATIVE_SMALLER
+} LengthUnit;
+
 typedef struct {
     double length;
-    char factor;
+    LengthUnit unit;
 } RsvgLength;
Then, do the same for the normalization function, so it will get the direction in which to normalize as an enum instead of a char.
+typedef enum {
+    LENGTH_DIR_HORIZONTAL,
+    LENGTH_DIR_VERTICAL,
+    LENGTH_DIR_BOTH
+} LengthDir;

 double
-_rsvg_css_normalize_length (const RsvgLength * in, RsvgDrawingCtx * ctx, char dir)
+_rsvg_css_normalize_length (const RsvgLength * in, RsvgDrawingCtx * ctx, LengthDir dir)
Making the C version easier to get right
While doing the last change above, I found a place in the code that used the wrong direction by mistake, probably due to a cut&paste error. Part of the problem here is that the code was specifying the direction at normalization time.
I decided to change it so that each direction value carried its own
direction since initialization, so that subsequent
code wouldn't have to worry about that. Hopefully, initializing a
width field should make it obvious that it needed
LENGTH_DIR_HORIZONTAL.
 typedef struct {
     double length;
     LengthUnit unit;
+    LengthDir dir;
 } RsvgLength;
That is, so that instead of
  /* at initialization time */
  foo.width = _rsvg_css_parse_length (str);

  ...

  /* at rendering time */
  double final_width = _rsvg_css_normalize_length (&foo.width, ctx, LENGTH_DIR_HORIZONTAL);
we would instead do this:
  /* at initialization time */
  foo.width = _rsvg_css_parse_length (str, LENGTH_DIR_HORIZONTAL);

  ...

  /* at rendering time */
  double final_width = _rsvg_css_normalize_length (&foo.width, ctx);
This made the drawing code, which deals with a lot of coordinates at the same time, a lot less noisy.
Initial port to Rust
To recap, this was the state of the structs after the initial refactoring in C:
typedef enum {
    LENGTH_UNIT_DEFAULT,
    LENGTH_UNIT_PERCENT,
    LENGTH_UNIT_FONT_EM,
    LENGTH_UNIT_FONT_EX,
    LENGTH_UNIT_INCH,
    LENGTH_UNIT_RELATIVE_LARGER,
    LENGTH_UNIT_RELATIVE_SMALLER
} LengthUnit;

typedef enum {
    LENGTH_DIR_HORIZONTAL,
    LENGTH_DIR_VERTICAL,
    LENGTH_DIR_BOTH
} LengthDir;

typedef struct {
    double length;
    LengthUnit unit;
    LengthDir dir;
} RsvgLength;
This ported to Rust in a straightforward fashion:
pub enum LengthUnit {
    Default,
    Percent,
    FontEm,
    FontEx,
    Inch,
    RelativeLarger,
    RelativeSmaller
}

pub enum LengthDir {
    Horizontal,
    Vertical,
    Both
}

pub struct RsvgLength {
    length: f64,
    unit: LengthUnit,
    dir: LengthDir
}
It got a similar constructor that took the
direction and produced an RsvgLength:
impl RsvgLength {
    pub fn parse (string: &str, dir: LengthDir) -> RsvgLength { ... }
}
(This was before using Result; remember that the original
C code did very little error checking!)
The initial Parse trait
It was at that point that it seemed convenient to introduce a Parse
trait, which all CSS value types would implement to
parse themselves from string.
However, parsing an RsvgLength also needed an extra piece of data,
the LengthDir. My initial version of the Parse trait had an
associated called Data, through which one could pass an extra piece
of data during parsing/initialization:
pub trait Parse: Sized {
    type Data;
    type Err;

    fn parse (s: &str, data: Self::Data) -> Result<Self, Self::Err>;
}
This was explicitly to be able to pass a LengthDir to the parser for
RsvgLength:
impl Parse for RsvgLength {
    type Data = LengthDir;
    type Err = AttributeError;

    fn parse (string: &str, dir: LengthDir) -> Result <RsvgLength, AttributeError> { ... }
}
This was okay for lengths, but very noisy for everything else that
didn't require an extra bit of data. In the rest of the code, the
helper type was Data = () and there was a pair of extra parentheses ()
in every place that parse() was called.
Removing the helper Data type
Introducing one type per direction
Over a year later, that () bit of data everywhere was driving me
nuts. I started refactoring the Length module to remove it.
First, I introduced three newtypes to wrap Length, and indicate
their direction at the same time:
pub struct LengthHorizontal(Length);
pub struct LengthVertical(Length);
pub struct LengthBoth(Length);
This was done with a macro because now each wrapper type
needed to know the relevant LengthDir.
Now, for example, the declaration for the <circle> element looked
like this:
pub struct NodeCircle {
    cx: Cell<LengthHorizontal>,
    cy: Cell<LengthVertical>,
    r: Cell<LengthBoth>,
}
(Ignore the Cell everywhere; we got rid of that later.)
Removing the dir field
Since now the information about the length's direction is embodied in
the LengthHorizontal/LengthVertical/LengthBoth types, this made it
possible to remove the dir field from the inner
Length struct.
 pub struct RsvgLength {
     length: f64,
     unit: LengthUnit,
-    dir: LengthDir
 }

+pub struct LengthHorizontal(Length);
+pub struct LengthVertical(Length);
+pub struct LengthBoth(Length);
+
+define_length_type!(LengthHorizontal, LengthDir::Horizontal);
+define_length_type!(LengthVertical, LengthDir::Vertical);
+define_length_type!(LengthBoth, LengthDir::Both);
Note the use of a define_length_type! macro to generate code for
those three newtypes.
Removing the Data associated type
And finally, this made it possible to remove the Data associated
type from the Parse trait.
 pub trait Parse: Sized {
-    type Data;
     type Err;

-    fn parse(parser: &mut Parser<'_, '_>, data: Self::Data) -> Result<Self, Self::Err>;
+    fn parse(parser: &mut Parser<'_, '_>) -> Result<Self, Self::Err>;
 }
The resulting mega-commit removed a bunch of stray parentheses ()
from all calls to parse(), and the code ended up a lot easier to
read.
Removing the newtypes
This was fine for a while. Recently, however, I figured out that it would be possible to embody the information for a length's direction in a different way.
But to get there, I first needed a temporary refactor.
Replacing the macro with a trait with a default implementation
Deep in the guts of length.rs, the key function that does something
different based on LengthDir is its scaling_factor method:
enum LengthDir {
    Horizontal,
    Vertical,
    Both,
}

impl LengthDir {
    fn scaling_factor(self, x: f64, y: f64) -> f64 {
        match self {
            LengthDir::Horizontal => x,
            LengthDir::Vertical => y,
            LengthDir::Both => viewport_percentage(x, y),
        }
    }
}
That method gets passed, for example, the width/height of the
current viewport for the x/y arguments. The method decides whether
to use the width, height, or a combination of both.
And of course, the interesting part of the define_length_type! macro
was to generate code for calling LengthDir::Horizontal::scaling_factor()/etc. as
appropriate depending on the LengthDir in question.
First I made a trait called Orientation with a scaling_factor
method, and three zero-sized types that implement that trait. Note
how each of these three implementations corresponds to one of the
match arms above:
pub trait Orientation {
    fn scaling_factor(x: f64, y: f64) -> f64;
}

pub struct Horizontal;
pub struct Vertical;
pub struct Both;

impl Orientation for Horizontal {
    fn scaling_factor(x: f64, _y: f64) -> f64 {
        x
    }
}

impl Orientation for Vertical {
    fn scaling_factor(_x: f64, y: f64) -> f64 {
        y
    }
}

impl Orientation for Both {
    fn scaling_factor(x: f64, y: f64) -> f64 {
        viewport_percentage(x, y)
    }
}
Now most of the contents of the define_length_type! macro can go in
the default implementation of a new trait
LengthTrait. Crucially, this trait has an
Orientation associated type, which it uses to call into the
Orientation trait:
pub trait LengthTrait: Sized {
    type Orientation: Orientation;

    ...

    fn normalize(&self, values: &ComputedValues, params: &ViewParams) -> f64 {
        match self.unit() {
            LengthUnit::Px => self.length(),

            LengthUnit::Percent => {
                self.length() *
                <Self::Orientation>::scaling_factor(params.view_box_width, params.view_box_height)
            }

            ...
    }
}
Note that the incantation is
<Self::Orientation>::scaling_factor(...) to call that method on the
associated type.
Now the define_length_type! macro is shrunk a lot, with the
interesting part being just this:
macro_rules! define_length_type {
    {$name:ident, $orient:ty} => {
        pub struct $name(Length);

        impl LengthTrait for $name {
            type Orientation = $orient;
        }
    }
}

define_length_type! { LengthHorizontal, Horizontal }
define_length_type! { LengthVertical, Vertical }
define_length_type! { LengthBoth, Both }
We moved from having three newtypes of length-with-LengthDir to three newtypes with dir-as-associated-type.
Removing the newtypes and the macro
After that temporary refactoring, we had the Orientation trait and
the three zero-sized types Horizontal, Vertical, Both.
I figured out that one can use PhantomData as a way to carry
around the type that Length needs to normalize itself, instead of
using an associated type in an extra LengthTrait. Behold!
pub struct Length<O: Orientation> {
    pub length: f64,
    pub unit: LengthUnit,
    orientation: PhantomData<O>,
}

impl<O: Orientation> Length<O> {
    pub fn normalize(&self, values: &ComputedValues, params: &ViewParams) -> f64 {
        match self.unit {
            LengthUnit::Px => self.length,

            LengthUnit::Percent => {
                self.length
                    * <O as Orientation>::scaling_factor(params.view_box_width, params.view_box_height)
            }

            ...
        }
    }
}
Now the incantation is <O as Orientation>::scaling_factor() to call
the method on the generic type; it is no longer an associated type in
a trait.
With that, users of lengths look like this; here, our <circle>
element from before:
pub struct Circle {
    cx: Length<Horizontal>,
    cy: Length<Vertical>,
    r: Length<Both>,
}
I'm very happy with the readability of all the code now. I used to
think of PhantomData as a way to deal with wrapping pointers from
C, but it turns out that it is also useful to keep a generic
type around should one need it.
The final Length struct is this:
pub struct Length<O: Orientation> {
    pub length: f64,
    pub unit: LengthUnit,
    orientation: PhantomData<O>,
}
And it only takes up as much space as its length and unit fields;
PhantomData is zero-sized after all.
(Later, we renamed Orientation to Normalize, but the code's
structure remained the same.)
Summary
Over a couple of years, librsvg's type that represents CSS lengths went from a C representation along the lines of "all data in the world is an int", to a Rust representation that uses some interesting type trickery:
-
C struct with
charfor units. -
C struct with a
LengthUnitsenum. -
C struct without an embodied direction; each place that needs to normalize needs to get the orientation right.
-
C struct with a built-in direction as an extra field, done at initialization time.
-
Same struct but in Rust.
-
An ugly but workable
Parsetrait so that the direction can be set at parse/initialization time. -
Three newtypes
LengthHorizontal,LengthVertical,LengthBothwith a common core. A cleaned-upParsetrait. A macro to generate those newtypes. -
Replace the
LengthDirenum with anOrientationtrait, and three zero-sized typesHorizontal/Vertical/Boththat implement the trait. -
Replace most of the macro with a helper trait
LengthTraitthat has anOrientationassociated type. -
Replace the helper trait with a single
Length<T: Orientation>type, which puts the orientation as a generic parameter. The macro disappears and there is a single implementation for everything.
Refactoring never ends!

Things are Looking Pod-tastic | Fall Time Blathering
Résultat du vote sur le changement de nom du projet
Les membres du comité électoral openSUSE ont publié ce matin les résultats du vote sur le changement du nom de projet en cours depuis début octobre. Comme expliqué notamment ici et là, l'objectif de ce vote était d'expliquer les tenants et aboutissants de la conservation ou non du nom openSUSE en préliminaire à la création à venir d'une fondation openSUSE.
Avec 42 voix en faveur d'un changement et 225 voix pour le maintien du nom openSUSE, les membres du Conseil ont maintenant une idée claire de la position de la communauté sur ce point et vont pouvoir entamer les travaux, études et négociations autour de l'usage de ce nom par la fondation à venir. Rappelons en effet qu'openSUSE n'ayant pas, pour l'heure, d'existence juridique, c'est l'entreprise parainne SUSE qui est propriétaire et se charge de protéger le nom déposé openSUSE.
C'est notamment ce point important qui va évoluer lorsque de la fondation openSUSE verra le jour.

三大雲平台工具容器升級小記 with openSUSE Leap 15.1 container
- 12 月的時候將 awscli 用 python3 安裝
- 原因是 Google SDK 目前還是 Python2, 所以想要一起升級 :p
- 我有比較過 docker build 以及使用現有的 docker image 修改後再使用 docker commit 建立的 image 大小還是很有差異的
- 檔案在 Github 上面
- openSUSE Leap 版本
- Update time
- Google SDK 版本還有下載的檔案路徑以及檔案名稱
- 我檔案的名稱取名爲 opensuseLeap151_ansible_Dockerfile
- 使用 -f 指定 Dockerfile 名稱
- 最後是 ” . “ 目前的目錄