
 Member
 cb400f
SailfishOS on Sony Xperia XA2 Plus
Not too much noise has been made about it, but fairly recently SailfishOS for Sony Xperia XA2, XA2 Ultra and XA2 Plus (finally) came out of beta stage after the initial release last autumn. I went and got myself an XA2 Plus and have been using it for a week now and am very pleased with it. Compared to former SailfishOS devices the Android runtime for the XA2 models is at version 8.x (compared to 4.x for previous devices), meaning a lot more Android apps will run on it.
So if you’re looking for a proper GNU/Linux phone and/or an alternative to the Google/Apple duopoly now is your chance to run SailfishOS on very decent and affordable midrange hardware. Below is a video of the XA2 Plus running SailfishOS (not mine).
you can buy the image here (EUR 49,90) and installation instructions are here.
I unlocked and flashed the device on openSUSE Leap 15.0 using the android-tools package from this home repo https://download.opensuse.org/repositories/home:/embar-:/Lietukas/openSUSE_Leap_15.0/
What is SailfishOS?
SailfishOS is a proper GNU/Linux OS for mobile devices based in Finland. It’s the successor of Nokia’s MeeGo so to speak. It has a cool, smooth and efficient swipe based interface. Behind the scenes it’s using Qt, Wayland, RPM, BlueZ, Systemd, Pulseaudio etc. as well as openSUSE technologies libzypp and Open Build Service.

kubic-control for openSUSE Kubic
Intro
If you think, this is too much text and sounds far too complicated or you are not interested in background informations: install openSUSE Kubic and go directly to the “Deploy Kubernetes” Section. There is not really an easier way to deploy Kubernetes!
Why should I want to use kubic-control?
We have kubeadm on openSUSE Kubic to manage kubernetes, why do we need yet another management tool? There is a nice blog giving an answer to this: Automated High Availability in kubeadm v1.15: Batteries Included But Swappable, which explains, beside kubernetes multi master, also the scope of kubeadm very well: “kubeadm is focused on performing the actions necessary to get a minimum viable, secure cluster up and running in a user-friendly way. kubeadm’s scope is limited to the local machine’s filesystem and the Kubernetes API, and it is intended to be a composable building block for higher-level tools.”
The following tasks are out of scope for kubeadm:
- Infrastructure provisioning
- Third-party networking
- Non-critical add-ons, e.g. monitoring, logging and visualitzation
- Specific cloud provider integrations
kubic-control is such a higher-level toolkit. It configures the Host OS (in the feature, it will even be able to install new baremetal nodes with help of yomi), setups all necessary services, uses kubeadm to deploy kubernetes and installs and configures all necessary add-ons, like pod network and update and reboot services for the OS and the cluster. It will also help you to avoid mistakes like not calling kubeadm with the right arguments if you want to use flannel for the network.
What is kubic-control?
kubic-control consists of three binaries:
- kubicd, a daemon which communicates via gRPC with clients. It’s setting up kubernetes on openSUSE Kubic, including pod network, kured, transactional-update, …
- kubicctl, a cli interface
- haproxycfg, a cli interface adjust haproxy.cfg for use as loadbalancer for the kubernetes API
The communication is encrypted, the kubicctl command can run on any machine. The user authenticates with his certificate, using RBAC to determine if the user is allowed to call this function. kubiccd will use kubeadm and kubectl to deploy and manage the cluster. So the admin can at everytime modify the cluster with this commands, too, there is no hidden state-database except for the informations necessary for a kubernetes multi-master/HA setup.
Requirementes
Mainly generic requirements by kubernetes itself:
- All the nodes on the cluster must be on a the same network and be able to communicate directly with each other.
- All nodes in the cluster must be assigned static IP addresses. Using dynamically assigned IPs will break cluster functionality if the IP address changes.
- The Kubernetes master node(s) must have valid Fully-Qualified Domain Names (FQDNs), which can be resolved both by all other nodes and from other networks which need to access the cluster.
- Since Kubernetes mainly works with certificates and tokens, the time on all Nodes needs to be always in sync. Else communication inside the cluster will break.
As salt is used for the communication, the Admin Node needs to run a salt-master and all other nodes needs to be configured as salt-minion.
Installation
Currently, the easiest way to get a running kubernetes cluster on openSUSE Kubic is to take the DVD and install the nodes with YaST. There are three relevant system roles to choose from:
- Kubic Admin Node
- Additional Kubic Node
- Kubic Loadbalancer Node
Kubic Admin Node
The Kubic Admin Node is running kubicd, the salt-master and the first kubernetes master node. The overhead for kubicd and the salt-master is very low, so you don’t need a bigger machine because of this. During the first boot, some certificates are created for kubicd in /etc/kubicd/pki:
- Kubic-Control-CA.key - the private CA key
- Kubic-Control-CA.crt - the public CA key. This one is needed by kubicctl, too
- KubicD.key - the private key for kubicd
- kubicD.crt - the signed public key for kubicd
- admin.key - private key, allows kubicctl to connect to kubicd as admin
- admin.crt - public key, allows kubicctl to connect to kubcd as admin
For kubicctl, you need to create a directory ~/.config/kubicctl which contains Kubic-Control-CA.crt, user.key and user.crt. For the admin role, this need to be a copy of admin.key and admin.crt. For other users, you need to create corresponding certificates and sign them with Kubic-Control-CA.crt. If you call kubicctl as root and there is no user.crt in ~/.config/kubicctl, the admin certificates from /etc/kubicd/pki are used if they exist. Certificates for additional users can be created with _kubicctl certificates create
Please take care of this certificates and store them secure, this are the passwords to access kubicd!
Additional Kubic Node
Additional Kubic Nodes will become either additional master nodes for HA of the kubernetes API, or worker nodes. The procedure is in both cases the same:
- Install the Additional Kubic Node system role. At some point during the workflow, you need to enter the hostname or IP address of the Kubic Admin Node for the salt-minion.
- Accept the salt-minion on the Kubic Admin Node with salt-key -A
Kubic Loadbalancer Node
The Kubic Loadbalancer Node system role installs a MicroOS without container runtime but haproxy instead. During installation, you need to provide the hostname or IP address of the Kubic Admin Node for the salt minion. Accept the salt-minion on the Kubic Admin Node with salt-key -A
Afterwards, the haproxy needs to configured and enabled. In one of the next versions, kubic-control should be able to do this itself.
Deploy Kubernetes
Normally, after you did install the Kubic Admin Node and the needed numbers of Additional Kubic Nodes, deploying kubernetes is quite simple. Login to the Kubic Admin Node, accept the Keys of the salt-minions and run the following command to deploy the contral-plane on the master with weave net as POD network and kured to manage the reboot of nodes during an upgrade:
kubicctl init
Now we only need the worker nodes, who will run our workload. The Node names are always the minion ID, which is normally the FQHN of that node:
kubicctl node add node1,node2,...
That’s all. Two commands to setup your cluster! Run now kubectl get nodes to see your cluster!
Multi-Master Kubernetes
Setting up a control-plane with three master nodes (kubic-control currently allows any number of control-plane nodes, but this should be at minimum three and an uneven number of nodes!) is quite as simple.
At first, you need to setup a loadbalancer if you don’t have one in the network for the kubernetes API. That’s currently a manual process, but will also be handled by kubernetes-control in the near future.
Afterwards setup the initial master, where “load.balancer.dns” is the DNS name, under which the kubernetes API servers should be reacheable:
kubicctl init --multi-master load.balancer.dns
Now add more master nodes:
kubicctl node add --type master master2,master3
And the worker Nodes:
kubicctl node add node1,node2,...
Now you have a running kubernetes cluster with 3 Master Nodes and several worker Nodes with only three commands! kubectl get nodes should show you the status of your Nodes.
Next Steps
This is just the beginning of our journey to make kubic-control a tool to manage your whole openSUSE Kubic cluster. Many more things are planned or under active development:
- Re-configure a haproxy loadbalancer when adding or removing master nodes
- Install new nodes with yomi
- Certificate handling
- Extend support and handling of add-ons, including rolling updates
- Integration of ignition
- Create “ready-to-run” images for all kinds of virtualisation consisting of the three system roles: Kubic Admin Node, Additional Kubic Node and Kubic Loadbalancer Node.
- Add support to deploy container images from the devel:kubic:containers project
As with any new software, especially stuff we’re changing so quickly, there is a chance of bugs. If you try the steps in this guide and find any, please report them to our Bugzilla under the “Kubic” component.
Please Note: kubic-control on Kubic is under heavy active development. Many new functionality will come which may change current functionality.
Thanks, and have a lot of fun!

When find can't find
If you happen to be using gnu find in the deadly combination with a directory that is a symlink (you just don’t know that yet), you will find face the hard truth that running:
find /path/to/directory -type f
Will return zero, nada, nichts, meiyou, which is annoying.

this will make you question your life decisions, and your knowledge on tools that you use daily, only to find out that the directory is actually a symlink :).
So next time you find yourself using find and it returns nothing, but you are sure that your syntax is correct and get
no errors, try adding the --fowllow or use the -L
` find -L /path/to/directory/with/symlink -type f`
This will do what you want :)


CPU Security Mitigation on openSUSE | Tuning it for Your Case
Xfce, A Model GTK Based Desktop | Late Summer Blathering

Xfce 4.14 ya disponible en Tumbleweed


Συμβαίνει τώρα: GUADEC!!!

Μετά από ένα χρόνο προετοιμασία, επιτέλους το συνέδριο ξεκίνησε!!!
Μερικές χρηστικές οδηγίες...
1. Εγγραφές 8.30 με 9.30.
2. Πρώτη ομιλία στις 10.00
3. Φαγητό 13.30-14.30
5. Τελευταία ομιλία Keynote είναι στις 17.00 με 18.00
6. Gala party στις 19.00
Για όσους δεν μπορείτε να βρίσκεστε, θα υπάρξει και ζωντανή μετάδοση. Θα ανακοινωθούν οι διευθύνσεις στο http://2019.guadec.org
EDIT: Η διεύθυνση είναι η https://2019.guadec.org/pages/streaming.html.
Τι θα παρακολουθήσετε; Θα το βρείτε στο https://schedule.guadec.org
Καλό συνέδριο και καλή διασκέδαση.


How to colorize your NGINX log files with CCZE
If your are into devops or someone who take care backend of NGINX, you will notice there is limit of tools to read / transform NGINX access or error log files into colorize which is helpful and readable, compare to Httpd / Apache which have tonnes of script and tools to colorize your logs.
The last time I configuring NGINX was 4 years ago and yesterday I setup webserver for my client using NGINX instead of Httpd / Apache, after 7 minutes port 80 was open to public, I notice slowness on my client VPS machine, so I assume maybe some massive bots are scanning this webserver for some reason.
I open NGINX log with my favourite less- R command line and I feel awful and ackward. Do you know why? Because I been involve with lot of programming framework and tool that offer me ANSI colorize log.
If you are just like me, then I suggest you to install ccze! Here some currrent info from Fedora repository
[rnm@robbinespu ~] $ sudo dnf info ccze
Last metadata expiration check: 0:00:13 ago on Thu 22 Aug 2019 11:55:41 AM +08.
Available Packages
Name         : ccze
Version      : 0.2.1
Release      : 22.fc30
Architecture : x86_64
Size         : 81 k
Source       : ccze-0.2.1-22.fc30.src.rpm
Repository   : fedora
Summary      : A robust log colorizer
URL          : http://bonehunter.rulez.org/CCZE.html
License      : GPLv2+
Description  : CCZE is a roboust and modular log colorizer, with plugins for apm,
             : exim, fetchmail, httpd, postfix, procmail, squid, syslog, ulogd,
             : vsftpd, xferlog and more.
Like it said, this is a robust and modular log colorizer and comes with few plugins. It available on Fedora, Debian, Ubuntu, Centos, Opensuse and others distro repository.
Just install it:
$ sudo dnf install ccze #for Red Hat/CentOS/Fedora based
$ sudo apt install ccze #for Debian/Ubuntu based
and to use it, you need to open your file reader and pipe into ccze. For example:
$ sudo less -R /var/log/nginx/access.log | ccze -A | less -R

You may check helps for more option how to manipulate and using ccze
$ ccze --help
Usage: ccze [OPTION...]
ccze -- cheer up 'yer logs.

  -a, --argument=PLUGIN=ARGS...   Add ARGUMENTS to PLUGIN
  -A, --raw-ansi             Generate raw ANSI output
  -c, --color=KEY=COLOR,...  Set the color of KEY to COLOR
  -C, --convert-date         Convert UNIX timestamps to readable format
  -F, --rcfile=FILE          Read configuration from FILE
  -h, --html                 Generate HTML output
  -l, --list-plugins         List available plugins
  -m, --mode=MODE            Change the output mode
                             (Available modes are curses, ansi and html.)
  -o, --options=OPTIONS...   Toggle some options
                             (such as scroll, wordcolor and lookups,
                             transparent, or cssfile)
  -p, --plugin=PLUGIN        Load PLUGIN
  -r, --remove-facility      remove syslog-ng's facility from start of the
                             lines
  -?, --help                 Give this help list
      --usage                Give a short usage message
  -V, --version              Print program version

Mandatory or optional arguments to long options are also mandatory or optional
for any corresponding short options.

Report bugs to <algernon@bonehunter.rulez.org>.
Cheers and have fun!
Endeavour OS | Review from an openSUSE User
Ποιες ομιλίες θα παρακολουθήσετε στο GUADEC; Δείτε το πρόγραμμα!!!
Σε προηγούμενο άρθρο είδαμε την εφαρμογή που φτιάχτηκε αποκλειστικά για το συνέδριο GUADEC. Εκεί μπορείτε να δείτε πρόγραμμα του συνεδρίου με το πάτημα ενός κουμπιού.
Μεταβαίνοντας από τον υπολογιστή σας στην διεύθυνση https://schedule.guadec.org θα δείτε όλο το πρόγραμμα του συνεδρίου, τις παράλληλες εκδηλώσεις και τα BoF που θα γίνουν κατά τη διάρκεια του συνεδρίου.
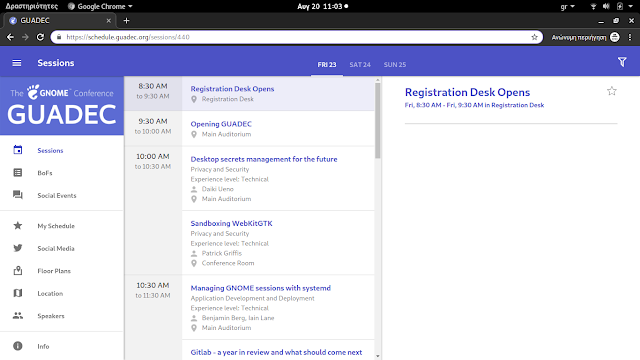
Σημειώστε λοιπόν ποιες ομιλίες θέλετε να παρακολουθήσετε για να βρίσκεστε στις αίθουσες. Σύντομα θα ανακοινωθούν και τα κανάλια παρακολούθησης στο Youtube.
Μην ξεχνάτε εάν θέλετε να συμμετάσχετε σε κάποιο BoF να γραφτείτε στο wiki (η να στείλετε ένα μνμ ότι θέλετε να σας προσθέσουμε).