sebas
sebasDesk lamp

Some time ago, I wanted to make my own desk lamp. It should provide soft, bright task lighting above my desk, no sharp shadows that could cover part of my work area, but also some atmospheric lighting around the desk in my basement office. The lamp should have a natural look around it, but since I made it myself, I also didn’t mind exposing some of its internals.

I had oak floor boards that I got from a friend (thanks, Wendy!) lying around. which I used as base material for the lamp. I combined these with some RGBW led strips that I had lying around, and a wireless controller that would allow me to connect the lamp to my Philips Hue lighting system, that I use throughout the house to control the lights. I sanded the wood until it was completely smooth, and then gave it an oild finish to make it durable and give it a more pronounced texture.


The center board is covered in 0.5mm aluminium sheets to dissipate heat from the LED strips (again, making them last longer) and provide some extra diffusion of the light. This material is easy to work with, and also very suitable to stick the led strips to. For the light itself, I used SMD5050 LED strips that can produce warm and cold white light, as well as RGB colors. I put 3 rows of strips next to each other to provide enough light. The strips wrap around at the top, so light is not just shining down on my desk, but also reflecting from walls and ceiling around it. The front and back are another piece of wood to avoid looking directly into the LEDs, which would be distractive, annoying when working and also quite ugly. I attached a front and back board as well to the lamp, making it into an H shape.

The controller (a Gledopto Z-Wave controller, that is compatible with Philips Hue) is attached to the center board as well, so I just needed to run 2 12V wires to the lamp. I was being a bit creative here, and thought “why not use the power cables also to have the lamp hanging from the ceiling?”. I used coated steel wire, which I stripped here and there to have power run through steel hooks screwed into the ceiling to supply the lamp with power while also being able to adjust its height. This ended up creating a rather clean look for the whole lamp and really brought the whole thing together.

AWS 以console 及 aws-cli 新增IAM使用者小記


- 這邊可以觀察到有 2 種 ARN, 官方ARN以及有帶 使用者帳號ID 的 ARN
- 這邊一定要用 egrep 而不是 grep
- 實做上發現在 Linux 與 Mac 都可以用指令上 中文 tag, 但是在 container 內還不行, 改天來找一下原因
使用 Ansible 安裝 netdata on GCP 小記
- 已經裝了三個雲端平台的工具還有 Ansible 環境
- 這邊我有透過 -v 把本機上面的三個平台的設定檔掛載到容器內, 還有 .ssh 目錄 也掛載上面, 因為 google 的 SSH 金鑰 也會存放在裡面
- --project 是因為我有多個 profile 所以指定那一個專案
- 這邊要用 使用者@SERVER_NAME, 因為預設不允許讓 root 登入
- 使用者帳號就要看當初 GCE 內的 SSH 金鑰使用者名稱
- 相關檔案可以在 Github 上面找到 https://github.com/sakanamax/LearnAnsible/tree/master/playbook/general/netdata

 Member
GUADEC: Να πάω ή να μην πάω;

Όπως γνωρίζετε, συνεισφέρω σε πολλά projects ανοικτού λογισμικού. Σχεδόν όλα οργανώνουν την ετήσια μάζωξη (την λένε συνέδριο), όπου συναντιούνται οι προγραμματιστές και χρήστες του εν λόγω project. Τις περισσότερες φορές, το οικονομικό αποτελεί πρόβλημα για την συμμετοχή. Το αεροπορικό και η διαμονή είναι τα έξοδα που θα πρέπει να δώσεις συγκεντρωμένα. Η διατροφή στην πόλη διεξαγωγής είναι ίσως λίγο ακριβότερη από την πόλη σου (αν βέβαια έτρωγες συνέχεια έξω).
Τα projects διαθέτουν τα λεγόμενα travel support programs (δείτε του GNOME και του openSUSE) όπου σας βοηθούν οικονομικά στην μεταφορά και την διαμονή σας, συνήθως έως 80%. Θα μου πείτε γιατί όχι 100%; Γιατί απλά θα το βλέπατε σαν ταξιδιωτικό γραφείο και όχι σαν project στο οποίο συνεισφέρετε. Τα projects ανοικτού λογισμικού μπορούν να σας υποστηρίξουν οικονομικά και σε τοπικά συνέδρια όπου θα προωθήσετε το συγκεκριμένο project.
Όμως ας αφήσουμε τον πρόλογο. Ένα από τα πολλά project που συνεισφέρω είναι και το GNOME. Το GNOME διοργανώνει κάθε χρόνο το συνέδριο GUADEC (και για την Ασία το GNOME.Asia). Κάθε χρόνο λοιπόν, κοινότητες στην Ευρώπη παίρνουν το χρίσμα να διοργανώσουν το GUADEC. Φέτος λοιπόν οι τυχεροί ήταν κάτι παιδιά από τη Θεσσαλονίκη. Ο Θάνος, η Βίβια, ο Σεμπάστιαν και εγώ, ξεκινήσαμε την έρευνα να δούμε εάν μπορούμε να διοργανώσουμε το GUADEC στη Θεσσαλονίκη. Κάναμε τις επαφές μας και φτιάξαμε την υποψηφιότητά μας. Το αποτέλεσμα; Διοργανώστε το GUADEC. Άρα για να σας απαντήσω το ερώτημα του τίτλου, ΕΓΩ ΠΡΕΠΕΙ ΝΑ ΠΑΩ.
Τι πρέπει να γνωρίζετε:
1. Θα διεξαχθεί στο Πανεπιστήμιο Μακεδονίας. Το Πανεπιστήμιο Μακεδονίας είναι συνδιοργανωτής του συνεδρίου. Μας έχει βοηθήσει όσο δεν φαντάζεστε. Τόσο καιρό δεν το έχουμε προωθήσει ως συνδιοργανωτή. Η αλήθεια είναι ότι έχουμε επικεντρωθεί σε λειτουργικά του συνεδρίου παρά στην προώθηση.
2. Η ημερομηνία είναι η 23 έως τις 28 Αυγούστου. Πρόγραμμα δεν έχει βγει επίσημα αλλά έχουν γίνει δεκτές οι ομιλίες και σύντομα θα βγει το επίσημο πρόγραμμα. Γενικά να γνωρίζετε ότι 23-25 θα είναι οι κύριες ημέρες με τις ομιλίες και οι άλλες 3 θα είναι ημέρες για να hackάρετε το GNOME. Θα υπάρχει θεματολογία, δεν θα είναι πολύ χαλαρά. Βέβαια εμείς θα είμαστε στον χώρο από πιο νωρίς. Σίγουρα από τις 20-21 του μηνός αλλά μην σας πω και πιο νωρίς.
3. Στα πιο βασικά τώρα. Για να έρθετε στο συνέδριο, πρέπει να κάνετε την εγγραφή σας εδώ https://registration.guadec.org. Αρχικά πρέπει να κάνετε το registration και να πάρετε το εισιτήριό σας και έτσι να μας βοηθήσετε να ξέρουμε για πόσα άτομα θα ετοιμάσουμε υλικά, φαγητό, καφέδες κλπ. Εάν δεν αντέχετε οικονομικά, μπορείτε να μπείτε στα επίσημα κανάλια και να ρωτήσετε πως μπορείτε να μπείτε δωρεάν (ΠΑΡΑΚΑΛΩ ΝΑ ΜΗΝ ΡΩΤΑΤΕ ΕΜΕΝΑ. ΘΑ ΣΑΣ ΠΑΡΑΠΕΜΠΩ ΣΤΑ ΚΑΝΑΛΙΑ). Μια εναλλακτική είναι να γίνετε εθελοντής (θα τα πούμε αργότερα αυτά). Εάν δεν είστε από τη Θεσσαλονίκη και θέλετε να μείνετε κάπου οικονομικά, μπορείτε να μείνετε στο προτεινόμενο hostel. Βρίσκεται στο κέντρο της πόλης, πολύ κοντά είναι τα πάντα σε φαγητό, διασκέδαση. Παίρνει λίγο χρόνο μέχρι το Πανεπιστήμιο Μακεδονίας αλλά σε σχέση με άλλες χώρες που έχω πάει, είναι ΠΟΛΥ ΚΟΝΤΑ. Τέλος, καλό είναι να πάρετε και την προσφορά για την σίτιση. Περιέχει 3 μεσημεριανά (μας είπανε ότι θα σκάσετε στο φαγητό. Επίσης θα έχει όλα τα ειδικά γεύματα λακτόζες, γλουτένες, βίγκαν, μίγκαν, σίγκαν κλπ) και 9 καφέδες (μην στεναχωριέστε, υπάρχει και καφετέρια για παραπάνω καφέ). Στην γύρω περιοχή δεν έχει κάποιο γυράδικο. Πρέπει να περπατήσετε 10 λεπτά για να βρείτε κάποιο στην Καμάρα.
Όταν τελειώστε, θα ερωτηθείτε και εάν θέλετε να συμμετάσχετε σε κάποια extra social event όπως εκδρομή στη θάλασσα, πικ-νικ, ποδόσφαιρο κλπ.
Τώρα θα με ρωτήσετε, ρε φιλαράκι, δεν έχω αποφασίσει να γραφτώ. Μπορώ να έρθω τελευταία στιγμή; Θεωρητικά ναι αλλά θα είναι λίγο προχειροδουλειά. Δηλαδή δεν θα έχετε εκτυπωμένο το όνομά σας στο καρτελάκι σας, θα έχετε ένα εκτυπωμένο χαρτί για τη μάσα κλπ.
4. Βλέπεις τα παραπάνω και λες ότι θέλεις να είσαι εθελοντής (για να μπεις και τζάμπα). Τι θα κάνεις; Η αλήθεια είναι ότι δεν ξέρω να σου απαντήσω. Όμως αυτό που μπορώ να σου πω είναι να γραφτείς στην λίστα https://mail.gnome.org/mailman/listinfo/guadec-list και να πεις (στα αγγλικά) ότι θέλεις να γίνεις εθελοντής. Ποια είναι τα επόμενα βήματα; Έτσι για να ξέρεις πάνω κάτω, θα μαζευτούν νωρίτερα (ίσως 22 το μεσημεροβράδυ) για να μπει ο καθένας στο πόστο του. Τι πόστα; Κάποιος στις εγγραφές, κάποιος θα εκφωνεί ποιος είναι ο επόμενος ομιλητής (ή να ψάχνει να τον βρει στην καφετέρια), να κουβαλήσει κάποια πράγματα, στήσιμο-ξεστήσιμο κλπ κλπ.
5. Τα μπλουζάκια που θα τυπωθούν είναι καταπληκτικά. Άλλο να σας το λέω, άλλο να τα φοράτε. Απλά σας λέω ότι είναι το νούμερο 37 στο gitlab όσοι θέλετε σπόιλερ.
Να ευχαριστήσω προσωπικά (θα γίνει και επίσημα) τους χορηγούς γιατί χωρίς χορηγούς, συνέδριο δεν γίνεται. Χαίρομαι ιδιαίτερα για το openSUSE διότι ως γνωρίζετε είμαι από τους πρωτοπόρους που κάναμε την αρχή στην Ελλάδα και καταφέραμε να φέρουμε το συνέδριο στη Θεσσαλονίκη.
Όσοι έχετε έρθει σε κάποιο συνέδριο στο εξωτερικό (και όσοι δεν έχετε έρθει σας ενημερώνω τώρα), θα ξέρετε ότι δεν υπάρχει κάποιο αποδεικτικό ότι παρακολούθησες το συνέδριο ή ότι ήσουν εθελοντής. Προφανώς δεν μπορείς να αποδείξεις ότι ήσουν μέσα στις ομιλίες και δεν έπινες μπύρες σε όλο το συνέδριο. Όμως αυτό που θα γίνει είναι ότι την επόμενη έκδοση GNOME 3.34 θα την ονομάσουν Θεσσαλονίκη. Οπότε μπορείτε να βοηθήσετε στις μεταφράσεις της έκδοσης 3.34. Αν δεν ξέρετε πως, μην ρωτάτε εμένα. Διαβάστε την σελίδα της συμμετοχής και μετά μπορώ να σας απαντήσω σε συγκεκριμένες ερωτήσεις (ΟΧΙ ΓΕΝΙΚΟΥ ΤΥΠΟΥ).
Επίσης φροντίστε όταν έρθετε να μιλήσετε με κόσμο, με εταιρίες. Οι χορηγοί σίγουρα θα έρθουν για να προσλάβουν κάποιον από τους τοπικούς συμμετέχοντες (οι ξένοι ήδη δουλεύουν). Συζητιέται πολύ και ο θεσμός των newcomers. Θα υπάρχουν πολλοί νεοφερμένοι που θα προσπαθήσουμε να τους βάλουμε να μιλήσουν με πεπειραμένους ώστε να νιώσουν ευπρόσδεκτοι.
Τέλος για τους λάτρεις των celebrities, θα έρθει και ο ένας από τους ιδρυτές του GNOME, ο Federico Mena Quintero. Υπάρχουν και άλλα μεγάλα ονόματα. Μέχρι τότε όμως, σηκωθείτε από καρέκλες, πολυθρόνες, ντιβάνια, μπαουλοντίβανα και να σας βλέπω να γράφεστε...

Wavebox | Chat Unification Snap Application on openSUSE Tumbleweed
Budgie 10.4 on openSUSE Leap 15.1
Outside the Cubicle | Gladiator Geartrack Gardening Pack
Debian 10 | Review from an openSUSE User

What are ACPI SLIT tables and why are they filled with lies?
Let’s say you’ve got a computer with a single processor and you want more computational power. A good option is to add more processors since they can mostly use the same technologies already present in your computer. Boom. Now you’ve got a symmetric multiprocessing (SMP) machine.
But pretty quickly you’re going to run into one of the drawbacks of SMP machines with a single main memory: bus contention. When data requests cannot be serviced from a processor’s cache, you get multiple processors trying to access memory via a single bus. The more processors you have, the worse the contention gets.
To fix this, you might decide to attach separate memory to each processor and call it local memory. Memory attached to remote processors becomes remote memory. Now each processor can access its own local memory using a separate memory bus. This is what many manufacturers started doing in the early 1990’s, and they called it Non-uniform Memory Access (NUMA), and named each group of processor, local memory, and I/O buses a NUMA node.
NUMA systems improve the performance of most multiprocessor workloads, but it’s rare for any workload to be perfectly confined to a single NUMA node. All kinds of things can happen that result in remote memory accesses, such as a task being migrated to a new NUMA node or running out of free local memory.
This might sound like the pre-1990 memory bus contention problem all over again, but the situation is actually worse now. Accessing remote memory takes much longer than accessing local memory, and not all remote memory has the same access latency. Depending on how the memory architecture is configured, NUMA nodes can be multiple hops away with each hop adding more latency.
So when a task exhausts all of local memory and the Linux kernel needs to grab free block from a remote node it has a decision to make: which remote node has enough free memory and the lowest access latency?
To figure that out, the kernel needs to know the access latency between any two NUMA nodes. And that’s something the firmware describes with the ACPI System Locality Distance Information Table (SLIT).
What are SLIT tables?
System firmware provides ACPI SLIT tables (described in the section 5.2.17 of
the ACPI 6.1
specification)
that describe the relative differences in access latency between NUMA nodes.
It’s basically a matrix that Linux reads on boot to build a map of NUMA memory
latencies, and you can view it multiple ways: with numactl, the
node/nodeX/distance sysfs file, or by dumping the ACPI tables directly with
acpidump.
Here is the data from my NUMA test machine. It only has two NUMA nodes so it doesn’t give a good sense of how the node distances can vary, but at least we’ve got much less data to read.
$ numactl -H
available: 2 nodes (0-1)
node 0 cpus: 0 1 2 3 4 5 6 7 8 9 10 11 24 25 26 27 28 29 30 31 32 33 34 35
node 0 size: 31796 MB
node 0 free: 30999 MB
node 1 cpus: 12 13 14 15 16 17 18 19 20 21 22 23 36 37 38 39 40 41 42 43 44 45 46 47
node 1 size: 32248 MB
node 1 free: 31946 MB
node distances:
node   0   1
  0:  10  21
  1:  21  10
$ cat /sys/devices/system/node/node*/distance
10 21
21 10$ acpidump > acpidata.dat
$ acpixtract -sSLIT acpidata.dat
Intel ACPI Component Architecture
ACPI Binary Table Extraction Utility version 20180105
Copyright (c) 2000 - 2018 Intel Corporation
SLIT - 48 bytes written (0x00000030) - slit.dat
$ iasl -d slit.dat
Intel ACPI Component Architecture
ASL+ Optimizing Compiler/Disassembler version 20180105
Copyright (c) 2000 - 2018 Intel Corporation
Input file slit.dat, Length 0x30 (48) bytes
ACPI: SLIT 0x0000000000000000 000030 (v01 SUPERM SMCI--MB 00000001 INTL 20091013)
Acpi Data Table [SLIT] decoded
Formatted output: slit.dsl - 1278 bytes
$ cat slit.dsl
/*
* Intel ACPI Component Architecture
* AML/ASL+ Disassembler version 20180105 (64-bit version)
* Copyright (c) 2000 - 2018 Intel Corporation
*
* Disassembly of slit.dat, Thu Jul 11 11:53:37 2019
*
* ACPI Data Table [SLIT]
*
* Format: [HexOffset DecimalOffset ByteLength] FieldName : FieldValue
*/
[000h 0000 4] Signature : "SLIT" [System Locality Information Table]
[004h 0004 4] Table Length : 00000030
[008h 0008 1] Revision : 01
[009h 0009 1] Checksum : DE
[00Ah 0010 6] Oem ID : "SUPERM"
[010h 0016 8] Oem Table ID : "SMCI--MB"
[018h 0024 4] Oem Revision : 00000001
[01Ch 0028 4] Asl Compiler ID : "INTL"
[020h 0032 4] Asl Compiler Revision : 20091013
[024h 0036 8] Localities : 0000000000000002
[02Ch 0044 2] Locality 0 : 0A 15
[02Eh 0046 2] Locality 1 : 15 0A
Raw Table Data: Length 48 (0x30)
0000: 53 4C 49 54 30 00 00 00 01 DE 53 55 50 45 52 4D // SLIT0.....SUPERM
0010: 53 4D 43 49 2D 2D 4D 42 01 00 00 00 49 4E 54 4C // SMCI--MB....INTL
0020: 13 10 09 20 02 00 00 00 00 00 00 00 0A 15 15 0A // ... ............The distances (memory latency) between a node and itself is normalised to 10, and every other distance is scaled relative to that 10 base value. So in the above example, the distance between NUMA node 0 and NUMA node 1 is 2.1 and the table shows a value of 21. In other words, if NUMA node 0 accesses memory on NUMA node 1 or vice versa, access latency will be 2.1x more than for local memory.
At least, that’s what the ACPI tables claim.
How accurate are the SLIT table values?
It’s a perennial problem with ACPI tables that the values stored are not always accurate, or even necessarily true. Suspecting that might be the case with SLIT tables, I decided to run Intel’s Memory Latency Checker tool to measure the actual main memory read latency between NUMA nodes on my test machine.
Measuring memory latency is notoriously difficult on modern machines because of
hardware prefetchers. Fortunately, MLC disables prefetchers using the Linux
msr module but that also means you need to run it as root.
$ ./Linux/mlc --latency_matrix
Intel(R) Memory Latency Checker - v3.7
Command line parameters: --latency_matrix

Using buffer size of 200.000MiB
Measuring idle latencies (in ns)...
		Numa node
Numa node	     0	     1
       0	  78.5	 119.4
       1	 120.8	  76.6
A bit of quick maths shows that these latency measurements do not match with the SLIT values. In fact, the relative distance between node 0 and 1 is closer to 1.5.
OK, but who cares?
Remember when I said that NUMA node distances were used by the kernel? One of the places they’re used is figuring out whether to load balance tasks between nodes. Moving tasks across NUMA nodes is costly, so the kernel tries to avoid it whenever it can.
How costly is too costly? The current magic value used inside Linux kernel is 30 – if the NUMA node distance between two nodes is more than 30, the Linux kernel scheduler will try not to migrate tasks between them.
Of course, if the ACPI tables are wrong, and claim a distance of 30 or more but in reality it’s less, you’re unnecessarily impacting performance because you’ll likely see one extremely busy NUMA node while over nodes sit idle. And the scheduler will refuse to migrate tasks to the idle nodes until the active load balancer kicks in.
This
patch
fixes this exact bug for AMD EYPC machines which report a distance of 32
between some nodes (I measured the memory latency with mlc and it’s
definitely less than 3.2x). With the patch applied you get a nice 20-30%
improvement to CPU-intensive benchmarks because the scheduler balances tasks
across the entire system.
Ugh. Firmware.
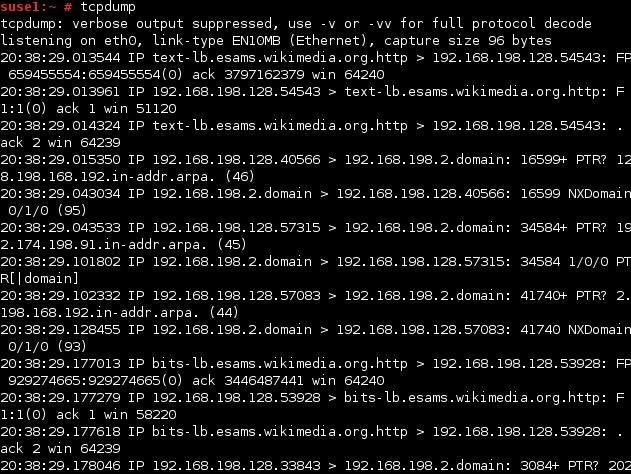
Diagnóstica tu red con Tcpdump