
 Member
 jimfehlig
Let’s Brew!
Where to start? There are many blogs on homebrewing from folks with lots of experience so I won’t be providing any earth-shattering information for knowledgeable brewers, but I can provide a perspective from a novice that might be interesting for others considering diving into homebrewing. Along the way perhaps I’ll be lucky enough to also get some feedback and tips from the pros! I’ll first talk briefly about the ingredients used to make beer and then discuss the process of turning those ingredients into the tasty beverage we all love using the Clawhammer BIAB system I discussed in a previous post.
Beer is actually made from a simple list of ingredients: water, barley, hops, and yeast. All are very important to the quality of the final product. Although the ingredient list is simple, the chemical characteristics of water, the types of barley and the degree of malting, the families of hops, and the strains of yeast vary greatly, which accounts for the seemingly endless varieties of beer we see. Some beers include ingredients like fruit, honey, and other sweeteners, but IMO those are for amateurs and kids and will not be considered in this blog post. We’ll save those ingredients for the ice cream and pies!

The beer we are brewing here is a recipe from a good friend and fellow brewer, which he named Baldy Chutes Pale Ale in honor of the famed ski run at Alta Ski area. BTW, in the winters when not brewing or working I can often be spotted at Alta :-). Ok, back to making beer. Let’s review the ingredients: water, malted barley, hops, and yeast. Many brewers say that yeast is the secrete sauce to a beer. I don’t have enough experience to confirm or deny this rumor, but understand its role in the process enough to know it is important. Therefore I make a yeast starter three days before brewing. Being one that likes simplicity, I use a canned yeast starter instead of preparing one traditionally. I buy the bagged yeast, adding it, the yeast starter, and water to a flask and drop in a magnetic stir stick.

The flask is placed on a stir plate that slowly stirs the yeast in the starter to ensure it has oxygen to flourish. I try to keep the concoction at a constant temperature, ideally 68F, but it really at the mercy of the temperature of my office. On the morning of brewing, I place the flask in the refrigerator so the yeast will separate from the starter and settle to the bottom.

Another task I’ve learned to do the night before brewing is filling the boil pot with cold tap water, particularly in the winter months when the water is very cold. This allows raising it to room temperature without using electricity. It saves a few electrons for the conservation-minded folks. One other item to consider the night before brewing, or even before starting your yeast starter, is that brewing takes some time. I’ve found I need to reserve 5-6 hours for preparation, actual brewing, and cleanup. I don’t start a brew session unless I have the day free, or at least 8 hours to give some buffer in case of catastrophe.
For my last brew, I did all the preparation the night before. I installed the boil pot heating element, inserted the grain basket, connected the circulation pump, setup the controller and temperature probe, filled the pot with water per recipe, and added a campden tablet per gallon of water to help neutralize the city water chlorine. On brew day I only had to turn on the controller and heat the water to mash-in temperature.

Once water is at mash-in temperature, it is time to slowly stir in the milled barlies of your recipe. Avoid dumping to much of that grains at once, otherwise they are likely to form dough balls that will act like little safes for the grain’s sugars. We wont be able to extract the sugar locked inside those dough balls. So slowly pour in your grains, giving the mixture a good stir each time grains are added, being careful not to damage the grain basket. After all the grain is thoroughly mixed with the water in the grain basket and the mixture has returned to mash-in temperature, start circulating the water over the grains using the system’s pump. Typical beer recipes generally call for an hour or so of mashing, a process meant to extract the grain’s sugars and produce our prized wort.

The Clawhammer system makes mash-out easy by providing the grain basket and hooks that make a temporary ledge for the basket to drain as much of the sugar-saturated water from the grains. While the grains are draining, the controller can be adjusted to begin bringing the wort to boil temperature. After the grains have mostly drained they can be removed from the pot and placed in a 5 gallon bucket for further draining.

This allows covering the boil pot with lid and a towel or other insulation to help accelerate our goal of boil temperature. I’ve found it can take 15-20 minutes to reach boil temperature with the 110 volt element. You should experiment with boil temperature. I’ve found most recipes I brew boil around 200F at my house, which is 4600 feet elevation. The primary advice I can give is to keep a close eye on the pot once you’ve reached 195F to avoid the dreaded boil-over. Wort boil-over can make an awful mess and extend your brew time with extra cleaning, not to mention the hazard of erupting sugar water at boil temperature!

Most of the recipes I’ve attempted thus far call for 60 minutes boil time. At various intervals of the boil your recipe may call for adding hops, yeast nutrient, and whirlfloc tablets or Irish moss. The latter is used to help clarify your beer. Hops not only add unique flavors to beer but also bitter the beer to offset the sweetness of the barley sugars. I enjoy taking the occasional whiff of the hops before adding them to the boil. There’s something about the smell of fresh hop pellets that’s hard to resist. Interestingly, hops are a relative of marijuana and are grown similarly, where only the female plants are allowed to thrive and all male plants are removed as soon as they are identified.

It’s all downhill after the boil is complete. There is still lots of cleaning to do, but the real time-consuming part of the brew is done. It is time to chill the wort to fermenting temperature, which is dictated by your recipe. Most ales are fermented at 68F. Lagering beer is a more time-consuming process where the fermentation is done slowly at various temperatures. I have not yet done any lagering since you really need another chest freezer or refrigerator with a dual stage controller to precisely control the temperature of the fermenting beer.
Sanitation of all equipment is a must after the boil to avoid contaminating and spoiling your beer. I use Star San non-rinse sanitizer for all of my post-boil brew equipment: carboys, kegs, siphon tubes, etc. After thoroughly sanitizing a carboy and siphon tube I transfer the wort into the carboy for fermentation, collecting a bit of the wort along the way to take a starting gravity (SG) reading.

Before adding the yeast, I like to aerate the beer with a small pump similar to a fish tank aerator. This ensures there is plenty of oxygen in the wort for the yeast to thrive and turn all that sweet sugar to alcohol! Before adding the yeast I decant most of the yeast starer leaving just enough to thin the thick yeast layer on the bottom of the flask to ensure the all-important yeast is completely emptied from the flask.

After the yeast is added to the wort it is time to seal the carboy with an airlock and let the fermentation begin! I wrap my carboy in a heater to keep the temperature consistent. For ales I can always find a place in my house that will be at or below 68F, even in the summer months.

I always like to keep an eye on my beer for a few days into the fermentation process. Once the yeast really gets after the sugars, the mixture will look very cloudy and hopefully you’ll have lots of air bubbles in the airlock, indicating the yeast is happy and doing its job. I always find fermentation fastinating. To me, it is a bit of magic. I agree with the old addage that brewers make wort and yeast makes beer!
About half way through the fermenation process I like to transfer the beer to a secondary carboy. A lot of yeast waste, hop bits, and small particles of barley will settle to the bottom of the primary fermentor. This is a good time to transfer the contents to another fermentor and leave the baggage behind. Strictly speaking it is not needed, but I like a non-cloudy beer so put in a bit of extra time with the secondary fermentor.

After the second stage fermentation is complete it is time to transfer the beer to a keg for carbonation. This is also the time to collect a bit of the flat, fermented beer for a final gravity (FG) reading. This allows us to determine the alcohol content of the beer. The formula for Alcohol By Volume (ABV) is: ABV% = (SG-FG)/0.776. Or for the pedantic math nerds out there: ABV% = (SG-FG)*131.

If there are no existing kegs on tap, I carbonate a freshly kegged beer at 22 PSI for a week. If my gas system is in use for pouring (10-12 PSI) I’ll let the new keg carbonate for two weeks, at which point we reap the rewards of our labor! Fresh beer with no bullshit sweeteners, additives, or preservatives. Beer as it was meant to be enjoyed!

BIAB Homebrewing
Being a beer lover, I always wanted to brew my own beer but lacked time, money, and space required form making my own liquid bread. Over my travels and many places I’ve called home I’ve met several homebrewers and even spent afternoons helping brew batches of beer. While lending a helping hand I quickly realized the equipment needed to make beer from all-grain ingredients was the barrier for me. That all changed last fall when I helped a good fried make a batch of Alaska Amber clone. He had recently invested in a new Brew In A Bag (BIAB) system from Clawhammer Supply and I was immediately impressed with the functionality and usability of the system. I decided that afternoon it was time to start brewing my own beer! I had found a brew system that provided the balance of simplicity and functionality I was looking for. Along with more free time in my life now that kids are older and more independent, it’s a great time to start a new hobby!
The Clawhammer BIAB system includes all the components you need for creating your favorite all-grain beer. It consists of a 10 gallon stainless steel boil pot, a 110 volt heating element (220 volt option available at substantially more cost), a controller for heat and pump, a temperature probe, a 110 volt pump, a plate wort chiller, grain and hop baskets, high temperature, restaurant-grade rubber hose, and all the quick-release fittings and valves needed to connect the system components. The system requires assembly but that was made easy by the helpful videos provided by Clawhammer Supply. That leads me to the only complaint about the system: lack of written documentation. Videos are fine, but I’m old school and generally like to read shit :-).

When deciding on the 110 vs 220 volt system, I read many reviews stating the 110 system was adequate if the boil pot was insulated. Clawhammer even sells an insulation kit for their boil pots. So I opted for the 110 volt element and fabricated my own insulation wrap for the pot with some insulation bought at the local hardware store.
I already mentioned how I liked the Clawhammer system simplicity. You have a boil pot that heats water with an electric element, a large grain basket that fits inside the pot, and a pump to circulate hot water over the grains to extract their all-important sugars. After mashing the grains and boiling the wort, simply insert the wort chiller in the system to cool the wort before transferring to fermentation storage. The system is also relatively mobile, opening the possibility to take it to the Henry’s Lake place for some Idaho brewing! Perhaps this picture of the entire system in action chilling a pale ale wort will help you understand my excitement around this system. In a followup post I’ll describe the steps for creating an all-natural, preservative and additive free beer with the Clawhammer BIAB system. Until then, enjoy a few cold ones!

A Week on Gnome for a KDE Plasma User with openSUSE Tumbleweed

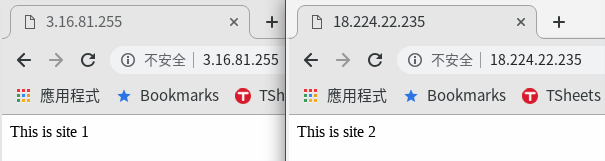
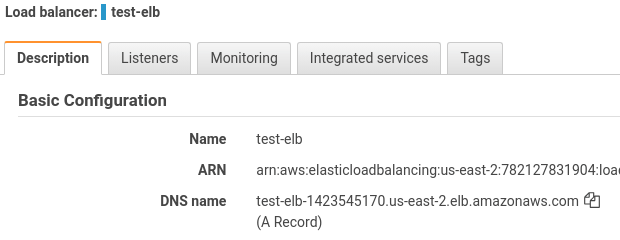
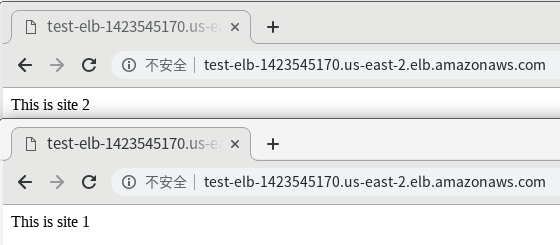
AWS Elastic Load Balancing with openSUSE instance in AWS 測試小記

- Instance-id 請換成自己的 id
- --groups 後面請填上 security-group-id
- 使用 AWS CLI 來建立 Application Load Balancer https://docs.aws.amazon.com/zh_tw/elasticloadbalancing/latest/application/tutorial-application-load-balancer-cli.html
- 使用以路徑為基礎的路由與 Application Load Balancer 搭配使用 https://docs.aws.amazon.com/zh_tw/elasticloadbalancing/latest/application/tutorial-load-balancer-routing.html
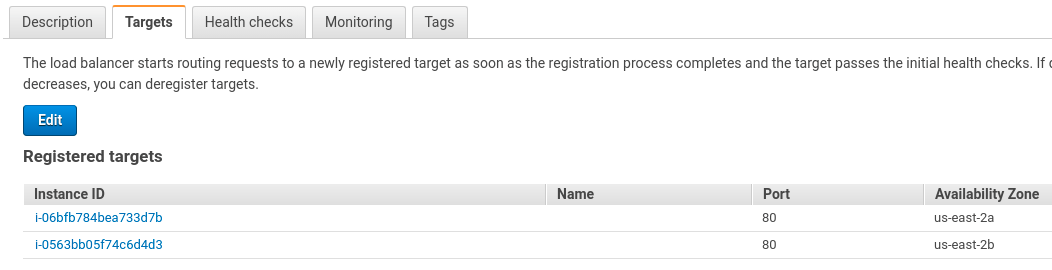
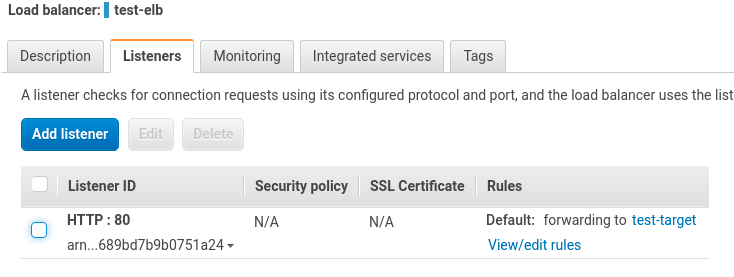
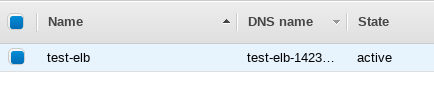
- 建立一個 test-elb, 與 2 個 subnet 和 1 個 security group


- 這邊要指定 vpc-id 不能使用預設的方式

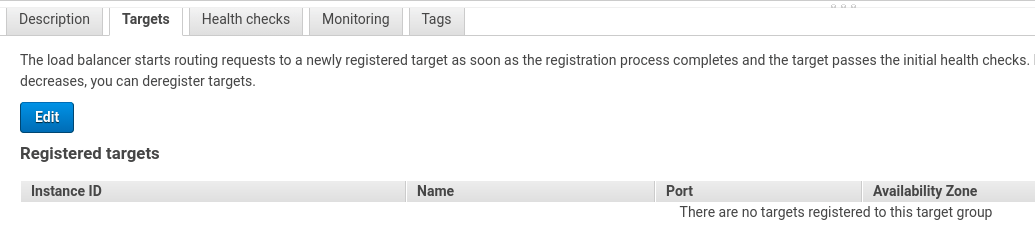
- Target-group-arn 用剛剛建立起來的 arn
- --targets 後面接 2 個 openSUSE instance id

experimental openSUSE mirror via IPFS
The InterPlanetary File System (IPFS) can be used to provide files in a more efficient and distributed way than HTTP.
Our filesystem repo already has the go-ipfs client.
You use it with
ipfs daemon --init
And then you can add my Tumbleweed mirror with
zypper ar http://127.0.0.1:8080/ipns/opensuse.zq1.de./tumbleweed/repo/oss/ ipfs-oss
You can also browse the content online at
http://opensuse.zq1.de./tumbleweed/repo/oss/ . During my testing I found that the results are sometimes inappropriately cached on the Cloudflare CDN, so if you used it under this URL without the ipfs client, this might throw signature errors in zypper.
On the server side, the mirror is updated using the syncopensuse script from
https://github.com/bmwiedemann/opensusearchive and consistency of the repo is verified with checkrepo
When a complete repo was synced, dynaname updates a DNS entry to point to the new head:
> host -t txt _dnslink.opensuse.zq1.de.
_dnslink.opensuse.zq1.de is an alias for tumbleweedipfs.d.zq1.de.
tumbleweedipfs.d.zq1.de descriptive text “Last update: 2019-04-03 12:23:43 UTC”
tumbleweedipfs.d.zq1.de descriptive text “dnslink=/ipfs/QmSXEVuU5z23rDxMyFYDhSAUaGRUPswuSXD3aVsBEzucjE”
If you got spare bandwidth and 300 GB disk on some public server, you could also host a mirror of today’s version, simply by doing ipfs pin add QmSXEVuU5z23rDxMyFYDhSAUaGRUPswuSXD3aVsBEzucjE
This is a permalink: http://127.0.0.1:8080/ipfs/QmSXEVuU5z23rDxMyFYDhSAUaGRUPswuSXD3aVsBEzucjE also browsable via any public IPFS gateway. This means, it will always remain on the 20190401 version of Tumbleweed and no changes in content are possible – similar to how a git commit ID always refers to the same data.
So why did I create this IPFS mirror? That is related to my work on reproducible builds for openSUSE. There it regularly happened that published Tumbleweed binaries were built with libraries, compilers and toolchains that were no longer available in current Tumbleweed. This prevented me from verifying that the published binaries were indeed built correctly without manipulation on the OBS build workers.
Now, with this archive of rpms easily available, it was possible to verify many more Tumbleweed packages than before. And most importantly, it remains possible to independently verify even after Tumbleweed moves on to newer versions. This data is going to stay available as long as anyone pins it on a reachable server. I’m going to pin it as long as it remains relevant to me, so probably a bit until after the next full Tumbleweed rebuild – maybe 6 to 12 months.
Thus, it now is even less easy to sneak in binary backdoors during our package build process.

Falkon, otra alternativa de navegador web para los escritorios Linux

Falkon es un navegador web diseñado para integrarse bien con todos los escritorios Linux comunes, como los escritorios GNOME y KDE Plasma. Es compatible con los estándares web actuales y viene con muchas características, como un bloqueador de anuncios integrado. Anteriormente se conocía como QupZilla.
Si deseas probar un navegador web alterno a Mozilla Firefox, definitivamente Falkon es una gran elección.
Enabling scroll wheel emulation for the Logitech Trackman Marble using Wayland and GNOME 3
For ergonomic reasons, I’ve long used Trackballs as pointing devices instead of regular mice. For several years now, I have been using a Logitech Trackman Marble and a libinput tweak to use the trackball for scrolling by holding down one of the buttons while spinning the ball.

This worked well until some distributions decided to switch to using Wayland as a replacement for X.org. In the past, I have been reverting back to using X.org (by setting WaylandEnable=True in /etc/gdm/custom.conf), as Wayland does not support the required libinput configurations. I found a workaround that creates a shared library that can be preloaded to implement this, but that looked somewhat hacky to me.
But as Wayland seems to be the way forward and my latest distribution upgrade caused some weird X.org issues (my dual-screen setup did no longer work properly), I caved in and switched to Wayland again. At least all of my screens were properly detected afterward, but the scroll wheel emulation was broken. I did some research to see if the libinput support in Wayland had improved in that regard in the meanwhile, but it seems it doesn’t.
However, I found a solution for enabling mouse wheel emulation in Wayland/GNOME3 on the Arch Linux Wiki: simply run the following command in a terminal window:
gsettings set org.gnome.desktop.peripherals.trackball scroll-wheel-emulation-button 8
Now button 8 (the small button above the left button) acts both as a “back” button (e.g., when browsing web pages) as well as the modifier that turns the trackball into a scroll wheel, just like before. Nifty!

translation-finder 1.1
The translation-finder module has been released in version 1.1. It is used by Weblate to detect translatable files in the repository making setup of translation components in Weblate much easier. This release brings lot of improvements based on feedback from our users, making the detection more reliable and accurate.
Full list of changes:
- Improved detection of translation with full language code.
- Improved detection of language code in directory and file name.
- Improved detection of language code separated by full stop.
- Added detection for app store metadata files.
- Added detection for JSON files.
- Ignore symlinks during discovery.
- Improved detection of matching pot files in several corner cases.
- Improved detection of monolingual Gettext.
