
 Member
 Futureboy
Christmastime in the year 2020 | Holiday Blathering

Result of the Modernizing AutoYaST initiative
In April, we announced the Modernizing AutoYaST initiative. The idea was not to rewrite AutoYaST but just introduce a few new features, remove some limitations and improve the code quality.
Although they were not set in stone, we had some ideas about what changes we wanted to introduce. However, as soon as we started to work, it became clear that we needed to adapt our roadmap. So if you compare our initial announcement with the result, you can spot many differences.
This article describes the most relevant changes. If you want to try any of these features, they are already available in openSUSE Tumbleweed.
Reducing profiles size
When AutoYaST generates a profile from an existing system, it includes a lot of information to reproduce the installation. As a consequence, those profiles are rather long, which makes working with them quite annoying.
However, it is not always clear when it is safe to omit some information from the profile without compromising the final result. To address this problem, we decided to introduce the concept of target. Thus, when generating a profile, you can ask AutoYaST to generate a more compact profile.
# yast2 clone_system modules target=compact filename=autoinst-compact.xml
In my current machine, the size of the profile is reduced from 2201 lines to just 834. But which information is omitted? Let’s enumerate a few items:
- System users and groups.
- Not modified firewall zones.
- System services which preset has not been changed.
- Printer settings if the
cupsservice is disabled.
Note that not all YaST modules implement support for this flag. Actually, in some cases, it does not make any sense.
Making easier to write dynamic profiles
When dealing with the installation of multiple systems, it might be useful to use a single profile that adapts to the system being installed at runtime. AutoYaST already offered two mechanisms to implement this behavior: rules and classes and pre-install scripts.
However, we though that it might be easier if you could embed Ruby (ERB) code in your profiles. The idea is to provide a set of helper functions that you can use to inspect the system and adjust the profile by setting values, adding or skipping sections, etc. It sounds cool, right? Let’s see a simple example.
The code below finds the largest disk by sorting them size and sets the value of the device
element.
<partitioning t="list">
  <drive>
    <% disk = disks.sort_by { |d| d[:size] }.last %> <!-- find the largest disk -->
    <device><%= disk[:device] %></device> <!-- print the disk device name -->
    <initialize t="boolean">true</initialize>
    <use>all</use>
  </drive>
</partitioning>
Of course, apart from a set of helpers (disks, network_cards, os_release or hardware), you
have the power of Ruby in your fingertips. What about retrieving a whole section from a remote
location? At some extent, it could replace the classes and rules feature.
<bootloader>
  <% require "open-uri" %>
  <%= URI.open("http://192.168.1.1/profiles/bootloader-common.xml").read %>
</bootloader>
Unfortunately, the documentation of this feature is still a work in progress. However, we expect to have it ready in the upcoming weeks.
Improved scripting support
Apart from introducing support for ERB, as described in the previous section, we improved script handling. Until now, Shell, Perl and Python were the only supported scripting languages. We removed this limitation and now you can use any interpreter available at installation time. Moreover, it is possible to pass custom options to the interpreter.
<intepreter>/usr/bin/bash -x</interpreter>
Additionally, we fixed a few issues and extended the error handling to inform the user when the script did not run successfully.
Validating the profile
Building and tweaking your profile can be a time-consuming task. AutoYaST offers XML-based validation, but the sort of errors you can detect is rather limited.
To make your life easier, we introduced these new features to leverage profile validation:
- Automatic profile validation at runtime.
- A new
check-profilecommand to detect errors without running the installer.
When AutoYaST fetches the profile, it automatically performs the XML-based validation, reporting any
error found. It works even if you are using features like Rules and classes or Dynamic profiles.
However, it can be easily disabled by setting the YAST_SKIP_XML_VALIDATION parameter to 1 when
booting the installer.
Regarding the check-profile, it basically uses part of the code that runs during
AutoYaST initialization. It includes:
- Profile fetching (even from a remote location).
- XML-based validation.
- Support for dynamic profiles: rules and classes, ERB and pre-installation scripts (optional).
- Optionally, detection of problems during profile import.
Needlessly to say that you should run this command with caution. Bear in mind that ERB and pre-installation scripts can run any arbitrary code. In fact, we are working with our security experts to make this command safer. See bsc#1177123 for further details.
Reducing the second stage
Unlike a normal installation, AutoYaST still uses two phases, which are known as stages. The first stage is responsible for most of the installation tasks: partitioning, registration, software installation, network configuration, etc. Depending on the content of the profile, the second stage comes into play after the first reboot. It takes care of additional configuration processes, like setting the firewall rules, enabling/disabling services, etc.
To reduce the need for a second stage, we moved the processing of several sections to the first
stage. At this point, these sections are processed during this stage: bootloader,
configuration_management, files, firewall, host, kdump, keyboard, language,
networking, partitioning, runlevel, scripts (except post-scripts and init-scripts, which
are processed during the second stage), security, services-manager, software, ssh_import,
suse_register, timezone and users. Thus if your profile does not contain any other section,
you can happily disable the second stage.
<general>
  <mode>
    <second_stage t="boolean">false</second_stage>
  </mode>
 </general>
A better UI to define the partitioning section
The user interface offered by AutoYaST to define the partitioning section was confusing, buggy and rather limited. Therefore we took the chance to, basically, rewrite the whole thing.

It is still a work in progress, but it is already much better than the old one. For instance, in addition to disks and LVM, it supports defining sections for RAID, bcache and multi-device Btrfs file systems.
It should be noted that these changes are already available in openSUSE 15.2 and SUSE Linux Enterprise 15 SP2, so you do not need to wait until 15.3 or SP3 to enjoy them.
Conclusion
New features and bug fixes are the most visible changes. However, as part of this process, we refactored a lot of code, improved code coverage, extended the documentation, etc. In general, we feel that we improved AutoYaST quality in a sensible way. And we hope you have that impression too in the future.
HP EliteBook 840 G7 running openSUSE Tumbleweed

Introducing the openSUSE 2020 End of Year Survey
This year has been tough. But times of difficulties and challenges are also opportunities to reflect on where we come from, as a thriving global open-source community, and where we’re heading.
As dust settles, we look back and remember all the good moments for openSUSE – as well as the more difficult ones – we’ve been through together. And there sure are reasons to rejoice:
- the fun and passionate “Meet the Candidates” gathering scheduled for today
- a first step into the future with the development kickoff of Leap 15.3
- significant improvements for openSUSE on the PinePhone
- the debut of a long term openSUSE - ARM journey
- the release of the Open Build Service Connector extension for Visual Studio Code
- the openSUSE + LibreOffice Conference, with plenty of excellent sessions
- the launch of “let’s improve the openSUSE learning experience” initiative
- amazing Hacktoberfest contributions
- the arrival of Leap 15.2 on Windows Subsystem for Linux … as well as countless improvements of the infrastructure (news-o-o, software-o-o) thanks to our terrific contributors, content writers, designers, developers and engineers.
The point of this post is not to pat ourselves on the back, however. As a community we cannot achieve excellence without humility. There are still plenty of things to improve regarding both the technology and the people it serves. We all have something to learn from each other, and from the community as a whole; it is in this spirit that we would like to invite you to the “2020 End of the Year survey”. The survey has almost 40 questions cherry-picked to better understand your story with openSUSE, the issues you faced and your expectations for the future. Your insights will be invaluable for all of us, especially to help the new Board orientate its actions.
We wish you a beautiful end of the year and look forward to reading you. The survey starts today on survey.opensuse.org and runs until Jan. 2.

openSUSE Tumbleweed – Review of the week 2020/51
Dear Tumbleweed users and hackers,
The year is slowly coming to an end, and a lot of people start to disappear on holiday breaks. But as we’re already used from previous years, this has never stopped Tumbleweed. Same this year: week 51 has seen another 5 snapshots being published (1212, 1213, 1214, 1215, and 1216).
The main changes contained in those snapshots were:
- GStreamer 1.18.2
- systemd 246.7
- Linux kernel 5.9.14
- KDE Frameworks 5.77.0
The items planned to be shipped in the next snapshots contain these items:
- KDE Applications 20.12
- Linux kernel 5.10
- Mozilla Firefox 84.0
- icu 68.1: breaks a couple of builds (Staging:I)
- brp-check-suse: a bug fix in how it detected dangling symlinks (it detected them, but did not fail as it was supposed to)
- permissions package: prepares for easier listing, while supporting a full /usr merge
- RPM 4.16: still a few packages build failures (Mozilla *, openblas)
- Ruby 3.0: mainly YaST not ready for that switch. We are likely to stay on 2.7 as ‘default ruby’ version, but add rubygem packages for Ruby 3.0 by end of the year
- First experiments with rpmlint 2.0 started in Staging:M
- openssl 3.0: currently alpha 9 in Staging:O
I Have No Idea How To Debug This
On my desktop system, I’m running XFCE on openSUSE Tumbleweed. When I leave my desk, I hit the “lock screen” button, the screen goes black, and the monitors go into standby. So far so good. When I come back and mash the keyboard, everything lights up again, the screens go white, and it says:
blank: Shows nothing but a black screen
Name: tserong@HOSTNAME
Password:
Enter password to unlock; select icon to lock
So I type my password, hit ENTER, and I’m back in action. So far so good again. Except… Several times recently, when I’ve come back and mashed the keyboard, the white overlay is gone. I can see all my open windows, my mail client, web browser, terminals, everything, but the screen is still locked. If I type my password and hit ENTER, it unlocks and I can interact again, but this is where it gets really weird. All the windows have moved down a bit on the screen. For example, a terminal that was previously neatly positioned towards the bottom of the screen is now partially off the screen. So “something” crashed – whatever overlay the lock thingy put there is gone? And somehow this affected the position of all my application windows? What in the name of all that is good and holy is going on here?
Update 2020-12-21: I’ve opened boo#1180241 to track this.
Digest of YaST Development Sprint 115
The YaST Team just finished the last sprint before the Christmas break of this convulted 2020. So let’s start the festivities by celebrating what we have achieved in the latest two weeks. That includes:
- Several additions to AutoYaST
- Better management of required packages
- Usability improvements in the registration process
- Drop of the SysVinit support
- Translation infrastructure for the
wickedCockpit module
Let’s go into the details.
You may remember that we recently introduced support in the YaST Partitioner for tmpfs mount
points and for Btrfs subvolume quotas. Now those technologies have been incorporated to AutoYaST.
See this pull request for some overview of
the tmpfs support or this other one if you want to
check the full documentation. If you are more curious about Btrfs subvolume quotas, check this pull
request for some general description with
screenshots or the documentation one for more
comprehensive information.
We also improved how YaST manages the packages
to install in order to support the different storage technologies and file systems. During
installation, YaST now makes a difference between optional and mandatory packages, which implies it
will not longer force you to install ntfsprogs just because there is a leftover NTFS partition
somewhere in the system. Moreover, in an installed system YaST only forces installation of those
packages strictly needed to perform the Partitioner actions, reducing to a minimum the number of
repository refresh operations triggered by the Partitioner.
Regarding the registration process during the installation of SLE (SUSE Linux Enterprise), we have been working in a couple of fronts:
- More informative and up-to-date information about the implications of skipping registration when performing a so-called online installation.
- Some experiments (still under discussion) regarding the layout of the registration screen.
In a more general scope, we removed some bits of code in YaST that were still trying to modify
the obsolete /etc/inittab file. See the
announcement
in the yast-devel mailing list about the definitve drop of support for SysVinit.
Going beyond YaST itself, we added internationalization support to our Cockpit module for wicked.
The corresponding project is now available in
the openSUSE Weblate instance and all the automation is in place to ensure all the translations
contributed by our awesome volunteers are incorporated into future releases of the module.
As mentioned at the beginning of the post, this was the last development sprint of 2020, which also means this will be the last blog entry from the YaST Team this year. We will restart the usual development (and reporting) pace after the Christmas and new year season. So there is only one more thing left to say - see you in 2021!
KDE Frameworks, VirtualBox, systemd update in Tumbleweed
Five openSUSE Tumbleweed snapshots have been released since last Friday.
Snapshot 20201215 is the latest update to arrive in the rolling release. The snapshot updated KDE Frameworks 5.77.0 and offered a significant amount of bug fixes and additions for the 83 addon libraries; the Breeze Icon package added an edit-move action icon, the Attica package fixed a crash and KDeclarative relicenses files to the LGPL v2 or later. Both the KIO and Kirigami packages had extensive work done; KIO cleaned up dead code and now requires Qt 5.13. Kirigami fixed rendering borders to the proper size and also made a fix for low power mode. openSUSE’s autoyast2 4.3.64 package added support for Btrfs quotas. The default window sizing was fixed in an update of gnome-tweaks 3.34.1. Location-aware applications will notice a fix for Wifi crashes in the 2.5.6 geoclue2 package. Some obsolete settings were removed from the 4.3.6 yast2-security package and text editor vim fixed the CTRL-Z behavior.
The smallest snapshot of the week was 20201214. The lone Japanese package man-pages-ja provided nearly a year’s worth of updates to version 20201115.
Some GStreamer packages like gstreamer-devtools and gstreamer-editing-services updated to version 1.18.2 in the 20201213 snapshot. KDevelop5 5.6.1 provided some small performance improvements and a set of oddities were fixed with initial parsing of project files, The Linux Kernel 5.9.14 provided serval USB serial fixes as well as Advanced Linux Sound Architecture fixes. The only major update to arrive this week in Tumbleweed was an update to xapps 2.0.0, which should benefit Cinnamon, MATE and Xfce users. Document viewer xreader 2.8.0 added an issue with the Tab key toggling checkboxes and moved the new sidebar button to be part of the navigation group.
GStreamer had various stability, performance and reliability improvements in its 1.18.2 release, which fixed an MPEG-TS timestamping regression when playing DVB streams, that arrived in snapshot 20201212. Firmware updater package fwupd 1.5.3 added the serio->firmare_id for the UDev device manager. A minor release of systemd 246.7 had some udev renaming options made; a full list of changes can be found here. Support for Python 3.5 was removed in the python-cryptography 3.3 package and libzypp 17.25.5 fixed the update of GNU Privacy Guard keys with an elongated expiration date. The GNOME desktop’s indexing and search provider tracker 3.0.2 improved the turtle parser and made the UPDATE parser tree processing iterative rather than recursive.
The 20201211 snapshot kicked off the week with the 6.1.16 maintenance update to virtualbox, which had a workaround to improve resizing of 32-bit VMs with the VMSVGA graphics controller, and it does not try to use RandR version 1.3 due to bugs causing the X server to hang. The 5.2.0 machine emulator version of qemu has a new KVM feature that improves the handling of asynchronous page faults, and new arm boards mps2-an386 (Cortex-M4 based) and mps2-an500 were added. The qemu update also has RISC-V improvements for the Ibex (OpenTitan) Platform Level Interrupt Controller.

On the Graying of GNOME
The GNOME project turned 23 this year, and despite equally persistent rumors to the contrary, it's still alive and kicking.
Just how alive, though? All I know is this: Where the topic of GNOME's health goes, accurate data rarely follows. Of course, there is data — lots of it in fact, in public source code repositories. Though flawed in many ways, it allows us to make comparisons to the past — and maybe predictions for the future: Are a few organizations carrying most of the workload, making them critical points of failure? Are new contributors able to pick up the slack from those who leave? Is the project graying (i.e. increasingly dominated by veterans)?
In one of my occasional fits of hubris, I set out to process this data to see if I could shake out anything meaningful. I'm usually fine with just satisfying my own curiosity and leaving it at that, but it's one of those times where the results seem interesting enough for a blog post. So here we are.
I'm going to lead with the nice graphs and follow on with a section on methodology. The latter is long, boring, and mandatory reading.
Active contributors
By generation
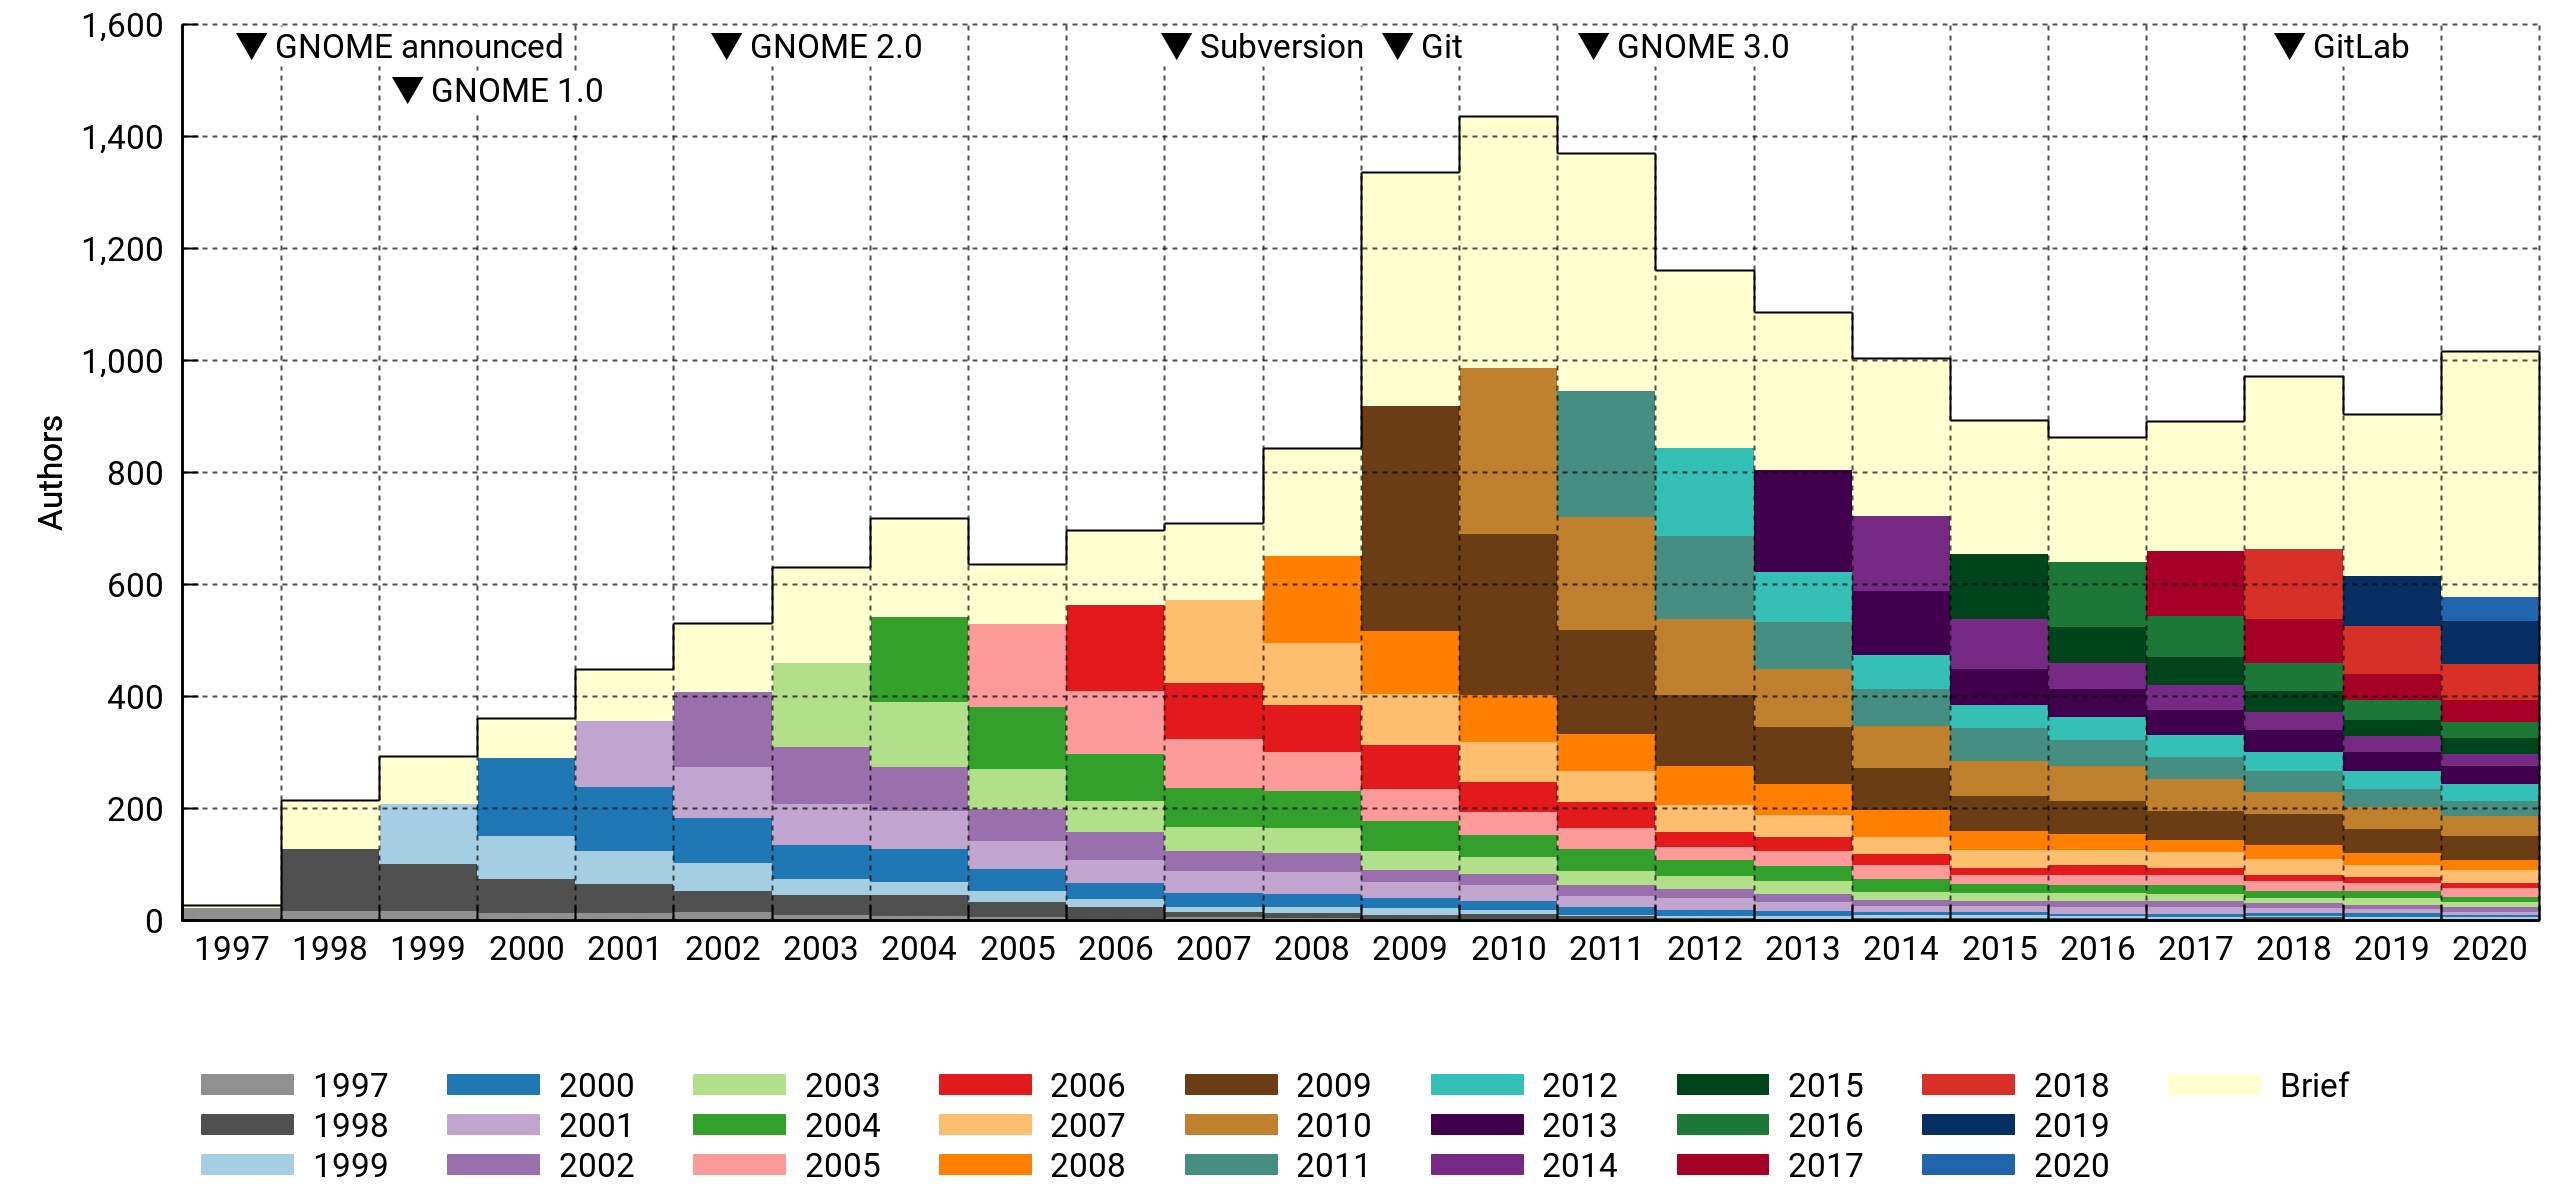
The stacked histogram above shows the number of contributors who touched the project on a yearly basis. Each contributor is assigned to a generational cohort based on the year of their first contribution. The cohorts tend to shrink over time as people leave.
There's a special "drive-by" cohort (in a fetching shade of off-white) for contributors who were only briefly involved, meaning all their activity fits in a three-month window. It's a big group. In a typical year, it numbers 200-400 persons who were not seen before or since. Most of them contribute a single commit.
According to this, GNOME peaked at slightly above 1,400 contributors in 2010 and went into decline with the GNOME 3.0 release the following year. However, 2020 saw the most contributors in a long time, even with preliminary data — there's still two weeks to go. Who knows if it's an anomaly or not. It's been an atypical year across the board.
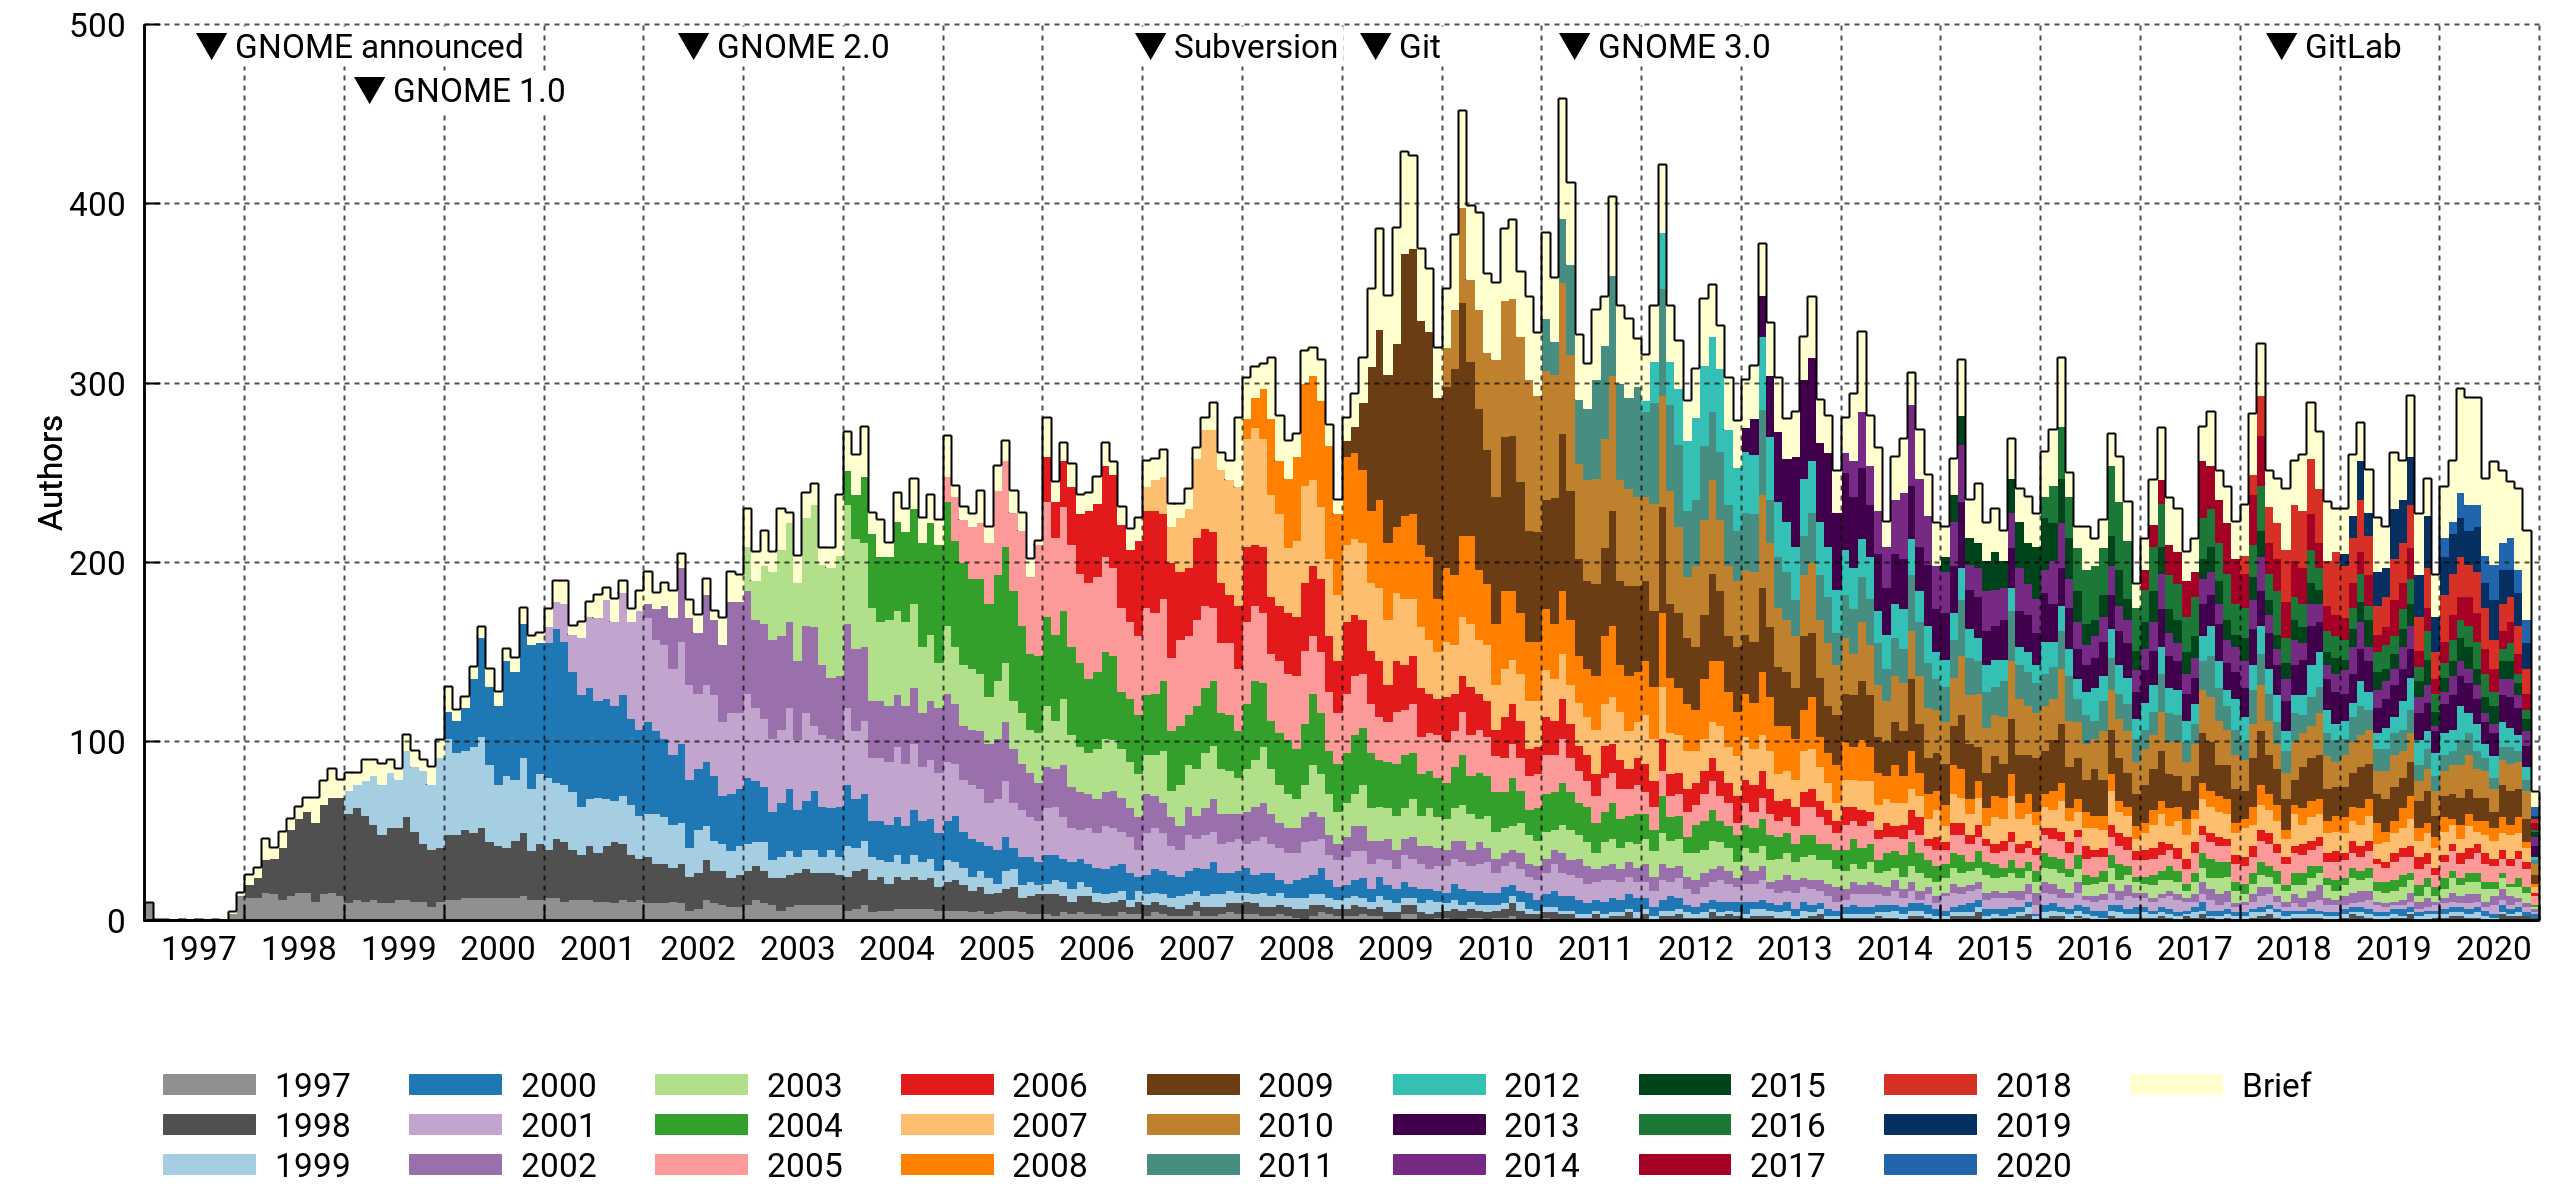
This is the same histogram, but with per-month bins. There's a clear periodicity caused by the semiannual release cycle. The peak month was March 2011, right before the GNOME 3.0 release. About 450 contributors got involved that month.
The drive-by cohort is relatively smaller on a monthly basis. This makes sense, as it has little overlap from month to month, and the per-year bins tend to add them all up.
By affiliation
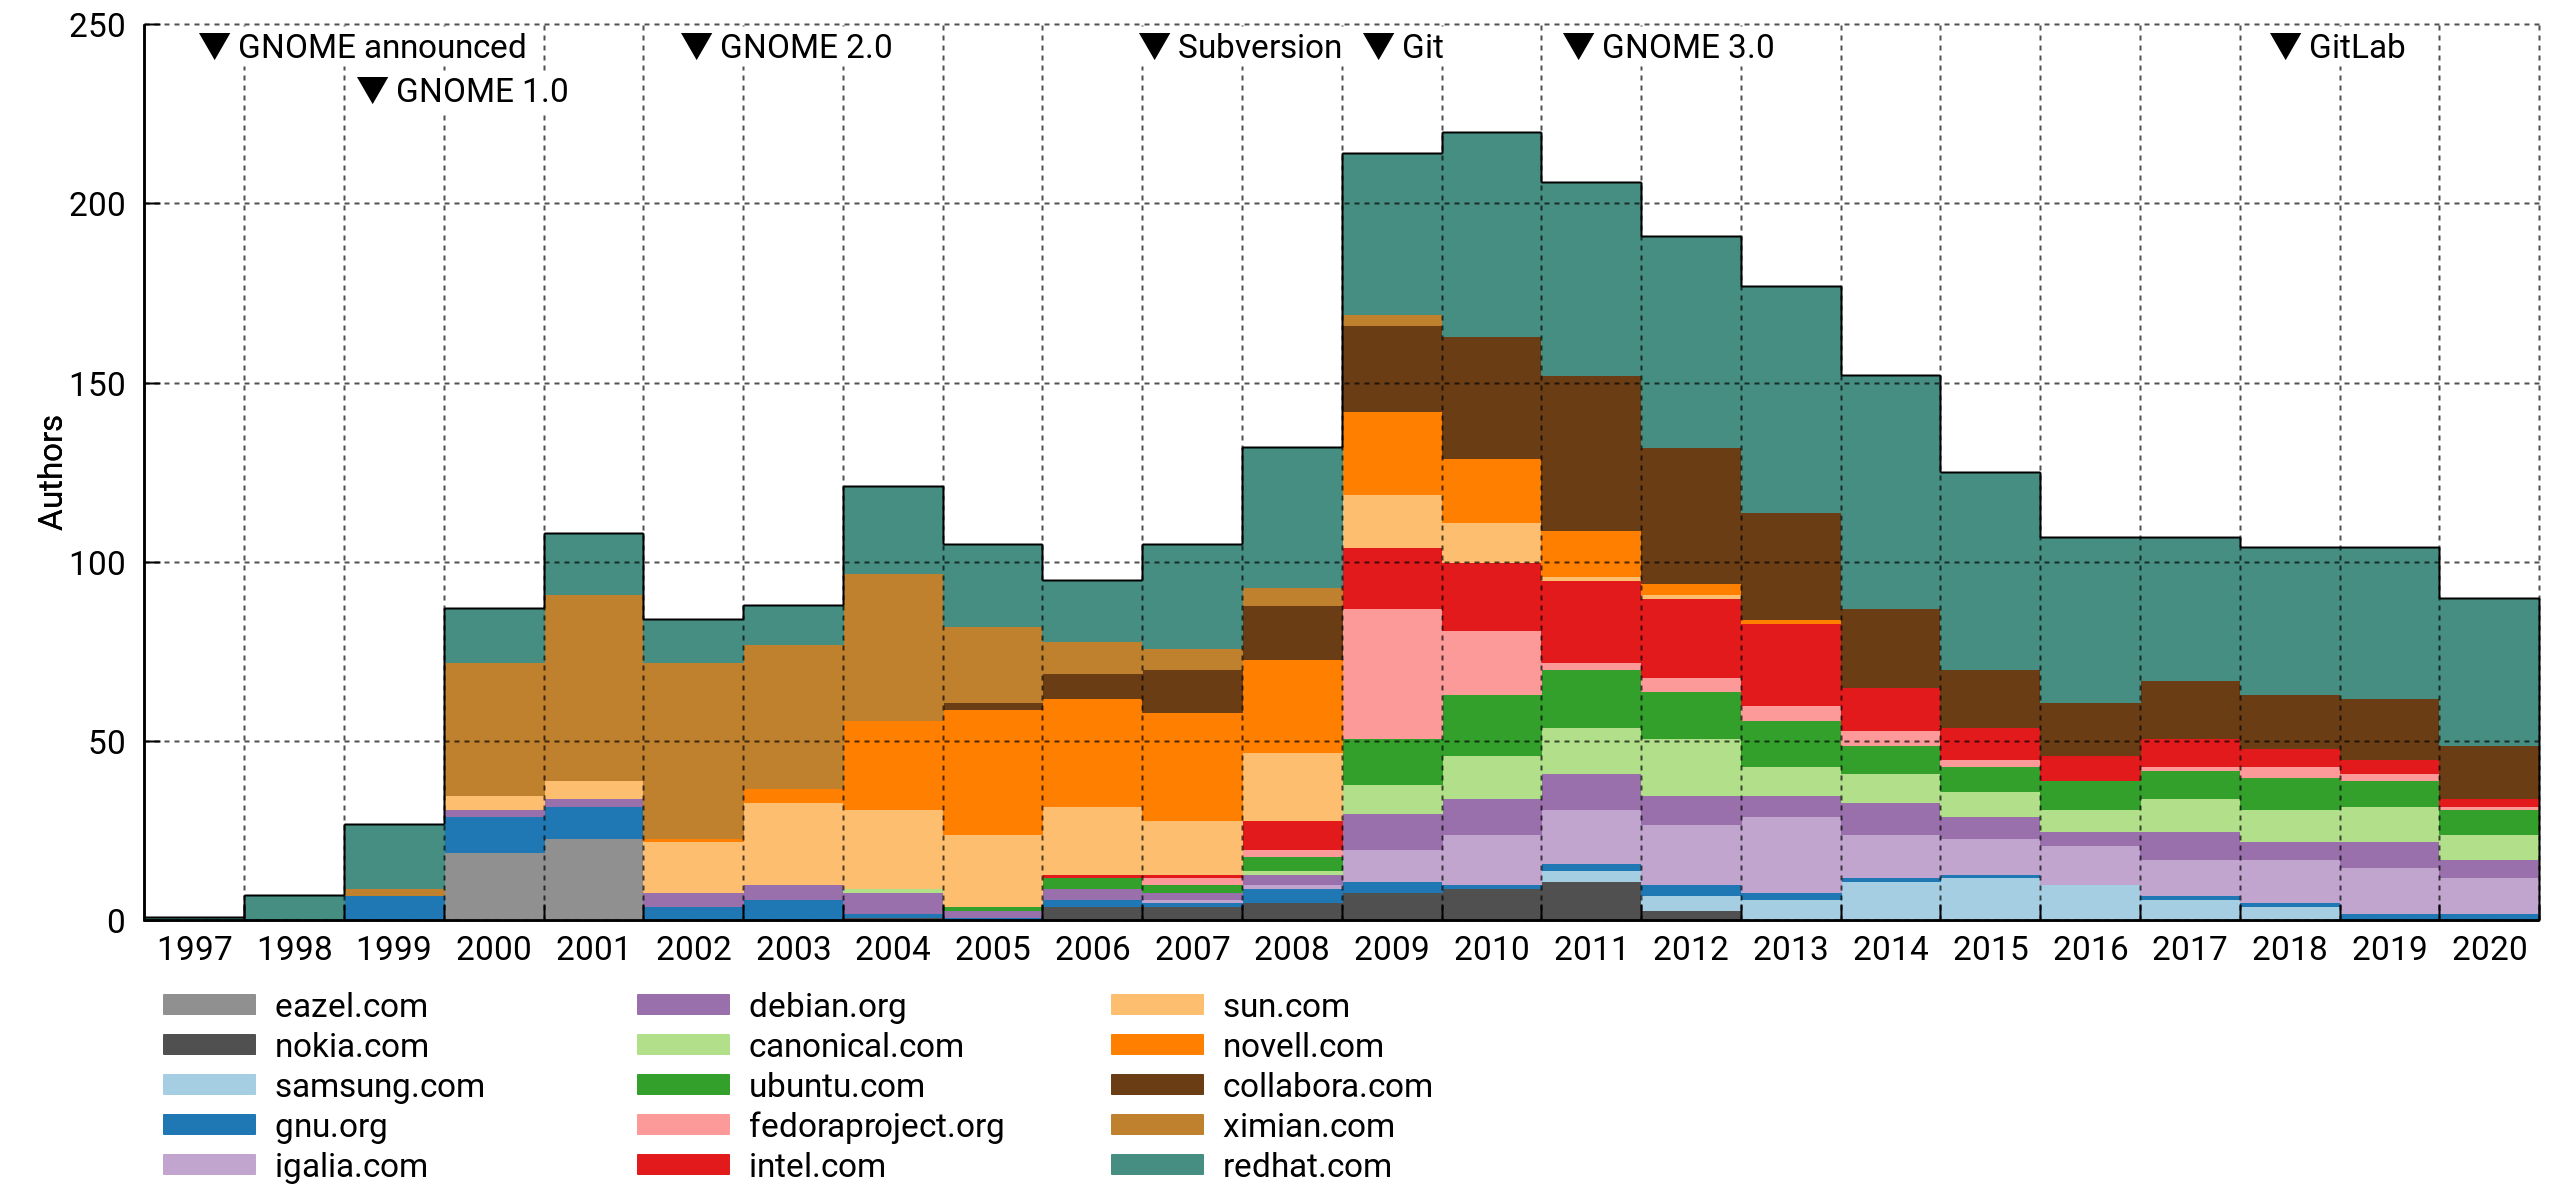
Above, the top 15 affiliations of active contributors. I've excluded personal accounts. This is pretty flawed (details below), but interesting nonetheless. For what it's worth, it mostly lines up with my memory of things.
The pattern tracks well with the total despite only capturing a minority portion of it. I think this means that paid and unpaid contributions are driven by the same underlying trends, or that there's a lot of the former hiding in the latter.
Commit count
By generation
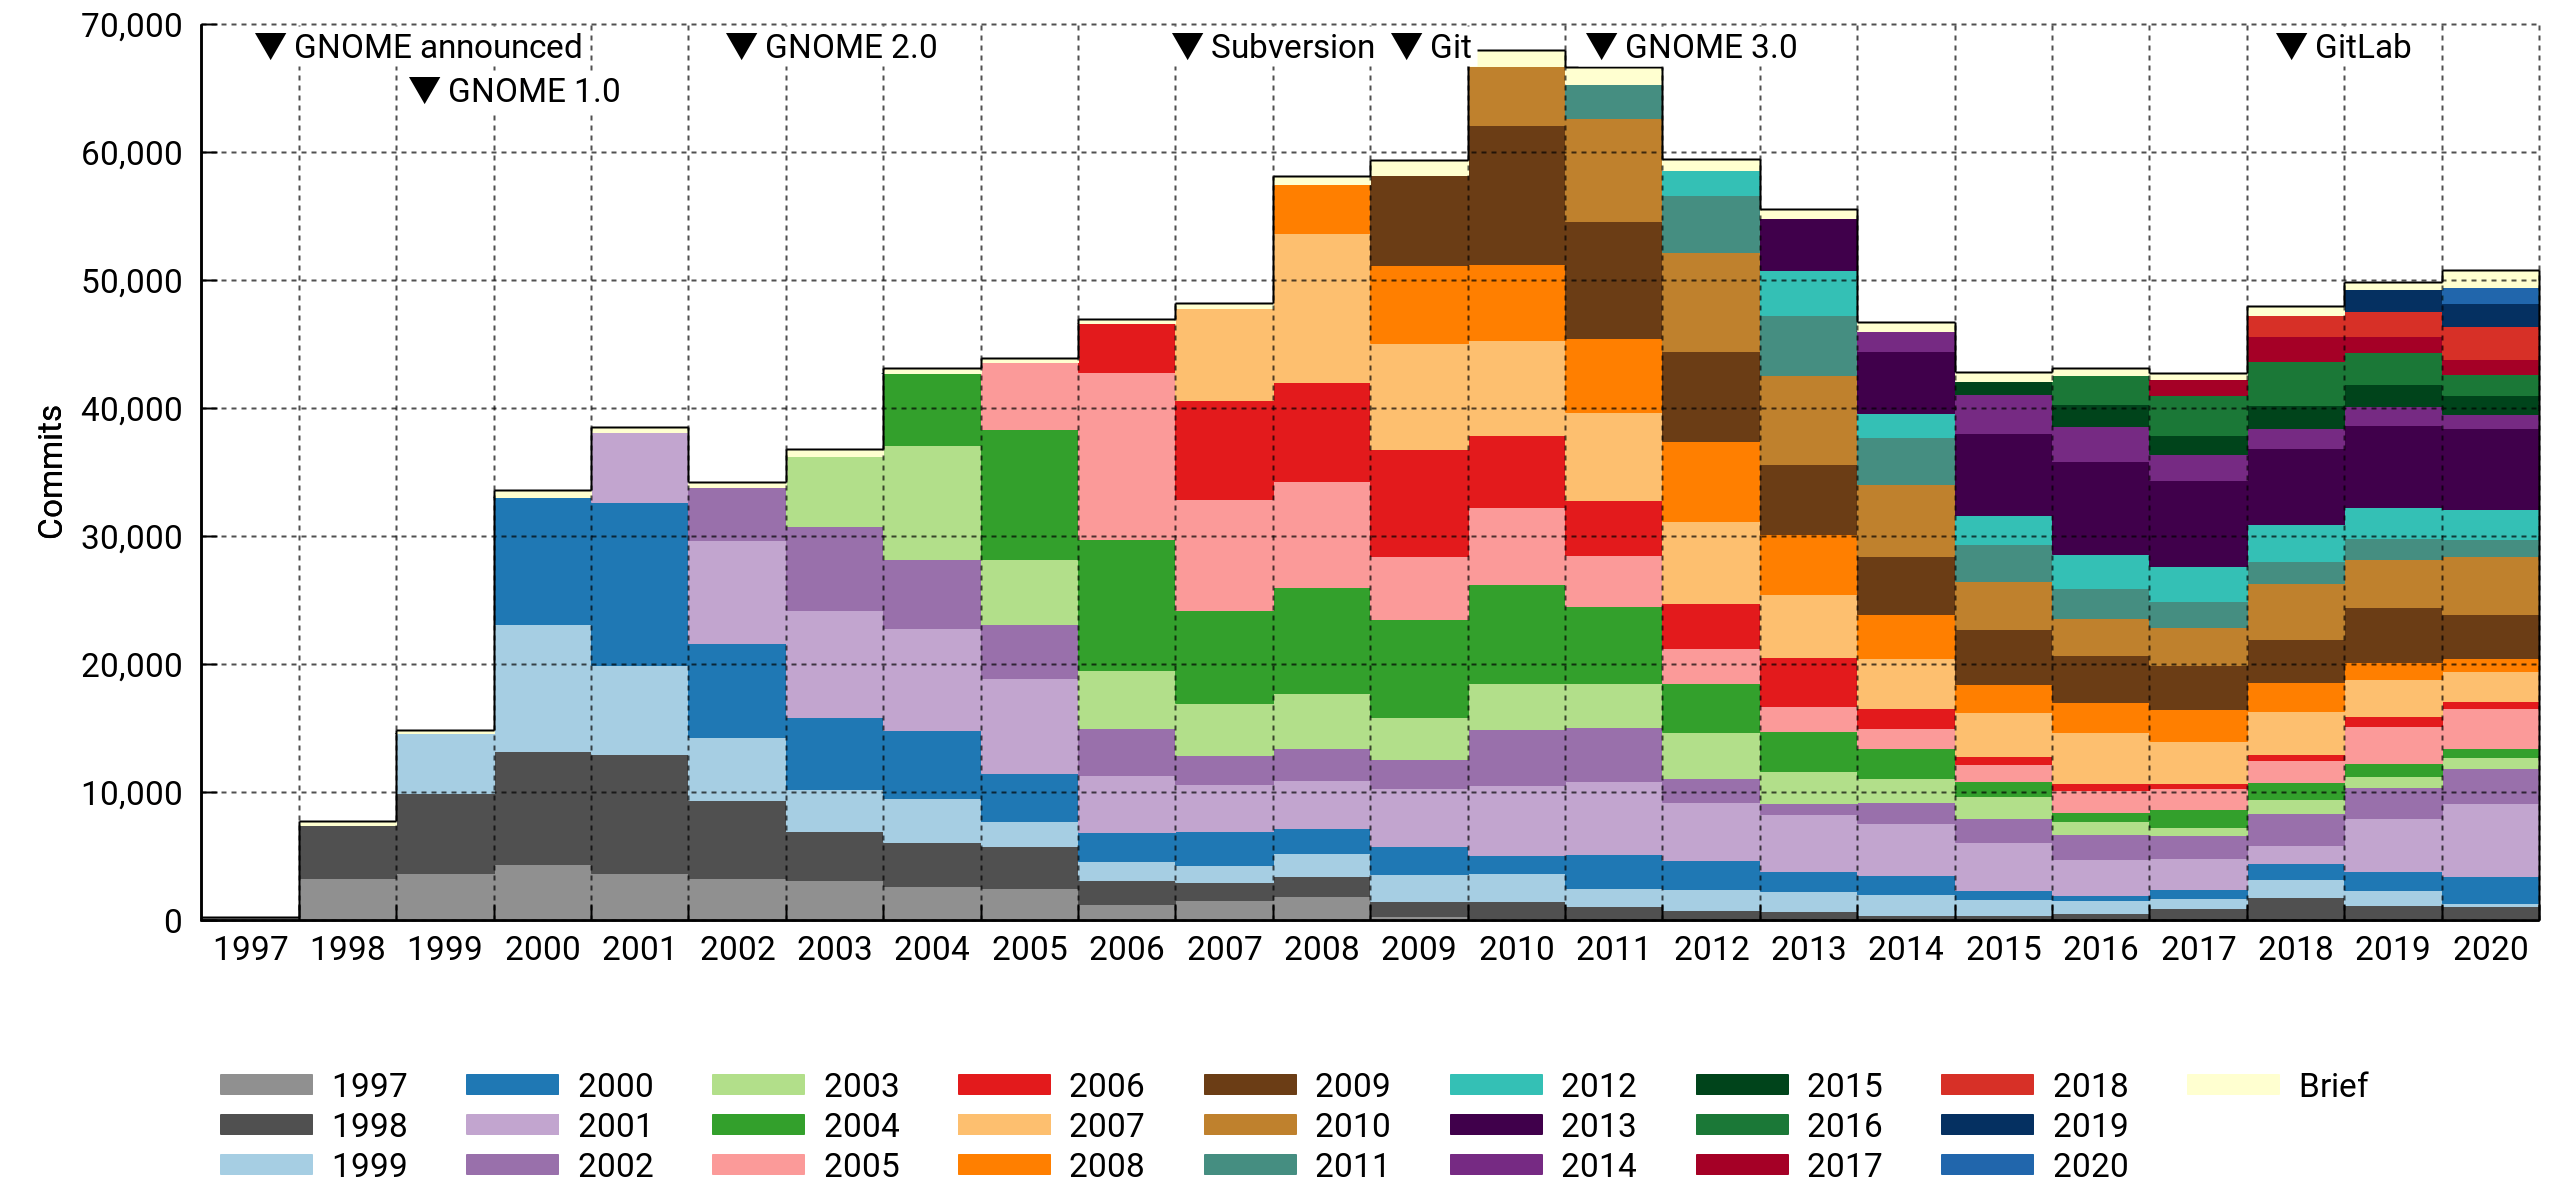
Here I'm counting the number of commits per year in the various cohorts.
At first glance, this looks much less dire. However, note how newcomers are having a smaller impact, especially from 2014 on. And the 2018-2020 bounce is entirely due to a handful of veterans making a comeback.
Half the commits in 2020 were made by contributors who've been with the project for ten years or more. Also noteworthy, drive-by commits are a vanishingly small portion of the total.
By affiliation
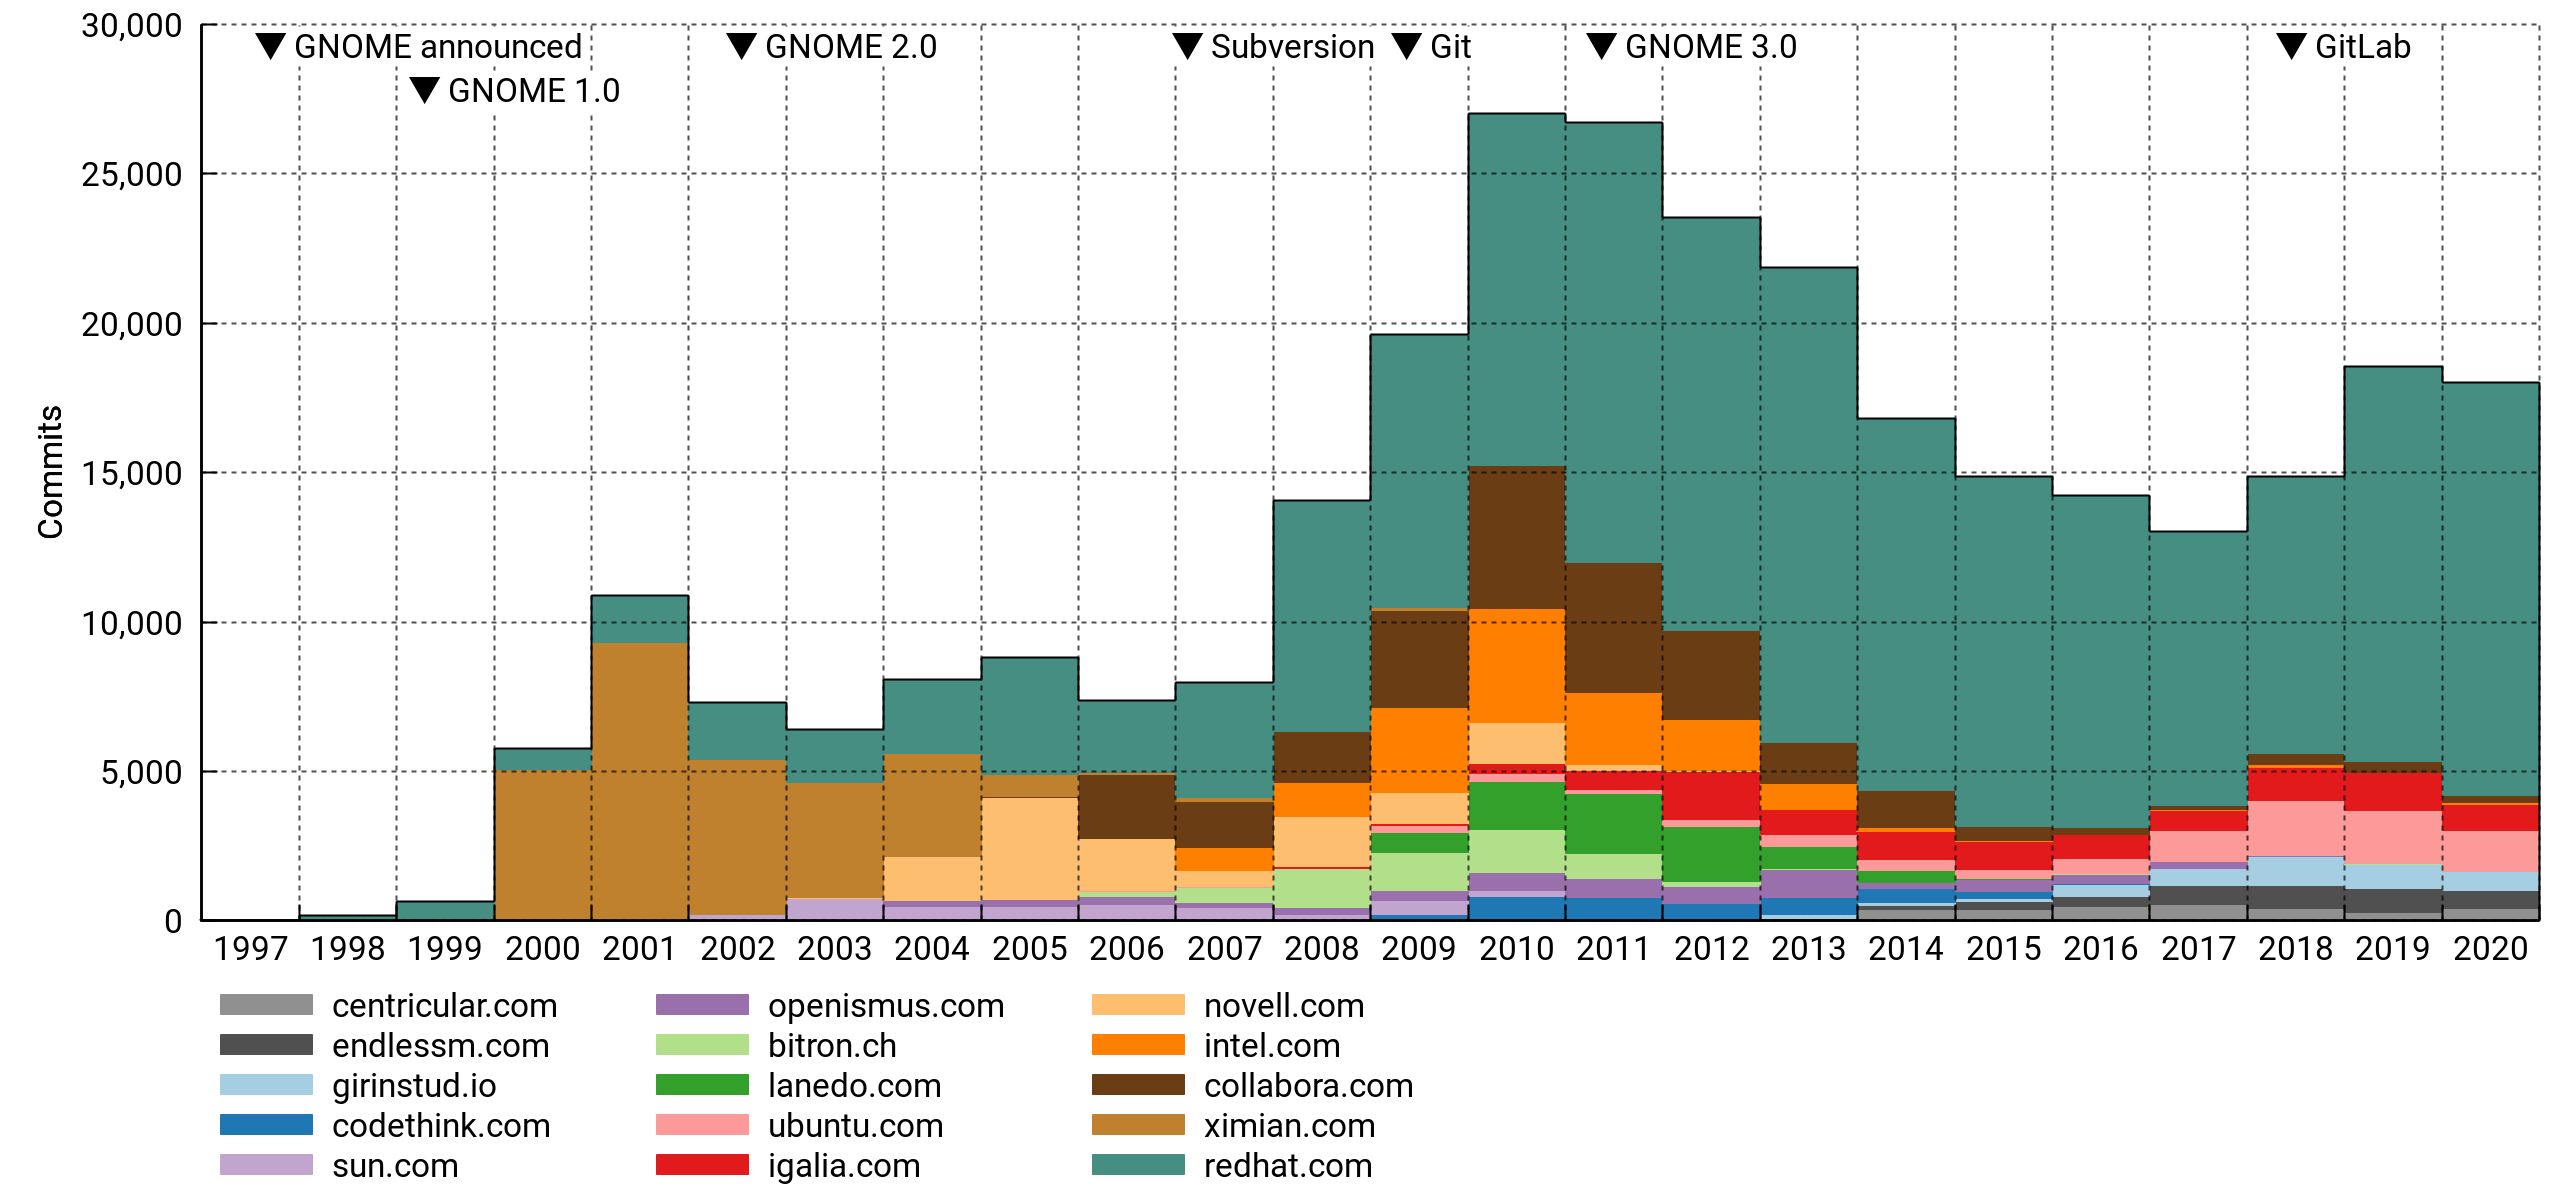
Top 15 affiliations again, but now ordered by commit counts. It's safe to say that GNOME is dependent on paid developers in a big way. Specifically, and to no one's surprise, it leans heavily on Red Hat.
General observations
A few observations can be made with confidence:
- By F/OSS standards, the project is not unhealthy. It has hundreds of experienced and first-time contributors every year. It is well-organized and arguably well-funded compared to its peers. But:
- Every metric has the project peaking around 2010.
- A diminishing number of veterans is doing an increasing share of the work.
- Although recruitment is stable, newcomers don't seem to be hitting their stride in terms of commits.
- Corporate sponsorship is probably necessary to keep the project going, but the field of sponsors has kept thinning.
I think GNOME is addressing the risk factors competently by modernizing infrastructure (GitLab, Discourse). This has obvious value even in the absence of quantifiable results, but it'll be interesting to see if the effect can be measured over the next couple of years.
Diminished enthusiasm may also be due to there being fewer ways for a new contributor to make their mark or assume a role of responsibility. GNOME has become more conservative, certainly much more so than it was a decade ago in the run-up to GNOME 3. The rationale and phrasing in the announcement of the new versioning scheme (e.g. "Radical technological and design changes are too disruptive for maintainers, users, and developers") seems indicative of this trend1.
Notes on methodology
So what's wrong with this analysis? If you're so inclined, you can find the details under the next couple of subheadings and pass harsh, harsh judgement.
I've set the unscientific rigor bar high enough to hopefully yield something useful, but low enough that I could do it in my spare time and not get stuck in the dreaded state commonly known as "90% done".
Module selection
I aggregated data from 189 Git repositories. The vast majority of these are hosted on gnome.org, with a handful from freedesktop.org and github.com. Commits are uniquely identified by their commit hash, meaning trivial duplicates are counted only once.
GNOME has always been a decentralized, big-tent project, so it's not obvious how to delineate it. I've tried to be fair by including most of the repositories from a full meta-gnome-desktop jhbuild, including fairly low-level dependencies like Cairo, Pango, and Pipewire, as well as past, present and would-be flagship applications under the GNOME umbrella. Documentation and infrastructure is represented, as are many archived projects (e.g. ORBit2, Bonobo, Sabayon, GAL).
I was a little uncertain about what to do with X.Org and Wayland. In the end I decided to include the latter, but not the former, since Wayland has close ties to GNOME (it even references GTK+ in its TODO file), while X.Org has its roots in the much older XFree86.
Mono is another project I resisted including; its development was tangential to GNOME proper, diverging completely in the most recent decade. However, I did include GtkSharp and several GNOME-hosted C# applications common on desktops in the 2005-2010 time frame.
Since I haven't established hard criteria for module selection, it's subject to various biases. Older code is probably underrepresented, since providers of important functionality were more loosely attached to the project early on (e.g. GNOME Online Accounts and Telepathy got pulled in, should I have included Gaim or Pidgin too? How about XChat?).
Anyway, the list isn't terrible, but there's room for improvement.
Contributor identities
Similar studies often identify contributors by their e-mail addresses. I used full author names instead, since there's good reason to think they're more stable over a 20-year time span. We're fairly consistent in spelling our own names, and we change them rarely (often never). On the other hand, e-mail addresses come and go with different hosting arrangements, employers, etc.
An added challenge with this approach is that sometimes different people have the exact same name. In practice, I'm not aware of any instances of this happening in GNOME. It seems to be rare enough that I doubt it'd introduce significant error in most projects.
I should add here that the drive-by cohort depends on a fair amount of hindsight (you never know when someone might come back with more contributions, but the likelihood drops off quickly as time passes). This means the cohorts for 2020 are preliminary. They'll be a lot more accurate with another run late next year.
Domain names
I'm using e-mail domain names as a proxy for organizations in some of the graphs. This is a notoriously unreliable approach for at least three reasons:
- Contributors often use personal e-mail addresses for paid work, leading to significant undercounting in general.
- Specific companies may require their employees (or ask them nicely) to use company e-mail for collaboration. Out of the listed companies, I know of at least one that definitely did this. However, there are many that don't, and these will be comparatively less well represented.
- The mapping between DNS and organizations isn't one-to-one. A company may operate under multiple names or TLDs (e.g.
.co.ukand.com).
Despite these weaknesses, it's common to slice the data this way. It's difficult to do better without access to semi-closed data troves, and depending on your views on privacy and ability to handle PII safely, it might not be something you'd want to get into anyway. But I bet you'd be well-positioned for it if you were, say, the corporate owner of both LinkedIn and GitHub.
When grouping by organization, the goal is to get an idea of which outside entities are sponsoring contributions. Therefore, I've filtered out addresses from the biggest mass e-mail providers like @gmail.com and project-centric providers of personal accounts (e.g. @gnome.org, @gtk.org).
I took the liberty of reassigning the personal domains of a few extra prolific authors who would've otherwise showed up as individual organizations. Since there's no way I'm doing it for everyone, this introduces some bias. The full details are in the project's metadata file (see: code).
Version control systems
Changeovers in version control systems divide GNOME's VCS history into three eras with noticeable discontinuities between them.
Before 1998: Dark ages
In the Bad Old Days, Free Software would often use plain RCS or no version control at all. I have basically no data for this era: The GIMP, being the ur-project from which GTK+ spawned, was imported to CVS in November 1997, but by then it had already been in development since at least mid-1995. It may be possible to reconstruct it somewhat by diffing old tarball releases. Linux historians have done this for the kernel.
1998-2009: Centralized
GNOME projects were mostly maintained in CVS from 1998 on, with infrastructure provided by Red Hat. A few companies (e.g. Ximian) maintained projects in their own CVS instances that were later consolidated under GNOME.
CVS had many limitations. For instance, history edits and other complex operations — like, oh, renaming a file — fell under the technical term "surgery" and the auspices of a competent server-side surgeon. The centralization of accounts also fostered a workflow where outside contributions were committed without any formal authorship metadata. This shows up in my plots as undercounting of active contributors.
GNOME moved to Subversion in 2007. While technically superior to CVS, it was still a centralized file-tracking solution and didn't change the workflow very much.
2009-present: Decentralized
Subversion didn't last long; 2009 saw the move to Git. The active contributor count shot up that year, and part of this is due to more accurate authorship metadata. I think there's a case to be made that involvement had been gradually increasing even before Git's introduction, but moving to a proper DVCS certainly didn't hurt.
Since a lot of contributors moved off @gnome.org in this switch, and affiliations are assigned based on e-mail addresses, the discontinuity is most visible in these graphs.
I expected the improved history management (and reduced commit anxiety) in Git's wake would also have produced more numerous commits. The data doesn't really bear this out — the count did increase the following year, but it's hard to distinguish from the general momentum leading up to GNOME 3.
Code
I wrote a small program to automate this somewhat. It's nothing much, but at least it can serve as a humorous example of what can happen when your reach starts to exceed awk's grasp and it occurs to you that hey, I should use Rust for scripting!
CSV files
I've uploaded the report data used in the charts in CSV format. It should be fairly self-explanatory and can be imported directly in LibreOffice (UTF-8, comma-separated).
Disclaimer
According to a quick tally, I've done enough work on GNOME projects for a place in the top 3% of committers2. That's decent enough, but the lion's share of it is, shall we say, not very recent. I don't presume to speak for the project or, in fact, any group at all.
1 Not necessarily a bad thing. There's something to be said for not constantly yanking the rug out from beneath everyone's feet.
2 Humblebrag aside, I'd like to emphasize that since there are so many small contributions ("long tail"), it's easy to end up in a high percentile even with a modest commitment.
Alpha Releases of openSUSE Leap 15.3 are Available for Testing
Alpha images of openSUSE’s next stable fixed release openSUSE Leap 15.3 are now available for testing at software.opensuse.org/distributions/testing.
Release Manager Luboš Kocman announced the availability of the Alpha images yesterday in an email to developers on the openSUSE Factory mailing list.
“I’d like to inform you that you can already find openSUSE Leap 15.3 testing images on software.opensuse.org,” Kocman wrote. “You may notice that Installation images for all arches can be now found in the Installation tabs, and the tab Ports no longer exist. This new structure corresponds with the way how we build images in 15.3.”
openSUSE Leap 15.3 is based on the Jump concept that was developed over the past several months, which makes it and SUSE Linux Enterprise compatible. openSUSE Leap aligns with SLE and its Service Packs (SP), which keeps the system updated, stable and patched. Upon General Availability of this release, there will be a whole new level of harmony between Leap 15.3 and SUSE Linux Enterprise 15 SP3.
The end of CentOS 8 announced last week aligns well for those users who are ready to move away from RedHat’s community enterprise release to a release model with openSUSE Leap, which has a life cycle of about 18 months of maintenance and security updates per minor release.
The point release of Leap 15.3 enters its Alpha build phase. During the Alpha phase, regular Alpha images will be built on a rolling basis until mid-February, when it is scheduled to transition to a Beta build phase. The beta submission deadline is February 12. The Beta phase has a similar model until the General Availability of the release; at GA, the rolling builds stop and Leap transitions into a maintenance and security update phase.
“Any update request to existing packages should be simply submitted against openSUSE:Leap:15.3 and OBS will determine where to redirect the request either to SLE or openSUSE Backports,” the email states. “Please note that new packages need to be currently submitted against openSUSE:Backports:SLE-15-SP3.opensuse-factory@ We know it’s inconvenient and we’ll work with the Autobuild team to make it a default destination place for any new package submission for openSUSE Leap 15.3.”
Distro hoppers, hobbyists, users and tech enthusiasts can download the current builds and help test the releases at software.opensuse.org/distributions/testing.
Users of openSUSE Leap 15.1 have until January of 2021 before it reaches its End of Live and users need to update to Leap 15.2. The Public Availability of Leap 15.3 is scheduled to be released in July, 2021, according to the releases roadmap Users of Leap 15.2 will need to update to the newer version within six months of the release of Leap 15.3.