
Database monitoring
While we monitor basic functionality of our MariaDB (running as Galera-Cluster) and PostgreSQL databases since years, we missed a way to get an easy overview of what's really happening within our databases in production. Especially peaks, that slow down the response times, are not so easy to detect.
That's why we set up our own Grafana instance. The dashboard is public and allows everyone to have a look at:
- The PostgreSQL cluster behind download.opensuse.org. Around 230 average and up to 500 queries per second are not that bad...
- The Galera cluster behind the opensuse.org wikis and other MariaDB driven applications like Matomo or Etherpad. One interesting detail here is - for example - the archiving job of Matomo, triggering some peaks every hour.
- The Elasticsearch cluster behind the wiki search. Here we have a relatively high JVM memory foodprint. Something to look at...
Both: the Grafana dashboard and the databases are driving big parts of the openSUSE infrastructure. And while everything is still up and running, we would love to hear from experts how we could improve. If you are an expert or know someone, feel free to contact us via Email or in our [IRC channel](irc://irc.opensuse.org/#opensuse-admin).

About me

 knocte
Xamarin forks and whatnots
- In Linux(GTK), cold storage mode when pairing was broken, because the absence of internet connection was not being detected properly. The bug was in a 3rd-party nuget library we were using: Xam.Plugin.Connectivity. But we couldn't migrate to Xamarin.Essentials for this feature because Xamarin.Essentials lacks support for some platforms that we already supported (not officially, but we know geewallet worked on them even if we haven't released binaries/packages for all of them yet). The solution? We forked Xamarin.Essentials to include support for these platforms (macOS and Linux), fixed the bug in our fork, and published our fork in nuget under the name `DotNetEssentials`. Whenever Xamarin.Essentials starts supporting these platforms, we will stop using our fork.
- The clipboard functionality in geewallet depended on another 3rd-party nuget library: Xamarin.Plugins.Clipboard. The GTK bits of this were actually contributed by me to their github repository as a Pull Request some time ago, so we just packaged the same code to include it in our new DotNetEssentials fork. One dependency less to care about!
- Xamarin.Forms had a strange bug that caused some buttons sometimes to not be re-enabled. This bug has been fixed by one of our developers and its fix was included in the new pre-release of Xamarin.Forms 4.5, so we have upgraded geewallet to use this new version instead of v4.3.

Highlights of YaST Development Sprint 93
The Contents
Lately, the YaST team has been quite busy fixing bugs and finishing some features for the upcoming (open)SUSE releases. Although we did quite some things, in this report we will have a closer look at just a few topics:
- A feature to search for packages across all SLE modules has arrived to YaST.
- Improved support for S390 systems in the network module.
- YaST command-line interface now returns a proper exit-code.
- Added progress feedback to the Expert Partitioner.
- Partial support for Bitlocker and, as a lesson learned from that, a new warning about resizing empty partitions.
The Online Search Feature Comes to YaST
As you already know, starting in version 15, SUSE Linux follows a modular approach. Apart from the base products, the packages are spread through a set of different modules that the user can enable if needed (Basesystem module, Desktop Applications Module, Server Applications Module, Development Tools Module, you name it).
In this situation, you may want to install a package, but you do not know which module contains such a package. As YaST only knows the data of those packages included in your registered modules, you will have to do a manual search.
Fortunately, zypper introduced a new search-packages command some time
ago that allows to find out where a given package is. And now it is time
to bring this feature to YaST.
For technical reasons, this online search feature cannot be implemented within the package manager, so it is available via the Extra menu.

YaST offers a simple way to search for the package you want across all available modules and extensions, no matter whether they are registered or not. And, if you find the package you want, it will ask you about activating the needed module/extension right away so you can finally install the package.

If you want to see this feature in action, check out the demonstration video.
Like any other new YaST feature, we are looking forward to your feedback.
Fixing and Improving Network Support for S390 Systems
We have mentioned a lot of times that we recently refactored the Network module, fixing some long-standing bugs and preparing the code for the future. However, as a result, we introduced a few new bugs too. One of those bugs was dropping, by accident, the network devices activation dialog for S390 systems. Thus, during this sprint, we re-introduced the dialog and, what is more, we did a few improvements as the old one was pretty tricky. Let’s have a look at them.
The first obvious change is that the overview shows only one line per each s390 group device, instead of using one row per each channel as the old did.

Moreover, the overview will be updated after the activation, displaying the Linux device that corresponds to the just activated device.

Last but not least, we have improved the error reporting too. Now, when the activation fails, YaST will give more details in order to help the user to solve the problem.

Fixing the CLI
YaST command-line interface is a rather unknown feature, although it has been there since ever. Recently, we got some bug reports about its exit codes. We discovered that, due to a technical limitation of our internal API, it always returned a non-zero exit code on any command that was just reading values but not writing anything. Fortunately, we were able to fix the problem and, by the way, we improved the behavior in several situations where, although the exit code was non-zero, YaST did not give any feedback. Now that the CLI works again, it is maybe time to give it a try, especially if it is the first time you hear about it.
Adding Progress Feedback to the Partitioner
The Expert Partitioner is a very powerful tool. It allows you to perform very complex configurations in your storage devices. At every time you can check the changes you have been doing in your devices by using the Installation Summary option on the left bar. All those changes will not be applied on the system until you confirm them by clicking the Next button. But once you confirm the changes, the Expert Partitioner simply closes without giving feedback about the progress of the changes being performed.
Actually, this is a kind of regression after migrating YaST to its new Storage Stack (a.k.a. storage-ng). The old Partitioner had a final step which did inform the user about the progress of the changes. That dialog has been brought back, allowing you to be aware of what is happening once you decide to apply the configuration. This progress dialog will be available in SLE 15 SP2, openSUSE 15.2 and, of course, openSUSE Tumbleweed.

Recognizing Bitlocker Partitions
Bitlocker is a filesystem encrypting technology that comes included with Windows. Until the previous sprint, YaST was not able to recognize that a given partition was encrypted with such technology.
As a consequence, the automatic partitioning proposal of the (open)SUSE installer would happily delete any partition encrypted with Bitlocker to reclaim its space, even for users that had specified they wanted to keep Windows untouched. Moreover, YaST would allow users to resize such partitions using the Expert Partitioner without any warning (more about that below).
All that is fixed. Now Bitlocker partitions are correctly detected and displayed as such in the Partitioner, which will not allow users to resize them, explaining that such operation is not supported. And the installer’s Guided Setup will consider those partitions to be part of a Windows installation for all matters.
Beware of Empty Partitions
As explained before, whenever YaST is unable to recognize the content of a partition or a disk, it considers such device to be empty. Although that’s not longer the case for Bitlocker devices, there are many more technologies out there (and more to come). So users should not blindly trust that a partition displayed as empty in the YaST Partitioner can actually be resized safely.
In order to prevent data loss, in the future YaST will inform the user about a potential problem when trying to resize a partition that looks empty.

Hack Week is coming…
That special time of the year is already around the corner. Christmas? No, Hack Week! From February 10 to February 14 we will be celebrating the 19th Hack Week at SUSE. The theme of this edition is Simplify, Modernize & Accelerate. If you are curious about the projects that we are considering, have a look at SUSE Hack Week’s Page. Bear in mind that the event is not limited to SUSE employees, so if you are interested in any project, do not hesitate to join us.
 Member
openSUSE Tumbleweed – Review of the week 2020/06
Dear Tumbleweed users and hackers,
This week I canceled more snapshots than I released – only 2 snapshots have been sent out (0201 and 0205). Feels quite bad, but on the other hand, I’m glad we have openQA protecting you, the openSUSE Tumbleweed users, from those issues. As the -factory mailing list shows this week, despite all the testing, we can’t ever predict all the special cases found on our users’ machines.
So, what was happening this week:
- Qt 5.14.1
- SQLite 3.31.1
- Virtualbox 6.1.2
- Mesa 19.3.3
- chkconfig moved from aaa_base to insserv-compat (if you have some legacy init scripts around from a package that does not specify this dependency, please file a bug)
- netcfg – the topic on the mailing list: /etc/services, /etc/protocols and /etc/ethers moved to /usr/etc. Two major sources for errors on user machines have been identified:
- users ignoring *.rpmnew files and nor merging the config changes from packages into their own config (in this specific case for /etc/nsswitch.conf)
- Some people seem to have removed even patterns-base-minimal_base, which resulted in those users not having libnss_usrfiles2 being pulled in. As a result, even if the config file was maintained/corrected, the services file could not be found.
- Both issues are being attempted to be resolved: libnss_usrfiles2 is not only required by the pattern, but also by netcfg (netcfg sets the default config, so we thought this is the best point) and aaa_base tries to correct /etc/nsswitch.conf (but that results in ursfiles being added again, even if the user would have explicitly removed it)
I hope we could help everybody recover their system in a proper way by now, and that the future goal – having as few as possible files in /etc config from the distribution – is something you can follow as a rationale. Besides that, the stagings are still filled with these things:
- KDE Applications 19.12.2
- KDE Plasma 5.18
- Linux Kernel 5.5.1
- Python 3.8 (salt, hopefully going to be unblocking soon)
- Removal of python 2
- glibc 2.31
- GNU make 4.3
- libcap 2.30: breaks fakeroot and drpm
- RPM: change of the database format to ndb
- elfutils: adding support for debuginfod

Reaching the login prompt in 2.5 seconds - a journey
Not only in development environments it’s very handy to have a quick turnaround time, which can include reboots. Especially for transactional systems where changes to the system only take effect after booting into the new state, this can have a significant impact.
So let’s see what can be done. Remember: “The difference between screwing around and science is writing it down”!
Starting point
Starting point for this experiment is a VM (KVM), 4GiB RAM, 2 CPU cores, no EFI. Tumbleweed was installed as Server (textmode) with just defaults.
# systemd-analyze
Startup finished in 1.913s (kernel) + 2.041s (initrd) + 22.104s (userspace) = 25.958s
Almost 26 seconds just to get to the login prompt of a pretty minimal system, that’s not great. What can we do?
Low-hanging fruit
systemd-analyze blame tells us what the worst offenders are:
# systemd-analyze blame --no-pager
18.769s btrfsmaintenance-refresh.service
17.027s wicked.service
 3.170s plymouth-quit.service
 3.170s plymouth-quit-wait.service
 1.078s postfix.service
 1.023s apparmor.service
  839ms systemd-udev-settle.service
  601ms systemd-logind.service
  532ms firewalld.service
btrfsmaintenance-refresh.service is a bit special: It calls systemctl during execution
to enable/disable and start/stop the btrfs-*.timer units. Those depend on time-sync.target, which itself needs network.service through chronyd.service.
wicked.service is the next item on the list. Before the unit is considered active, it tries
to fully configure and setup all configured interfaces, which includes DHCPv4 and v6 by default.
This is directly used as state for network.service and thus network.target.
There is no distinction between network.service and network-online.target by wicked.
To make the bootup quicker, switching to NetworkManager is an option,
which interprets network.service in a more async way and thus is much quicker to reach the active state.
Note that with DHCP, switching between wicked and NM might result in a different IP address!
# zypper install NetworkManager
# systemctl disable wicked
Removed /etc/systemd/system/multi-user.target.wants/wicked.service.
Removed /etc/systemd/system/network.service.
Removed /etc/systemd/system/network-online.target.wants/wicked.service.
Removed /etc/systemd/system/dbus-org.opensuse.Network.Nanny.service.
Removed /etc/systemd/system/dbus-org.opensuse.Network.AUTO4.service.
Removed /etc/systemd/system/dbus-org.opensuse.Network.DHCP4.service.
Removed /etc/systemd/system/dbus-org.opensuse.Network.DHCP6.service.
# systemctl enable NetworkManager
Created symlink /etc/systemd/system/network.service → /usr/lib/systemd/system/NetworkManager.service.
Let’s also remove plymouth - except for eyecandy it does not provide any useful features.
# zypper rm -u plymouth
Reading installed packages...
Resolving package dependencies...

The following 23 packages are going to be REMOVED:
  gnu-unifont-bitmap-fonts libdatrie1 libdrm2 libfribidi0 libgraphite2-3 libharfbuzz0 libpango-1_0-0 libply5 libply-boot-client5 libply-splash-core5 libply-splash-graphics5 libthai0 libthai-data libXft2 plymouth plymouth-branding-openSUSE
  plymouth-dracut plymouth-plugin-label plymouth-plugin-label-ft plymouth-plugin-two-step plymouth-scripts plymouth-theme-bgrt plymouth-theme-spinner

23 packages to remove.
After the operation, 4.8 MiB will be freed.
Continue? [y/n/v/...? shows all options] (y):
...
Plymouth is still started in the initrd, but as it’s not part of the root filesystem anymore
it’s not stopped by plymouth-quit.service. This combination would result in a broken boot!
Normally, the initrd should be regenerated automatically if anything relevant changes,
but for removals that’s not implemented (boo#966057).
# mkinitrd
...
# reboot
...
Let’s see how much time this saved:
# systemd-analyze
Startup finished in 1.675s (kernel) + 2.066s (initrd) + 2.696s (userspace) = 6.438s
Over 19s saved, that’s quite a lot already!
# systemd-analyze blame --no-pager
1.411s btrfsmaintenance-refresh.service
893ms systemd-logind.service
849ms apparmor.service
Now the biggest contributor to the bootup time is btrfsmaintenance-refresh.service. As it is not quite clear how much value it provides with a recent kernel (boo#1063638#c106), let’s just remove it.
# zypper rm -u btrfsmaintenance
# reboot
...
# systemd-analyze
Startup finished in 1.700s (kernel) + 2.010s (initrd) + 2.367s (userspace) = 6.079s
multi-user.target reached after 2.347s in userspace
That’s a bit better again.
# systemd-analyze blame --no-pager
873ms apparmor.service
550ms systemd-logind.service
504ms postfix.service
405ms firewalld.service
Both apparmor and systemd-logind.service are needed, so no low hanging fruit remain.
Accelerating early boot
There’s still one part remaining in the boot time equation we can completely eliminate!
Startup finished in 1.700s (kernel) + 2.010s (initrd) + 2.367s (userspace) = 6.079s
                                      ^^^^^^^^^^^^^^^
So, what exactly is the initrd for anyway? In the vast majority of installations, it’s very clearly defined: Mount the real root filesystem and switch to it. Depending on the configuration, this can range from simple (local ext4) to very complex (encrypted block device over the network accepting the password over ssh). Additionally, the kernel binary as loaded by the bootloader is very small, so does not include drivers for every system. Those are part of modules included in the initrd.
Turns out, in simple cases (the majority of VM guest systems) we can boot without initrd just fine. The current setup is not tuned for this setup though, so a few adjustments are required.
Drivers for mounting / without loading modules
The kernel needs drivers for both the virtual devices connecting to the storage device and for the
filesystem on it.
The former part is dealt with by using the kernel-kvmsmall flavor, but unfortunately it does not
have btrfs built-in.
Fortunately, this is easy to fix by rebuilding the kernel with a custom config. By putting
CONFIG_FS_BTRFS=y (and some other required options) into config.addon.tar.bz2 next to the standard
openSUSE kernel in OBS, it spits out an .rpm with a working binary.
# zypper ar obs://devel:kubic:quickboot/ devel:kubic:quickboot
# zypper in --from devel:kubic:quickboot kernel-kvmsmall
kernel-kvmsmall does not have all kernel features enabled (not even as modules), which means that in
some cases it might be necessary to apply the changes on kernel-default instead, which has a complete
set of modules.
Mounting root by UUID
However, if you now reboot and comment out the initrd command in the grub config, you will notice
that the boot fails as the kernel is unable to find the root device. This is because by default,
the GRUB configuration uses root=UUID=deadbeef-1234... as parameter. This is interpreted by the
initrd in userspace. To be exact, when a block device is recognized by the kernel, Udev reacts by
reading the filesystem UUID and creating a link in /dev/disk/by-uuid/... which is then used as root device.
Without an initrd, that does not happen and the kernel is unable to continue.
Workaround here is to set GRUB_DISABLE_LINUX_UUID=true in /etc/default/grub. This means that device paths
like root=/dev/vda2 are used, which can lead to issues when changing the disk layout or order.
By additionally setting GRUB_DISABLE_LINUX_PARTUUID=false, it uses root=PARTUUID=cafebabe-4554... which is
supported by the kernel as well, but is more reliable.
# echo GRUB_DISABLE_LINUX_UUID=true >> /etc/default/grub
# echo GRUB_DISABLE_LINUX_PARTUUID=false >> /etc/default/grub
# grub2-mkconfig -o /boot/grub2/grub.cfg
# reboot
... (comment out the initrd call in grub, after pressing "e" in the menu and prepending "#" in the last line)
# systemd-analyze
Startup finished in 1.778s (kernel) + 2.725s (userspace) = 4.504s
Almost a third shaved off again, awesome!
However, there are now error messages shown in the console, which is not that awesome.
Something about systemd-gpt-auto-generator and systemd-remount-fs being unable to find
the root device - just like the kernel earlier. The cause is actually the same - /etc/fstab
still contains the mounts in UUID= format and those errors happen before systemd-udevd.service
is started and udev has settled.
No matter how systemd is configured, it’s not possible to get rid of the first error - generators run before any units. So we have to start udev even before that - before systemd!
But first, a quick detour.
Getting transactional
Let’s take a look at how MicroOS is doing. As the name already says, it’s supposed to be lighter than plain Tumbleweed out of the box.
# systemd-analyze
Startup finished in 1.788s (kernel) + 2.036s (initrd) + 21.243s (userspace) = 25.068s

# systemd-analyze blame --no-pager
17.669s btrfsmaintenance-refresh.service
16.177s wicked.service
 3.377s apparmor.service
 1.356s health-checker.service
 1.179s systemd-udev-settle.service
  968ms systemd-logind.service
  811ms kdump.service
A second quicker, ok. Plymouth is gone, but we gained health-checker and kdump.
The time is dominated by wicked slowing down the startup though, so let’s replace it.
Additionally, disable btrfsmaintenance-refresh.service. It’s not possible to remove it
as the microos_base pattern requires it.
# transactional-update shell
transactional update # zypper install NetworkManager
transactional update # systemctl disable wicked
transactional update # systemctl enable NetworkManager
transactional update # systemctl disable btrfsmaintenance-refresh.service
transactional update # exit
# reboot
...
# systemd-analyze
Startup finished in 1.744s (kernel) + 1.989s (initrd) + 2.342s (userspace) = 6.075s

# systemd-analyze blame
1.251s apparmor.service
1.066s kdump.service
 824ms NetworkManager-wait-online.service
 742ms systemd-logind.service
 730ms kdump-early.service
 638ms systemd-udevd.service
 563ms create-dirs-from-rpmdb.service
Much better again.
Booting a read only system without initrd
In a system with a read-only root filesystem like MicroOS (or transactional server), the initrd has
another task: Make sure that /var and /etc are mounted already, so that early boot can store logs
and read configuration.
So we actually have to mount /var and /etc before starting systemd. How? By having our own init
script! It is started directly by the kernel by setting init=/sbin/init.noinitrd and as last
step just does exec /sbin/init to replace itself as PID 1 with systemd.
Unfortunately it’s not quite as easy as just doing mount /var and calling it a day, as the mount
for /var uses a UUID= as source, so it needs udev running… Luckily, udev actually works in that
environment, after mounting /sys, /proc and /run manually.
Here the circle closes - we have udev running before systemd now. So by just using the script we need for read-only systems everywhere, that issue is solved too.
Making initrd-less booting simpler
As the setup for initrd-less booting is quite complex, there’s now a package which does the needed setup automatically (except for installing a suitable kernel).
This contains the needed “pre-init” wrapper script /sbin/init.noinitrd as well as a grub configuration
module which automatically adds entries to boot the system without initrd. Those are only generated
for kernels which have support for the root filesystem built-in. It takes care of setting root/rootflags
and init parameters properly as well. The boot options with initrd are still there, as failsafe.
# zypper ar obs://devel:kubic:quickboot/openSUSE_Tumbleweed devel:kubic:quickboot
# transactional-update initrd shell pkg in --from devel:kubic:quickboot kernel-kvmsmall noinitrd
...
transactional update # grub2-set-default 0
transactional update # exit
# reboot
...

# systemd-analyze
Startup finished in 1.889s (kernel) + 2.246s (userspace) = 4.135s

# systemd-analyze blame
1.022s apparmor.service
 847ms kdump.service
 820ms NetworkManager-wait-online.service
 782ms systemd-logind.service
 608ms kdump-early.service
 542ms dev-vda3.device
Just over 4 seconds! That the /var partition is now part of the top six on systemd-analyze
means that we’re getting close to the limits.
An issue with issue-generator
Booting without an initrd seems to have introduced a bug: Instead of showing the active
network interface enp1s0 and its addresses, there’s just a lonely eth0: on the login
screen. Checking the journal, this is because the interface got renamed from eth0 to enp1s0
during boot. Usually this happens when udev runs in the initrd already, which means that
after switch-root there’s an add event with the new name already, which issue-generator
picks up. Without initrd, the rename happens in the booted system and issue-generator has to
handle that somehow.
How can this be implemented? To find out which udev events are triggered by a rename, the udev
monitor is very helpful. With the --property option it shows which properties are attached
to the triggered events:
# udevadm monitor --udev --property &
# ip link set lo down
# ip link set lo name lonew
# ip link set lonew name lo
...
UDEV  [630.458943] move     /devices/virtual/net/lo (net)
ACTION=move
DEVPATH=/devices/virtual/net/lo
SUBSYSTEM=net
DEVPATH_OLD=/devices/virtual/net/lonew
INTERFACE=lo
IFINDEX=1
SEQNUM=3616
USEC_INITIALIZED=1054433
ID_NET_LINK_FILE=/usr/lib/systemd/network/99-default.link
SYSTEMD_ALIAS=/sys/subsystem/net/devices/lonew /sys/subsystem/net/devices/lonew
TAGS=:systemd:
# fg
^C
# ip link set lo up
So using the DEVPATH_OLD and INTERFACE properties, the rename can be implemented in
issue-generator’s udev rules:
After applying those changes and a reboot, enp1s0 is shown properly now!
Optimizing apparmor.service
Those who paid attention to the output of systemd-analyze blame will have noticed
that compared to plain Tumbleweed, apparmor.service takes longer to start on MicroOS.
Why is that so?
# systemd-analyze plot > plot.svg
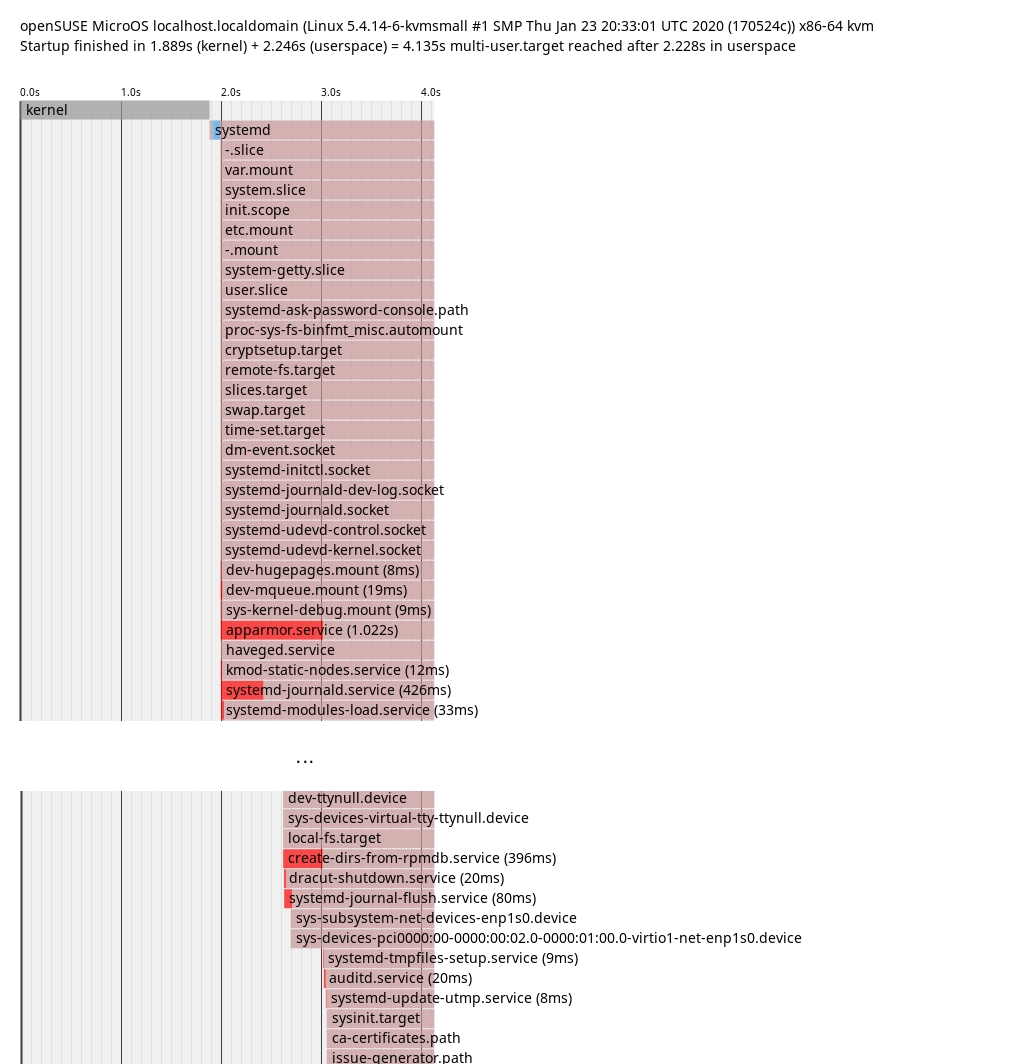
In this plot it’s possible to guess which explicit and also implicit dependencies there
are between services. If a service starts after a different service ends, it’s probably
an explicit dependency. If a service is only up after a different service started, it’s probably
waiting for it in some way. That’s what we can see in the plot: apparmor.service only finished
startup after create-dirs-from-rpmdb.service started up. So getting that to start earlier or
quicker would accelerate apparmor.service as well.
To confirm this theory, just disable the service:
# systemctl disable create-dirs-from-rpmdb.service
# reboot
# systemd-analyze blame
927ms systemd-logind.service
824ms NetworkManager-wait-online.service
721ms kdump.service
689ms kdump-early.service
554ms apparmor.service
# systemctl enable create-dirs-from-rpmdb.service
Confirmed. So how can this be optimized properly?
The purpose of this service is to create directories owned by packages, which are not part
of the system snapshots. It orders itself between local-fs.target and
systemd-tmpfiles-setup.service. Some tmpfiles.d files might rely on packaged directories
being present, so it has to run before systemd-tmpfiles-setup.service. Except for changing
it to RequiresMountsFor=/var /opt /srv there isn’t much potential for optimization.
However, instead of running on every boot, the service only has to be active if the set of packages
changed. Luckily, with rpm 4.15, a new method to ease such checks (rpmdbCookie) got implemented and
it was easy to make use of it in the service.
With this deployed, it only runs when necessary and otherwise just takes some time
to get the cookie from the rpm database:
# systemd-analyze blame
872ms NetworkManager-wait-online.service
832ms systemd-logind.service
811ms kdump.service
645ms dev-vda3.device
597ms kdump-early.service
526ms apparmor.service
# systemd-analyze blame | grep create-dirs-from-rpmdb
 52ms create-dirs-from-rpmdb.service
For some reason this doesn’t always help though, sometimes apparmor.service is back at >1s,
so this needs some more investigation.
rebootmgr
On top of the blame list we have NetworkManager-wait-online.service. This service can take a variable
amount of time depending on the network configration and the environment and is in most cases not needed
for getting services up and running. So what is currently pulling that into multi-user.target?
# systemd-analyze critical-chain
The time when unit became active or started is printed after the "@" character.
The time the unit took to start is printed after the "+" character.

multi-user.target @2.472s
└─rebootmgr.service @2.284s +24ms
  └─network-online.target @2.282s
    └─NetworkManager-wait-online.service @1.311s +970ms
      └─NetworkManager.service @1.246s +61ms
It’s rebootmgr.service! The reason it orders itself After=network-online.target is that it can
directly communicate with etcd. However, support for that is currently disabled in rebootmgr anyway
and it appears to handle the case with no network connection on start just fine. So until that
change ends up in the package, let’s just adjust that manually:
# systemctl edit --full rebootmgr.service
(Remove lines with network-online.target)
# reboot
Note that this doesn’t really improve the perceived speed of booting as only multi-user.target
itself depended on it and sshd/getty are started before that already.
The critical chain to multi-user.target is now:
# systemd-analyze critical-chain
The time when unit became active or started is printed after the "@" character.
The time the unit took to start is printed after the "+" character.

multi-user.target @2.188s
└─kdump.service @1.287s +899ms
  └─NetworkManager.service @1.202s +82ms
    └─dbus.service @1.197s
      └─basic.target @1.195s
        └─sockets.target @1.195s
          └─dbus.socket @1.195s
Getting close to the edge
It’s time to get creative now - what’s left for optimizing? Everything after this is arguably a hack, much more than the previous changes.
Disabling non-essential services
Let’s just disable everything which isn’t actually needed to get the system up.
apparmor.service:
Used for system hardening. If the system is not security relevant
(e.g. an isolated VM), this can be disabled. Not recommended though.
rebootmgr.service:
If a reboot is scheduled (e.g. by the automatic transactional-update.timer),
it triggers an automatic reboot in the configured timeframe (default 3:30am).
If the system is rebooted manually, this can be disabled.
kdump.service:
Loads a kernel and initrd for kernel coredumping into RAM. Unless
the system is a highly critical production machine and every crash has to be analyzed,
this can be disabled.
With those changes applied:
# systemd-analyze
Startup finished in 1.899s (kernel) + 1.505s (userspace) = 3.405s
# systemd-analyze blame
629ms systemd-journald.service
532ms systemd-logind.service
480ms dev-vda3.device
479ms dev-vda2.device
303ms systemd-hostnamed.service
Over a second saved again. systemd-analyze tells us that there’s not much left in userspace to optimize.
Kernel configuration
Currently the kernel takes quite a long time during boot for benchmarking some algorithms.
This is done so that it knows which of the available implementations is the quickest on the
system it’s running on.
Ironically, this means that on CPUs with new features it actually takes a bit longer.
If performance for RAID6 is not important, this can simply be disabled by setting
CONFIG_RAID6_PQ_BENCHMARK=n
After building such a kernel and installing it:
# systemd-analyze
Startup finished in 1.083s (kernel) + 1.356s (userspace) = 2.439s
This saves almost a second during kernel startup.
Direct kernel boot
The bootloader takes some time during boot as well (boot menu, kernel loading), which can be optimized as well. Apart from the obvious option to decrease the time the boot menu is shown (or hiding it by default), it’s also possible to skip it altogether! By supplying the kernel and cmdline from the VM host, booting can be even quicker. This is only a good idea in setups where there is a custom kernel build with everything built-in though, as otherwise it may happen that the modules in the VM get out of sync with the kernel image supplied by the VM host. This also breaks automatic rollbacks (health-checker needs GRUB for that) and selecting old snapshots to boot from.
I’m not aware of a way to measure the time it takes to load the kernel, so no measurement here. This mostly removes the time which systemd-analyze doesn’t show (on non-EFI systems).
Conclusion
Getting from 25.958s to 2.439s (with hacks) means that over 90% of boot time can be optimized away.
The next task is to push those optimizations into the distro and make them the default or at least easy to apply.
Have a lot of fun!


New IP addresses for build.opensuse.org
During the maintenance window this Thursday (2020-02-06) we will move the IPv4 and IPv6 address of build.opensuse.org. The new addresses are:
-
195.135.221.162
-
2001:67c:2178:8::162
People using this Open Build Service instance should normally not notice - but if you were crazy enough to add the old IP addresses to some firewall rules or configuration files, please make sure that you update your configuration accordingly.
Please note that this affects also the following CNAME (alias) entries:
Using Tilix – Part 2 on openSUSE
Last week, we introduced Tilix and started exploring its basics, let’s now familiarize ourselves with the advanced features of Tilix, namely:
-
Management of bookmarks, local or remote;
-
Personalized links (clickable links based on regular expressions);
-
Automatic profile switching depending on location (local or remote (SSH));
-
Password management;
-
Launch of internal actions.
Bookmark management
Tilix allows you to save and manage a list of “bookmarks”, that is to say local or remote locations. Just open the Preferences and define some folder or remote servers to connect to, then open this list, select the desired bookmark and go immediately to the folder or open the SSH session to a remote host.
Note: the bookmarks are saved in $HOME/.config/tilix/bookmarks.json We recommend that you create this file by hand beforehand if you notice that your bookmarks are not saved correctly after leaving Tilix.
Create a bookmark folder
Tilix allows you to organize your bookmarks by creating a simple folder in which you can create them, so that they are well organized. This is useful for, for example, grouping SSH connections to the same group of machines:

Click on the folder then on the + to add bookmarks.
Local bookmarks
To add bookmarks, open Tilix preferences, then go to the Bookmarks section to click on the +”.
Here we will add a bookmark to the local copy of a project on the Open Build Service.

Remote bookmarks
The procedure is the same, but choose Remote then enter the bookmark parameters:
-
Name: the reference of your bookmark;
-
Protocol: choice: SSH, SFTP, TELNET, FTP;
-
Host: the host name of the target followed by the port number;
-
User: the user of the connection;
-
Settings: SSH options for example;
-
Command: if it is an SSH connection, the command to launch on the remote host.

Commands
Same procedure as the others, but here we simply enter a command to launch. The bookmark is therefore here a simple alias.

My order to update the local copy of my OBS repository.
Use bookmarks
You can access your bookmarks via “Ctrl + Shift + B”, you just have to select it and the corresponding command is launched:

Personalized links
Tilix allows you to define a list of links (URI to a web page or a local or remote file:// location) that will be made clickable based on a regular expression or a simple word. To do this, open the Preferences then the Advanced section. For the example, we will add a link to the Open Build Service with the key work obs;

The regular expression has become clickable, either by “Ctrl + click”, or by a right-click.
Automatic profile change
We arrive there in a functionality of Tilix, which is particularly useful and must care to avoid to make severe mistake by typing a command in the bad directory or in a remote connection: the automatic change of profile. Tilix, like many modern terminal emulators, allows you to create several profiles (colors, shell used, font etc …) but in addition, it allows to automatically switch from one to the other, depending from the active location: either a local folder or, more interesting, but also requiring a little more manipulation, an SSH connection.
Local

For the example, we will create a profile called “Root” that will be activated automatically when we explore one of the following folders:
<code class="hljs">/etc
/usr
/root
</code>
Now, in the “Advanced” tab of the profile, we will define the condition necessary for its activation.
As specified, the values must be in the format “host:folder” or “host:” or “: folder”, the “:”. These are mandatory, so “host” or “folder” alone are not allowed.
And now if we go to /etc:

The changeover was done automatically and as soon as we leave /etc, Tilix will use the default profile again.
During a remote connection
Tilix allows us to do the same during an SSH connection. But this requires a bit of configuration on the remote host:
Copy of the script on the remote host:
You must push the script /usr/share/tilix/scripts/tilix_int.sh in the $HOME of the remote user (or to any other folder from where it can be sourced like /usr/local/bin):
<code class="hljs elixir">scp /usr/share/tilix/scripts/tilix_int.sh user<span class="hljs-variable">@hostname</span><span class="hljs-symbol">:/home/user</span>
</code>
Then connect to it beforehand to add the launch of the script to the connection, via its .bashrc for example:
<code class="hljs elixir">[geeko<span class="hljs-variable">@host</span> ~]<span class="hljs-variable">$ </span>cat .bashrc
<span class="hljs-comment"># .bashrc</span>
<span class="hljs-comment"># User specific aliases and functions</span>
. ./tilix_int.sh
</code>
Then, there too, define the profile switch condition as above but by specifying the host (the one provided by the hostname command on which Tilix itself is bases) this time. Then connect. The profile will change as soon as the SSH connection is established. It will switch back to the default profile as soon as we log out.
Password management
Tilix also allows you to store passwords in memory. To do this, click on the menu of the active terminal and choose “Passwords …”:

And fill it in:

Tilix keeps the passwords saved in the GNOME keyring.

This is a very interesting function coupled with the previous ones:
-
using bookmarks, you launch a remote connection;
-
thanks to the saved passwords you unlock your SSH key for example;
-
then Tilix immediately switches you to the profile of your choice if necessary.
Launch of internal actions
Within a current Tilix session, it allows you to launch internal actions that can be useful, for example, to split the window in two and then open an X program in the created tile:
<code class="hljs stylus">tilix -<span class="hljs-selector-tag">a</span> session-add-<span class="hljs-attribute">right</span> -e htop
</code>

This functionality is very useful when coupled with an alias or chained, allowing you to build your session layout and start your apps.
In conclusion
Tilix has been actively developed and is now considered mature. We hope that this review of its advanced features will have convinced you, or at least made you want to try it.
See you soon, enjoy!

openSUSE Board election 2019-2020 result
The openSUSE Board election 2019-2020 reached an end on the night of 31 January 23h59 CET after running for about two weeks.
Four candidates ran in this election and the result is as follows:
- Simon Lees 161
- Sarah Julia Kriesch 138
- Vinzenz Vietzke 130
- Alessandro de Oliveira Faria 95
Simon is re-elected and gets to serve for another term while Sarah replaces outgoing board member Gertjan Lettink.
281 out of 500 eligible members voted in this election.