

Review of the HP Pavilion Power 580-146nd
Because of the incredible bargains during the Steam summer / winter sales, I have acquired 42 games over the last 6 years. My old openSUSE system was never able to play these games in a decent manner. Intel HD Graphics 4000 will only get you so far… I have looked into building a new AMD PC, which would allow me to run Linux / Steam games at high settings and 1080p. Recently I noticed a promotion for the HP Pavilion Power 580 desktop, equipped with a Ryzen 5 1400 processor and with a Radeon RX 580 graphics card. Heavily reduced in price. So I took the plunge and got myself a brand new desktop PC.
Design and hardware

The case of the HP Pavilion Power desktop looks pretty good. Its a very small case: 36.4 cm in height, 16.5 cm in width and 37.8 cm in depth. The front has some sharp triangular edges that make the desktop pleasant to look at.
One issue with the case is airflow. There are 2 side vents in this case. The fan in the back of the case blows in cool air. This is used by the processor cooler and hot air will immediately move out of the case. Which means the CPU is adequately cooled. The graphics card also gets cool air from below, but dispenses this air to an area where it cannot easily get out of the case. It needs to find its way out towards the top side vent located far to the left. It would have been better if there was an air vent directly in between the graphics card and the power supply.

Specifications and benchmarks
The specifications:
- AMD Ryzen 5 1400 CPU
- AMD Radeon RX 580 GPU
- 16 GB DDR4 RAM
- 128 GB M.2 SSD
- 1 TB 7200rpm HDD
- 1 x HDMI port
- 3 x Display port
- 1 x Type C USB 3.0 port
- 3 x Type A USB 3.0 port
- 2 x Type A USB 2.0 port
- 1 x DVD re-writer
- 1 x SD card reader
- 2 x Audio-in jack
- 1 x Audio-out jack
- 1x Microphone jack
- 1 x LAN port
- 1 x 300W 80 plus bronze PSU
On the front side, there is a DVD re-writer, a SD-card reader, an USB 3.0 type-C port, an USB 3.0 type-A port and a headphone jack. So this case is very well equipped from the front to handle all your media. The backside of the case is less prepared for the job. It has 2 USB 3.0 ports and 2 USB 2.0 ports. It has the regular ports for audio in, audio out and microphone. The graphics card provides 1 HDMI port and 3 display ports. And it has an Ethernet port. I think that there are not enough USB ports on the backside. I have a wired keyboard and mouse that take up the two USB 2.0 ports. Which leaves me with 2 USB 3.0 ports for everything else. To combat this issue, I have connected a TP-Link UH700. Which provides me with 7 additional USB 3.0 ports.

The power supply is a 300W and its 80 plus bronze rated. It is sufficient, but I would be more comfortable with a 450W or a 550W unit. That would give the machine a bit of headroom.
For benchmarks, I always look at the benchmark scores on the websites: cpubenchmark.net and videocardbenchmark.net. In the table below I compare the HP Pavilion Power 580-146nd with my previous PC, the Zotac ZBOX Sphere OI520. The CPU of my new desktop is 2,5 times faster then the CPU in my previous PC. The GPU is a whopping 18 times faster. So that means that this new PC will provide me with a big increase in overall performance.
|
Zotac ZBOX Sphere OI520 |
HP Pavilion Power 580-146nd |
|
|
Benchmark score CPU |
3287 |
8410 |
|
Benchmark score GPU |
455 |
8402 |
Installing openSUSE
I have wiped Windows from the system and installed openSUSE Leap 15. The installation went without a problem. However, there were some annoyances to resolve directly after installation.
The biggest one is sound. I hit an issue where the speakers ‘pop’ every time that a new video (YouTube) or new audio file (Amarok) started playing. This loud ‘pop’ was very annoying and not good for my speakers. I am not the first person to encounter this issue, as it was also posted on the openSUSE forms. The proposed solution by John Winchester resolved this issue for me. I now only hear this ‘pop’ during the startup of my PC.
Another issue is that my Bluetooth adapter is not recognized. I have installed the bluez-auto-enable-devices and bluez-firmware and bluez-tools. If I run the command “sudo rfkill list all”, it does find the Bluetooth adapter and indicates that it is not Soft blocked and not Hard blocked. But according to the KDE Plasma 5 desktop applet, no Bluetooth adapters have been found.
Furthermore the amdgpu-pro driver is not yet available for openSUSE Leap 15. The open source AMD driver is performing okay. But I did hit an issue where I cannot get the display to turn on again, a few hours after it was (automatically) switched off. This could very well be related to the graphics driver. I have now configured my PC to suspend after 3 hours. When I restart the PC from this suspended state, I don’t encounter this problem.
Gaming
This is the area where my new PC excels! I can run all games on very high settings and get frame rates higher than 60 Frames per Second. I would have expected some higher frame rates from the open source games that I tested. Some of these games are not very graphically intensive. But even with the RX 580, the frame rates are just good, but not great. The exception is Xonotic, a super fun FPS that not only looks great, but shows very high frame rates. And I must say that SuperTuxKart looks amazing with all settings at the highest level (6). I have listed the frame rates that I see on average below:
- OpenArena – 90 FPS
- Urbanterror – 125 FPS
- Xonotic – 90 to 200 FPS
- SuperTuxKart – 60 FPS
- SpeedDreams – 25 to 150 FPS


I can now play games on Steam that I couldn’t play before. I play these games on very high settings and 1080p. The frame rates are good, certainly considering the advanced graphics of these games. I have listed the frame rates that I see on average below:
- Rise of the Tomb Raider – 50 FPS
- BioShock Infinity – 90 FPS
- Half Life 2 – 90 to 120 FPS
- Road Redemption – 60 FPS
- Euro Truck Simulator 2 – 60 FPS


Multitasking
The HP Pavilion Power 580-146nd is a great multitasking machine. For fun, I tried opening LibreOffice Writer, LibreOffice Draw, Darktable, Amarok, Dolphin, Dragon Player, GIMP and Steam at the same time while playing music in Amarok. Programs opened instantly and the CPU cores / threads used very little of the available CPU power. In the future, I will use this desktop for testing various Linux distributions on Virtualbox, for developing photo’s with Darktable and for making movies with Kdenlive. So I will use a bit more of the available power. For ‘normal’ desktop usage this machine has plenty of power to spare.

Conclusion
The HP Pavilion Power 580-146nd packs a lot of power for a price that is hard to match when building your own PC. However, it might surprise you that I would not recommend this exact machine to others. The reason is that Nvidia cards are still better supported on openSUSE Leap 15. I feel that for most people, the HP Pavilion Power 580-037nd would be the better choice. This machine features an Intel i5-7400 CPU, a Nvidia GeForce GTX 1060 GPU and has 8 GB of RAM. The pricing is very comparable. And the outside of the machine is the same.
For me personally, this machine was absolutely the right choice. I am very interested in the AMD Ryzen CPU’s. I also like AMD’s strategy to develop an open source driver for its GPU’s (amdgpu) for the Linux kernel. I was looking for an AMD machine and this HP Pavilion Power 580-146nd fits the bill and then some.
Published on: 3 September 2018

Dive into ErLang
I recently had a chance to learn Erlang. In the beginning, it was quite hard to find a good book or tutorial that gave a clear idea of the language and the best practices. Hoping this blog can help someone who wants to get started.
As I began, it started to strike me that modern languages like Go, Ruby, Javascript have parts which have some similarity with Erlang. The parts include concurrency aspects w.r.t. passing messages using channels in Golang, the way functions return results of last executed expression in Ruby and first class functions in Golang/Javascript.
Erlang’s history revolves around telecom industry. It has been known for concurrency using light-weight processes, fault-tolerance, hot loading of code in production environments etc. The Open Telecom Platform (OTP) is another key aspect of Erlang which provides the framework for distributed computing and all other aspects mentioned above.
Some key points to keep in mind,
- Values are immutable
- Assignment operator (=) and functions work based on pattern matching
- No iterative statements like for, while, do..while.. etc. recursive functions serve the purpose
- Lists, Tuples (records – a hack using tuples) are very important data structures
- If, Case.. Of.. are the conditional blocks
- Guards are additional pattern matching clauses used with functions and Case.. Of..
- Every expression should return a value and last expression in a function automatically returns the result
- Functions are first class citizens
- Usage of punctuations ‘; , .’ etc. (one can relate this to indentation requirements in python)
Lets gets started with some code samples,
% Execute this from erlang shell. erl is the command
> N = 10.
10
%% The above statement compares N with 10 and binds N with 10 if its unbound. If its already bound with some other value, exception is thrown.%% Tuple
> Point = {5, 6}
{5,6}%% List
> L = [2, 5, 6, 7].
[2, 5, 6, 7]%% Extracting Head and Tail from List is key for List processing/transformations
> [H|T] = [2, 5, 6, 7].
>H.
2
>T.
[5, 6, 7]%% List comprehensions
> Even = [E || E <- L, E rem 2 =:= 0].
[2,6]
Lets take a look at the simple functions,
helloworld () -> hello_world.
The simple function will return hello_world, a constant string – atom. Lets have a look at a recursive function,
%% Factorial of N
factorial (N) when N =:= 0 -> 1;
factorial (N) -> N * factorial(N-1).%% Tail recursion
tail_factorial (N) -> tail_factorial(N, 1).
tail_factorial (0, Acc) -> Acc;
tail_factorial (N, Acc) -> tail_factorial (N-1, Acc * N).
The factorial functions demonstrate how Erlang does pattern matching on function parameters, usage of Guard (‘when’ clause), punctuations. We could have also written the statement as ‘factorial(0) -> 1;’ .
The second version tail_factorial demonstrates the optimized version using tail recursion to simulate the iterative method. In this method Erlang would remove the previous stack frames using Last Call Optimization (LCO). It is important to understand both techniques as recursion is used quite extensively.
Erlang has the following data types – atom, number, boolean (based on atom), strings and binary data. atom’s occupy more space and its better to using binary data type for strings of larger sizes.
Other builtin data structures are queues, ordsets, sets, gb_trees . Error, Throw, Exit, Try.. Of .. Catch statements provide the exception handling capabilities.
The most interesting part of the language is about spawning light weight processes and passing messages between them,
– module (dolphin-server).%% API– export ([dolphin_handler/0]).dolphin_handler() ->receivedo_a_flip ->io:format (“How about no ? ~n”);fish ->
io:format (“So long and thanks for the fish! ~n”);_ ->io:format (“we’re smarter than you humans~n”);
end,dolphin_handler().%% From shell, compile dolphin-server module>c(‘dolphin-server’).
%% Spawns a new process
> Dolphin = spawn (‘dolphin-server’, dolphin_handler, []).<0.124.0> %% process id of the newly spawned process
%% Now start passing messages!!
> Dolphin ! fish.
So long and thanks for the fish!>Dolphin ! “blah blah”we’re smarter than you humans
 ~n”);
~n”);Open Telecom Platform (OTP)
- gen_server – for implementing server side piece in client/server
- supervisor – for implementing a supervisor in a supervisor tree. It takes care of the details regarding restarting of processes, fault-tolerance etc.
- gen_event – for implementing event handling functionality
- gen_statem – for implementing state machines
https://learnyousomeerlang.com/contents is one of the best online books for understanding how to use Erlang, best practices while building an application which is production ready. Its good to take pauses and move with book as its quite exhaustive, but wonderfully written 

 Member
 federico1
Debugging an Rc reference leak in Rust
The bug that caused two brown-paper-bag released in librsvg — because it was leaking all the SVG nodes — has been interesting.
Memory leaks in Rust? Isn't it supposed to prevent that?
Well, yeah, but the leaks were caused by the C side of things, and by
unsafe code in Rust, which does not prevent leaks.
The first part of the bug was easy: C code started calling a
function implemented in Rust, which returns a newly-acquired reference
to an SVG node. The old code simply got a pointer to the node,
without acquiring a reference. The new code was forgetting to
rsvg_node_unref(). No biggie.
The second part of the bug was trickier to find. The C code
was apparently calling all the functions to unref nodes as
appropriate, and even calling the rsvg_tree_free() function in the
end; this is the "free the whole SVG tree" function.
There are these types:
// We take a pointer to this and expose it as an opaque pointer to C
pub enum RsvgTree {}

// This is the real structure we care about
pub struct Tree {
    // This is the Rc that was getting leaked
    pub root: Rc<Node>,
    ...
}
Tree is the real struct that holds the root of the SVG tree and some
other data. Each node is an Rc<Node>; the root node was getting
leaked (... and all the children, recursively) because its reference
count never went down from 1.
RsvgTree is just an empty type. The code does an unsafe cast of
*const Tree as *const RsvgTree in order to expose a raw pointer to
the C code.
The rsvg_tree_free() function, callable from C, looked like this:
#[no_mangle]
pub extern "C" fn rsvg_tree_free(tree: *mut RsvgTree) {
    if !tree.is_null() {
        let _ = unsafe { Box::from_raw(tree) };
                         // ^ this returns a Box<RsvgTree> which is an empty type!
    }
}
When we call Box::from_raw() on a *mut RsvgTree, it gives us back
a Box<RsvgTree>... which is a box of a zero-sized type. So, the program
frees zero memory when the box gets dropped.
The code was missing this cast:
    let tree = unsafe { &mut *(tree as *mut Tree) };
                                 // ^ this cast to the actual type inside the Box
    let _ = unsafe { Box::from_raw(tree) };
So, tree as *mut Tree gives us a value which will cause
Box::from_raw() to return a Box<Tree>, which is what we intended.
Dropping the box will drop the Tree, reduce the last reference count
on the root node, and free all the nodes recursively.
Monitoring an Rc<T>'s reference count in gdb
So, how does one set a gdb watchpoint on the reference count?
First I set a breakpoint on a function which I knew would get passed
the Rc<Node> I care about:
(gdb) b <rsvg_internals::structure::NodeSvg as rsvg_internals::node::NodeTrait>::set_atts
Breakpoint 3 at 0x7ffff71f3aaa: file rsvg_internals/src/structure.rs, line 131.

(gdb) c
Continuing.

Thread 1 "rsvg-convert" hit Breakpoint 3, <rsvg_internals::structure::NodeSvg as rsvg_internals::node::NodeTrait>::set_atts (self=0x646c60, node=0x64c890, pbag=0x64c820) at rsvg_internals/src/structure.rs:131

(gdb) p node
$5 = (alloc::rc::Rc<rsvg_internals::node::Node> *) 0x64c890
Okay, node is a reference to an Rc<Node>. What's inside?
(gdb) p *node
$6 = {ptr = {pointer = {__0 = 0x625800}}, phantom = {<No data fields>}}
Why, a pointer to the actual contents of the Rc. Look inside
again:
(gdb) p *node.ptr.pointer.__0
$9 = {strong = {value = {value = 3}}, weak = {value = {value = 1}},  ... and lots of extra crap ...
Aha! There are the strong and weak reference counts. So, set a
watchpoint on the strong reference count:
(gdb) set $ptr = &node.ptr.pointer.__0.strong.value.value
(gdb) watch *$ptr
Hardware watchpoint 4: *$ptr
Continue running the program until the reference count changes:
(gdb) continue
Thread 1 "rsvg-convert" hit Hardware watchpoint 4: *$ptr

Old value = 3
New value = 2
At this point I can print a stack trace and see if it makes sense, check that the refs/unrefs are matched, etc.
TL;DR: dig into the Rc<T> until you find the reference count, and
watch it. It's wrapped in several layers of Rust-y types; NonNull
pointers, an RcBox for the actual container of the refcount plus the
object it's wrapping, and Cells for the refcount values. Just dig
until you reach the refcount values and they are there.
So, how did I find the missing cast?
Using that gdb recipe, I watched the reference count of the toplevel SVG node change until the program exited. When the program terminated, the reference count was 1 — it should have dropped to 0 if there was no memory leak.
The last place where the toplevel node loses a reference is in
rsvg_tree_free(). I ran the program again and checked if that
function was being called; it was being called correctly. So I knew
that the problem must lie in that function. After a little
head-scratching, I found the missing cast. Other functions of the
form rsvg_tree_whatever() had that cast, but rsvg_tree_free() was
missing it.
I think Rust now has better facilities to tag structs that are exposed
as raw pointers to extern code, to avoid this kind of perilous
casting. We'll see.
In the meantime, apologies for the buggy releases!

What ails GHashTable?
I promised a closer look at GHashTable and ways to improve it; here's that look and another batch of benchmarks to boot.
This time around I've dropped most of the other tables from the plots, keeping only khash and adding results from my GLib branch and Rust's HashMap, the latter thanks to a pull request from Josh Stone. These tables have closely comparable performance and therefore provide a good reference. Besides, every table tested previously is either generally slower or more memory-hungry (or both), and including them would compress the interesting parts of the plot.
I'll try to be brief this time¹. For more background, check out my previous post.
Bad distribution

First and foremost, the distribution was terrible with densely populated integer keyspaces. That's taken care of with a small prime multiplier post-hash.
Peak memory waste

Previously, we'd resize by allocating new arrays and reinserting the entries, then freeing the old arrays. We now realloc() and rearrange the entries in place, lowering peak memory use by about a third. This can prevent going into swap or even crashing out on a memory-constrained system.
Overall memory waste
If you've got a sharp eye, you'll notice that overall memory consumption is lower now too. Whereas the old implementation always made space for 64-bit keys and values, the new one will allocate 32 bits when possible and switch to bigger entries on demand. In the above test, the keys are integers in the range [0 .. 2³²-1], reducing memory consumption by 20% overall. If values had been in [0 .. 2³²-1] too, the reduction would've amounted to 40%. A caveat though — negative integers (e.g. from GINT_TO_POINTER()) still require 64 bits due to two's complement/sign extension.
Load factor mistargeting
When GHashTable is subjected to churn/aging, it will accumulate tombstones, and eventually the sum of entries and tombstones will eclipse the maximum load, resulting in a cleanup. Since a cleanup is just a reinsertion in place, it's handled similarly to a resize, and we take the opportunity to pick a better size when this happens. Unfortunately, the grow threshold was set at .5 if the table got filled up the rest of the way by tombstones, resulting in post-grow load factors as low as .25. That's equal to the shrink threshold, so with a little (bad) luck it'd shrink back immediately afterwards.
I changed the threshold to .75, so the load factor intervals (not counting tombstones) now look like this:
- <.25 → shrink immediately → .5
- [.25 .. .75] → no change
- [.75 .. .9375] → grow on cleanup → [.375 .. .46875]
- >.9375 → grow immediately → .46875
This seems like a more reasonable stable range with less opportunity for fluctuation and waste, and there's still lots of headroom for tombstones, so cleanups aren't too frequent.
But it's slower now?
In some cases, yes — can't be helped. It's well worth it, though. And sometimes it's faster:

This particular run uses less memory than before, which is puzzling at first, since keys and values are both pointers. A look at the test's smaps reveals the cause:
01199000-08fb8000 rw-p 00000000 00:00 0 [heap]
The heap happened to be mapped in the lower 4GiB range, and GHashTable can now store 32-bit entries efficiently. That means pointers too.
I caught khash doing something interesting in this benchmark. Some time after the aging cycle has started (1), it initiates a tombstone cleanup. In this case it decides to grow the table simultaneously, starting at (2). This could be an example of the kind of load factor mistargeting I mentioned above — certainly it would have a very low load factor for the remainder of the test.
Robin Hood to the rescue?
Short answer: No. Long answer:

Rust uses Robin Hood probing, and the linear shifts required for insertion and deletion start to get expensive as the table fills up. It also came in last in a lookup-heavy load I ran. On the other hand it avoids tombstones, so there's no need for periodic cleanups, and deletions will make it progressively faster instead of slower. GHashTable's quadratic probing seems to hold a slight edge, albeit workload-dependent and, well, slight. In any case, I couldn't find a compelling reason to switch.
What about attack resistance?
The improved GHashTable is much more resistant to accidental misbehavior. However, it wouldn't be too hard to mount a deliberate attack resulting in critically poor performance². That's what makes Rust's HashMap so interesting; it gets its attack resistance from SipHash, and if these benchmarks are anything to go by, it still performs really well overall. It's only slightly slower and adds a reasonable 4 bytes of overhead per item relative to GHashTable, presumably because it's storing 64-bit SipHash hashes vs. GHashTable's 32-bit spit and glue.
I think we'd do well to adopt SipHash, but unfortunately GHashTable can't support keyed hash functions without either backwards-incompatible API changes or a hacky scheme where we detect applications using the stock g_str_hash() etc. hashers and silently replace them with calls to corresponding keyed functions. For new code we could have something like g_hash_table_new_keyed() accepting e.g. GKeyedHasher.
A better option might be to add a brand new implementation and call it say, GHashMap — but we'd be duplicating functionality, and existing applications would need source code changes to see any benefit.
¹ Hey, at least I tried.
² If you can demo this on my GLib branch, I'll send you a beer dogecoin nice postcard as thanks. Bonus points if you do it with g_str_hash().

What Stable Kernel Should I Use
I get a lot of questions about people asking me about what stable kernel should they be using for their product/device/laptop/server/etc. all the time. Especially given the now-extended length of time that some kernels are being supported by me and others, this isn’t always a very obvious thing to determine. So this post is an attempt to write down my opinions on the matter. Of course, you are free to use what ever kernel version you want, but here’s what I recommend.
Announcing repo-checker for all
Adapted from announcement to opensuse-factory mailing list:
Ever since the deployment of the new repository checker, or repo-checker as you may be familiar, for Factory last year there have been a variety of requests (like this one opensuse-packaging) to utilize the tool locally. With the large amount of recent work done to handle arbitrary repository setups, instead of being tied to the staging workflow, this is now possible. This means devel projects, home projects, and openSUSE:Maintenance can also make use of the tool.
The tool is provided as an rpm package and is included in Leap and Tumbleweed, but to make use of this recent work version 20180821.fa39e68 or later is needed. Currently, that is only available from openSUSE:Tools, but will be in Tumbleweed shortly. See the openSUSE-release-tools README for installation instructions. The desired package in this case is openSUSE-release-tools-repo-checker.
A project has been prepared with an intentionally uninstallable package for demonstration. The following command can be used to review a project and print installation issues detected.
$ osrt-repo-checker --debug --dry project_only home:jberry:repo-checker
[D] no main-repo defined for home:jberry:repo-checker
[D] found chain to openSUSE:Factory/snapshot via openSUSE_Tumbleweed
[I] checking home:jberry:repo-checker/openSUSE_Tumbleweed@9a77541[2]
[I] mirroring home:jberry:repo-checker/openSUSE_Tumbleweed/x86_64
[I] mirroring openSUSE:Factory/snapshot/x86_64
[I] install check: start (ignore:False, whitelist:0, parse:False, no_filter:False)
[I] install check: failed
9a77541
## openSUSE_Tumbleweed/x86_64

### [install check & file conflicts](/package/view_file/home:jberry:repo-checker/00Meta/repo_checker.openSUSE_Tumbleweed)

<pre>
can't install uninstallable-monster-17-5.1.x86_64:
  nothing provides uninstallable-monster-child needed by uninstallable-monster-17-5.1.x86_64
</pre>
Note that the tool automatically selected the openSUSE_Tumbleweed repository since it builds against openSUSE:Factory/snapshot. The tool will default to selecting the first repository chain that builds against the afore mentioned or openSUSE:Factory/standard, but can be configured to use any repository.
All OSRT tools can be configured either locally or remotely via an OBS attribute with the local config taking priority. The local config is placed in the osc config file (either ~/.oscrc or ~/.config/osc/oscrc depending on your setup). Add a new section for the project in question (ex. [home:jberry:repo-checker]) and place the configuration in that section. The remote config is placed in the OSRT:Config attribute on the OBS project in question. For example, the demonstration project has configured the architecture whitelist. The format is the same for both locations.
To indicate the desired repository for review use the main-repo option. For example, one could set it as follows in the demonstration project.
main-repo = openSUSE_Leap_42.3
The benefit of the remote config is that it will apply to anyone using the tools instead of just your local run.
As mentioned above the list of architectures reviewed can also be controlled. For example, limiting to x86_64 and i586 can be done as follows.
repo_checker-arch-whitelist = x86_64 i586
There are several options available (see the code), but the only other one likely of interest is the no filter option (repo_checker-no-filter). The no filter option forces all problems to be included in the report instead of only those from the top layer in the repository stack. If one wanted to resolve all the problems in openSUSE:Factory a project with such fixes could be created and reviewed with the no filter option set to True in order to see what problems remain.
Do note that a local cache of rpm headers will be created in ~/.cache/opensuse-repo-checker which will take just over 2G for openSUSE:Factory/snapshot for x86_64 alone. You can delete the cache whenever, but be aware the disk space will be used.
Enjoy!
The unsung upsides of staying put
This week will be my last at Unruly; I’ll be moving on just shy of nine years from when I joined a very different company at the start of an enthralling journey.
Unruly’s grown from around a dozen people when I joined to hundreds, with the tech team growing proportionally. Team growth driven by needs arising from commercial success with revenue growth, investment, being acquired, and continued success today.
A constant over the past few years has been change. We had continued success partly because we successfully adapted products to rapidly changing commercial contexts. Success in turn instigated change that required more adaptation.
It’s been a privilege to be part of a company that was successful, affording me with many opportunities and remaining interesting for nine years; I’d like to think I’ve played some small part in making it so.
It’s almost a meme in tech that one “should” move on to a new organisation every 2 years to be successful and learn. Those who stick in the same place for longer are sometimes even judged as lacking ambition or being content with not learning new things. “Do they have 9 years of experience or one year of experience 9 times?” people quip.
There are, however, benefits of staying at the same company for an extended period of time that don’t get talked about a great deal.
Witness Tech Lifecycle
A cliched reaction when reading code is “who [what idiot] wrote this?”. It’s easy to blame problems on the previous administration. However, to do so is to miss a learning opportunity. If we followed Norm Kerth’s prime directive:
“Regardless of what we discover, we understand and truly believe that everyone did the best job they could, given what they knew at the time, their skills and abilities, the resources available, and the situation at hand.”
We could see code or systems that surprise us as an opportunity to understand what the context was that led people to build things in this way. Yes, perhaps they did not have the skill to see your “obviously better” solution. On the other hand maybe they had no idea that what they were building would be used for its current application. Maybe they had cost, or technological constraints that are now invisible to you.
Understanding the history of our software and systems can help us shape them into the future, avoid past mistakes, and improve our understanding of the domain at the current point in time.
It has been particularly interesting to see first hand how things play out with tech over an extended period of time, such as
- How early design decisions enable or limit longevity
- TDDed codebases supporting substantial change safely for many years
- Hot new hyped tech becoming tech nobody wants to touch
- Tech being used for drastically different purposes to what it was built for
- Code that is habitable and is “lived-in” out of necessity remaining easily maintainable for many years
- Highly reliable and valuable systems suffering from operational-underload. Having little need to change they fade from memory to the point that no-one knows how to make a change when it’s needed.
- Seeing the industry change rate outpace the rate at which software can be refactored.
Sticking around at the same place for a while makes it possible to observe all this happening. Even if you haven’t had the luxury of being a witness to the history, it’s an interesting exercise to dig through artifacts such as code, systems, documents, as well as speaking to those who were there to understand how things got to where they are today.
Witness Lifecycle of Practices
It’s been interesting to observe the cycle of teams trying new things to work more effectively. It often goes something like
- Frustration with the ineffectiveness of an aspect of how the team is working
- Experiment proposed
- Adoption of new working practice
- Cargo culted as “how we work”
- The original intent is forgotten
- The practice changes as people copy what they observe imperfectly
- Context changes
- The practice is no longer helpful; we keep doing it anyway out of habit
- Repeat
It seems to be relatively easy to communicate traditions and rituals through time—the things that we do that can be observed by new colleagues.
It appears much harder to retain organisational memory of the intent behind practices. This can lead to practices being continued after they stop being useful, or being twisted into a semblance of the original practice that doesn’t achieve the same benefits.
This happens on trivial things e.g. a team found they were recording meetings just because other teams were doing so, even though no-one was listening to their recordings.
It also happens in more dangerous contexts—we observed our practice of continuous deployment drifting from a safe, tight feedback loop to a fire and forget strategy of hope. Newcomers had observed regular, confident deploys, but missed the checking and responding part of the feedback loops.
Even well documented XP practices are not immune to this: the practice of continuous integration becoming synonymous with tooling and then used to support isolation rather than integration. TDD becoming synonymous with writing tests first rather than a feedback loop—creating resistance to refactoring rather than enabling it.
Various things help teams pick up on these sort of problems and adapt, but it takes longer to recognise there’s a problem when intent has been forgotten.
Our teams have regular retrospectives with facilitators from other teams. We’ve encouraged blogging & speaking about the way we work, both internally and externally. We even have a team of coaches who work to help teams continuously improve.
None of these are sufficient. I think where we’ve been most effective at retaining both practices and understanding of intent is where there’s a clear narrative that can be retold to new people in the team. e.g. tales of wins originating from Gold Cards (20% time), help people to understand why they’re valuable.
Sticking in the same place for a while gives the luxury of remembering the original intent behind working practices. Even if you’re new to a team it’s worth questioning things the team is doing, rather than assuming there’s a good reason; try to understand the intent and see if it’s still achieving that today. Fresh eyes are valuable too.
Observe Teams Grow
Seeing the same organisation at different stages of growth is quite interesting. Observing practices that worked at one scale ceasing to be effective.
It’s easy to look at things that work at other organisations and assume that they’ll work where you are as well. However, it’s enlightening to see things that used to work in your own organisation cease to work because the context has changed.
Take deployment strategies: when all your users are within earshot you can maybe just shout that there’s going to be an outage and see if anyone objects. At a larger scale, zero-downtime deployments become important. When risk is higher, things like canary deploys and blue-green deployments become necessary (if you want to continue to deliver continuously).
Take communication: if the team is small and co-located perhaps everyone can know what’s going on through osmosis. As the team grows, more deliberate communication is needed to keep people informed. As scale increases, more and more effort is needed to distil meaning from the noise of information.
Safely Explore Different Roles
Sticking in one place for a while affords one the luxury of not having to learn a new tech stack, domain, and culture. There’s of course plenty to learn just to keep up with the pace of change within the same tech stack and domain, but enough remains constant to create space for other learning.
For me it created space to learn leadership skills, change management skills, people management skills, coaching skills, facilitation skills and more.
In a supportive organisation it may even be possible to try out different sorts of roles without risking being out of a job if it doesn’t work out. Charity Majors’ post on the engineer manager pendulum really resonates with me. I’ve enjoyed the the opportunity to switch between very different roles within product development over the past few years. Others have even switched between BizDev, Adops, Product, Data and Development roles.
The last few years
I’ve been privileged to work for a supportive company that has provided me with opportunities without hopping around. I’ve had the honour of working with many brilliant people from whom I’ve learnt a great deal.
In the last nine years I’ve made many mistakes, and lived to correct them. I’ve helped build products that failed, and helped turn them into a success. I’ve hurt people, and been forgiven. I’ve created conflicts, and resolved them. I’ve seen code become legacy, and salvaged it. I’ve caused outages, and recovered from them.
I’m not suggesting that everyone should stick at the same place for a long time, just that it can be fulfilling if you find yourself in a place as great as Unruly.
The post The unsung upsides of staying put appeared first on Benji's Blog.
Integration Testing Browser Extensions with Jest
This post has been migrated to my new blog that you can find here:
https://pureooze.com/blog/posts/2018-08-16-integration-testing-browser-extensions-with-jest/
Previously I wrote about how I became the maintainer of Saka, an open source browser extension that allows users to search through and load open tabs, browsing history and bookmarks. I talked about how I came up with a solution for unit testing the extension to give me confidence with code changes. I also mentioned that there were issues with integration testing that I ran into which made it difficult to test components that relied on browser APIs.
Today I am happy to report that I have found a way to perform integration testing on extensions and want to share it with you in this post. But before we go down that particular rabbit hole lets first discuss integration testing and why it is useful for validating software.
The Testing Trophy

Kent C. Dodds has written about something he calls the ‘Testing Trophy’. If you have heard of the testing pyramid before this is a similar concept — it’s a visualization of how you should prioritize the different types of testing in applications. The title of Kent’s post says it all:
Write tests. Not too many. Mostly integration.
Why does he say this? Kent notes the problem with unit tests is that they only prove individual units work as expected— they do not prove that the units can work together as a whole. Integration testing on the other hand proves that all the components in our project can actually work together as expected.
To read the rest of this post it can be found on my new blog here:
https://pureooze.com/blog/posts/2018-08-16-integration-testing-browser-extensions-with-jest/
Integration Testing Browser Extensions with Jest was originally published in Information & Technology on Medium, where people are continuing the conversation by highlighting and responding to this story.
Introducing openSUSE to Vocational High School Students
Friday, August 10. I got info from my boss that our company invited to give a workshop presentation about Linux in one of the colleges in Bekasi. STMIK Bani Saleh Bekasi.
STMIK Bani Saleh Bekasi is the campus where I studying. Indeed, my campus has a relationship with our company. They are hosting their web and system in our company and we are a consultant for their infrastructure. So they invite our company to give a presentation about Linux and open a booth to showing our product.
But the workshop will be held on the next day. What the hell, it’s really unexpectedly. I think. The problem is we have to create a presentation just on one night.
The main aim of this workshop is how to utilize VPN remote to
But, I’m an openSUSE user and openSUSE contributor on Indonesia. So,
They agree. So, I bring openSUSE and Open Source software for my workshop. I didn’t bring a technical workshop. I will tell a story to the audience how we can have a lot of fun using Open Source Software.
So, I explain to them How we can travel around the world because of Open Source Software. How we can get friends around the world because of it. And i focused the Open Source Software to openSUSE.


Our company booth, showing our product, book.


First, I introducing about openSUSE. How we can contribute to openSUSE, telling about openSUSE community and the summit, and many more.

I just have a short time to present it. So,
But, We have a lot of fun at the workshop. Although it’s a Debian workshop. Because the world is not separate from what distro that we use.
The post Introducing openSUSE to Vocational High School Students appeared first on dhenandi.com.
Dual head? Dual Seat! Two Users at One Computer at the Same Time!
Dual Head or Multi Monitor
If you have two monitors attached to your computer then the setup is called dual head, the generic term for any number of monitors is multi-monitor.
This setup useful if a single monitor is not enough for you to see all needed windows at once. But in this setup both monitors can be used only one person at the same time.
Dual Seat or Multi Seat
If you have two monitors what about attaching one more keyboard and mouse and “split” the computer and have independent sessions for each user? That setup is called dual seat or multi seat in general.
Linux is a multi user systems from the very beginning, but normally these users either work remotely or they simply share one seat and need to cooperate who will use the computer when.
Hardware
For this multi seat solution you need a separate graphics adapter for each seat. Fortunately to save some money you can combine discrete graphics cards with an integrated one.
If you use an integrated card you might need to enable the multi graphics support in BIOS because usually when a discrete graphics card is found the integrated one is automatically disabled.

:information_source: This option is vendor dependant, check your mainboard manual.
Linux
I wanted to configure a multi seat in the past, but it was really complicated. I would have to tweak the X.org config manually and there were lots of hacks to make it work.
But actually it turned out that using a modern Linux distribution like openSUSE Leap 15.0 makes this very easy!
Using the loginctl Tool
As in almost all modern Linux distributions also in the openSUSE Leap 15.0 the console is managed by the systemd login manager. To interact with it from the command line you can use a tool called loginctl.
It can handle sessions, seats and users. Let’s see which seats are defined by default:
# loginctl list-seats
SEAT
seat0

1 seats listed.
Now we can list all hardware devices assigned to the default seat:
# loginctl seat-status seat0
seat0
	Sessions: *2
	 Devices:
		  ├─/sys/devices/LNXSYSTM:00/LNXPWRBN:00/input/input5
		  │ input:input5 "Power Button"
		  ├─/sys/device…LNXSYSTM:00/LNXSYBUS:00/PNP0C0C:00/input/input4
		  │ input:input4 "Power Button"
		  ├─/sys/devices/pci0000:00/0000:00:01.3/0000:02:00.0/usb1
		  │ usb:usb1
		  ├─/sys/devices/pci0000:00/0000:00:01.3/0000:02:00.0/usb2
		  │ usb:usb2
		  ├─/sys/device…2:00.1/ata2/host1/target1:0:0/1:0:0:0/block/sr0
		  │ block:sr0
		  ├─/sys/device…ata2/host1/target1:0:0/1:0:0:0/scsi_generic/sg1
		  │ scsi_generic:sg1
		  ├─/sys/device…1.3/0000:02:00.2/0000:03:04.0/0000:05:00.0/usb4
		  │ usb:usb4
		  ├─/sys/devices/pci0000:00/0000:00:03.1/0000:09:00.0/drm/card0
		  │ [MASTER] drm:card0
		  │ ├─/sys/device…000:00:03.1/0000:09:00.0/drm/card0/card0-DP-1
		  │ │ [MASTER] drm:card0-DP-1
		  │ ├─/sys/device…:00:03.1/0000:09:00.0/drm/card0/card0-DVI-D-1
		  │ │ [MASTER] drm:card0-DVI-D-1
		  │ └─/sys/device…00:03.1/0000:09:00.0/drm/card0/card0-HDMI-A-1
		  │   [MASTER] drm:card0-HDMI-A-1
		  ├─/sys/device…000:00/0000:00:03.1/0000:09:00.0/drm/renderD128
		  │ drm:renderD128
		  ├─/sys/device…i0000:00/0000:00:03.1/0000:09:00.0/graphics/fb0
		  │ [MASTER] graphics:fb0 "amdgpudrmfb"
...
The list will be very likely long as it contains all devices present in the system. Obviously all devices are currently assigned to this single seat.
Creating a New Seat
Each seat needs a master (main) device. In the list you should see the graphics card
devices marked with the [MASTER] tag.
Adding Output Device
Each graphics card should have two devices, drm:card<number> and graphics:fb<number>.
To create a new seat simply move these two master devices to the new seat. Use the
loginctl attach seat <path> command, copy and paste the full device path from the
previous list command:
# loginctl attach seat1 /sys/devices/pci0000:00/0000:00:03.2/0000:0a:00.0/graphics/fb1
# loginctl attach seat1 /sys/devices/pci0000:00/0000:00:03.2/0000:0a:00.0/drm/renderD129
You can check that the new seat is defined properly and contains the specified devices:
# loginctl seat-status seat1
seat1
        Sessions: *1
         Devices:
                  ├─/sys/devices/pci0000:00/0000:00:03.2/0000:0a:00.0/drm/card1
                  │ [MASTER] drm:card1
                  │ ├─/sys/device…000:00:03.2/0000:0a:00.0/drm/card1/card1-DP-2
                  │ │ [MASTER] drm:card1-DP-2
                  │ ├─/sys/device…:00:03.2/0000:0a:00.0/drm/card1/card1-DVI-D-2
                  │ │ [MASTER] drm:card1-DVI-D-2
                  │ └─/sys/device…00:03.2/0000:0a:00.0/drm/card1/card1-HDMI-A-2
                  │   [MASTER] drm:card1-HDMI-A-2
                  ├─/sys/device…000:00/0000:00:03.2/0000:0a:00.0/drm/renderD129
                  │ drm:renderD129
                  └─/sys/device…i0000:00/0000:00:03.2/0000:0a:00.0/graphics/fb1
                    [MASTER] graphics:fb1 "amdgpudrmfb"
Now I’d suggest rebooting the system. After reboot you should see the login screen on the both monitors. (BTW I’m using the default KDE SDDM login manager, I do not know if the other login managers support multi seat…)
Adding Input Devices
Now we need to assign also the input devices - a keyboard and a mouse. Find the keyboard
and the mouse devices in the loginctl seat-status seat0 output and move them to the
other seat with the loginctl attach seat1 <path> command.
It is easy if you use different keyboard and mouse models for each seat. If you use
the same models then you cannot easily distinguish between the devices. In that case
I suggest using the simple trial-and-error approach, just move a device to the other
seat and test if it is routed to the correct monitor. If not then simply move it back to
seat0 and move the other device to seat1. You do not need to reboot, you can
test it immediately.
:information_source: Multimedia keyboards might have several devices, do not forget to move them all.
And That’s it!
And that’s it! Now monitor should behave as an independent login screen with separate mouse and keyboard devices. Enjoy! :smile:
The Data Persistence
The configuration is persistent, the attached devices are remembered and automatically set after reboot. You do not need to reassign the devices after each reboot.
The Drawback
There is one drawback of enabling the multi seat feature - the multi head setup does not work anymore.
To make it work back you would have to reconnect the monitors back to the same card and move the assigned devices back to the original seat. That’s quite annoying but you could possibly automate the monitor connection by an automatic HDMI switch if you use HDMI (or DVI) for connecting the monitors and some scripting…
The Use Case: Minecraft! :video_game:
With this approach you can avoid arguing who will play Minecraft. Since now you can run two Minecraft instances in separate sessions at once! :tada:
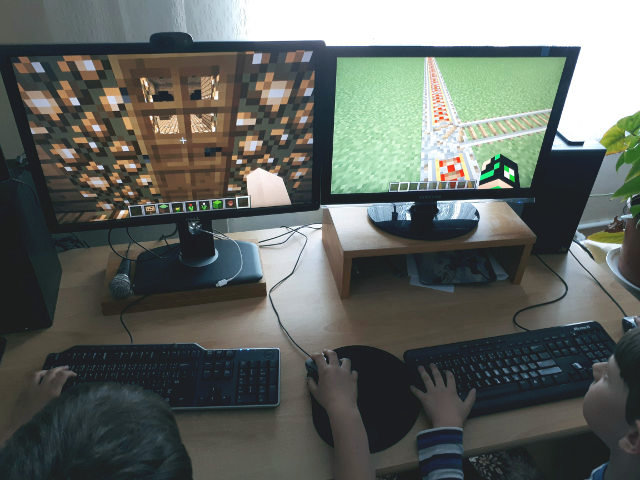
It’s not obvious from the picture, but there is only one computer below the table!